
Align text horizontally
-
In the text box, select the text that you want to change the horizontal alignment for.
-
On the Home tab, click the alignment option that you want
 .
.
 .
.Align text vertically
You can align all the text in a text box with the top, middle, or bottom of the text box.
-
Click the outer edge of the text box to select it.
-
On the Shape Format tab, click Format Pane.
-
Click the Shape Options tab if it isn’t already selected.
-
Click the text box icon
, and then click Text Box. -
Choose Top, Middle, or Bottom from the Vertical alignment drop-down list.
 , and then click Text Box.
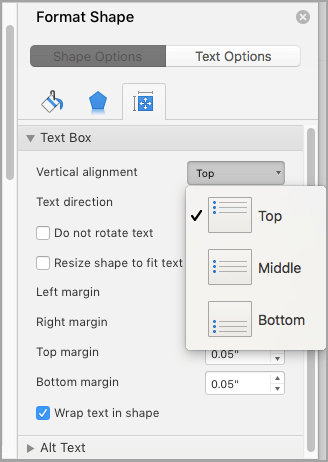
Adjust the text box margins
-
Click the outer edge of the text box to select it.
-
On the Shape Format tab, click Format Pane.
-
Click the Shape Options tab if it isn’t already selected.
-
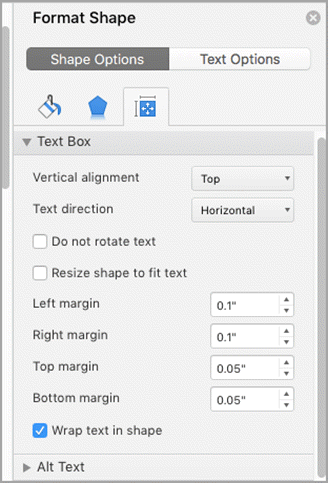
Click the text box icon
, and then click Text Box. -
You can adjust the left, right, top, and bottom margins.
Important:
Office for Mac 2011 is no longer supported. Upgrade to Microsoft 365 to work anywhere from any device and continue to receive support.
Upgrade now
Align text horizontally
-
In the text box, select the text that you want to change the horizontal alignment for.
-
On the Home tab, under Paragraph, click the alignment option that you want
.
Align text vertically
You can align all the text in a text box with the top, middle, or bottom of the text box.
-
Click the outer edge of the text box to select it.
-
Click the Format tab (the purple contextual tab that appears next to the Home tab), and then under Text Box, click Change text alignment within the text box
. -
Click the alignment option that you want.
 .
.Adjust the text box margins
-
Click the outer edge of the text box to select it.
-
On the Format menu, click Shape.
-
In the left pane of the Format Shape dialog box, click Text Box.
-
Under Internal Margin, adjust the measurements to increase or decrease the distance between the text and the outer border of the text box.
To align left, press Ctrl + L. To align right, press Ctrl + R. To align center, press Ctrl + C. To justify, Ctrl + J.
Contents
- 1 How do I align left margin in Word?
- 2 What is the shortcut key for Align text Left?
- 3 How do you type left to right in Word?
- 4 How do you align left and right text in Word?
- 5 What does left justified look like?
- 6 What is flush left in Word?
- 7 How do I turn on alignment guides in Word?
- 8 How do you write left to right?
- 9 How do you move a column to the left and right in Word?
- 10 How do you type left to right in Word on a Mac?
- 11 What are the 4 alignment options?
- 12 What is left aligned text?
- 13 What is left adjust?
- 14 Should be left justified?
- 15 How do you flush left?
- 16 How do you align both left and right?
- 17 Is APA justified or left aligned?
- 18 How do I show alignment lines in Word?
- 19 How do you use the word alignment?
- 20 What are alignment guides in Word?
How do I align left margin in Word?
For example, in a paragraph that is left-aligned (the most common alignment), text is aligned with the left margin. In a paragraph that is justified, text is aligned with both margins.
Align text left, center, or right.
| To | Click |
|---|---|
| Align text left | Align Text Left |
| Center text | Center Text |
| Align text right | Align Text Right |
What is the shortcut key for Align text Left?
Ctrl+L
Frequently used shortcuts
| To do this | Press |
|---|---|
| Center the text. | Ctrl+E |
| Align the text to the left. | Ctrl+L |
| Align the text to the right. | Ctrl+R |
| Cancel a command. | Esc |
How do you type left to right in Word?
You can change the text direction from within a Microsoft Office program by choosing the Right-to-left paragraph button in the Paragraph group on the Home tab (this only appears if you have a right-to-left language enabled).
How do you align left and right text in Word?
Align the text left or right
- Select the text that you want to align.
- On the Home tab, in the Paragraph group, click Align Left or Align Right .
What does left justified look like?
If printed text is left-justified, each line begins at the same distance from the left-hand edge of the page or column.
What is flush left in Word?
In English and most European languages where words are read left-to-right, text is usually aligned ‘flush left’, meaning that the text of a paragraph is aligned on the left-hand side while the right-hand side is ragged.
How do I turn on alignment guides in Word?
Turn on the snap-to options
- Select a chart, picture, or object in the document.
- On the right end of the ribbon, select Format > Align > Grid Settings. The Grid and Guides dialog box appears.
- Turn on one or both of these options: Option. Description. Snap objects to grid when the gridlines are not displayed.
How do you write left to right?
In a right-to-left, top-to-bottom script (commonly shortened to right to left or abbreviated RTL), writing starts from the right of the page and continues to the left, proceeding from top to bottom for new lines.
How do you move a column to the left and right in Word?
To move a row or column using the mouse, follow these steps:
- Select the entire row or column that you want to move.
- Click on the highlighted row or column and hold down the mouse button.
- Drag the row or column to the place where you want it to be.
- Release the mouse button.
How do you type left to right in Word on a Mac?
Use bidirectional keyboard shortcuts
- Change selected text to left to right: Press Command-Option-Control-Right Arrow.
- Change selected text to right to left: Press Command-Option-Control-Left Arrow.
- Change selected text to the default direction: Press Command-Option-Control-Down Arrow.
What are the 4 alignment options?
There are four main alignments: left, right, center, and justified. Left-aligned text is text that is aligned with a left edge. Right-aligned text is text that is aligned with a right edge.
What is left aligned text?
Left-aligned text is text that is aligned with a left edge. Right-aligned text is text that is aligned with a right edge. Centered text is text that is centered between two edges.
What is left adjust?
Updated: 08/02/2020 by Computer Hope. Left align, left alignment, or left justify is text, pictures, graphics, or page formatting that aligns text along the left side of a page or containing element. This text has a ragged right edge because it is left-aligned instead of being right aligned.
Should be left justified?
Margins: All page margins (top, bottom, left, and right) should be 1 inch. All text should be left-justified. Indentation: The first line of every paragraph should be indented 0.5 inches.
How do you flush left?
Flush Left (FL) – Text Alignment
Your entire document should be aligned with the left margin (flush left). Your text should appear with a straight and even edge on the left side and ill be uneven on the right side.
How do you align both left and right?
Figure B
- On the Home tab, click the Paragraph group’s dialog launcher and then click Tabs in the bottom-left corner.
- Enter 6.5 in the Tab stop position.
- Click Right in the Alignment section (Figure C).
- Click Set.
- Click OK.
Is APA justified or left aligned?
Align the text of an APA Style paper to the left margin. Leave the right margin uneven, or “ragged.” Do not use full justification for student papers or manuscripts being submitted for publication.
How do I show alignment lines in Word?
Click the shape or object in the document. Under Drawing Tools on the Format tab, in the Arrange group, click Align, and then click View Gridlines.
How do you use the word alignment?
Examples of alignment in a Sentence
The school has to bring its programs into alignment with state requirements. New alignments have been created within the political party. These example sentences are selected automatically from various online news sources to reflect current usage of the word ‘alignment.
What are alignment guides in Word?
Microsoft Word is equipped with live layout and alignment guides to help you align, resize, and move objects. The example below draws a shape and lines it up using the alignment tool. 1. In the “Insert” tab, click “Shape” and select a shape to draw.

on
September 11, 2012, 1:34 AM PDT
Three ways to display text in the margin of a Word document
Use these simple methods to display text and graphics in the left or right margin of a Word document.
You might think adding text to the margin of a document is a job for publishing software, but Word can handle it. You can use a negative left indent for text that starts in the left margin and then extends into the body of the document. When you want to position text completely in the left margin, alongside normal text, you can use a text box, a column, or even a table. The text box is the easiest method to implement and maintain.
Negative left indent
This first method for displaying text in the margin is the easiest – you simply apply a negative left indent as follows:
- Select the text.
- Click the Paragraph group’s dialog launcher (the small arrow in the bottom-right corner). In Word 2003, choose Paragraph from the Formatting menu.
- Click the Indents and Spacing tab, if necessary.
- In the Indention section, enter a negative Left value, such as -.75.
- Click OK.
If you apply this format often, consider creating a style. This method is certainly easy, but the text extends to the right, beyond the margin – it isn’t confined to the margin. For that, you can use a text box.
Margin text box
When you want to drop text into the margin, as a special visual element, the negative indent won’t do. Fortunately, a text box is easy to insert, format, and position. Before you try this, however, be sure to disable Word’s drawing layer, as follows:
- Click the File tab and choose Options (under Help). In Word 2007, click the Office button and then click Word Options. In Word 2003, choose Options from the Tools menu.
- Click Advanced in the left pane. In Word 2003, click the General tab.
- In the Editing Options section, uncheck the Automatically Create Drawing Canvas When Inserting AutoShapes options. (In Word 2003, it’s in the General Options section.)
- Click OK.
You can still use all the drawing tools; you just won’t have the added headache of working in layers. Now, let’s add the text “Use Quick Styles” to the left of the formatting paragraph in the example document, as follows:
- Click the Insert menu and Click Text Box in the Text group. Then, choose Draw Text Box (from the list below the gallery options). In Word 2003, choose Text Box from the Drawing toolbar (View, Toolbars, Drawing).
- Use the mouse to drag and drop a text box of the approximate size in the margin. Notice that the box is about the same height as the paragraph – that will help us center the text later.
- Enter the text “Use Quick Styles.”
- On the Contextual Format ribbon, choose Middle from the Align Text dropdown in the Text group.
- Choose No Outline from the Shape Outline dropdown in the Shape Styles group.
- Next, click the Home tab and click Italics in the Font group and Center in the Paragraph group. You can also change the font’s color, face, and so on.
In Print Layout (view), Word easily displays the text. You can move the box or apply most any formatting that you like, as long as the drawing layer is disabled. (For more information on Word’s drawing layer, read 10+ ways to avoid drawing layer headaches in Word.)
Anchor to the header
We could easily quit here and have a comprehensive review of adding text to the left margin, but let’s push on. You can also anchor margin text to the header and Word will display it on every page! First, open the header by double-clicking the header section. In Word 2003, choose Header and Footer from the View menu. The technique is essentially the same in both versions, but the header section looks different.
With the header in edit mode, and the cursor in the header section, repeat the steps above to add a text box, format it, and position it in the right margin. As you can see below, I used WordArt and rotated the text box. Then, with the header still in edit mode, I moved it to the right of its corresponding section, within the body of the document. When you’re done, close the header.
In this case, you probably wouldn’t want to display this text on every page, but the technique itself is sound. To edit the text box, you’ll have to work in the header – remember, the text box is actually in the header, regardless of where you position it.
-
Software
Quote:
Originally Posted by MaartenRo

How do i put a small text in the left margin of a Word doc? I would like the text to go along with the specific line as i change the position of that line. The text in the margin is a reference to that specific sentence.
You can insert a text box (Insert tab on the Ribbon), and from there you can easily format it with or without a border, shading, etc. That may be the simplest, though if you wish it to line up precisely with that sentence in the rest of the document, all on one line, you’ll have to eyeball it well.
Or you can change one paragraph to a negative left indent, then use tab and hanging indent to re-align the actual text along the left line.
I did a quick cheesy version of each, and left the paragraph controls visible so you could see what it looked like.
In this piece of writing, we will present you 3 different methods to create margin texts in your Word document.
Once in a while, we can see on brochures that texts are displayed on page margins. Therefore, in case you too, want to add some texts which are useful but not quite relevant to document content, we here will offer you 3 varying methods for you to complete the task in Word.
Method 1: Set Negative Indent
- First and foremost, select the text which you want to put in margin.
- Then click “Home” tab.
- Next, click the extend button in “Paragraph” group.

- Now you will open the “Paragraph” dialog box. Look at the “Indentation” part. For example, if you want to employ left indent, you can choose an indentation value from the spin control behind “Left”.
- At last, click “OK” to save the change.


Now you can see the text moves to the left margin.
Method 2: Insert a Text Box
- Since you cannot directly insert a text box into the margins, you should insert it into the document editing area first. Click “Insert” tab.
- Then click “Text Box” in “Text” group.
- Next you can either choose a built-in text box style or choose “Draw Text Box” option to draw one by yourself.

- Now enter text into text box.
- Next drag the text box to a margin.
- Certainly, you can click the text box to rotate. And you can also set the text font, text direction, etc.

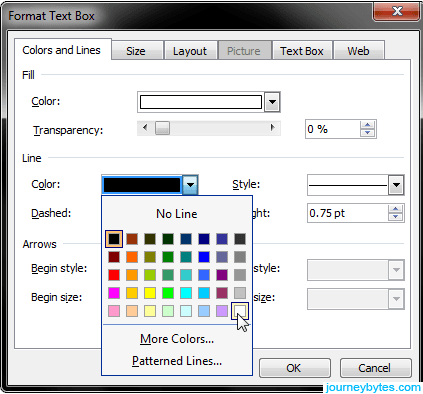
- The last step is to remove the text box lines if necessary. Right click on text box.
- Then choose “Format Shape”.
- In “Format Shape” dialog box, click “Line Color” first.
- Then choose “No line”.
- Finally, click “Close”.


Method 3: Anchor Text Box to “Header” or “Footer”
By applying method 2, your text only shows in the margin of one page. How about making it appearing on each page repeatedly? That’s the reason why you must read method 3.
- At the beginning, double click “Header” or “Footer” area to enter editing mode.
- Then either in “Header” or “Footer” area, you should make use of method 2 to insert a text box, enter a text.
- Now drag the text box to a margin where you want it to stay.
- Next double click the empty area to exit “Header” or “Footer”.


Eventually, you can see in the below picture that the same text shows on the same place on every page of the document.
Comparison of 3 Methods
| Methods | Advantages | Disadvantages |
| Set Negative Indent | 1. It’s the quickest way.
2. You can directly modify the margin text whenever you need. |
When you make change on other document content, the margin text may get affected. |
| Insert a Text Box | 1. The margin text is free from the effect of document modification.
2. Click the text box and you can edit the text again. |
1. You cannot insert a text box in margins directly.
2. You may have to remove text box lines if necessary. 3. The margin text will not appear on every page of the document. |
| Anchor Text Box to “Header” or “Footer” | 1. The same text will show on the same place on every page of document.
2. The margin text is free from the effect of document modification. |
1. You have to enter “Header” or “Footer” before editing margin text again.
2. You have to insert a text box in “Header” or “Footer” first and you may need to remove text box lines. |
Rescue Corrupt Files
Over time, people are growing to realize that a damaged file is to some degree recoverable. So when a file gets damaged, they will certainly try the built-in repair function in word first. Yet, most corrupt files are far beyond the capability of this feature. Therefore, you should get an awesome corrupt Word file repair tool to save critical files as soon as possible.
Author Introduction:
Vera Chen is a data recovery expert in DataNumen, Inc., which is the world leader in data recovery technologies, including Excel damage repair tool and pdf repair software products. For more information visit www.datanumen.com
Have you ever wondered whether it’s possible to type in the margin of a Word document? Something like this:
I was the other day because I recalled seeing it in some papers and books but never on the Word documents people typically type. So it turns out it’s actually possible and is relatively easy to accomplish using either one of two methods.
The methods discussed below will work on all versions of Word from 2003 and later. If you’ve trouble following the instructions, watch the embedded video from my channel to see the steps.
Method 1: Type Text in the Margin using Negative Indentation
This method uses the indent option to move the target text past the margin. The indent buttons on the ribbon however don’t accomplish this, and so we need to use the paragraph settings dialog for this.
1. Select the text you need in the margin.
2. Right-click on the selected text and select Paragraph. This is the easiest way to do this plus it works in all versions of MS Word as of this writing.
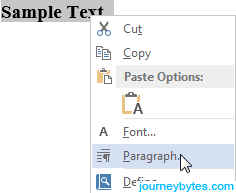
Alternatively, you can also click on the little arrow inside the paragraph options in the ribbon or simply head to the Page Layout tab for quick access to the indentation settings (MS Word 2007 and later only).
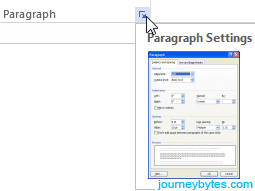
3. In the dialog under Indentation, enter a negative value inside the left box e.g. -1.75 cm, -2 cm or -2.5cm etc. then click the Ok button.

If you need the text inside the right margin instead of the left, first align the text to the right then enter a negative value in the right box e.g. -1.75 cm, -2 cm or -2.5cm etc.
Note: Don’t enter a very high value (above -3 cm) as this will move the text outside the page boundary.
Method 2: Type Text in the Margin using a Text Box
The first method works quite quick but I realized later on that it may not be practical in most situations. Reason being, the indentation setting applies to the whole line and as such you can’t add text on the same line without it being constrained to this setting.
Clearly, most of us don’t want this and this is where the text box comes in.
The text box method works a bit differently on Word 2003 and Word 2007 and later versions. I’ll cover both cases individually.
i. Using the Text Box in Word 2007 and later
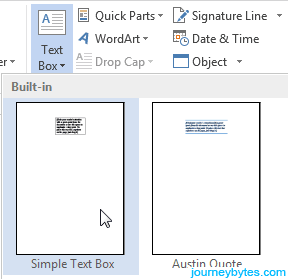
1. Go to the Insert tab, click the Text Box button then choose Simple Text Box.
2. Enter and format the text you need in the margin inside the text box.
3. Drag the text box inside the margin that you want.
4. To remove the text box boundary, select the text box then switch to the Format tab in the ribbon. Now just look for Shape outline, click the small arrow beside it and select No Outline. That’s it!
ii. Using the Text Box in Word 2003
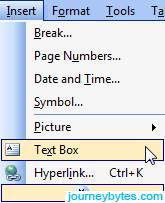
1. In the menu bar under Insert select Text Box.
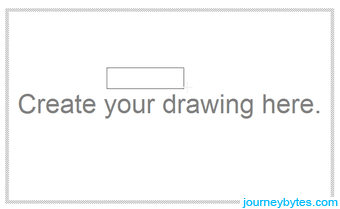
2. Doing that will only insert a blank canvas. To draw a text box, click and hold inside the canvas, then drag your mouse. Release the button once the size meets your needs.
3. Enter and format the text you need in the margin inside the text box.
4. Drag the text box inside the margin that you want. You can now delete the canvas by clicking inside it followed by pressing the Delete button on your keyboard.
Note: If you delete the canvas without moving the text box, the text box will also be deleted.
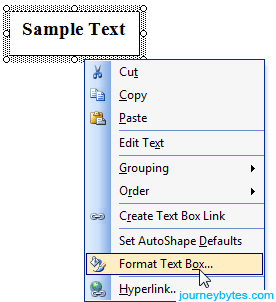
5. To remove the text box boundary, first select the text box, right-click on the boundary then select Format Text Box. You can also just double-click on the boundary.
6. In the Format Text Box dialog, go to the line settings and change the colour to white. Press the Ok button and you’re done!
Still having problems? Just drop me a comment below and I’ll get to you as soon as I can.
![]()
Download Article
A user-friendly guide to changing a Word document’s margins to wide, narrow, and more
![]()
Download Article
- Applying Preset Margins (Desktop)
- Creating Custom Margins (Desktop)
- Using the Mobile App
- Q&A
- Warnings
|
|
|
|
Are you trying to adjust your margins in Microsoft Word? The margins are the empty space between the edge of the page and the contents of the document. Depending on your needs, you can change the margins to become wider, narrower, or a mix of both. You’ll be able to select from a few preset options or customize your own. This wikiHow will show you how to fix and change the default 1-inch margins in Microsoft Word using your iPhone, Android, or Windows or Mac computer.
Things You Should Know
- On desktop, click «Layout» → «Margins» → select a margin preset.
- For custom margins, click «Custom Margins…» and enter the values for Top, Left, Bottom, and Right.
- On mobile, tap «•••» → «Home» → «Layout» → «Margins» → select a preset or «Custom Margins». Enter a new value and tap «Done».
-
1
-
2
Click Layout. This will be in the top toolbar, between Design and References.
Advertisement
-
3
Click Margins. You can find this in the upper-left corner of the Layout tab. This looks like a rectangle with blue lining the margins.
- A pop-up menu will open.
-
4
Select a margin type. You’ll see a list of preset margins: Normal, Narrow, Moderate, Wide, Mirrored, and Office 2003 Default. Click a preset margin to apply it to your document. It should be applied immediately.
- If you don’t like how it looks, you can select Normal again, or press CTRL + Z (Windows) or CMD + Z (Mac) to undo the change.
Advertisement
-
1
Click Layout. This will be in the top toolbar, between Design and References.
-
2
Click Margins. You can find this in the upper-left corner of the Layout tab. This looks like a rectangle with blue lining the margins.
- A menu will open.
-
3
Click Custom Margins…. This will be at the bottom of the drop-down menu.
- A new window will open.
-
4
Set your new margins. On the desktop application, you’ll be able to edit the margin sizes for: Top, Left, Bottom, Right, Gutter, and Gutter Positions. On the web version, you’ll only be able to edit the margin sizes for: Top, Left, Bottom, and Right. You’ll see a preview of the document layout at the bottom of the window.
- Click the field and enter your new margin size, or use the up/down arrow to adjust the current margins.
- For Gutter Positions, select Left or Top.
- Only adjust the Gutter margin if you intend to use the document in a bound format, like a book or report, and you need space for the binding. In this case, type a number in Gutter that will allow enough room for the binding and use the drop-down to indicate whether the binding will be on the top or on the left.
- Make sure Apply to is set to Whole document, unless you only want to change the margins from This point forward.
-
5
Set new default margins (optional). If you want to use this margin for all new documents in Microsoft Word, click Set as default in the bottom-left corner. Click Yes to confirm.
- When you create a new document, the margins will reflect the change.
-
6
Click OK when finished. The changes will be applied immediately.
Advertisement
-
1
Open the Microsoft Word app. Microsoft Word is available for iOS in the App Store and for Android in the Google Play Store.
- If you aren’t already logged in to your Microsoft account, enter your email address and password to do so now.
-
2
Open a new or existing project. Tap a recent project on your homepage, or tap the + tab to create a new one.
-
3
Tap ••• . This is the «•••» located at the top of your on-screen keyboard. If you don’t see your keyboard, tap the document to open it.
- A new menu will open at the bottom.
-
4
Tap Home. This is located at the top of the new menu.
- A pop-up menu will open.
-
5
Tap Layout. You can find this between Draw and Review.
-
6
Tap Margins. This is the first listing in the Layout tab.
-
7
Select a margin type. You’ll see a list of preset margins: Normal, Narrow, Moderate, Wide, and Mirrored. Tap a preset margin to apply it to your document. It should be applied immediately.
- If you don’t like how it looks, you can select Normal again, or pick a new preset.
- Be sure to save your document when you’re finished.
-
8
Create a custom margin (optional). Tap Custom Margins at the bottom of the Margins menu. You’ll be able to edit the margin sizes for: Top, Left, Bottom, and Right.
- Tap a margin to edit it.
- Tap the backspace button to erase the existing margin.
- Enter a new margin value.
- Tap Done in the top-right corner.
- Tap Margins → Custom Margins to edit another margin.
- The changes will be applied immediately.
Advertisement
Add New Question
-
Question
I want the page ruler. What can I do?

To get the ruler, go into the View tab (Word 2010 and newer) and select the Ruler checkbox.
-
Question
Can I ever allow one more letter on a line to finish a long word rather than wrap to the next line?
No. The only thing you could possibly do would be to make all the margins wider. Making only one word go to the next line is impossible unless you do the same for all words.
Ask a Question
200 characters left
Include your email address to get a message when this question is answered.
Submit
Advertisement
Thanks for submitting a tip for review!
-
Leaving the margin under .25″ may lead to text being cut off when printed.
Advertisement
About This Article
Article SummaryX
1. Open a Microsoft Word document.
2. Click the Layout tab.
3. Click Margins.
4. Click Custom Margins….
5. Set the margins.
6. Click the Apply to drop-down.
7. Select how to apply the margins.
8. Click OK.
Did this summary help you?
Thanks to all authors for creating a page that has been read 493,209 times.
Is this article up to date?
 Please Note:
This article is written for users of the following Microsoft Word versions: 2007, 2010, 2013, and 2016. If you are using an earlier version (Word 2003 or earlier), this tip may not work for you. For a version of this tip written specifically for earlier versions of Word, click here: Extending a Paragraph into the Left Margin.
![]()
Written by Allen Wyatt (last updated December 14, 2021)
This tip applies to Word 2007, 2010, 2013, and 2016
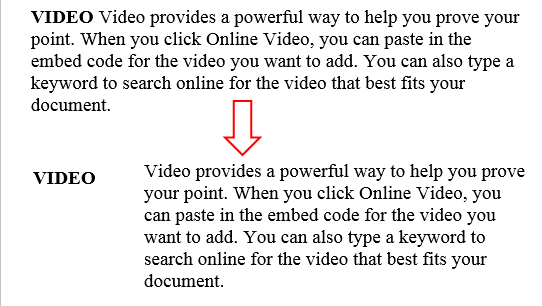
You probably already know that Word allows you to specify an indent from the left margin on a paragraph-by-paragraph basis, if desired. The indent value you set is added to the left margin value for the page, thereby deriving how far the left side of the paragraph should appear in relation to the left edge of the paper.
For some layout tasks, you may want to set a negative indent for a paragraph. Word allows you to do this, effectively moving the left side of the paragraph into the margin area you defined for your page. To set a negative indent, follow these steps:
- Select the paragraph or paragraphs you want affected by the formatting change. (If you want the change to a single paragraph only, you can simply make sure the insertion point is within that paragraph.)
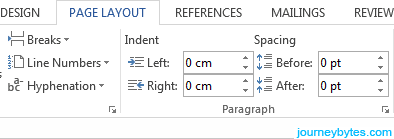
- Display the Home tab of the ribbon.
- Click the small icon at the bottom-right of Paragraph group. Word displays the Paragraph dialog box. (See Figure 1.)
- Using the Left control, specify a negative value. For instance, if you wanted the paragraph to extend a quarter-inch into the left margin area, you would enter -.25 as the Left value.
- Click on OK.
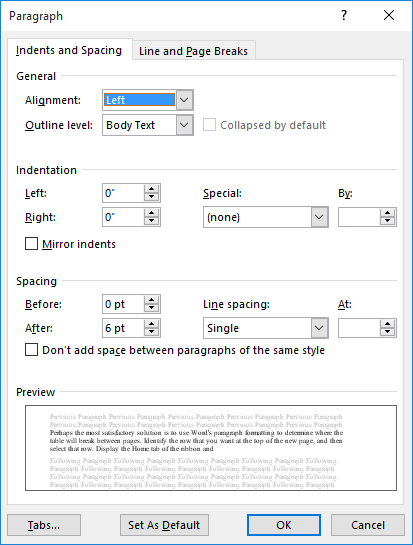
Figure 1. The Paragraph dialog box.
WordTips is your source for cost-effective Microsoft Word training.
(Microsoft Word is the most popular word processing software in the world.)
This tip (6831) applies to Microsoft Word 2007, 2010, 2013, and 2016. You can find a version of this tip for the older menu interface of Word here: Extending a Paragraph into the Left Margin.
Author Bio
With more than 50 non-fiction books and numerous magazine articles to his credit, Allen Wyatt is an internationally recognized author. He is president of Sharon Parq Associates, a computer and publishing services company. Learn more about Allen…
MORE FROM ALLEN
PRIVATE Fields in WordPerfect Documents
Did you ever convert a document from WordPerfect and see PRIVATE fields in it? Here’s what those fields mean.
Discover More
Printing Only Selected Pages
I often need to print only select pages of a document, rather than the whole thing. Word makes it easy to be judicious in …
Discover More
Copying Fill Color in a Table
You may spend some time getting the color in a portion of a table just right, only to be faced with the task of copying …
Discover More
More WordTips (ribbon)
Compound List Formatting
Word can help you do quite a bit of complex formatting to your lists, both bulleted and numbered. Using the steps …
Discover More
Searching for Paragraph Formatting
You can use the Find and Replace capabilities of Word to search for a wide variety of information. One thing you can look …
Discover More
Typing Beyond the Right Margin
In the days of typewriters, you could type beyond the right margin by using the MarRel lever or key. This tip discusses …
Discover More