
PowerPoint for Microsoft 365 PowerPoint 2021 PowerPoint 2019 PowerPoint 2016 PowerPoint 2013 PowerPoint 2010 More…Less
If you are using PowerPoint 2013 or a newer version, you can link data from a saved Excel worksheet to your PowerPoint presentation. That way, if data in the worksheet changes, you can easily update it in your PowerPoint presentation.
Link an entire Excel worksheet to PowerPoint
-
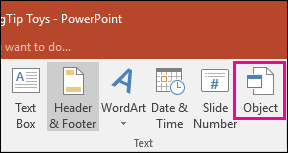
In PowerPoint, on the Insert tab, click or tap Object.

-
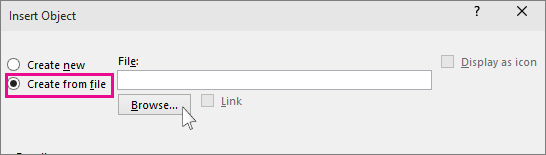
In the Insert Object dialog box, select Create from file.
-
Click or tap Browse, and in the Browse box, find the Excel workbook with the data you want to insert and link to.
-
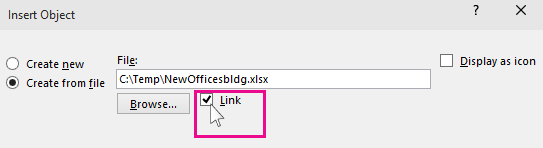
Before you close the Insert Object box, select Link, and click OK.
Important: The linked object in your presentation displays all the data from the active, top worksheet in the linked Excel workbook. When you save the Excel workbook, make sure the worksheet you want in your presentation is the one you see when you first open the workbook.
Link a section of data in Excel to PowerPoint
-
In Excel, open the saved workbook with the data you want to insert and link to.
-
Drag over the area of data you want to link to in PowerPoint, and on the Home tab, click or tap Copy.
-
In PowerPoint, click the slide where you want to paste the copied worksheet data.
-
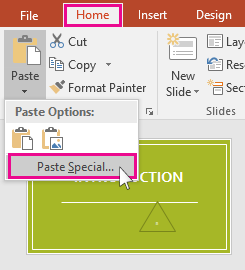
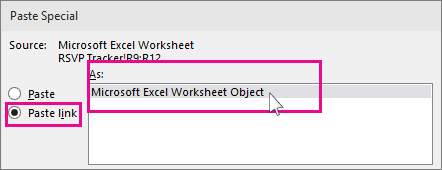
On the Home tab, click the arrow below Paste, and select Paste Special.
-
In the Paste Special box, click Paste link, and then, under As, select Microsoft Excel Worksheet Object.
Copy and paste (unlinked) Excel data in PowerPoint
In this case, the Excel data will not be linked to your PowerPoint presentation. You copy the data from an Excel worksheet and paste it into your presentation. The worksheet does not send automatic updates to PowerPoint.
-
In Excel, open the workbook with the data you want to copy.
-
Drag over the area of data you want to copy, and on the Home tab, click or tap Copy.
-
In PowerPoint, click the slide where you want to paste the copied worksheet data.
-
On the Home tab, in the Clipboard group, click the arrow below Paste.
-
Under Paste Options, pick one of the following. Move the mouse pointer over each Paste option to see a preview of what it would look like.
Use Destination Styles to copy the data as a PowerPoint table, using the format of the presentation
Keep Source Formatting to copy the Excel data as a PowerPoint table, using the format of the worksheet
Embed to copy the data as information that can be edited in Excel later
Picture to copy the data as a picture that can’t be edited in Excel
Keep Text Only to copy all the data as a single text box


See Also
Copy an Excel chart to another Office program
Insert a linked worksheet
To insert and link a saved Excel worksheet onto your PowerPoint slide, do the following:
Important: The linked object in your presentation displays all data from the active, top worksheet in the linked Excel workbook.
-
In PowerPoint 2010, on the Insert tab, in the Text group, click Object.
-
In the Insert Object dialog box, select Create from file.
-
Click Browse, and in the Browse dialog box, browse to and then select the Excel workbook that contains the information that you want to insert, and then click OK.
-
In the Insert Object dialog box, select Link and then click OK.
To edit a linked Excel worksheet, do one of the following:
-
To edit the data from within Excel, right-click the object on the slide, point to Linked Worksheet Object, and select Edit.
-
To update the data on the slide to match the data in the original Excel file, right-click the object on the slide, and click Update Link.
Insert a linked selection from a worksheet
To insert and link a selection of data from a saved Excel worksheet, do the following:
-
In Excel, open the workbook containing that data that you want to insert.
-
Select and copy the data that you want.
Keyboard shortcut You can press CTRL+C to copy the data.
-
In PowerPoint 2010, click the slide where you want to paste the copied worksheet data.
-
On the Home tab, in the Clipboard group, click the arrow below Paste, and select Paste Special.
-
In the Paste Special dialog box, under As, select a Microsoft Excel Worksheet Object.
-
Select the Paste link check box and click OK.
To edit a selection of cells from a linked Excel worksheet, do one of the following:
-
To edit the data from within Excel, right-click the object on the slide, point to Linked Worksheet Object, and select Edit.
-
To update the data on the slide to match the data in the original Excel file, right-click the object on the slide, and click Update Link.
Copy a selection of cells onto a slide
To paste a copy a selection of Excel data onto your PowerPoint slide, do the following:
Note: Data copied and pasted onto a PowerPoint slide does not automatically update when the data is changed in the Excel workbook. To link the data on the PowerPoint slide to the original Excel data source, see the «Insert a linked selection from a worksheet» section immediately above.
-
In Excel, open the workbook that contains the information that you want to copy.
-
Select and copy the data that you want.
Keyboard shortcut You can press CTRL+C to copy the data.
-
In PowerPoint 2010, click the slide where you want to paste the copied worksheet data.
-
On the Home tab, in the Clipboard group, click the arrow below Paste.
-
Under Paste Options, do one of the following:
-
Select Keep Source Formatting if you want to copy the data as a PowerPoint table, but want it keep the appearance of the original Excel worksheet.
-
Select Use Destination Styles if you want to copy the data as a PowerPoint table, but want it to assume the appearance of the PowerPoint presentation.
-
Select Embed if you want to copy the data as information that can be edited in PowerPoint.
-
Select Picture if you want to copy the data as an un-editable picture.
-
Select Keep Text Only if you want to copy all the data as a single text box.
-
See Also
Import content from other applications
Copy an Excel chart to another Office program
Need more help?
XLSX (EXCEL) to PPT Converter
Convert your xlsx files to ppt online & free
Drop files here. 100 MB maximum file size or Sign Up
Convert to XLSX
xlsx
Office Open XML Worksheet Sheet
XLSX is a file format created with Microsoft Excel, version from 2007 and younger. This file is a spreadsheet. All data distributed document and stored in the cells. Each cell has a unique address, which is denoted by the letters and Arabic numerals. XLSX file format is based on the Open XML. To reduce the size of the file is compressed ZIP.
PPT Converter
ppt
Microsoft PowerPoint 97/2000/XP
A file to store the generated presentations and Microsoft PowerPoint slide shows with the ability to edit them. It was first introduced to store the data in PowerPoint 97 Editor. Stores a set of individual slides with text, graphics, video, and audio information. The file contains information on visual effects inside the slides.
How to convert XLSX to PPT
Step 1
Upload xlsx-file(s)
Select files from Computer, Google Drive, Dropbox, URL or by dragging it on the page.
Step 2
Choose «to ppt»
Choose ppt or any other format you need as a result (more than 200 formats supported)
Step 3
Download your ppt
Let the file convert and you can download your ppt file right afterwards
XLSX to PPT Quality Rating
4.0 (2,798 votes)
You need to convert and download at least 1 file to provide feedback!
Please report all problems and bugs in the Feedback-Section to improve the quality of the converter. Thank you! |


Электронная таблица Excel часто используется вместе с презентациями PowerPoint для создания отчетов о бюджете, бизнес-планов, сведений об инвентаризации, финансовых отчетов, отчетов о состоянии проекта и т. Д. Электронная таблица Microsoft Excel, вероятно, является один из лучших инструментов, используемых для учета и планирования бизнеса. Мы часто используем таблицы Excel для анализа данных, планирования событий, планирования аудитов, составления диаграмм, расчета бюджета, планирования расходов и т. Д. Чтобы представить эти аналитические отчеты, созданные в Excel, мы в основном используем Microsoft PowerPoint для профессиональной презентации.
Как листы Excel, так и слайды PowerPoint используются бок о бок, и мы часто копируем таблицы и диаграммы из Excel и вставляем их в слайд PowerPoint для создания презентации в виде слайд-шоу. Но мы обычно постоянно обновляем таблицы Excel новыми данными, и в таких случаях неудобно менять все таблицы в слайдах PowerPoint. Этого препятствия для обновления изменений, внесенных в лист Excel, в слайд Powerpoint можно избежать, связав данные Excel с PowerPoint.
Содержание
- Конвертировать Excel в PowerPoint
- Скопируйте и вставьте данные Excel в PowerPoint
- Связать лист Excel с PowerPoint
- Связать раздел данных в Excel с PowerPoint
Конвертировать Excel в PowerPoint
К счастью, Microsoft позволяет использовать технику связывания и встраивания объектов, также известную как OLE, для связывания данных из электронной таблицы Excel со слайдами PowerPoint, которые автоматически обновляют презентации Powerpoint при внесении изменений в таблицу Excel. В этом случае лист Excel является исходным файлом, а информация из объекта Excel связана с PowerPoint. При этом любые изменения в исходном файле отражаются непосредственно в связанных объектах в PowerPoint. В этой статье мы расскажем, как скопировать данные из листа Excel и поместить их в презентацию PowerPoint со встроенными элементами управления.
Скопируйте и вставьте данные Excel в PowerPoint
Вы можете скопировать таблицы данных из электронной таблицы Excel и вставить их в презентацию PowerPoint. Однако данные в PowerPoint не обновляются автоматически при изменении или обновлении данных электронной таблицы.
Откройте файл Excel , который вы хотите скопировать, и выделите все данные в файле, который вы хотите скопировать, перетащив область нужных вам данных.
Перейдите на вкладку Главная и нажмите Копировать.

Теперь откройте Microsoft PowerPoint и откройте слайд-презентацию, куда вы хотите вставить данные электронной таблицы.
Нажмите правой кнопкой мыши на слайде и выберите вариант Вставить в раскрывающемся меню.
Вы можете изменить параметры презентации, нажав на значок буфера обмена.
После этого нажмите Сохранить , чтобы применить изменения.
Связать лист Excel с PowerPoint
При связывании электронной таблицы Excel с PowerPoint все содержимое файла в качестве объекта будет вставлено в презентацию PowerPoint.
Откройте Microsoft PowerPoint и перейдите на вкладку Вставить .
Нажмите Объект в разделе «Текст».

Появится диалоговое окно Вставить объект . Нажмите на переключатель с параметром Создать из файла .

Нажмите кнопку Обзор и выберите электронную таблицу Excel, данные которой вы хотите связать с Powerpoint.
Установите флажок Ссылка и нажмите ОК.

Измените размер снимка электронной таблицы на слайде и дважды щелкните ее, чтобы открыть файл в Microsoft Excel.
Связать раздел данных в Excel с PowerPoint
Запустите Microsoft Excel и откройте электронную таблицу, которую вы хотите связать с PowerPoint.
Выберите данные, которые вы хотите вставить в слайд PowerPoint, перетаскивая область данных.
Перейдите на вкладку «Главная» и нажмите «Копировать».
Запустите PowerPoint и откройте слайд PowerPoint, куда вы хотите вставить данные.
Перейдите на вкладку «Главная» и нажмите стрелку рядом с параметром «Вставить».

Выберите Специальная вставка.
В диалоговом окне Специальная вставка нажмите переключатель с параметром Вставить ссылку и в разделе Вставить ссылку Как , выберите Объект Microsoft Excel Worksheet и нажмите Ok.

Стоит отметить, что описанная выше методика OLE не будет работать, если исходный файл Excel будет переименован или если вы переместите исходный файл из исходного местоположения, поскольку ссылка не сможет найти файл.
Это все.
Best Free Online Excel to PowerPoint Converter
Quick and easy
Excel to PowerPoint Converter is a service for online file conversion from one type to another. We support many popular formats for work, all possible image formats, multimedia file formats, etc. Our Excel to PowerPoint conversion tool is easy to use: select the desired file type, then define the output format of your document, upload the file and click ‘Upload’.
Security guaranteed
We guarantee secure and private. We do not get the right to your file and there will be no manual checking. We care about your privacy and your files. In this regard, we will also not share your data with other parties. It is essential that you have the opportunity to immediately delete the files you have uploaded from our server. If you forget to do this, they will be automatically deleted from our server after 24 hours. We completely secure your information.
Universal conversion
You can convert files to Excel to PowerPoint from any OS or device with an internet connection. Our service works on any OS including Windows, Mac, and Linux.
Most popular conversions
We support the most common conversion options for work and study. Use our Free application to decrease your workload, when dealing with both document and image files.
Fast and Easy Conversion
Upload your document, choose the save format type and click on “Convert” button. You will get the download link as soon as the file is converted.
Convert from Anywhere
It works from all platforms including Windows, Mac, Android and iOS. All files are processed on our servers. No plugin or software installation required for you.
Conversion Quality
. All files are processed using Aspose APIs, which are being used by many Fortune 100 companies across 114 countries.
Linking Excel and PowerPoint is a powerful solution to automate reports and a major time-saver. In this post, we will lay out the pros and cons of each link solution.
-
What are the main benefits of linking Excel and PowerPoint?
-
Method 1: using the regular «Paste» options to create the Excel-PowerPoint link
-
Method 2: using the «Paste Special» options to create the Excel-PowerPoint link
-
Method 3: using Power-user to create robust links between Excel and PowerPoint
What are the main benefits of linking Excel and PowerPoint?
Nowadays, PowerPoint, Excel and Word are still among the most widely used applications in business environment. No less than 1.2 billion people use Office globally.
Excel is by far the reference application for preparing, crunching and analyzing data, whether it is for sales analysis, survey results, budget reports or any kind of financial analysis. In most cases, the results and conclusions are then presented through PowerPoint which is easier for sharing them in a visual way, while providing context and comments around the data.
In many instances, analysts will prepare the data in Excel and then simply copy and paste their charts and tables into PowerPoint in order to present them.
If the data is updated, they will need to copy and paste all the updated charts and tables back into PowerPoint in order to update the presentation as well.
While manually copying and pasting is simple, it can quickly become a dangerous nightmare:
-
It is heavily time-consuming: if you have 100 tables and charts to update, you will likely spend an hour just copying and pasting them into PowerPoint. Oh, and what if you realize that there was some error in the data? Well, you can start all over again!
-
It requires you to reposition and reformat the charts each time
-
The risk of manual error is very high: humans are imperfect, and multiple copy-pasting like this will likely result in some chart being forgotten. Whilst perfectly understandable, this can greatly damage your reputation.
For these reasons, creating links between Excel and PowerPoint is an elegant solution for automating and securing reports. Not only will it save you time and reduce the risk of manual mistakes, it will also give you greater flexibility. Your boss needs a report udpated for a meeting in 5 minutes? No problem!
Oh, and icing on the cake: linking PowerPoint charts and tables to Excel data usually makes your presentation lighter, so you can email it more easily. Read more tips for reducing the size of you PowerPoint and Excel files.
So how can you do that?
Let’s see 3 different methods, each with their pros and cons.
Method 1: using the regular «Paste» options to create the Excel-PowerPoint link
This method is very easy and you might even use it without knowing it. Let’s see how it works.
Creating the link between Excel and PowerPoint 🔗
-
From Excel, select the chart
-
Right-click the chart and click «Copy» (or press CTRL+C)
-
Go to the PowerPoint slide on which you want to insert the chart
-
Go to the Home tab and click the arrow button under «Paste«, then select one of the following 2 options:
-
Choose «Use Destination Theme & Link Data» to convert the chart to your presentation’s colors and style
-
Choose «Keep Source Formatting & Link Data» to maintain the original appearance of the chart from Excel

That’s it, the chart in PowerPoint is now linked to the data from Excel!
Updating the link
Once the link is created, of course the next step will be to udpate the PowerPoint chart when your data in Excel has changed.
-
Just after creating the link, your charts in PowerPoint will be updated automatically if you change the data in the Excel workbook.
-
Later, select the chart in the PowerPoint presentation. Right-click it and hit «Edit data«. The Excel file will open to allow the update (if it was not open already).

Advantages ✅
-
Linked charts remain chart objects, so you can easily customize the format afterwards
-
Links do not trigger any security warning (unlike Method 2 that we will see just after)
-
Updates run fast
Limitations ⛔️
-
If you rename the closed Excel file, the links will be broken
-
If you duplicate the Excel file, the links will not work with the new version
-
If you move the closed Excel file, the links will be broken
-
If you email the files, the links will be broken for the recipient
-
If you move the source range of data in Excel while the PowerPoint is closed, the chart will still reference the old (hence wrong range of data)
-
These links cannot be created for tables
-
These links also do not allow linking values within your textboxes and shapes
👉🏻As you can see, these limitations are pretty severe. If the links get broken 🔌, instead of saving time, you might find yourself unexpectedly and urgently updating your reports manually in panic mode before your meeting. 😱
Method 2: using the «Paste Special» options to create the Excel-PowerPoint link
This is a little less-known, but once you know it, almost as easy as the previous one.
Creating the link between Excel and PowerPoint 🔗
-
From Excel, select the chart or range
-
Right-click and hit «Copy» (or press CTRL+C)
-
Go to the PowerPoint slide on which you want to insert the chart or table
-
Go to the Home tab, click the arrow button under «Paste«, and hit «Paste Special«
-
The dialog box below will open. Select «Link» at the left and then «OK«.

Updating the link
After the link is created, you will be able to update like this:
-
Just after creating the link, your charts and tables in PowerPoint will be immediately updated when the data changes in Excel.
-
Later, open the PowerPoint presentation. A security prompt will show up, like the one below. Click «Update links» and all links will be updated at once. The Excel file does not need to be open.

-
Or, once PowerPoint is open, you can also update each chart or table individually. In the presentation, select the linked object, right-click it and hit «Update link«, like in the screenshot below. The Excel file does not need to be open.

Advantages ✅
-
Links can be created for charts as well as tables
Limitations ⛔️
-
Objects are pasted as pictures, so you will not be able to make any changes to their format. If you resize them, the picture could also get a bit blurry.
-
Updates are quite long to run, even for a single linked object.
-
Links trigger anoying security warnings everytime the PowerPoint presentation is opened
-
If you rename the closed Excel file, the links will be broken
-
If you duplicate the Excel file, the links will not work with the new version
-
If you move the closed Excel file, the links will be broken
-
If you email the files, the links will be broken for the recipient
-
If you move the source range of data in Excel while the PowerPoint is closed, the chart will still reference the old (hence wrong) range of data.
-
These links also do not let you link values within your textboxes and shapes
👉🏻That’s a long list!
And, again, there is a significant risk for the links to get broken and put you back in panic mode to update manually at the last minute. 😱
So the main interest for these links is clearly the ability to link tables while the first method cannot.
Method 3: using Power-user to create robust links between Excel and PowerPoint
Due to the limitations of Methods 1 and 2, many users prefer to rely on manual copy-pasting, and waste sometimes considerable amounts of time in the process.
To solve these issues, Power-user designed an intuitive and robust Excel-PowerPoint link allowing you to automate your reports. This link comes as part of the Power-user add-in which also includes dozens of features for PowerPoint, Excel & Word.
Creating a link between Excel and PowerPoint for a chart, table or range 🔗
-
From Excel, select the chart, table or range
-
Right-click and hit «Copy» (or press CTRL+C)
-
Go to PowerPoint
-
From the Home tab, click «Paste» (or press CTRL+V).
-
Click «Link» from the contextual button at the top left of the chart to create the link:

Inserting values in the middle of your PowerPoint texts that are linked to an Excel cell 🔗
This is a unique and very powerful feature that only Power-user offers. Not only can you automate your reports by updating charts and tables, but you can also write text comments in PowerPoint that include dynamic values linked to Excel data. This is the ultimate step to make truly automated reports.
For instance, you can have a slide title that says «Online sales stand at +17,2% this month» with the value «+17,2%» being automatically updated from a cell in Excel.
-
From PowerPoint, select a text and place the cursor where you want to insert a linked value
-
Right-click and then choose «Insert value from linked Excel cell«
-
Using the selection dialog that opens, navigate to the Excel cell you want to link with your presentation and validate
Updating and managing your links
After a link is created, you can easily update it by clicking the buttons at the top left.

From here, you can automatically update all the linked objects (charts, tables, texts) to take the new data from Excel.
You can also open the Link Manager, from where you will find additional options:
-
View the list of all linked objects and easily navigate from one to the other
-
Update each link independently, or all at once
-
See the location of the data source
-
Opens the folder containing the Excel source or go directly to the link source in Excel
-
See the date and time of the last update, and who made the last update
-
Break the link
-
…

Advantages ✅
-
Linked charts remain chart objects, so you can easily customize the format afterwards
-
You can link anything: charts, tables, ranges, cells and even values in your text
-
Links do not trigger any security warning
-
Updates run fast
-
The links will resist if you rename the files or have multiple versions (v1, v2, v3 etc.).
-
The links will resist if you move the files
-
The links will remain if you email the files
-
If you move the source range of data in Excel while the PowerPoint is closed, the link will resist
-
You will have easy access to multiple options for managing links
At any time, just open both the PowerPoint and the Excel file and hit update, it will re-establish the links with the currently opened version.
If the recipient doesn’t have Power-user installed, the links will be converted into Method 1 links to ensure compatibility.
- Что делает макрос
- Код макроса
- Как работает макрос
- Как использовать
- Скачать файл
Ссылка на это место страницы:
#zadacha
Вы можете создать книгу таким образом, что она имитирует презентацию PowerPoint. После того, как вы сделаете это, вы можете легко преобразовать рабочую книгу в презентацию PowerPoint, фактически используя только небольшую автоматизацию. С помощью этого макроса, вы можете строить целые презентации в Excel.
Перед тем, как осуществить этот макрос в вашей книге, необходимо установить ссылку на библиотеку объектов Microsoft PowerPoint.
Ссылка на это место страницы:
#formula
SubPreobrazovatRabochuyuKniguVPrezentaciyu()DimppAsPowerPoint.ApplicationDimPPPresAsPowerPoint.PresentationDimPPSlideAsPowerPoint.SlideDimxlwkshtAsExcel.WorksheetDimMyRangeAsStringDimMyTitleAsStringSetpp =NewPowerPoint.ApplicationSetPPPres = pp.Presentations.Addpp.Visible =TrueMyRange ="A2:F6"ForEachxlwkshtInActiveWorkbook.Worksheetsxlwksht.SelectApplication.Wait (Now + TimeValue("0:00:1"))MyTitle = xlwksht.Range("A1").Valuexlwksht.Range(MyRange).CopyPicture _Appearance:=xlScreen, Format:=xlPictureSlideCount = PPPres.Slides.CountSetPPSlide = PPPres.Slides.Add(SlideCount + 1, ppLayoutTitleOnly)PPSlide.SelectPPSlide.Shapes.Paste.Selectpp.ActiveWindow.Selection.ShapeRange.Align msoAlignCenters,Truepp.ActiveWindow.Selection.ShapeRange.Top = 100PPSlide.Shapes.Title.TextFrame.TextRange.Text = MyTitleNextxlwkshtpp.ActivateSetPPSlide =NothingSetPPPres =NothingSetpp =NothingEndSub
Ссылка на это место страницы:
#kak
1. Шаг 1 объявляет шесть переменных:
— PP является переменной объекта, приложения PowerPoint;
— PPPres является переменной объекта презентации PowerPoint;
— PPSlide является переменной слайдов в PowerPoint;
— xlwksht является переменной объекта рабочего листа;
— MyRange переменная, используемая для хранения и передачи имени диапазона в виде строки;
— MyTitle переменная, используемая для хранения и передачи заголовок для каждого слайда.
2. Шаг 2 открывает PowerPoint с пустой презентацией. Обратите внимание, что мы устанавливаем свойство Visible приложения PowerPoint в True. Это гарантирует, что мы можем увидеть, как работает код.
3. Шаг 3 заполняет переменную MyRange диапазоном, который мы хотим захватить как содержание слайдов. Мы также заполняем переменную MyTitle со значением ячейки A1. Это значение становится заголовком для слайда.
4. Шаг 4 запускает цикл через каждый лист в книге. Обратите внимание, что мы используем метод Application.Wait, говоря макросу, чтобы он сделал паузу в течение секунды. Это позволяет скопировать весь диапазон.
5. Шаг 5 использует метод CopyPicture для копирования в качестве изображения.
6. Шаг 6 добавляет новый слайд в презентации с помощью метода Add объекта Slide. Обратите внимание, что мы используем SlideCount + 1, чтобы указать порядковый номер добавленного слайда. Использование SlideCount + 1 позволяет динамически назначать следующий доступный номер в качестве индекса слайда. Также обратите внимание, что мы используем ppLayoutTitleOnly, обеспечивая наш слайд названием текстового фрейма.
7. Шаг 7 вставляет изображение в активный слайд, размещая его по центру, отступая от верхнего края 100 пикселей.
8. Далее передаем переменную MyTitle в заголовок.
Ссылка на это место страницы:
#touse
Для реализации этого макроса, вы можете скопировать и вставить его в стандартный модуль:
1. Активируйте редактор Visual Basic, нажав ALT + F11.
2. Щелкните правой кнопкой мыши имя проекта / рабочей книги в окне проекта.
3. Выберите Insert➜Module.
4. Введите или вставьте код во вновь созданном модуле.
Ссылка на это место страницы:
#file
Файлы статей доступны только зарегистрированным пользователям.
1. Введите свою почту
2. Нажмите Зарегистрироваться
3. Обновите страницу
Вместо этого блока появится ссылка для скачивания материалов.

Привет! Меня зовут Дмитрий. С 2014 года Microsoft Cretified Trainer. Вместе с командой управляем этим сайтом. Наша цель — помочь вам эффективнее работать в Excel.
Изучайте наши статьи с примерами формул, сводных таблиц, условного форматирования, диаграмм и макросов. Записывайтесь на наши курсы или заказывайте обучение в корпоративном формате.

Подписывайтесь на нас в соц.сетях:
I’ve received a large number of questions on how to command other programs with VBA through Excel. In this post, we will walk through how to copy a specified cell range and paste it into a brand new PowerPoint presentation. This might seem like a task that would be much more efficient to carry out manually. However, when you need to put together a presentation with 50+ Excel images, having a VBA macro do all the heavy lifting is much faster! Let me first show you the VBA code and then I will highlight some of the main sections that are most important.
Sub ExcelRangeToPowerPoint()
‘PURPOSE: Copy/Paste An Excel Range Into a New PowerPoint Presentation
‘SOURCE: www.TheSpreadsheetGuru.com
Dim rng As Range
Dim PowerPointApp As Object
Dim myPresentation As Object
Dim mySlide As Object
Dim myShape As Object
‘Copy Range from Excel
Set rng = ThisWorkbook.ActiveSheet.Range(«A1:C12»)
‘Create an Instance of PowerPoint
On Error Resume Next
‘Is PowerPoint already opened?
Set PowerPointApp = GetObject(class:=»PowerPoint.Application»)
‘Clear the error between errors
Err.Clear
‘If PowerPoint is not already open then open PowerPoint
If PowerPointApp Is Nothing Then Set PowerPointApp = CreateObject(class:=»PowerPoint.Application»)
‘Handle if the PowerPoint Application is not found
If Err.Number = 429 Then
MsgBox «PowerPoint could not be found, aborting.»
Exit Sub
End If
On Error GoTo 0
‘Optimize Code
Application.ScreenUpdating = False
‘Create a New Presentation
Set myPresentation = PowerPointApp.Presentations.Add
‘Add a slide to the Presentation
Set mySlide = myPresentation.Slides.Add(1, 11) ’11 = ppLayoutTitleOnly
‘Copy Excel Range
rng.Copy
‘Paste to PowerPoint and position
mySlide.Shapes.PasteSpecial DataType:=2 ‘2 = ppPasteEnhancedMetafile
Set myShape = mySlide.Shapes(mySlide.Shapes.Count)
‘Set position:
myShape.Left = 66
myShape.Top = 152
‘Make PowerPoint Visible and Active
PowerPointApp.Visible = True
PowerPointApp.Activate
‘Clear The Clipboard
Application.CutCopyMode = False
End Sub
Teaching Excel The PowerPoint Language
In order to control PowerPoint from inside Excel’s Visual Basic Editor, we need to teach Excel how to speak in PowerPoint’s terms. PowerPoint uses a vocabulary containing terms such as «Slide» and «Presentation» that simply do not exist in Excel’s own code language. You can learn more about this topic by reading my post Teaching Excel To Speak PowerPoint. In order to activate PowerPoint’s object library, simply click the Tools menu in the Visual Basic Editor and select Reference. Then make sure the reference Microsoft Office PowerPoint 12.0 Object Library is checked (the version number may verify, for example in Office 2016 the reference would be Office PowerPoint 16.0 Object Library). In the below image, I show you exactly how to do this and prove afterward that Excel now knows PowerPoint lingo!
UPDATE: I have updated the code in this article so you do not need to do this step, however IntelliSense for any PowerPoint objects in the Visual Basic Editor will not work. This is not that big of a deal unless you need coding direction when adding additional PowerPoint automation to your VBA macro.
In this part of the code, we are determining if Microsoft PowerPoint is open or not. If PowerPoint is already open, we can set a variable equal to the entire program by using GetObject. If PowerPoint is not currently running we can use CreateObject to run an instance of PowerPoint and then set a variable equal to that specific instance of PowerPoint.
When using CreateObject, the target application will start running but it is not visible on the screen. Therefore we need to turn the Visible setting on (equal to true). Also, VBA with PowerPoint is a little bit different than with Excel in that it is much more dependent on its window showing on the screen. Therefore a second command must be written to Activate PowerPoint.
Copy From Excel, Paste Onto Slide
Now that you have a new presentation and a new slide, you can command Excel to paste your range into PowerPoint. Near the beginning of the code, there was a line that allowed you to specify the exact range you wanted to copy. The variable rng was used to remember this range and to allow you to reference the range later on in the code.
Guru Tip: It is a good idea to place code that may need to be manually changed at some point in the future near the beginning of the subroutine. This prevents you from having to scroll through your code and pinpoint the exact place where you spelled out which range you wanted to copy or which worksheet you wanted to pull data from. This can save you a bunch of time and prevent confusion!
Notice how we set a variable equal to the newly pasted item. This is important because it allows you to modify the picture after it has been placed into PowerPoint. In the example code, I chose to change the picture position by setting the Left and Top dimensions. You could also choose to resize the image, add a shadow, or apply any other modification you would typically do manually inside of PowerPoint.
You have now reached the end of the macro and successfully pasted in a range from Excel into a PowerPoint presentation!
Learn What VBA Can Do With PowerPoint
For the longest time, I had no idea I could use VBA with PowerPoint. I thought VBA was strictly an Excel thing. It was actually through an online VBA course that I was shown how to control PowerPoint & Word with VBA commands. It’s unfortunate that there is very little documentation out on the web concerning VBA outside of Excel. It is one of the major contributors in personally deciding to create this site and I hope to compile a bunch of resources for you in these areas. The best place to get your feet wet with VBA for PowerPoint is to hop on over to the PowerPoint Code Vault. This is where I post pre-written code and it serves as a great guide on how to write VBA for PowerPoint.
About The Author
Hey there! I’m Chris and I run TheSpreadsheetGuru website in my spare time. By day, I’m actually a finance professional who relies on Microsoft Excel quite heavily in the corporate world. I love taking the things I learn in the “real world” and sharing them with everyone here on this site so that you too can become a spreadsheet guru at your company.
Through my years in the corporate world, I’ve been able to pick up on opportunities to make working with Excel better and have built a variety of Excel add-ins, from inserting tickmark symbols to automating copy/pasting from Excel to PowerPoint. If you’d like to keep up to date with the latest Excel news and directly get emailed the most meaningful Excel tips I’ve learned over the years, you can sign up for my free newsletters. I hope I was able to provide you with some value today and I hope to see you back here soon!
— Chris