Import or export text (.txt or .csv) files
There are two ways to import data from a text file with Excel: you can open it in Excel, or you can import it as an external data range. To export data from Excel to a text file, use the Save As command and change the file type from the drop-down menu.
There are two commonly used text file formats:
-
Delimited text files (.txt), in which the TAB character (ASCII character code 009) typically separates each field of text.
-
Comma separated values text files (.csv), in which the comma character (,) typically separates each field of text.
You can change the separator character that is used in both delimited and .csv text files. This may be necessary to make sure that the import or export operation works the way that you want it to.
Note: You can import or export up to 1,048,576 rows and 16,384 columns.
Import a text file by opening it in Excel
You can open a text file that you created in another program as an Excel workbook by using the Open command. Opening a text file in Excel does not change the format of the file — you can see this in the Excel title bar, where the name of the file retains the text file name extension (for example, .txt or .csv).
-
Go to File > Open and browse to the location that contains the text file.
-
Select Text Files in the file type dropdown list in the Open dialog box.
-
Locate and double-click the text file that you want to open.
-
If the file is a text file (.txt), Excel starts the Import Text Wizard. When you are done with the steps, click Finish to complete the import operation. See Text Import Wizard for more information about delimiters and advanced options.
-
If the file is a .csv file, Excel automatically opens the text file and displays the data in a new workbook.
Note: When Excel opens a .csv file, it uses the current default data format settings to interpret how to import each column of data. If you want more flexibility in converting columns to different data formats, you can use the Import Text Wizard. For example, the format of a data column in the .csv file may be MDY, but Excel’s default data format is YMD, or you want to convert a column of numbers that contains leading zeros to text so you can preserve the leading zeros. To force Excel to run the Import Text Wizard, you can change the file name extension from .csv to .txt before you open it, or you can import a text file by connecting to it (for more information, see the following section).
-
Import a text file by connecting to it (Power Query)
You can import data from a text file into an existing worksheet.
-
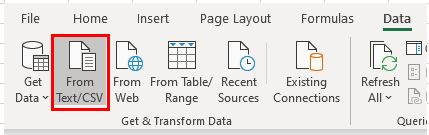
On the Data tab, in the Get & Transform Data group, click From Text/CSV.
-
In the Import Data dialog box, locate and double-click the text file that you want to import, and click Import.
-
In the preview dialog box, you have several options:
-
Select Load if you want to load the data directly to a new worksheet.
-
Alternatively, select Load to if you want to load the data to a table, PivotTable/PivotChart, an existing/new Excel worksheet, or simply create a connection. You also have the choice of adding your data to the Data Model.
-
Select Transform Data if you want to load the data to Power Query, and edit it before bringing it to Excel.
-
If Excel doesn’t convert a particular column of data to the format that you want, then you can convert the data after you import it. For more information, see Convert numbers stored as text to numbers and Convert dates stored as text to dates.
Export data to a text file by saving it
You can convert an Excel worksheet to a text file by using the Save As command.
-
Go to File > Save As.
-
Click Browse.
-
In the Save As dialog box, under Save as type box, choose the text file format for the worksheet; for example, click Text (Tab delimited) or CSV (Comma delimited).
Note: The different formats support different feature sets. For more information about the feature sets that are supported by the different text file formats, see File formats that are supported in Excel.
-
Browse to the location where you want to save the new text file, and then click Save.
-
A dialog box appears, reminding you that only the current worksheet will be saved to the new file. If you are certain that the current worksheet is the one that you want to save as a text file, click OK. You can save other worksheets as separate text files by repeating this procedure for each worksheet.
You may also see an alert below the ribbon that some features might be lost if you save the workbook in a CSV format.
For more information about saving files in other formats, see Save a workbook in another file format.
Import a text file by connecting to it
You can import data from a text file into an existing worksheet.
-
Click the cell where you want to put the data from the text file.
-
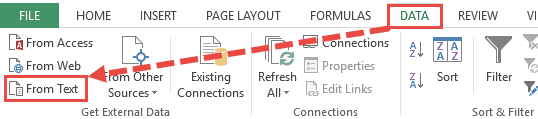
On the Data tab, in the Get External Data group, click From Text.
-
In the Import Data dialog box, locate and double-click the text file that you want to import, and click Import.
Follow the instructions in the Text Import Wizard. Click Help
 on any page of the Text Import Wizard for more information about using the wizard. When you are done with the steps in the wizard, click Finish to complete the import operation.
 -
In the Import Data dialog box, do the following:
-
Under Where do you want to put the data?, do one of the following:
-
To return the data to the location that you selected, click Existing worksheet.
-
To return the data to the upper-left corner of a new worksheet, click New worksheet.
-
-
Optionally, click Properties to set refresh, formatting, and layout options for the imported data.
-
Click OK.
Excel puts the external data range in the location that you specify.
-
 on any page of the Text Import Wizard for more information about using the wizard. When you are done with the steps in the wizard, click Finish to complete the import operation.
If Excel does not convert a column of data to the format that you want, you can convert the data after you import it. For more information, see Convert numbers stored as text to numbers and Convert dates stored as text to dates.
Export data to a text file by saving it
You can convert an Excel worksheet to a text file by using the Save As command.
-
Go to File > Save As.
-
The Save As dialog box appears.
-
In the Save as type box, choose the text file format for the worksheet.
-
For example, click Text (Tab delimited) or CSV (Comma delimited).
-
Note: The different formats support different feature sets. For more information about the feature sets that are supported by the different text file formats, see File formats that are supported in Excel.
-
-
Browse to the location where you want to save the new text file, and then click Save.
-
A dialog box appears, reminding you that only the current worksheet will be saved to the new file. If you are certain that the current worksheet is the one that you want to save as a text file, click OK. You can save other worksheets as separate text files by repeating this procedure for each worksheet.
-
A second dialog box appears, reminding you that your worksheet may contain features that are not supported by text file formats. If you are interested only in saving the worksheet data into the new text file, click Yes. If you are unsure and would like to know more about which Excel features are not supported by text file formats, click Help for more information.
For more information about saving files in other formats, see Save a workbook in another file format.
The way you change the delimiter when importing is different depending on how you import the text.
-
If you use Get & Transform Data > From Text/CSV, after you choose the text file and click Import, choose a character to use from the list under Delimiter. You can see the effect of your new choice immediately in the data preview, so you can be sure you make the choice you want before you proceed.
-
If you use the Text Import Wizard to import a text file, you can change the delimiter that is used for the import operation in Step 2 of the Text Import Wizard. In this step, you can also change the way that consecutive delimiters, such as consecutive quotation marks, are handled.
See Text Import Wizard for more information about delimiters and advanced options.
If you want to use a semi-colon as the default list separator when you Save As .csv, but need to limit the change to Excel, consider changing the default decimal separator to a comma — this forces Excel to use a semi-colon for the list separator. Obviously, this will also change the way decimal numbers are displayed, so also consider changing the Thousands separator to limit any confusion.
-
Clear Excel Options > Advanced > Editing options > Use system separators.
-
Set Decimal separator to , (a comma).
-
Set Thousands separator to . (a period).
When you save a workbook as a .csv file, the default list separator (delimiter) is a comma. You can change this to another separator character using Windows Region settings.
Caution: Changing the Windows setting will cause a global change on your computer, affecting all applications. To only change the delimiter for Excel, see Change the default list separator for saving files as text (.csv) in Excel.
-
In Microsoft Windows 10, right-click the Start button, and then click Settings.
-
Click Time & Language, and then click Region in the left panel.
-
In the main panel, under Regional settings, click Additional date, time, and regional settings.
-
Under Region, click Change date, time, or number formats.
-
In the Region dialog, on the Format tab, click Additional settings.
-
In the Customize Format dialog, on the Numbers tab, type a character to use as the new separator in the List separator box.
-
Click OK twice.
-
In Microsoft Windows, click the Start button, and then click Control Panel.
-
Under Clock, Language, and Region, click Change date, time, or number formats.
-
In the Region dialog, on the Format tab, click Additional settings.
-
In the Customize Format dialog, on the Numbers tab, type a character to use as the new separator in the List separator box.
-
Click OK twice.
Note: After you change the list separator character for your computer, all programs use the new character as a list separator. You can change the character back to the default character by following the same procedure.
Need more help?
You can always ask an expert in the Excel Tech Community or get support in the Answers community.
See Also
Import data from external data sources (Power Query)
Need more help?
See all How-To Articles
This tutorial demonstrates how to open a text file in Excel and Google Sheets.
Open Text File in Excel
- In the Ribbon, select File > Open > Browse, and then select the text or CSV file to be opened.
The Text Import Wizard opens to the first of three steps.
- Depending on the data contained in the file selected, you can either choose Delimited or Fixed Width as the file type. If the data is separated with a character like a comma, semicolon, space, or tab, select Delimited. If the first row of data contains column headings, check My data has headers.
- Click Next.
- In Step 2, select the type of delimiters contained in the text file – in this case the tab delimiter. Then select the text qualifier. In some cases, the data may be enclosed in quotes, but for this example, (none) is selected as the text qualifier.
- Click Next.
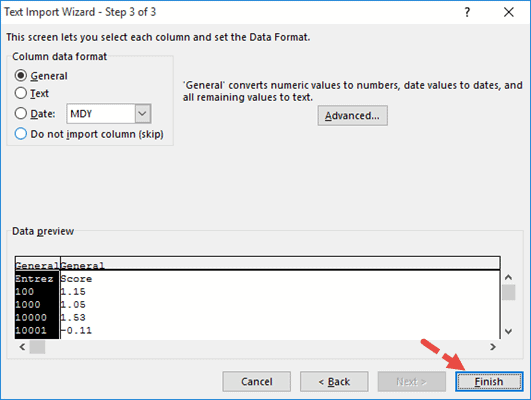
- The final step of the text import wizard allows you to specify the data type contained in each column. Most of the time, Excel is able to determine the data type automatically, and you can leave the selected Column data format on General.
- Click Finish to import the data into Excel.
Import Text File Using Get Data
An alternative way of importing data into Excel from a text file, is to use the Get and Transform Data feature.
- In the Ribbon, select Data > Get and Transform Data > From Text/CSV.
- Select the file to be imported, and then click Import.
- The file appears in a dialog box with the delimiter already automatically selected, and the text divided by Excel according to the data stored in the text file. Click Load to load the data into Excel.
The data now appears in a new sheet in Excel. There are now two new tabs on the Ribbon – Table Design and Query – as well as a Queries & Connections pane appearing on the right-hand side of the screen. This shows that the data is linked to the TXT file and if any data in the TXT file was to change (external to Excel), the data displayed in Excel would change too.
- To unlink the imported data from the external TXT file, in the Ribbon, select Table Design > External Table Data > Unlink.

- The data is imported into Excel as a table. To convert it to a standard Excel range, in the Ribbon, select Table Design > Tools > Convert to Range.
Both the Table Design and Query tabs on the Ribbon disappear.
Open Text File in Google Sheets
- From the File menu in Google Sheets, select Import.
- Click Upload, and then click on the blue Select a file from your device button to select the required file.
The name of the file to be imported is displayed under File with the default options available for importing automatically selected.
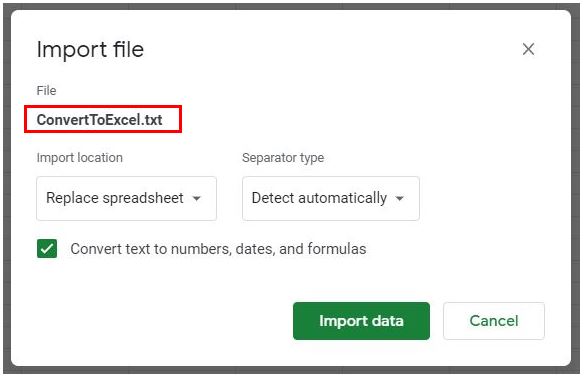
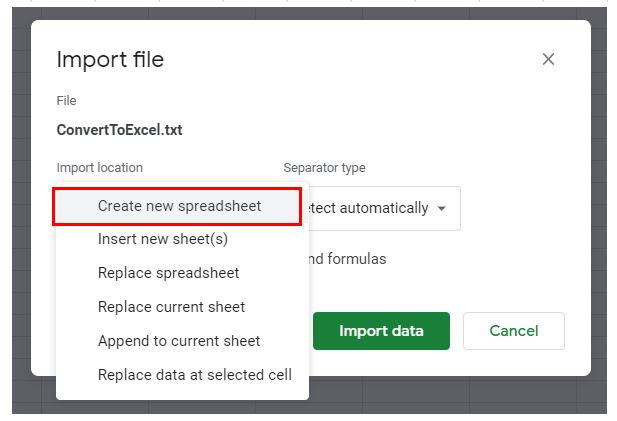
- To change the Import Location, click the drop-down list under Import Location and select the option required.
To change the Separator type, click the drop-down list on the right and select a character to delineate by.

- Keep Convert text to numbers, dates, and formulas checked and then click Import Data to import the file into a new Google sheet.
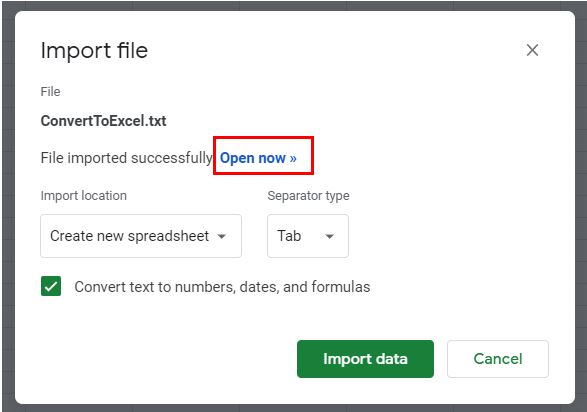
- Click Open now.
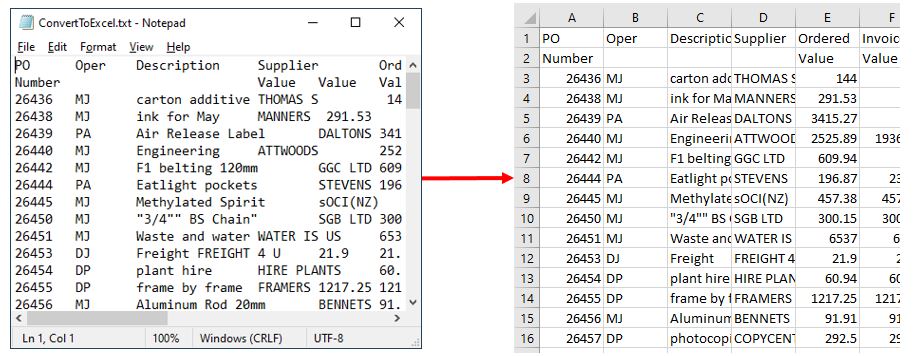
Different applications generate data in different forms.
A SaaS application might generate a report in the form of a PDF, while another application might generate data in the form of a TXT or CSV file.
The challenge lies in consolidating the data into a single application that can work with all the data to produce the required results.
Microsoft Excel is one application that is frequently used for this, owing to its versatility in importing data from files with a wide variety of extensions.
For example, if you have a list of items saved in a Text file (or in Notepad), Excel allows you to import this list so that you can process it further.
In this tutorial we will show you two ways to convert a text file to Excel:
- By using the Text Import Wizard
- By opening the file directly in Excel
What is a Text File?
A Text file is one that contains text with no special formatting (as in bold, italic, images, etc.).
These files are identified with the ‘.txt’ extension and can be opened in any text editor, like Notepad or word processor, like Microsoft Word.
But in many cases, you can have data in a text file that you need to open in Excel and analyze there.
Thankfully, you can easily open text files in Microsoft Excel and then further work on it.
Let’s see how to do that!
Let us look at two ways in which we can convert a Text file (.txt) to Excel.
Method 1: Using the Text Import Wizard to Convert a Text File to Excel
If you have a spreadsheet open in Excel and want to import the contents of a Text file at a specific area of your spreadsheet, the Text Import Wizard might be the best way to go.
This wizard scans your text file and ensures that the data in the file is imported the way you want.
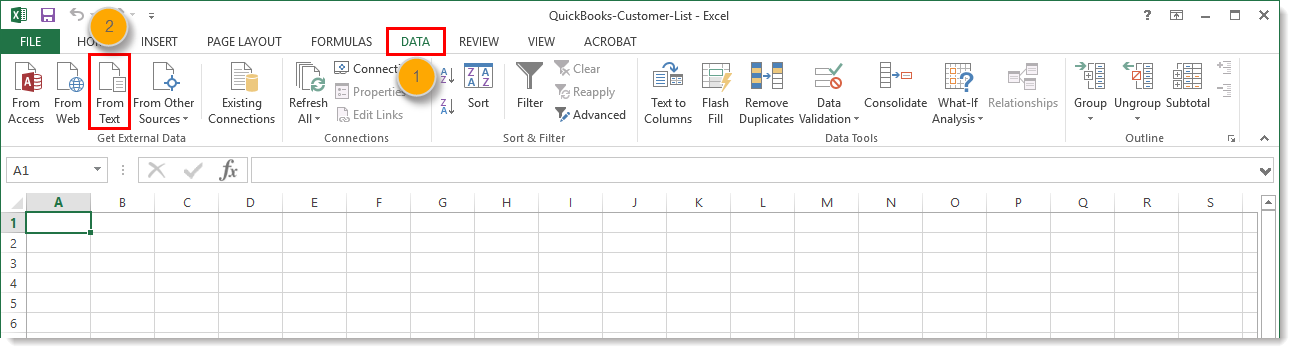
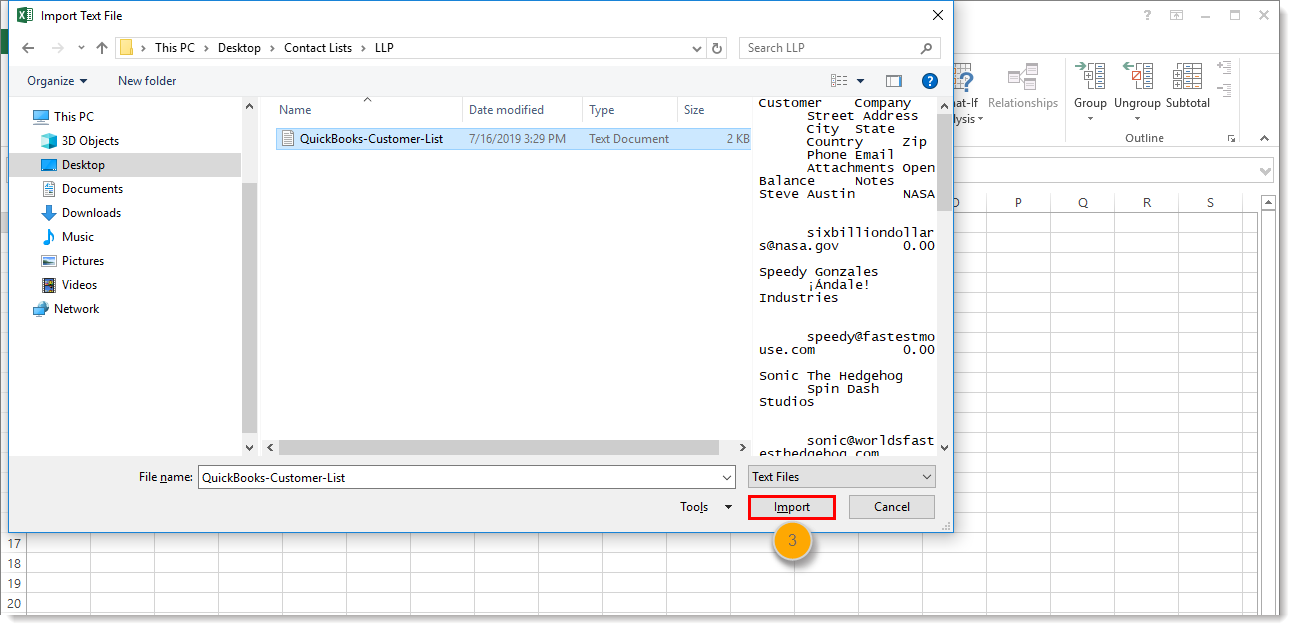
To use the Text Import Wizard, select the Data tab, followed by ‘From Text’ (which you will find under the ‘Get External Data’ group.
After this, select the text file that you want to import.
Your Text Import Wizard should now open automatically.

The Text Import Wizard guides you in providing the best settings to import your text file data through 3 steps:
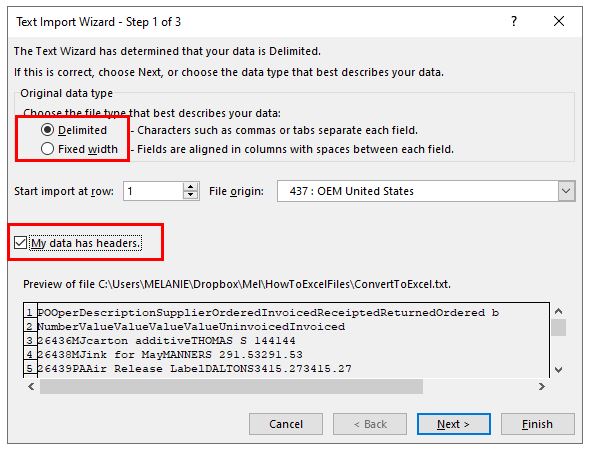
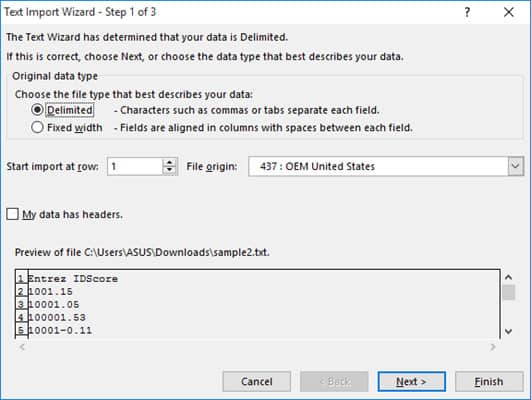
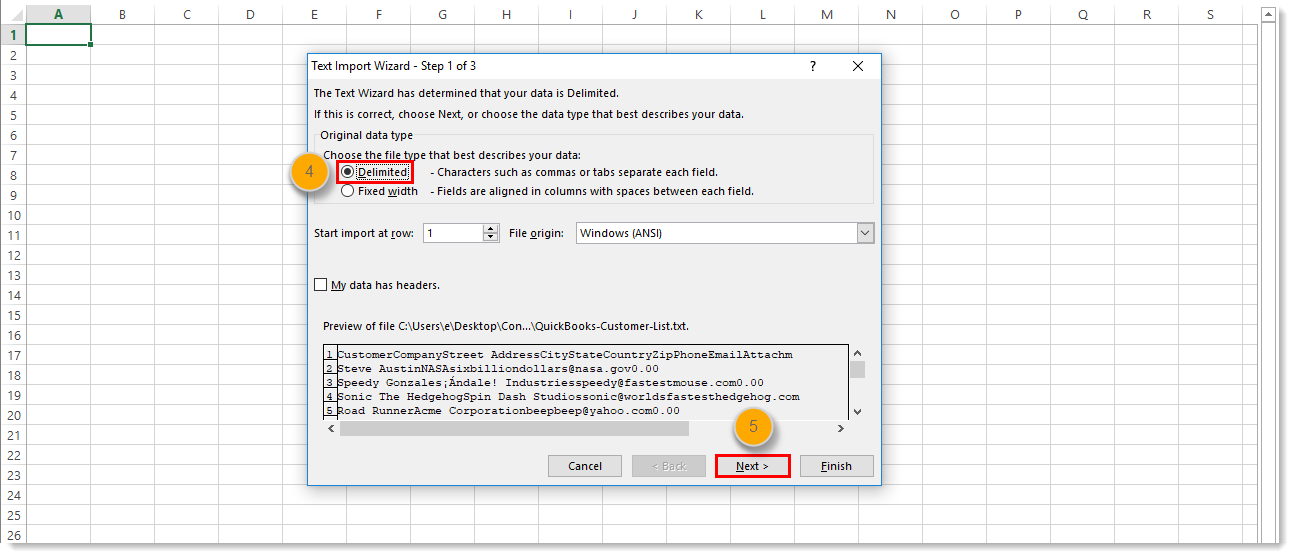
Step 1 of 3
In this step you can provide the settings for the following:
- Original Data Type: Here you can choose how you want your data to be separated into columns. You have two options:
- Delimited: Select this if your text file data is separated by tabs, colons, semicolons or other characters.
- Fixed width: Select this if all items in each column of your data are the same width.
- Start import at row: Type or select the first row of your data from where you want to start importing.
- File origin: Select the character set that your text file uses, for example 437 (for the OEM United States character set). Usually, it’s fine to leave this at the default setting.
- My data has headers: Keep this field checked if your Text file’s dataset contains headers.

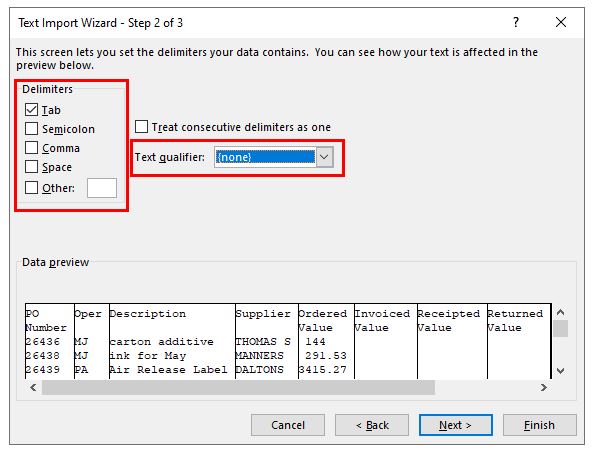
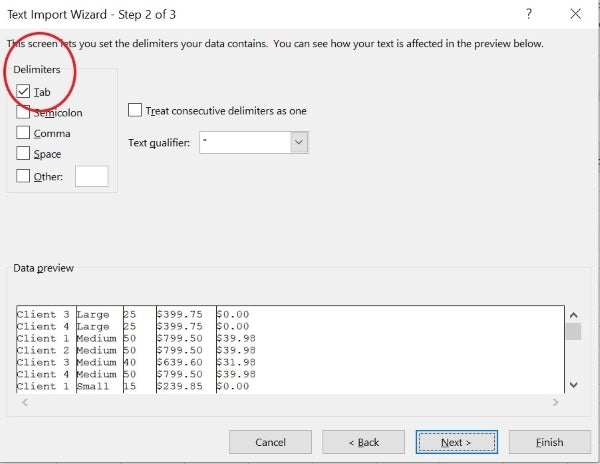
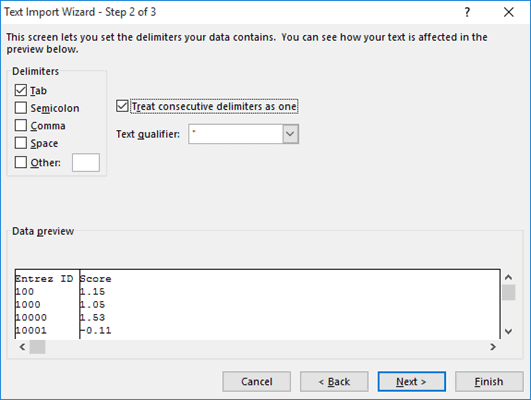
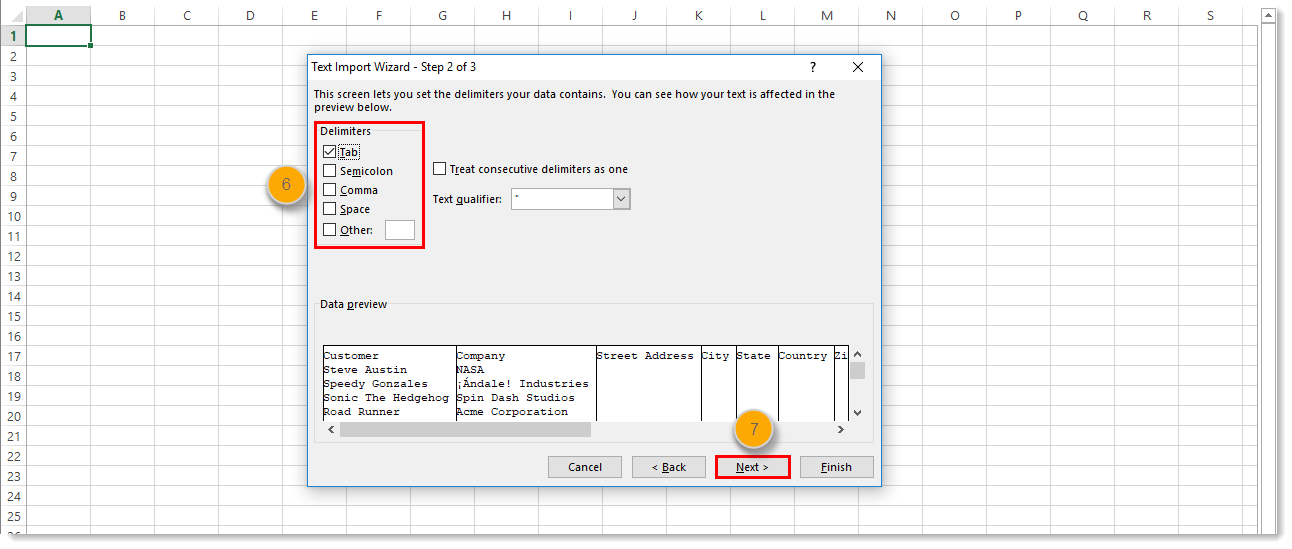
Step 2 of 3
If you had selected the ‘Delimited’ radio button in Step 1, then this step lets you specify the delimiters that your data contains (for example tabs, commas, semicolons, etc.) You can also specify if you want consecutive delimiters to be counted as one.
Moreover, if your text values are enclosed in a special set of characters (for example in single or double quotes), then you can specify the character in this step.
These characters are known as ‘Text qualifiers’ and help specify if you want a set of values to be imported as one.
For example, “Scott, Steve” is imported as a single value, even though the words are separated by a comma delimiter.

At the bottom of the screen, you can see a preview of how your data will get affected in the spreadsheet after conversion.
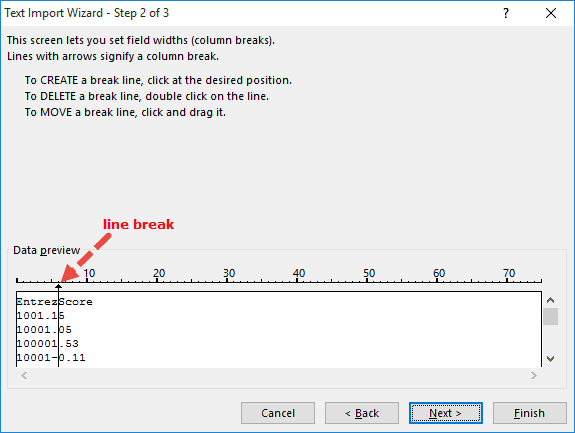
If you had selected the ‘Fixed Width’ radio button in Step 1, on the other hand, then Step 2 lets you specify widths for each column.
You can introduce a new column break in the preview window by simply clicking at the appropriate point on the scale.
A line with an arrow should appear to represent the column break.

Place line breaks wherever you need to in the preview window.
If you want to move a line break, simply drag it across. If you want to remove a line, simply double-click on it.
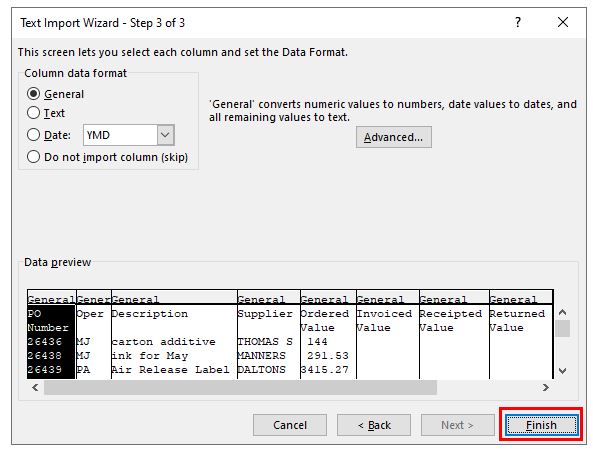
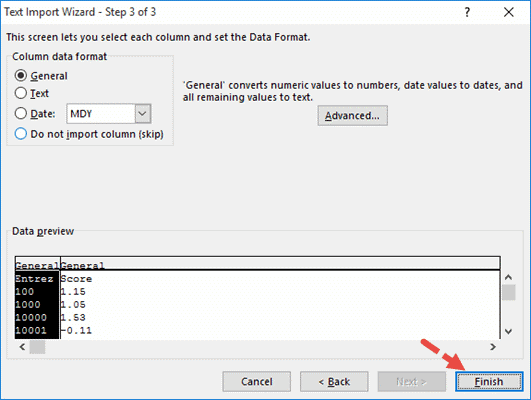
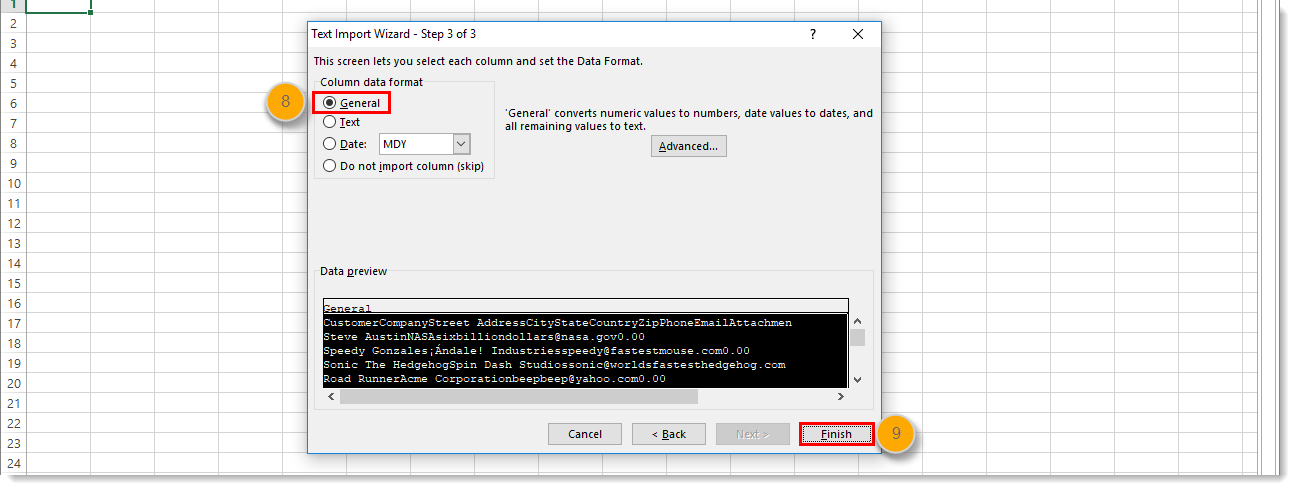
Step 3 of 3
This lets you specify the data format for each column.
You can specify if you want a column to remain in the default format set by the Text Import Wizard or if you want to set the format to be General, Text, or Date.
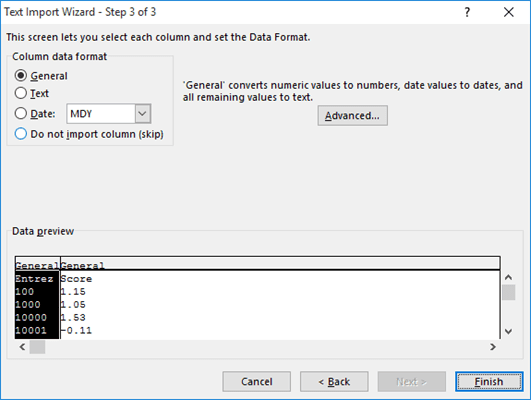
Simply select a column from the preview window and select the format you want.
If you want to remove a selected column, select the last radio button option (which says ‘Do not import column‘).
The Advanced button in this step opens the Advanced Text Import Settings dialog box.
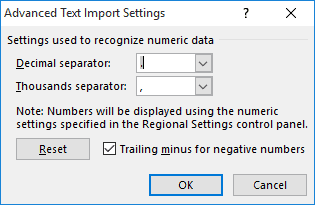
This dialog box lets you specify advanced formatting options.
For example, you can use the Advanced Text Import Settings to specify what decimal or thousands separators have been used in the text file, so that they can be made to match your computer’s regional settings.
Once you’re done providing all the settings for your imported text data, click on the Finish button.
This will open the Import Data dialog box.
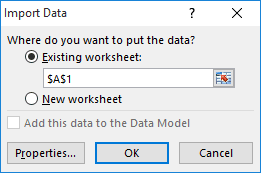
In this box, you can select where you want your text file’s data imported.
If you want to import it into the existing worksheet, you can select or type in a reference to the cell where you want Excel to start displaying the imported data.
If you want to open it in a new worksheet, however, then select the radio button next to ‘New Worksheet’.
Click OK.
Your text file should now get imported to your selected location in Excel, with the format settings that you had specified in the Text Import Wizard.

Also read: How to Open XML Files in Excel?
Method 2: Opening a Text File Directly in Excel
You can also choose to simply open the text file directly in Excel.
While opening, Excel recognizes a text file and automatically converts it into a format that can be displayed in a spreadsheet.
All you need to do is click on the File tab, select Open and then browse and select the text file that you want to open.
One issue that you are likely to face when trying to open a text file directly in Excel is trying to locate the file in the folder.
This is because Excel’s ‘Open File’ dialog box, by default, filters, and displays only Excel files like those with extensions ‘.xls’, ‘.xlsx’, etc.
It also displays CSV files, if your computer is set up to use Excel as the default application to open CSV files.
So if you don’t see your required text file in the folder when trying to open it in Excel, simply select ‘All Files’ from the ‘File Types’ drop-down, as shown below:
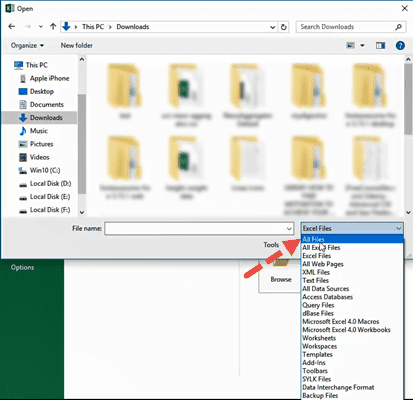
This will display the Text Import Wizard from where you can set up how you want your Text file’s data to be displayed in Excel (as shown in method 1).

You should now see your text file converted and displayed in Excel.
Once the file opens, if you still find some of the columns (or individual cells) not converted to your required format, you can convert them manually.
While this method to open the Text file directly in Excel works well, the benefit of using the first method (using Text Import Wizard) allows you to make some adjustments even before getting the data in Excel.
In this tutorial, we showed you two ways to convert and open a Text file in Excel.
A third method could be by using online tools like Online2pdf, but we did not dwell too much on this because Excel’s Text Import Wizard provides much more flexibility, allowing you to adjust your data, and format them exactly how you want them.
We hope this tutorial was helpful for you.
Other Excel tutorials you may also like:
- How to Convert a CSV File to Excel?
- How to Open VCF File in Excel?
- How to Open Excel File [xls, xlsx] Online (for FREE)
- Why does Excel Open on Startup (and How to Stop it)
- How to Make Excel File Read Only
- How to Insert an Excel file into MS Word
- How to Save Selection in Excel as PDF (3 Easy Methods)
- How to Merge Two Excel Files?
- How to Convert PDF to Excel without Software?
- How to Open DAT Files in Excel?
Содержание
- How to Open a Text (.txt) File in Excel & Google Sheets
- Open Text File in Excel
- Import Text File Using Get Data
- Open Text File in Google Sheets
- How To Open A Notepad File In Excel?
- Why are my Excel files opening in notepad?
- How do I open a Notepad file?
- How do I open a file with Excel?
- Which file types can be opened with Notepad as well as MS Excel?
- Can csv file be opened in notepad?
- How do I open notepad in Windows?
- How do I open notepad in CMD?
- Can I open an Excel file without Excel?
- How do I automatically open a CSV file in Excel with columns?
- How do I open Excel in Windows 10?
- How do I open a file in Windows 10?
- How do I open a file that is too big for notepad?
- Can CSV files be opened in Excel?
- How do I save a Notepad file as a CSV?
- How do I open a CSV file in text?
- How do I open a csv file without Excel?
- What is the shortcut key to open Notepad?
- How do I open a Notepad document in Word?
- Where is Notepad in laptop?
- What happened to Notepad in Windows 10?
- How to convert notepad to excel?
- How do I copy from Notepad to Excel?
- How do I convert a TXT file to Excel?
- How do I convert a notepad file?
- How do I read a notepad file?
- How to Extract Information From Notepad to Excel : MS Excel Tips
- Can you convert notepad to word?
- How do I convert text to Python in Excel?
- Is a TXT file a csv file?
- Why are my Excel files opening in notepad?
- How do I convert notepad to CSV?
- How do I import data into Excel?
- How do I convert a JSON file to Excel?
- How do you parse data in Excel?
- How do I convert a CSV file to a text file?
- Is JSON a text file?
- How do I automatically open a CSV file in Excel with Windows 10?
How to Open a Text (.txt) File in Excel & Google Sheets
This tutorial demonstrates how to open a text file in Excel and Google Sheets.
Open Text File in Excel
- In the Ribbon, select File > Open > Browse, and then select the text or CSV file to be opened.
The Text Import Wizard opens to the first of three steps.
- Depending on the data contained in the file selected, you can either choose Delimited or Fixed Width as the file type. If the data is separated with a character like a comma, semicolon, space, or tab, select Delimited. If the first row of data contains column headings, check My data has headers.
- Click Next.
- In Step 2, select the type of delimiters contained in the text file – in this case the tab delimiter. Then select the text qualifier. In some cases, the data may be enclosed in quotes, but for this example, (none) is selected as the text qualifier.
- Click Next.
- The final step of the text import wizard allows you to specify the data type contained in each column. Most of the time, Excel is able to determine the data type automatically, and you can leave the selected Column data format on General.
- Click Finish to import the data into Excel.
Import Text File Using Get Data
An alternative way of importing data into Excel from a text file, is to use the Get and Transform Data feature.
- In the Ribbon, select Data > Get and Transform Data > From Text/CSV.
- Select the file to be imported, and then click Import.
- The file appears in a dialog box with the delimiter already automatically selected, and the text divided by Excel according to the data stored in the text file. Click Load to load the data into Excel.
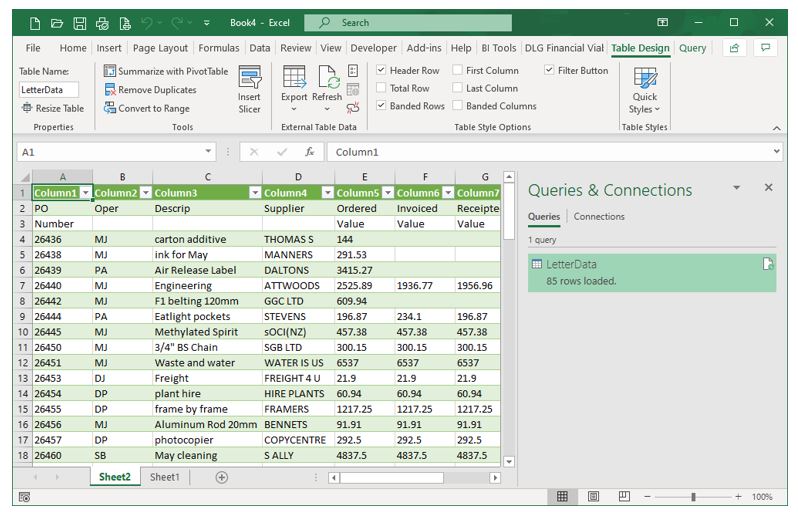
The data now appears in a new sheet in Excel. There are now two new tabs on the Ribbon – Table Design and Query – as well as a Queries & Connections pane appearing on the right-hand side of the screen. This shows that the data is linked to the TXT file and if any data in the TXT file was to change (external to Excel), the data displayed in Excel would change too.
- To unlink the imported data from the external TXT file, in the Ribbon, select Table Design > External Table Data > Unlink.
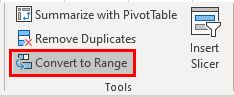
- The data is imported into Excel as a table. To convert it to a standard Excel range, in the Ribbon, select Table Design > Tools > Convert to Range.
Both the Table Design and Query tabs on the Ribbon disappear.
Open Text File in Google Sheets
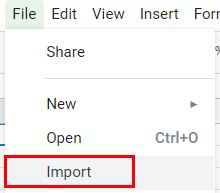
- From the File menu in Google Sheets, select Import.
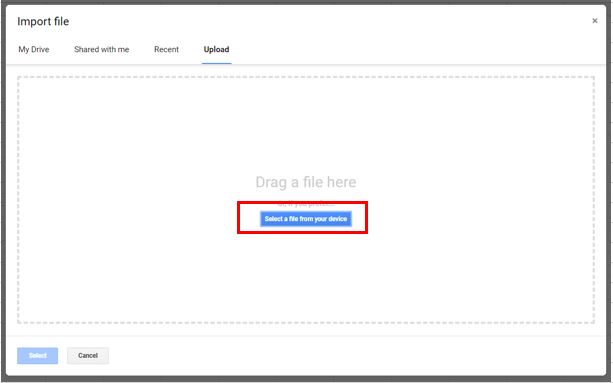
- Click Upload, and then click on the blue Select a file from your device button to select the required file.
The name of the file to be imported is displayed under File with the default options available for importing automatically selected.
- To change the Import Location, click the drop-down list under Import Location and select the option required.
To change the Separator type, click the drop-down list on the right and select a character to delineate by.
- Keep Convert text to numbers, dates, and formulas checked and then click Import Data to import the file into a new Google sheet.
- Click Open now.
Источник
How To Open A Notepad File In Excel?
U can Open text file by using following steps:
- Right Click on Notepad.
- Choose Default programs.
- Uncheck Always use the selected program to open this kind of file.
- Click on Browse.
- Select path depent on OS, for Win7 : C:Program Files (x86)Microsoft OfficeOffice14.
- Select Excel.
- Click on Open.
Why are my Excel files opening in notepad?
This usually indicates that you either do not have Microsoft Excel installed or that you do not have Excel set as the default program for CSV files.Click Change program. Click the Microsoft Excel option under Recommended Programs. Click OK.
How do I open a Notepad file?
Open Notepad by using the Start Menu (in Windows 10 and Windows 7) or the Start screen (in Windows 8.1) You can find and open Notepad in the Windows 10 Start Menu. Click Start, scroll down the list of apps, and open the Windows Accessories folder. There you find the Notepad shortcut.
How do I open a file with Excel?
How to set Excel as default app to open . xls data files:
- Select the Windows Icon in the start bar.
- In the Search Bar, type “Default Programs.”
- Click “Default Programs.”
- Wait for the app to start, then select “Set your default programs.”
- Find desired Excel version in the list.
Which file types can be opened with Notepad as well as MS Excel?
Computer Science Class 9 Englis…
Text files can be directly read using a text editor such as Notepad in Microsoft Windows. These files often have extension . txt but can often have other extensions (a common one we will use is . csv).
Can csv file be opened in notepad?
Answer: You can open the CSV file on Google Sheet, Notepad, or OpenOffice Calc. Just right-click on the file, select Open With and pick either OpenOffice Calc or Notepad. To open in Google Sheets, go to the File option in Google Sheet, click import, select the CSV file you want to open, click import.
How do I open notepad in Windows?
When you see a Command Prompt, type notepad and press Enter to launch a Notepad window. Click File and select Open in the Notepad window. Ensure you select the All Files option at the bottom of the window, and then click the Computer option.
How do I open notepad in CMD?
Open Notepad With the Command Prompt
Open the command prompt — press Windows-R and run Cmd, or in Windows 8, press Windows-X and select Command Prompt — and type Notepad to run the program. On its own, this command opens Notepad in the same way as if you had loaded it through the Start menu or Start screen.
Can I open an Excel file without Excel?
XLS files can be opened with any version of Excel. If you don’t have Excel, you can use Microsoft’s free Excel Viewer, which supports opening and printing the file as well as copying data out of it. Several free Excel alternatives can be used to both open and edit XLS files, including WPS Office and OpenOffice Calc.
How do I automatically open a CSV file in Excel with columns?
To do that: Open Excel. Click on Data. Click on From Text/CSV.
- Right-click the file and select “Open with…”. The new sub-menu will show up.
- Click on the “Choose another app” option.
- From the new menu select Excel and tick the box next to “Always use this app to open . csv files” option.
How do I open Excel in Windows 10?
To open Excel from Windows start menu, click the Windows icon on left bottom corner of Windows taskbar or press the Windows key on your keyboard. Scroll down to letter “E” to find Excel shortcut in start menu. Click the Excel menu item to open Excel.
How do I open a file in Windows 10?
PART files are usually Misc Files. Look for a program on your computer that opens this type of file, and see if it will open the PART file.
On a Windows Computer:
- Right-click the file icon.
- Select “Properties” from the drop-down menu.
- Find the file type listed under “Type of File”.
How do I open a file that is too big for notepad?
How to Open a Large File in Notepad or Notepad++
- Break the text file into smaller parts. If the file is above the 2GB threshold, use a site like Split CSV to divide it into portable chunks.
- Use a browser app.
- Large Text Reader.
- EditPad Lite.
- Universal Viewer.
- Glogg.
Can CSV files be opened in Excel?
csv file, Excel automatically opens the text file and displays the data in a new workbook. Note: When Excel opens a . csv file, it uses the current default data format settings to interpret how to import each column of data.
How do I save a Notepad file as a CSV?
Click “File” in Notepad and click “Save As.” In the “File name” box, type the name of your file followed by “. CSV.” For example, if you wanted to save a catalog as a CSV, you may type “catalog. csv” into the “File name” box. Click “Save.”
How do I open a CSV file in text?
How to open a CSV in a text editor
- Open a text editor like Windows Notepad or TextEdit.
- Click “File” and then “Open.”
- In the “File Open” dialog box, click the drop-down menu to the right of the “File name” field. If it’s currently set to “Text Documents,” change it to “All Files.”
- Find the CSV file and select it.
How do I open a csv file without Excel?
Go to Data >> Get External Data >> From Text.
- Go to the location of the CSV file, that you want to import.
- Choose Delimited,
- Click next to display the second step of Text Import Wizard.
- Click next to move to the third step.
- Select the General column and click the Advanced…
- Click OK and then Finish.
- This is the result.
What is the shortcut key to open Notepad?
Open Notepad by pressing the Windows key (or Ctrl-Esc) and N. You can also open it by pressing the Windows key and R (if necessary), typing notepad.exe, and pressing Enter. Press Ctrl-V to paste the plain text into a blank file, and type Alt-F, A to open the Save As dialog box.
How do I open a Notepad document in Word?
how can I convert notepad documents into Word, please?
- Locate the file using Windows Explorer and right click it.
- Select Open with from the pop-up menu.
- Click Choose default program…
- Select Word in the Recommended Programs box.
- Check Always use the selected program to open this kind of file.
- Click on OK.
Where is Notepad in laptop?
Ways to Open Notepad on Your Windows 10 Machine
Select the Start button on the taskbar and then choose Notepad. Find it by searching. Type note in the search box and select Notepad in the search results.
What happened to Notepad in Windows 10?
What Happened to Notepad in Windows 10. Microsoft has been playing around with Notepad for quite some time now. Earlier, they moved it to Microsoft Store, but the decision was revoked later. Now, Notepad again will be available through Microsoft Store.
Источник
How to convert notepad to excel?
Asked by: Jaida Bogan
- Open the Excel spreadsheet where you want to save the data and click the Data tab.
- In the Get External Data group, click From Text.
- Select the TXT or CSV file you want to convert and click Import.
- Select «Delimited». .
- Click Next.
How do I copy from Notepad to Excel?
Go to Notepad and tap Cltr+A (aka Select All) then Ctrl+C (aka Copy). Back at Excel, right-click the destination cell and choose Paste, Keep Text only icon.
How do I convert a TXT file to Excel?
- Step 1: Install the Pandas package. If you haven’t already done so, install the Pandas package. .
- Step 2: Capture the path where your text file is stored. .
- Step 3: Specify the path where the new CSV file will be saved. .
- Step 4: Convert the text file to CSV using Python.
How do I convert a notepad file?
- Launch Word and open the text file. .
- Click File, and then click Save As. .
- Open the menu next to Save As Type, and then select Word Document to select the . .
- Click Save to perform the conversion.
How do I read a notepad file?
- Select file Activity to select the file at run time [file.txt].
- Then Assign Activity and assigning variable of String type = File.ReadAllText(selectedFile). opList = File.ReadAllText(selectedFile)
- Then used For each loop.
33 related questions found
Can you convert notepad to word?
Notepad is a word processing program that saves documents as text (TXT) files. . You can convert TXT to DOC easily in Microsoft Word or a free word processing program, such as Open Office or AbiWord.
How do I convert text to Python in Excel?
- Write Excel File Using xlsxwriter Module. We can also write the excel file using the xlsxwriter module. .
- Write Excel File Using openpyxl Module. It is defined as a package which is generally recommended if you want to read and write . .
- Writing data to Excel files with xlwt. .
- Writing Files with pyexcel.
Is a TXT file a csv file?
CSV- A comma-separated values (CSV) file contains tabular data (numbers and text) in plain-text form. . TXT- A text file (TXT) is a computer file that stores a typed document as a series of alphanumeric characters and does not contain special formatting.
Why are my Excel files opening in notepad?
This usually indicates that you either do not have Microsoft Excel installed or that you do not have Excel set as the default program for CSV files. . Click Change program. Click the Microsoft Excel option under Recommended Programs. Click OK.
How do I convert notepad to CSV?
- Open Excel and create a new spreadsheet.
- Select the Data tab.
- On the far right, click “Get External Data”, then select the “From Text” option.
- Find the TXT file on your computer and click “Open”.
- In the first step of the Import Wizard, select “Delimited”.
How do I import data into Excel?
- Click the Data tab on the Ribbon..
- Click the Get Data button. .
- Select From File.
- Select From Text/CSV. .
- Select the file you want to import.
- Click Import. .
- Verify the preview looks correct. .
- Click Load.
How do I convert a JSON file to Excel?
- Go to: http://convertcsv.com/json-to-csv.htm.
- Select «Choose File»
- Click Choose file to upload JSON file.
- After selecting the JSON file from your computer, skip to Step 3 on website and click on «Convert JSON to CSV» or «JSON to Excel».
How do you parse data in Excel?
Click the “Data” tab in the ribbon, then look in the «Data Tools» group and click «Text to Columns.» The «Convert Text to Columns Wizard» will appear. In step 1 of the wizard, choose “Delimited” > Click [Next]. A delimiter is the symbol or space which separates the data you wish to split.
How do I convert a CSV file to a text file?
- Upload csv-file(s) Select files from Computer, Google Drive, Dropbox, URL or by dragging it on the page.
- Choose «to txt» Choose txt or any other format you need as a result (more than 200 formats supported)
- Download your txt.
Is JSON a text file?
A JSON file is a text file; the text it contains is just a specific kind of «code» that represents structured data.
How do I automatically open a CSV file in Excel with Windows 10?
Click the Microsoft Excel option under ‘Recommended Programs‘, then click the OK button. From the list of ‘Recommended Programs’, choose Excel. Any CSV file you click to open with now open in Excel automatically.
Источник
You may need to access a text file in Excel for a variety of reasons when working on various projects. Data generation can be carried out in a variety of methods, just like the design of every application for a certain purpose. Word provides the ability to make documents with the look and feel of a PDF. Text files can be created in a variety of ways, but because of the data they contain, they must be opened in Excel.A slow project is the result if you don’t know how to open text file in Excel.
This article explains how to open text file in Excel using three distinct approaches, so that you may continue your work. A few minutes of your time here and you’ll be able to open text file in Excel and get to work!
How To Open Text File in Excel: First Method
1. Click inside of the cell of WPS spreadsheet where you want to embed the file.
2. Now go to the insert and click on object which will be on the right side of WPS spreadsheet.
3. After clicking the object you will shown up insert object window select the create from file option and then browse the file you want to embed to WPS spreadsheet.
4. Once you browse the file you want to embed, click on display as icon option and hit ok and your file will be embedded to WPS worksheet.
How To Open Text File in Excel: Second Method
1. Open the Excel spreadsheet where you want to save the data and click the Data tab. And go to the import data option which is circled in following picture.
2. Once you open the import data option you will find the options choose import data again.
3. Click ok in the pop-up window.
4. Now select data source it means the from which text file you want to get the data which you want to convert to excel which is show by number 1 in following picture. And then click the next option and choose the file from your computer you want to convert.
5. Once you click the next the file conversion window will be open stay with other encodings and click next.
6. Now you have text import wizard-step 1 of 3 window stay with “delimited” and click the next.
7. Now you have text import wizard-step 2 of 3 window stay with tab and then click next.
8. Now stay with the General option and click finish.
9. Once you will click the finish your data will be imported to the excel.
How To Open Text File in Excel: third Method
1. Copy the text you want to convert to columns.
2. Paste the text to your worksheet, and select the cells you want to convert.

3. Once you select the cell you want to convert Click Data tab choose Text to Columns. It will pop up a Convert Text to Columns Wizard Dialog Box.
4. Choose the file type that best describes your data and click Next.

• The Delimited option means that characters in your text, such as commas or tabs, divide each field.
• The Fixed Width option aligns fields in columns with space between each field.
5. Define the data delimiters, such as tab, semicolon, comma, space, and others.
6. Select the Date Format in Column data format, and a data preview will appear in the dialogue box.
Finally, your material will appear in numerous columns. Tab and space are used as delimiters in this example. Other delimiters are possible. By checking several check boxes, you can see how your data will be divided.
This article outlines the procedures necessary that how to open text file in Excel spreadsheet. Please visit the WPS Academy website for further information on the WPS office. You may also get a free download of WPS Office from this site, which allows you to edit documents in Word, Excel, PowerPoint, and PDF.
How to Import Text Files Into Excel: Step-by-Step Guide (2023)
Don’t you just wish you can magically import data that you need into a new usable format faster with nothing to do any manual work? 😩
Well, Microsoft Excel can grant your wish. Excel allows you to open other file formats such as comma-separated values (CSV) files and tab-separated (TXT) files. You can also import data from a text file by converting them into an Excel spreadsheet you can now work with.
Sounds awesome, right? 😀
Learn how to import data from a text file into Excel with our step-by-step guide.
Download this free practice workbook we’ve prepared for you to get started.
How to import a text or CSV file in Excel
Before you learn how to import a text file into Excel, you need to learn the basics of the text file formats first.
What is a text or CSV file?
Text files are formatted in a very specific way so they can be read by programs like Microsoft Excel. There are different text file formats. The commonly used ones are:
- Comma-separated values text files (.csv), in which the comma character (,) typically separates each field of text.
- Delimited text files (.txt), in which the TAB character typically separates each field of text.
Now, how does Excel reads data from a text or CSV file? 🤔
Each line of the file is a “record”. In Excel, that means it’s a row. Records are delineated by line breaks. Each line break corresponds to one row in Excel.
Delimiters such as commas, tabs, or space characters separate fields within the record. CSV files are comma delimited.
So, when Excel sees “Excel,CSV,Formatting”, it will import data in an Excel worksheet like this:

You can change the separator character that is used in CSV files or text files. This may be necessary to make sure that the import or export operation works the way that you want it to.
You can import or export up to 1,048,576 rows and 16,384 columns 👍
The only other notable thing about CSV files is that the double quote symbol indicates text fields. That’s important because text fields can contain commas and line breaks.
If they’re contained within quotes, commas, and line breaks won’t end the field or the record.
Prepare the Text File
Of course, in a real-life setting, you don’t need to prepare the text file. You may have already downloaded it in TXT or CSV file formats waiting to be imported into an Excel file.
For our tutorial, let’s open a Notepad File to create a sample text file. If you’re using Mac, open TextEdit📝
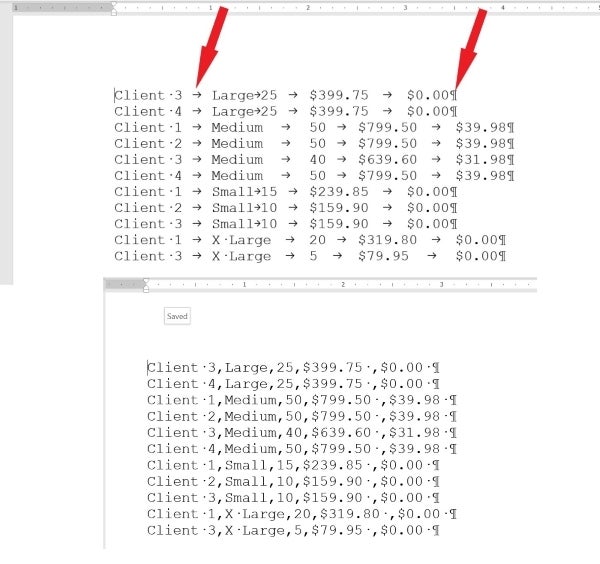
Type the following data in your notepad as shown below. Or copy this and paste it into your notepad.
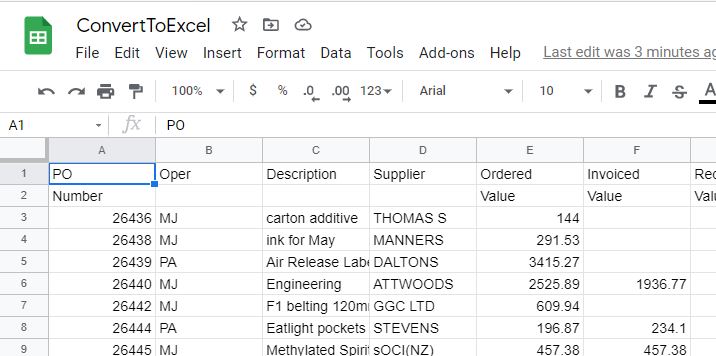
Last Name,First Name,Address
Reed,James,Washington
Owens,Donovan,Texas
Hutchins,Ricky,Wisconsin

Then save this text file to be used later.
There are two ways to import data from a text file with Excel: you can open it in Excel, or you can import it as an external data range. Let’s try to do each one of them 😊
Import a text or CSV file by opening it in Excel
The first way you can import text files in Excel is rather simple.
Just open a CSV file or a text file that you created in another program as an Excel workbook by using the Open command.
Open your practice workbook and do the following steps 👇
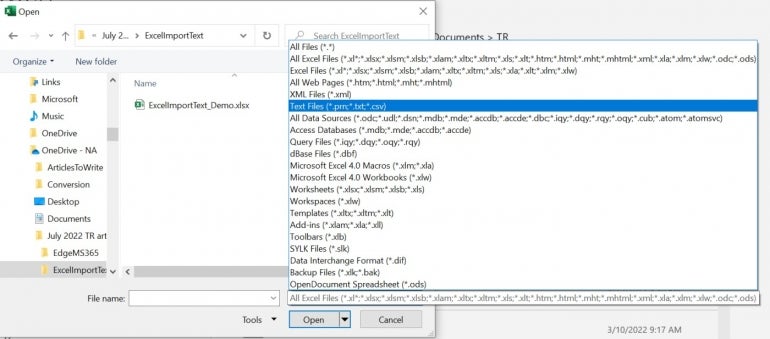
- Go to File Tab.

- Click Open.
- Browse to the location that contains the text file.

The Open dialog box pops up.
- Locate and double-click the text file that you want to open.

If you open a CSV file, Excel automatically opens the text file and displays the data in a new workbook. If the file is a text file, Excel starts the Text Import Wizard.
Since our file is a text file, the Text Import Wizard window pops up 🧙
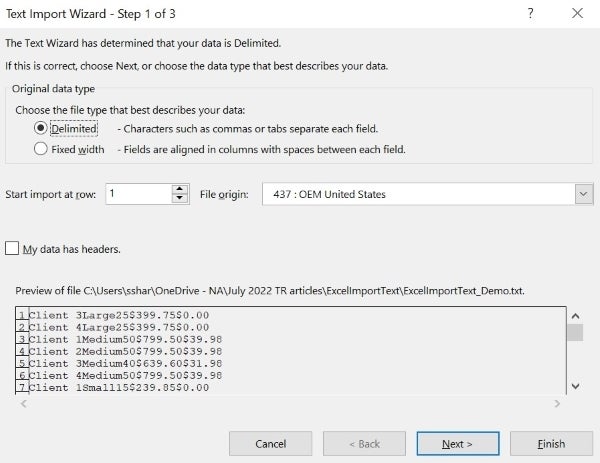
There are 3 steps to go through. Let’s start with Step 1 out of 3.
The Text Import Wizard has determined that our data is Delimited. But to be sure:
- Click Delimited for the Original Data Type.

- Click Next to proceed to Step 2.

- Click Comma as the delimiter.

The window will also show a Data Preview Field.
- Click Next to proceed to Step 3.

Here you can select individual columns and apply specific formatting by clicking them and choosing an option from the Column data format list.
We’ll leave it as General, which is what you’ll most often use.
- Select General.

- Finally, click Finish to get your data.

This is now the result. The imported data is now in a new blank worksheet, not in your existing worksheet 😀

Opening a text file in Excel does not change the format of the file — you can see this in the Excel title bar, where the name of the file retains the text file name extension (for example, .txt or .csv).

Simple, right? 😊
Import a text or CSV file by connecting to it (Power Query)
You can also import data from a text file into an existing worksheet.
- Go to Data Tab.
- Click the Get Data drop-down button in the Get & Transform Data group.

- Select From File.
- Select From Text/CSV.

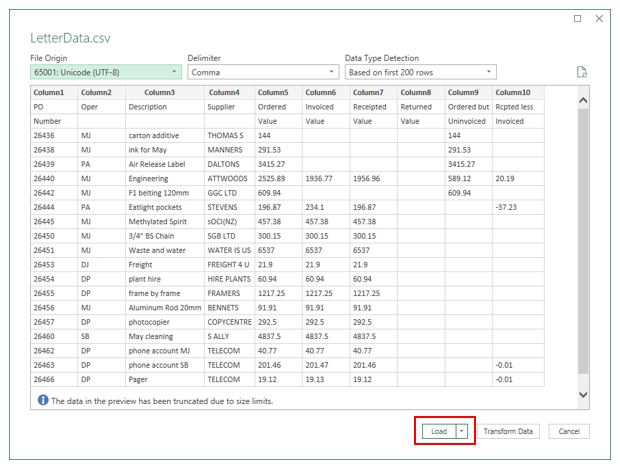
- In the Import Data dialog box, locate and double-click the text file that you want to import, and click Import.

In the preview dialog box, you have several options:
- Select Load if you want to load the data directly to a new worksheet.
- Select Load to if you want to load the data to a table, PivotTable/PivotChart, an existing worksheet, a new Excel worksheet, or simply create a connection. You also have the choice of adding your data to the Data Model.
- Select Transform Data if you want to load the data to Power Query, and edit it before bringing it to Excel.
- Click Transform Data.

The Text Power Query Editor window will pop up. It shows the data preview as well.

The data are already separated as you can see 👀
In the case that the data are NOT separated as they should be, here’s what to do: 👇
- Click the Split column button.
- Select By delimiter from the drop-down list.

- Select Comma as the delimiter.

- Click OK.

Look at the preview to check if it’s good to go.

As you can see, it added another unnecessary column. To remove or undo any changes you’ve done, head over to the Query Setting panel on the right side of the window.
Click the ❌ symbol. This will remove or undo any applied steps.

Look at the data preview again. If everything looks good…
- Finally, click the Close & Load button.

Now, this is what it will look like. The data is imported into a new worksheet in the current Excel workbook 😊

That’s it – Now what
Clearly, Microsoft Excel helps you import data from text files with just a few clicks. This saves you from manually typing data from other file formats by converting them to a usable file format you can work on 👍
If this sounds awesome already, then you are in for a big surprise! Excel can actually help you do 50 tasks all at once with just a single click 🤯
That’s right, this is possible with Excel Mighty Macros. It’s perfect for your workflow automation. Learn how to record, and edit a macro, the basics of the VBA editor, and learn how to write your first macro from scratch. Learn it all with me!
Join my free email course to get started with macros. It’s free and perfect for beginners 😊
Kasper Langmann2023-02-02T18:55:50+00:00
Page load link
Often you need to import data to the Excel spreadsheet from a text file. Microsoft Excel offers a Text Import Wizard to import data from different text file formats:
- Comma-separated files (.csv) or tab-separated files (.txt), see how to import data from a structured text file,
- Files with fixed-width columns without delimiters between data columns where data starts at fixed positions of the line:

To import data from a text file, do the following:
1. On the File tab, click Open (or click
Ctrl+O).
2. On the Open pane, click the Browse button:

3. On the Open dialog box:
- Select the path to the text file you want to import,
- From the File Type dropdown list, select All Files or Text Files:

- Click the Open button.

4. In the Text Import Wizard – Step 1 of 3 dialog box:
4.1. In the Original data type group, choose the Fixed width option:

Note: If you see delimiters, leave the option Delimited selected and follow the steps of importing a structured text file.
4.2. You can change the File origin to use another encoding to display the data (you need to know the character encoding for the data or try other encodings until you see the correct data in the preview section):

4.3. Click the Next > button.
5. In the Text Import Wizard – Step 2 of 3 dialog box:

5.1. Create, move, and delete break lines:

5.2. Click the Next > button.
6. In the Text Import Wizard – Step 3 of 3 dialog box:
6.1. Select the column and the appropriate data format for this column in the Column data format group:

Notes:
- You can skip this step and format columns after importing.
- You can click the Advanced… button to select the correct Decimal separator and Thousands separator (see how to change the used by default decimal symbol and digit grouping symbol):

- You can ignore some columns for importing by selecting the Do not import column (skip) in the Column data format group (the second column Session in the previous example).

6.2. Repeat the previous step for all columns you want to import and click Finish.
Excel imports all the data you selected:

See also this tip in French:
Comment importer un fichier texte dans la feuille de calcul Excel.

on
July 19, 2022, 7:02 AM PDT
How to quickly import a .txt or .csv file into Microsoft Excel
Microsoft Excel has an import wizard, but if you structure the text correctly, you can bypass the wizard altogether.
We may be compensated by vendors who appear on this page through methods such as affiliate links or sponsored partnerships. This may influence how and where their products appear on our site, but vendors cannot pay to influence the content of our reviews. For more info, visit our Terms of Use page.

We don’t open foreign files with Microsoft Excel—or do we? When importing a .txt or .csv file, that’s exactly what you should do. If the source file delimits the data correctly, Excel will make quick work of setting up the data in .xlsx format. It’s so easy, I’m surprised users don’t do this all the time.
In this tutorial, we’ll discuss delimiting data, and then I’ll show you how to open a .txt and .csv file in Microsoft Excel.
SEE: 98 Excel tips every user should master (TechRepublic)
I’m using Microsoft 365 on a Windows 10 64-bit system, but you can user earlier versions of Excel.
About opening a text file into Microsoft Excel
Microsoft Excel supports two ways to import data from a text file. You can open the file in Excel, or you can import the data using an Excel wizard. The two most common text file formats you’ll work with are .txt and .csv, where .csv stands for comma separated values.
You can’t import just any .txt file and expect Excel to take care of everything. A bit of setup in the text file will facilitate the process. If the content doesn’t contain delimiters, open the text file and insert them yourself, which is a lot of work. If you’re lucky, you can run a replace task to insert the commas. A .csv file is easier because the software automatically inserts a delimiter, usually a comma, between fields of text when you save the file.
The structure of the data is extremely important. The file must delimit the fields and the record (Figure A). To see the special character symbols, click Show/Hide in the Paragraph group on Word’s Home tab. This file contains several records. A tab character separates the fields, and a paragraph mark at the end of each record marks the record. The next record begins on the next line. Similarly, the .cvs file contains the same data and uses a comma delimiter.
Figure A
How to open a .txt file in Excel
The easiest way to import a delimited text file into Excel is to open that file in Excel. It’s possible and it’s quick. Simply open the text file as you would any other file:
Close the file you plan to import, and open a blank Excel workbook.
Click the File tab and choose Open. Or, if Open is on the Quick Access Toolbar (QAT), click it. You can also press Ctrl + O to start the Open task.
If the text file is available in the recently used files list (Figure B), click it, and you’re done, and you can skip the following steps.
Figure B
If you don’t see the file, click This PC and browse through the folders until you find it.
Use the File Type dropdown to select the text file formats (Figure C). Doing so updates the list of files you can open, including text files.
Figure C
Double-click the text file, or select it and click Open.
Excel’s import wizard does a good job of interpreting the data if the structure is correct. You don’t need to make any changes in the first pane shown in Figure D. We’re importing a delimited file, and the data doesn’t have a header row. Click Next.
Figure D
The second pane (Figure E) sets the tab character as the delimiter, which is correct. Check the preview pane at the bottom. The wizard correctly parses the data into fields. At this point, click Finish. You can make other changes when importing data, but in our case, we’re done.
Figure E
As you can see in Figure F, Excel opened the text file perfectly. This is only possible because the data is delimited in a way Excel can interpret and work with.
Figure F
How to open a .csv file in Excel
Opening a .csv file is as easy as opening a .txt file, and usually, you won’t have to clean up the data before doing so because the save task inserts the delimiter. Repeat the process in the previous section, except for the following:
- When searching for the file you want to open, remember that you’re looking for a .csv file, not a .txt file.
- Make sure to change the file type in the Open dialog box to .csv instead of .txt.
- In step 2 of the Text Import Wizard, uncheck Tab and check Comma to identify the delimiter.
If done correctly, Microsoft Excel will open the .csv file, and the results will be the same as with the .txt file process.
By the way, you can also quickly export data from Excel to a text file by saving the .xlsx file as a .txt file. Try it—the results might surprise you.
Stay tuned
If a text file is property structured, you can open the file with Excel and go straight to work. A .csv file is the same way. You won’t always get that lucky though, so we’ll discuss more complex import issues in a future article.
Also See
-
These new Excel features for working with text and lists will save you time
(TechRepublic) -
Get productivity tips about Excel and time management
(TechRepublic) -
Best project management software 2022
(TechRepublic) -
Best software for businesses and end users
(TechRepublic on Flipboard)
-
CXO
-
Microsoft
-
Software
Your data could be in any form from PDF, TXT, PNG, JPG, to CSV files. Some applications create files in the form of a PDF whereas other apps generate data files in the form of a TXT or CSV file. On the whole, you must be struggling to convert a Text file to an Excel spreadsheet because switching data into a single file can work differently instead of multiple files.
With Microsoft Excel, you can do this task frequently because it has many features that can help you execute multiple functions. Suppose, you are having a list of items in a TXT file, with Excel you can easily import the list to process it differently.
Here you will get to know exactly how converting a text file to an Excel spreadsheet could be an easygoing thing.
You can do this by:
- Using the Text Import Wizard
- Opening the file directly in Excel
So, before getting into the boat let’s have a look at what a text file basically is?
What is a Text File?
In a text file, as the name shows, you will see the text without special formattings such as italic, bold, images, or other formats. A text file appears with a .txt extension and you can view this file in any text editor such as Notepad or a word processor like Microsoft Word. However, you can open a text file in Excel to make further changes.
Let’s get to know how it all happens:
Converting a Text File to Excel Spreadsheet – How it Works
Normally, two methods exist for this as mentioned earlier:
- Text Import Wizard
- Direct File open in Excel
Using the Text Import Wizard to Convert a Text File to Excel
The Text Import Wizard feature could be one of the best tools when you need to import the data of a text file at some specific place on the spreadsheet of Excel.
Your text file gets scanned using the Wizard tool and it ensures that the data in the file is imported exactly as you want it to.
To make this tool functional, simply choose the Data tab given in the “From Text” menu located under the “Get External Data” group.

Later on, choose the text file you need to import.

Now, you will see the Text Import Wizard appears automatically.
Here are 3 steps that will guide you further to import the text file:
Step 1:
At first, you may need to provide the settings for the following:
Original Data Type:
In this option, you have to choose how your data should be separated into columns. You have two options:
Delimited: If the text file data is being separated using tabs, colons, semicolons, or other characters, you will have to choose this option.
Fixed Width: If each item in the columns of your data has similar width then you should choose this option.
Start Import at Row:
Type or choose the first row of the data right from you want to start importing.
File Origin:
Choose the character set that your text files use such as 437. Generally, you can leave it in the default setting.
My Data has Headers:
If the data set of your Text file has headers, then you have to check this field.
Step 2:
In case, if you had selected the “Delimited” button in the earlier step, then it is the time to indicate the delimiters in your data such as commas, tabs, semicolons, etc. You can even specify the consecutive delimiters in the data to be as one.
Further in this step, you can indicate the character if the text values are covered in a special set of characters such as single or double quotes. Do you know these characters are known as “Text qualifiers” that can help in indicating the set of values to be counted as one? For instance, “Scott, Steve” is considered as a single value, whereas a comma delimiter separates both words.

Once the conversion is done, at the bottom of the screen a preview of how your data is affected in the sheet will appear. In this step, you can identify widths for all columns if you had selected the “Fixed Width” button in the earlier step. If you click at some useful pointers on the scale, you can bring in a new column break in the preview window.
The column break is represented with a line having an arrow. To move a line break, you will have to drag it and if you want to remove it, just double click on it.
Step 3:
Once you are done specifying the values, now you should specify the data format for all columns. It’s up to you whether you need the column to be in the default format that the Text Import Wizard has set for you or you may want to set the format to be General, Text, or Date.
To select the format you need, just select a column from the preview window. To remove a selected column, just choose the last radio button saying, “Do not import column”.
By pressing the “Advanced” button, a dialog box of the Advanced Text Import Settings will pop up.

From this dialog box, you will find options to specify advanced formatting. For instance, to specify what decimal or separators have been used in the text file, you may use the Advanced Text Import Settings. It is because they must be compatible with the regional settings of your computer.
Click on the Finish button once you are done with all the settings for the imported text data.

Clicking on the finish button will pop up the Import Data dialog box.
From this box, you can then choose where you need the data of your text file imported. You have to choose or type in a reference to the cell if you need to import this data into the current worksheet. On the other hand, if you need it to open in a new worksheet, then choose the radio button next to “New Worksheet.”

Now, click on the OK button and the file will start importing to the designated location in Excel.
Using the Direct File Open to Convert a Text or CSV File into Excel
In Excel 2007, 2010, 2013, and 2016, you will see all the steps are similar to importing a TXT or CSV file into Excel.
Go to the Excel spreadsheet that is needed to have the data and click on the Data tab.
Choose the “From Text” option given in the Get External Data group.
Choose the TXT or CSV file that is needed to convert and click on the Import option.
Now, choose “Delimited”. As you know a delimiter is just a new way that explains you TXT file has tabs or the CSV file has commas to separate and group the data.
Choose the Next option.
In the Data preview field, choose the delimiter that helps in grouping the data in a separate column. Basically, you have to choose “Tab” while converting a TXT file to Excel spreadsheet and “Comma” while converting a CSV file.
Also, note that selecting the “Space” option could split a single column into multiple columns at times when the header has more than one word.
Now, click on the Next option.
Choose “General”.
Click on the “Finish” button.
Select “Existing Worksheet” and add “=$A$1” to the field. It will make sure that data starts in Row 1, Column A of the spreadsheet. Having a blank row in the sheet could lead to a file import error.
Click on the OK button.

Click Save.