
Import or export text (.txt or .csv) files
There are two ways to import data from a text file with Excel: you can open it in Excel, or you can import it as an external data range. To export data from Excel to a text file, use the Save As command and change the file type from the drop-down menu.
There are two commonly used text file formats:
-
Delimited text files (.txt), in which the TAB character (ASCII character code 009) typically separates each field of text.
-
Comma separated values text files (.csv), in which the comma character (,) typically separates each field of text.
You can change the separator character that is used in both delimited and .csv text files. This may be necessary to make sure that the import or export operation works the way that you want it to.
Note: You can import or export up to 1,048,576 rows and 16,384 columns.
Import a text file by opening it in Excel
You can open a text file that you created in another program as an Excel workbook by using the Open command. Opening a text file in Excel does not change the format of the file — you can see this in the Excel title bar, where the name of the file retains the text file name extension (for example, .txt or .csv).
-
Go to File > Open and browse to the location that contains the text file.
-
Select Text Files in the file type dropdown list in the Open dialog box.
-
Locate and double-click the text file that you want to open.
-
If the file is a text file (.txt), Excel starts the Import Text Wizard. When you are done with the steps, click Finish to complete the import operation. See Text Import Wizard for more information about delimiters and advanced options.
-
If the file is a .csv file, Excel automatically opens the text file and displays the data in a new workbook.
Note: When Excel opens a .csv file, it uses the current default data format settings to interpret how to import each column of data. If you want more flexibility in converting columns to different data formats, you can use the Import Text Wizard. For example, the format of a data column in the .csv file may be MDY, but Excel’s default data format is YMD, or you want to convert a column of numbers that contains leading zeros to text so you can preserve the leading zeros. To force Excel to run the Import Text Wizard, you can change the file name extension from .csv to .txt before you open it, or you can import a text file by connecting to it (for more information, see the following section).
-
Import a text file by connecting to it (Power Query)
You can import data from a text file into an existing worksheet.
-
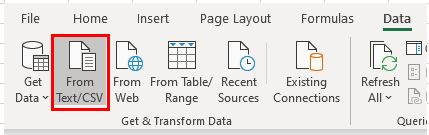
On the Data tab, in the Get & Transform Data group, click From Text/CSV.
-
In the Import Data dialog box, locate and double-click the text file that you want to import, and click Import.
-
In the preview dialog box, you have several options:
-
Select Load if you want to load the data directly to a new worksheet.
-
Alternatively, select Load to if you want to load the data to a table, PivotTable/PivotChart, an existing/new Excel worksheet, or simply create a connection. You also have the choice of adding your data to the Data Model.
-
Select Transform Data if you want to load the data to Power Query, and edit it before bringing it to Excel.
-
If Excel doesn’t convert a particular column of data to the format that you want, then you can convert the data after you import it. For more information, see Convert numbers stored as text to numbers and Convert dates stored as text to dates.
Export data to a text file by saving it
You can convert an Excel worksheet to a text file by using the Save As command.
-
Go to File > Save As.
-
Click Browse.
-
In the Save As dialog box, under Save as type box, choose the text file format for the worksheet; for example, click Text (Tab delimited) or CSV (Comma delimited).
Note: The different formats support different feature sets. For more information about the feature sets that are supported by the different text file formats, see File formats that are supported in Excel.
-
Browse to the location where you want to save the new text file, and then click Save.
-
A dialog box appears, reminding you that only the current worksheet will be saved to the new file. If you are certain that the current worksheet is the one that you want to save as a text file, click OK. You can save other worksheets as separate text files by repeating this procedure for each worksheet.
You may also see an alert below the ribbon that some features might be lost if you save the workbook in a CSV format.
For more information about saving files in other formats, see Save a workbook in another file format.
Import a text file by connecting to it
You can import data from a text file into an existing worksheet.
-
Click the cell where you want to put the data from the text file.
-
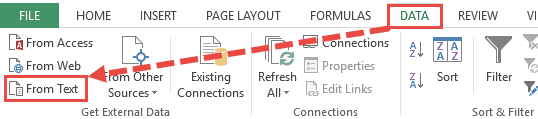
On the Data tab, in the Get External Data group, click From Text.
-
In the Import Data dialog box, locate and double-click the text file that you want to import, and click Import.
Follow the instructions in the Text Import Wizard. Click Help
 on any page of the Text Import Wizard for more information about using the wizard. When you are done with the steps in the wizard, click Finish to complete the import operation.
 -
In the Import Data dialog box, do the following:
-
Under Where do you want to put the data?, do one of the following:
-
To return the data to the location that you selected, click Existing worksheet.
-
To return the data to the upper-left corner of a new worksheet, click New worksheet.
-
-
Optionally, click Properties to set refresh, formatting, and layout options for the imported data.
-
Click OK.
Excel puts the external data range in the location that you specify.
-
If Excel does not convert a column of data to the format that you want, you can convert the data after you import it. For more information, see Convert numbers stored as text to numbers and Convert dates stored as text to dates.
Export data to a text file by saving it
You can convert an Excel worksheet to a text file by using the Save As command.
-
Go to File > Save As.
-
The Save As dialog box appears.
-
In the Save as type box, choose the text file format for the worksheet.
-
For example, click Text (Tab delimited) or CSV (Comma delimited).
-
Note: The different formats support different feature sets. For more information about the feature sets that are supported by the different text file formats, see File formats that are supported in Excel.
-
-
Browse to the location where you want to save the new text file, and then click Save.
-
A dialog box appears, reminding you that only the current worksheet will be saved to the new file. If you are certain that the current worksheet is the one that you want to save as a text file, click OK. You can save other worksheets as separate text files by repeating this procedure for each worksheet.
-
A second dialog box appears, reminding you that your worksheet may contain features that are not supported by text file formats. If you are interested only in saving the worksheet data into the new text file, click Yes. If you are unsure and would like to know more about which Excel features are not supported by text file formats, click Help for more information.
For more information about saving files in other formats, see Save a workbook in another file format.
The way you change the delimiter when importing is different depending on how you import the text.
-
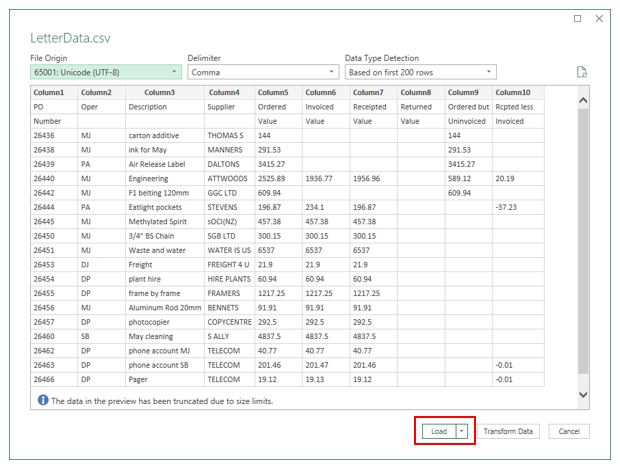
If you use Get & Transform Data > From Text/CSV, after you choose the text file and click Import, choose a character to use from the list under Delimiter. You can see the effect of your new choice immediately in the data preview, so you can be sure you make the choice you want before you proceed.
-
If you use the Text Import Wizard to import a text file, you can change the delimiter that is used for the import operation in Step 2 of the Text Import Wizard. In this step, you can also change the way that consecutive delimiters, such as consecutive quotation marks, are handled.
See Text Import Wizard for more information about delimiters and advanced options.
If you want to use a semi-colon as the default list separator when you Save As .csv, but need to limit the change to Excel, consider changing the default decimal separator to a comma — this forces Excel to use a semi-colon for the list separator. Obviously, this will also change the way decimal numbers are displayed, so also consider changing the Thousands separator to limit any confusion.
-
Clear Excel Options > Advanced > Editing options > Use system separators.
-
Set Decimal separator to , (a comma).
-
Set Thousands separator to . (a period).
When you save a workbook as a .csv file, the default list separator (delimiter) is a comma. You can change this to another separator character using Windows Region settings.
Caution: Changing the Windows setting will cause a global change on your computer, affecting all applications. To only change the delimiter for Excel, see Change the default list separator for saving files as text (.csv) in Excel.
-
In Microsoft Windows 10, right-click the Start button, and then click Settings.
-
Click Time & Language, and then click Region in the left panel.
-
In the main panel, under Regional settings, click Additional date, time, and regional settings.
-
Under Region, click Change date, time, or number formats.
-
In the Region dialog, on the Format tab, click Additional settings.
-
In the Customize Format dialog, on the Numbers tab, type a character to use as the new separator in the List separator box.
-
Click OK twice.
-
In Microsoft Windows, click the Start button, and then click Control Panel.
-
Under Clock, Language, and Region, click Change date, time, or number formats.
-
In the Region dialog, on the Format tab, click Additional settings.
-
In the Customize Format dialog, on the Numbers tab, type a character to use as the new separator in the List separator box.
-
Click OK twice.
Note: After you change the list separator character for your computer, all programs use the new character as a list separator. You can change the character back to the default character by following the same procedure.
Need more help?
You can always ask an expert in the Excel Tech Community or get support in the Answers community.
See Also
Import data from external data sources (Power Query)
Need more help?
Different applications generate data in different forms.
A SaaS application might generate a report in the form of a PDF, while another application might generate data in the form of a TXT or CSV file.
The challenge lies in consolidating the data into a single application that can work with all the data to produce the required results.
Microsoft Excel is one application that is frequently used for this, owing to its versatility in importing data from files with a wide variety of extensions.
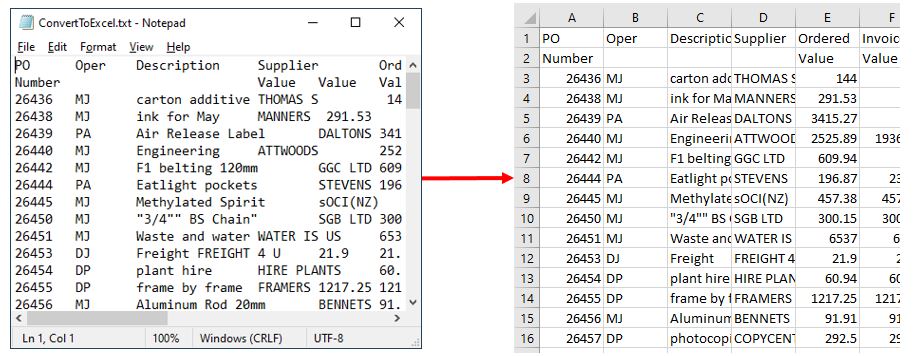
For example, if you have a list of items saved in a Text file (or in Notepad), Excel allows you to import this list so that you can process it further.
In this tutorial we will show you two ways to convert a text file to Excel:
- By using the Text Import Wizard
- By opening the file directly in Excel
What is a Text File?
A Text file is one that contains text with no special formatting (as in bold, italic, images, etc.).
These files are identified with the ‘.txt’ extension and can be opened in any text editor, like Notepad or word processor, like Microsoft Word.
But in many cases, you can have data in a text file that you need to open in Excel and analyze there.
Thankfully, you can easily open text files in Microsoft Excel and then further work on it.
Let’s see how to do that!
Let us look at two ways in which we can convert a Text file (.txt) to Excel.
Method 1: Using the Text Import Wizard to Convert a Text File to Excel
If you have a spreadsheet open in Excel and want to import the contents of a Text file at a specific area of your spreadsheet, the Text Import Wizard might be the best way to go.
This wizard scans your text file and ensures that the data in the file is imported the way you want.
To use the Text Import Wizard, select the Data tab, followed by ‘From Text’ (which you will find under the ‘Get External Data’ group.
After this, select the text file that you want to import.
Your Text Import Wizard should now open automatically.
The Text Import Wizard guides you in providing the best settings to import your text file data through 3 steps:
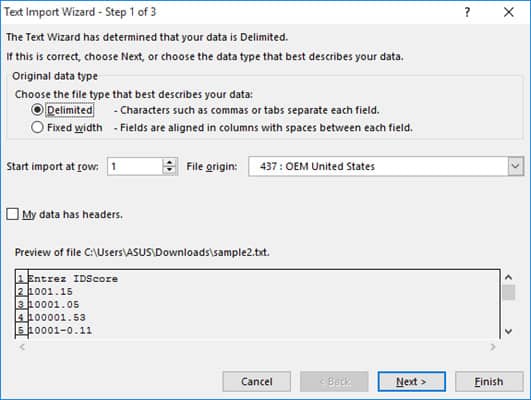
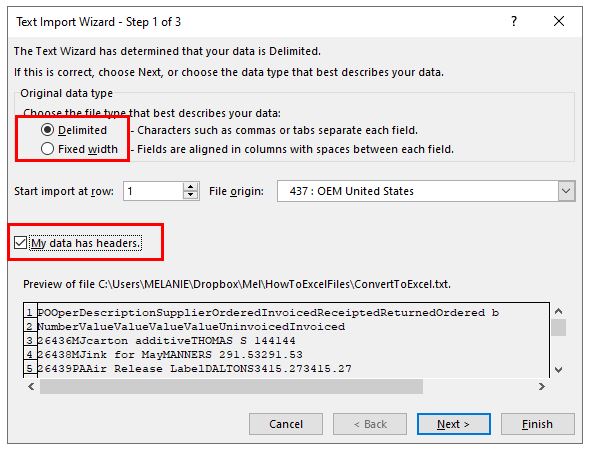
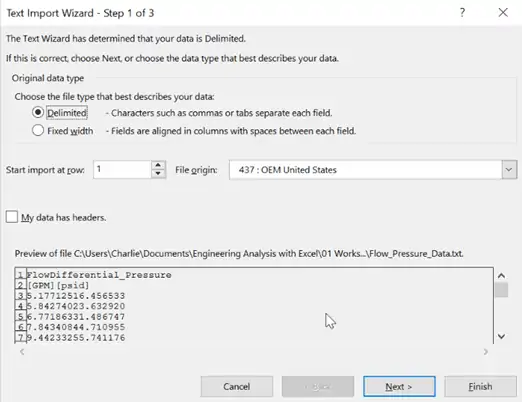
Step 1 of 3
In this step you can provide the settings for the following:
- Original Data Type: Here you can choose how you want your data to be separated into columns. You have two options:
- Delimited: Select this if your text file data is separated by tabs, colons, semicolons or other characters.
- Fixed width: Select this if all items in each column of your data are the same width.
- Start import at row: Type or select the first row of your data from where you want to start importing.
- File origin: Select the character set that your text file uses, for example 437 (for the OEM United States character set). Usually, it’s fine to leave this at the default setting.
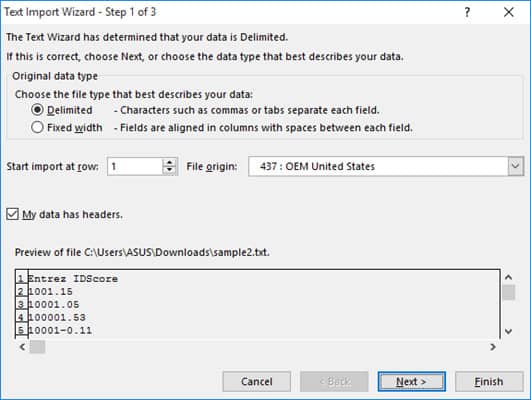
- My data has headers: Keep this field checked if your Text file’s dataset contains headers.
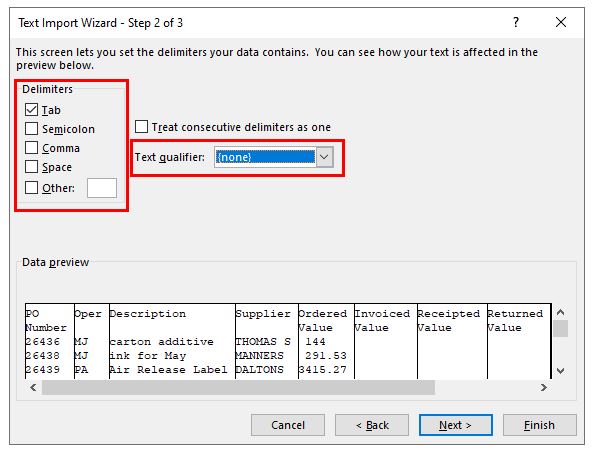
Step 2 of 3
If you had selected the ‘Delimited’ radio button in Step 1, then this step lets you specify the delimiters that your data contains (for example tabs, commas, semicolons, etc.) You can also specify if you want consecutive delimiters to be counted as one.
Moreover, if your text values are enclosed in a special set of characters (for example in single or double quotes), then you can specify the character in this step.
These characters are known as ‘Text qualifiers’ and help specify if you want a set of values to be imported as one.
For example, “Scott, Steve” is imported as a single value, even though the words are separated by a comma delimiter.
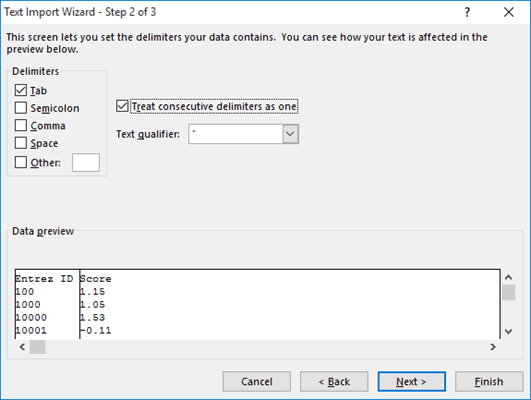
At the bottom of the screen, you can see a preview of how your data will get affected in the spreadsheet after conversion.
If you had selected the ‘Fixed Width’ radio button in Step 1, on the other hand, then Step 2 lets you specify widths for each column.
You can introduce a new column break in the preview window by simply clicking at the appropriate point on the scale.
A line with an arrow should appear to represent the column break.
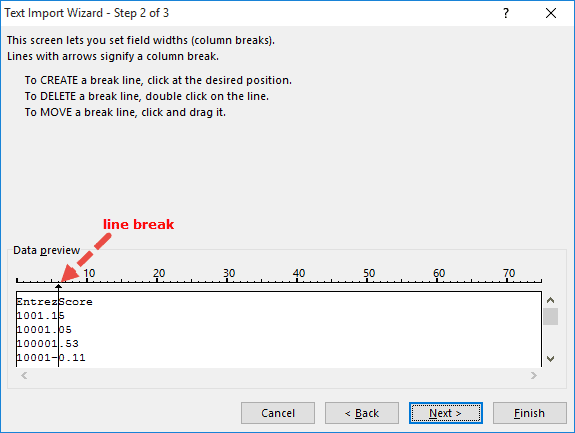
Place line breaks wherever you need to in the preview window.
If you want to move a line break, simply drag it across. If you want to remove a line, simply double-click on it.
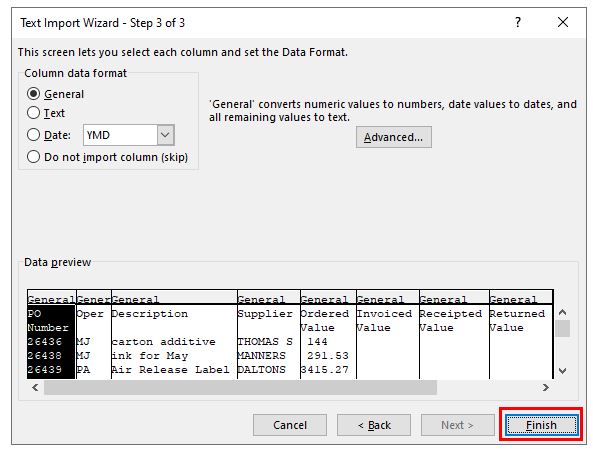
Step 3 of 3
This lets you specify the data format for each column.
You can specify if you want a column to remain in the default format set by the Text Import Wizard or if you want to set the format to be General, Text, or Date.
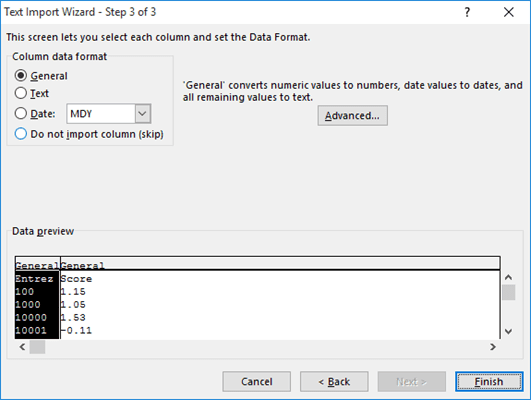
Simply select a column from the preview window and select the format you want.
If you want to remove a selected column, select the last radio button option (which says ‘Do not import column‘).
The Advanced button in this step opens the Advanced Text Import Settings dialog box.
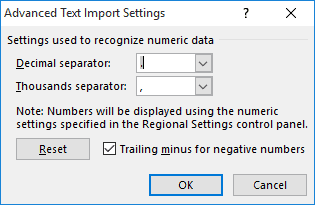
This dialog box lets you specify advanced formatting options.
For example, you can use the Advanced Text Import Settings to specify what decimal or thousands separators have been used in the text file, so that they can be made to match your computer’s regional settings.
Once you’re done providing all the settings for your imported text data, click on the Finish button.
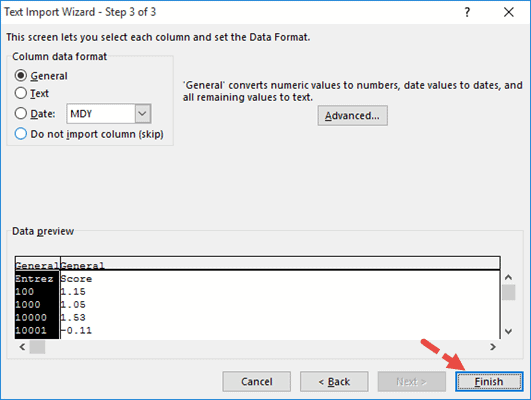
This will open the Import Data dialog box.
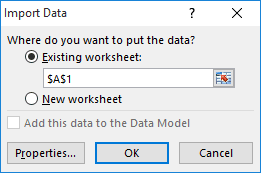
In this box, you can select where you want your text file’s data imported.
If you want to import it into the existing worksheet, you can select or type in a reference to the cell where you want Excel to start displaying the imported data.
If you want to open it in a new worksheet, however, then select the radio button next to ‘New Worksheet’.
Click OK.
Your text file should now get imported to your selected location in Excel, with the format settings that you had specified in the Text Import Wizard.

Also read: How to Open XML Files in Excel?
Method 2: Opening a Text File Directly in Excel
You can also choose to simply open the text file directly in Excel.
While opening, Excel recognizes a text file and automatically converts it into a format that can be displayed in a spreadsheet.
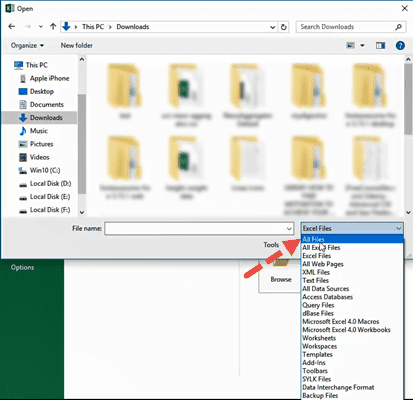
All you need to do is click on the File tab, select Open and then browse and select the text file that you want to open.
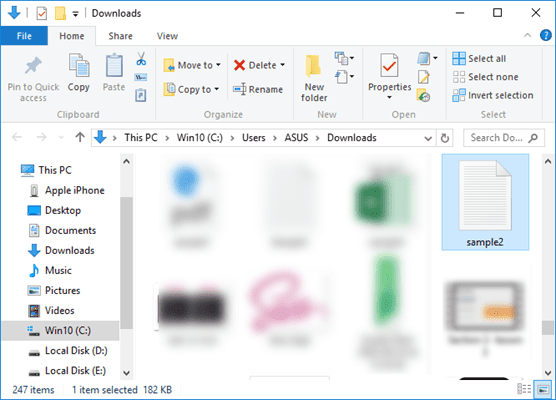
One issue that you are likely to face when trying to open a text file directly in Excel is trying to locate the file in the folder.
This is because Excel’s ‘Open File’ dialog box, by default, filters, and displays only Excel files like those with extensions ‘.xls’, ‘.xlsx’, etc.
It also displays CSV files, if your computer is set up to use Excel as the default application to open CSV files.
So if you don’t see your required text file in the folder when trying to open it in Excel, simply select ‘All Files’ from the ‘File Types’ drop-down, as shown below:
This will display the Text Import Wizard from where you can set up how you want your Text file’s data to be displayed in Excel (as shown in method 1).

You should now see your text file converted and displayed in Excel.
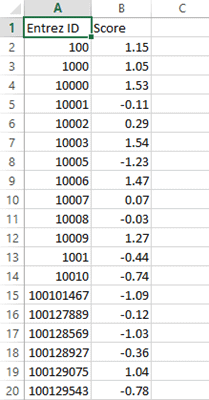
Once the file opens, if you still find some of the columns (or individual cells) not converted to your required format, you can convert them manually.
While this method to open the Text file directly in Excel works well, the benefit of using the first method (using Text Import Wizard) allows you to make some adjustments even before getting the data in Excel.
In this tutorial, we showed you two ways to convert and open a Text file in Excel.
A third method could be by using online tools like Online2pdf, but we did not dwell too much on this because Excel’s Text Import Wizard provides much more flexibility, allowing you to adjust your data, and format them exactly how you want them.
We hope this tutorial was helpful for you.
Other Excel tutorials you may also like:
- How to Convert a CSV File to Excel?
- How to Open VCF File in Excel?
- How to Open Excel File [xls, xlsx] Online (for FREE)
- Why does Excel Open on Startup (and How to Stop it)
- How to Make Excel File Read Only
- How to Insert an Excel file into MS Word
- How to Save Selection in Excel as PDF (3 Easy Methods)
- How to Merge Two Excel Files?
- How to Convert PDF to Excel without Software?
- How to Open DAT Files in Excel?
See all How-To Articles
This tutorial demonstrates how to open a text file in Excel and Google Sheets.
Open Text File in Excel
- In the Ribbon, select File > Open > Browse, and then select the text or CSV file to be opened.
The Text Import Wizard opens to the first of three steps.
- Depending on the data contained in the file selected, you can either choose Delimited or Fixed Width as the file type. If the data is separated with a character like a comma, semicolon, space, or tab, select Delimited. If the first row of data contains column headings, check My data has headers.
- Click Next.
- In Step 2, select the type of delimiters contained in the text file – in this case the tab delimiter. Then select the text qualifier. In some cases, the data may be enclosed in quotes, but for this example, (none) is selected as the text qualifier.
- Click Next.
- The final step of the text import wizard allows you to specify the data type contained in each column. Most of the time, Excel is able to determine the data type automatically, and you can leave the selected Column data format on General.
- Click Finish to import the data into Excel.
Import Text File Using Get Data
An alternative way of importing data into Excel from a text file, is to use the Get and Transform Data feature.
- In the Ribbon, select Data > Get and Transform Data > From Text/CSV.
- Select the file to be imported, and then click Import.
- The file appears in a dialog box with the delimiter already automatically selected, and the text divided by Excel according to the data stored in the text file. Click Load to load the data into Excel.
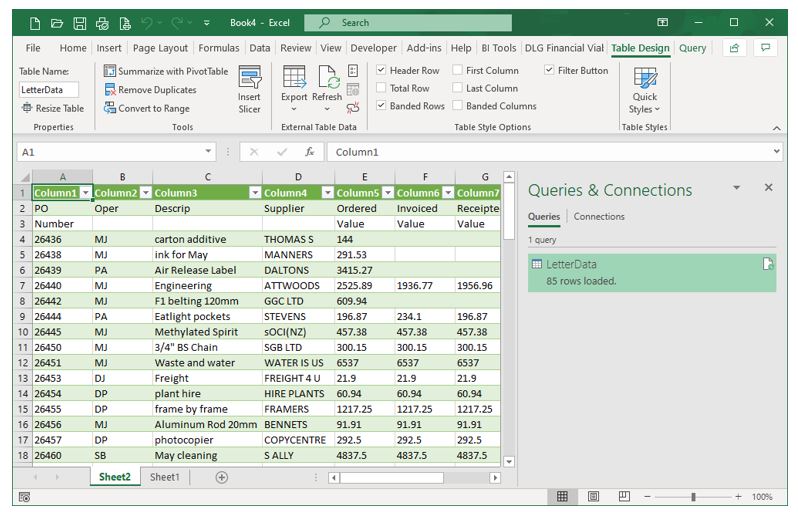
The data now appears in a new sheet in Excel. There are now two new tabs on the Ribbon – Table Design and Query – as well as a Queries & Connections pane appearing on the right-hand side of the screen. This shows that the data is linked to the TXT file and if any data in the TXT file was to change (external to Excel), the data displayed in Excel would change too.
- To unlink the imported data from the external TXT file, in the Ribbon, select Table Design > External Table Data > Unlink.

- The data is imported into Excel as a table. To convert it to a standard Excel range, in the Ribbon, select Table Design > Tools > Convert to Range.
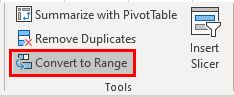
Both the Table Design and Query tabs on the Ribbon disappear.
Open Text File in Google Sheets
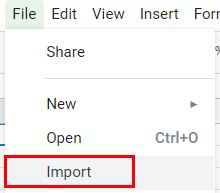
- From the File menu in Google Sheets, select Import.
- Click Upload, and then click on the blue Select a file from your device button to select the required file.
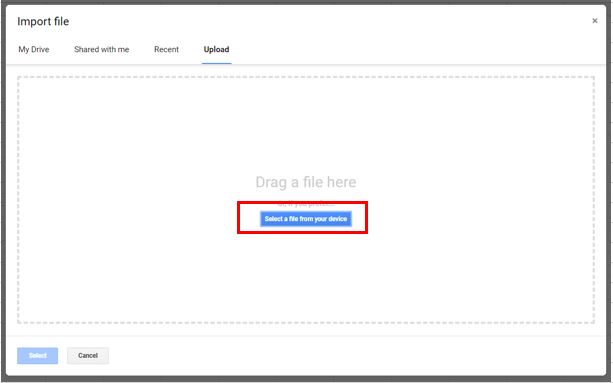
The name of the file to be imported is displayed under File with the default options available for importing automatically selected.
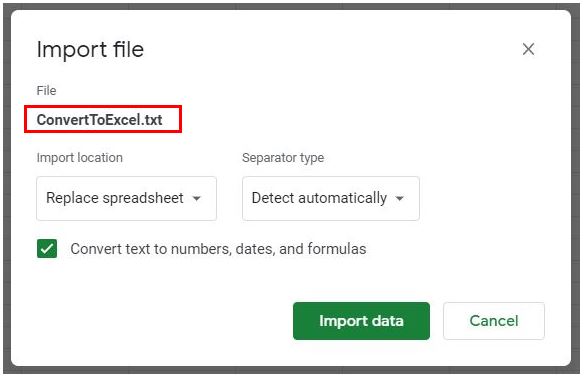
- To change the Import Location, click the drop-down list under Import Location and select the option required.
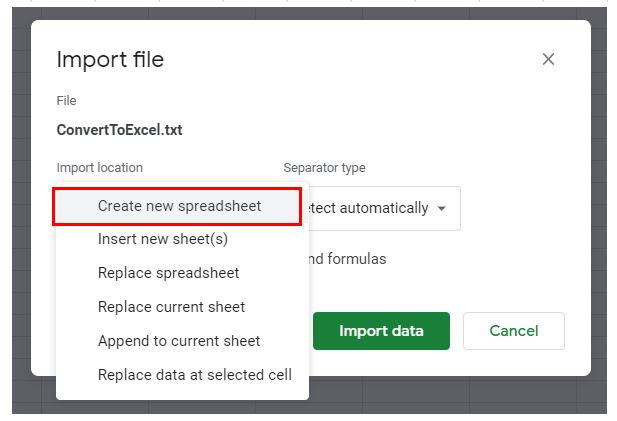
To change the Separator type, click the drop-down list on the right and select a character to delineate by.

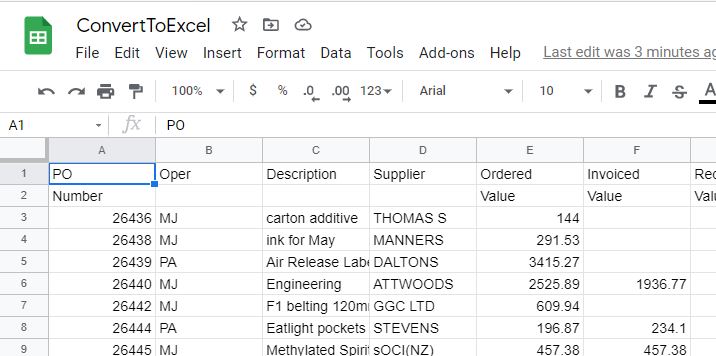
- Keep Convert text to numbers, dates, and formulas checked and then click Import Data to import the file into a new Google sheet.
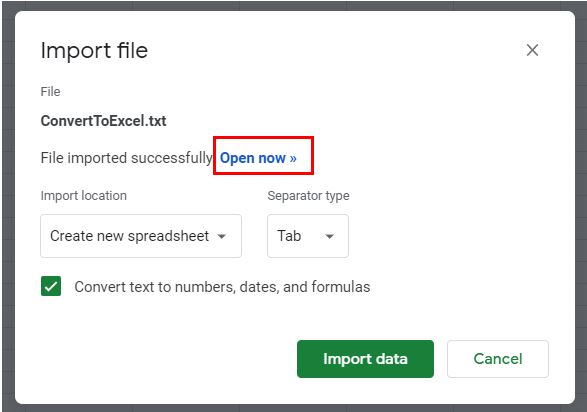
- Click Open now.
Содержание
- Import or export text (.txt or .csv) files
- Import a text file by opening it in Excel
- Import a text file by connecting to it (Power Query)
- Export data to a text file by saving it
- Import a text file by connecting to it
- Export data to a text file by saving it
- Need more help?
- File format reference for Word, Excel, and PowerPoint
- File formats that are supported in Word
- File formats that are supported in Excel
- File formats that are supported in PowerPoint
- Unsupported file formats in Office
- Additional file format information
- Microsoft Office Clipboard file formats
- Opening or viewing unsupported file formats
Import or export text (.txt or .csv) files
There are two ways to import data from a text file with Excel: you can open it in Excel, or you can import it as an external data range. To export data from Excel to a text file, use the Save As command and change the file type from the drop-down menu.
There are two commonly used text file formats:
Delimited text files (.txt), in which the TAB character (ASCII character code 009) typically separates each field of text.
Comma separated values text files (.csv), in which the comma character (,) typically separates each field of text.
You can change the separator character that is used in both delimited and .csv text files. This may be necessary to make sure that the import or export operation works the way that you want it to.
Note: You can import or export up to 1,048,576 rows and 16,384 columns.
Import a text file by opening it in Excel
You can open a text file that you created in another program as an Excel workbook by using the Open command. Opening a text file in Excel does not change the format of the file — you can see this in the Excel title bar, where the name of the file retains the text file name extension (for example, .txt or .csv).
Go to File > Open and browse to the location that contains the text file.
Select Text Files in the file type dropdown list in the Open dialog box.
Locate and double-click the text file that you want to open.
If the file is a text file (.txt), Excel starts the Import Text Wizard. When you are done with the steps, click Finish to complete the import operation. See Text Import Wizard for more information about delimiters and advanced options.
If the file is a .csv file, Excel automatically opens the text file and displays the data in a new workbook.
Note: When Excel opens a .csv file, it uses the current default data format settings to interpret how to import each column of data. If you want more flexibility in converting columns to different data formats, you can use the Import Text Wizard. For example, the format of a data column in the .csv file may be MDY, but Excel’s default data format is YMD, or you want to convert a column of numbers that contains leading zeros to text so you can preserve the leading zeros. To force Excel to run the Import Text Wizard, you can change the file name extension from .csv to .txt before you open it, or you can import a text file by connecting to it (for more information, see the following section).
Import a text file by connecting to it (Power Query)
You can import data from a text file into an existing worksheet.
On the Data tab, in the Get & Transform Data group, click From Text/CSV.
In the Import Data dialog box, locate and double-click the text file that you want to import, and click Import.
In the preview dialog box, you have several options:
Select Load if you want to load the data directly to a new worksheet.
Alternatively, select Load to if you want to load the data to a table, PivotTable/PivotChart, an existing/new Excel worksheet, or simply create a connection. You also have the choice of adding your data to the Data Model.
Select Transform Data if you want to load the data to Power Query, and edit it before bringing it to Excel.
If Excel doesn’t convert a particular column of data to the format that you want, then you can convert the data after you import it. For more information, see Convert numbers stored as text to numbers and Convert dates stored as text to dates.
Export data to a text file by saving it
You can convert an Excel worksheet to a text file by using the Save As command.
Go to File > Save As.
In the Save As dialog box, under Save as type box, choose the text file format for the worksheet; for example, click Text (Tab delimited) or CSV (Comma delimited).
Note: The different formats support different feature sets. For more information about the feature sets that are supported by the different text file formats, see File formats that are supported in Excel.
Browse to the location where you want to save the new text file, and then click Save.
A dialog box appears, reminding you that only the current worksheet will be saved to the new file. If you are certain that the current worksheet is the one that you want to save as a text file, click OK. You can save other worksheets as separate text files by repeating this procedure for each worksheet.
You may also see an alert below the ribbon that some features might be lost if you save the workbook in a CSV format.
For more information about saving files in other formats, see Save a workbook in another file format.
Import a text file by connecting to it
You can import data from a text file into an existing worksheet.
Click the cell where you want to put the data from the text file.
On the Data tab, in the Get External Data group, click From Text.
In the Import Data dialog box, locate and double-click the text file that you want to import, and click Import.
Follow the instructions in the Text Import Wizard. Click Help  on any page of the Text Import Wizard for more information about using the wizard. When you are done with the steps in the wizard, click Finish to complete the import operation.
In the Import Data dialog box, do the following:
Under Where do you want to put the data?, do one of the following:
To return the data to the location that you selected, click Existing worksheet.
To return the data to the upper-left corner of a new worksheet, click New worksheet.
Optionally, click Properties to set refresh, formatting, and layout options for the imported data.
Excel puts the external data range in the location that you specify.
If Excel does not convert a column of data to the format that you want, you can convert the data after you import it. For more information, see Convert numbers stored as text to numbers and Convert dates stored as text to dates.
Export data to a text file by saving it
You can convert an Excel worksheet to a text file by using the Save As command.
Go to File > Save As.
The Save As dialog box appears.
In the Save as type box, choose the text file format for the worksheet.
For example, click Text (Tab delimited) or CSV (Comma delimited).
Note: The different formats support different feature sets. For more information about the feature sets that are supported by the different text file formats, see File formats that are supported in Excel.
Browse to the location where you want to save the new text file, and then click Save.
A dialog box appears, reminding you that only the current worksheet will be saved to the new file. If you are certain that the current worksheet is the one that you want to save as a text file, click OK. You can save other worksheets as separate text files by repeating this procedure for each worksheet.
A second dialog box appears, reminding you that your worksheet may contain features that are not supported by text file formats. If you are interested only in saving the worksheet data into the new text file, click Yes. If you are unsure and would like to know more about which Excel features are not supported by text file formats, click Help for more information.
For more information about saving files in other formats, see Save a workbook in another file format.
The way you change the delimiter when importing is different depending on how you import the text.
If you use Get & Transform Data > From Text/CSV, after you choose the text file and click Import, choose a character to use from the list under Delimiter. You can see the effect of your new choice immediately in the data preview, so you can be sure you make the choice you want before you proceed.
If you use the Text Import Wizard to import a text file, you can change the delimiter that is used for the import operation in Step 2 of the Text Import Wizard. In this step, you can also change the way that consecutive delimiters, such as consecutive quotation marks, are handled.
See Text Import Wizard for more information about delimiters and advanced options.
If you want to use a semi-colon as the default list separator when you Save As .csv, but need to limit the change to Excel, consider changing the default decimal separator to a comma — this forces Excel to use a semi-colon for the list separator. Obviously, this will also change the way decimal numbers are displayed, so also consider changing the Thousands separator to limit any confusion.
Clear Excel Options > Advanced > Editing options > Use system separators.
Set Decimal separator to , (a comma).
Set Thousands separator to . (a period).
When you save a workbook as a .csv file, the default list separator (delimiter) is a comma. You can change this to another separator character using Windows Region settings.
Caution: Changing the Windows setting will cause a global change on your computer, affecting all applications. To only change the delimiter for Excel, see Change the default list separator for saving files as text (.csv) in Excel.
In Microsoft Windows 10, right-click the Start button, and then click Settings.
Click Time & Language, and then click Region in the left panel.
In the main panel, under Regional settings, click Additional date, time, and regional settings.
Under Region, click Change date, time, or number formats.
In the Region dialog, on the Format tab, click Additional settings.
In the Customize Format dialog, on the Numbers tab, type a character to use as the new separator in the List separator box.
In Microsoft Windows, click the Start button, and then click Control Panel.
Under Clock, Language, and Region, click Change date, time, or number formats.
In the Region dialog, on the Format tab, click Additional settings.
In the Customize Format dialog, on the Numbers tab, type a character to use as the new separator in the List separator box.
Note: After you change the list separator character for your computer, all programs use the new character as a list separator. You can change the character back to the default character by following the same procedure.
Need more help?
You can always ask an expert in the Excel Tech Community or get support in the Answers community.
Источник
File format reference for Word, Excel, and PowerPoint
Applies to: Office 2019, Office 2016
Supported file formats and their extensions are listed in the following tables for Word, Excel, and PowerPoint.
File formats that are supported in Word
The following table describes the file formats that are supported in Word, alphabetized by extension.
| Extension | Name of file format | Description |
|---|---|---|
| .doc | Word 97-2003 Document | The binary file format for Word 97-Word 2003. |
| .docm | Word Macro-Enabled Document | The XML-based and macro-enabled file format for Word 2019, Word 2016, Word 2013, Word 2010, and Office Word 2007. Stores Visual Basic for Applications (VBA) macro code. |
| .docx | Word Document | The default XML-based file format for Word 2019, Word 2016, Word 2013, Word 2010, and Office Word 2007. |
| .docx | Strict Open XML Document | Conforms to the Strict profile of the Open XML standard (ISO/IEC 29500). This profile of Open XML doesn’t allow a set of features that are designed specifically for backward-compatibility with existing binary documents, as specified in Part 4 of ISO/IEC 29500. |
| .dot | Word 97-2003 Template | Template for Word 97-Word 2003 files. |
| .dotm | Word Macro-Enabled Template | Template for creating new Word 2019, Word 2016, Word 2013, Word 2010, and Office Word 2007 files that contain macros. Users who want to include UI customizations or macros in the template should use this file format. |
| .dotx | Word Template | Template for creating new Word 2019, Word 2016, Word 2013, Word 2010, and Office Word 2007 files that don’t contain macros. |
| .htm, .html | Web Page | A web page that is saved as a folder that contains an .htm file and all supporting files, such as images, sound files, cascading style sheets, scripts, and more. Good for posting on a site or editing with Microsoft Office FrontPage or another HTML editor. |
| .htm, .html | Web Page, Filtered | Saving in the Web Page, Filtered file format removes Microsoft Office-specific tags. If users save in filtered HTML and then re-open the file in an Office application, text and general appearance are preserved. However, some features might work differently. |
| .mht; .mhtml | Single File Web Page | A web page as a single file that includes an .htm file and all supporting files, such as images, sound files, cascading style sheets, scripts, and more. |
| .odt | OpenDocument Text | A file format for saving Word 2019, Word 2016, and Word 2013 files so that they can be opened in document applications that use the OpenDocument format. Users can also open documents in the .odt format in Word 2019, Word 2016, and Word 2013. Formatting might be lost when users save and open .odt files. |
| Portable Document Format (PDF), a PostScript-based electronic file format that was developed by Adobe Systems. It preserves document formatting and enables file sharing.
Files that use the PDF file format can be saved and opened by using Word 2019, Word 2016, and Word 2013. Important: PDF files might not have a perfect page-to-page correspondence with the original. For example, the pages might break at different locations. |
||
| .rtf | Rich Text Format | RTF controls the representation and formatting of a document, both on the screen and in print. When they use the .rtf file format, documents created under different operating systems and with different software applications can be transferred between those operating systems and applications. |
| .txt | Plain Text | When users save a document as a .txt file, the document loses all formatting. |
| .wps | Works 6-9 Document | This is the default file format of Microsoft Works, versions 6.0 through 9.0. |
| .xml | Word 2003 XML Document | The XML format supported in Office Word 2003. |
| .xml | Word XML Document | The XML file format supported in Word 2019, Word 2016, Word 2013, Word 2010, and Office Word 2007 (Open XML). |
| .xps | XPS Document | XML Paper Specification, a file format that preserves document formatting and enables file sharing. When the XPS file is viewed online or printed, it keeps exactly the format that users intended, and the data in the file can’t be easily changed.
You can use Word 2019, Word 2016, or Word 2013 to save documents in the XPS Document file format, but you can’t open them by using Word 2019, Word 2016, or Word 2013. |
File formats that are supported in Excel
The following tables describe the file formats that are supported in Excel.
| Extension | Name of file format | Description |
|---|---|---|
| .csv | CSV (Comma delimited) | Saves a workbook as a comma-delimited text file for use on another Windows operating system, and makes sure that tab characters, line breaks, and other characters are interpreted correctly. Saves only the active sheet. |
| .csv | CSV (Macintosh) | Saves a workbook as a comma-delimited text file for use on the Macintosh operating system, and makes sure that tab characters, line breaks, and other characters are interpreted correctly. Saves only the active sheet. |
| .csv | CSV (MS-DOS) | Saves a workbook as a comma-delimited text file for use on the MS-DOS operating system, and makes sure that tab characters, line breaks, and other characters are interpreted correctly. Saves only the active sheet. |
| .dbf | DBF 3, DBF 4 | dBase III and IV. Users can open these files formats in Excel 2019, Excel 2016, and Excel 2013, but, users can’t save an Excel file to dBase format. |
| .dif | DIF (Data Interchange Format) | Saves only the active sheet. |
| .htm, .html | Web Page | A web page that is saved as a folder that contains an .htm file and all supporting files, such as images, sound files, scripts, and more. |
| .mht, .mhtml | Single File Web Page | A web page that is saved as a single file that includes an .htm file and all supporting files, such as images, sound files, scripts, and more. |
| .ods | OpenDocument Spreadsheet | A file format for saving Excel 2019, Excel 2016, and Excel 2013 files so that they can be opened in spreadsheet applications that use the OpenDocument Spreadsheet format, such as Google Docs and OpenOffice.org Calc. Users can also open spreadsheets in the .ods format in Excel 2019, Excel 2016, and Excel 2013. When users save and open .ods files, they might lose formatting. |
| Portable Document Format, a format that preserves document formatting and enables file sharing. When the PDF format file is viewed online or printed, it keeps the format that users intended. Data in the file can’t be easily changed. The PDF format is also useful for documents that will be reproduced by using commercial printing methods. | ||
| .prn | Formatted Text (Space delimited) | Lotus space-delimited format. Saves only the active sheet. |
| .slk | SYLK (Symbolic Link Format) | Saves only the active sheet. |
| .txt | Text (Tab delimited) | Saves a workbook as a tab-delimited text file for use on another Windows operating system, and makes sure that tab characters, line breaks, and other characters are interpreted correctly. Saves only the active sheet. |
| .txt | Text (Macintosh) | Saves a workbook as a tab-delimited text file for use on the Macintosh operating system, and makes sure that tab characters, line breaks, and other characters are interpreted correctly. Saves only the active sheet. |
| .txt | Text (MS-DOS) | Saves a workbook as a tab-delimited text file for use on the MS-DOS operating system, and makes sure that tab characters, line breaks, and other characters are interpreted correctly. Saves only the active sheet. |
| .txt | Unicode Text | Saves a workbook as Unicode text, a character encoding standard that was developed by the Unicode Consortium. Saves only the active sheet. |
| .xla | Excel 97-2003 Add-In | The Excel 97-2003 Add-In, a supplemental program that runs additional code and supports VBA projects. |
| .xlam | Excel Add-In | The XML-based and macro-enabled Add-In format for Excel 2019, Excel 2016, Excel 2013, and Office Excel 2007. An Add-In is a supplemental program that runs additional code. Supports VBA projects and Excel 4.0 macro sheets (.xlm). |
| .xls | Excel 97-Excel 2003 Workbook | The Excel 97-Excel 2003 Binary file format. |
| .xls | Microsoft Excel 5.0/95 Workbook | The Excel 5.0/95 Binary file format. |
| .xlsb | Excel Binary Workbook | The binary file format for Excel 2019, Excel 2016, Excel 2013, and Excel 2010 and Office Excel 2007. This is a fast load-and-save file format for users who need the fastest way possible to load a data file. Supports VBA projects, Excel 4.0 macro sheets, and all the new features that are used in Excel. But, this isn’t an XML file format and is therefore not optimal for accessing and manipulating content without using Excel 2019, Excel 2016, Excel 2013, Excel 2010 or Excel 2007 and the object model. |
| .xlsm | Excel Macro-Enabled Workbook | The XML-based and macro-enabled file format for Excel 2019, Excel 2016, Excel 2013, Excel 2010 and Office Excel 2007. Stores VBA macro code or Excel 4.0 macro sheets (.xlm). |
| .xlsx | Excel Workbook | The default XML-based file format for Excel 2019, Excel 2016, Excel 2013, Excel 2010, and Office Excel 2007. Can’t store VBA macro code or Microsoft Excel 4.0 macro sheets (.xlm). |
| .xlsx | Strict Open XML Spreadsheet | An ISO strict version of the Excel Workbook file format (.xlsx). |
| .xlt | Excel 97 — Excel 2003 Template | The Excel 97 — Excel 2003 Binary file format for an Excel template. |
| .xltm | Excel Macro-Enabled Template | The macro-enabled file format for an Excel template for Excel 2019, Excel 2016, Excel 2013, Excel 2010, and Office Excel 2007. Stores VBA macro code or Excel 4.0 macro sheets (.xlm). |
| .xltx | Excel Template | The default file format for an Excel template for Excel 2019, Excel 2016, Excel 2013, Excel 2010, and Office Excel 2007. Can’t store VBA macro code or Excel 4.0 macro sheets (.xlm). |
| .xlw | Excel 4.0 Workbook | An Excel 4.0 file format that saves only worksheets, chart sheets, and macro sheets. Users can open a workbook in this file format in Excel 2019, Excel 2016, and Excel 2013. But, users can’t save an Excel file to this file format. |
| .xml | XML Spreadsheet 2003 | XML Spreadsheet 2003 file format. |
| .xml | XML Data | XML Data format. |
| .xps | XPS Document | XML Paper Specification, a file format that preserves document formatting and enables file sharing. When the XPS file is viewed online or printed, it maintains exactly the format that users intended, and the data in the file can’t be easily changed. |
File formats that are supported in PowerPoint
The following tables describe the file formats that are supported in PowerPoint.
| Extension | Name of file format | Description |
|---|---|---|
| .bmp | Device Independent Bitmap | A slide that is saved as a graphic for use on web pages. |
| .emf | Enhanced Windows Metafile | A slide that is saved as a 32-bit graphic (for use with Microsoft Windows 95 and later versions). |
| .gif | GIF Graphics Interchange Format | A slide that is saved as a graphic for use on web pages. |
| .jpg | JPEG File Interchange Format | A slide that is saved as a graphic for use on web pages. |
| .mp4 | MPEG-4 Video | A presentation that is saved as a video. |
| .odp | OpenDocument Presentation | A format that can be opened in presentation applications that use the OpenDocument Presentation format, such as Google Docs and OpenOffice.org Impress. Users can also open presentations in the .odp format in PowerPoint. Some information might be lost when users save and open .odp files. |
| Portable Document Format, a PostScript-based electronic file format that was developed by Adobe Systems. It preserves document formatting and enables file sharing. | ||
| .png | PNG Portable Network Graphics Format | A slide that is saved as a graphic for use on web pages. |
| .pot | PowerPoint 97-2003 Template | A template for PowerPoint 97 to Office PowerPoint 2003 presentations. |
| .potm | PowerPoint Macro-Enabled Template | A template for PowerPoint 2019, PowerPoint 2016, PowerPoint 2013, PowerPoint 2010, and Office PowerPoint 2007 presentations that contain macros. |
| .potx | PowerPoint Template | A template for creating new PowerPoint 2019, PowerPoint 2016, PowerPoint 2013, PowerPoint 2010, and Office PowerPoint 2007 presentations. |
| .ppa | PowerPoint 97-2003 Add-In | A PowerPoint 97 to Office PowerPoint 2003 add-in. |
| .ppam | PowerPoint Add-In | An add-in that stores custom commands, Visual Basic for Applications (VBA) code, and specialized features. |
| .pps | PowerPoint 97-2003 show | A presentation that always opens in Slide Show view instead of in Normal view. |
| .ppsm | PowerPoint Macro-Enabled Show | A slide show that includes macros. |
| .ppsx | PowerPoint Show | A presentation that always opens in Slide Show view instead of in Normal view. |
| .ppt | PowerPoint 97-2003 Presentation | The default PowerPoint 97 to Office PowerPoint 2003 format. |
| .pptm | PowerPoint Macro-Enabled Presentation | A presentation that contains Visual Basic for Applications (VBA) code. |
| .pptx | PowerPoint Presentation | The default PowerPoint 2019, PowerPoint 2016, PowerPoint 2013, PowerPoint 2010, and Office PowerPoint 2007 XML-based file format. |
| .pptx | PowerPoint Picture Presentation | A PowerPoint 2019, PowerPoint 2016, PowerPoint 2013, PowerPoint 2010 or PowerPoint 2007 presentation where each slide is converted into a picture. Saving a file as a PowerPoint Picture presentation reduces the file size, but some information is lost. |
| .pptx | Strict Open XML Presentation | An ISO strict version of the PowerPoint Presentation file format (.pptx). |
| .rtf | Outline/RTF | A presentation outline that is saved as a text-only document that provides smaller file sizes and the ability to share macro-free files with other users who might not have the same version of PowerPoint or the operating system. Any text in the notes pane isn’t saved with this file format. |
| .thmx | Office Theme | A style sheet that includes definitions of a color theme, font theme, and effect theme. |
| .tif | TIFF Tag Image File Format | A slide that is saved as a graphic for use on web pages. |
| .wmf | Windows Metafile | A slide that is saved as a 16-bit graphic (for use with Microsoft Windows 3. x and later versions). |
| .wmv | Windows Media Video | A presentation that is saved as a video. PowerPoint 2019, PowerPoint 2016, and PowerPoint 2013 presentations can be saved at High Quality (1024 x 768, 30 frames per second); Medium Quality (640 x 480, 24 frames per sec); and Low Quality (320 X 240, 15 frames per second).
The WMV file format plays on many media players, such as Windows Media Player. |
| .xml | PowerPoint XML Presentation | The XML format that is supported in PowerPoint 2019, PowerPoint 2016, PowerPoint 2013, PowerPoint 2010, and Office PowerPoint 2007. |
| .xps | XPS Document | XML Paper Specification (XPS), an electronic paper format for exchanging documents in their final form. |
Unsupported file formats in Office
Office applications don’t support the file formats described in the following table
| Application | Unsupported file format |
|---|---|
| Excel | — Excel Chart (Excel 2.0, 3.0, and 2.x file formats) (.xlc) — Lotus 1-2-3 file formats (all versions) (.wk1, .wk2, .wk3, .wk4, .wks) — Microsoft Works (all versions) (.wks) — DBASE II file format (.dbf) — Quattro Pro for MS-DOS file format (.wq1) — Quattro Pro 5.0 and 7.0 for Windows (.wb1, .wb3) |
| PowerPoint | — Opening or saving to PowerPoint 95 (or earlier) file formats — Pack and Go Wizard (.ppz) files. — Web Page (.htm, .html) files |
Additional file format information
This section provides additional file formats and whether they’re supported in the applications in Office.
Microsoft Office Clipboard file formats
Users can paste data from the Office Clipboard into Word, Excel, and PowerPoint if the Office Clipboard data is in one of the formats shown in the following table.
| File format | Extension | Description |
|---|---|---|
| Picture | .wmf or .emf | Pictures in Windows Metafile Format (WMF) or Windows Enhanced Metafile Format (EMF).
Note: If users copy a Windows metafile picture from another program, Excel pastes the picture as an enhanced metafile. |
| Bitmap | .bmp | Pictures stored in Bitmap format (BMP). |
| Excel file formats | .xls | Binary file formats for Excel versions 5.0/95, Excel 97-2003, Excel 2013, Excel 2016, and Excel 2019. |
| SYLK | .slk | Symbolic Link Format. |
| DIF | .dif | Data Interchange Format. |
| Text (tab-delimited) | .txt | Tab-separated text format. |
| CSV (Comma-delimited) | .csv | Comma-separated values format. |
| Formatted text (Space-delimited) | .rtf | Rich Text Format (RTF). Only from Excel. |
| Embedded object | .gif, .jpg, .doc, .xls, or .bmp | Excel objects, Excel 2013 objects, objects from correctly registered programs that support OLE 2.0 (OwnerLink), and Picture or another presentation format. |
| Linked object | .gif, .jpg, .doc, .xls, or .bmp | OwnerLink, ObjectLink, Link, Picture, or other format. |
| Office drawing object | .emf | Office drawing object format or Picture (Windows enhanced metafile format, EMF). |
| Text | .txt | Display Text, OEM Text. |
| HTML | .htm, .html | Hypertext Markup Language.
Note: When users copy text from another program, Excel pastes the text in HTML format, regardless of the format of the original text. |
| Single File Web Page | mht, .mhtml | This file format integrates inline graphics, applets, linked documents, and other supporting items referenced in the document. |
Opening or viewing unsupported file formats
If the file format that users want to use isn’t supported, they can try the following methods to open the file.
Search the internet for a company that makes file format converters for file formats that aren’t supported in the application.
Save to a file format that another program supports. For example, users might want to import their Word, Excel, or PowerPoint file into another program that doesn’t support the application’s native file format. However, the other program might support importing another supported file format, such as a text file format. In this case, users can save their work in text file format, and then from the other program, import the text file.
Источник
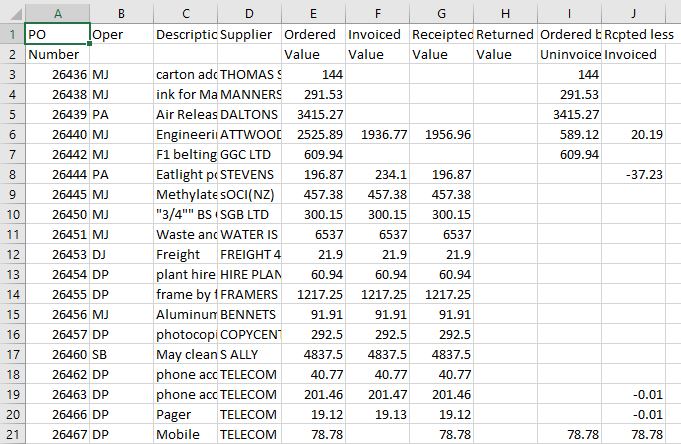
Importing text files into Excel comes up very often in engineering because there are many different types of engineering software that export text files. Often, you’ll need to bring data from data acquisition, remote measurement, CAD programs, or finite element software into Excel for further examination. So it’s really good to be able to know how to get that data into Excel without a lot of hassle so you can quickly perform your analysis.
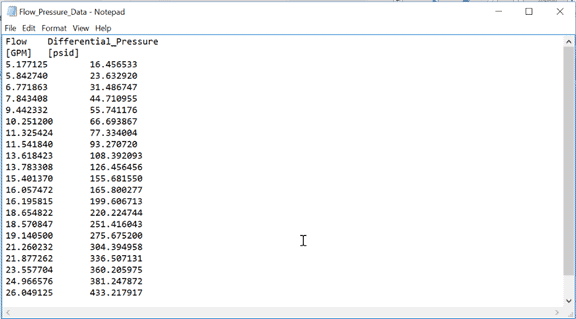
In this particular example, I have some data in a text file called Flow_Pressure_Data.txt.
Copy-and-Paste
The simplest way to get this data into Excel, although it may not be the best, is just to highlight it, type Ctrl+C to copy it, then select a cell in the workbook, and type Ctrl+V to paste it.
If the text data contains tab-separated-values, meaning that the columns of data are separated by a tab-stop character, then the data will automatically split into columns in Excel.
In this case, the data was separated into tabs, and everything came into columns like we’d want.
However, once the data has been pasted into Excel, there is really no good way to refresh it later on if the source file changes. The only way to update it is to re-paste the data. And maybe that’s ok for some situations. But if it’s not, we can use a text data import in Excel to create a refreshable table of data from a text file.
You can find this command under the Data tab in the “Get External Data” group.

By clicking on that button, we’re given the option to select a text file. And once I select the text file, the Text Import Wizard opens.
There are more details to Text Import Wizard that I’ll cover in another post, but for now click Next twice and then Finish.
Now Excel is asking where to put the data. The cell that is selected is going to be the top left corner of the imported data.
If I select cell F2, that selection will be represented in the window. You can also choose to import the data to a new sheet.
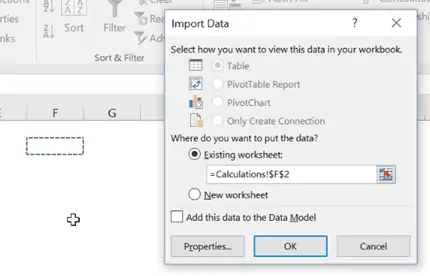
So once the location for the data is selected, I can click Ok and the data is added to the worksheet starting at cell F2.
Modifying Text Import Properties
As I mentioned above, if you copy-and-paste data into Excel there’s no way to update it without copying and pasting again. But if you import a text file into Excel, there are many more options. We can see what those options are by right-clicking anywhere on the imported data.
Now there are three extra commands to select in the context menu that were not available before:
- Edit Text Import
- Data Range Properties
- Refresh
By selecting Edit Text Import, we can select a new file to import – which will take us through the whole text import wizard again.
The next command allows us to set the Data Range Properties. By clicking on that, the Properties window opens. From this window we can change things like the name or whether or not the query definition should be saved.
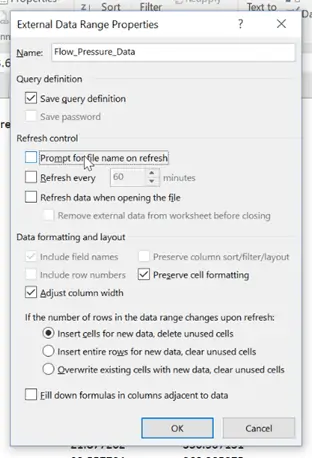
Refreshing Imported Text Data
You can also control how the text data is refreshed. You could choose to update the data on a fixed schedule or whenever the workbook is opened. You can also choose whether or not to prompt for the file name every time the data is refreshed. If I know that the file name will be the same each time I like to unselect the box, so I’ll do that here.
I’m going to click OK in the Data Range Properties window and open up the text file again. I’ll change the first flow value to 5.0 and the first pressure value to 20.0, and then save it.
Next I’ll go back to Excel, right-click on the import data, and select “Refresh” way at the bottom.
Excel will then go back out to the text file and re-query the data and pull in the updated values.
Wrap-Up
Hopefully you can see how importing a text file into Excel can be so much more powerful than simply copying and pasting the data. I use this feature quite often when I need to update the data in a spreadsheet from software sources outside of Excel.