
Word has this nice feature which enables insertion of text fields, check boxes, drop-down lists, etc. You can use these elements to create a form in Word.
These elements are available under the tab menu Developer in the Word Ribbon. If you are unable to find this tab in the Ribbon, most likely you need to enable this using the Word Options dialog box.
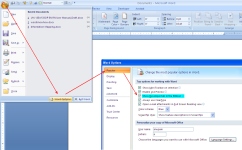
To enable the Developer tab (Word 2007)
1. Click the Office button ![]() . A drop-down list appears.
. A drop-down list appears.
2. Click the Word Options button from the bottom of the list. Word Options dialog box appears.
3. On the dialog box, under the category Popular (see on the left hand side), select the option Developer tab in the Ribbon. Now, you can view the Developer tab in the Ribbon. See below image.
To insert a legacy check box
1. Click the Developer tab.
2. Under the group Controls, click the Legacy Tools button. A drop-down list of icons appears. See below image.
3. Under the section Legacy Form, click the check box icon as shown in the below image. Word creates a check box at the cursor position. By default, the checkbox is in design mode (you can see the Design Mode icon being enabled within the Controls group)

Note: If you wish, you can remove the shading of the check box by clicking the Form Field Shading icon under Legacy Form.
4. By the way, you cannot use the checkbox in design mode. To disable design mode, click the Design Mode icon within the Controls group.
Also, you should enforce protection to the document (or form) before you share it with others to capture information.
This step is applicable to all other controls as well.
To enforce protection
1. Under the Developer tab, within the group Protect, click icon Protect Document. A drop-down list appears.
2. From the drop-down menu, click Restrict Formatting and Editing. Restrict Formatting and Editing task pane appears on the right hand side.
3. From this dialog box, select option Allow only this type of editing in the document option. A drop-down is enabled. Select Filling in forms option from the drop-down list. See below image.
4. Click button Yes, Start Enforcing Protection. The Start Enforcing Protection dialog box appears, which prompts you to enter a password.
5. Enter a password and retype password. Your document is protected and the check box is now clickable.

Important: Remember that you cannot edit a protected document. If you wish to make changes in the document, you have to remove protection by entering the valid password.
To stop protection
1. Under the Developer tab, within the group Protect, click Protect Document. The Restrict Formatting and Editing task pane appears.
2. From the bottom of the dialog box, click the button Stop Protection. Enter valid password to remove protection.
To insert a drop-down list
1. Under the Developer tab, within the group Controls, click the Drop-Down List icon. A drop-down list appears in the document. See below image.

2. You can see the Properties button being enabled within the Controls group. Click Properties. The Content Control Properties dialog box appears.
3. In the dialog box, under section General, enter a Title of the drop-down list.
4. Under section Drop-Down List Properties , click button Add to enter the display name and value for the first list item in the Add Choice dialog box and then click OK. Item is added to the list.
In the similar way, you can keep adding items to the list.
5. Click the Modify/Remove button to edit/delete list items.
6. Finally, click OK to close the Content Control Properties dialog box. You can view the drop-down list displays all the list items. See below image.

7. Enforce protection to the document, so that list values cannot be modified.
To insert an ActiveX Control check box
1. Click the Developer tab.
2. Under the group Controls, click the Legacy Tools button.
3. From category ActiveX Controls, click the check box icon. A check box is created at the insertion point. See below image.
You can notice that the Design Mode icon being enabled within the Controls group. This is important to edit the check box properties.
4. Right-click the check box. From the right-click menu, click CheckBox Object and then click Edit. The check is in edit mode. You can enter a name of the checkbox.
5. From the right-click menu, click Properties to control properties of the check box.
6. Click Design Mode to disable. The check box is now clickable.

Note: The difference between a legacy and ActiveX control check box is that, ActiveX checkbox provides advanced or extended features, i.e. you can write program for it in visual basic to make the check box behave in different ways.
Insert text fields
1. Click the Developer tab.
2. Under the group Controls, click the icon Rich Text or Text. A text field is created in the document. See below image.
3. You can change the default text appearing in the text box by enabling the Design Mode button in the Control Group.

Insert a Combobox
- Under the Developer tab, within the group Controls, click the Combobox icon
 . A combobox is created at the cursor position.
 - Select the combobox and then click Properties (available within the group Controls. The Content Control Properties dialog box appears.
- In the dialog box, under the section General, enter a Title of the combobox.
- In the dialog box, under the section Drop-down List Properties, click the Add button. Add Choice dialog box appears.
- Enter a display name and value for the first list item. Click OK.
- Click Add again to enter a second list item. Click OK. You can keep adding as many item as you need.
- Finally, click OK.
 . A combobox is created at the cursor position.
The combobox list is populated with the list items. Remember, the combobox should not be in Design Mode to view the list of items. You can find the Design Mode icon within the group Controls . See below image.

Also See:
https://wordknowhow.wordpress.com/2014/04/03/how-to-create-radio-buttons-option-buttons-in-ms-word/
https://wordknowhow.wordpress.com/2014/04/03/how-to-create-or-add-checkboxes-checkbox-controls-to-your-word-document/
https://wordknowhow.wordpress.com/2014/04/08/how-to-add-a-text-field-in-word/
Примечание:
Мы стараемся как можно оперативнее обеспечивать вас актуальными справочными материалами на вашем языке. Эта страница переведена автоматически, поэтому ее текст может содержать неточности и грамматические ошибки. Для нас важно, чтобы эта статья была вам полезна. Просим вас уделить пару секунд и сообщить, помогла ли она вам, с помощью кнопок внизу страницы. Для удобства также приводим
ссылку на оригинал (на английском языке)
.
В шаблоне формы Microsoft Office InfoPath можно использовать текстовое поле для сбора информации от пользователей или отображения данных из базы данных или другого внешнего источника данных.
В этой статье
-
Использование текстового поля
-
Пользовательский интерфейс
-
Добавление текстового поля
-
Советы по макету
Использование текстового поля
При необходимости с помощью текстового поля:
-
Разрешить пользователям введите любой фрагмент обычного текста в форму.
-
Отображать сведения, такие как результат формулы или текущую дату.
На приведенном ниже рисунке текстовые поля используются для ввода пользователем контактные данные.
По умолчанию при вставке надписи на шаблон формы InfoPath добавляет одинарная линия текстового поля. Если нужно текстового поля для отображения многострочный текст вместо этого можно включить разрывы абзацев или обтекание текстом для надписи после его вставки. Кроме того можно использовать поля форматированного текста.
Связанные элементы управления
InfoPath включает элементы управления, которые отличают текстовые поля, но, предназначены для разных целей. Чтобы определить, какие из этих элементов лучше всего использовать для шаблона формы, ознакомьтесь со списком следующее:
Поле форматированного текста Как и обычные текстового поля поля форматированного текста позволяет пользователям введите, изменение и просмотр текста. В отличие от текстового поля поля форматированного текста по умолчанию отображаются многострочный текст. Пользователи также могут добавлять элементы форматирования для поля форматированного текста, например полужирного или курсивного текста, рисунков и таблиц. Форматирование данных в поля форматированного текста сохраняется как XHTML, который может быть несовместим с источники данных, ожидается короткий последовательностей обычный текст.
Поле выражения Поле выражения обычно используется для отображения текста, доступного только для чтения для отображения значения другого элемента управления в форме или создавать формулы, основанные на выражение XPath. В отличие от текстового поля поле выражения не сохранить или сохранить данные. Таким образом следует использовать поле выражения только в том случае, если вы не хотите сохранять его значения или ссылки на него в другую формулу.
Можно использовать текстовые поля самостоятельно или добавить их в повторяющихся таблиц, разделов и других элементов управления, связанных с макетом. Например текстовые поля часто отображаются в ячейках в повторяющейся таблице.
К началу страницы
Взаимодействие с пользователем
Ввод данных в текстовое поле можно легко. Пользователи размещение своих курсора внутри текстового поля и введите необходимые сведения. Данные в форме отображается как обычный текст.
Совет: Если требуется пользователи должны иметь возможность применить форматирование символов к тексту в текстовом поле поля форматированного текста можно использовать вместо стандартной текстового поля.
Текстовые поля включают несколько знакомые возможности системы Microsoft Office. Например если пользователи слово в текстовое поле, увидят красной волнистой линией, которая указывает на возможную орфографическую ошибку.
Вместе с ошибками функцию автозаполнения включена для текстовых полей по умолчанию. Автозавершение сохраняет предыдущие элементы, которые пользователи ввели в форму. При вводе первых нескольких символов в текстовое поле InfoPath перечислены возможные варианты из операции, которые пользователь ввел перед. Это упрощает пользователи должны вводить повторяющихся или стандартных данных, например его имя или адрес, в формах, которые они заполнять.
Примечание: При разработке шаблона формы в InfoPath, вы можете создавать шаблон формы с поддержкой веб-браузера. При разработке шаблона формы с поддержкой браузера некоторых функций, таких как проверка орфографии, будут недоступны для использования в InfoPath, так как они не работают в веб-браузере.
К началу страницы
Вставка текстового поля
Процедура Вставка текстового поля немного зависят от ли разработка шаблона формы пустой или индексация внешнего вида шаблона формы базы данных или другого внешнего источника данных.
Ниже показано, как выглядит текстового поля, при выборе в Режим конструктора.
Элементы управления могут быть связанными или свободными. Если элемент управления связан, он подключен к полю или группе в источнике данных, поэтому данные, вводимые в элемент управления, сохраняются в XML-файле самой формы. Когда элемент управления является свободным, он не подключен к полю или группе, а данные, вводимые в него, не сохраняются. Если выбрать элемент управления или навести на него указатель мыши, в его правом верхнем углу , отобразится текст и значок привязки. В тексте указаны группа или поле в источнике данных, к которым привязан элемент управления. Значок указывает на то, правильно ли элемент управления привязан к полю или группе. Если привязка правильная, выводится зеленый значок. Если с привязкой что-то не так, вы увидите синий или красный значок.
Источник данных для шаблона формы состоит из полей и групп, которые отображаются в виде иерархической структуры в области задач Источник данных. Текстовые поля всегда связаны с полями. В следующем примере текстовое поле Фамилия в форме привязан к полю Фамилия в области задач Источник данных.
Добавление текстового поля в шаблоне пустой формы
При создании нового пустого шаблона формы по умолчанию устанавливается флажок Автоматически создавать источник данных в области задач Элементы управления. Это позволяет InfoPath автоматически создавать поля и групп в источнике данных по мере добавления элементов управления в шаблон формы. Эти поля и группы представлены в виде значков папок и файлов в области задач Источник данных.
-
Поместите курсор в то место шаблона формы, куда вы хотите вставить элемент управления.
-
Если область задач Элементы управления не отображается, щелкните Другие элементы управления в меню Вставка или нажмите клавиши ALT+I, C.
-
В разделе Вставить элементы управления щелкните Текстовое поле.
-
Чтобы добавить метку к элементу управления, введите текст сверху или слева от элемента управления, за которым следует двоеточие (:). Например, если текстовое поле предназначена для сбора Фамилия пользователя, введите Фамилия:.
Добавление текстового поля в шаблоне формы, основанного на существующий источник данных
Если основе внешнего вида шаблона формы на существующий файл язык XML (Extensible Markup), базы данных или веб-службы, InfoPath извлекает поля и группы в области задач Источник данных из соответствующего источника данных. В этом случае можно вставить текстовое поле, перетащив поле из области задач Источник данных в шаблоне формы или путем вставки текстового поля из области задач элементы управления вместо способами, описанными в следующей процедурой.
-
Поместите курсор в то место шаблона формы, куда вы хотите вставить элемент управления.
-
Если область задач Элементы управления не отображается, щелкните Другие элементы управления в меню Вставка или нажмите клавиши ALT+I, C.
-
В разделе Вставить элементы управления щелкните Текстовое поле.
-
В диалоговом окне Привязка текстового поля выберите поле, в котором нужно сохранить данные текстовое поле и нажмите кнопку ОК.
-
InfoPath в качестве используется имя поля или группы подпись элемента управления. При необходимости измените текст подписи.
Совет: В области задач Источник данных также можно использовать для вставки элементов управления. В области задач Источник данных щелкните правой кнопкой мыши поле, которое вы хотите связать текстового поля, чтобы и в контекстном меню выберите пункт Надпись.
К началу страницы
Советы по макету
Прежде чем вставлять надписи на шаблон формы, подумайте, как вы хотите упорядочить их. Вы можете добавить текстовых полей, перетаскивая их место, где требуется шаблона формы, но, которая может привести к угодно конструктор. Если вы хотите больше организации шаблона формы, можно добавлять макетная таблица и затем вставить подписи и элементы управления в отдельные ячейки, чтобы он хорошо выровнять. На приведенном ниже рисунке четырех строк и двух столбцов макетной таблицы используется для упорядочения подписей и элементов управления.

В дополнение к использованию макетных таблиц для упорядочения текстовых полей, можно выполните одно или несколько из указанных ниже действий.
-
Чтобы одновременно изменить размер нескольких текстовых полей, выделите текстовые поля, размер которых нужно изменить, в меню Формат выберите пункт Свойства, откройте вкладку размер и внесите необходимые изменения.
-
Размер текстовых полей с учетом изменения длину текста, пользователям потребуется ввести в полях шаблона формы.
-
Чтобы изменить границы или цвет нескольких текстовых полей, одновременно, выберите текстовые поля, которые вы хотите изменить, в меню Формат выберите команду границы и заливка, перейдите на вкладку границы и внесите необходимые изменения.
-
Чтобы настроить текст, отображаемый в текстовом поле, используйте поля Шрифт и Размер шрифта на панели инструментов Форматирование. Чтобы изменить шрифт и размер шрифта для всех текстовых полях шаблона формы за один раз, выберите текстовое поле с форматированием и нажмите кнопку Применить шрифт для текстовых полей в меню Формат.
-
Чтобы увидеть, как будут выглядеть текстовые поля с текстом, в них, в меню Вид нажмите кнопку Образец данных. Это позволит понять, как будет выглядеть формы при заполнении его.
-
Настройка межзнакового интервала вне текстового поля с помощью полей. Настройка межзнакового интервала вокруг текста внутри текстового поля с помощью полей. Оба параметра находятся на вкладке размер в диалоговом окне Свойства текстового поля.
-
В некоторых случаях текст внутри текстового поля и подписи слева от текстового поля может отображаться для немного отсутствовать выравнивания. Чтобы быстро изменить выравнивание их, дважды щелкните текстовое поле, нажмите кнопку Выровнять на вкладке размер и нажмите кнопку Применить. Если подпись и текстовое поле находятся в разных ячейках макетной таблицы, щелкните правой кнопкой мыши ячейку, содержащую подпись, в контекстном меню выберите команду Свойства таблицы и на вкладке Ячейка в группе Вертикальное выравнивание выберите Центр.
К началу страницы
Add a text box
- Go to Insert > Text Box, and then select Draw Text Box.
- Click or tap in the document, and drag to draw the text box the size that you want.
- To add text to a text box, select inside the text box, and then type or paste text. Notes:
Contents
- 1 How do you make a text box expand as you type in Word?
- 2 How do I insert a textbox in Word without moving text?
- 3 How do I fix box size in Word?
- 4 How do I move a text box freely in Word?
- 5 How do you insert a textbox in docs?
- 6 How do you create a text box?
- 7 How do I insert a text field in Word?
- 8 How do fields work in Word?
- 9 How do I edit a text box in Word?
- 10 Where is the text box Tools tab in Word?
- 11 Why can I not move a text box in Word?
- 12 Why do text boxes move in Word?
- 13 How do you create a text box in Google Docs?
- 14 Why can’t I insert a textbox in Google Docs?
- 15 How do I add more boxes to a table in Google Docs?
- 16 What is meant by text box?
- 17 What is a text box component?
- 18 What is the example of textbox?
- 19 How do you enter a checkbox in Word?
- 20 How do I create a field in Word template?
How do you make a text box expand as you type in Word?
Make sure the Text Box tab is displayed. (In Format Shape pane in Word 2013 and Word 2016, click Shape Options, click the Layout & Properties icon, and then expand the Text Box category.)
How do I insert a textbox in Word without moving text?
Add a Text Box
- Open the Microsoft Word document that needs a floating text box added.
- Click the “Insert” tab on the Ribbon and click “Text Box” on the Text panel.
- Click in your document window and drag to set the dimensions of the box.
How do I fix box size in Word?
Follow these general steps.
- Place the text box in your document.
- Adjust the width of your text box to reflect what you need.
- Right-click the text box and choose Format Text Box from the resulting Context menu.
- Make sure the Text Box tab is displayed.
- Make sure the Resize AutoShape to Fit Text check box is selected.
How do I move a text box freely in Word?
Move a picture, shape, text box, or WordArt
To move multiple text boxes or shapes, press and hold Ctrl while you click the borders. When the cursor changes to the four headed arrow, drag it to the new location. To move in small increments, press and hold Ctrl while pressing an arrow key.
How do you insert a textbox in docs?
Insert a text box
- Click Insert.
- Click Drawing and then New.
- Click on the Text box icon.
- Click and drag the mouse to shape the box to the size that you want, then release the mouse.
- Input what you want to appear in the text box and then hit Save and close.
How do you create a text box?
Double-click inside the box to select the placeholder text and insert your own. When you’re working inside a text box, use the Format bar at the top of the page to change the colors, font style, alignment, and more.
How do I insert a text field in Word?
How to insert a Text field in Word
- Launch Microsoft Word.
- Click anywhere on the document.
- Click the Insert tab.
- Click the Quick Parts button.
- Click Field from the drop-down menu.
- Choose a field name from the field name list.
- then, choose an option from the list on the right.
- Click OK.
How do fields work in Word?
Word fields are placeholders that store and display data. They perform simple tasks, such as returning the current date or current page number, but they’re much more than that. You can use them to ask questions, make decisions based on specific conditions, and perform calculations.
How do I edit a text box in Word?
How to Edit a Textbox in Word
- Click anywhere in the Word text box to enter editing mode.
- Click and drag your mouse across a section of text to edit it.
- Click the “Home” tab to access text formatting tools.
Where is the text box Tools tab in Word?
Text Box Tools tab appears on the Ribbon. Click the Format tab under this. Under the Format tab, within the group Arrange, click the Text Wrapping icon. From the drop-down menu, you can view various text-wrapping styles and the one highlighted is the default style.
Why can I not move a text box in Word?
If the text box is In Line With Text, it’s constrained by the margins. With any other text wrapping, you should be able to drag it anywhere. But it may be that all you need to do is change the internal margin of the text box: Right-click on the edge of the text box and choose Format Shape…
Why do text boxes move in Word?
Make sure the Move Object With Text check box is selected. Make sure the Lock Anchor check box is selected. Make sure the Allow Overlap check box is selected. Click on OK to close the Layout dialog box.
How do you create a text box in Google Docs?
To do that, go to Insert > Drawing and select the Text Box icon in the menu bar of the Drawing window. Set the transparency you want for the text box by clicking on the text box to select it and changing the fill color. Press the blue Save and Close button to insert the text box into your document.
Why can’t I insert a textbox in Google Docs?
If you aren’t seeing the text box in the drawing feature after you draw the text box, you will need to change the border color and/or fill color while the text box is in the drawing panel. After you change the border and/or fill color, press the blue Save and close button to put the text box in your document.
How do I add more boxes to a table in Google Docs?
- On your computer, open a document or a slide in a presentation.
- Right-click a cell in a table.
- To add a row or column next to the selected cell, click: Insert column left. Insert column right. Insert row above. Insert row below.
What is meant by text box?
A text box (input box), text field or text entry box is a control element of a graphical user interface, that should enable the user to input text information to be used by a program.
What is a text box component?
Basic TextField
The TextField wrapper component is a complete form control including a label, input, and help text. It comes with three variants: outlined (default), filled, and standard. Outlined.
What is the example of textbox?
Below is an example of a one-line text box that is often used for a name, e-mail, or password. The text box may have a fixed length, allowing only a few words to be entered. It may also allow more text than the length of the text box, requiring a user to use arrow keys to scroll horizontally to see all entered text.
How do you enter a checkbox in Word?
Inserting a tick-box in Microsoft Word
- Select the Customize Quick Access Toolbar dropdown.
- Select More Commands.
- Select Developer Tab.
- Select Tick Box.
- Press Insert.
How do I create a field in Word template?
Creating Fillable Forms Using Microsoft Word
- Enable Developer Tab. Open Microsoft Word, then go to the File Tab > Options > Customize Ribbon > check the Developer Tab in the right column > Click OK.
- Insert a Control.
- Edit Filler Text.
- Design Mode button again to exit the mode.
- Customize Content Controls.
Insert Fields in a Microsoft Word Document to Display Variable Content
by Avantix Learning Team | Updated January 10, 2021
Applies to: Microsoft® Word® 2010, 2013, 2016, 2019 or 365 (Windows)
You can insert built-in or custom fields in Word documents to display variable content that will change when you update the fields. Some fields (like page numbers, merge fields or cross-references) are inserted automatically when you use Microsoft Word features. If you want to insert custom fields, you will need to create custom document properties.
By default, Word displays the result of a field rather than its field codes. You can right-click a field and select Toggle Field Codes to display field codes or field results.
Recommended article: How to Hide Comments in Word (or Display Them)
Do you want to learn more about Microsoft Word? Check out our virtual classroom or live classroom Word courses >
If you are working with fields in Microsoft Word, you will be using quite a few function keys (such as F9). On some laptops, you will need to press the Fn key on your keyboard to enable your function keys. For example, instead of pressing F9 to update a field or fields, you would press Fn + F9.
Inserting built-in fields
To insert a field, click Quick Parts in the Text group on the Insert tab in the Ribbon. The Field command appears in the Quick Parts drop-down menu as follows:

Below is the Field dialog box in Microsoft Word with Page selected:

To insert a built-in field using the Field dialog box:
- Navigate to the location in the Word document where you want to insert a field.
- Click the Insert tab in the Ribbon and then click Quick Parts in the Text group. A drop-down menu appears.
- Select Field. A dialog box appears.
- In the list of Field names, select a field. You can filter the list by clicking the down arrow in the Categories list and selecting a category first. Select All to display all fields.
- Under Field properties, select any properties or options you want.
- To view the codes for a field in the Field box, click Field Codes. For some fields, this button is clicked by default.
- Ensure that Preserve Formatting During Updates is checked so that formatting you apply is not removed when the fields are updated.
- Click OK. The field is inserted into the document.
Format the field results by applying text formatting to the field using the Home tab in the Ribbon.
You can view or hide all field codes in your document by pressing Alt + F9. Field codes appear between braces or curly brackets { } and you cannot type these braces. Be sure to hide the field codes again by pressing Alt + F9.
To edit a built-in field in the Field dialog box:
- Right-click the field and then click Edit Field. A dialog box appears.
- Change the field properties and options.
- Click OK.
Understanding Word document properties
There are 3 different types of document properties in Word:
- Standard document properties (also called built-in document properties)
- Custom document properties
- Document library properties
Word documents contain a set of standard document properties such as Title, Author, Keywords and Comments. These properties are used to store metadata about your document. You cannot change the name of standard properties but you can edit the value of some of them (such as Title). Other standard properties that cannot be edited store data that is updated automatically (such as Size or Last Modified).
Document library properties are related to documents that are stored in a document library on a website or in a public folder (such as files in SharePoint).
In addition to the standard properties, you can create your own custom document properties. These properties can be created to store additional information in a document other than the standard document properties. For example, custom document properties could be created for Product1, Product2, Product3, Sponsor, Project Manager, Cell Phone or Disclaimer. Each custom document property must be assigned a name, a data type and a value. The four data types are Text, Date, Number and Yes or No.
After you create custom document properties for your Word document, you can then insert them as custom fields.
Adding a custom document property
To add a custom document property:
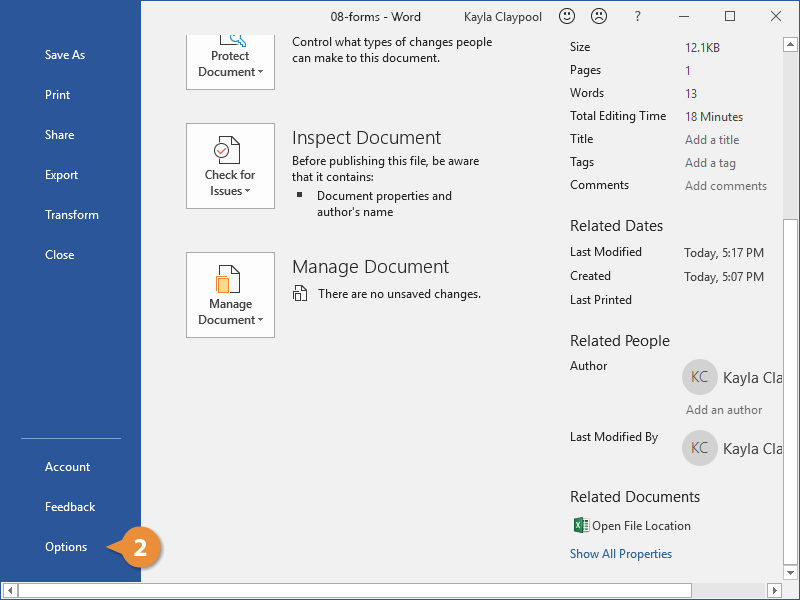
- Open the Word document in which you want to add a custom document property.
- Click the File tab in the Ribbon and then click Info on the left. Info is usually selected by default.
- On the right side of screen, click Properties. A drop-down menu appears.
- Select Advanced Properties. A dialog box appears.
- Click the Custom tab in the dialog box.
- Type a name for the custom document property in the Name box. You can also choose one of the other properties that appear in the drop-down list.
- Select Text, Date, Number or Yes or No as the data type for the custom property.
- Enter a value for the property in the Value box.
- Click Add. The custom property appears in the list at the bottom of the dialog box.
- Click OK.
After you have added a custom document property, you will be able to insert it into your document as a field.
In the example below, we’re adding a field for Project Manager:

After you click Add, the custom field appears in the Properties list:

Inserting custom document property fields
The value of a custom document property can be inserted in a Word document using DocProperty fields. Custom document properties that have been added to a document are saved with the document whether they are inserted as a DocProperty field or not. You can insert DocProperty fields multiple times in a document.
To insert a custom document property field using the Field dialog box:
Navigate to the location in the Word document where you want to insert a field.
- Click the Insert tab in the Ribbon and then click Quick Parts in the Text group. A drop-down menu appears.
- Select Field. A dialog box appears.
- In the list of Field names on the left, select DocProperty.
- Under Field properties, select a property name.
- To view the codes for a field in the Field box, click Field Codes. For some fields, this button is clicked by default.
- Ensure that Preserve Formatting During Updates is checked so that formatting you apply is not removed when the fields are updated.
- Click OK. The field is inserted into the document.
In the example below, we’re inserting the custom Project Manager field we created in Advanced Properties:

Updating built-in and custom fields
Word should automatically update fields when a document is opened. Many fields are also updated automatically when you go to Print Preview (click the File tab and then click Print). If you prefer, you can update fields manually.
To update a field manually, right-click the field and then click Update Field or press F9.
To update all fields manually in the main body of a document, press Ctrl + A to select all and then press F9.
Some fields in headers, footers or text boxes must be updated separately. Click in the header, footer or text box, press Ctrl + A to select all and then press F9. Page fields do not need to be updated manually because they update when you go the Print Preview.
If you want to edit a custom DocProperty field, you will need to edit it in the Advanced Properties dialog box.
Subscribe to get more articles like this one
Did you find this article helpful? If you would like to receive new articles, join our email list.
More resources
How to Create, Save, Edit and Use Templates in Word
How to Insert, Format and Update Cross-References in Word
5 Ways to Insert the Division Symbol in Word (Type or Insert ÷)
10 Microsoft Word Tips, Tricks and Shortcuts for Selecting in Tables
How to Create a Table of Contents in Word (Insert, Format and Update a TOC)
Related courses
Microsoft Word: Intermediate / Advanced
Microsoft Excel: Intermediate / Advanced
Microsoft PowerPoint: Intermediate / Advanced
Microsoft Word: Long Documents Master Class
Microsoft Word: Styles, Templates and Tables of Contents
Microsoft Word: Designing Dynamic Word Documents Using Fields
VIEW MORE COURSES >
Our instructor-led courses are delivered in virtual classroom format or at our downtown Toronto location at 18 King Street East, Suite 1400, Toronto, Ontario, Canada (some in-person classroom courses may also be delivered at an alternate downtown Toronto location). Contact us at info@avantixlearning.ca if you’d like to arrange custom instructor-led virtual classroom or onsite training on a date that’s convenient for you.
Copyright 2023 Avantix® Learning
Microsoft, the Microsoft logo, Microsoft Office and related Microsoft applications and logos are registered trademarks of Microsoft Corporation in Canada, US and other countries. All other trademarks are the property of the registered owners.
Avantix Learning |18 King Street East, Suite 1400, Toronto, Ontario, Canada M5C 1C4 | Contact us at info@avantixlearning.ca
You can use Word to create interactive digital forms that other people can fill out on their computers before printing or sending them back to you. It takes a little preparation but keeps you from having to decipher messy handwriting! Some of the tools you will use when creating a form include:
- Templates: Forms are normally saved as templates so that they can be used again and again.
- Content controls: The areas where users input information in a form.
- Tables: Tables are often used in forms to align text and form fields, and to create borders and boxes.
- Protection: Users can complete the form fields without being able to change the form’s text and/or design.
Show the Developer Tab
Before you can create a form, you’ll need to turn on the Developer tab to get access to the advanced tools.
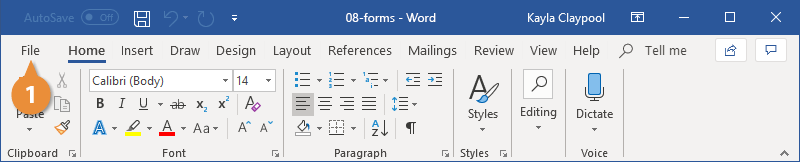
- Click the File tab.

- Select Options.

The Word Options window opens.
- Click the Customize Ribbon tab on the left.
The column on the right controls which ribbon tabs are enabled.
- Check the Developer check box.
- Click OK.
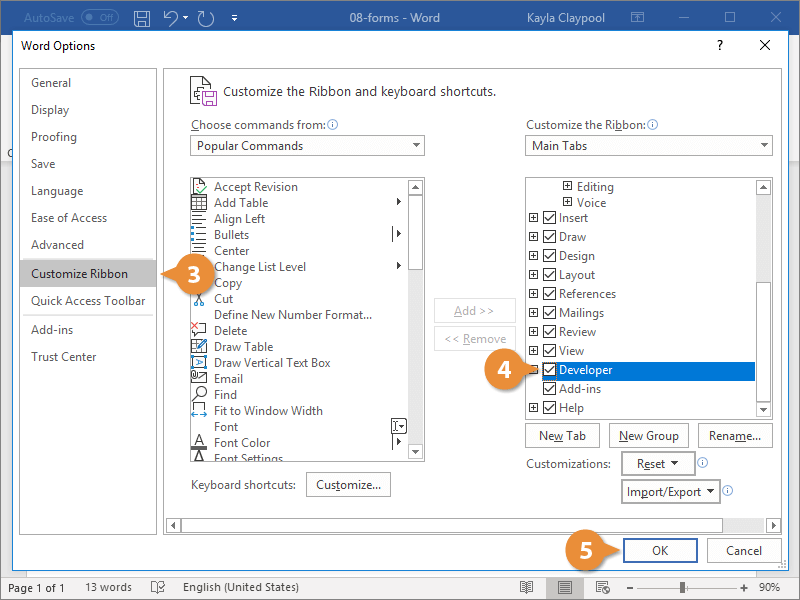
The Developer tab now appears on the ribbon. In addition to advanced tools for macro recording, add-ins, and document protection, we now have access to form controls.
Create a Form
Once you’ve enabled the Developer tab, and created the layout and structure of the form, you can start adding form fields to your document with Content Controls.
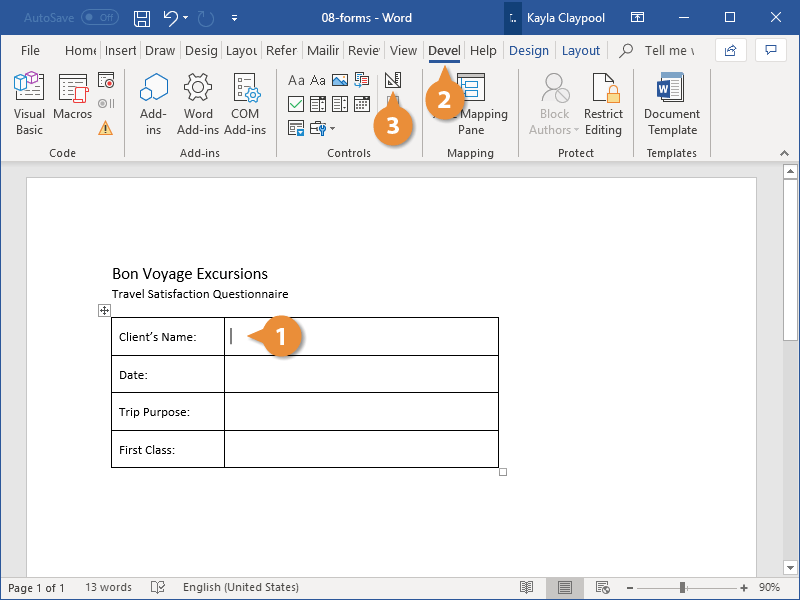
- Place the text cursor where you want to insert the form field.
- Click the Developer tab on the ribbon.
The Controls group contains the different kinds of content controls you can add to a form, as well as the toggle button for Design Mode.
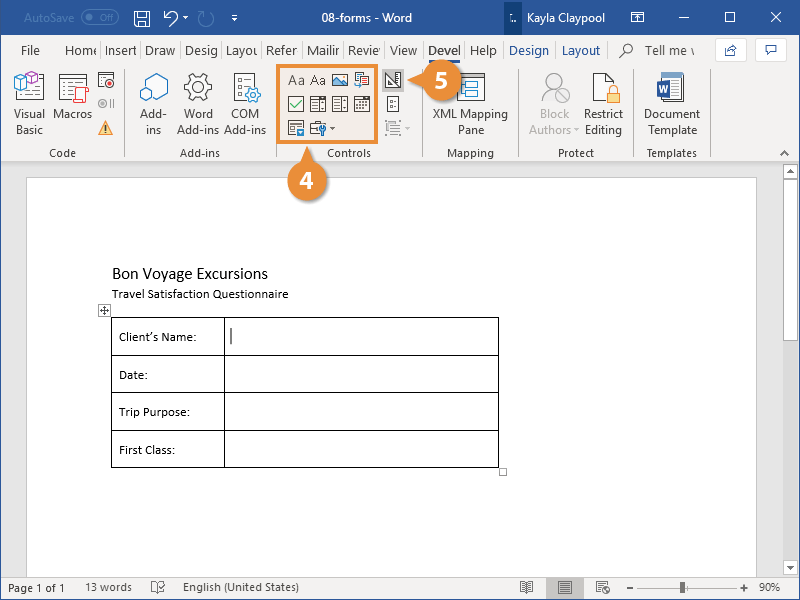
- Click the Design Mode button in the controls group.
While Design Mode is active, controls you insert won’t be active, so clicking a check box to move it around won’t also check it. You can also customize placeholder text for some controls.
- Click a Content Control buttons to insert the selected type of control.
The content control is inserted.
Select a form field and click the Properties button on the ribbon to edit a control’s options. Depending on the type of control you’ve inserted, you can change its appearance, set up the options in a list, or lock the control once edited.
- When you’re done, click the Design Mode button again to exit Design Mode.
You leave Design Mode, and the content controls that you’ve inserted can now be used.
Types of Form Controls
There are many different types of form controls you can add to a form that will allow people to add different types of responses.
Finalize a Form
When you’re ready to distribute a form so others can fill it out, you can restrict the form so that content controls cannot be removed or changed by those filling it out.
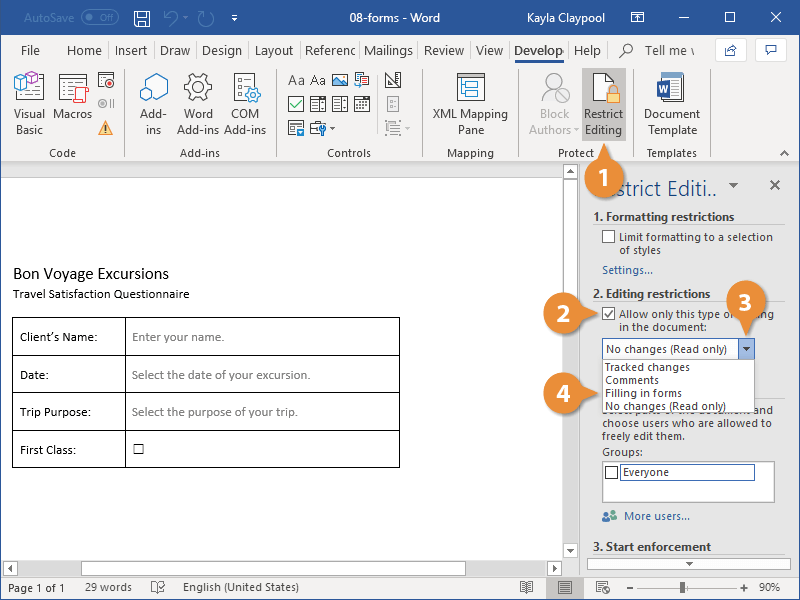
- Click the Restrict Editing button on the Developer tab.
The Restrict Editing pane appears on the right.
- Check the Editing restrictions check box.
- Click the Editing restriction list arrow.
- Select Filling in forms.
When this option is enabled, the only change that anyone else can make to this document is the filling in of form fields. They won’t be able to move, delete, or edit the fields themselves until protection is turned off.
- Click the Yes, Start Enforcing Protection button.
A password is not required to start enforcing protection, but you can add one if you’d like to prevent just anyone from turning this protection off.
- Enter a password (optional), then click OK.
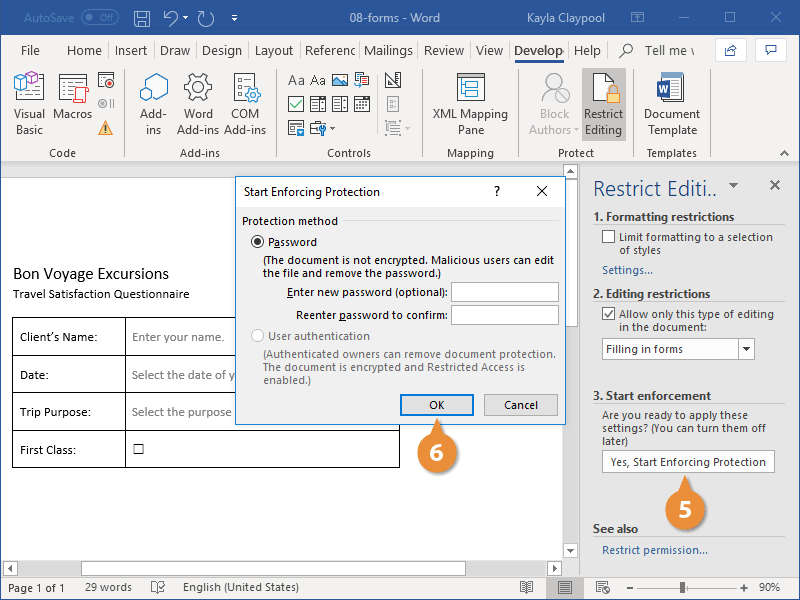
The document is now restricted, and anyone you send it to will only be able to fill in the forms.

FREE Quick Reference
Click to Download
Free to distribute with our compliments; we hope you will consider our paid training.