
Whether you’re a one-person business operating out of your kitchen, or a billion-dollar company on Wall Street, the expectation is the same. Your business documents must be the paragon of professionalism and competence.


This expectation shouldn’t be a cause for worry. With applications like Microsoft Word you can create professional-looking documents with your own computer. Through the years, Word has become more powerful, yet more intuitive. Anyone with basic computer skills can use Word to create well-designed documents.
In this article, you’ll learn how to format text in Word to make your business documents easier to read and understand. You’ll also pick up tips on how to make sure your formatting doesn’t look amateurish—even if you’re getting started with Word.
Formatting Text in Word
Formatting text in Microsoft Word refers to controlling how text appears in your document. This includes the size, color, and font of the text. It also covers text alignment, spacing, and letter case.
Microsoft Word styles make it easy to change and apply styles throughout a document. A “style” is a set of formatting settings applied to a specific kind of text.
For example, you can set up a style for headings that’s bold, 14 points, aligned left, and uses the Tahoma font. This means all text in your document with the heading style will be formatted the same way. You don’t have to manually format each heading in your document.
In this post, you’ll see how to use MS Word styles.
How to Format Text in Word
To show you how to format text in Word, we’ll walk through formatting a completely unformatted business document file.
This is what my marketing report looks like without any formatting in Word:


As you can see, it’s plain and boring. Nobody would be inspired to read it, let alone act on the findings of the report!
Some basic Word text formatting can fix that.
1. How to Apply Typographic Emphasis
1. For starters, let’s use typographic emphasis (bold, italic, underline) to make the report title stand out.
To do this, select the text you want to emphasize. Click on the bold button on the Microsoft Word ribbon.


Note that the ribbon also has the buttons to apply italic, underline, strikethrough, and other formatting effects for text. Follow the same steps to apply those effects.
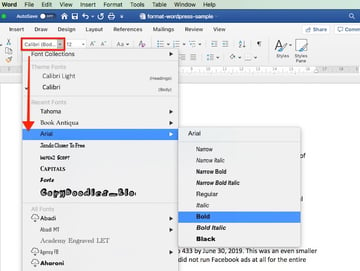
2. Now, let’s change the font, font size, and color of the title.
Again, select the text. Click the drop-down arrow on the font section of the ribbon, then select the font you want to apply. In this case, I’m using Arial bold.


3. To change the font size, highlight the text. Click the drop-down arrow on the font size indicator on the ribbon. Click on the font size of your choice.


Or, after highlighting the text, you can type the font size into the font size indicator on the ribbon. This is especially useful when the font size you want isn’t available in the font size selector.


4. You can also use the Increase Font Size or Decrease Font Size buttons on the ribbon to quickly change the font size.


5. We can easily change the font color as well.
Highlight the text, then click the down arrow beside the Font Color selector. Click on the color of your choice.


Choose More Colors… if you wish to apply a custom color.
2. How to Change Capitalization in Word
Microsoft Word also allows you to easily and quickly change the capitalization of your text. For example, if we want to make the title all uppercase, we don’t have to retype it.
Highlight the title, then click the Change Case button on the ribbon.


Or, highlight the text, go to Format > Change Case…


… then click on the radio button for the case you want to apply. Click OK.


Now the title is looking much better. It’s the most prominent part of the document and commands the reader’s attention. However, we can still improve its readability.
3. How to Format Paragraphs
One way to make your document easier to read is by increasing white space around lines and paragraphs.
1. To adjust the line spacing, select the text. Click on the arrow on the Line and Paragraph Spacing button. Select the line spacing you wish to apply.


2. To change the spacing around a paragraph, select the paragraph. Click on the arrow on the Line and Paragraph Spacing button > Line Spacing Options…. Then, type the amount of spacing before and after the paragraph. (Tip: You can adjust other settings from this dialog box as well.)
For the title, I’ll add a generous amount of space after the paragraph, to set it apart from the rest of the document.


3. Finally, let’s change the alignment of the title. Select the text, click on either the Align Left, Center Text, Align Right, or Justify button on the ribbon. Since this is a title, let’s use Center Text.


These simple formatting effects make the title stand out from the rest of the document.
4. How to Work With MS Word Styles
As much as Word makes it easy to format text, if you need to apply formatting effects on the entire document, the process becomes tedious.
Word solves that through styles. MS Word Styles allow you to define a set of formatting commands and apply them automatically to every item in the document with that style.
Let’s look at a specific example:
1. How to Modify a Paragraph Style
Let’s follow the steps above to define a style for the main headings of the report with the following characteristics:
- Font: Arial
- Size: 14 points
- Color: Blue-grey
- Typographic Emphasis: Bold
- Case: Capitalize each word
- Alignment: Left
- Line spacing: Single
- Paragraph spacing: 6 pts before paragraph, 0 pts after paragraph
It would look like this:


One way to apply this exact formatting on every main heading is to modify the existing Heading 1 style in our document. Place your cursor anywhere in the main heading. Go to Styles, right-click on Heading 1, then choose Update Heading 1 to Match Selection.


You can also modify any style by going to Format > Style…. The Style dialog box opens.


Select the style you want to modify from the Style list. This gives you a preview of the paragraph and character, as well as a description of the current style settings of the selected style.
Click Modify…. The Modify Style dialog box pops up.


Change the text and paragraph format settings. You can control the font, font size, font color, typographic emphasis, alignment, and spacing. When you’re done, click OK.
2. How to Apply a Paragraph Style
Now, go to each main heading in the document and apply the Heading 1 style to it. Place the cursor on a heading, go to Styles > Heading 1.


The selected text instantly takes on the formatting of Heading 1.


3. How to Create a List Paragraph Style
You can also create a new paragraph style from scratch, instead of modifying an existing one. To demonstrate, let’s create a list-type paragraph style.
1. Go to Format > Style…. Fill in the Properties section of the dialog box that opens. For Style based on, you may wish to use one of the pre-existing list styles as a starting point.


2. Next, change the formatting options. The box below gives you a preview of what the list paragraph would look like with those settings. There’s also a summary of the formatting properties you’ve specified.


You also have the option to do the following for this style:
- Add to template. Adds the style you’re creating to the document template.
- Add to Quick Style list. Shows the new style to the Quick Style list, making it quickly accessible from the ribbon.
- Automatically update. Automatically updates the style when you manually format a paragraph with that style.
When you’re happy with the settings you’ve made, click OK. Notice how the new Bullet style you created is now included in the Quick Style popup.


Once the bullet style is applied, our list now looks like this:


4. How to Use Character Styles in Microsoft Word
You can also define a style to an individual word or a block of text, rather than a paragraph. In the next example, I’d like to apply a character style for every URL in the document.
1. Select the text. Then, go to Format > Styles…. From the Style dialog, click New…. The Create New Style from Formatting dialog opens.


2. Give the new character style a name. For Style type, choose Character. Then, make the formatting settings you want to apply to this character. Note that you can’t change alignment and spacing for a character style. The preview box shows you a sneak peek of the text based on the settings you specified.


3. When you’re done, click OK.


To apply the character style, place your cursor in a word or select a set of words. Go to Format > Style…. Find the character style you wish to apply. Click Apply.


Tip: To quickly find the MS Word styles you’ve created, for List, choose User-defined styles.
5. How to Use Table Styles in Word
We can also define a table style to provide a consistent look to the tables in our document.
1. Create the table. Go to Insert > Table…, then indicate the number of columns and rows you need in your table (you can always add or remove these later). Click OK.


2. Add your text to the table. If necessary, click and drag any of the borderlines to adjust the width or a column, or the height of a row.
3. To apply a table style, click anywhere on the table, then go to Table Design. The Table Design ribbon appears.


4. Click on the down-arrow for table styles to display the table styles gallery.


5. Click on any style to apply it to your table.


Expand the table styles gallery again to change the existing style, clear the style you applied, or create your own table style.
Discover Great Microsoft Word Templates for 2020
Some experts say it’s a good idea to set up your formatting styles in Word first before typing or copying the text into the document. One quick way to do this is by starting with a Microsoft Word template. Templates come pre-formatted by professional designers to look current and impressive.
You can find thousands of Word templates for all kinds of business documents in Envato Elements.


For a small monthly subscription fee, you get unlimited downloads of all the templates at Elements. You also have unlimited access to everything else in the Elements catalog:
- presentation templates
- web templates
- fonts
- photos
- graphics
- other digital assets
Use as many of these assets as you want, as often as you want, without paying more. This makes Elements a terrific source for all the creative assets you need to create remarkable marketing and communication materials.
You can also pay as you go at GraphicRiver. This marketplace also offers a huge library of templates for Microsoft Word and other digital assets for all your marketing and communication needs. The difference is, you only pay each time you use an item. This can be a very economical option.
Below are some of the best print templates for Word available on Envato Elements and GraphicRiver:
After downloading any of these Microsoft Word templates, you can apply what you’ve learned about formatting text in Word. This way, you can personalize the template so that it aligns with your visual branding and preferences. You now know how to take any Word template and make it your own!
5 Top FAQs on Formatting Text in Microsoft Word
Below are some of the questions that come up as people format text in Word.
1. How Do You Make a Word Document Easier for the Reader to Scan?
Your primary goal when formatting text in Word is to make it easy for people to scan, read, and understand the content of the document. The different formatting options in Word help you achieve this:
- Use typographic emphasis like bold, italics, and underline to emphasize specific text and add variety to your document.
- Break up the document into sections with headings and sub-headings to help the reader scan and navigate their way through it.
- Use either bulleted or numbered lists where appropriate to shorten paragraphs and make lists easier to comprehend.
- Set up line and paragraph spacing so that there’s plenty of white spaces throughout the document.
2. How Many Fonts Should I Use in a Word Document?
It’s easy—and fun—to apply different fonts in Word. Too easy, in fact, that you could end up overwhelming your reader and making your document look like someone played with the formatting.
Avoid this by sticking to a maximum of two different fonts in a single document. For instance, you could choose a sans serif font for your title and headings, and a serif font for all other text. You could even use one font for the entire document, relying on typographical emphasis and color to distinguish different types of text from each other.
3. Why Should I Use Microsoft Word Text Styles?
Use Microsoft Word text styles because they let you apply formatting settings globally throughout your document. This is important in long documents, where formatting each line or paragraph is too onerous. With text styles, you only need to determine what style you want for each piece of text. Word will do the rest.
4. How Can I Make My Document Formatting Consistent?
Using MS Word styles, as you’ve learned in this article, is an easy way to make your document formatting consistent. You decide and set how you want each type of text to be formatted. Then you can apply those styles consistently through your entire document.
Beyond Microsoft Word styles, also make sure that the recurring parts of your document are consistent as well. These include your headers and footers, for example. You must also be consistent with the placement of images: Do they have borders? Are they always within the document’s margins or do they bleed to the edge of the page?
When you use a Word template, these design decisions are already made for you. So, if you want a consistent design without all the hard work, then starting with a template for Word is the way to go.
5. How do You Copy text into Word without also copying junk code?
When you copy text from one application and paste it into Word, you run the risk of also copying the underlying formatting code for it. This code or set of formatting commands is invisible so you won’t know you’re copying it inadvertently. This can mess up your formatting in Word. Soon, you’ll be pulling your hair wondering why Word won’t “follow” your commands.
To avoid this grief, make sure you strip all formatting when you copy and paste the text into Word. Here’s how: Copy the text. In Word, click Edit > Paste and Match Style.


That’s all there is to it!
Using Microsoft Word, Style Your Business Document for Maximum Impact
You’ve learned how to format a document in Word to make it easier to scan and read. Good formatting is also essential to make sure the final document represents you and your business in a favorable light.
You’ve seen how doable formatting is, even if you’re starting from scratch with completely unformatted text. You’ve also discovered that you can rely on professional designers to make the formatting decisions for you by starting with a template for Word.
For unlimited downloads of print templates for Word at a fixed subscription fee, look to Envato Elements. Here, you can also have your fill of fonts, icons, photos, and other design assets you’ll need without having to pay more. Or, get your premium Word templates from GraphicRiver on a pay-per-use basis. You also get a wide range of choices without having to commit to a subscription.
With Microsoft Word styles and formatting tools, there’s no more excuse to have poorly designed business documents. Make your next business document one you’ll be proud of.
3.4.1 Document Creation
To create a new document ,do this:
1. Click office button, choose New… . The new document dialog box appears as in Figure.

2. In the left pane , there are different types of templates. Select Installed templates. In the center pane, scroll the installed Templates list , and click the Oriel Lettertemplate . In the right side , you can see the preview of the selected template.
3. Word 2007 opens a new business letter document based on the selected template, with placeholders for the text you need to type.
3.4.2 Editing Text
This section includes how to insert, delete, modify and copy text. You can undo or redo the edits in a Word document by using the Undo or Redo options. Before you can start editing, the cursor must be moved to the location where the changes have to be made.
Following Table lists the arrow keys used to move around in a document.

Undoing Edits:
The undo command is used to reverse actions. Alternatively, press Ctr+Z
Redoing Edits:
The Redo option is used to reverse the last Undo. Alternatively, press Ctr+Y
3.4.3 Text Selection
Text can be selected by using the mouse, the keyboard, or both
To select one word:
Place the insertion point on the word and double-click on it.
To select a sentence:
Hold down the Ctrl key while clicking anywhere in the sentence.
To select a paragraph:
Place the mouse pointer at the beginning of the paragraph and press the Shift Key and click on last of the paragraph.
3.4.5 Font & Size selection
Font selection:
Font refers to the manner or style in which text is displayed in the document.Different fonts contain different collection of characters and symbols. Word offers many ways to change fonts and font styles. The text to be formatted needs to be selected first.Follow these steps to change fonts and font styles.
- Use the drop-down font list on the format toolbar as displayed in the figure below or type the name of the desired font name box on the toolbar and press the Enter key
- Use Bold(B), italics(I), Underline(U) buttons on the format toolbar.
- To add bold formatting to the text, follow these steps:
- Select the text and click on the Bold button.
- Alternatively, click on the bold button and type the text. Similarly, the characters can be underlined and italicized.
Changing Font Size:
Font size is measured in points and picas are used for measuring spacing, line thickness, and so on.
Use the drop-down font size on the Font toolbar, type the font size, in the font size box on the format toolbar and press the Enter key or select size from the font size toolbar.
Use any of these keyboard shortcuts to increase or decrease the font size:
Alternatively you can use Ctrl+] or Ctrl+[ to increase or decrease the font size.
3.4.6 Alignment of Text

Alignment is a way of organizing the text. It refers to the position of the text relative to the margins. Word enables you to left-align, right-align, centre-align and justify.
- Right-Aligned Text:

- Left-aligned Text:
- Centered Text:
- Justified Text:

Indent Paragraphs
Indenting paragraphs allows you set text within a paragraph at different margins. There are several options for indenting:
- First Line: Controls the left boundary for the first line of a paragraph
- Hanging: Controls the left boundary of every line in a paragraph except the first one
- Left: Controls the left boundary for every line in a paragraph
- Right: Controls the right boundary for every line in a paragraph
To indent paragraphs, you can do the following:
- Click the Indent buttons to control the indent.
- Click the Indent button repeated times to increase the size of the indent.

- Click the dialog box of the ParagraphGroup
- Click the Indents and Spacing Tab
- Select your indents

Add Borders and Shading
You can add borders and shading to paragraphs and entire pages. To create a border around a paragraph or paragraphs:
- Select the area of text where you want the border or shading.
- Click the Borders Button on the Paragraph Group on the Home Tab
- Choose the Border and Shading
- Choose the appropriate options

Apply Styles
Styles are a present collection of formatting that you can apply to text. To utilize Quick Styles:
- Select the text you wish to format.
- Click the dialog box next to the Styles Group on the Home Tab.
- Click the style you wish to apply.

Change Spacing Between Paragraphs and Lines
You can change the space between lines and paragraphs by doing the following:
- Select the paragraph or paragraphs you wish to change.
- On the Home Tab, Click theParagraph Dialog Box
- Click the Indents and Spacing Tab
- In the Spacing section, adjust your spacing accordingly

3.5.2 Formatting Text
Styles
A style is a format enhancing tool that includes font typefaces, font size, effects (bold, italics, underline, etc.), colors and more. You will notice that on the Home Tab of the Ribbon, that you have several areas that will control the style of your document: Font, Paragraph, and Styles.
![]()
Change Font Typeface and Size
To change the font typeface:
- Click the arrow next to the font name and choose a font.

- Remember that you can preview how the new font will look by highlighting the text, and hovering over the new font typeface.

To change the font size:
- Click the arrow next to the font size and choose the appropriate size, or
- Click the increase or decrease font size buttons.

Font Styles and Effects
Font styles are predefined formatting options that are used to emphasize text. They include: Bold, Italic, and Underline. To add these to text:
- Select the text and click the Font Styles included on the Font Group of the Ribbon, or
- Select the text and right click to display the font tools

Change Text Color
To change the text color:
- Select the text and click the Colorsbutton included on the Font Group of the Ribbon, or
- Highlight the text and right click and choose the colors tool.
- Select the color by clicking the down arrow next to the font color button.

Highlight Text
Highlighting text allows you to use emphasize text as you would if you had a marker. To highlight text:
- Select the text
- Click the Highlight Button on the Font Group of the Ribbon, or
- Select the text and right click and select the highlight tool
- To change the color of the highlighter click on down arrow next to the highlight button.

Copy Formatting
If you have already formatted text the way you want it and would like another portion of the document to have the same formatting, you can copy the formatting. To copy the formatting, do the following:
- Select the text with the formatting you want to copy.
- Copy the format of the text selected by clicking the Format Painterbutton on the Clipboard Group of the Home Tab
- Apply the copied format by selecting the text and clicking on it.

Clear Formatting
To clear text formatting:
- Select the text you wish to clear the formatting
- Click the Styles dialogue box on the Styles Group on the Home Tab
- Click Clear All

3.5.3 Bullets and Numbering
You can use bullets and numbers to make the lists in your document attractive and easy to read. You can bullet or number your lists by using either the Ribbon.
To get Bullets or numbers automatically as you type your list:
- Type an asterisk (*) and a space or a tab.
- Enter Text and press the Enter key.
In the same way you can do for numbered lists. You can also bullet a paragraph by clicking on the bullet list button.
To Change the bullet style, follow these steps
- Type a list of your favorite authors.
- Select the Bullets and Numbering option of the format menu. The bullets and numbering dialog box gets invoked as displayed in figure below.
- Click on the Bullets tab in the Bullets and Numbering dialog box.
- Click to select a style of your choice.


The use of Styles in Word will allow you to quickly format a document with a consistent and professional look. Styles can be saved for use in many documents.
Apply Styles
There are many styles that are already in Word ready for you to use. To view the available styles click theStyles dialog box on the Styles Group in the Home Tab. To apply a style:
Creating New Styles
You can create styles for formatting that you use regularly. There are two ways to do this: New Styles or New Quick Styles.
Microsoft Word is a popular word processing software. It helps in arranging written text in a proper format and giving it a systematic look. This formatted look facilitates easier reading. It provides spell-check options, formatting functions like cut-copy-paste, and spots grammatical errors on a real-time basis. It also helps in saving and storing documents.
It’s also used to add images, preview the complete text before printing it; organize the data into lists and then summarize, compare and present the data graphically. It allows the header and footer to display descriptive information, and to produce personalized letters through mail. This software is used to create, format and edit any document. It allows us to share the resources such as clip arts, drawing tools, etc. available to all office programs.
In this chapter, you will learn about Concepts related to MS Word in detail. You will know about Word Processing Basics, Opening and Closing the Document, Text Creation and Manipulation, Formatting Text, and Table Manipulation.
Basics of Word Processing
Word processor is used to manipulate text documents. It is an application program that creates web pages, letters, and reports.
| Sr.No. | Word Processing Concepts & Description |
|---|---|
| 1 | Opening Word Processing Package
Word processing package is mostly used in offices on microcomputers. To open a new document, click on «Start» button and go to «All Programs» and click on «Microsoft Word». |
| 2 | Opening and Closing Documents
Word automatically starts with a blank page. For opening a new file, click on «New». |
| 3 | Page Setup
Page setup options are usually available in «Page Layout» menu. Parameters defined by the user help in determining how a printed page will appear. |
| 4 | Print Preview
This option is used to view the page or make adjustments before any document gets printed. |
| 5 | Cut, Copy and Paste
In this section, we shall learn how to use cut, copy and paste functions in Word. |
| 6 | Table Manipulation
Manipulation of table includes drawing a table, changing cell width and height, alignment of text in the cell, deletion/insertion of rows and columns, and borders and shading. |
Summary
This topic provides us with a clear idea about components of word processing basics, opening and closing the documents, text creation and manipulation, formatting the text, table manipulation, etc.
It often happens that, a daily program such as Word, is a perfect unknown for most users. It is true that, in all the years of his career, he has undergone many changes.
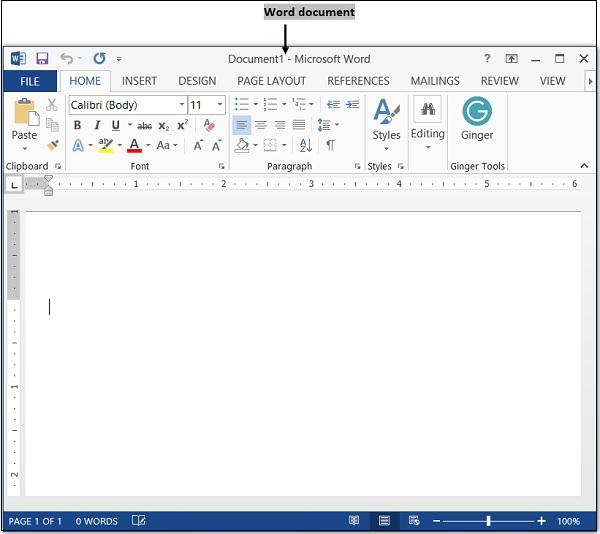
The latest versions incorporate many different types of options although, in essence, the functionalities are the same. The elements of the main word window are:

1-A Menu Bar
2-Standard toolbar
3-Bar selector of tool icons
4-Tools icons
5-scroll bars
6-Bar of Views of the document and state
7-Work Area
8-Help and search area
Each one is described below.
You may also be interested the excel elements .
Main elements of the word window
Menu bar
It is the access point to the options and tools of the program. It has a conventional form and is where we can locate all the material. They are arranged in a grouped and ordered way through drop-down menus.
Standard toolbar
It is a toolbar that stands out above the others. In it we can find the most used options such as: open file, save a file, cut, copy, paste, print.
We also find the help button, zoom or the icons that activate or deactivate the toolbars. We also have the sidebars or the multimedia gallery.
Tool icon selector bar
This bar is used to select the groups of tool icons that we want to show. Over the years, many of them have been incorporated.
In turn, the authors have been forced to put a selector so that the user can select the icon of the tool more conveniently. We can highlight: format, design, document elements, tables, graphics, revision.
Tools icons
In this bar all tool icons are shown depending on the selected group. All of them have a short legend that describes their function, which appears when we position ourselves in an icon and wait 2 seconds.
The most characteristic and we have all used at some time, are the format icons where we can select the source to use. In it we can enlarge it, color it, italicize, center the text, insert an image, etc.
Scrollbars
We have vertical and horizontal scroll bars, here we can navigate through the document from top to bottom and from left to right.
In addition, in this area we can paginate the document in a simple way and even access a selector. This is where we can move quickly or search and replace text in the document in different ways.
For example: p or modifications, by comments, by sections, by fields, by graphics, by tables, by titles, by notes, etc.
Bar of document views and status
Here we can change the layout of the document view in the lower left using different views: Draft, Outline, Design, Printing, Notepad and Full screen.
All of them useful at some point of our work with Word. Regarding the state, it will give us a quick overview of the number of pages of the document, words and the state of the spelling.
Work area
Here we can write our document, also, in it we will access a number of considerable options.
If we click on our right mouse button and select a block of text or a phrase with it, we will see the options.
Help and search area
In this Area we can enter any search pattern. The program will show us the result directly or using a side panel where the search results will be displayed.
References
- Area of Technology (2014). Elements of the Word 2017 window, from areatecnologia.com. Website: areatecnologia.com
- Verito (2014). Elements of the Word 2017 window, from slideshare.net. Website: slideshare.net
- Site Google (2014). Description of each of its parts of the Word 2017 window of Site Google. Website: sites.google
- WordPress (2013). Main elements of Microsoft Word 2017, from teescribodelcorazon. Website: teescribodelcorazon.wordpress
- Junta de Extremadura (2016). Basic elements of Microsoft Office Word 2016-2017, of the Ministry of Education and Employment. Website: emtic.educarex.es