
Word for Microsoft 365 Word 2021 Word 2019 Word 2016 Word 2013 Word 2010 Word Starter 2010 More…Less
You can change the look of your text by changing its fill, changing its outline, or adding effects, such as shadows, reflections, or glows.
Note: You can also apply text effects to WordArt.
Add an effect to text
-
Select the text that you want to add an effect to.
-
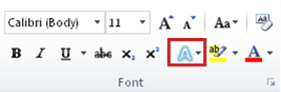
On the Home tab, in the Font group, click Text Effect.

-
Click the effect that you want.
For more choices, point to Outline, Shadow, Reflection, or Glow, and then click the effect that you want to add.
Remove an effect from text
-
Select the text that you want to remove an effect from.
-
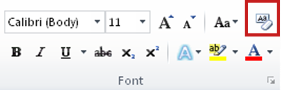
On the Home tab, in the Font group, click Clear Formatting.
Need more help?
Most of your Word documents are likely set in standard, drab Times New Roman or Calibri typography, perhaps with the occasional cheesy Word Art thrown in for variety. Yet Word actually includes a number of text effect tools that give you everything you need to make beautiful art from your words.
In this tutorial, I’ll show you how to create the cool text effects you want in every modern version of Microsoft Word, using its advanced type and typography formatting features. Once you’re done, you’ll know the tricks that I used to make Word templates that look great.
How to Make a Stylish Text Effect in MS Word (Quick Video)
In this quick screencast video, you’ll learn how to go beyond default Word Art options and make a cool text effect in Microsoft Word, using text formatting tools to create stylish typography:
For more detailed information on how to make beautiful Word text effects, review the step-by-step instructions below.
How to Make MS Word Text Effects (Step by Step)
Learn how to apply both standard text effects and more advanced options inside Microsoft Word’s Format pane, such as Drop Shadow and Reflection. Discover how to transform your text into cool typography art. Let’s get started:
1. Set Up a New Page in MS Word
Start by creating a new document by either clicking File > New or pressing the Control-N shortcut. To set properties like the page orientation and the page size, jump into the Layout tab.
.jpg)
.jpg)
.jpg)
If you plan to print your document and you already know the final paper size, it is important to set it as a first step. Why? Microsoft Word lets you easily scale any object, but
some properties, like the outline width, remain unchanged. Font size also
stays the same during the resizing, and has to be updated manually. Working in
the final paper size right from the beginning helps save time in the
future.
There are two things you need to know about the Layout tab before we set the final page size values. First, the Size drop-down menu contains only the paper sizes which are possible to print with the currently selected printer. In other words, you cannot set an A3 paper size when your printer can only print up to A4 documents. To fix that, you can jump to the File > Print menu and change the printer to a different one for a second, for example the Microsoft XPS Document Writer, which is a «virtual printer» that only saves files locally to your computer.
.jpg)
.jpg)
.jpg)
Don’t print anything, but once you’ve chosen a different printer, go back (using the left arrow in the top left corner), and open Layout > Size again. The list of available sizes should be much larger now.
.jpg)
.jpg)
.jpg)
Then, the other thing worth noting is that the drop-down menus for Margins, Orientation and Size may not be enabled all the time. If you have a Text Box placed and selected inside the document, some Layout options will be disabled. I’m specifically pointing this out because we will use Text Box objects all the time, and jumping to the Layout tab and seeing those options disabled can be quite frustrating.
.jpg)
.jpg)
.jpg)
Now you know how to always be able to set a page Size. Set the size to A4
and the Orientation to Landscape. Your page is now set up the way you’ll want for your custom Word text effect art, and you’ll know how to tweak it again next time.
.jpg)
.jpg)
.jpg)
2. Change the Font and the Font Size
Now, it’s time to add your text and start tweaking it. Type anything you want, select the text, and pick the font and size you want. Most of the text effects look best in large sizes, so don’t be afraid to
use either the Increase Font Size button
or the font size drop-down menu to make the text really big.
If the maximum
value of 72 pt is not enough, type in any number you want, for example
250 pt (only type the number). You can also use non-integer values, such as 198.5, if you want to get the largest possible text without wrapping.
.jpg)
.jpg)
.jpg)
3. What Is Kerning? (How to Set It in Word)
Let’s look at an important concept for setting typography in Word. When a type designer creates a font, every letter has its own width set to make sure the gaps between the letters are even. This works fine in most cases, except for the combination
of letters with less «rectangular» shapes, like «V» and «A».
Thus, type designers add “kerning” features, which specify that those two letters when placed next to each other will have the gap smaller (or bigger). In a perfect world, an application uses this kerning and everything looks fine. Well, not everything functions as expected in the real world.
.jpg)
.jpg)
.jpg)
If you only need to know one thing about kerning, remember this—it should always be enabled, but it is off by default in Microsoft Word. To turn it on, open the Font dialog (Control-D) Advanced tab, and check Kerning for fonts X points and above.
When you check this checkbox, a current font size is filled into the edit box, but you probably want to change it to 1 pt instead—just to make sure it will be really enabled all the time for
any text. Then click the Set as Default button. For more information about kerning, see Quick Tip: Typography Skills, Basic Kerning.
.jpg)
.jpg)
.jpg)
It is important to know that the kerning also has to be enabled this way for every text box in the document. If you accidentally or on purpose delete everything in your document
(Control-A > Delete), the kerning is again turned off.
4. Apply Standard Text Effects in Microsoft Word
Before we start adding our own text effect, let’s briefly take a look what Word offers us in the Text Effect and Typography drop-down menu on the Home tab on the ribbon. There are 15 pre-defined text effects with different outlines, fills, and shadow effects, and some of the presets also include 3D effects. The colors of those presets always reflect the selected color theme.
.jpg)
.jpg)
.jpg)
You can jump to the Design tab and select a different color scheme from the Colors drop-down menu. Jump back to the Home tab, open the Text Effects and Typography drop-down menu, and it should look a bit different.
.jpg)
.jpg)
.jpg)
This is nice, but unfortunately there’s no way to adjust those presets. The items in this list cannot be edited or deleted, and you cannot add new presets. Those 15 presets can be helpful
if you need a nice looking header and you only have two minutes of your time, but you will learn nothing new about the text
effects just by using them.
5. Body Text vs. a Text Box
The text can be placed in a document in two different ways. The usual way is to create a new document and start typing. We can call this type of text «body text«. While the text effects can be added to this body text quite easily, they are limited, and thus using body text is not a preferred option.
The second way is to use a Text Box object and write into this text box. To insert a new Text Box, select Insert > Shapes > Text Box, and draw a new text box the same way you draw for example a rectangle.
.jpg)
.jpg)
.jpg)
The text placed inside a text
box has several advantages. It can be moved around the document freely without
any restrictions (even off the document or over the margins), and it can be
rotated. Moreover, some additional text effects like the 3D rotate options are
available.
If you do not like the default appearance of the text box—especially the white fill and the black outline—both can be easily set to none on the Format tab. Use the Shape Fill and the Shape Outline drop-down menus.
.jpg)
.jpg)
.jpg)
To select a text box with no fill and no outline, click over the text, which will show the text box
borders as a dotted line. Clicking over this dotted line to select a text box should be easy now.
6. Change Your Page Background in Word
The standard white paper color may seem a little bit boring for our text effect, and it may be a good idea to set it to a different color. Go to the Design tab, and from the Page Color drop-down menu, select a dark gray color. As for any other color
drop-down, the first two columns with grays are still the same, but the eight columns on the right side change depending on the chosen color palette. After changing the background, the black text inside the text box is almost invisible now, but that’s fine—we’ll fix it in a minute.
.jpg)
.jpg)
.jpg)
7. Master the Almighty Format Pane
The Format tab in Word allows us to format the text box as well as the text itself. There are drop-down menus for the text fill, outline, and all the other possible effects, and there are submenus and submenus and submenus. It is definitively not an easy way to tweak the effects,
and we only have access to a limited number of presets and options. There is
a better place to adjust the setting—the Format Pane.
The Format Pane is an essential pane for setting all the advanced options, yet there is no standard way to display this pane. In short, every «More…» item on the Format tab (More Lines, More Gradients, More Textures) opens the Format Pane,
but since we have the Text Box inside our document, we might as well right click
the text box border and select Format Shape.
.jpg)
.jpg)
.jpg)
Before we move on, remember there is only one Format Pane,
but the content of this pane changes depending on the selected content. It’s
different for the text box, for body text, and for an image.
I say it to
prevent any confusion, because the name of this Format Pane also changes—it
can be Format Shape, Format Text Effects or Format Picture. Because this will
be our base station for setting all the effect, it is a good habit to keep this
pane open all the time.
8. Set the Text Fill and the Outline
With the background color set and a Format Pane still open,
select the text box and type in any word, for example “Effect”. Keep the font set to
Calibri and set the size to 72 pt. In the Format Pane, select Text Options,
open the Text Fill settings, and change the Text fill from the Solid Fill to the
Gradient Fill. From the Preset Gradients drop-down menu, select a yellow top
spotlight. This will create a subtle shading, as if there was a light source
shining from the top.
.jpg)
.jpg)
.jpg)
To make the text a little bit more interesting, we will also add an outline. Change the Text
Outline from No Line to Solid Line, raise the Width to a bigger number,
for example 3 pt, and change the Color to white.
.jpg)
.jpg)
.jpg)
The outline is nice, but too
strong. We can open the Compound Type drop-down menu and select Double, which
will split the outline into two: one visible over the text, and one outside the
text. To get rid of the ugly joins, change the Join type to Round instead of the default Bevel.
.jpg)
.jpg)
.jpg)
All we need to do now
is to increase the Transparency to make this outline less visible. A value
around 60% seems to be just fine.
.jpg)
.jpg)
.jpg)
9. Add More Cool Word Text Effects
With the text box
still selected and the Format Pane still open, switch to the Text Effects
tab. As a first effect, we will add a simple drop shadow below the text. Open
the Shadow effect properties, and from the presets drop-down menu, select Outer:
Offset Bottom. Because the page background color is quite dark, the effect is
quite subtle, which is fine, and probably does not need any additional tweaking.
.jpg)
.jpg)
.jpg)
If you want, you can
also try to add a Reflection effect. Select any preset, but increase the Blur
value to make the reflection less visible and not too distracting.
.jpg)
.jpg)
.jpg)
In just a few steps, we have a nice looking text effect, and we can call it done.
.jpg)
.jpg)
.jpg)
10. Share the Document (.docx vs .pdf)
When sharing your
document with your friends, you can choose between two main formats: the Word
native .docx, or Adobe Acrobat .pdf file. The document saved in .docx format
keeps the effects fully dynamic, but depending on the effects used, the other
person often needs to have the latest version of Microsoft Word installed.
Otherwise, the document can look different (and most likely ugly).
The biggest advantage
of the document saved in a .pdf format is that it will look exactly the same on
every device, in any application. However, you lose the ability to edit the
text effects, and probably also the ability to edit the text. Microsoft Word
can export as well as import the .pdf files, but the ability to edit the text with the applied effects is in most cases lost. For more information, please read this helpful tutorial:
To save the document
in the .docx format, simply hit the save button—it should be the default
format. To save the document as a .pdf file, select File > Export >
Create PDF/XPS, and then choose PDF in the file type drop-down when saving the file.
.jpg)
.jpg)
.jpg)
Key Takeaways: For Making Your Own MS Word Text Effects
We’ve only scratched
the surface of the text effects in Microsoft Word, but you should have a solid
knowledge of the Word basics needed for future effects. Here is a list of
the main takeaways:
- When possible, set
the paper size as a first step. Resizing the objects afterwards can bring
unexpected complications. - Most text effects look best in very large sizes.
- Always be sure to enable kerning and good typography practices when working with text in Word.
- There is a
difference between «body text» and text placed inside a
Text Box. For text effects, text placed inside a Text Box is preferred. - The Format Pane is the
best place to change any formatting—make sure to have this pane
visible all the time. - Share your creations
in Word .docx format to keep the ability to edit, or Adobe Acrobat .pdf format to
make sure everything will look the same at all times.
Enjoy creating your own text effects using these steps, and leave a comment below if you have any trouble making your own text effects in Word!
To learn more about Microsoft Word, study the
following tutorials:
Editorial Note: This post was originally published in 2014. It has been comprehensively revised by our staff to make it current, accurate, and up to date—with special assistance from Laura Spencer.
Did you find this post useful?
![]()
Hello, I’m Vaclav, graphics designer from Czech Republic, mainly focused on GUI design. Despite everything I’ve created in Photoshop, my most well-known creation is a viral video «Was iOS7 created in Microsoft Word?».
Большинство ваших документов Word, вероятно, составлены в стандартном, сером шрифте Times New Roman или Calibri, возможно, со случайным дрянным Word Art для разнообразия. Но Word имеет все инструменты для создания художественного текста.
В этом уроке я покажу вам всё, что нужно для создания крутых текстовых эффектов во всех современных версиях Microsoft Word, с его шрифтами и расширенными функциями форматирования. В конце вы будете знать, как сделать великолепные шаблоны в Word.
Как сделать стильный текстовый эффект в MS Word (Quick Video)
В этом видеоролике вы узнаете, как выйти за рамки параметров Word Art и создать крутой эффект в Microsoft Word инструментами форматирования текста:
Подробности о том, как создавать красивые текстовые эффекты в Word ищите в инструкции ниже.
Как создавать текстовые эффекты в MS Word (поэтапно)
Учитесь применять стандартные текстовые эффекты и более сложные параметры в Format панели Microsoft Word, такие как Drop Shadow и Reflection. Узнайте, как превратить ваш текст в крутую картинку. Давайте начнём:
1. Настроим новую страницу в MS Word
Начните с создания нового документа, нажав File > New или сочетание клавиш Ctrl+N. Чтобы задать ориентацию и размер страницы, перейдите на вкладку Layout.
Если вы планируете печатать свой документ и знаете размер бумаги, установите его сразу. Зачем? Microsoft Word позволяет легко масштабировать любой объект, но некоторые свойства, такие как outline width, остаются неизменными. Размер шрифта при изменения размера бумаги должен обновляться вручную. Установка размера бумаги с самого начала сэкономит время в будущем.
Перед установкой значений размера страницы вам нужно знать две вещи о вкладке Layout. Во-первых, раскрывающееся меню Size содержит размеры бумаги, которые можно печатать на выбранном принтере. То есть, вы не установите формат бумаги A3, если ваш принтер может печатать документы только формата A4. Чтобы исправить это, вы можете перейти в меню File > Print и в течение секунды изменить принтер на другой, например, Microsoft XPS Document Writer, такой «virtual printer», который сохраняет файлы на вашем компьютере.
Не печатайте ничего, но как только вы выбрали другой принтер, вернитесь (по левой стрелке в верхнем левом углу), снова откройте Layout>Size. Список доступных размеров теперь будет намного больше.
Затем следует обратить внимание на то, что выпадающие меню для Margins, Orientation и Size могут не быть включены все время. Если у вас есть Text Box, выбранный внутри документа, некоторые параметры Layout будут отключены. Я специально указываю на это, потому что мы будем использовать объекты Text Box и вид вкладки Layout с отключенными параметрами может оказаться неприятным.
Теперь вы знаете, как устанавливать Size страницы. Установите размер A4 и Orientation на Landscape. Теперь ваша страница настроена для Word эффекта, и вы сможете в следующий раз настроить её снова.
2. Замена шрифта и его размера
Теперь пришло время добавить текст и начать его настройку. Введите всё, что хотите, выделите текст и выберите нужный шрифт и размер. Большинство эффектов лучше заметны в больших размерах, поэтому не бойтесь кнопки Increase Font Size или выпадающего меню размера шрифта, чтобы сделать текст крупным.
Если значения 72 pt недостаточно, введите нужные цифры, например 250 pt (только число). Можете использовать дробные значения, вроде 198,5, если нужен максимальный размер без переноса.
3. Что такое Kerning? (как установить его в Word)
Обратимся к важной концепции написания в Word. Когда конструктор создаёт шрифт, каждая буква имеет свою ширину, но промежутки между буквами равные. В основном это отлично работает, за исключением комбинации букв с менее «прямоугольными» формами, таких как «V» и «A».
Здесь конструкторы шрифтов делают “kerning”, который определяет, что эти две буквы, расположенные рядом, будут иметь меньший интервал (или больший). В идеале приложение использует этот кернинг и всё выглядит отлично. Но не всё так, как ожидалось, работает в реальном слове.
О функции kerning знайте только одно — она должна быть включена, но по умолчанию в Microsoft Word она отключена. Поэтому откройте Font dialog (Ctrl+D) Advanced и проверьте Kerning for fonts X points and above.
После установки флажка текущий размер шрифта заполняется в окне редактирования, но вы, вероятно, захотите изменить его на 1 pt, чтобы убедиться, что он действительно включен. Затем нажмите кнопку Set as Default. Подробнее о kerning смотрите в Quick Tip: Typography Skills, Basic Kerning.
Важно знать, что kerning должен быть включен для каждого текстового поля в документе. Если вы случайно или намеренно всё в документе удалили (Ctrl+A >Delete), kerning выключится.
4. Применение стандартных эффектов текста в Microsoft Word
До начала работы с эффектами, кратко рассмотрим, что предлагает Word в раскрывающемся меню Text Effect and Typography на вкладке Home ленты. 15 определенных текстовых эффектов с различными outlines, fills, shadow effects, а некоторые из пресетов имеют 3D-эффект. Цвета этих пресетов всегда отражают выбранную цветовую тему.
Перейдя на вкладку Design, выберите другую цветовую схему в меню Colors. Вернитесь на вкладку Home, откройте меню Text Effects and Typography и оно будет выглядеть несколько иначе.
Это красиво, но, к сожалению, без возможности настройки. Элементы в этом списке нельзя редактировать или удалять и добавлять новые пресеты. Эти 15 пресетов полезны, если вам нужен привлекательный заголовок, а у вас только две минуты времени, но вы не узнаете ничего нового о текстовых эффектах, просто используя их.
5. Текст, как Body Text вместо Text Box
Текст можно поместить в документ двумя способами. Обычный способ — создать новый документ и набирать. Мы можем назвать этот тип текста «body text». Хотя текстовые эффекты можно добавить в body text довольно легко, они ограничены и, таким образом, использование body text не подходит.
Второй способ — использовать объект Text Box и писать в этом текстовом поле. Чтобы вставить новый Text Box, выберите Insert > Shapes > Text Box и нарисуйте новый text box так же, как вы рисуете, например, прямоугольник.
Текст, помещенный в text box, имеет ряд преимуществ. Он может свободно перемещаться по документу без каких-либо ограничений (даже вне документа или по краям) и его можно поворачивать. Кроме того, доступны некоторые дополнительные текстовые эффекты, такие, как опции поворота 3D.
Если вам не нравится внешний вид текстового поля по умолчанию, особенно белый и чёрный, то на вкладке Format их можно установить на «нет». Из списка возьмите Shape Fill и Shape Outline.
Чтобы выбрать text box без заливки и без контура, щёлкните по тексту, который будет отображать границы text box в виде пунктирной линии. Щелчок для выбора text box теперь будет простым.
6. Замена фона страницы в Word
Стандартный цвет белой бумаги может показаться немного скучным для нашего эффекта и можно попробовать установить другой цвет. Перейдите на вкладку Design и в раскрывающемся меню Page Color выберите тёмно-серый цвет. Как и в других списках, первые две колонки с серыми остаются теми же, но восемь столбцов справа изменяются в зависимости от выбранной цветовой палитры. После изменения фона чёрный текст внутри text box почти невидим, прекрасно, мы исправим его через минуту.
7. Освойте всесильную Format Pane
Вкладка Format в Word позволяет нам форматировать text box и сам текст. Для раскрытия текста, контура и всех других возможных эффектов имеются выпадающие меню, а также подменю, подменю и подменю. Это не самый простой способ настройки, где мы имеем доступ к ограниченному количеству пресетов и опций. Есть более удобное место для настройки — Format Pane.
Format Pane необходимая область настройки всех дополнительных параметров, но стандартного способа отображения этой панели нет. Каждый элемент «More…» на вкладке Format (More Lines, More Gradients, More Textures) открывает Format Pane, но поскольку у нас есть text box внутри документа, мы можем щёлкнуть правой кнопкой мыши по границе текстового поля и выбрать Format Shape.
Прежде чем двигаться дальше, помните, что есть только одна Format pane, но содержимое этой панели изменяется в зависимости от его выбора. Есть разница для text box, для body text и для изображения.
Я говорю это, чтобы избежать путаницы, потому что название Format pane также изменяется, это могут быть Format Shape, Format Text Effects или Format Picture. Поскольку это наша база для установки всех эффектов, будем держать панель открытой.
8. Установим заливку текста и контур
Когда набор цветов фона и Format Pane открыты, выберите text box, введите любое слово, например “Effect”. Пусть будет шрифт Calibri, размер 72 pt. В панели Format Pane выберите Text Options, откройте значение Text Fill и поменяйте Text fill с Solid Fill на Gradient Fill. В меню Preset Gradients выберите жёлтый верхний указатель. Это создаст тонкое затенение, как если бы источник света был сверху.
Чтобы текст был поинтересней, добавим контур. Измените Text Outline с No Line на Solid Line, сделайте Width побольше, например 3 pt и измените Color на белый.
Контур хорош, но слишком силен. Мы можем открыть меню Compound Type и выбрать Double, который разделит контур на два, один видимый над текстом и один за его пределами. Чтобы избавиться от уродливых стыков, измените Join type на Round, а не на Bevel по умолчанию.
Теперь нам нужно только увеличить Transparency, чтобы контур был менее заметным. Поставим около 60%.
9. Ещё несколько крутых эффектов Word Text
С выделенным text box в открытой Format Pane перейдите на вкладку Text Effects. Добавим под текстом эффект простой тени. Откройте свойства Shadow и в выпадающем меню пресетов выберите Outer: Offset Bottom. Поскольку цвет фона страницы тёмный, эффект довольно тонкий и, вероятно, не нуждается в дополнительной настройке.
Если хотите, можно добавить эффект Reflection. Выберите любой пресет, но увеличьте значение Blur, чтобы сделать отражение менее заметным и не слишком отвлекающим.
Всего за несколько шагов мы сделали приятный эффект текста.
10. Форматы документа (.docx или .pdf)
Когда вы делитесь своим документом, можете выбрать один из двух основных форматов. Файл с расширением .docx или Adobe Acrobat .pdf. Документ в формате .docx сохраняет эффекты в полной динамике, но у получателя должна стоять такая же версия Microsoft Word. В противном случае документ может выглядеть по-другому (и, скорее всего, некрасиво).
Большое преимущество документа, сохраненного в формате .pdf в том, что он будет выглядеть одинаково на каждом устройстве. Однако теряется возможность редактировать эффекты и править текст. Microsoft Word может экспортировать и импортировать .pdf-файлы, но съедобность текста с примененными эффектами в большинстве случаев теряется. Подробности об этом в уроке:

Microsoft Word
How to Convert & Edit PDF Documents in Microsoft Word
Matthew Guay

Чтобы сохранить документ в формате .docx, нажмите кнопку «Сохранить». Чтобы сохранить документ в формате .pdf, выберите File > Export > Create PDF/XPS, затем выберите PDF из списка типов файлов.
Выводы: для создания эффектов текста в MS Word
Мы поверхностно прошлись по эффектам текста в Microsoft Word, но у вас должно быть твёрдое знание основ Word на будущее. Вот основные тезисы:
- По возможности сразу установите размер бумаги. Изменение размера объектов впоследствии может привести к неожиданным осложнениям.
- Большинство текстовых эффектов выглядят лучше всего в очень больших размерах.
- Обязательно включите kerning и хорошую типографику при работе с текстом в Word.
- Существует разница между «body text» и текстом внутри Text Box. Для текстовых эффектов предпочтительнее размещать текст внутри Text Box.
- Format Pane — лучшее место для любого форматирования — убедитесь, что панель видима всё время.
- Делитесь своими творениями в формате Word .docx для возможной правки или в Adobe Acrobat .pdf, чтобы всё всегда выглядело одинаково.
Наслаждайтесь созданием собственных текстовых эффектов, используя эти шаги и оставьте комментарий, если у вас есть проблемы с их созданием в Word!
Чтобы узнать больше о Microsoft Word, изучите следующие пособия:
-
Microsoft Word
How to Create a Table of Contents in Microsoft Word
Bob Flisser
-
Microsoft Word
How to Simplify Word Document Formatting With Styles
Bob Flisser


Примечание редакции: этот пост впервые опубликован в 2014 году. Он был всесторонне переработан нашими сотрудниками для текущих, точных обновлений — при особой помощи от Laura Spencer.
Text Effect is a feature in Microsoft Word that allows you to add some fanciness to your text, making it look like a WordArt object. Using the text effects in Word, you can create fancy text such as text with reflection, text with shadow or outline, or glowing text.
Adding or Changing Text Effect in Word
To add or change text effect in Word, select the text and go to the Home tab, under the Font group, click on the Text Effects and Typography drop-down button. From the shortcut menu that appears, click to select the effect you want for your text.

Below is a blow-by-blow instruction on how to apply or change text effects in Word:
- Select the text to which you wish to apply or change the text effect.
- Go to Home > Font > Text Effect and Typography.
- A shortcut menu will show up with the available text effects. Hover your mouse on them to preview how the selected text changes.
- If you found the text effect you like, just click on it to apply.
Also, at the bottom of the text effect gallery, you can click any of the effects listed for their sub galleries.
Below are the available text effects in Microsoft Word:
- Outline: This text effect sets the text outline. Clicking on it will show a gallery where you can apply a color or style for the text outline.
- Shadow: This effect adds shadow text to your selection. You can choose from many shadow options like an outer or inner shadow effect.
- Reflection: The reflection text effect creates a faint reflection on the invisible surface beneath the text, like a partial mirror image of the text.
- Glow: This adds some colored-glowing effect to the text.
- Number Styles: This effect applies to numbers. So, you can use this if your text includes numbers.
- Statistic Sets: This effect adds interest to the letter appearance. For instance, one of the styles in this sub-category will make both lowercase and uppercase the same size in height without the changing letter shape.
How do you remove text effects in Word?
Adding text effects in Microsoft Word is just as simple as removing them. However, it doesn’t involve using the same Text Effect and Typography command. It involves using the clear formatting tool as explained below.
Thus, to remove Text Effects in Word, select the text with the effect, then go to the Home tab in the Font group, click the Clear Formatting command. This clear all the formats applied to the selection including the Text Effect.

This is how you may add or change and remove text effects in Microsoft Word.
Read Also: How to remove heading and heading styles in Word
Word Art в Microsoft Office — это текстовое поле, которое предлагает множество стилей, которые придают художественный вид вашему тексту, чтобы привлечь внимание. Пользователи могут использовать WordArt при создании листовок, рекламных объявлений и других творений, потому что WordArt выделяется.
Текстовый эффект и WordArt
Вы можете настроить текст WordArt, изменив цвет, размер и шрифт текста WordArt. В Microsoft Office вы также можете настроить текстовый эффект текста WordArt.
В этом уроке мы будем использовать Microsoft Word.
Создать Текст WordArt.
Убедитесь, что Текстовое поле WordArt выбрано.
Нажмите Текстовые эффекты в Стили WordArt группа.
Вы можете выбрать такие эффекты, как Тень, Отражение, Светиться, Скос, 3-D вращение, и Преобразовать в его раскрывающемся списке.
В Эффект тени добавляет эффект тени к вашему тексту. Вы можете выбрать эффект тени, который состоит из Нет тени, Внешний, Внутренний, Перспектива, и щелкните Параметры тени флажок внизу списка.
А Форматировать фигуру справа появится окно, в котором вы можете выполнить дальнейшую настройку, например Пресеты, Цвет, Прозрачность, Размер, Размытие, Угол и Расстояние.
В Эффект отражения придает тексту отражающий эффект. В Отражение эффект состоит без отражения и Варианты отражения.
Когда вы нажимаете Параметры отражения флажок, A Форматировать фигуру Окно появится справа. Которые состоят из Пресеты, Тпрозрачность, Размер, Размытие, и Расстояние для настройки эффекта отражения.
В Эффект свечения позволяет тексту иметь эффект свечения. Эффект свечения состоит из Нет свечения, Вариация свечения, и Больше свечения Цвета которые позволяют пользователю выбрать любой цвет в своем тексте свечения.
Когда вы нажимаете Параметры свечения флажок внизу списка, Форматировать фигуру справа появится окно, состоящее из Пресеты, Тпрозрачность, Размер, Размытие, и Расстояние для настройки эффекта свечения.
В Эффект скоса придает тексту скошенный вид. Эффект скоса состоит из Без скоса и Скос.
Когда пользователь нажимает 3-D параметры, а Форматировать фигуру Появится окно, отображающее дальнейшую настройку эффекта скоса. К ним относятся выбор Верхний скос и Нижний скос, то Ширина и Высота обоих скосов, Глубина и Контур цвет и размер, Материал, выбор Освещение, и Молния Угол и Перезагрузить, который позволяет сбросить настройки Bevel.
В Эффект трехмерного вращения придает тексту эффект трехмерного вращения. Эффект трехмерного вращения состоит из Нет трехмерного вращения, Параллельный, Перспектива, и Косой.
Вы увидите Вариант трехмерного вращения; если щелкнуть по нему, Форматировать фигуру появится окно с такими параметрами, как Пресеты, X вращения, Y вращения, Z вращения, Оставить ровный текст поворота, Расстояние от земли, и Перезагрузить.
В Эффект трансформации придает тексту эффект кривой. Эффект трансформации состоит из Без преобразования, Следовать по пути, и Деформация.
Выберите любой из этих Последствия, и текст в документе изменится.
Надеюсь, это поможет; если у вас есть вопрос, прокомментируйте его ниже.
Читать дальше: Как создать штрих-код в Microsoft Word.