
Excel for Microsoft 365 Excel for the web Excel 2021 Excel 2019 Excel 2016 Excel 2013 Excel 2010 Excel 2007 More…Less
Occasionally, dates may become formatted and stored in cells as text. For example, you may have entered a date in a cell that was formatted as text, or the data might have been imported or pasted from an external data source as text.
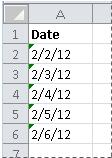
Dates that are formatted as text are left-aligned in a cell (instead of right-aligned). When Error Checking is enabled, text dates with two-digit years might also be marked with an error indicator:  .
.
Because Error Checking in Excel can identify text-formatted dates with two-digit years, you can use the automatic correction options to convert them to date-formatted dates. You can use the DATEVALUE function to convert most other types of text dates to dates.
If you import data into Excel from another source, or if you enter dates with two-digit years into cells that were previously formatted as text, you may see a small green triangle in the upper-left corner of the cell. This error indicator tells you that the date is stored as text, as shown in this example.
You can use the Error Indicator to convert dates from text to date format.
Notes: First, ensure that Error Checking is enabled in Excel. To do that:
-
Click File > Options > Formulas.
In Excel 2007, click the Microsoft Office button
 , then click Excel Options > Formulas.
 -
In Error Checking, check Enable background error checking. Any error that is found, will be marked with a triangle in the top-left corner of the cell.
-
Under Error checking rules, select Cells containing years represented as 2 digits.
 , then click Excel Options > Formulas.
Follow this procedure to convert the text-formatted date to a normal date:
-
On the worksheet, select any single cell or range of adjacent cells that has an error indicator in the upper-left corner. For more information, see Select cells, ranges, rows, or columns on a worksheet.
Tip: To cancel a selection of cells, click any cell on the worksheet.
-
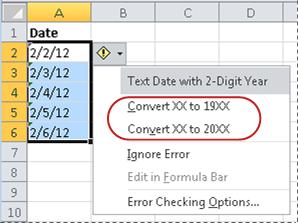
Click the error button that appears near the selected cell(s).
-
On the menu, click either Convert XX to 20XX or Convert XX to 19XX. If you want to dismiss the error indicator without converting the number, click Ignore Error.
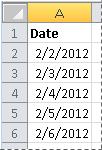
The text dates with two-digit years convert to standard dates with four-digit years.
Once you have converted the cells from text-formatted dates, you can change the way the dates appear in the cells by applying date formatting.

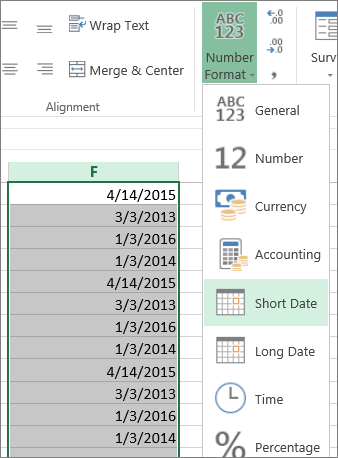
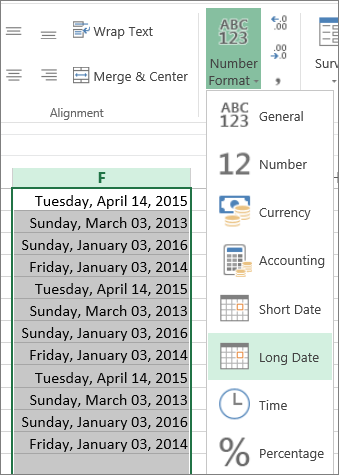
If your worksheet has dates that were perhaps imported or pasted that end up looking like a series of numbers like in the picture below, you probably would want to reformat them so they appear as either short or long dates. The date format will also be more useful if you want to filter, sort, or use it in date calculations.

-
Select the cell, cell range, or column that you want to reformat.
-
Click Number Format and pick the date format you want.
The Short Date format looks like this:
The Long Date includes more information like in this picture:
To convert a text date in a cell to a serial number, use the DATEVALUE function. Then copy the formula, select the cells that contain the text dates, and use Paste Special to apply a date format to them.
Follow these steps:
-
Select a blank cell and verify that its number format is General.
-
In the blank cell:
-
Enter =DATEVALUE(
-
Click the cell that contains the text-formatted date that you want to convert.
-
Enter )
-
Press ENTER, and the DATEVALUE function returns the serial number of the date that is represented by the text date.
What is an Excel serial number?
Excel stores dates as sequential serial numbers so that they can be used in calculations. By default, January 1, 1900, is serial number 1, and January 1, 2008, is serial number 39448 because it is 39,448 days after January 1, 1900.To copy the conversion formula into a range of contiguous cells, select the cell containing the formula that you entered, and then drag the fill handle
across a range of empty cells that matches in size the range of cells that contain text dates.
-
-
After you drag the fill handle, you should have a range of cells with serial numbers that corresponds to the range of cells that contain text dates.
-
Select the cell or range of cells that contains the serial numbers, and then on the Home tab, in the Clipboard group, click Copy.
Keyboard shortcut: You can also press CTRL+C.
-
Select the cell or range of cells that contains the text dates, and then on the Home tab, in the Clipboard group, click the arrow below Paste, and then click Paste Special.
-
In the Paste Special dialog box, under Paste, select Values, and then click OK.
-
On the Home tab, click the popup window launcher next to Number.
-
In the Category box, click Date, and then click the date format that you want in the Type list.
-
To delete the serial numbers after all of the dates are converted successfully, select the cells that contain them, and then press DELETE.
 across a range of empty cells that matches in size the range of cells that contain text dates.
Need more help?
You can always ask an expert in the Excel Tech Community or get support in the Answers community.
Need more help?
Dates play an important role when we need to analyze trends. This is one of the most important things which you need to capture in the right way. Apart from the basic date format which is used by Excel to store dates. There are some other data formats that are acceptable.
Now the thing is: When we capture a date in the wrong format Excel treats that date as a text and, then we can’t use that date further in any calculation.
When it comes to textual data formats there is no one particular thing. It depends on the person who is entering those dates. The bottom line is: We do need some methods which we can use to convert a text to an actual date with the right format.
So today, in this post, I’d like to share with you 10 methods that we can use to convert a text to date format in Excel. For converting a text to date we need to use a combination of different functions.
So let’s get started.
Using the DATEVALUE function is a basic method to convert a date into an actual date which is stored as text.
Let’s say you have a list of dates in your worksheet and all the cells where dates are entered have text format but all those dates are in the correct date format.
In the below example, we have a date in a cell but when I try to add a number to that date I’m getting an error, even though the format of the data is correct.

But if you look at the cell format, it’s text. So here, is the best way to use the DATEVALUE function. You just need to refer to that cell in the function and it will convert that data into actual date.

And, then you can change its format to date.
Important Note: There are some situations where DATEVALUE can’t help us to get a date from a text. There is n number of irregular formats of dates and to deal with all those we need to create a custom formula using different functions.
In the next 10 examples, I will share with you how can we use these different functions.

2. Date with Back Slashes
The Excel date system supports dates with forwarding slashes. And, if we have a date where we have backslashes, it will treat it as a text.

To solve this problem we can use the below formula.
=DATE(RIGHT(A2,4),MID(A2,4,2),LEFT(A2,2))
3. Date with Month Name
Now, we have a date format where the month is entered with its name. For Excel, this is not a date anymore, even if it’s presenting a date clearly.

The below formula can help us with this.
=DATEVALUE(RIGHT(A3,2)&"-"&TEXT(MID(A3,6,3),"MMM")&"-"&LEFT(A3,4))
4. Date with Dots
It’s a common kind you problem where we get dots inside a date. This is a kind of format used by people who are not aware that this is not a proper date format.

And, this is the formula to correct it.
=DATE(RIGHT(A4,4),MID(A4,4,2),LEFT(A4,2))
5. Date with the Month Name and a Comma
This format is almost the same as the format we discussed in point 3.

And, we can correct it with the below formula.
=DATEVALUE(LEFT(A5,2)&"-"&TEXT(MID(A5,4,3),"MMM")&"-"&RIGHT(A5,4))
6. Date with the Day Name
Sometimes people store a date with the day’s name. And, if that date is not in a proper format Excel will treat it as text.

Use this formula for this type of text date.
=DATEVALUE(MID(A6,FIND(",",A6)+6,2)&"-"&MID(A6,FIND(",",A6)+2,3)&"-"&RIGHT(A6,4))
7. Date with a Day Name in the End
Here we have a date with the day name at the end. Now, the problem with this format is it has a comma between the date and day name.

But, we can get the valid date using the below formula.
=DATEVALUE(MID(A7,10,2)&"-"&MID(A7,6,3)&"-"&LEFT(A7,4))
8. Date Having a Suffix with Day
We have a “th” suffix with the day number and it makes it a text instead of a date as Excel is not able to recognize it.

The below formula will help you to get the real date.
=DATEVALUE(LEFT(A8,FIND("th",A8)-1)&"-"&MID(A8,FIND(" ",A8)+1,3)&"-"&RIGHT(A8,4))
9. Date with Space Between Day, Month, and Year
When we have a date format with space between day, month, and year, we can use the below formula to correct the date format.

=DATE(RIGHT(A9,4),MID(A9,4,2),LEFT(A9,2))
10. Date with Short Month Name
With a date format where we have a short month name at the start of the date.

We can use the following formula to convert it to a valid date format.
=DATEVALUE(MID(A10,5,2)&"-"&LEFT(A10,3)&"-"&RIGHT(A10,4))
11. Date Without Any Space Between Day, Month, and Year
And for a date where there is no space between day, month, and year.

The below formula will help us to get the correct date format.
=DATE(RIGHT(A11,2),MID(A11,3,2),LEFT(A11,2))
How do I convert the following text into {dd/mm/yyyy} format, in excel:
Dec 3, 2012
Nov 1, 2012
Oct 2, 2012
Sep 3, 2012
Aug 1, 2012
Jul 2, 2012
Jun 1, 2012
The expected results should be:-
3/12/2012 {dd/mm/yyyy}
1/11/2012
![]()
Ellesa
10.8k2 gold badges38 silver badges52 bronze badges
asked Mar 11, 2013 at 11:37
5
Try using «Text to columns» functionality to convert «in situ»
Select column of dates then use
Data > Text to columns > Next > Next > under «column data format» choose «Date» > in dropdown select MDY > OK
Now you should have valid dates which you can reformat any way you want, e.g. dd/mm/yyyy
See here
answered Mar 11, 2013 at 12:26
![]()
barry houdinibarry houdini
10.8k1 gold badge20 silver badges25 bronze badges
5
You can use Excel’s DATEVALUE function to convert each of the date strings to Excel date values, then format the cells as dates.
To format the cells, select them and right-click. Choose «Format cells» on the menu that appears, select Format Cells and choose a date format.
![]()
Ellesa
10.8k2 gold badges38 silver badges52 bronze badges
answered Mar 11, 2013 at 12:08
![]()
chuffchuff
3,4641 gold badge15 silver badges19 bronze badges
4
Your dates are already in a format that Excel should be able to recognize (MMM DD, YYYY), but sometimes importing data can lead to the cells being formatted as Text.
Here’s one way to fix your problem:
-
Type
0into a cell and copy it. You may also copy a blank cell. -
Select all the dates in your range. Right-click the cells > Paste Special > Add. Click OK.
Your dates should now look like these:
-
With your dates still selected, press Ctrl + F1 (assuming you’re on Windows) and then change the Number format to
mm/dd/yyyy,dd/mm/yyyyor whichever you prefer.


You can also try others ways to fix your dates, like:
- Copy the cells with the text dates and paste them into blank cells using Paste Special > Add.
- Highlight the cells with the dates, change the number format to
m/dd/yyyyand then manually pressF2for each cell. But this is too tedious. - As chuff mentioned above, use
DATEVALUE.
![]()
answered Mar 11, 2013 at 23:53
![]()
EllesaEllesa
10.8k2 gold badges38 silver badges52 bronze badges
If you are ok to store date in format like 20120312 Then you can use below formula
=DATE(LEFT(C7;4);MID(C7;5;2);RIGHT(C7;2))
Please try below
=TEXT(A1;"dd/mm/yyyy")
answered Mar 11, 2013 at 11:56
6
if you right click, you need to choose the format cells option, select the Custom option (all the way at the bottom), then in the Type box enter dd/mm/yyyy and click ok
answered Mar 11, 2013 at 11:48
![]()
7
By default, all dates are stored as numbers in excel. If there is a time component, it gets stored as numeric with decimals. The following steps can be followed ( from ablebits.com) . There is a picture in the site to follow along with the steps.
How to change date format in Excel
In Microsoft Excel, dates can be displayed in a variety of ways. When it comes to changing date format of a given cell or range of cells, the easiest way is to open the Format Cells dialog and choose one of the predefined formats.
Select the dates whose format your want to change, or empty cells where you want to insert dates.
Press Ctrl+1 to open the Format Cells dialog. Alternatively, you can right click the selected cells and choose Format Cells… from the context menu.
In the Format Cells window, switch to the Number tab, and select Date in the Category list.
Under Type, pick a desired date format. Once you do this, the Sample box will display the format preview with the first date in your selected data.
Changing the date format in Excel
If you are happy for the preview, click the OK button to save the format change and close the window.
If the date format is not changing in your Excel sheet, most likely your dates are formatted as text and you have to convert them to the date format first.
Hope this helps.
Improve Article
Save Article
Like Article
Improve Article
Save Article
Like Article
Excel is used to store large amounts of data for manipulation or computation purposes. If our spreadsheet contains the date in text format and we try to apply some formula to it for some analysis will throw some errors. We can easily identify the format of the mentioned date by looking at the alignment of data, if data is left aligned then it is in text format, and if it’s right aligned then it’s in date format. Changing their format text to date one by one would take lots of time as spreadsheets contain large amounts of data. So, in this article, we will see some approaches to convert Text to Date format in Excel.
Approach 1:
Step 1: Open the spreadsheet in Excel and select the cells which have the date in text format then go to home tab at top of the ribbon and then select replace from the find & select dropdown.
.png)
Step 2: Enter “-” in find what and “/” in replace with and press replace all.
.jpg)
Step 3: Finally, our spreadsheet has changed the date text in the Date format.
.jpg)
Approach 2:
Step 1: Open the spreadsheet with excel and select all data cells of one column and select the data tab in the top of the ribbon and then choose Texts to Columns from data tools. Then Convert Text to column wizard dialog box will appear and here you can see it is in Step 1 of 3 that is written in the dialog box.
.jpg)
Step 2: Just click NEXT in step 1 and step 2 as it is and in step 3 select the Date from the column data format and press finish.
.jpg)
Step 3: Similarly, select all data cells of another column and apply the above step to get the final result in date format.
Now you will understand how we change the date text in Date format.
Like Article
Save Article