
Excel for Microsoft 365 Excel 2021 Excel 2019 Excel 2016 Excel 2013 Excel 2010 More…Less
If someone’s entering data inaccurately, or you think a coworker may be confused about how to enter data, add a label. A simple name, such as «Phone,» lets others know what to put in a cell, and your labels can also provide more complex instructions.
You can add labels to forms and ActiveX controls.
Add a label (Form control)
-
Click Developer, click Insert, and then click Label
 .
.
-
Click the worksheet location where you want the upper-left corner of the label to appear.
-
To specify the control properties, right-click the control, and then click Format Control.
 .
.
-
Click Developer and then click Insert, and under ActiveX Controls, click Label
.
-
Click the worksheet location where you want the upper-left corner of the label to appear.
-
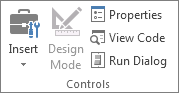
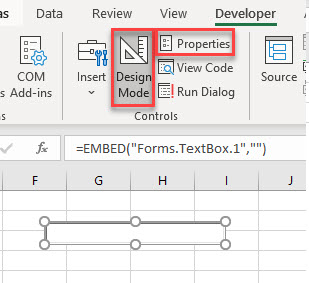
Click Design Mode
. -
Click the worksheet location where you want the upper-left corner of the label to appear.
-
To specify the control properties, click Properties
.Tip: You can also right-click the label, and then click Properties.
The Properties dialog box appears. For detailed information about each property, select the property, and then press F1 to display a Visual Basic Help topic. You can also type the property name in the Visual Basic Help Search box. This table summarizes the properties.
Summary of label properties by functional category
 .
. .
. .
.|
If you want to specify |
Use this property |
|
General: |
|
|
Whether the control is loaded when the workbook is opened. (Ignored for ActiveX controls.) |
AutoLoad (Excel) |
|
Whether the control can receive the focus and respond to user-generated events. |
Enabled (Form) |
|
Whether the control can be edited. |
Locked (Form) |
|
The name of the control. |
Name (Form) |
|
The way the control is attached to the cells below it (free floating, move but do not size, or move and size). |
Placement (Excel) |
|
Whether the control can be printed. |
PrintObject (Excel) |
|
Whether the control is visible or hidden. |
Visible (Form) |
|
Text: |
|
|
Font attributes (bold, italic, size, strikethrough, underline, and weight). |
Bold, Italic, Size, StrikeThrough, Underline, Weight (Form) |
|
Descriptive text on the control that identifies or describes it. |
Caption (Form) |
|
How text is aligned in the control (left, center, or right). |
TextAlign (Form) |
|
Whether the contents of the control automatically wrap at the end of a line. |
WordWrap (Form) |
|
Size and position: |
|
|
Whether the size of the control automatically adjusts to display all contents. |
AutoSize (Form) |
|
The height or width in points. |
Height, Width (Form) |
|
The distance between the control and the left or top edge of the worksheet. |
Left, Top (Form) |
|
Formatting: |
|
|
The background color. |
BackColor (Form) |
|
The background style (transparent or opaque). |
BackStyle (Form) |
|
The color of the border. |
BorderColor (Form) |
|
The type of border (none or single-line). |
BorderStyle (Form) |
|
The foreground color. |
ForeColor (Form) |
|
Whether the control has a shadow. |
Shadow (Excel) |
|
The visual appearance of the border (flat, raised, sunken, etched, or bump). |
SpecialEffect (Form) |
|
Image: |
|
|
The bitmap to display in the control. |
Picture (Form) |
|
The location of the picture relative to its caption (left, top, right, and so on). |
PicturePosition (Form) |
|
Keyboard and mouse: |
|
|
The shortcut key for the control. |
Accelerator (Form) |
|
A custom mouse icon. |
MouseIcon (Form) |
|
The type of pointer that is displayed when the user positions the mouse over a particular object (for example, standard, arrow, or I-beam). |
MousePointer (Form) |
-
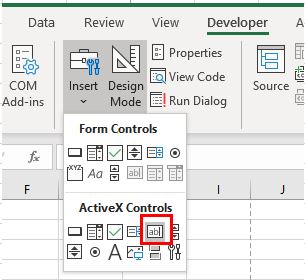
Click Developer and then click Insert, and under ActiveX Controls, click Text Box
.
-
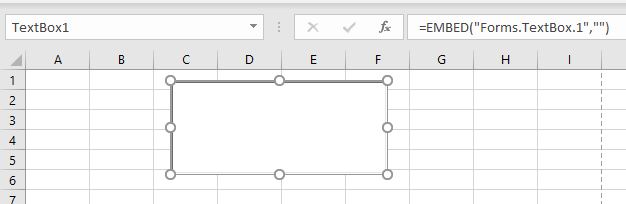
Click the worksheet location where you want the upper-left corner of the text box to appear.
-
To edit the ActiveX control, click Design Mode
. -
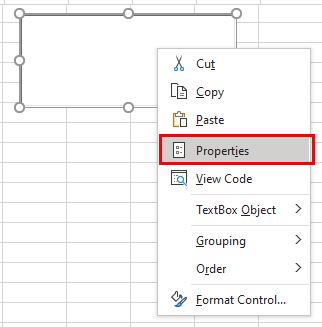
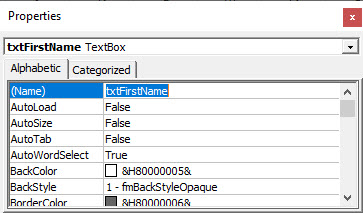
To specify the control properties, click Properties
.Tip: You can also right-click the text box, and then click Properties.
The Properties dialog box appears. For detailed information about each property, select the property, and then press F1 to display a Visual Basic Help topic. You can also type the property name in the Visual Basic Help Search box. The following section summarizes the properties that are available.
Summary of text box properties by functional category
 .
.|
If you want to specify |
Use this property |
|
General: |
|
|
Whether the control is loaded when the workbook is opened. (Ignored for ActiveX controls.) |
AutoLoad (Excel) |
|
Whether the control can receive the focus and respond to user-generated events. |
Enabled (Form) |
|
Whether the control can be edited. |
Locked (Form) |
|
The name of the control. |
Name (Form) |
|
The way the control is attached to the cells below it (free floating, move but do not size, or move and size). |
Placement (Excel) |
|
Whether the control can be printed. |
PrintObject (Excel) |
|
Whether the control is visible or hidden. |
Visible (Form) |
|
Text: |
|
|
Whether a word or a character is the basic unit used to extend a selection. |
AutoWordSelect (Form) |
|
Font attributes (bold, italic, size, strikethrough, underline, and weight). |
Bold, Italic, Size, StrikeThrough, Underline, Weight (Form) |
|
Whether selected text remains highlighted when the control does not have the focus. |
HideSelection (Form) |
|
The default run time mode of the Input Method Editor (IME). |
IMEMode (Form) |
|
Whether the size of the control adjusts to display full or partial lines of text. |
IntegralHeight (Form) |
|
The maximum number of characters a user can enter. |
MaxLength (Form) |
|
Whether the control supports multiple lines of text. |
MultiLine (Form) |
|
Placeholder characters, such as an asterisk (*), to be displayed instead of actual characters. |
PasswordChar (Form) |
|
Whether the user can select a line of text by clicking to the left of the text. |
SelectionMargin (Form) |
|
The text in the control. |
Text (Form) |
|
How text is aligned in the control (left, center, or right). |
TextAlign (Form) |
|
Whether the contents of the control automatically wrap at the end of a line. |
WordWrap (Form) |
|
Data and binding: |
|
|
The range that is linked to the control’s value. |
LinkedCell (Excel) |
|
The content or state of the control. |
Value (Form) |
|
Size and position: |
|
|
Whether the size of the control automatically adjusts to display all the contents. |
AutoSize (Form) |
|
The height or width in points. |
Height, Width (Form) |
|
The distance between the control and the left or top edge of the worksheet. |
Left, Top (Form) |
|
Formatting: |
|
|
The background color. |
BackColor (Form) |
|
The background style (transparent or opaque). |
BackStyle (Form) |
|
The color of the border. |
BorderColor (Form) |
|
The type of border (none or a single-line). |
BorderStyle (Form) |
|
The foreground color. |
ForeColor (Form) |
|
Whether the control has a shadow. |
Shadow (Excel) |
|
The visual appearance of the border (flat, raised, sunken, etched, or bump). |
SpecialEffect (Form) |
|
Whether an automatic tab occurs when a user enters the maximum allowable characters into the control. |
AutoTab (Form) |
|
Keyboard and mouse: |
|
|
Whether drag-and-drop is enabled. |
DragBehavior (Form) |
|
The selection behavior when entering the control (select all or do not select). |
EnterFieldBehavior (Form) |
|
The effect of pressing ENTER (create a new line or move focus). |
EnterKeyBehavior (Form) |
|
A custom mouse icon. |
MouseIcon (Form) |
|
The type of pointer that is displayed when the user positions the mouse over a particular object (for example, standard, arrow, or I-beam). |
MousePointer (Form) |
|
Whether tabs are allowed in the edit region. |
TabKeyBehavior (Form) |
|
Specific to Text Box: |
|
|
Whether the control has vertical scroll bars, horizontal scroll bars, or both. |
ScrollBars (Form) |
-
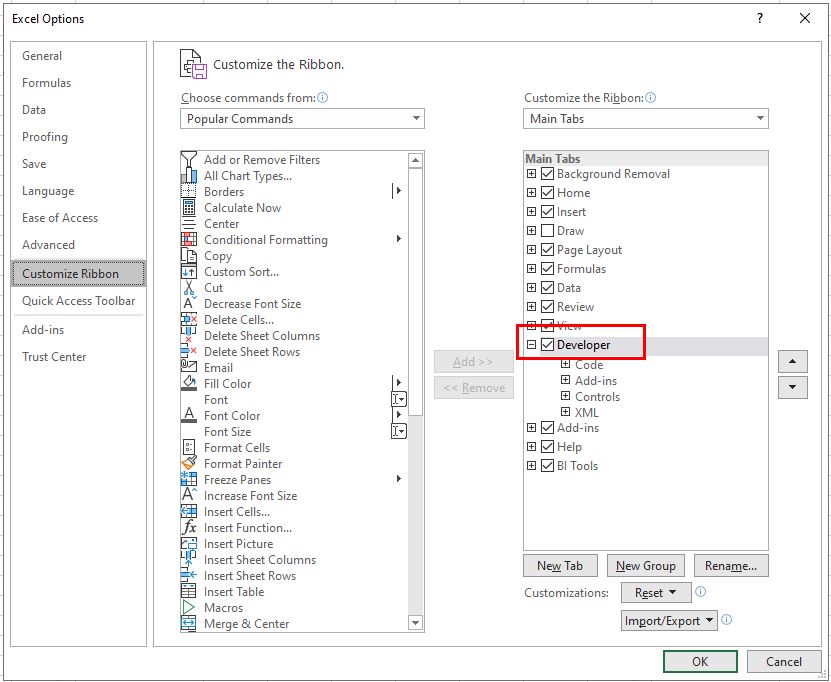
Click File, click Options, and then click Customize Ribbon.
-
Under Main Tabs , select the Developer check box, and then click OK.
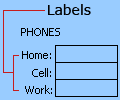
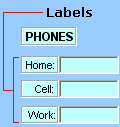
A label identifies the purpose of a cell or text box, displays brief instructions, or provides a title or caption. A label can also display a descriptive picture. Use a label for flexible placement of instructions, to emphasize text, and when merged cells or a specific cell location is not a practical solution.
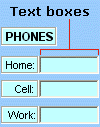
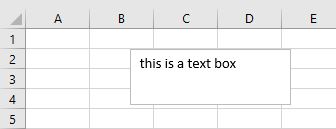
A text box is a rectangular box in which you can view, enter, or edit text or data in a cell. A text box can also be a static, and display data users can only read. Use a text box as an alternative to entering text in a cell, when you want to display an object that floats freely. You can also use a text box to display or view text that is independent of row and column boundaries, preserving the layout of a grid or table of data on the worksheet.
Label on a form control:
An ActiveX control label:
An ActiveX text box control:
Notes:
-
To create a text box with a set of placeholder characters that accepts a password, use the PasswordChar property. Make sure that you protect the linked cell or other location in which the text is stored. Use strong passwords that combine uppercase and lowercase letters, numbers, and symbols, such as Y6dh!et5, not House27. Passwords should be 8 or more characters;14 is better.
And don’t forget your password. If you do, we can’t help you retrieve it. Office doesn’t have a master key to unlock anything. Store passwords in a secure place away from the information they help protect.
-
To create a scrolling, multiple-line text box with horizontal and vertical scroll bars, set MultiLine to True, AutoSize and WordWrap to False, ScrollBars to 3, and LinkedCell to the cell address (such as D1) that you want to contain the text. To enter a new line, the user must press either CTRL+ENTER or SHIFT+ENTER, which generates a special character that is stored in the linked cell.
Need more help?
Want more options?
Explore subscription benefits, browse training courses, learn how to secure your device, and more.
Communities help you ask and answer questions, give feedback, and hear from experts with rich knowledge.
This tutorial will demonstrate how to insert a text box in Excel and Google Sheets.
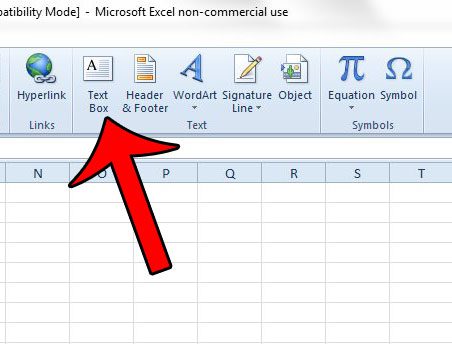
Insert a Text Box
1. In the Ribbon, select Insert > Text > Text Box.
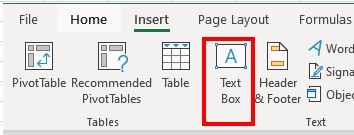
2. Click in the Excel worksheet where the text box needs to go, and drag down and to the right with the mouse to size the box accordingly.
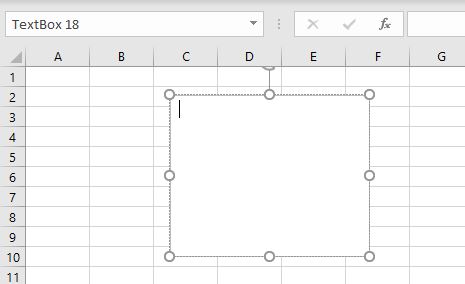
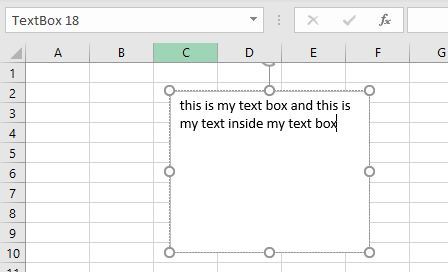
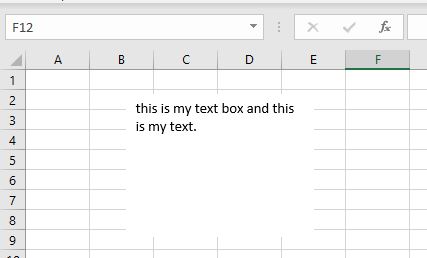
3. The cursor will now be inside the text box. To add text, just start typing!
Insert a Text Box Using the Shapes Menu
We can also insert a text box using Shapes on the Ribbon.
In the Ribbon, select Insert > Shapes > Basic Shapes > Text Box.
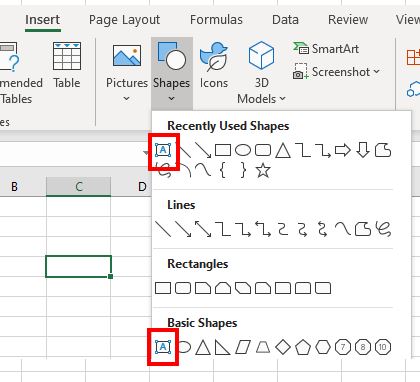
We may find that the Text Box icon is in the Recently Used Shapes group if we have recently inserted a text box into Excel.
How to Remove the Border From the Text Box
We may wish to remove the single border that is around the text box by default.
1. Click on the Text Box. A new tab will be added to the ribbon called Shape Format.
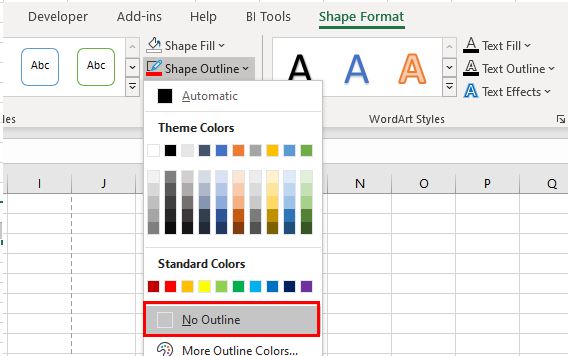
2. In the Ribbon, select Shape Format > Shape Outline > No Outline to remove the border from the text box.
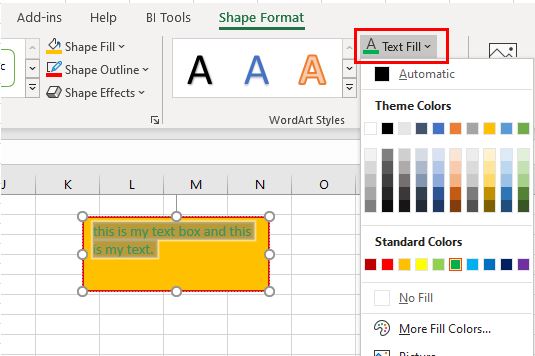
We can also use the Shape Format tab to change the border color or fill color of the text box using the Shape Fill option. We can change the color of the text inside the text box by selecting the text and then selecting Text Fill.
Insert an ActiveX Text Box
A different type of text box to insert into Excel is an ActiveX text box. This type of text box gives us greater flexibility than a text box created as a shape. One of the advantages is that we can add a scroll bar to this type of text box.
We need to have the Developer tab showing on our ribbon to insert an ActiveX text box.
1. To switch on the Developer tab, in the Ribbon, select File > Options > Customize Ribbon.
2. Check the Developer check box and click OK.
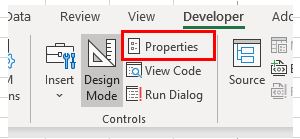
3. In the Ribbon, select Developer > Insert > ActiveX > Text Box.
4. As we did previously, drag down and to the right with the mouse to size the box accordingly.
5. Right-click on the text box and then click on Properties.
OR
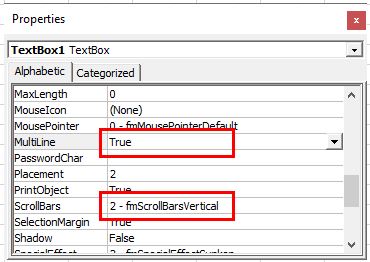
1. In the Ribbon, select Developer > Controls > Properties.
2. Select True for Multiline and then select 2 – frmScrollBarsVertical for ScrollBars.
3. Close the Properties box.
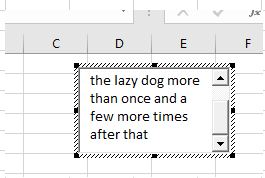
4. To enter text into the text box, click on the text box and then in the Ribbon, select Developer > Controls > Design Mode. This will switch Design Mode OFF and enable you to type text into the text box.

Alternatively, right-click on the text box, select TextBox Object and then click Edit.

5. Type in the desired text.
Note that it’s also possible to use VBA to insert text boxes.
How to Insert a Text Box in Google Sheets
To insert a text box into Google Sheets we need to create a drawing.
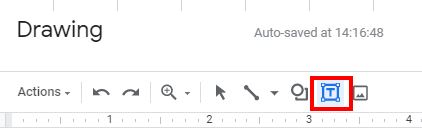
1. In the menu, select Insert > Drawing.

2. Select Text Box from the Drawing Toolbar.
3. Click in the drawing to create the text box.
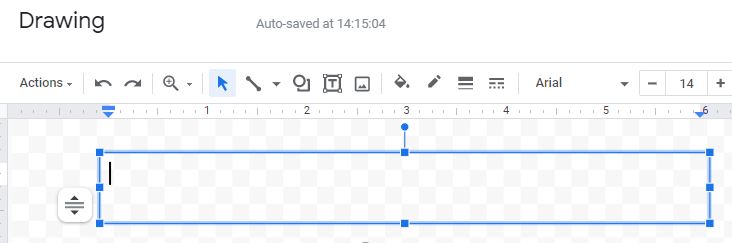
4. Type in the desired text and then click Save and Close.

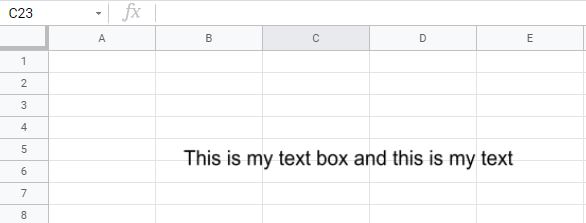
The text box will now appear in our sheet.
5. To edit the text box, click on the text box and then click on the drop down menu in the right-hand corner. Select Edit.
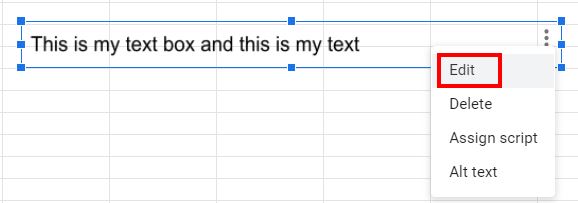
The drawing object will once again open allowing us to edit the text box.
Содержание
- VBA TextBox
- Creating Text Boxes on VBA forms
- Writing Code Behind Forms
- Creating Text Boxes in an Excel Worksheet
- VBA Coding Made Easy
- VBA Code Examples Add-in
- VBA Excel. Элемент управления TextBox (текстовое поле)
- Элемент управления TextBox
- Свойства текстового поля
- Привязка текстового поля к ячейке
- Объект TextBox (Outlook Forms Script)
- Замечания
- Советы по использованию текстовых полей
- Методы
- Свойства
- Поддержка и обратная связь
VBA TextBox
In this Article
This article will demonstrate how to use a Text Box in Excel VBA.
VBA has the ability to create forms that the user can interact with such as Invoice forms, or Contact details. Text Boxes are controls that can be used within these forms, or Text boxes can be created directly within Excel itself.
Creating Text Boxes on VBA forms
To insert a Text Box into a VBA form, we first need to create the form. This is done in the VBE Editor.
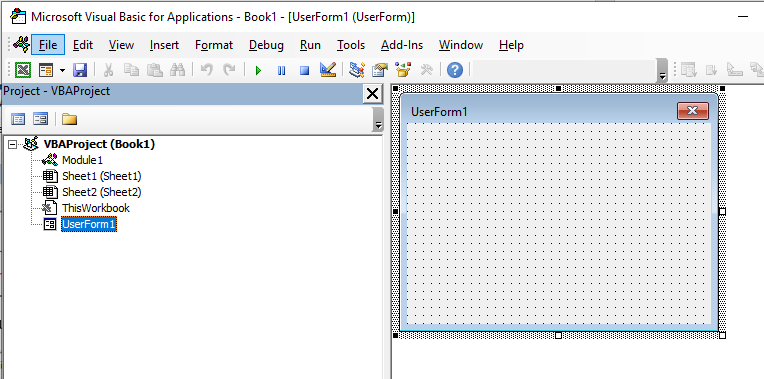
To insert a new user form into your code, select the UserForm option from the Insert Menu.
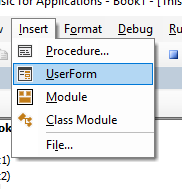
A new user form will appear in the Project Explorer and will be shown in the Code Window on the right.
You can rename your form using the Properties box. This should appear below your Project Explorer.
If it is how visible, Press F4 or click View, Properties Window.
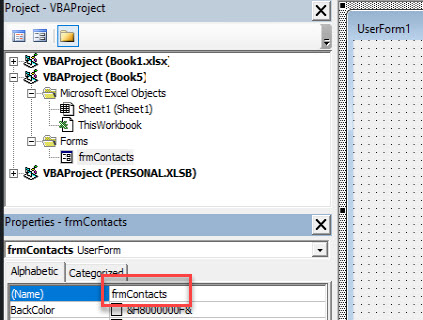
Click in the Name property and rename your form.
We can now start populating our form with controls – the text box control is the most popular control along with the label control.
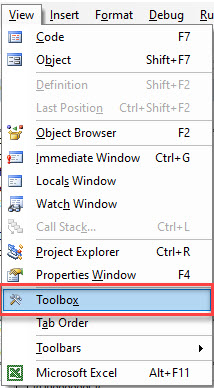
To populate the form with controls, we need to switch on the Toolbox.
In the Menu, select View > Toolbox.
To create a Text Box on your form, select the Text Box control in the Toolbox.
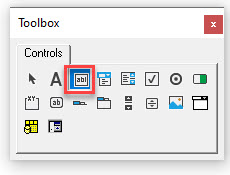
Drag a box shape on the form with your mouse, holding the left button down, and then release the mouse button.

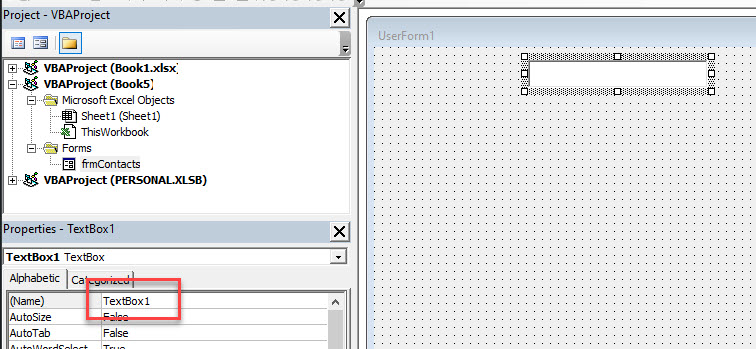
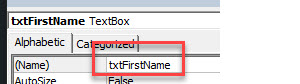
As this is the first Text Box we are creating, it will be named TextBox1. As with the form, you can use the Properties window to rename the text box.
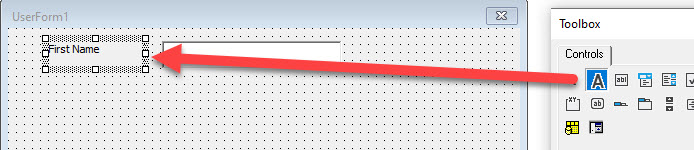
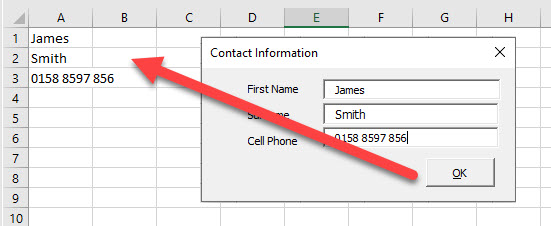
You might need to also create a label for your text box on the form. This is done with a label control. You drag on the form in the same way as you do for a Text Box, and then you can type the required text within the label control eg: First Name as shown below.
To use the form within VBA Code, we would need to add a command button to the form. This is done by selecting the Command Button control in the Toolbox and dragging the button onto your form.
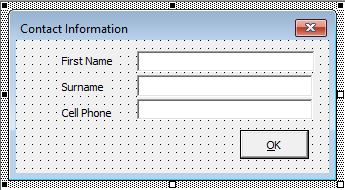
You can then continue to create your form using textboxes, labels and command buttons, renaming them as appropriate.
Writing Code Behind Forms
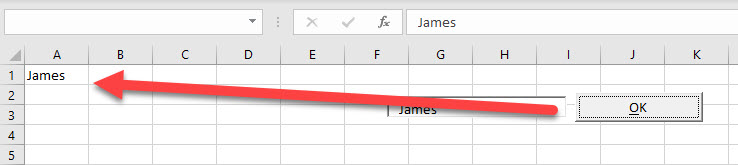
Once we have created our form, we need to write VBA code to insert the information in our form onto our Excel worksheet. This code is called CBF (Code Behind Forms).
In the the VBE, double-click on the command button to go to the code behind the button.
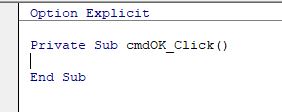
A sub-routine for the click event for the button will be created. We can type our VBA code in this routine. For example:
This routine will put the details typed in the text boxes into Excel, and then close the form.
Creating Text Boxes in an Excel Worksheet
It is also possible to create text boxes within the Excel spreadsheet. In order to do this, you need to have your Developer Ribbon switched on.
Note: If you don’t see the Developer Ribbon, you’ll need to enable it.
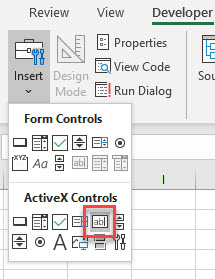
In the Ribbon, select Developer > Insert > ActiveX Controls > TextBox.
Click and drag in your Excel worksheet to draw the text box in the worksheet at the desired position. Release the mouse button to complete drawing the text box.
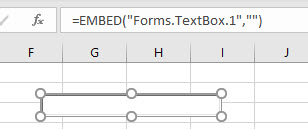
The text box will be in Design Mode. While in this mode, we can size the box, and select the Properties of the text box.
Click on the Properties button to show the Property Window for the text box. In this window, we can change a variety of properties of the text box such as the name of the box, the color of the text, background or border, the border style and the font used for the text in the text box for example.
To use the text box direct in Excel as we have used it in the VBA form above, we need a way to return the data typed into the text box to the Excel sheet. This can be done by adding a ActiveX command button to the worksheet, and using the click_event of this command button to return the information in the text box to the Excel sheet.
In the Ribbon, select Developer > Insert > ActiveX Controls > Command Button to add a command button to your Excel sheet. Switch on the Properties window and change the name of the button, the caption of the button and the Accelerator of the button as shown in the image below.
Double-click on the button to go to the VBA click event of the button and type the following code:
Switch back to the Excel worksheet, make sure Design Mode is switched off and then type in the created text box.

Click the command button to return the text to Excel.
VBA Coding Made Easy
Stop searching for VBA code online. Learn more about AutoMacro — A VBA Code Builder that allows beginners to code procedures from scratch with minimal coding knowledge and with many time-saving features for all users! 

VBA Code Examples Add-in
Easily access all of the code examples found on our site.
Simply navigate to the menu, click, and the code will be inserted directly into your module. .xlam add-in.
Источник
VBA Excel. Элемент управления TextBox (текстовое поле)
Элемент управления пользовательской формы TextBox в VBA Excel. Использование текстового поля для ввода и вывода информации, основные свойства, примеры. Привязка текстового поля к ячейке.
Элемент управления TextBox

Текстовое поле незаменимо, когда необходимо заполнить пользовательскую форму новой информацией. Например, это может быть ФИО нового сотрудника и его паспортные данные, сумма выручки за день, новый электронный адрес и многое-многое другое.
Вводить информацию в TextBox на открытой форме можно не только с помощью клавиатуры, но и вставкой текста из буфера обмена. Когда текстовое поле применяется для ввода пароля, есть возможность отобразить все его знаки замещающим символом, например, звездочкой.
Свойства текстового поля
| Свойство | Описание |
|---|---|
| AutoSize* | Автоподбор размера текстового поля. True – размер автоматически подстраивается под длину размещаемой строки. False – размер элемента управления определяется свойствами Width и Height. |
| AutoTab | Включение автоматической табуляции – передачи фокуса следующему элементу управления при достижении максимального числа символов при значениях свойства MaxLenght > 0. True – автоматическая табуляция включена, False – выключена. |
| ControlSource | Ссылка на источник данных для поля TextBox. |
| ControlTipText | Текст всплывающей подсказки при наведении курсора на TextBox. |
| Enabled | Возможность ввода, редактирования, копирования, вставки, удаления текста. True – все перечисленные опции включены, False – выключены (цвет текста в поле становится серым). |
| Font | Шрифт, начертание и размер текста в поле. |
| Height | Высота текстового поля. |
| Left | Расстояние от левого края внутренней границы пользовательской формы до левого края текстового поля. |
| Locked | Запрет ввода, редактирования, удаления текста. True – перечисленные опции запрещены (разрешено выделение и копирование текста), False – перечисленные опции разрешены. |
| MaxLenght | Максимальная длина строки. По умолчанию – 0, что означает – ограничений нет. |
| Multiline | Устанавливает многострочный (True) или однострочный (False) режим ввода-вывода текста. |
| PasswordChar | Задает символ, который будет отображаться при вводе знаков пароля. |
| TabIndex | Определяет позицию элемента управления в очереди на получение фокуса при табуляции, вызываемой свойством AutoTab или нажатием клавиш «Tab», «Enter». Отсчет начинается с 0. |
| Text** | Текстовое содержимое (значение) поля (=Value). |
| TextAlign | Выравнивание текста: 1 (fmTextAlignLeft) – по левому краю, 2 (fmTextAlignCenter) – по центру, 3 (fmTextAlignRight) – по правому краю. |
| Top | Расстояние от верхнего края внутренней границы пользовательской формы до верхнего края текстового поля. |
| Value** | Текстовое содержимое (значение) поля (=Text). |
| Visible | Видимость текстового поля. True – TextBox отображается на пользовательской форме, False – TextBox скрыт. |
| Width | Ширина текстового поля. |
| WordWrap | Актуально при Multiline = True. Переход на новую строку при достижении границы текстового поля. True – переход включен, False – переход выключен. |
* При использовании свойства AutoSize в значении True следует учитывать, что автоматическое изменение размеров поля при вводе текста может нарушить дизайн пользовательской формы.
** Text и Value — это два обозначения одного и того же свойства. Если в окне Properties элемента управления TextBox в поле свойства Text начать ввод строки, в поле Value ввод будет дублироваться. И наоборот, при вводе текста в поле свойства Value, дублирование произойдет в поле Text.
В таблице перечислены только основные, часто используемые свойства текстового поля. Все доступные свойства отображены в окне Properties элемента управления TextBox.
Свойства BackColor, BackStyle, BorderColor, BorderStyle отвечают за внешнее оформление текстового поля и его границ. Попробуйте выбирать доступные значения этих свойств в окне Properties, наблюдая за изменениями внешнего вида элемента управления TextBox на проекте пользовательской формы.
Привязка текстового поля к ячейке
Привязать элемент управления TextBox к ячейке на рабочем листе можно двумя способами.
1. В окне Properties элемента управления TextBox в поле свойства ControlSource необходимо указать адрес ячейки:

2. Присвоить свойству ControlSource адрес ячейки в коде VBA Excel:
Источник
Объект TextBox (Outlook Forms Script)
Отображает пользовательскую информацию или информацию из упорядоченного набора данных.
Замечания
Элемент управления TextBox (текстовое поле) обычно используется для отображения информации, добавленной пользователем. Он также может отображать набор данных, таких как таблица, запрос, лист или результат подсчета. Если Элемент TextBox привязан к источнику данных, изменение содержимого TextBox также изменяет значение привязанного источника данных.
Форматирование любой части текста TextBox повлияет на весь текст элемента управления. Например, если изменить шрифт или размер любого символа элемента управления, изменение затронет все символы элемента управления.
По умолчанию для TextBox используется свойство Value .
Советы по использованию текстовых полей
TextBox — это гибкий элемент управления, управляемый следующими свойствами: Text, MultiLine, WordWrap и AutoSize.
Text содержит текст, отображаемый в текстовом поле.
MultiLine определяет способ отображения текста элементом управления TextBox (в виде одной строки или множества строк). Символы новой строки определяют конец одной строки и начало другой. Если параметр MultiLine имеет значение False (значение по умолчанию), текст усекается, а не упаковывается в оболочку.
WordWrap позволяет TextBox переносить строки текста, которые не помещаются в TextBox. Значение по умолчанию — True.
Если вы не используете WordWrap, элемент TextBox начинает новую строку текста при обнаружении символа новой строки в тексте. Если WordWrap отключен, вы можете иметь текстовые строки, которые не помещаются полностью в TextBox. Элемент TextBox отображает части текста, которые помещаются в его ширину, и усекает части текста, которые не помещаются. WordWrap можно использовать лишь в случае, если MultiLine присвоено значение True.
AutoSize определяет, полностью ли отображается текст в TextBox. При использовании AutoSize вместе с TextBox размер последнего элемента увеличивается или уменьшается в зависимости от количества текста и размера шрифта. Значение по умолчанию — False.
AutoSize удобно применять в таких случаях:
Отображение заголовка из одной или нескольких строк.
Отображение содержимого TextBox длиною в одну строку.
Отображение содержимого TextBox, состоящего из нескольких строк только для чтения.
Избегайте применять AutoSize к пустому элементу TextBox, который использует свойства MultiLine и WordWrap. В таком случае при вводе текста в TextBox этот элемент автоматически принимает вид поля шириною в один символ, отображающего весь текст одной строкой.
Методы
| Имя | Описание |
|---|---|
| Copy | Копирует содержимое объекта в буфер обмена. |
| Cut | Удаляет выбранную информацию из объекта и переносит ее в буфер обмена. |
| Paste | Передает содержимое буфера обмена объекту. |
Свойства
| Имя | Описание |
|---|---|
| AutoSize | Возвращает или задает логическое значение, указывающее, будет ли объект автоматически изменять размер для отображения всего содержимого. Для чтения и записи. |
| AutoTab | Возвращает или задает логическое значение, указывающее, происходит ли автоматическая вкладка, когда пользователь вводит максимально допустимое количество символов в TextBox. Для чтения и записи. |
| AutoWordSelect | Возвращает или задает логическое значение, указывающее, является ли базовая единица, используемая для расширения выделенного фрагмента, словом или одним символом. Для чтения и записи. |
| BackColor | Возвращает или задает значение Long , указывающее цвет фона объекта . Для чтения и записи. |
| BackStyle | Возвращает или задает целое число , задающее стиль фона для объекта . Для чтения и записи. |
| BorderColor | Возвращает или задает значение Long , указывающее цвет границы объекта. Для чтения и записи. |
| BorderStyle | Возвращает или задает целое число , указывающее тип границы элемента управления. Для чтения и записи. |
| CanPaste | Возвращает логическое значение, указывающее, содержит ли буфер обмена данные, поддерживаемые объектом. Только для чтения. |
| CurLine | Возвращает или задает значение Long , представляющее текущую строку элемента управления. Для чтения и записи. |
| CurTargetX | Возвращает значение Long , представляющее предпочтительную горизонтальную позицию точки вставки в многострочной области TextBox. Только для чтения. |
| CurX | Возвращает или задает значение Long , представляющее текущее горизонтальное положение точки вставки в многострочной области TextBox. Для чтения и записи. |
| DragBehavior | Возвращает или задает целое число , указывающее, включает ли система функцию перетаскивания для элемента управления . Для чтения и записи. |
| Enabled | Возвращает или задает логическое значение, указывающее, может ли элемент управления получать фокус и реагировать на события, созданные пользователем. Для чтения и записи. |
| EnterFieldBehavior | Возвращает или задает целое число , указывающее поведение выделения при вводе элемента TextBox. Для чтения и записи. |
| EnterKeyBehavior | Возвращает или задает логическое значение, определяющее эффект нажатия клавиши ВВОД в TextBox. Для чтения и записи. |
| ForeColor | Возвращает или задает значение Long , указывающее цвет переднего плана объекта. Для чтения и записи. |
| HideSelection | Возвращает или задает логическое значение, указывающее, остается ли выделенный текст выделенным, если элемент управления не имеет фокуса. Для чтения и записи. |
| IMEMode | Возвращает или задает целое число , указывающее режим времени выполнения по умолчанию редактора метода ввода (IME) для элемента управления. Для чтения и записи. |
| IntegralHeight | Возвращает или задает логическое значение, указывающее, отображает ли элемент TextBox полные строки текста или частичные строки. Для чтения и записи. |
| LineCount | Возвращает значение Long , указывающее количество текстовых строк в элементе TextBox. Только для чтения. |
| Locked | Возвращает или задает логическое значение, указывающее, можно ли изменять элемент управления. Для чтения и записи. |
| MaxLength | Возвращает или задает значение Long , указывающее максимальное число символов, которое пользователь может ввести в TextBox. Для чтения и записи. |
| MouseIcon | Возвращает значение String , представляющее полное имя пути настраиваемого значка, назначаемого элементу управления. Только для чтения. |
| MousePointer | Возвращает или задает целое число , указывающее тип указателя, отображаемого при наведении указателя мыши на определенный объект. Для чтения и записи. |
| MultiLine | Возвращает или задает логическое значение, указывающее, может ли элемент управления принимать и отображать несколько строк текста. Для чтения и записи. |
| PasswordChar | Возвращает или задает значение String , указывающее замещающий символ, который будет отображаться вместо символов, фактически введенных в TextBox. Для чтения и записи. |
| ScrollBars | Возвращает или задает целое число , указывающее, имеет ли элемент управления вертикальные полосы прокрутки, горизонтальные полосы прокрутки или и то, и другое. Для чтения и записи. |
| SelectionMargin | Возвращает или задает логическое значение, указывающее, может ли пользователь выделить строку текста, щелкнув область слева от текста. Для чтения и записи. |
| SelLength | Возвращает или задает значение Long , представляющее количество символов, выделенных в элементе TextBox. Для чтения и записи. |
| SelStart | Возвращает или задает значение Long , представляющее начальную точку выделенного текста, или точку вставки, если текст не выделен. Для чтения и записи. |
| SelText | Возвращает или задает значение String , представляющее выделенный текст элемента управления. Для чтения и записи. |
| SpecialEffect | Возвращает или задает целое число , указывающее внешний вид объекта. Для чтения и записи. |
| TabKeyBehavior | Возвращает или задает логическое значение, указывающее, разрешены ли вкладки в области редактирования. Для чтения и записи. |
| Текст | Возвращает или задает значение String , указывающее текст в элементе управления . Для чтения и записи. |
| TextAlign | Возвращает или задает целое число , указывающее способ выравнивания текста в элементе управления . Для чтения и записи. |
| TextLength | Возвращает значение Long , представляющее длину текста в количестве символов в области редактирования TextBox. Только для чтения. |
| Значение | Возвращает или задает значение Variant , указывающее текст в области редактирования. Для чтения и записи. |
| WordWrap | Возвращает или задает логическое значение, указывающее, будет ли содержимое элемента управления автоматически переноситься в конце строки, а элемент управления разворачивается в соответствии с текстом. Для чтения и записи. |
Поддержка и обратная связь
Есть вопросы или отзывы, касающиеся Office VBA или этой статьи? Руководство по другим способам получения поддержки и отправки отзывов см. в статье Поддержка Office VBA и обратная связь.
Источник
Adding text boxes in Microsoft Excel may seem odd, considering the layout of a spreadsheet and the way that the application is generally.
But you can definitely encounter situations where text boxes are a preferable choice for some data or information.
The ability to move the text box alone can make it appealing, and you can even have a linked cell in a text box so that you can display that data in the box.
Excel 2010’s system of cells provides for an efficient way to organize and manipulate your data.
But occasionally you may be using Excel for a purpose that requires certain data to be placed in a text box instead of a cell.
Text boxes are very versatile, and you can adjust both their appearance and location with just a few clicks of your mouse.
Our guide below will show you where to find the tool that inserts text boxes into your spreadsheet. We will also direct you to the assorted text box menus so that you can adjust your text box settings as needed.
- Open your spreadsheet.
- Click Insert.
- Select the Text Box button.
- Draw the text box in the desired spot.
Our article continues below with additional information on making a text box in Microsoft Excel 2010, including pictures of these steps.
If you are using Photoshop to edit your pictures, then you might be looking for a way to isolate edits to laters. Our adjust layer size Photoshop article can show you how to change the size of the objects on just one of your layers.
How to Insert a Text Box in Excel 2010 (Guide with Pictures)
These steps were written specifically for Microsoft Excel 2010. You can also insert text boxes in other versions of Microsoft Excel, although the exact steps may vary slightly from those presented here.
Step 1: Open your file in Microsoft Excel 2010.
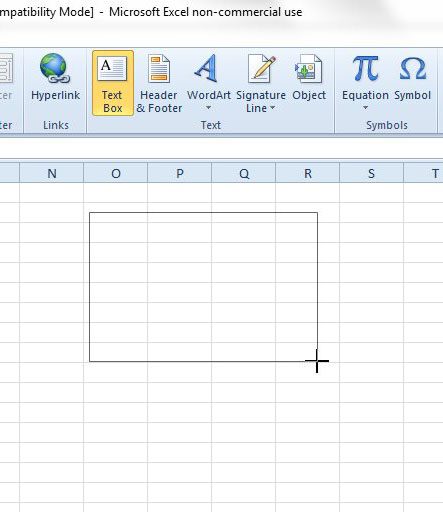
Step 2: Click the Insert tab at the top of the window.

Step 3: Click the Text Box button in the Text section of the Office ribbon.
Step 4: Click and hold in the spot on your worksheet where you wish to insert the text box, then drag your mouse to adjust the size of the text box. Release the mouse button when you are ready to create the text box.
Note that you can adjust the size or the location of the text box later, if you wish.
Our article continues below with additional information on how to customize a text box in Excel.
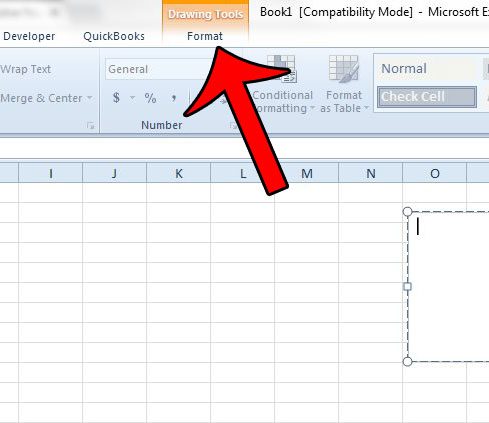
How to Change the Appearance Text Boxes in Excel
If you wish to adjust the appearance of the text box, you can click the Format tab at the top of the window, under Drawing Tools.
Additionally you can right-click inside of the text box, then select the Format Text Effects or Format Shape option for more settings.
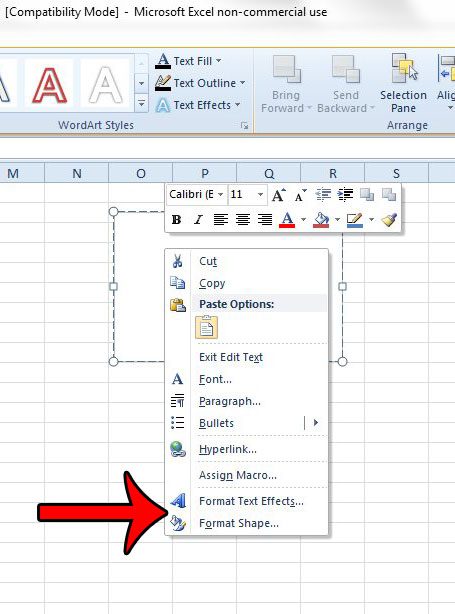
For example, you can remove the border from your text box if you wish to do so.
More Information on How to Make a Text Box in Excel 2010
- While a text box in Microsoft Excel may be used simply as a way to add content to your worksheet without actually placing it in the cells of that worksheet, it’s possible to have a linked cell that populates its data inside the text box. Simply click inside the text box, then click inside the formula bar and type =XX but replace the XX with the cell location. So, for example, if your data is inside cell A1, then you would type =A1.
- An Excel text box may be the focus of this article, but other Microsoft Office applications like Powerpoint and Word give you a way to add text to your document other than typing directly on the document page. You can add a text box in both of those applications if you click Insert at the top of the window and choose the Text Box option.
- You can resize your text box after creating it by clicking on one of the circular handles on the border of the text box. Note that this may adjust the layout of the information inside the text box depending on the manner in which you resize it.
Tips on Working with Text Boxes in Microsoft Excel
The text within a text box can be formatted in the same way that you format text in other documents. Simply type the text that you need, then select it and apply the desired formatting. Or you could make the formatting selection first, then type the text. This lets you do things like change a font, or a font color, or even a font size.
Knowing how to make boxes in Microsoft Excel can give you an extra tool when working with the application if you encounter a situation where the standard cell layout is insufficient. Whether you need to create a text box because you have a piece of information that isn’t part of a formula or won’t be included in any calculations, or you want to create an unusually sized object, a text box can be a helpful solution.
If you need to move to a new line in your text box, you can simply press Enter to do so. This works differently than forcing a new line inside of a standard Excel cell, as you need to hold down the Alt key and press Enter to add new lines within regular cells.
An Excel text box behaves in a similar manner to some other objects, like an image, in that it exists on a layer above the spreadsheet. This allows you to move the box freely around the worksheet. To move the text box, click inside of it, then click on the border and drag the box to a new location. Note that you can’t click on one of the control circles or the arrow, as that will resize the box.
Are you trying to use a formula in a text box, but are finding that the formula will not calculate a result? This article will show you how you can link a cell to a text box to achieve a result close to what you are looking for.

Matthew Burleigh has been writing tech tutorials since 2008. His writing has appeared on dozens of different websites and been read over 50 million times.
After receiving his Bachelor’s and Master’s degrees in Computer Science he spent several years working in IT management for small businesses. However, he now works full time writing content online and creating websites.
His main writing topics include iPhones, Microsoft Office, Google Apps, Android, and Photoshop, but he has also written about many other tech topics as well.
Read his full bio here.
Updated: 03/06/2020 by
Microsoft Excel allows users to add or insert a text box in a spreadsheet. A text box is a separate area in your spreadsheet, with boundaries and position that you can change. The text you place inside the box wraps to the next line at the boundaries of the box.
Using a text box, you can create a block of text that appears above, below, or next to data, charts, or other objects. Text boxes allow for diverse text placement, helping you to create a more interesting and informational layout in your spreadsheet.
After adding a text box, you may decide to change the size of the text box, or to remove it. Click a link below and follow the instructions for adding, resizing, or removing a text box in Excel.
Add a text box
- Open Microsoft Excel.
- In the Ribbon, click the Insert tab.
- On the Insert tab, click the Text option on the far right side, and select the Text Box option.
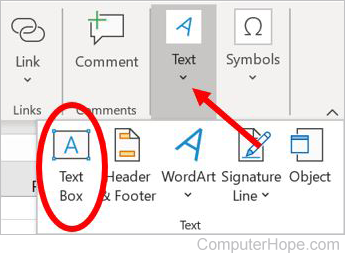
- Move the mouse cursor to where you want the text box to be located. Press and hold the left mouse button, then drag the mouse down and to the right to «draw» the text box. The further you drag the mouse, the larger the text box that is created.
Resize a text box
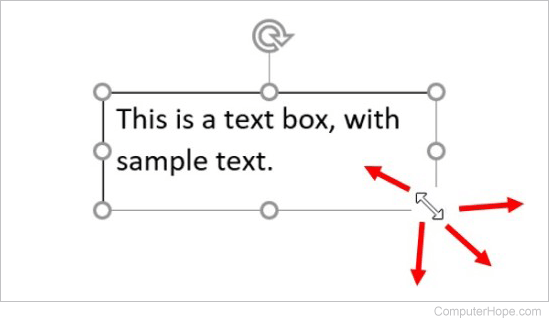
- Open the Excel spreadsheet containing the text box.
- Find the text box and click the outer edge to select it. When selected, there are small circles on each corner and in the middle of each side of the text box.
- Place your mouse cursor over one of the circles on the outer edge or corner of the text box, so the cursor changes to a double-sided arrow.
- Press and hold the left mouse button on the circle, then drag the mouse cursor in the desired direction to increase or decrease the size of the text box.
Remove a text box
- Open the Excel spreadsheet containing the text box.
- Find the text box and click the outer edge to select it. When selected, there are small circles on each corner and in the middle of each side of the text box.
- Press the Del or Backspace on the keyboard to remove the text box from the spreadsheet.