
- Lesson resourcesResources
- Quick referenceReference
- Transcript
- Notes
About this lesson
Insert decorative text into your publication.
Lesson versions
Multiple versions of this lesson are available, choose the appropriate version for you:
2016, 2019/365.
Quick reference
Text — WordArt
Insert decorative text as headlines and banners into your publication.
When to use
Headlines and banners can attract attention creatively by using WordArt. Always stay professional and don’t over-decorate, and you will soon find that WordArt is a valuable feature.
Instructions
- The more you practice, the better you will become at knowing all the fun and creative options within the WordArt toolbar.
Computer Tips
- Ctrl + scroll to zoom in is faster than pointing to the bottom right zoom controls. Zoom in or out quickly by holding down Ctrl and scroll with your mouse wheel.
- To un-do anything, simply press Ctrl + Z, or click the un-do button on the Quick Access Toolbar:
Login to download
-
00:04
Welcome to the Insert ribbon. -
00:06
And I’m going to draw your attention right over here to this little section called -
00:09
Text. -
00:09
The next few lessons are going to be all about the Text element. -
00:12
Of course, you can’t have a newsletter without writing text in there. -
00:15
So we can draw a text box, which you actually see on my screen right now. -
00:19
So at this point, this text box has some text inside of it. -
00:23
And that’s, basically, the banner to my publication. -
00:26
Boring, very boring. -
00:28
So instead I want to jazz this up. -
00:30
So I’m not going to go to Business Information, I am going to go to Word Art. -
00:34
Now Word Art actually allows you to have a little fun, okay? -
00:38
So I can click any one of these options or any one of these shapes. -
00:42
And as soon as I click one, I’m going to head for, I think, this one right here. -
00:45
Soon as I click that, it opens up a new dialog box. -
00:48
It wants me to enter some text, which I had copied from the previous one. -
00:51
I’m going to go ahead and click OK. -
00:53
Keep in mind, I can choose my font, style, size, and hit OK. -
00:57
And there we go, our first WordArt. -
01:00
Now notice, the handles on this text box, -
01:02
these circles allow you to resize both vertically and horizontally. -
01:06
But the squares, you can only go one way or the other. -
01:10
Okay, left or right or up or down. -
01:12
You can’t do both, the corners always allow you to go both directions. -
01:17
Also if I hold down my Ctrl key while I use that diagonal, -
01:20
all four sides expand at the same time. -
01:23
Or hold my Ctrl on just the squares, then both sides come in, -
01:26
resize at the same time. -
01:27
Keep that in mind, a little bit of magic. -
01:30
Okay, a little more on here. -
01:31
See this top circle? -
01:32
That is a rotate. -
01:33
I can actually spin this around and drop it wherever I want to. -
01:37
Keep in mind that Ctrl+Z will always undo whatever you just did that you -
01:41
didn’t like. -
01:42
And notice there’s a little yellow triangle down here at the bottom. -
01:45
Now notice the shape of my mouse. -
01:48
When I float my mouse on that yellow diamond, watch what happens. -
01:51
It completely changes the shape. -
01:54
Now watch when I click and drag that yellow diamond. -
01:56
Now I’m forced myself through the wind or this way and I’m screeching to a stop. -
02:00
You know, what effect do you want to have on your fonts, -
02:03
that’s what you can do with Word Art. -
02:06
Now, take a look at the top, we’ve got a brand new ribbon up there. -
02:08
As long as I’m clicked on that Word Art box, I get WordArt Tools. -
02:12
And there’s some really fancy stuff. -
02:14
First of all, I can go right back to edit my text if I want to change it. -
02:17
I could also double-click right here and get the same thing. -
02:19
This is cool, the spacing. -
02:21
Keep your eyes on the text inside that box. -
02:23
I’m going to choose Very Tight, watch what happens. -
02:26
See it all kind of slammed together like bubble text? -
02:28
Looks kind of cool. Now I’m going to choose Very Loose. -
02:31
And it spreads it way apart. -
02:32
So you can get really creative. -
02:34
I can tell you you’re probably a lot more creative than I am. -
02:37
I usually just go in, grab a default Word Art, and move it. -
02:40
I have seen some amazing stuff in Word Art. -
02:43
Check this button out. -
02:43
It says Even Height. -
02:44
Now, again, keep your eyes on the letters in the box. -
02:47
Click. -
02:48
Check that out. -
02:48
They are all the same height. -
02:50
And if you want to turn it off, just click it again. -
02:52
Puts it back. -
02:53
Now, this one is going to change the text to vertical. -
02:56
Please don’t ever make your readers read vertical text. -
02:59
It’s always hard to figure out what it is. -
03:01
So we always like horizontal text. -
03:03
So I’m going to turn that off. -
03:04
And then of course we can align this. -
03:07
Check this button out, the Word Art Styles. -
03:09
You can just float your mouse, change up the style if you want. -
03:13
You can change your shape of it down below. -
03:16
Whatever you want to do. -
03:17
It’s your document, you will decide the best options for you. -
03:22
And I’m going to stick with this one. -
03:23
I can also change the shape of the box itself. -
03:26
I can change the fill color of my fonts. -
03:29
And I can change the outline of my fonts. -
03:32
And I can put shadows on my fonts. -
03:35
You can spend the entire day in here on WordArt. -
03:38
It’s addictive, all right? -
03:39
So keep in mind the arrange forward and backward. -
03:41
If you’ve got layered objects around it, and -
03:43
you want your WordArt to come to the front. -
03:45
And then of course exact measurements. -
03:47
All this to say, keep it professional, have fun, but use your creativity. -
03:53
And I will tell you though, -
03:54
you will spend a lot of time in here once you discover how fun it is.
Lesson notes are only available for subscribers.
Lesson 15: Text Boxes and WordArt
/en/word2010/working-with-shapes/content/
Introduction
You may want to insert a text box into your document to draw attention to specific text or have the ability to easily move text within a document. Text boxes are basically treated the same as shapes, so you can add the same types of effects to them and can even change their shape.
In this lesson, you will learn how to insert a text box and format it in various ways, including resizing and moving it, as well as changing the text box shape, color, and outline. You will also learn how to create and format WordArt.
Text boxes
Text boxes are useful for helping to organize your document. They are basically treated the same as shapes, so when you insert a text box you can format it by changing its fill color, outline color, and shape style, as well as create WordArt and add 3D effects.
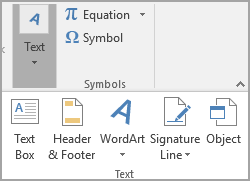
To insert a text box:
- Select the Insert tab on the Ribbon.
- Click the Text Box command in the Text group. A drop-down menu will appear.
- Select Draw Text Box.
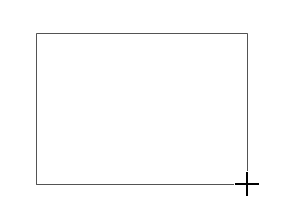
 Creating a blank text box
 - Click and drag on the document to create the text box.
Drawing the text box
- You can now start typing to create text inside the text box.
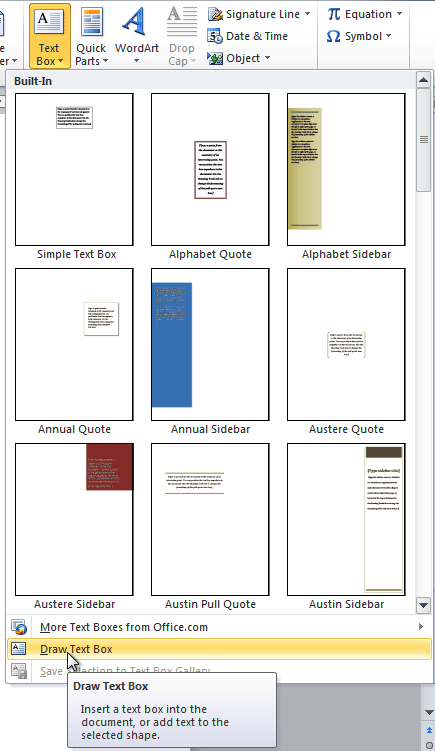
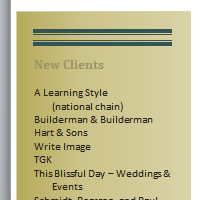
From the drop-down menu, you can also select one of the built-in text boxes that have predefined colors, fonts, positions, and sizes. If you choose this option, the text box will appear automatically so you will not need to click and drag to draw it.
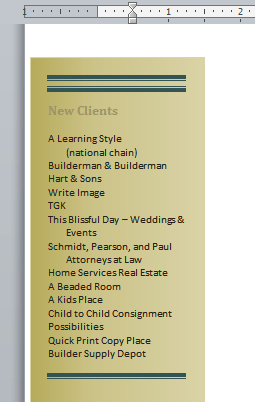 A built-in text box
To move a text box:
- Click the text box.
- Hover the mouse over one of the edges of the text box. The mouse pointer becomes a cross with arrows on each end .
- Click and drag the text box to the desired location on the page.
Moving a text box
 .
.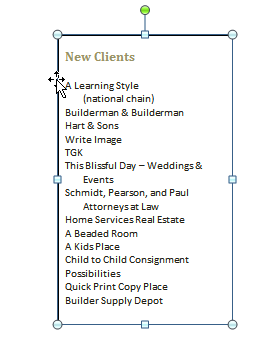
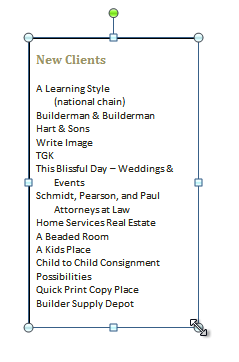
To resize a text box:
- Click the text box.
- Click and drag one of the sizing handles on the corners or sides of the text box until it is the desired size.
Resizing a text box
If you drag the sizing handles on any of the four corners, you will be able to change the height and width at the same time. The sizing handles on the top or bottom of the text box will only allow you to resize vertically, while the handles on the left and right sides will resize the text box horizontally.
Changing a text box’s appearance
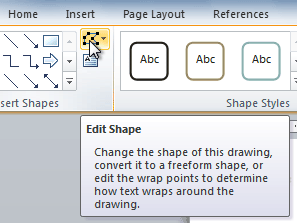
To change the text box shape:
- Select the text box. A new Format tab appears with Drawing Tools.
- Go to the Format tab.
- Click the Edit Shape command.
The Edit Shape command
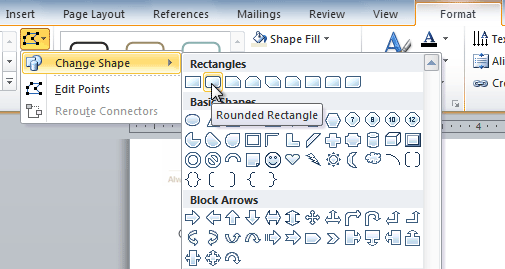
- Click Change Shape to display a drop-down list.
Choosing a different shape for the text box
- Select the desired shape from the list.
To choose a shape style:
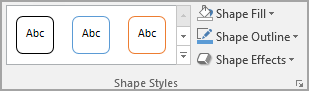
Choosing a shape style allows you to apply a preset fill and outline color, and in some cases other effects such as beveling and shadow. You don’t have to pick a style for your text box, but it can help you save time or experiment with different appearances.
- Select the text box. The Format tab appears.
- Select the Format tab.
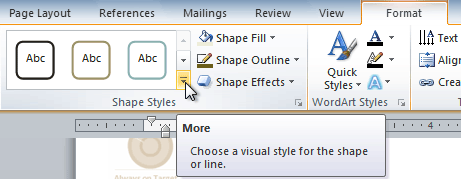
- Click the More drop-down arrow in the Shape Styles group to display more style options.
Viewing the Shape Styles
- Hover your mouse over the styles to see a live preview.
- Select the desired style.
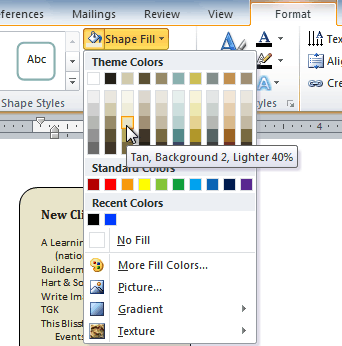
To change shape fill:
- Select the text box. The Format tab appears.
- Click the Format tab.
Changing the fill color
- Click the Shape Fill command to display a drop-down menu.
- From the drop-down menu, you can select a color from the list, choose No Fill, or select More Fill Colors to use a color that’s not on the list.
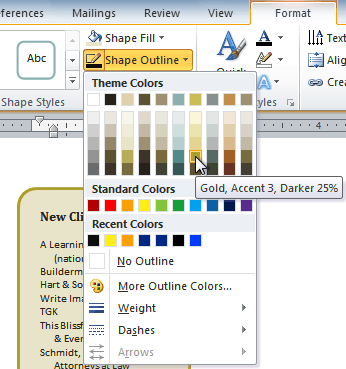
To change the shape outline:
- Select the text box. The Format tab appears.
- Click the Shape Outline command to display a drop-down list.
Changing the outline color
- Select a color from the list, choose No Outline, or select More Outline Colors to use a color that’s not on the list.
- From the drop-down menu, you can change the outline color, weight (thickness), and whether it is a dashed line.
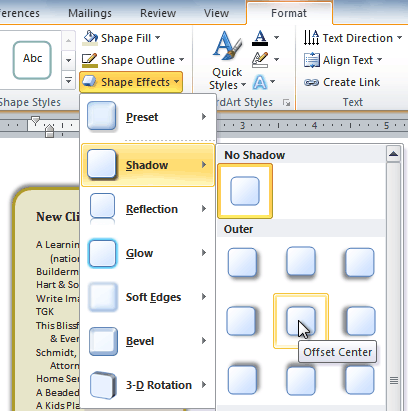
To change shadow effects:
- Select the text box. The Format tab appears.
- Select the Format tab.
- Click the Shape Effects command.
- Click Shadow.
- Move your mouse over the menu options to see a live preview in your document.
Adding a shadow
- Click the desired option to select the shadow effect.
To choose a different shadow color for your shape, select Shadow Options from the drop-down menu, then click the Color button.
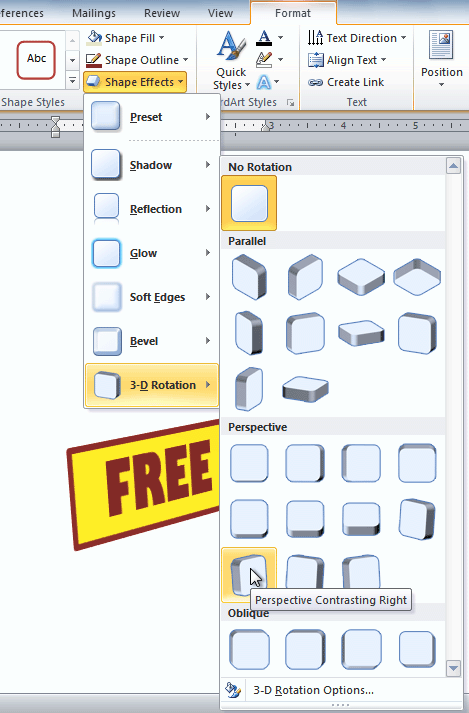
3D effects
Just like other types of shapes, text boxes can have 3D effects. There are two types of effects you can apply to your shapes to give them a 3D appearance: 3-D Rotation and Bevel. 3-D Rotation gives the appearance that you are viewing an object from a different angle, and it can be applied to any shape. Bevel adds thickness and a rounded edge to shapes; however, it doesn’t work with every type of shape.
To use 3-D Rotation:
- Select the text box.
- Select the Format tab.
- Click Shape Effects from the Shape Styles group.
- Hover your mouse over 3-D Rotation. A drop-down menu will appear.
Applying 3-D Rotation to a text box
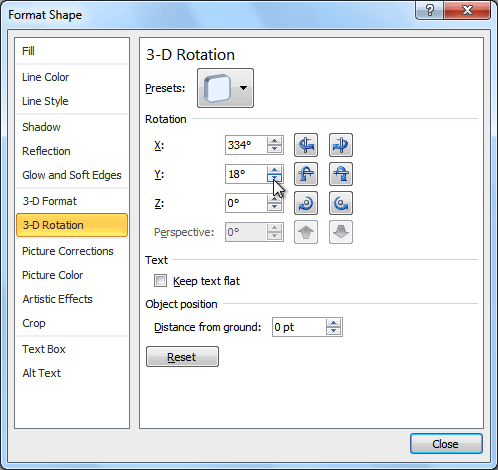
- Select the desired rotation preset from the drop-down menu. You can also click 3-D Rotation Options if you would prefer to type custom values.
3-D Rotation Options
To use bevel:
- Select the text box.
- Select the Format tab.
- Click Shape Effects from the Shape Styles group.
- Hover your mouse over Bevel. A drop-down menu will appear.
Adding bevel to a text box
- Select the desired bevel preset from the drop-down menu. You can also click 3-D Options if you would prefer to type custom values.
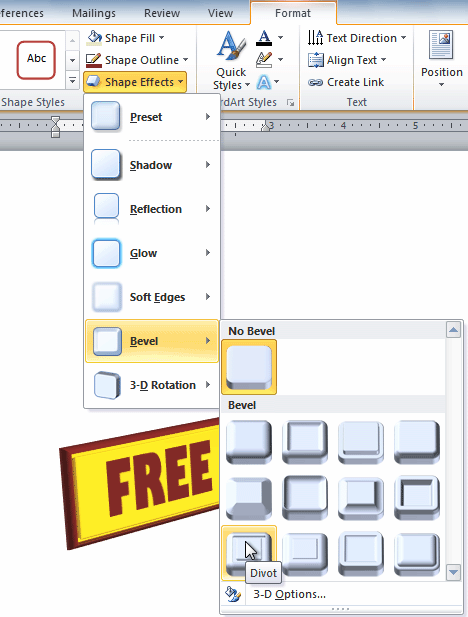
If you click 3-D Options, you’ll also be able to change the shape’s Material to give it a metal, plastic, or translucent appearance, and you can choose the Lighting type to change how the shape is illuminated.
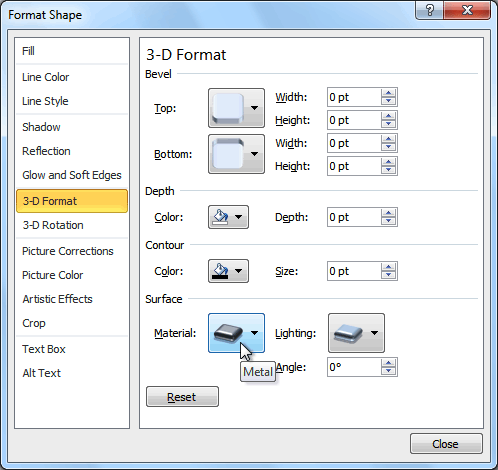 3-D Format Options
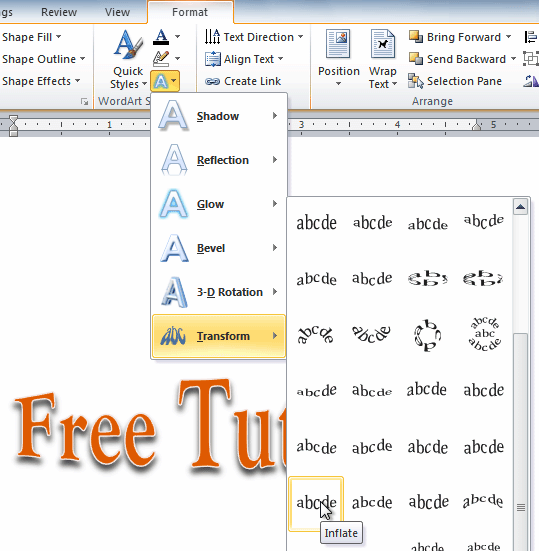
Creating WordArt
In addition to adding effects to a text box, you can add effects to the text inside the text box, which is known as WordArt. For the most part, the types of effects you can add are the same as the ones you can add to shapes or text boxes (shadow, bevel, etc.). However, you can also Transform the text to give it a wavy, slanted, or inflated look.
To apply a quick style to text:
A quick style will automatically apply several effects to your text at once. You can then refine the look of your text by adding or modifying text effects.
- Select the text box, or select some text inside of the text box. The Format tab will appear.
- Click the Format tab.
- Click the Quick Styles command in the WordArt Styles group. A drop-down menu will appear.
Selecting a Quick Style
- Select the desired style preset to apply the style to your text.

After you have applied a quick style, you can still modify the font or font color from the Home tab if you want.
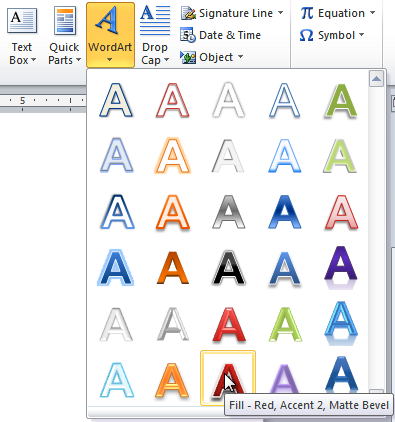
To convert regular text into WordArt:
For text to be formatted as WordArt, it needs to be inside of a text box. However, there’s a shortcut that allows you to convert text into WordArt even if it’s not in a text box.
- Select the text you want to convert.
- Click the Insert tab.
- Click the WordArt command. The Quick Styles drop-down menu will appear.
Converting text to WordArt
- Select the desired quick style.
- Word will automatically create a text box for your text and apply the style to the text.
After converting to WordArt

Some effects, such as shadows, can be added from the Text Effects menu in the Home tab. When you add effects in this way, it will not place the text in a text box.
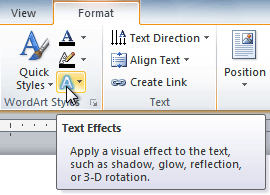
To add or modify text effects:
- Select the text box, or select some text inside of the text box. The Format tab will appear.
- Click the Format tab.
- Click the Text Effects command in the WordArt Styles group. A drop-down menu will appear, showing the different effect categories.
The Text Effects command
- Hover over an effect category. A drop-down menu will appear. You can hover the mouse over the different presets to see a live preview.
Adding an effect
- Select the desired effect preset. The effect will be applied to your text. If you want, you can combine several effects.
The finished WordArt

Challenge!
- Create a new document.
- Insert a text box.
- Enter some text into the text box.
- Move the text box to the desired location.
- Change the outline of the text box to a different color.
- Change the fill color of the text box.
- Add some WordArt effects to the text.
/en/word2010/inserting-clip-art-and-pictures/content/
Excel for Microsoft 365 Outlook for Microsoft 365 PowerPoint for Microsoft 365 Excel 2021 Outlook 2021 PowerPoint 2021 Excel 2019 Outlook 2019 PowerPoint 2019 Excel 2016 Outlook 2016 PowerPoint 2016 Excel 2013 Outlook 2013 PowerPoint 2013 Project Professional 2013 Project Standard 2013 Excel 2010 Outlook 2010 PowerPoint 2010 More…Less
When you add pictures, shapes, or other objects to your Office documents, they automatically stack in individual layers as you add them. You can move individual shapes or other objects or groups of objects in a stack. For example, you can move objects up or down within a stack one layer at a time, or you can move them to the top or bottom of a stack in one move. You can overlap objects when you draw to create different effects.

Notes:
-
For information on aligning objects, see Align or arrange a picture, shape, text box, or WordArt.
-
For information about grouping objects, see Group or ungroup shapes, pictures, or other objects.
Move a picture, shape, text box, or WordArt
-
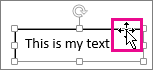
Click the border of the WordArt, text box, or shape that you want to move.
To move multiple text boxes or shapes, press and hold Ctrl while you click the borders.
-
When the cursor changes to the four headed arrow, drag it to the new location.
To move in small increments, press and hold Ctrl while pressing an arrow key. And to move the object horizontally or vertically only, press and hold Shift while you drag it.
Note: The incremental, or nudge, distance is a 1 pixel increment. What 1 screen pixel represents relative to the document area depends on the zoom percentage. When your document is zoomed in to 400%, 1 screen pixel is a relatively small nudge distance on the document. When your document is zoomed out to 25%, 1 screen pixel is a relatively large nudge distance on the document.
Depending on how far you’re moving the WordArt, shape, or text box, it might be easier to cut and paste it. Right-click the object, and then click Cut (or, press Ctrl+X). Press Ctrl+V to paste it. You can also cut and paste it into a different document, or between programs, such as from a PowerPoint slide to an Excel worksheet.
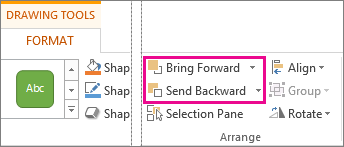
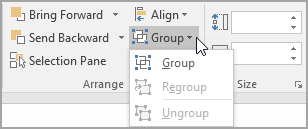
Move a text box, WordArt, or shape forward or backward in a stack
-
Click the WordArt, shape, or text box that you want to move up or down in the stack.
-
On the Drawing Tools Format tab, click either Bring Forward or Send Backward.
You’ll have the choice of moving the object up one layer (Bring Forward) or to the top of the stack (Bring to Front). Send Backward has similar options: down one layer (Send Backward) or to the bottom of the pile (Send to Back).
Tips:
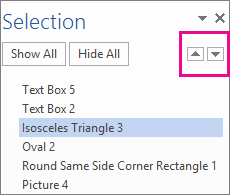
-
In Office 2016 and Office 2013, if you have a lot of WordArt, shapes, text boxes, or other objects, it may be easier to use up and down arrows in the Selection Pane to move objects. The Selection Pane is not available in Project or in Office 2010.
-
-

See also
-
Align or arrange a picture, shape, text box, or WordArt
-
Group or ungroup shapes, pictures, or other objects
Need more help?
Want more options?
Explore subscription benefits, browse training courses, learn how to secure your device, and more.
Communities help you ask and answer questions, give feedback, and hear from experts with rich knowledge.
You can use either a text box or WordArt to add text on top of a photo in Word, Outlook, PowerPoint, or Excel.
Text box over a photo

If your text is longer or doesn’t need fancy styling, a text box may be suitable. You can format the text any way you like.
WordArt over a photo

If the text is brief and you want a stylized look—similar to what you might see on a postcard—then WordArt might be your best option.
Which app are you using?
Word or Outlook | PowerPoint or Excel
Word or Outlook
Use a text box to add text on top of a photo
-
In your document, click to select an insertion point.
-
On the Insert tab, in the Illustrations group, click Shapes, and then click New Drawing Canvas.
-
Click the drawing canvas, and then, on the Insert tab, in the Illustrations group, click Pictures.
-
Browse to and double-click the photo that you want to use, and then click outside the drawing canvas.
-
On the Insert tab, in the Text group, click Text Box, and then at the bottom of the menu, click Draw Text Box.
-
Type the text that you want to appear in the text box, and then drag the text box to the location that you want on top of the picture.
-
To change the font or style of the text, highlight the text and then select the text formatting you want on the shortcut menu.
-
Click the outside edge of the text box, and then drag the text box to position it over your photo.
-
Make sure that the text box is still selected, and then, on the Shape Format tab, in the Shape Styles group, do the following:
-
Click Shape Fill, and then click No Fill.
-
Click Shape Outline, and then click No Outline.
-
-
Click the outside edge of the photo, press and hold Ctrl, and then click the edge of the WordArt so that both items are selected.
-
On the Shape Format tab, in the Arrange group, select Group > Group.


Use WordArt to add text on top of a photo
-
In your document, click to select an insertion point.
-
On the Insert tab, in the Illustrations group, click Shapes, and then click New Drawing Canvas.
-
Click the drawing canvas, and then, on the Insert tab, in the Illustrations group, click Pictures.
-
Browse to and double-click the photo that you want to use.
-
On the Insert tab, in the Text group, click WordArt, click the style of text you want, and then type your text.
-
Click the outside edge of the WordArt to select it, drag the text over your photo and then, if you want, rotate the text to the angle that works best for your photo.
-
Click the outside edge of the photo, press and hold Ctrl, and then click the edge of the WordArt so that both items are selected.
-
On the Picture Format tab, in the Arrange group, select Group > Group.
PowerPoint or Excel
Use a text box to add text on top of a photo
-
In your file, make sure that you’ve inserted a photo.
-
On the Insert tab, in the Text group, click Text Box, drag to draw a text box anywhere near the picture, and then type your text.
-
To change the font or style of the text, highlight the text, right-click it, and then select the text formatting you want on the shortcut menu.
-
Click the outside edge of the text box, drag the text over your photo and then, if you want, rotate the text to the angle that works best for your photo.
-
Make sure that the text box is still selected, and then, on the Shape Format tab, in the Shape Styles group, do the following:
-
Click Shape Fill, and then click No Fill.
-
Click Shape Outline, and then click No Outline.
-
-
Click the outside edge of the photo, press Ctrl, and then click the edge of the text box so that both items are selected.
-
On the Shape Format tab, in the Arrange group, select Group > Group.
Use WordArt to add text on top of a photo
-
In your file, make sure that you’ve inserted a photo.
-
On the Insert tab, in the Text group, click WordArt, click the style of text you want, and then type your text.
-
Click the outside edge of the WordArt to select it, drag the text over your photo and then, if you want to, rotate the text to the angle that works best for your photo.
-
Click the outside edge of the photo, press and hold Ctrl, and then click the edge of the WordArt so that both items are selected.
-
On the Shape Format tab, in the Arrange group, select Group > Group.
Which app are you using?
Word or Outlook | PowerPoint or Excel
Word or Outlook
Use a text box to add text on top of a photo
-
In your document, click to select an insertion point.
-
On the Insert tab, in the Illustrations group, click Shapes, and then click New Drawing Canvas.
-
Click the drawing canvas, and then, on the Insert tab, in the Illustrations group, click Pictures.
-
Browse to and double-click the photo that you want to use, and then click outside the drawing canvas.
-
On the Insert tab, in the Text group, click Text Box, and then at the bottom of the menu, click Draw Text Box.
-
Type the text that you want to appear in the text box, and then drag the text box to the location that you want on top of the picture.
-
To change the font or style of the text, highlight the text and then select the text formatting you want on the shortcut menu.
-
Click the outside edge of the text box, and then drag the text box to position it over your photo.
-
Make sure that the text box is still selected, and then, under Drawing Tools, on the Format tab, in the Shape Styles group, do the following:
-
Click Shape Fill, and then click No Fill.
-
Click Shape Outline, and then click No Outline.
-
-
Click the outside edge of the photo, press and hold Ctrl, and then click the edge of the WordArt so that both items are selected.
-
Under Drawing Tools, on the Format tab, in the Arrange group, select Group > Group.
Use WordArt to add text on top of a photo
-
In your document, click to select an insertion point.
-
On the Insert tab, in the Illustrations group, click Shapes, and then click New Drawing Canvas.
-
Click the drawing canvas, and then, on the Insert tab, in the Illustrations group, click Pictures.
-
Browse to and double-click the photo that you want to use.
-
On the Insert tab, in the Text group, click WordArt, click the style of text you want, and then type your text.
-
Click the outside edge of the WordArt to select it, drag the text over your photo and then, if you want, rotate the text to the angle that works best for your photo.
-
Click the outside edge of the photo, press and hold Ctrl, and then click the edge of the WordArt so that both items are selected.
-
Under Picture Tools, on the Format tab, in the Arrange group, select Group > Group.
PowerPoint or Excel
Use a text box to add text on top of a photo
-
In your file, make sure that you’ve inserted a photo.
-
On the Insert tab, in the Text group, click Text Box, drag to draw a text box anywhere near the picture, and then type your text.
-
To change the font or style of the text, highlight the text, right-click it, and then select the text formatting you want on the shortcut menu.
-
Click the outside edge of the text box, drag the text over your photo and then, if you want, rotate the text to the angle that works best for your photo.
-
Make sure that the text box is still selected, and then, under Drawing Tools, on the Format tab, in the Shape Styles group, do the following:
-
Click Shape Fill, and then click No Fill.
-
Click Shape Outline, and then click No Outline.
-
-
Click the outside edge of the photo, press Ctrl, and then click the edge of the text box so that both items are selected.
-
Under Drawing Tools, on the Format tab, in the Arrange group, select Group > Group.
Use WordArt to add text on top of a photo
-
In your file, make sure that you’ve inserted a photo.
-
On the Insert tab, in the Text group, click WordArt, click the style of text you want, and then type your text.
-
Click the outside edge of the WordArt to select it, drag the text over your photo and then, if you want to, rotate the text to the angle that works best for your photo.
-
Click the outside edge of the photo, press and hold Ctrl, and then click the edge of the WordArt so that both items are selected.
-
Under Drawing Tools, on the Format tab, in the Arrange group, select Group > Group.
© 2023 Prezi Inc.
Terms & Privacy Policy