
Excel for Microsoft 365 for Mac Word for Microsoft 365 for Mac PowerPoint for Microsoft 365 for Mac Excel 2021 for Mac Word 2021 for Mac PowerPoint 2021 for Mac Excel 2019 for Mac Word 2019 for Mac PowerPoint 2019 for Mac Excel 2016 for Mac Word 2016 for Mac PowerPoint 2016 for Mac More…Less
Here’s how to add a line, pattern, or custom border to a text box, picture, and other objects in Word, PowerPoint, or Excel for Mac.
Note: If you didn’t add the border to the shape, text box, picture, or other object in Mac Office, you can’t change or remove the border for the object.
Try the «Sketched» outline
If you’re using Microsoft 365 for Mac (version 16.28 or later), you can give a casual, hand-drawn look to shapes with the Sketched outline.
-
Select an existing shape in your document, or draw a new one.
-
With the shape selected, on the Shape Format tab, select Shape Outline > Sketched, and then select a line width. (The smaller the point size («pt»), the thinner the line is.)
Add or remove a border for a shape or text box
-
Select the shape or text box to which you want to add, change, or remove a border.
-
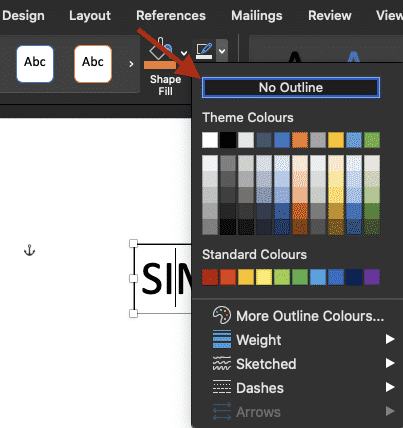
Click Shape Format, and then click the arrow next to Shape Outline.

-
Do any of the following:
To
Do This
Add or change the color of the border
Either click the color that you want, or mix your own color by clicking More Outline Colors.
Add or change the thickness of the border
Point to Weight, and then choose the line weight that you want.
Add or change the style of the border
Point to Dashes, and then click the line style that you want.
Remove the border from the shape or text box
Click No Outline.

Add or remove a picture border
-
Select the picture to which you want to add, change, or remove a border.
-
Click Picture Format, and then click the arrow next to Picture Border.
-
Do any of the following:
To
Do This
Add or change the color of the border
Either click the color you want, or mix your own color by clicking More Outline Colors.
Add or change the thickness of the border
Point to Weight, and then choose the line weight you want.
Add or change the style of the border
Point to Dashes, and then click the line style you want.
Remove the border from the picture
Click No Outline.

See also
Add a page border
Need more help?
Text boxes in an MS Word document are a very useful feature. Text within a box acts as a highlight for the reader. Here, we will show you how to:
- Add a Text Box
- Remove a Text Box
- Customize a Text Box Border
- Change Border Color
- Create Dashed Border
- Change Border Thickness
Let us begin.
Step #1: Open the Word document.
Open the Word document where you want to add the text box.
Step #2: Add the Text Box
Position the cursor where you want the text box to appear.
In the top menu bar, click on the Insert tab to change the ribbon.

In the section Text, click on the Text Box icon to open a dialog box for Built-In text boxes.

Click on the text box you find suitable. We select the Simple Text Box.

Word adds the text box in the document.

Remove a Text Box
Step #1: Open the Word document.
Open the Word document that has at least one text box.
Step #2: Remove the text box
Click on the text box boundary to select it.

Press the Delete button on your keyboard.
Word will delete the text box from your document.
Customize a Text Box Border
Step #1: Open the Word document.
Open the Word document that has at least one text box.
Step #2: Customize the text box border
Click on the text box boundary to select it.

Right-click on the text box boundary to open a menu.
Click on Format AutoShape/Picture.

This opens a dialog box for Format Text Box.
Click on the Colors and Lines tab.

Change Border Color
Under Line, click on the down arrow on the right-hand side of Color:.

This opens a dialog box for Theme Colors and Standard Colors.
Click on the color of your choice.

The chosen color will appear against the Color: tab under Line.

Note: At this point, you can click on OK at the bottom of the dialog box to exit. Word will change the color of the box to your chosen color. Else, move to the next step to make more changes.
Create Dashed Border
In the Format Text Box dialog box, under Line, click on the down arrow on the right side of Dashed:.

This opens a choice for different dashed lines.
Select the most suitable dashed line.

The chosen dashed line will appear against the Dashed: tab under Line.

Note: At this point, you can click on OK at the bottom of the dialog box to exit. Word will make the changes to the text box as per your choices above. Else, move to the next step to make more changes.
Change Border Thickness
In the Format Text Box dialog box, under Line, click on the down arrow on the right side of Style:.

This opens a choice for lines of a different style.
Each line style has its weight in points on its left.
Select the line most suitable to you.

The chosen line style will appear against the Style: tab.
The weight of the chosen line style will appear against the Weight: tab under Style:.

The choice of line styles offers only a few discrete weights.
To change the line weight, select the number next to Weight:.
Change the number as you like.

Click on OK at the bottom of the Format Text Box dialog box to exit.
Word will make the changes to the text box according to all your choices.

Conclusion
Follow our step-by-step instructions to add or delete text boxes in your Word document. Beautify your text boxes with our instructions. We have shown you how to change the border color, style of the border line, and the thickness of the border.
Text boxes are a fantastic feature, they allow you to insert text anywhere in your document at any angle in different fonts, formats, colours and orientations. For this reason, more people are using text boxes in their everyday Word documents for creative headings or to make certain text stand out.
When you insert a new text box into your Microsoft Word document, Word will automatically place a border around it. This is something designers love but for the purpose of your document, a border may not be required.

Removing the border from your text box will make the text inside look as though it is a ‘part’ of your document, not a text box insert.
In this post, we will show you how to remove the border from your text box in just a few short steps.
Removing the border from your text box in Word
- Open Word
- Select the text box you would like to remove the border from
- Click Shape Format tab

- Select Shape Outline

- Click No Outline
By pressing no outline you will immediately remove the border from your text box.
Unfortunately, there is no way to remove more than one border at a time, unless your text boxes are in a row and you can highlight them and select them together.
Searching for a better way to manage Tracked Changes in Word?
If you are collaborating in Microsoft Word, chances are you have sent a document around your team for review. Receiving back a file, covered in tracked changes, red marks and what feels like a million comments to review.
It can be a daunting task to begin reviewing each change, one-by-one, or sorting through the changes and only reviewing the ones that are marked by your team members or relevant to your area of expertise.

It’s overwhelming and a very manual process, but lucky for you there is a better way.
Introducing Simul Docs.
A purpose-built tool, that was created for you – the team that like to collaborate, edit and track changes but just want it to be a whole lot simpler.
First things first, you don’t even have to remember to turn on tracked changes when working with Simul Docs on your side.
If you start making a change to your shared Word Document, Simul knows you want that edit tracked so it does it for you, every, single, time, you can make changes in peace while Simul does the hard work for you.

What about managing multiple users edits in the same document, is it that messy with Simul Docs?
You guessed it, it’s not, Simul has a solution for that too.
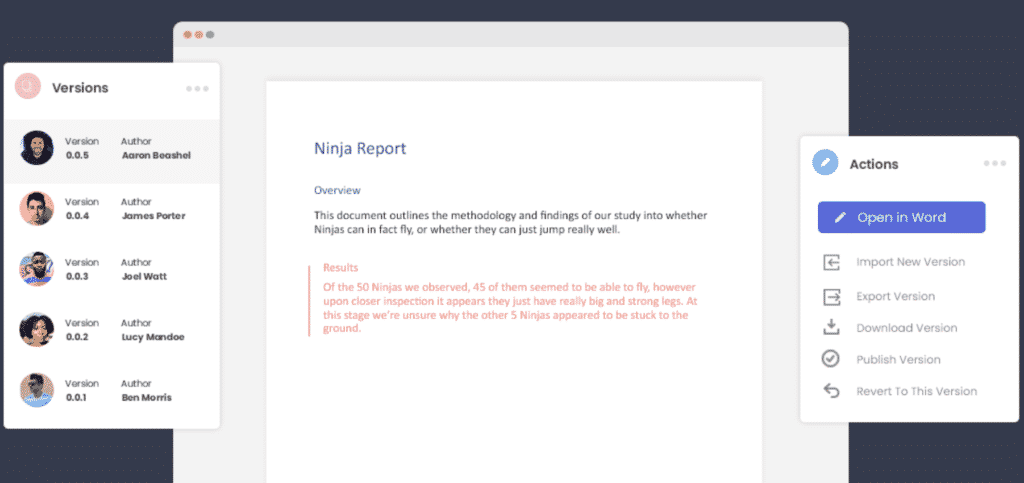
Each users document will be saved as a neat new version, stored to the side of your dashboard in an easy to use versions list. You can then open each version at your leisure and accept or reject each author’s changes individually.
This doesn’t mean that you will then end up with 5 different versions, Simul will make sure that the documents all stay up to date, if Aaron is making changes in the file, the rest of the team can see them, live.
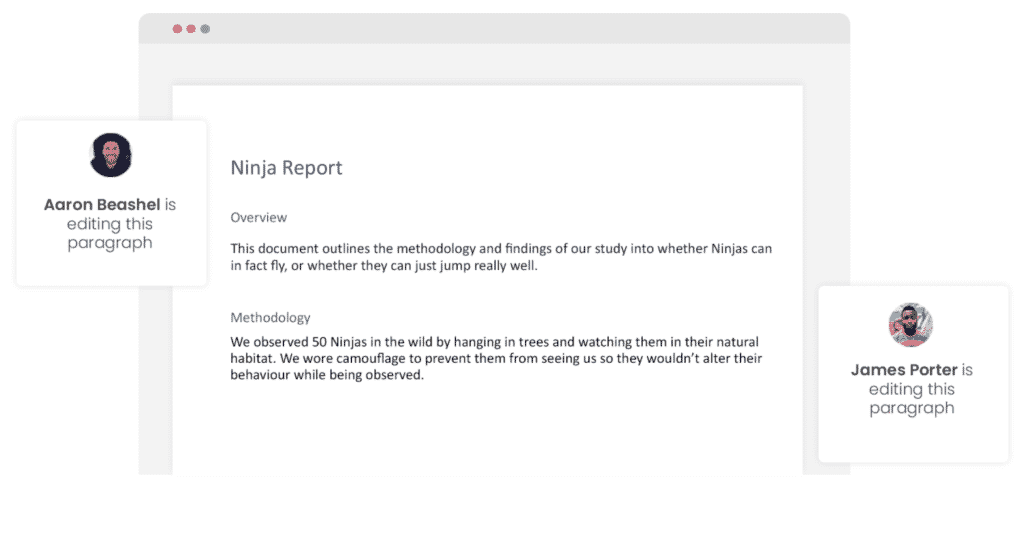
They can make changes at the same time, or even make a change over Aaron’s change and all of this will be saved in their own version. So collaboration becomes simple. Once you have approved or rejected everyone’s changes you will be left with a clean, fresh, new version ready to continue the process or finalise the document.

To make things even easier, Simul marks who made which changes and when. At a glance, you know which document was updated by who, its a simple feature that makes a world of difference when you are collaborating with more than one or two other people.
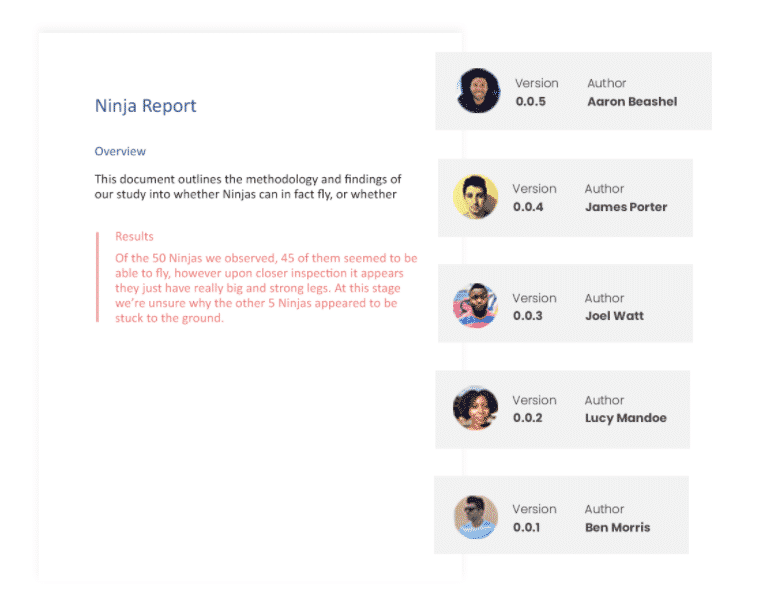
Finally, Simul will keep every single version on file for you, saved in that nifty versions list we mentioned earlier.
So, Simul ends up making your collaboration process easier and helps you manage version control as you’ve never seen before. Each version is saved in the versions list, with the version number, authors name and any changes made visible to make it easy for you to refer back to an old version, or find an old change at any time.
Gosh, how much easier did redlining, tracking changes and version control just become?
Its a fantastic tool, that has your back and is here to simplify collaboration.
If you haven’t tried it already, head over to www.simuldocs.com and start with the free trial option. Your team will love you.
Remove the border
- Select the text box or shape border that you want to remove.
- Under Drawing Tools, on the Format tab, in the Shape Styles group, click Shape Outline, and then click No Outline.
Contents
- 1 How do you make a text box border invisible in Word?
- 2 How do you delete a text box without removing the text in Word 2010?
- 3 Why is there a box around my text in Word?
- 4 How do I get rid of text box borders?
- 5 How do you remove borders in Word?
- 6 How do I remove text boxes but not text in Word?
- 7 Can’t delete a text box in Word?
- 8 How do you do a 1/2 point outline?
- 9 How do you remove input box focus?
- 10 How do I edit text boxes in Word?
- 11 How do I change the border color of a text box in Word?
- 12 How do you change the shape of an outline in Word?
- 13 How do I remove the design consulting data series from the chart?
- 14 How do I remove the active button border?
- 15 How do I remove border color?
- 16 How do I get rid of the blue border on my focus input?
How do you make a text box border invisible in Word?
Word
- Right-click the text box that you want to make invisible.
- On the shortcut menu, click Format Text Box.
- On the Colors and Lines tab, in the Fill section, click the arrow next to Color, and then click No Color.
- On the Colors and Lines tab, in the Line section, click the arrow next to Color, and then click No Color.
How do you delete a text box without removing the text in Word 2010?
Method 1: Remove Text Box By Copying and Pasting
- Step 1: Open up a Word file. To get started, let’s open up an MS Word document.
- Step 2: Copy the text from the text box.
- Step 3: Paste the text on a space outside the text box.
- Step 4: Delete the text box.
Why is there a box around my text in Word?
The bottom line is that if the Normal style is formatted to have a box around it, then there is a good chance that all your paragraphs will have boxes around them. Check the style formatting and remove any boxes that may be associated with the style, and your problem may be immediately fixed.
How do I get rid of text box borders?
To remove the border from a text box, follow these steps:
- Either click on the border of the text box or position the insertion point within the text box.
- Select the Text Box option from the Format menu.
- Click on the Colors and Lines tab, if necessary.
- In the Color drop-down list, select No Line.
- Click on OK.
How do you remove borders in Word?
If you later decide to remove the border, here’s how to do it.
- Place the cursor anywhere within the bordered text. On the Design tab, in the Page Background group, select Page Borders.
- In the Borders and Shading dialog box, select Borders.
- Under Setting, select None.
- Select OK.
- The border is removed from the document.
How do I remove text boxes but not text in Word?
Follow these steps:
- In your document, press Ctrl+A.
- Press Ctrl+C.
- Open a new, blank document.
- Make sure the Home tab of the ribbon is displayed.
- Click the down-arrow under the Paste tool (at the left side of the ribbon) and choose Paste Special.
- In the list of formats, choose Unformatted Text.
- Click on OK.
Can’t delete a text box in Word?
To delete a textbox you must click on the textbox border, then press the Delete key.
How do you do a 1/2 point outline?
Select the shape or text box to which you want to add, change, or remove a border. Click Shape Format, and then click the arrow next to Shape Outline. Either click the color that you want, or mix your own color by clicking More Outline Colors. Point to Weight, and then choose the line weight that you want.
How do you remove input box focus?
Answer: Use CSS outline property
In Google Chrome browser form controls like ,
Including a text box in a Word document provides you with the ability to display text outside of the regular document content. This text box can then be formatted and moved around, but you may be wondering how to remove the border from that text box if you don’t need it.
You can remove borders from text boxes in a Word document by selecting the border of the text box, choosing the Shape Format tab at the top of the window, then clicking the Shape Outline button and selecting the No Outline option from the drop down list.
Microsoft Word handles a text box like a separate object, much like if you added a picture or a table to your document. As such, it has a variety of formatting options that you can apply.
But if you have never had to change a setting for a text box, you may be having trouble figuring out where all of those options are.
Our guide below will show you how to get rid of your text box border in Microsoft Word so that you don’t see the line surrounding the box in your document.
How to Delete a Text Box Border in Microsoft Word
- Open your document.
- Click on the text box border.
- Select the Shape Format tab.
- Click the Shape Outline button and choose No Outline.
Our article continues below with additional information on how to remove text box border in Word, including pictures of these steps.
Learn how to draw a line through text in Google Docs if you also use that program and want to learn about some of its less common text formatting tools.
How to Get Rid of the Border on a Text Box in Word 2016 (Guide with Pictures)
The steps in this article were performed in the Microsoft Word for Office 365 version of the application, but will work in most other versions of Word as well.
Step 1: Open the document with the text box whose border you wish to remove.
Step 2: Click on the text box border, which will select the entire object.
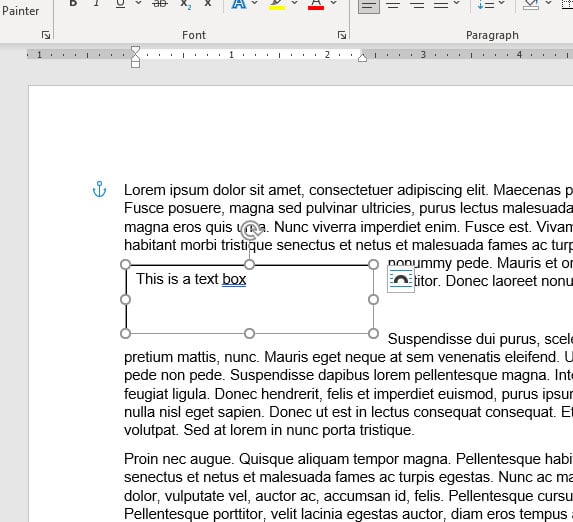
If you are having trouble clicking on the text box border, you can also choose to click inside of the text box.
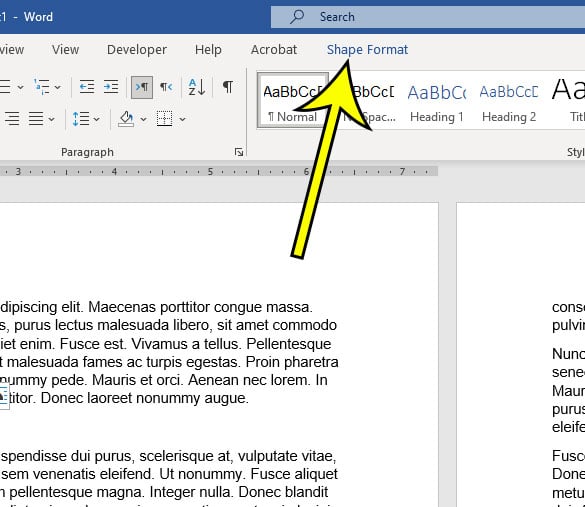
Step 3: Select the Shape Format tab at the top of the window.
Note that this tab is only visible when the text box is selected, so you won’t see it when you are editing the body of your document.
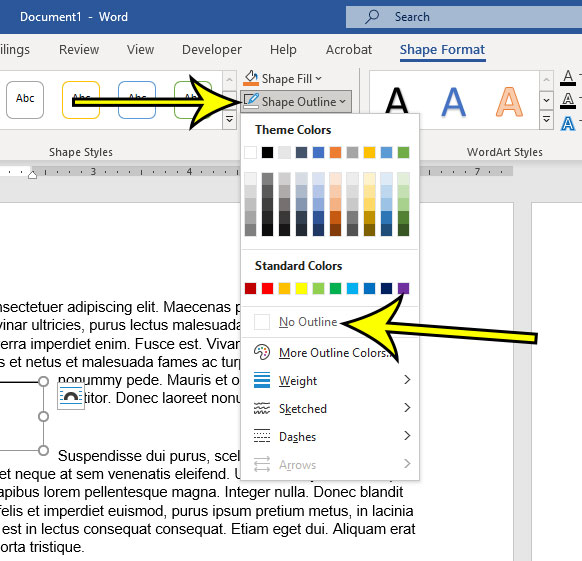
Step 4: Click the Shape Outline button in the Shape Styles group in the ribbon, then choose the No Outline option from the drop down.
Now that you know how to remove text box border in Word you will be able to fix issues that arise in your document related to text box borders.
You will still see a line around the text box, as it is currently selected. However, when you click on another part of the document, that line should be gone, allowing you to see how the text box will look now that you have eliminated the border.
More Information on How to Remove Border from Text Box in Word
While the steps in this tutorial discuss removing the border completely, you can use these same steps if you want to use a different color for your border.
The text box border can be further customized from this menu by selecting the Weight, Sketched, or Dashes option. This will change things such as the style of the text box border, or its thickness. There is also an option on the Shape Outlines menu that says More Outline Colors, which you can choose if you don’t see the color that you want to use for the border.
Word also gives you the option to adjust the fill color of your text box. By default the text box background is white, but you can make it almost any other color that you would like. This is accomplished by going to Shape Format > Shape Fill then selecting the desired background color. If you do change the background color, you may also need to change the text color. You can do this by selecting the text inside of the text box, then using the Font formatting options found on the Home tab.
if you need to do something other than removing the border from a text box, then you will find a lot of options on the Format Shape dialog box. you can open this menu by clicking the small Format Shape button that appears at the bottom-right of the Shape Styles group in the ribbon.
Here you will find ways to customize your shape or text box, including:
- Changing the line style
- Adjusting the line weight
- Changing the shape border
- Changing the vertical alignment or text direction
- Using different margins for the content inside of the text box
- Adding various effects to the text box like shadow, reflection, glow soft edges, and more
- Applying or removing a fill color from the text box
There is even a tab for Text Options that let you select the formatting and layout settings for the text that is inside of the text box.
When you combine all of these different customization options along with the ability to create a custom border or remove a border from a text box then you can see just how many options there are for you to format the text box the way that you want.
If you need to change multiple text boxes at the same time inside of your document, then you can do that by clicking the first text box, then hold Ctrl key on your keyboard, and clicking on the additional text boxes that you want to change.
Note that doing this will cause you to apply the same changes to each of the selected text boxes. So if you give a different border style from the Borders tab then it will apply that effect to each of the selected text boxes.

Kermit Matthews is a freelance writer based in Philadelphia, Pennsylvania with more than a decade of experience writing technology guides. He has a Bachelor’s and Master’s degree in Computer Science and has spent much of his professional career in IT management.
He specializes in writing content about iPhones, Android devices, Microsoft Office, and many other popular applications and devices.
Read his full bio here.