
By default, text boxes can accommodate a single line of text. If you want a text box to be able to accommodate multiple lines of text, you can enable paragraph breaks or text wrapping for the text box after you insert it onto your form template.
-
Right-click the text box for which you want to enable multiple lines of text, and then click Text Box Properties on the shortcut menu.
-
Click the Display tab.
-
To enable multiple lines of text to be typed in the text box, select the Multi-line check box, and then optionally do one of the following:
-
To prevent users from being able to insert paragraph breaks in the text box by pressing ENTER, clear the Paragraph breaks check box.
-
To prevent text from automatically wrapping to the next line when the user types more text than the width of the text box, clear the Wrap text check box.
-
-
In the Scrolling list, click the text-scrolling option that you want.
Note: If you select the Multi-line check box in a browser-compatible form template, you won’t be able to clear the Enable paragraph breaks or Wrap text check boxes or specify options in the Scrolling list.
Need more help?

If you want to get creative with your text or simply have more flexibility, consider adding a customizing a text box in Word.
If you want more flexibility with certain text in your Word document, why not use a text box? Since a text box is considered an object, you can move it wherever you like in your document. This is handy for placing text in areas you normally wouldn’t.
You can use a text box to call attention to something in your document, rotate snippets of text, or create a unique appearance. Microsoft Word also provides formatting options for text boxes that give them their own nifty style or useful function.
Here, we’ll show you how to add or draw a text box and then format it to your liking in Microsoft Word.
With Word on Windows, you can either insert a preformatted text box or draw one of your own. Either way, you can customize it afterward, so choose the best option for you.
Go to the spot in your document where you want the text box and select the Insert tab. Click the Text Box drop-down arrow and pick a Built-In style or Draw a Text Box.

If you’re using Word on Mac, go to the Insert tab, click the Text drop-down arrow, and then the Text Box arrow. You can then choose to draw a simple text box or one where the text inside is vertical.

To draw your text box on either platform, drag the crosshairs to create the size you want. You can resize the text box any time after you draw it too.

When your text box appears, click inside to add your own words.
Format and Customize a Text Box in Word
Once you insert or draw your text box, select it and go to the Shape Format tab to view all of your formatting options. You’ll find the following features in Word on Windows, which may differ slightly in Word on Mac.

Shape Styles
Choose a theme or preset style for your text box. These options include filling colors and various effects.

Or you can use the Shape Fill, Outline, and Effects options to create your own distinctive style. From gradients and patterns to dashed lines and scribbles, you have many terrific options for customizing the appearance of your text box.

Note: Some options in the Shape Styles section may not be available if you select a preset text box.
WordArt Styles
Along with making the text box itself look snazzy, you can do the same with the text inside of it. Check out the Quick Styles in the WordArt Styles for premade options.

Or use the Text Fill, Outline, and Effects to make the text really pop. You can do things like add a shadow and glow or warp the text, so it’s curvy and cool.

Text, Accessibility, Arrange, and Size
The remaining sections of the ribbon allow you to change the direction of the text inside the box, use text wrapping with other elements in your document, rotate the text box, and adjust its exact size. You can also use the Alt Text Accessibility option to describe the text box.

Edit Your Text Box
After you customize your text box, you can still edit it anytime. Just note that when you select the text box to make changes, it may appear without some of the elements or effects you’ve applied. This is to make text editing simpler.
Once you complete your edits and deselect the text box, it will return to normal with your customizations.

Add Text Anywhere, Any Way in Word
Text boxes in Microsoft Word let you place text anywhere in your document without worries of margins or other normal text limitations. And because you can completely format the text box almost any way you want, it can be both a fun and useful addition to your document.
If you use Google Docs and Microsoft Word, take a look at how to work with text boxes in Docs too!
![]()
Text boxes in an MS Word document are a very useful feature. Text within a box acts as a highlight for the reader. Here, we will show you how to:
- Add a Text Box
- Remove a Text Box
- Customize a Text Box Border
- Change Border Color
- Create Dashed Border
- Change Border Thickness
Let us begin.
Step #1: Open the Word document.
Open the Word document where you want to add the text box.
Step #2: Add the Text Box
Position the cursor where you want the text box to appear.
In the top menu bar, click on the Insert tab to change the ribbon.

In the section Text, click on the Text Box icon to open a dialog box for Built-In text boxes.

Click on the text box you find suitable. We select the Simple Text Box.

Word adds the text box in the document.

Remove a Text Box
Step #1: Open the Word document.
Open the Word document that has at least one text box.
Step #2: Remove the text box
Click on the text box boundary to select it.

Press the Delete button on your keyboard.
Word will delete the text box from your document.
Customize a Text Box Border
Step #1: Open the Word document.
Open the Word document that has at least one text box.
Step #2: Customize the text box border
Click on the text box boundary to select it.

Right-click on the text box boundary to open a menu.
Click on Format AutoShape/Picture.

This opens a dialog box for Format Text Box.
Click on the Colors and Lines tab.

Change Border Color
Under Line, click on the down arrow on the right-hand side of Color:.

This opens a dialog box for Theme Colors and Standard Colors.
Click on the color of your choice.

The chosen color will appear against the Color: tab under Line.

Note: At this point, you can click on OK at the bottom of the dialog box to exit. Word will change the color of the box to your chosen color. Else, move to the next step to make more changes.
Create Dashed Border
In the Format Text Box dialog box, under Line, click on the down arrow on the right side of Dashed:.

This opens a choice for different dashed lines.
Select the most suitable dashed line.

The chosen dashed line will appear against the Dashed: tab under Line.

Note: At this point, you can click on OK at the bottom of the dialog box to exit. Word will make the changes to the text box as per your choices above. Else, move to the next step to make more changes.
Change Border Thickness
In the Format Text Box dialog box, under Line, click on the down arrow on the right side of Style:.

This opens a choice for lines of a different style.
Each line style has its weight in points on its left.
Select the line most suitable to you.

The chosen line style will appear against the Style: tab.
The weight of the chosen line style will appear against the Weight: tab under Style:.

The choice of line styles offers only a few discrete weights.
To change the line weight, select the number next to Weight:.
Change the number as you like.

Click on OK at the bottom of the Format Text Box dialog box to exit.
Word will make the changes to the text box according to all your choices.

Conclusion
Follow our step-by-step instructions to add or delete text boxes in your Word document. Beautify your text boxes with our instructions. We have shown you how to change the border color, style of the border line, and the thickness of the border.
There are two ways you can insert a text into a Word document
First method:
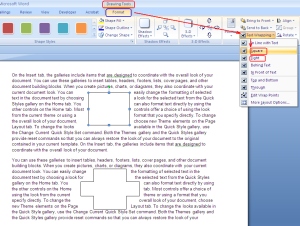
From the Ribbon, under the tab Insert, within the group Text, click the Text Box icon. You can view a gallery of built-in text boxes in a drop-down list. From the ribbon under the tab insert within the group text click the text box icon you can view a gallery of built in text boxes in a drop-down list
- Click to insert one of these into your document. Depending on the Text Wrapping property of the selected text box, it may sit on top of text, behind the text, in line with text, surrounded by text, etc.
- Now, to reveal the text wrapping property of the inserted text box, click the text box on the borders. Text Box Tools tab appears on the Ribbon.
- Click the Format tab under this. Under the Format tab, within the group Arrange, click the Text Wrapping icon. From the drop-down menu, you can view various text-wrapping styles and the one highlighted is the default style. You can change this property as required.

You can also create a new empty text box from the gallery drop-down. Click Draw Text Box from the bottom of the drop-down. The mouse pointer changes to a plus symbol and you can draw a text box.

Note: Text wrapping styles are: In Line with Text, Square, Tight, Behind Text, In Front of Text, Top and Bottom, and Through. All these style are self-explanatory.
Difference between Square and Tight
You may wonder about the difference between Square and Tight styles, as in both case text surrounds the box. Difference lies in the manner that text surrounds. With Square, text takes the shape of a square around the box (irrespective box shape). With Tight, surrounding text takes the shape of the box (e.g. star shaped box, trapezoid, hexagon, etc.)
Second method:
- From the Ribbon, under the tab Insert, within the group Illustrations, click Shapes. From the gallery of Shapes, under Basic Shapes, click the Rectangle shape.
- The mouse pointer changes to a plus symbol and you can draw a rectangular shape in your document. What you can draw is a basic rectangular shape and you cannot enter text readily.
- Right-click the shape and from the right-click menu, select Add Text. The shape transforms to a text box and you can enter text.
- Change the text-wrapping property of the text boxes as explained above.
How to fix text boxes in one line
If you select the text wrapping style of a text box to In Line with Text, the text box gets fixed to that line. So, the text box will move only with the line.
Formatting text boxes
You can design a text box with fill color, gradient color, border color, shadow, 3D effects, and many more.
- Right-click on the borders of the text box and from the right-click menu, select Format Text Box. Format Text Box dialog box appears.
- From the Colors and Lines tab, apply fill color, change transparency of color, add border line color, change border line pattern, etc.
- From the Size tab, select height and width of the text box, lock aspect ratio,
- In the Layout tab, you can select the text wrapping type as discussed above. You can also specify height and width of the text box relative to the page, page margin, etc.
- In the Text Box tab, set the left, right, bottom, and top margins the text inside the text box. Also, set the vertical alignments: Top, Center, or Bottom.
Use built in text box styles
You can select the built in text box styles from the Text Box Styles group under Text Box Tools tab >> Format tab >> Tex Box Styles
Change direction of text inside text box
If you want the text inside text box to appear vertically (from top or bottom), under the Format tab, within group Text, click Text Direction.
Flow text from one box to another
Select a text box and from the Format tab, within group Text, click Create Link. A coffee cup icon appears. Then click the next text box (should be a empty text box) to which you want the text to flow from the first text box. Done. It links the first text box to the second. Want to break the link, right-click on the first text box, then from the right click menu, select Break Forward Link.

Cut, Copy, and Paste text boxes
Click on the borders of text box and then right-click. From the right-click menu, select Copy to copy text box, select Cut to delete text box, and select Paste to paste the check box at the point of insertion.
Changing the text box shape
Under Text Box Tools tab >> Format tab >> Tex Box Styles, click Change Shape. From the drop-down, select any of the shapes. Text box takes the selected shape.
Grouping text boxes
If you are using multiple text boxes in one place to create a design, flow chart, etc., you can group all to manage them easily, move them all together. To group, press CTRL and click on the borderlines of all text boxes one by one. Release the CTRL button and right-click on the selected text boxes. From the right-click menu, select Group under Grouping.
 Please Note:
This article is written for users of the following Microsoft Word versions: 2007, 2010, 2013, 2016, 2019, and Word in Microsoft 365. If you are using an earlier version (Word 2003 or earlier), this tip may not work for you. For a version of this tip written specifically for earlier versions of Word, click here: Creating See-through Text Boxes.
![]()
Written by Allen Wyatt (last updated November 9, 2019)
This tip applies to Word 2007, 2010, 2013, 2016, 2019, and Word in Microsoft 365
Word allows you to create text boxes in your document. These can be used to create special document elements, such as sidebars or boxed text. There may be times when you want the text box to be transparent, meaning that whatever is behind the text box shows through. There are two ways you can handle this: you can either make the text box partially transparent or make it fully transparent. How you accomplish this depends on the version of Word you are using.
If you are using Word 2007, follow these steps to control the transparency:
- Place your text box, as normal.
- Right-click on the text box. Word displays a Context menu.
- Choose Format Text Box from the Context menu. Word displays the Format Text Box dialog box.
- Make sure the Colors and Lines tab is selected. (See Figure 1.)
- Click the Semitransparent check box if you want a «ghost image» of what is behind the text box to show through.
- If you want the text box to be fully transparent, use the Color setting in the Fill area to choose No Fill.
- Display the Layout tab. (See Figure 2.)
- Make sure the wrapping style is set to In Front of Text.
- Click on OK.
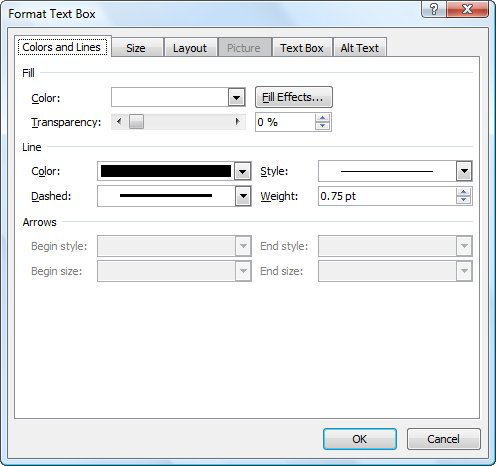
Figure 1. The Colors and Lines tab of the Format Text Box dialog box.
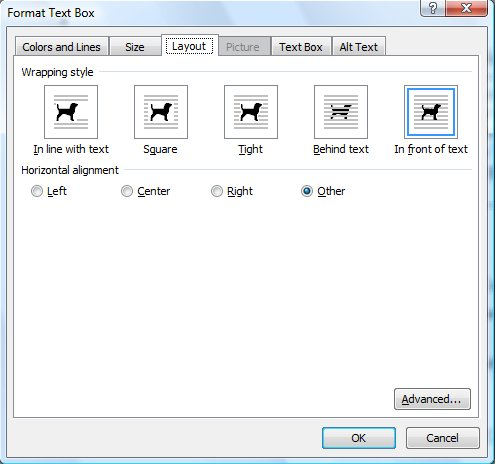
Figure 2. The Layout tab of the Format Text Box dialog box.
In Word 2010 the steps are a bit different:
- Place your text box, as normal.
- Right-click on the text box. Word displays a Context menu.
- Choose Format Shape from the Context menu. Word displays the Format Shape dialog box.
- At the left side of the dialog box click Fill. (See Figure 3.)
- Use the Transparency slider to adjust how transparent you want the Text Box to be. (If you want the Text Box to be fully transparent, slide the control all the way to 100%. You can also make it fully transparent by clicking the No Fill radio button.)
- At the left side of the dialog box click Line Color. (See Figure 4.)
- Either choose No Line or use the Transparency slider to adjust how transparent you want the line to be.
- Click on OK.
- Again right-click the text box to display the Context menu.
- Choose Wrap Text option and then choose In Front of Text.
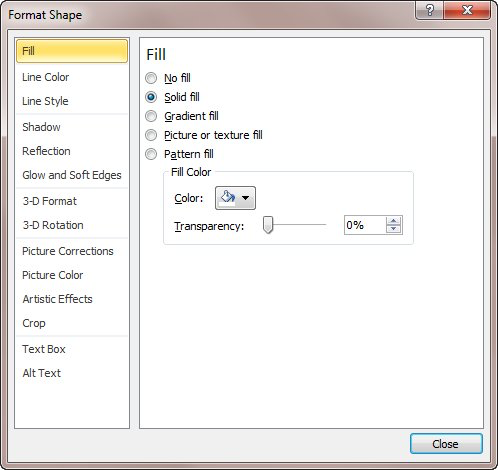
Figure 3. The Fill options of the Format Shape dialog box.
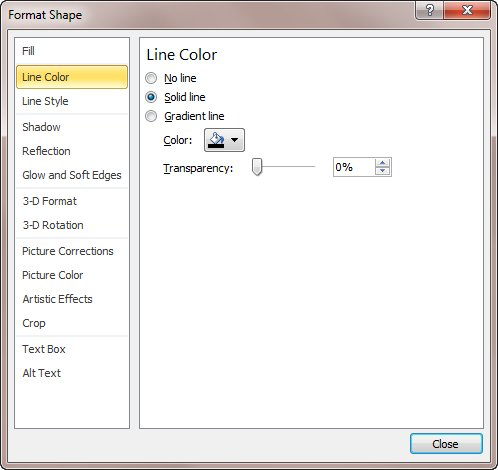
Figure 4. The Line Color options of the Format Shape dialog box.
In Word 2013 or a later version, the steps are even more different:
- Place your text box, as normal.
- Right-click on the text box. Word displays a Context menu.
- Choose Format Shape from the Context menu. Word displays the Format Shape pane at the right side of the screen.
- Click the Fill and Line icon (it looks like a spilling paint bucket).
- Click on the Fill option to expand it. (See Figure 5.)
- Use the Transparency slider to adjust how transparent you want the Text Box to be. (If you want the Text Box to be fully transparent, slide the control all the way to 100%. You can also make it fully transparent by clicking the No Fill radio button.)
- Again, right-click the text box to display the Context menu.
- Choose Wrap Text option and then choose In Front of Text.
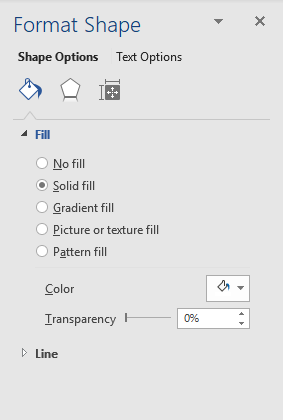
Figure 5. The Format Shape task pane.
WordTips is your source for cost-effective Microsoft Word training.
(Microsoft Word is the most popular word processing software in the world.)
This tip (12687) applies to Microsoft Word 2007, 2010, 2013, 2016, 2019, and Word in Microsoft 365. You can find a version of this tip for the older menu interface of Word here: Creating See-through Text Boxes.
Author Bio
With more than 50 non-fiction books and numerous magazine articles to his credit, Allen Wyatt is an internationally recognized author. He is president of Sharon Parq Associates, a computer and publishing services company. Learn more about Allen…
MORE FROM ALLEN
The EDATE Function
Want to figure a date a certain number of months in the future or past? The EDATE function may be just what you need for …
Discover More
Headings in Tables Not Showing in TOC
Word includes a couple of built-in tools that rely upon the use of heading styles in your document. These tools include …
Discover More
Mysterious Boxes around Paragraphs
Do you have some mysterious and unwanted boxes showing up around the paragraphs in your document? Here are some ideas on …
Discover More
More WordTips (ribbon)
Selecting Text in Linked Text Boxes
Text boxes are often used as design elements in a document layout. If you have linked text boxes, you may have noticed …
Discover More
Rounded Corners for a Text Box
Text boxes are great for positioning information the way you want it to appear in your page layout. Fortunately, you …
Discover More
No-border Text Boxes by Default
Text boxes can be a great design element when laying out your documents. If you want those text boxes to have no borders …
Discover More