
Word for Microsoft 365 Word for Microsoft 365 for Mac Word 2021 Word 2021 for Mac Word 2019 Word 2019 for Mac Word 2016 Word 2016 for Mac Word 2013 Word 2010 Word for Mac 2011 More…Less
A text box is an object you can add to your document that lets you put and type text anywhere in your file. Text boxes can be useful for drawing attention to specific text and can also be helpful when you need to move text around in your document.
Add a text box
-
Place cursor where you want the text box to appear.
-
Go to Insert and in Illustrations select Drawing.
-
Select Text Box and use your cursor to create the text box.
-
Insert text in box and apply any styling needed.
-
Select Save andClose.
If you aren’t using a mouse
-
Press Alt + Period (.) and then press N.
-
Then press D to select drawings.
-
Press Alt + Period (.) and then press N.
-
Type the text that you want.
-
Press the Esc key 3 times.
-
Press Enter to save textbox.
Notes:
-
To format the text in the text box, select the text, and then use the formatting options in the Font group on the Home tab.
-
To format the text box itself, use the commands on the Shape Format contextual tab that appears when you select a text box.
-
To position the text box, select it, and then when the pointer becomes a
 four-headed arrow, drag the text box to a new location.
 -
You can also change or remove a border from a text box or shape.
-
If you have multiple text boxes, you can link them together so that text will flow from one box to another. Select one of the text boxes and on the Shape Format tab, select Create Link.
-
 four-headed arrow, drag the text box to a new location.
Editing in a text box
-
Double click the textbox.
-
In Drawing (Preview), select the textbox to place your cursor and edit text.
-
When finished select Save and Close to view updated text box.
Copy a text box
-
Select the border of the text box that you want to copy.
-
Press Ctrl+C.
Note: Make sure the pointer is on the border of the text box, not inside it. If the pointer is inside, pressing Ctrl+C will copy the text, not the text box.
-
Select a location and press Ctrl+V to paste the text box.
Delete a text box
-
Select the border of the text box that you want to delete, and then press Delete.
Note: Make sure the pointer is on the border of the text box and not inside it. If the pointer is inside the box, pressing Delete will delete the text inside the text box, not the box.
Add a text box
-
Go to Insert > Text Box, and then select Draw Text Box.
-
Click or tap in the document, and drag to draw the text box the size that you want.
-
To add text to a text box, select inside the text box, and then type or paste text.
Notes:
-
To format the text in the text box, select the text, and then use the formatting options in the Font group on the Home tab.
-
To format the text box itself, use the commands on the Format contextual tab, which appears under Drawing Tools when you select a text box.
-
To position the text box, select it, and then when the pointer becomes a
, drag the text box to a new location. -
You can also change or remove a border from a text box or shape.
-
If you have multiple text boxes, you can link them together so that text will flow from one box to another. Select one of the text boxes and on the Format tab, under Drawing Tools, and then select Create Link.
-
Copy a text box
-
Select the border of the text box that you want to copy.
-
Go to Home > Copy
.Make sure that the pointer is not inside the text box, but rather on the border of the text box. If the pointer is not on the border, pressing Copy will copy the text inside the text box and not the text box.
-
Go to Home and select Paste.
 .
.
Delete a text box
-
Select the border of the text box and then press DELETE.
Make sure that the pointer is not inside the text box, but rather on the border of the text box. If the pointer is not on the border, pressing DELETE will delete the text inside the text box instead.
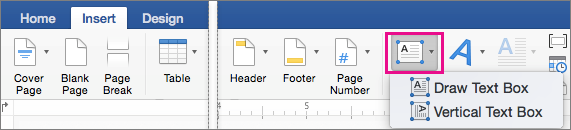
Add a text box
-
Go to Insert > Text Box and then select either Draw Text Box (where the text aligns horizontally on the page) or Vertical Text Box (where the text aligns vertically on the page).
-
Select in the document, and then drag to draw the text box the size that you want.
-
To add text to a text box, click or tap inside the text box, and then type or paste text.
-
To format the text in the text box, select it, and then Control + Click the text and select Font.
-
To add different effects to the text box, select the text box, and use the options on the Shape Format tab (such as changing the text direction or aligning the text at the top, middle or bottom of the text box).
-
To position the text box, select and hold it, and then when the pointer becomes a
, drag the text box to a new location.
-
Note: If you have drawn multiple text boxes, you can link them together so that text will flow from one box to another. You can only link an empty text box to the one that you’ve selected. To do this, select the text box that you want to link to another text box, and then go to Shape Format > Create Link.
Copy a text box
-
Select the text box you want to copy.
Make sure that the pointer is on the border of the text box and not inside the text box. If the pointer is not on the border, the text inside the text box is copied.
-
Press Control + Click, and then select Copy. Or, press
+ C. -
Select the location in your document where you want to paste the text box, press Control + Click, and then select Paste. Or, press
+ V.
 + C.
+ C.Remove a text box
-
Select the border of the text box that you want to delete, and then press DELETE.
Make sure that the pointer is on the border of the text box and not inside the text box. If the pointer is not on the border, pressing DELETE will delete the text inside the text box.
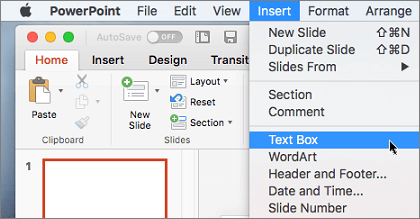
Add a text box
-
Go to Insert > Text Box.
-
Click in your file where you’d like to insert the text box, hold your mouse button down, then drag to draw the text box the size that you want.
-
After you’ve drawn the text box click inside it to add text.
Copy a text box
-
Select the text box you want to copy.
Make sure that the pointer is on the border of the text box and not inside the text box. If the pointer is not on the border, the text inside the text box is copied.
-
Press Control + Click, and then select Copy. Or, press
+ C. -
Select the location in your document where you want to paste the text box, press Control + Click, and then select Paste. Or, press
+ V.
Remove a text box
-
Select the border of the text box that you want to delete, and then press DELETE.
Make sure that the pointer is on the border of the text box and not inside the text box. If the pointer is not on the border, pressing DELETE will delete the text inside the text box.
Need more help?
Add a text box
- Go to Insert > Text Box, and then select Draw Text Box.
- Click or tap in the document, and drag to draw the text box the size that you want.
- To add text to a text box, select inside the text box, and then type or paste text. Notes:
Contents
- 1 How do I create a fixed text box in Word?
- 2 How do you insert a box in Word 2020?
- 3 Where is text box tools in Word?
- 4 How do I make a text box a certain size in Word?
- 5 How do I make a small box in Word?
- 6 How do you insert a little box in Word?
- 7 Why can’t I add a text box in Word?
- 8 Why is there no text box option in Word?
- 9 What is text box tool?
- 10 How do I apply a shape style to a text box in Word?
- 11 How do I insert a 2×2 box in Word?
- 12 How do you make a clickable checkbox in Word?
- 13 How do I insert a checkbox without the Developer tab in Word?
- 14 How do I create a fillable field in Word?
- 15 How do you insert a checkbox in Word for Mac?
- 16 How do you insert a checkbox in docs?
- 17 How do I insert a text field in Word?
- 18 Can you add a text box in Word Online?
- 19 How do I insert text into an object in Word?
- 20 How do I insert a textbox in Word without borders?
How do I create a fixed text box in Word?
Follow these general steps.
- Place the text box in your document.
- Adjust the width of your text box to reflect what you need.
- Right-click the text box and choose Format Text Box from the resulting Context menu.
- Make sure the Text Box tab is displayed.
- Make sure the Resize AutoShape to Fit Text check box is selected.
How do you insert a box in Word 2020?
Place you cursor at the start of the first line. Go to the Developer tab, and then click Check Box. If you want a space after the check box, press Tab or Spacebar. Use a Tab character if you want to format the list item with hanging indentation, like Word applies to bulleted lists.
Where is text box tools in Word?
Go to Insert > Text Box, and then select Draw Text Box. Click or tap in the document, and drag to draw the text box the size that you want. To add text to a text box, select inside the text box, and then type or paste text.
How do I make a text box a certain size in Word?
Click the Insert tab of the ribbon, click the Text Box button, and choose Draw Text Box. Draw a text box of any size. The Text Box Tools tab should appear on the ribbon, with the Size group at the right end. Type in the measurements, and the box will take that size.
How do I make a small box in Word?
Click the “Text Box” button on the Ribbon and choose the first option, “Simple Text Box.” Position the cursor on the Word page and drag to form the size of the box.
How do you insert a little box in Word?
Just position your cursor in the document where you want a check box, switch to the “Developer” tab, and then click the “Check Box Content Control” button. You should see a check box appear wherever you placed your cursor.
Why can’t I add a text box in Word?
If any part of the document is protected, insertion of pictures and text boxes (which in Word are actually graphic objects) is disabled. It seems you’re limiting the restriction to headers and footers.
Why is there no text box option in Word?
Provided you are still viewing the document in Print Layout view, you should be able to see any text boxes. If you still can’t see it, it could be possible that the text box is formatted for no line and no fill and that the text it contains is formatted as hidden (and you have the display of hidden text turned off).
What is text box tool?
The Text Box tool is useful for placing text notes and comments on the PDF. Text is contained within a text box you define, including its size, background color, and other properties.Go to Markup > Text > Text Box. Click on the Markups toolbar .
How do I apply a shape style to a text box in Word?
To change the shape style:
- Select the text box you want to change.
- On the Format tab, click the More drop-down arrow in the Shape Styles group.
- A drop-down menu of styles will appear. Select the style you want to use.
- The text box will appear in the selected style.
How do I insert a 2×2 box in Word?
Click the Insert tab and then click Pictures. Select the photo that you want to turn into a 2×2 picture. Click the Insert button to insert the picture into your Word document. You can also copy the picture (Ctrl + C) and paste it into your Word document (Ctrl + V).
How do you make a clickable checkbox in Word?
On the right side, check the “Show Developer tab in the Ribbon” and click OK. The Developer tab will now appear on the Ribbon. Under the Developer tab, click Legacy Tools button in Controls group and select the “Check Box Form Field” control. It will insert a clickable checkbox at your cursor’s location.
How do I insert a checkbox without the Developer tab in Word?
Open the drop-down menu and click on Define New Bullet. Click on the Symbol tab. From the list of fonts, select Wingdings (or Wingdings 2 in newer versions of Word) and find the appropriate, empty checkbox. Click OK to confirm and then once more.
How do I create a fillable field in Word?
Creating Fillable Forms Using Microsoft Word
- Enable Developer Tab. Open Microsoft Word, then go to the File Tab > Options > Customize Ribbon > check the Developer Tab in the right column > Click OK.
- Insert a Control.
- Edit Filler Text.
- Design Mode button again to exit the mode.
- Customize Content Controls.
How do you insert a checkbox in Word for Mac?
Place the cursor where you want to add a checkbox in your document. Click the Developer tab at the top and select the Check Box Content Control icon from the Controls section. Word will add an interactive checkbox to your document. You can click on this box and it will be ticked.
How do you insert a checkbox in docs?
Insert checkboxes
- On your computer, open a spreadsheet in Google Sheets.
- Select the cells you want to have checkboxes.
- In the menu at the top, click Insert. Checkbox.
- To remove checkboxes, select the checkboxes you want to remove and press Delete.
How do I insert a text field in Word?
How to insert a Text field in Word
- Launch Microsoft Word.
- Click anywhere on the document.
- Click the Insert tab.
- Click the Quick Parts button.
- Click Field from the drop-down menu.
- Choose a field name from the field name list.
- then, choose an option from the list on the right.
- Click OK.
Can you add a text box in Word Online?
On the Insert tab, in the Text group, click Text Box. Click in the presentation, and then drag to draw the text box the size that you want. To add text to a text box, click inside the text box, and then type or paste the text.
How do I insert text into an object in Word?
To do so, click the “Insert” tab on the ribbon menu. Then, click the downward-facing arrow next to “Object” and select “Text from File.” Browse to the file you want and double-click it. Its text will appear in the Word document.
How do I insert a textbox in Word without borders?
Remove the border
- Select the text box or shape. If you want to change multiple text boxes or shapes, click the first text box or shape, and then press and hold Ctrl while you click the other text boxes or shapes.
- On the Format tab, click Shape Outline, and then click No Outline.
Achieve more control and flexibility with your documents
Updated on September 11, 2022
What to Know
- Select Insert > Text Box > choose a text box template. Select and drag box to the position you want.
- To resize text, select and drag circles around the edge. To rotate text, select and drag the circular arrow.
- Place the cursor inside the text box and type the information you want to appear.
This article explains how to use text boxes in Microsoft Word. Instructions apply to Word for Microsoft 365, Word 2019, Word 2016, and Word 2013.
How to Insert a Text Box in Word
Start by opening the document you want to add a text box to. Then follow the steps below.
-
On the ribbon, select Insert.
-
In the Text group, select Text Box, then choose a text box template.
-
The new text box appears in the middle of the text, and the Shape Format tab is automatically selected.
-
Select and drag the box to the position you want. To resize the text box, select and drag the circles around the edge. To rotate the text box, select and drag the circular arrow at the top of the box.
-
Place the cursor inside the text box and type the information you want to appear there.
Why Use Text Boxes?
When you type text in Microsoft Word, you have options for making it look a particular way on the page (such as changing the page margins), but those options are limited. Text boxes expand your formatting repertoire by offering additional control and flexibility for how your text appears. You can place a text box anywhere within a document and format it with different colors and fonts. This feature is especially helpful for creating a blockquote or a sidebar.
Customize a Text Box
After you create a text box, you can customize it in a number of ways.
-
To bring up options, place the cursor inside the text box and right-click. Choose an option and follow the screen prompts to add a border, change the style, or adjust the way the text box interacts with the other text on the page.
Alternatively, use the controls on the Shape Format tab.
-
To go directly to the Layout Options menu, select the text box, then select the Layout Options icon (it looks like a horseshoe and is located to the right of the text box).
-
Change the text, make more adjustments, or move the box to another location at any time. To delete a text box, select its border, then press Delete on the keyboard.
Thanks for letting us know!
Get the Latest Tech News Delivered Every Day
Subscribe
Adding text boxes can make your document stand out.
- Using the pre-defined text box in MS Word
- Using the Draw Text Box tool in MS Word

Method 1: Using The Pre-defined Text Box In Ms Word
Step 1. Open up your MS Word document.

Step 2. Go to the Insert tab on the ribbon.
On the ribbon, click the Insert tab found next to the Home tab at the upper-left corner of your window. Then, move to the left side of the ribbon and select Text Box.
A drop-down menu will appear displaying several built-in text boxes that come in pre-defined formats.

If that isn’t enough for you, there’s also the option of clicking More Text Boxes from Office.com for more styles.

Start selecting a style that suits the theme of your document. The formatted text box will then appear at the right side of your file.

Once you’ve clicked on a text box style, a text box with a default message should appear.
Simply double-click or select the text box to edit the text, and input your own text into the box.

Method 2: Using the Draw Text Box tool in MS Word
This method allows you to create a text box from scratch and, later on, modify it to fit your own creative design.
Step 1. Open up your MS Word document.

Step 2. Go to the Insert tab on the ribbon.
On the ribbon, click on the Insert tab. You’ll find this next to the Home tab at the upper-left corner of your window. Then, move to the left side of the ribbon and select Text Box.
This will open a drop-down menu on the right side of your screen.
Now, select the Draw Text Box tool found at the bottom of the menu.

Once selected, you will notice that your mouse cursor will change into a black crosshair. This signals us that we are ready to create a text box.

The yellow circle beside the crosshair was purposefully added to help you spot the mouse.
Step 3. Draw your text box.
Once that’s done, we can now draw the text box by left-clicking and holding down the mouse while dragging your cursor to a particular direction.

You can now place your desired text in the box. Furthermore, you can resize the text box by clicking and dragging the circles around the box.

Notice that we have stretched the text box a bit to make sure the sentences inside have ample space to move around.
There you have it! You just created a simple text box from scratch.
Resizing, Moving, and Deleting a Text Box in MS Word
In this section, we will walk you through the steps of resizing, moving, and deleting your text box in MS Word.
Here’s how you can do that.
Resizing a text box in MS Word
You can easily resize your MS Word text boxes by simply dragging any of the four corners of your text box.
Make sure that your cursor changes into a crosshair before dragging. Otherwise, you will be moving your box instead of resizing it.

You should be able to drag your text box horizontally and vertically at the same time.
Another way is to drag the midpoints of each side if you want to resize one side at a time. Drag the top or bottom midpoints to resize vertically and left or right midpoints to resize horizontally.


For a more accurate sizing, MS Word has a Drawing tool where you can specify the height and width of your text box in exact units.
After selecting a text box, go to the Format tab on the ribbon. Note that this will only be visible when you have selected at least one text box.

On the right-most part of the ribbon, you will see the height and width field under the Size group. You can then enter your exact measurements in the given fields.

Tip: Double-clicking any side of your text box, automatically activates the Format tab.
Moving a text box in MS Word
Moving a text box in MS Word can easily be done by selecting the text box then dragging it by any of the sides. Make sure you avoid selecting the circles as these will resize your text box instead of moving it

Make sure to NOT hover your mouse inside the box, as this will only let you edit the text.
As another option, you can use your keyboard’s arrow keys to move your text box.
This method enables you to move your text box gradually by millimeters. This way, you can easily align them with other elements in your document.
If you’re looking for a more accurate way to position your text box, you can use MS Word’s Layout options found in the Format tab. We used the Top and Bottom text wrapping for this example. Go ahead and choose one that suits your layout.

Tip: Click on the More Layout Options for a finer way to position your text box.

Deleting a text box in MS Word
After selecting a text box, you should be able to delete it by pressing the Delete or Backspace keys on your keyboard.
Customizing a Text Box in MS Word
Microsoft Word offers several ways to customize text boxes with colors, shapes, styles, and a number of other effects. Even built-in text boxes can be modified to your preference. All these options are found in the Format tab on the ribbon. Remember that the Format tab can only be activated once a text box is selected.

Tip: Double-clicking any side of your text box automatically activates the Format tab.
Here’s a quick rundown of some of the groups under the Format tab.
Shape Styles Group
The options in this group can be used to customize the shape, background color, border outline, and shape effects of your text box. Of course, Microsoft Word has a number of pre-defined themes readily available for use.
WordArt Styles Group
As for any Word document, you can change your text as WordArt. If you’re not familiar with WordArt, don’t worry we’ve got you covered.
WordArt is simply how Microsoft Word refers to style options that make your text come alive with special effects. Basically, they’re pre-decorated text that’s ready for use. You can simply choose a style to see how it works.

These options are also accessible when you right-click on any side of your text box. You should see the three formatting tools: Style, Fill, and Outline.

As you may have noticed, there’re more than a dozen customization tweaks that we can do to make our text boxes stand out. Try out a few more and tell us down in the comments which styles you liked best!
Conclusion
We hope you found this article helpful!
In Microsoft Word, the user can create the text boxes in several built-in styles, predefined Textboxes offered in Word. If any of the built-in styles do not meet the user’s, interest there is a feature in Word that allows the user to draw the text box. There is an option where you can get more textboxes from Office.com and can save the selection to the text box gallery.
In this tutorial, we will explain:
- How to insert a Built-in Styles Text Box.
- How to insert text into Text Box.
- How to copy the Text Box to a new location.
- How to change the direction of text in the selected Text Box.
- How to Format the Text Box.
- How to change the default formatting for a Text Box.
- How to save a selected Text Box as a Building Block.
What is Text Box in Microsoft Word
A Text Box is a feature in Word that focuses on its content and displays essential text such as headings and quotes.
1] How to insert a Built-in Styles Text Box
![]()
Click the Insert tab on the menu bar.
On the Insert tab in the Text group, click the drop-down arrow of the Text Box button.
You will see a list of text box built-in styles you can choose from; select the one you desire.
The text box you selected will appear in the document.
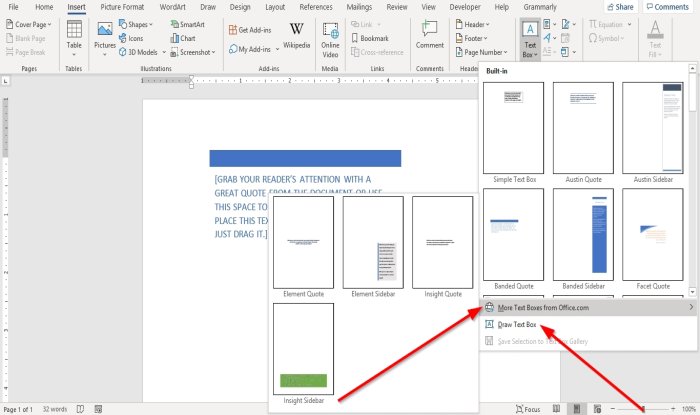
You can use More Text Boxes from Office.com to insert text boxes in the document.
In the Text Box drop-down list, you can also select Draw Text Box and draw a text box into the document.
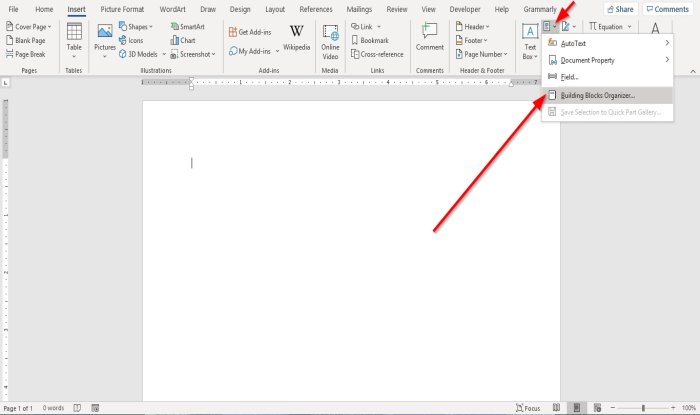
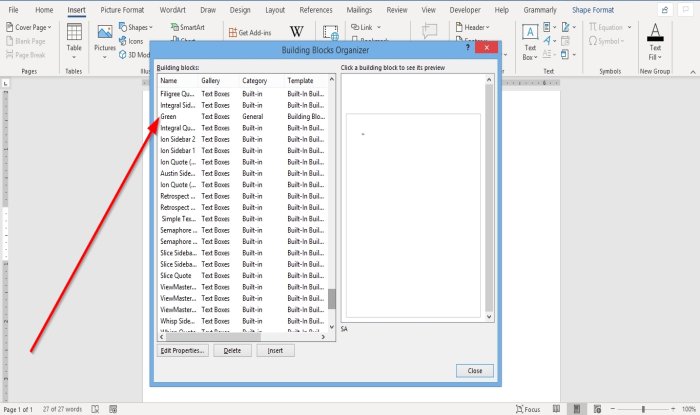
The other option to insert a Built-in Style text box is to your document is to click on the Explore Quick Parts button.
In the drop-down list, select Building Blocks Organizer.
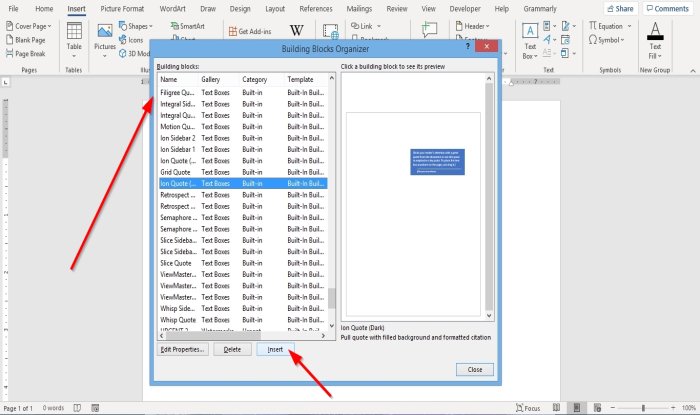
A Building Blocks Organizer dialog box will appear.
In the dialog box, scroll down until you see the text box gallery.
Click any text box of your choice and click Insert.
The text box is inserted into the document.
2] How to insert text into Text Box
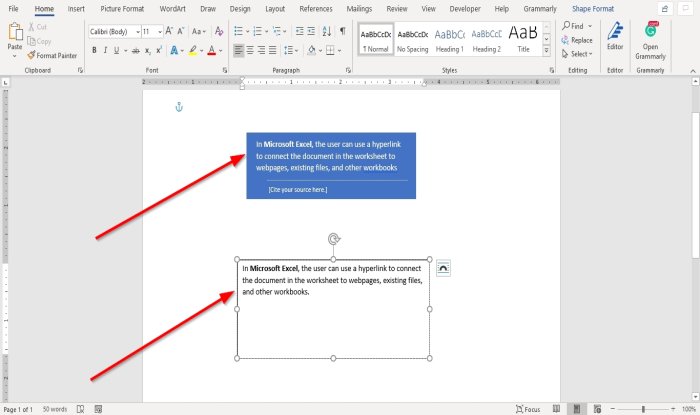
For a built-in style text box, click into the text box and press the Delete Key to delete the default text inside it and type your text.
For the text box you draw, click inside the text box and enter your text.
3] How to copy the Text Box to a new location
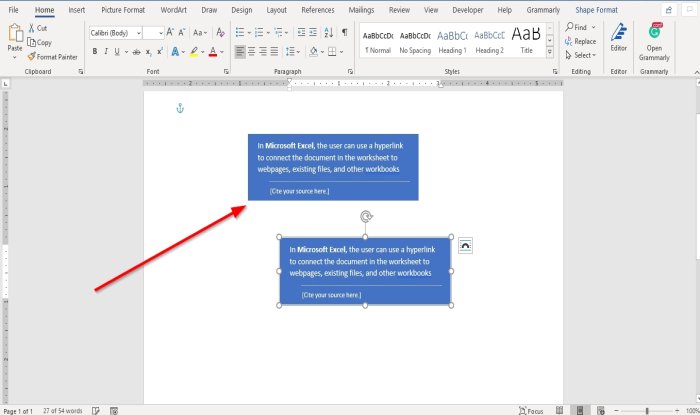
Place the cursor near the text box’s frame, hold the CTRL-key down, and drag the textbox.
You will notice that the text box is copied.
4] How to change the direction of text in the selected Text Box
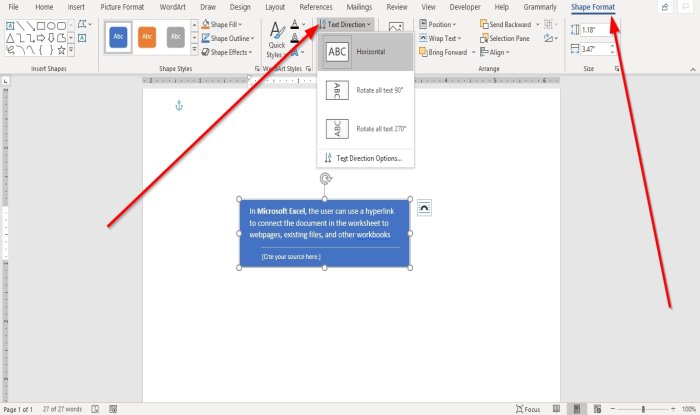
Go to the Shape Format tab.
On the Shape Format tab in the Text group, click Text Direction.
In the drop-down list, choose the direction you want the text to be in the text box.
5] How to Format the Text Box
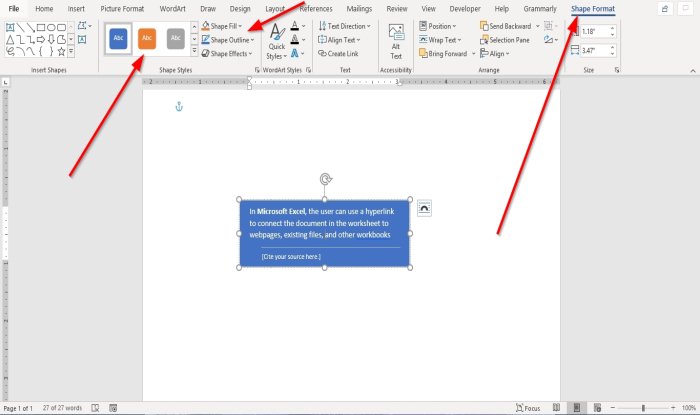
Click on the text box on the Shape Format tab in the Shape Styles group. You can choose the built-in styles you like.
You can format the text box by selecting Shape Fill, Shape Outline, and Shape Effects.
6] How to change the default formatting for a Text Box
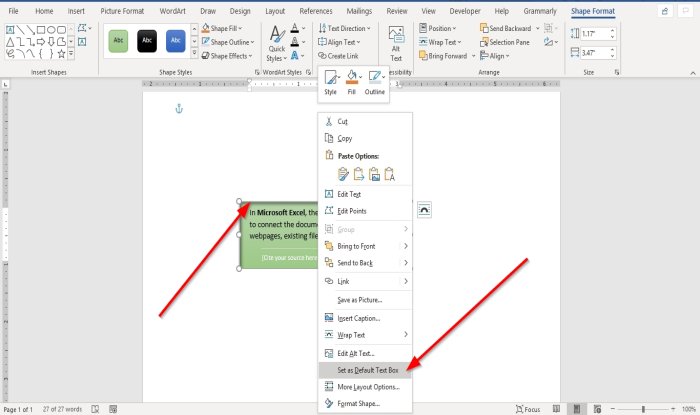
Right-click a formatted text box border and select Set as Default Text Box.
7] How to save a selected Text Box as a Building Block
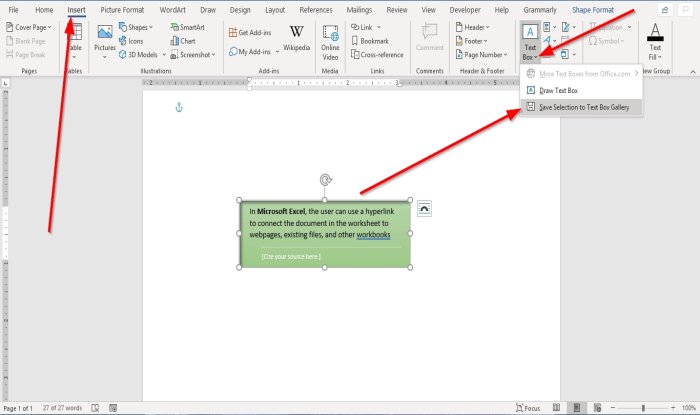
Go on the Insert tab in the Text group and select the Text Box button.
In the drop-down list, select Save Selection to Text Box Gallery.
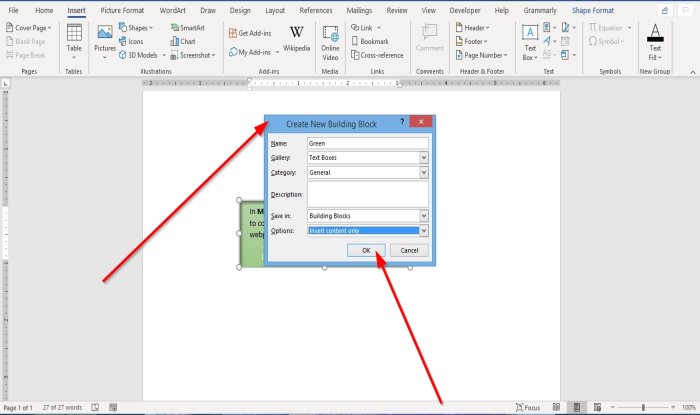
A Create New Building Block dialog box will appear, enter a name, select a category, or any changes you wish to make in the dialog box.
Click Ok.
If you want to see if the textbox you save is in the Building Block, click the Explore Quick Parts button in the Text group.
In the drop-down list, select Building Block Organizer.
A Building Blocks Organizer dialog box will appear; Scroll down until you see the name of the text box you name.
I hope this helps; if you have questions, please comment below.
Read next: How to print hidden text in Word on Windows and Mac.