
Excel for Microsoft 365 for Mac Word for Microsoft 365 for Mac PowerPoint for Microsoft 365 for Mac Excel 2021 for Mac Word 2021 for Mac PowerPoint 2021 for Mac Excel 2019 for Mac Word 2019 for Mac PowerPoint 2019 for Mac Excel 2016 for Mac Word 2016 for Mac PowerPoint 2016 for Mac More…Less
Here’s how to add a line, pattern, or custom border to a text box, picture, and other objects in Word, PowerPoint, or Excel for Mac.
Note: If you didn’t add the border to the shape, text box, picture, or other object in Mac Office, you can’t change or remove the border for the object.
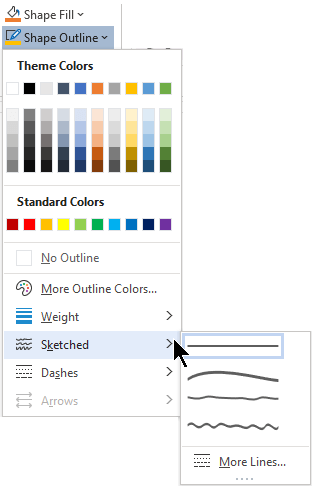
Try the «Sketched» outline
If you’re using Microsoft 365 for Mac (version 16.28 or later), you can give a casual, hand-drawn look to shapes with the Sketched outline.
-
Select an existing shape in your document, or draw a new one.
-
With the shape selected, on the Shape Format tab, select Shape Outline > Sketched, and then select a line width. (The smaller the point size («pt»), the thinner the line is.)
Add or remove a border for a shape or text box
-
Select the shape or text box to which you want to add, change, or remove a border.
-
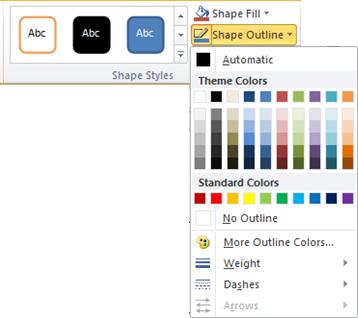
Click Shape Format, and then click the arrow next to Shape Outline.

-
Do any of the following:
To
Do This
Add or change the color of the border
Either click the color that you want, or mix your own color by clicking More Outline Colors.
Add or change the thickness of the border
Point to Weight, and then choose the line weight that you want.
Add or change the style of the border
Point to Dashes, and then click the line style that you want.
Remove the border from the shape or text box
Click No Outline.

Add or remove a picture border
-
Select the picture to which you want to add, change, or remove a border.
-
Click Picture Format, and then click the arrow next to Picture Border.
-
Do any of the following:
To
Do This
Add or change the color of the border
Either click the color you want, or mix your own color by clicking More Outline Colors.
Add or change the thickness of the border
Point to Weight, and then choose the line weight you want.
Add or change the style of the border
Point to Dashes, and then click the line style you want.
Remove the border from the picture
Click No Outline.

See also
Add a page border
Need more help?
Want more options?
Explore subscription benefits, browse training courses, learn how to secure your device, and more.
Communities help you ask and answer questions, give feedback, and hear from experts with rich knowledge.
Excel for Microsoft 365 Word for Microsoft 365 Outlook for Microsoft 365 PowerPoint for Microsoft 365 Project Online Desktop Client Excel 2021 Word 2021 Outlook 2021 PowerPoint 2021 Project Professional 2021 Project Standard 2021 Excel 2021 for Mac Word 2021 for Mac PowerPoint 2021 for Mac Excel 2019 Word 2019 Outlook 2019 PowerPoint 2019 Project Professional 2019 Project Standard 2019 Excel 2016 Word 2016 Outlook 2016 PowerPoint 2016 Project Professional 2016 Project Standard 2016 Excel 2013 Word 2013 Outlook 2013 PowerPoint 2013 Project Professional 2013 Project Standard 2013 Excel 2010 Word 2010 Outlook 2010 PowerPoint 2010 More…Less
Shape Outline lets you choose the color, thickness, or style of the outside border of a text box, shape, or SmartArt graphic. By setting the border to No Outline, you remove the border altogether.
Important: In Word and Outlook, you must first anchor multiple objects before selecting them. Select one object. Next, press and hold Ctrl while you select more objects
Note: If you’re changing the border of a SmartArt graphic, select the graphic, and find Shape Outline on the Format tab.
Try the «sketched» outline
If you’re using Microsoft 365, you can give a casual, hand-drawn look to shapes with the Sketched outline.
-
Select an existing shape in your document, or draw a new one.
-
With the shape selected, on the Shape Format tab, select Shape Outline > Sketched, and then select a line width.
(The smaller the point size («pt»), the thinner the line is.)
Set the line thickness
-
Select the text box or shape border.
If you want to change multiple text boxes or shapes, click the first text box or shape, and then press and hold Ctrl while you click the other text boxes or shapes.
-
Go to Format > Shape Outline, point to Weight, and then choose a thickness.
If you don’t see the Format tab, make sure you’ve selected the text box or shape.
Note: If you don’t see the thickness you want, select More Lines, and set the thickness you want in the Width box.
-
Select the text box or shape.
If you want to change multiple text boxes or shapes, click the first text box or shape, and then press and hold Ctrl while you click the other text boxes or shapes.
-
Click the Format tab, click Shape Outline, point to Dashes, and then click the style you want.
If you don’t see Format tab, make sure you’ve selected the text box or shape.
-
Select the text box or shape.
-
On the Format tab, click Shape Outline, point to Dashes, and then select More Lines.
-
In the Format Shape pane, under Line, select the line style options that you want.
-
Select the text box or shape.
If you want to change multiple text boxes or shapes, click the first text box or shape, and then press and hold Ctrl while you click the other text boxes or shapes.
-
On the Format tab, click Shape Outline, and then click No Outline.
See also
Add, change, or delete borders from documents or pictures
Add a fill or effect to a shape or text box
Apply or remove cell borders on a worksheet
-
Select the text box or shape.
If you want to change multiple text boxes or shapes, click the first text box or shape, and then press and hold Ctrl while you click the other text boxes or shapes.
-
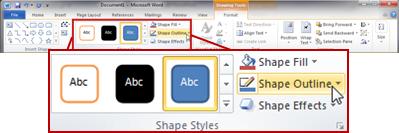
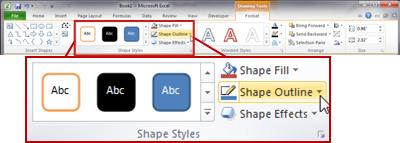
Under Drawing Tools, on the Format tab, in the Shape Styles group, click Shape Outline, point to Weight, and then click the line weight that you want.
If you don’t see the Drawing Tools or Format tabs, make sure that you have selected the text box or shape. You might have to double-click the text box or shape to open the Format tab.
Note: If you don’t see the thickness you want, select More Lines, and set the thickness you want in the Width box.
-
Select the text box or shape.
If you want to change multiple text boxes or shapes, click the first text box or shape, and then press and hold Ctrl while you click the other text boxes or shapes.
-
Under Drawing Tools, on the Format tab, in the Shape Styles group, click Shape Outline, point to Dashes, and then click the border style that you want.
If you don’t see the Drawing Tools or Format tabs, make sure that you have selected the text box or shape. You might have to double-click the text box or shape to open the Format tab.
-
Select the text box or shape.
-
Under Drawing Tools, on the Format tab, click Shape Outline, point to Dashes, and then select More Lines.
-
In the Format Shape dialog box, under Line Style, select the line style options that you want.
-
Select the text box or shape border that you want to remove.
If you want to change multiple text boxes or shapes, click the first text box or shape, and then press and hold Ctrl while you click the other text boxes or shapes.
-
Under Drawing Tools, on the Format tab, in the Shape Styles group, click Shape Outline, and then click No Outline.
If you don’t see the Drawing Tools or Format tabs, make sure that you have selected the text box or shape. You might have to double-click the text box or shape to open the Format tab.

See also
Add a fill or effect to a shape or text box
Add, change, or delete borders from documents or pictures
Add, copy, or delete a text box
Apply or remove cell borders on a worksheet
Need more help?
Want more options?
Explore subscription benefits, browse training courses, learn how to secure your device, and more.
Communities help you ask and answer questions, give feedback, and hear from experts with rich knowledge.
Text boxes in an MS Word document are a very useful feature. Text within a box acts as a highlight for the reader. Here, we will show you how to:
- Add a Text Box
- Remove a Text Box
- Customize a Text Box Border
- Change Border Color
- Create Dashed Border
- Change Border Thickness
Let us begin.
Step #1: Open the Word document.
Open the Word document where you want to add the text box.
Step #2: Add the Text Box
Position the cursor where you want the text box to appear.
In the top menu bar, click on the Insert tab to change the ribbon.

In the section Text, click on the Text Box icon to open a dialog box for Built-In text boxes.

Click on the text box you find suitable. We select the Simple Text Box.

Word adds the text box in the document.

Remove a Text Box
Step #1: Open the Word document.
Open the Word document that has at least one text box.
Step #2: Remove the text box
Click on the text box boundary to select it.

Press the Delete button on your keyboard.
Word will delete the text box from your document.
Customize a Text Box Border
Step #1: Open the Word document.
Open the Word document that has at least one text box.
Step #2: Customize the text box border
Click on the text box boundary to select it.

Right-click on the text box boundary to open a menu.
Click on Format AutoShape/Picture.

This opens a dialog box for Format Text Box.
Click on the Colors and Lines tab.

Change Border Color
Under Line, click on the down arrow on the right-hand side of Color:.

This opens a dialog box for Theme Colors and Standard Colors.
Click on the color of your choice.

The chosen color will appear against the Color: tab under Line.

Note: At this point, you can click on OK at the bottom of the dialog box to exit. Word will change the color of the box to your chosen color. Else, move to the next step to make more changes.
Create Dashed Border
In the Format Text Box dialog box, under Line, click on the down arrow on the right side of Dashed:.

This opens a choice for different dashed lines.
Select the most suitable dashed line.

The chosen dashed line will appear against the Dashed: tab under Line.

Note: At this point, you can click on OK at the bottom of the dialog box to exit. Word will make the changes to the text box as per your choices above. Else, move to the next step to make more changes.
Change Border Thickness
In the Format Text Box dialog box, under Line, click on the down arrow on the right side of Style:.

This opens a choice for lines of a different style.
Each line style has its weight in points on its left.
Select the line most suitable to you.

The chosen line style will appear against the Style: tab.
The weight of the chosen line style will appear against the Weight: tab under Style:.

The choice of line styles offers only a few discrete weights.
To change the line weight, select the number next to Weight:.
Change the number as you like.

Click on OK at the bottom of the Format Text Box dialog box to exit.
Word will make the changes to the text box according to all your choices.

Conclusion
Follow our step-by-step instructions to add or delete text boxes in your Word document. Beautify your text boxes with our instructions. We have shown you how to change the border color, style of the border line, and the thickness of the border.
How to create a border around text in Word
- Once the text is highlighted, click the Home tab.
- On the Home tab, click the down arrow on the border to get border options, like those shown in the picture.
- Select the type of border you want to use. If you want a single border around the text, click Outside Borders.
Contents
- 1 How do you put a box around text in Word?
- 2 How do I surround a textbox in Word?
- 3 How do I put a border around text in Word?
- 4 How do you put a border around text in Word?
- 5 How do I insert border in Word?
- 6 How do you put a box around a border in Word?
- 7 How do you make a lined text box in Word?
- 8 How do I turn a text box into a frame?
- 9 How do you insert a border line in Word?
- 10 How do I add a border to a box in Word?
- 11 How do you add a decorative border in Word?
- 12 How do I put a border around a paragraph in Word?
- 13 How do you outline text in Word?
- 14 How do you put a box around text in Word Online?
- 15 How do you put a border above text in Word?
- 16 How do you put a border around a text box?
- 17 How do you shade text in Word?
- 18 How do you text wrap in Word?
- 19 How do I hide the outline of a text box in Word?
- 20 Where is the Borders button in Word?
How do you put a box around text in Word?
Add a text box
- Go to Insert > Text Box, and then select Draw Text Box.
- Click or tap in the document, and drag to draw the text box the size that you want.
- To add text to a text box, select inside the text box, and then type or paste text. Notes:
How do I surround a textbox in Word?
Boxing text or paragraphs
Select the text you want to box in. Choose the Borders and Shading command from the bottom of the Border menu. The Borders and Shading dialog box appears. If you want to apply the border to only text (words) and not to the entire paragraph, choose Text from the Apply To drop-down list.
How to create a border around text in Word
- Once the text is highlighted, click the Home tab.
- On the Home tab, click the down arrow on the border to get border options, like those shown in the picture.
- Select the type of border you want to use. If you want a single border around the text, click Outside Borders.
How do you put a border around text in Word?
Add a border to selected text
- Select a word, line, or paragraph.
- On the Home tab, click the arrow next to the Borders button.
- In the Borders gallery, click the border style that you want to apply.
How do I insert border in Word?
Add a border to a page
- Go to Design > Page Borders.
- Make selections for how you want the border to look.
- To adjust the distance between the border and the edge of the page, select Options. Make your changes and select OK.
- Select OK.
How do you put a box around a border in Word?
Select the texts you will add borders, click Home > Borders > Borders and Shading. See screenshot: 2. In the Borders and Shading dialog box, select the Up, Down, Left and Right border boxes in the Preview section, select Text from the Apply to drop-down, and then click the OK button.
How do you make a lined text box in Word?
Place the insertion point where you want the ruling line (underlining). On the Format menu, click Font. In the Underline style box, select the line style you want, and then click OK. For every blank space you want to underline, press CTRL+SHIFT+SPACEBAR.
How do I turn a text box into a frame?
Converting a Text Box to a Frame
- Right-click on the text box. Word displays a Context menu.
- Choose the Format Text Box from the Context menu. Word displays the Format Text Box dialog box.
- Click on the Text Box tab. (See Figure 1.)
- Click on Convert to Frame.
- Click on OK.
How do you insert a border line in Word?
Inserting a line using the Borders button
- Select the paragraph(s) to which you want to add a line.
- Click the Home tab in the Ribbon.
- Click Borders in the Paragraph group. A drop-down menu appears.
- Select the line you want to use.
How do I add a border to a box in Word?
Add a border
- Open Microsoft Word.
- Click the Page Layout tab.
- In the Page Background group, click the Page Borders option.
- In the Borders and Shading window (shown below), if not already selected, click the Page Border tab.
- Select Box if you want a square border around your page.
How do you add a decorative border in Word?
To create a custom page border in Word:
- Open Word and click on the Design tab. Under Page Layout, click Page Borders. Click Page Border in the Borders and Shading window.
- Select the Custom option from the list of choices. This is when the real fun begins.
- Click OK to create the border.
How do I put a border around a paragraph in Word?
Adding Borders to Paragraphs
- Position the insertion point in the paragraph to which you want the border added.
- Display the Home tab of the ribbon.
- Click the down-arrow next to the Borders tool, in the Paragraph group.
- Choose Borders and Shading.
- Make sure the Borders tab is selected.
How do you outline text in Word?
Select your text or WordArt. Click Home > Text Effects. Click the effect you want. For more choices, point to Outline, Shadow, Reflection, or Glow, and then click the effect you want.
How do you put a box around text in Word Online?
Inserting a Text Box
- Make sure you can see, on your screen, the general area where you want to insert the text box.
- Make sure the Insert tab of the ribbon is displayed.
- Click on the Text Box tool in the Text group.
- Choose Draw Text Box.
- Position the crosshairs where you want the upper-left corner of the text box.
How do you put a border above text in Word?
- Open the Word document and scroll to the section with the line.
- Click the Insert tab, then click the “Text Box” button.
- Click inside the text box to type any text you want above the line.
- Handwrite any text you want to appear above the line.
- Click the orange Text Box Tools tab, then click the “Shape Outline” menu.
How do you put a border around a text box?
Add a custom border
- Right-click the text box, AutoShape, picture, or object that you want to add the border to.
- Select the appropriate Format

When you need to highlight a portion of text, it’s not always convenient to use a text box. To emphasize a paragraph while keeping it within the main content, you can put a border around that text in Word instead.
You can put a border around specific text, such as a single sentence, or an entire paragraph. Let’s look at how to do both as well as customize the border.
Select the text you want to surround with a border and go to the Home tab. Click the drop-down arrow next to Borders and choose “Borders and Shading.”

Use a Setting option on the left or the buttons below Preview on the right to add the border around the text. You can also adjust the Style, Color, and Width settings in the center of the window to customize the line for the border.
RELATED: How to Add Borders to or Change Borders on a Table in Word
In the Apply To drop-down box on the right side, select “Text” and when you finish, click “OK” to apply the border.
You’ll then see your text outlined with a border.
Put a Border Around a Paragraph
If you have an entire paragraph you’d like to place a border around, the process is similar. However, you have a few extra customization options.
RELATED: How to Put Borders Around Images in Microsoft Word
Select the paragraph you want to surround with a border and head to the Home tab. Click the Borders drop-down arrow and pick one of the quick border options such as Outside Borders or All Borders.
This places the border around the paragraph from margin to margin on each side and gives you a fast way to add the border. But you can also customize the border and adjust the space between the border and the text.
Select the bordered paragraph, click the drop-down arrow next to Borders on the Home tab, and choose “Borders and Shading.”
Like with customizing the border for specific text, you can change the Style, Color, and Width for the border line. Confirm that “Paragraph” is selected in the Apply To drop-down box. Then, to adjust the spacing, click “Options” on the right side of the window.
At the top, use the arrows or enter the number of points for the spacing on the top, bottom, left, and right of the border in relation to the text. As you make the changes, you’ll see a preview directly below. Click “OK” when you finish.
Make any other adjustments you want in the Borders and Shading window and click “OK” when you’re done to apply the border.
RELATED: How to Change Page Margins in Word
Remove a Border From Text in Word
If you decide later to remove a border you’ve added, it takes only a few clicks. Select the text or paragraph containing the border and revisit the Home tab. Click the drop-down arrow next to Borders and pick “No Border.”
Text boxes in Word are great ways to call out portions of text. But if you want to keep your text in line with the rest and simply highlight a small piece, consider surrounding it in a border. For other types of borders, take a look at how to create a page border in Word.
READ NEXT
- › How to Mirror or Flip Text in Microsoft Word
- › How to Outline Text in Adobe Photoshop
- › This New Google TV Streaming Device Costs Just $20
- › How to Adjust and Change Discord Fonts
- › HoloLens Now Has Windows 11 and Incredible 3D Ink Features
- › Google Chrome Is Getting Faster
- › The New NVIDIA GeForce RTX 4070 Is Like an RTX 3080 for $599
- › How Long Do CDs and DVDs Last?
How-To Geek is where you turn when you want experts to explain technology. Since we launched in 2006, our articles have been read billions of times. Want to know more?