
Many (business) users use Excel to create full blown applications. However, unlike applications developed by professional
software developers, Excel tools fall short of most software development practices that are considered minimal standards.
This introduces risks that can lead to reputational damages and substantial financial losses (remember the
«London Whale»).
This blog post introduces the concept of test-driven development before it shows you how to write an automated unit test
for a VBA function. All we need is Python, a free and open-source programming
language and xlwings, our Python package that connects to Excel. The concepts shown work on Windows and Mac.
If you already know what I am speaking of and don’t want to go through all the step by step instructions below: Simply head over to
GitHub where you
can clone or download a fully working example. For a broader but less technical view of this topic, download our white paper.
Overview
- The directory of horror: «John_handover»
- Test-driven development
- The missing piece: Python with xlwings
- Before we can start: Install Python
- A simple unit test
- No guarantee for success
- Where to go from here
The directory of horror: «John_handover»
We’ve all been there: On day one of our new job we are assigned the responsibility over a folder called «John_handover». John left
the company a while ago, but not without leaving behind a spreadsheet tool of about 20 MB of size, containing VBA and complex formulas
that involve multiple sheets (some of them hidden) and countless VLOOKUPs. Your boss is kind enough to tell you the secret of how to
manage it: «Just don’t touch anything and you will be fine.»
After getting over your first shock and thinking about how to get out of the mess, you come up with the solution of having IT transform
this Excel tool into a proper application. But it turns out that the IT budget has already been spent for this year and for next year
there are already a few other projects queuing up.
Bottom line is that you’re left with a tool that causes you a headache and that you don’t really understand. You would like to simplify
it but are afraid of breaking something.
Guess what: In software development, this situation is the rule rather than the exception. But there’s ways to get confidence over such
legacy tools and make sure that they still work as they are supposed to after a change. Say hello to test-driven development.
Test-driven development
A core component of modern software development is writing automated tests. Most commonly, these tests make sure that a small independent
unit of the program’s overall logic works correctly given a few test cases that are therefore called «unit tests». The paradigm that wants
you to write the tests first and only then adopt the logic of the program until all tests pass, is called «test driven development» (TDD).
In a nutshell, the thinking behind TDD is: «If it’s not tested, it’s broken» (Bruce Eckel in his book «Thinking in Java», 3rd edition).
Unit tests are a very effective way to automatically test a large number of use cases (including edge cases) to make sure that a program
still works correctly under all tested circumstances even after adding or changing pieces of the program.
Practically all common programming languages come with either a built- in framework for writing unit tests or integrate easily with an
existing framework. Excel, however, doesn’t offer any means to effectively write unit tests. That is, until now.
The missing piece: Python with xlwings
Python is a widely used programming language that excels at interacting with all kinds of different systems which is why it is sometimes
referred to as a «glue language». To interact smoothly between Excel and Python, we created xlwings, a Python package that is free and
open-source, like Python itself.
xlwings allows you to automate and program Excel with Python and therefore gives you access to Python’s built-in unittest module. Writing
unit tests for Excel with Python and xlwings is simple and intuitive:
- No Excel add-ins required
- No changes to the original Excel file necessary
- Create tests covering spreadsheet logic or VBA code
- You only need a Python installation with xlwings
Before we can start: Install Python
Simply download Anaconda, a free scientific Python distribution that
comes in the form of a one-click installer that already contains everything we need. After downloading, install Anaconda with the
defaults.
If it worked out correctly, you should see something like the following when typing python at a command prompt (on Windows) or
a Terminal (on Mac):
C:Usersfelix> python
Python 3.5.2 |Anaconda 4.2.0 (64-bit)| (default, Jul  5 2016, 11:41:13) [MSC v.1900 64 bit (AMD64)] on win32
Type "help", "copyright", "credits" or "license" for more information.
>>>
A simple unit test
Create a new macro-enabled workbook with the name mybook.xlsm and save it in the folder where you started the command prompt:
in my example that would be C:UsersFelix. Open the VBA editor by clicking Alt-F11, Insert a new VBA module (Insert > Module) and paste the following
simple VBA function:
Function mysum(x, y) As Double
    mysum = x + y
End Function
To access this function in Python, you can easily map it with xlwings: In the Python session we started above, execute the
following lines to import the xlwings package, then map the workbook and finally the VBA function. If you have saved your workbook
somewhere else than in the current working directory of the command prompt you would need to provide its full path.
>>> import xlwings as xw
>>> wb = xw.Book('mybook.xlsm')
>>> mysum = wb.macro('mysum')
Now you can use mysum as if it was a native Python function but it’s actually running the VBA code:
Let’s now create a Python file called test_mybook.py. In your favorite text editor, copy/paste the following into that
file:
import unittest
import xlwings as xw

class TestMyBook(unittest.TestCase):
    def setUp(self):
        # setUp will be called before the execution of each unit test
        self.wb = xw.Book('mybook.xlsm')  # map workbook
        self.mysum = self.wb.macro('Module1.mysum')  # map function

    def test_mysum(self):
        result = self.mysum(1, 2)  # get result from VBA
        self.assertAlmostEqual(3, result)  # test if result corresponds to the expected value

if __name__ == '__main__':
    # This allows us to easily run the tests from the command prompt
    unittest.main()
This file contains quite a bit of boilerplate code but the actual unit test is defined in test_mysum where we assert
that the result as delivered by the VBA function corresponds to the expected result. We use assertAlmostEqual so that
the test doesn’t fail because of floating point issues.
To run all unit tests in that file (ok, it’s just one for now), simply call the following from a command prompt
(if you still have a Python session running, then make sure to quit first by hitting Ctrl-D or entering quit()):
C:Usersfelix> python test_mybook.py
.
----------------------------------------------------------------------
Ran 1 test in 0.083s

OK
The report gives you a dot for all tests that ran successfully. If we would introduce an error in the VBA code by changing it
like this:
Function mysum(x, y) As Double
    mysum = x * y
End Function
Then the output would accordingly tell us about the failed test like this:
C:Usersfelix> python test_mybook.py
F
======================================================================
FAIL: test_mysum (__main__.TestMyBook)
----------------------------------------------------------------------
Traceback (most recent call last):
  File "test_mybook.py", line 17, in test_mysum
    self.assertAlmostEqual(3, result)
AssertionError: 3 != 2.0 within 7 places

----------------------------------------------------------------------
Ran 1 test in 0.093s

FAILED (failures=1)
No guarantee for success
Unit tests are tremendously helpful in regaining trust over a complex workbook and feel comfortable before
doing changes. However, even if all tests pass, it’s in no way a guarantee for bug free code.
First, only situations that you can think of are tested and second, the tests might pass if you pick the wrong edge cases.
In the sample above, if I would have tested 2 + 2 = 4, instead of 1 + 2 = 3, then the unit test would have
still passed when using the multiplication by mistake. Hence it usually makes sense to test a few scenarios
including various edge cases.
Where to go from here
The unit test that we’ve built in this blog post is just a simple example of writing a test that checks the logic
of a VBA function.
However, you can use the same unit testing infrastructure to validate a model by comparing the output of a VBA function
with the output of an alternative implementation, e.g. in one of Python’s heavily tested 3rd party packages.
Also, you can write tests that control the correct formulas and relationships in cells as this is where you often introduce
errors by copy/pasting or by dragging the wrong cells and consequently filling cells with the wrong formula.
To get an overview over these techniques, too, download our white paper.
Время на прочтение
7 мин
Количество просмотров 14K
Проблема
Есть определенная функциональная область приложения: некая экспертная система, анализирующая состояние данных, и выдающая результат — множество рекомендаций на базе набора правил. Компоненты системы покрыты определенным набором юнит-тестов, но основная «магия» заключается в выполнении правил. Набор правил определен заказчиком на стадии проекта, конфигурация выполнена.
Более того, поскольку после первоначальной приемки (это было долго и сложно — потому, что “вручную») в правила экспертной системы регулярно вносятся изменения по требованию заказчика. При этом, очевидно, неплохо — бы проводить регрессионное тестирование системы, чтобы убедиться, что остальные правила все еще работают корректно и никаких побочных эффектов последние изменения не внесли.
Основная сложность заключается даже не в подготовке сценариев — они есть, а в их выполнении. При выполнении сценариев “вручную», примерно 99% времени и усилий уходит на подготовку тестовых данных в приложении. Время исполнения правил экспертной системой и последующего анализа выдаваемого результата — незначительно по сравнению с подготовительной частью. Сложность выполнения тестов, как известно, серьезный негативный фактор, порождающий недоверие со стороны заказчика, и влияющий на развитие системы («Изменишь что-то, а потом тестировать еще прийдется… Ну его…»).
Очевидным техническим решением было бы превратить все сценарии в автоматизированные и запускать их регулярно в рамках тестирования релизов или по мере необходимости. Однако, будем ленивыми, и попробуем найти путь, при котором данные для тестовых сценариев готовятся достаточно просто (в идеале — заказчиком), а автоматические тесты — генерируются на их основе, тоже автоматически.
Под катом будет рассказано об одном подходе, реализующим данную идею — с использованием MS Excel, XML и XSLT преобразований.
Тест — это прежде всего данные
А где проще всего готовить данные, особенно неподготовленному пользователю? В таблицах. Значит, прежде всего — в MS Excel.
Я, лично, электронные таблицы очень не люблю. Но не как таковые (как правило — это эталон юзабилити), а за то, что они насаждают и культивируют в головах непрофессиональных пользователей концепцию «смешивания данных и представления» (и вот уже программисты должны выковыривать данные из бесконечных многоуровневых «простыней», где значение имеет все — и цвет ячейки и шрифт). Но в данном случае — мы о проблеме знаем, и постараемся ее устранить.
Итак, постановка задачи
- обеспечить подготовку данных в MS Excel. Формат должен быть разумным с точки зрения удобства подготовки данных, простым для дальнейшей обработки, доступным для передачи бизнес пользователям (последнее — это факультативно, для начала — сделаем инструмент для себя);
- принять подготовленные данные и преобразовать их в код теста.
Решение
Пара дополнительных вводных:
- Конкретный формат представления данных в Excel пока не ясен и, видимо, будет немного меняться в поисках оптимального представления;
- Код тестового скрипта может со временем меняться (отладка, исправление дефектов, оптимизация).
Оба пункта приводят к мысли, что исходные данные для теста необходимо предельно оделить и от формата, в котором будет осуществляться ввод, и от процесса обработки и превращения в код автотеста, поскольку обе стороны будут меняться.
Известная технология превращения данных в произвольное текстовое представление — шаблонизаторы, и XSLT преобразования, в частности — гибко, просто, удобно, расширяемо. В качестве дополнительного бонуса, использование преобразований открывает путь как к генерации самих тестов (не важно на каком языке программирования), так и к генерации тестовой документации.
Итак, архитектура решения:
- Преобразовать данные из Excel в XML определённого формата
- Преобразовать XML с помощью XSLT в финальный код тестового скрипта на произвольном языке программирования
Конкретная реализация на обеих этапах может быть специфична задаче. Но некоторые общие принципы, которые, как мне кажется, будут полезны в любом случае, приведены ниже:
Этап 1. Ведение данных в Excel
Здесь, честно говоря, я ограничился ведением данных в виде табличных блоков. Фрагмент файла — на картинке.

- Блок начинается со строки, содержащей название блока (ячейка “A5″). Оно будет использовано в качестве имени xml-элемента, так что содержание должно соответствовать требованиям. В той же строе может присутствовать необязательный “тип” (ячейка “B5″) — он будет использовано в качестве значения атрибута, так что тоже имеет ограничения.
- Каждая колонка таблицы содержит помимо “официального” названия, представляющего бизнес-термины (строка 8), еще два поля для “типа” (строка 6) и “технического названия” (строка 7). В процессе подготовки данных технические поля можно скрывать, но во время генерации кода использоваться будут именно они.
- Колонок в таблице может быть сколько угодно. Скрипт завершает обработку колонок как только встретит колонку с пустым значением “тип” (колонка D).
- Колонки со “типом”, начинающимся с нижнего подчеркивания — пропускаются.
- Таблица обрабатывается до тех пор, пока не встретиться строка с пустым значением в первой колонке (ячейка “A11”)
- Скрипт останавливается после 3 пустых строк.
Этап 2. Excel -> XML
Преобразование данных с листов Excel в XML — несложная задача. Преобразование производится с помощью кода на VBA. Тут могут быть варианты, но мне так показалось проще и быстрее всего.
Ниже приведу лишь несколько соображений — как сделать финальный инструмент удобнее в поддержке и использовании.
- Код представлен в виде Excel add-in (.xlam) — для упрощения поддержки кода, когда количество файлов с тестовыми данными более 1 и эти файлы создаются/поддерживаются более чем одним человеком. Кроме того — это соответствует подходу разделения кода и данных;
- XSLT шаблоны размещаются в одном каталоге с файлом add-in — для упрощения поддержки;
- Генерируемые файлы: промежуточный XML и результирующий файл с кодом, — желательно помещать в тот же каталог, что и файл Excel с исходными данными. Людям создающим тестовые скрипты будет удобнее и быстрее работать с результатами;
- Excel файл может содержать несколько листов с данными для тестов — они используются для организации вариативности данных для теста (например, если тестируется процесс, в котором необходимо проверить реакцию системы на каждом шаге): откопировал лист, поменял часть входных данных и ожидаемых результатов — готово. Все в одном файле;
- Поскольку все листы в рабочей книге Excel должны иметь уникальное имя — эту уникальность можно использовать в качестве части имени тестового скрипта. Такой подход дает гарантированную уникальность имен различных подсценариев в рамках сценария. А если включать в имя тестового скрипта название файла, то достичь уникальности названий скриптов становится еще проще — что особенно важно в случае если тестовые данные готовят несколько человек независимо. Кроме того, стандартный подход к именованию поможет в дальнейшем при анализе результатов теста — от результатов исполнения к исходным данным будет добраться очень просто;
- Данные из всех листов книги сохраняются в один XML файл. Для нас это показалось целесообразным в случае генерации тестовой документации, и некоторых случаях генерации тестовых сценариев;
- При генерации файла с данными для теста удобно оказалось иметь возможность не включать в генерацию отдельные листы с исходными данными (по разным причинам; например, данные для одного из пяти сценариев ещё не готовы — а тесты прогонять пора). Для этого мы используем соглашение: листы, где название начинается с символа нижнего подчёркивания — исключаются из генерации;
- В файле удобно держать лист с деталями сценария по которому создаются тестовые данные («Documentation») — туда можно копировать информацию от заказчика, вносить комментарии, держать базовые данные и константы, на которые ссылаются остальные листы с данными, и так далее. Разумеется, данный лист в генерации не участвует;
- Чтобы иметь возможность влиять на некоторые аспекты генерации финального кода тестовых скриптов, оказалось удобным включать в финальный XML дополнительную информацию «опции генерации», которые не являются тестовыми данными, но могут использоваться шаблоном для включения или исключения участков кода (по аналогии с pragma, define, итп.) Для этого мы используем именованные ячейки, размещённые на негенерируемом листе «Options»;
- Каждая строка тестовых данных должна иметь уникальный идентификатор на уровне XML — это здорово поможет при генерации кода и при обработке кросс-ссылок между строками тестовых данных, которые при этом необходимо формулировать в терминах как раз этих уникальных идентификаторов.
Фрагмент XML который получается из данных в Excel с картинки выше
<MasterRecord type="Type1">
<columns>
<column>
<type>Field</type>
<name>TechName1</name>
<caption>Business Name 1</caption>
</column>
<column>
<type>Field</type>
<name>TechName2</name>
<caption>Business Name 2</caption>
</column>
<column>
<type>Field</type>
<name>TechName3</name>
<caption>Business Name 3</caption>
</column>
</columns>
<row id="Type1_1">
<Field name="TechName1">A</Field>
<Field name="TechName2">123</Field>
<Field name="TechName3">2016-01-01</Field>
</row>
<row id="Type1_2">
<Field name="TechName1">B</Field>
<Field name="TechName2">456</Field>
<Field name="TechName3">2016-01-01</Field>
</row>
</MasterRecord>
Этап 3. XML -> Code
Эта часть предельно специфична задачам которые решаются, поэтому ограничусь общими замечаниями.
- Начальная итерация начинается по элементам, представляющим листы (различные тестовые сценарии). Здесь можно размещать блоки setup / teardown, утилит;
- Итерация по элементам данных внутри элемента сценария должна начинаться с элементов ожидаемых результатов. Так можно логично организовать сгенерированные тесты по принципу «один тест — одна проверка»;
- Желательно явно разделить на уровне шаблонов области, где генерируются данные, выполняется проверяемое действие, и контролируется полученный результат. Это возможно путём использования шаблонов с режимами (mode). Такая структура шаблона позволит в дальнейшем делать другие варианты генерации — просто импортируя этот шаблон и перекрывая в новом шаблоне необходимую область;
- Наряду с кодом, в тот же файл будет удобно включить справку по запуску тестов;
- Очень удобным является выделение кода генерации данных в отдельно вызываемый блок (процедуру) — так чтобы его можно было использовать как в рамках теста, так и независимо, для отладки или просто создания набора тестовых данных.
Финальный комментарий
Через какое-то время файлов с тестовыми данными станет много, а отладка и «полировка» шаблонов генерации тестовых скриптов будет все продолжаться. Поэтому, прийдется предусмотреть возможность «массовой» генерации автотестов из набора исходных Excel файлов.
Заключение
Используя описанный подход можно получить весьма гибкий инструмент для подготовки тестовых данных или полностью работоспособных автотестов.
В нашем проекте удалось довольно быстро создать набор тестовых сценариев для интеграционного тестирования сложной функциональной области — всего на данный момент около 60 файлов, генерируемых примерно в 180 тестовых классов tSQLt (фреймворк для тестирования логики на стороне MS SQL Server). В планах — использовать подход для расширения тестирования этой и других функциональных областей проекта.
Формат пользовательского ввода остается как и раньше, а генерация финальных автотестов можно менять по потребностям.
Код VBA для преобразования Excel файлов в XML и запуска преобразования (вместе с примером Excel и XML) можно взять на GitHub github.com/serhit/TestDataGenerator.
Преобразование XSLT не включено в репозиторий, поскольку оно генерит код для конкретной задачи — у вас все равно будет свой. Буду рад комментариям и pull request’ам.
Happy testing!
When potential employers ask you to take a Microsoft Excel assessment test, they are trying to determine whether or not you are the best candidate for the position. This test allows you to put your best foot forward, without worrying about impressing an interviewer. With a little bit of practice and training, you can prove you have the basic, intermediate, or advanced skill set that is needed to be successful in the position.
Did you know?
Excel Assessment Tests (aka Excel Skills Tests) are divided into three levels: (1) basic, (2) intermediate, and (3) advanced. Passing scores vary by company. To succeed, you will need to demonstrate your skills in multiple-choice questions or in an interactive Excel simulation.
The Excel Assessment test is objective, and shows hiring managers that you are capable of helping their company. Start by understanding what they require, so you can sharpen your Excel skills before the test.

You need to demonstrate your ability in formatting spreadsheets, writing formulas, or manipulating data with pivot tables, to show you are a better choice than lesser-skilled job applicants.
Excel Navigation Pad
Test Features
Excel Test for Interview
Excel assessment tests can be administered either before or after an interview as a way to screen potential employees for a position. Tests can be administered in the office or from your home. In some cases, the job applicant will have to complete the test during the interview in the employer’s view.
The test will use either your version of Excel or an in-app test version. It’s important to find out which version of Excel you will be tested on, as some features are different in the earlier versions of Excel. iPrep’s practice tests will prepare you for MS Excel 2016, or 2019/Office 365.
Excel tests for interviews are typically administered in one of two ways:
- Multiple-choice questions
- Excel interactive spreadsheet
Multiple Choice
In multiple choice versions of the test, you will be asked questions and directed to choose the best response. These questions will cover the areas of Excel that you are expected to know in the role and will look something like this:

Excel Interactive Spreadsheet
When faced with an interactive spreadsheet test, you will be given an actual spreadsheet and asked to complete specific tasks. For example, in the question below you are being asked to add a row into an actual Excel file.
Questions can be single-task questions, where you are asked to do one thing, or multi-tasked. In a multi-tasked question, you might be asked to do the following in the Excel pictured below:
- Add a tape measure into the new row
- Add in the following sales figures: January – $27, February -$35, March – $11
- Add in a formula to calculate the average monthly sales figures for tape measures
- Add in a formula to calculate the total sales for the first quarter

Three Proficiency skills
Excel is a powerful program that is capable of doing any number of things. However, the role you are applying for probably won’t require you to know everything about Excel. Your test should only ask questions that are relevant to the position you are applying to.

That being said, most Excel employment tests are divided into three levels:
- Excel Basic Test – This skill set is needed by people in administrative and clerical positions. Therefore, the tasks expected of employees in these roles are of a formatting nature.
- Excel Intermediate Test – This skill set is needed by people working with the information contained in the spreadsheets. These tasks require a deeper knowledge of Excel.
- Excel Advanced Test – This skill set is used by people who need to analyze the data contained within the spreadsheet. These tasks require a strong knowledge of Excel.
Technical Facts
The format of each test differs greatly depending on the company administering the test. Some will ask you to take the test at home, while others proctor the exam in the office.
Larger companies often use a test developed by one of the industry’s leading skills assessment testers, while smaller companies frequently create their own test. This non-standardized test means candidates are best off practicing on assessment tests that offer a wide range of questions and topics. Tests are typically given in three levels, based on the job requirements.
Excel Test Levels

Here are the topics you can expect for each of these levels:
| Excel Basic Test |
Excel Intermediate Test |
Excel Advanced Test |
|---|---|---|
| For administrative or clerical positions. You can expect the following types of tasks to be tested: | For roles that require calculations. You can expect the following types of tasks to be tested: | For roles that require data analysis and working with data. You can expect the following types of tasks to be tested: |
| Copy/paste | Use Autosum | Full PivotTable use |
| Add/remove column or row | Sort data through auto-filtering | Enter calculations using average functions |
| Fill cell range with series of labels | Create conditional formatting rules | Sort table using multiple fields |
| Move a chart in a worksheet | Change chart types | Add new fields to table |
| Navigate between worksheets | Create PivotTables | Use goal seek |
| Open a workbook | Filter PivotTable data | Data validation |
| Open/close Excel | Freeze top rows | Record macros |
| Apply bold or italics formatting to cells | Add comments | Apply styles to a chart |
| Change cell colors/fonts | Apply number formatting to cells | Lock cells |
| Preview and print workbooks | Merge cells |
If you are applying for a position at a large company, they may use a commercially developed standardized test. These tests typically take 15-45 minutes to complete and contain between 10-35 questions.
Results Scale and Interpretations
Companies that create and score their own tests will compare your results with that of other candidates they have interviewed, as well as requirements for the job. It’s important to do as well as possible on the Excel assessment, as it demonstrates your ability to contribute to the company immediately. Candidates with lower scores require training, which takes time and costs money, so doing well on the test will help you stand out among other job seekers.
Larger companies which use assessment tests receive a report detailing the following:
- Your score
- Your percentile
- Your score in different sections
Your potential employer could receive a report that looks like this, which shows how well you did, compared to other test takers.

The report will also break down your test performance by levels. While an overall score may not be that impressive, the employer can see if a candidate has strong basic skills, which may be enough for the role.

Additionally, the report includes scores by topics. This provides further insight to the hiring manager as to the areas where you have strong skills, and those areas which might require additional training.

This Score Report, which comes from the Kenexa Prove It Power User test, includes the raw score, percent correct, percentile ranking, and global average.

iPREP: Concise. Focused. What you need.
Practice
Online self-paced
Excel Assessment Test FAQs
What is an Excel assessment test?
Many employers require their potential employees to take an Excel assessment test. This test lets the hiring manager know how well the candidate knows Excel, and whether or not they are capable of completing the tasks in Excel that their role would require.
Some companies use multiple choice tests, while others provide the candidate with an interactive Excel sheet and ask the job candidate to perform different tasks.
What is included in Excel tests for interviews?
Excel tests can cover a number of topics, depending on the role. For someone looking at an administrative or clerical position, the test would challenge the candidate with basic activities, such as formatting and file management. Sales or marketing roles would require a candidate to write formulas and use pivot tables to analyze data.
What are the most common question topics on Excel tests?
While different roles have different requirements, here are the five most common topics that appear in Excel assessment tests:
• Opening and saving files
• Sorting data based on different types of criteria
• Adding and removing rows or columns
• Autofilling cells with data
• Sum/Average functions and formulas
How to prepare for Excel assessment tests?
Before taking an Excel assessment test, ask about the test format and version of Excel that you will be tested on. Once you have that information, you can work with online practice tests, like those offered by iPrep, to familiarize yourself with the types of questions that are asked on these tests. This will help you identify your strengths and weaknesses, and the tips and tricks they offer will help you improve on the areas where you did poorly.
What Excel skills are employers looking for?
Employers want to know that you can handle the Excel tasks that you will come across in your job. This generally means that they want someone who can easily navigate Excel’s ribbon and taskbar, format worksheets, use functions, and manipulate data.
What types of roles typically require an Excel assessment?
Excel is used for a number of different functions. A Capital One 2017 report found that 82% of middle skill jobs require digital skills, including spreadsheets. However, it is an especially important tool in the following roles:
• Accountants
• Administrative assistants and clerical workers
• Business analysts
• Marketing and sales managers
• Loan officers
• Project managers
• Teachers
Job listings that mention Excel skills as a requirement are very likely to require candidates to take an Excel assessment test.
Excel Assessment Test Tips
Doing well on the Excel assessment is something potential employers consider while making a hiring decision. Here are a few tips for how you can get the best score possible:
- Understand the job requirements and level of Excel proficiency required. Prepare for these types of questions.
- Review common formulas, such as SUM, COUNT, IF, VLOOKUP, AND, CONCATENATE, and more.
- Review common keyboard shortcuts in Excel. These shortcuts save a significant amount of time over the course of a workday.
- Practice creating and filtering PivotTables. These are especially important for a role that involves analyzing data, and are very common in advanced-level Excel tests.
- Make sure you’re up to date on the version of Excel that is being used in the office. Depending on the company, you may find yourself working on Excel 2010, 2013, 2016 or 2019/Office 365.
- Take practice tests, like those offered by iPrep. These interactive tests will guide you by highlighting the skills you have and the areas you need to improve upon.

Administration
- Test Location: The Excel Assessment test is administrated by the hiring company, typically in their office.
- Test Schedule: The test generally takes place following at least an initial interview.
- Test Format: Multiple choice or computerized simulation.
- Test Materials: Computer. Additional materials determined by each employer.
- Cost: None
- Retake Policy: Determined by each employer.

Test Provider
While most small businesses create their own Excel assessment, larger corporations tend to use assessments from one of these leading test developers.
IBM Talent Assessments (formerly Kenexa Prove lt) – There are 3 versions of this test: Normal User, Power User, and Whole Test. The test is an interactive test, where users are presented with actual spreadsheets and challenged to complete different tasks. The test is administered online, and untimed, although the speed in which you complete tasks are measured and influence your final score. The Normal User test has 30 questions, the Power User test has 25 questions, and the Whole Test has 55 questions.
January 2020 update: IBM announced that the Kenexa Prove It Excel assessments will be gradually shifted from the IBM Talent Assessments platform to SHL, a global leader in assessment tests.
Isograd – A 25-questions assessment that takes about 30 minutes to complete. It is taken online and provides immediate skills report to the test administrator.
Indeed – This multiple-choice test is available for beginning, intermediate, and advanced users.

eSkill – These tests are highly configurable by the test administer, allowing them to customize the number of questions, level of questions, and time limit.
EmployTest – This interactive Excel spreadsheet assessment asks about 35 questions covering formatting, functions, charts and formulas. Results are immediately emailed to test administer.
Interview Mocha – This ten-question assessment test takes 20 minutes to complete. Test administrators can customize the level of difficulty, as well as introduce their own questions into the test.
Information Sources
- IBM Kenexa Prove It
- Isograd Testing Services
- Indeed
- eSkill EmployTest
- Interview Mocha
- Microsoft
Disclaimer
All the information and prep materials on iPrep are genuine and were created for tutoring purposes. iPrep is not affiliated with IBM, Isograd, Indeed, eSkill EmployTest, Interview Mocha or other Excel assessment test developers.
Содержание
- Реализация тестирования
- Способ 1: поле для ввода
- Способ 2: выпадающий список
- Способ 3: использование элементов управления
- Вопросы и ответы

Часто для проверки качества знаний прибегают к использованию тестов. Их применяют также для психологического и других видов тестирования. На ПК с целью написания тестов довольно часто применяют различные специализированные приложения. Но с поставленной задачей может справиться даже обычная программа Microsoft Excel, которая имеется на компьютерах почти всех пользователей. Используя инструментарий данного приложения можно написать тест, который по функциональности мало чем будет уступать решениям, выполненным с помощью специализированного ПО. Давайте разберемся, как при помощи Экселя выполнить данную задачу.
Реализация тестирования
Любой тест подразумевает выбор одного из нескольких вариантов ответа на поставленный вопрос. Как правило, их несколько. Желательно, чтобы после завершения теста пользователь уже видел сам, справился ли он с тестированием или нет. Выполнить эту задачу в Экселе можно несколькими путями. Давайте опишем алгоритм различных способов, как это сделать.
Способ 1: поле для ввода
Прежде всего, разберем самый простой вариант. Он подразумевает наличие списка вопросов, в котором представлены варианты ответов. Пользователь должен будет указать в специальное поле вариант того ответа, который он считает верным.
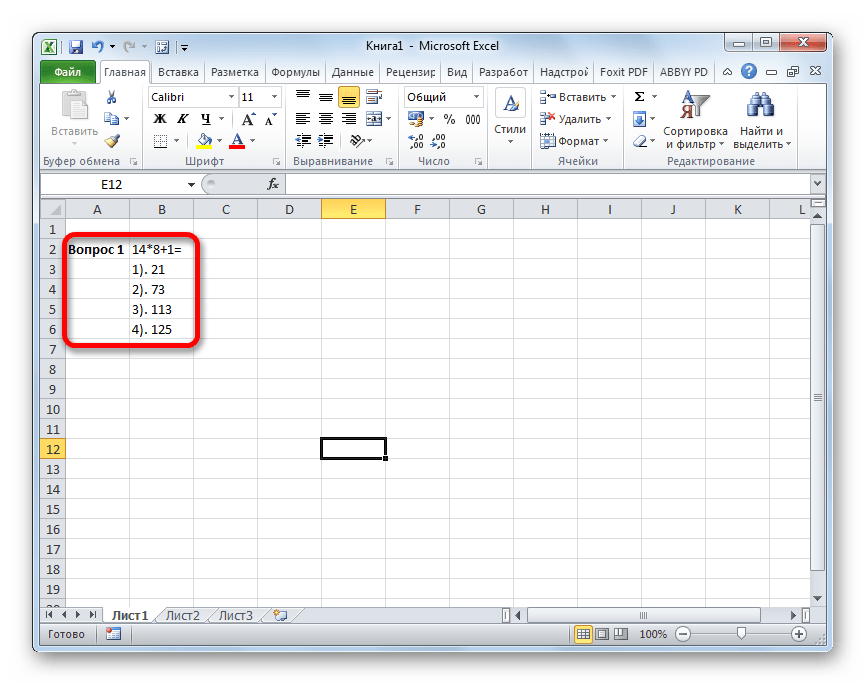
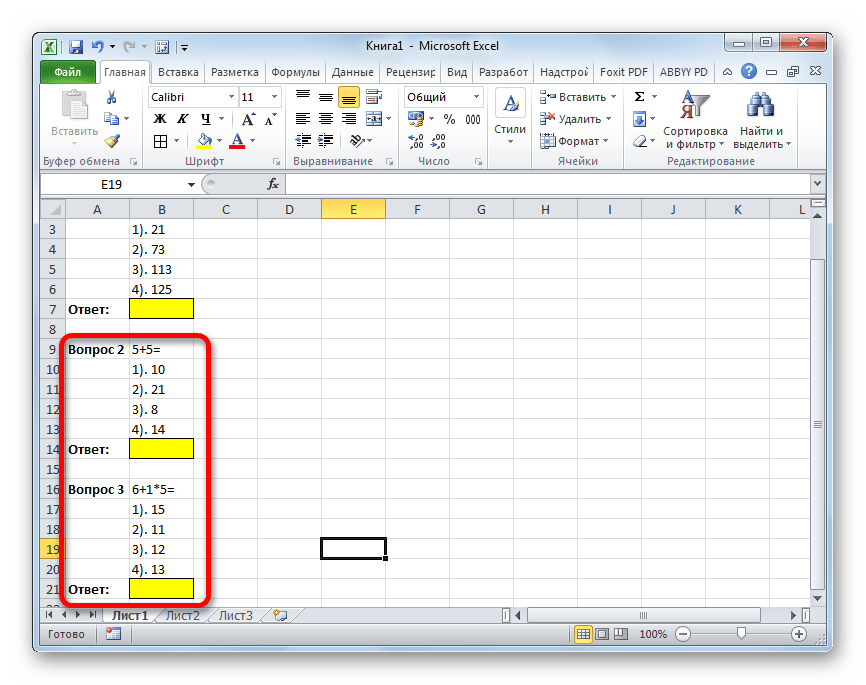
- Записываем сам вопрос. Давайте в этом качестве для простоты будем использовать математические выражения, а в качестве ответов – пронумерованные варианты их решения.
- Отдельную ячейку выделяем для того, чтобы пользователь мог вписывать туда номер того ответа, который он считает верным. Для наглядности помечаем её желтым цветом.
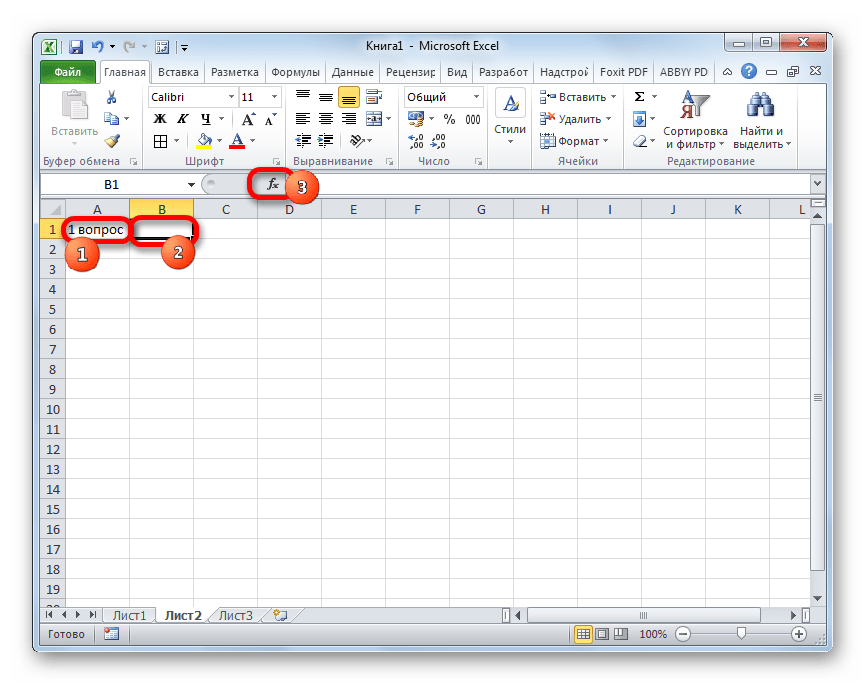
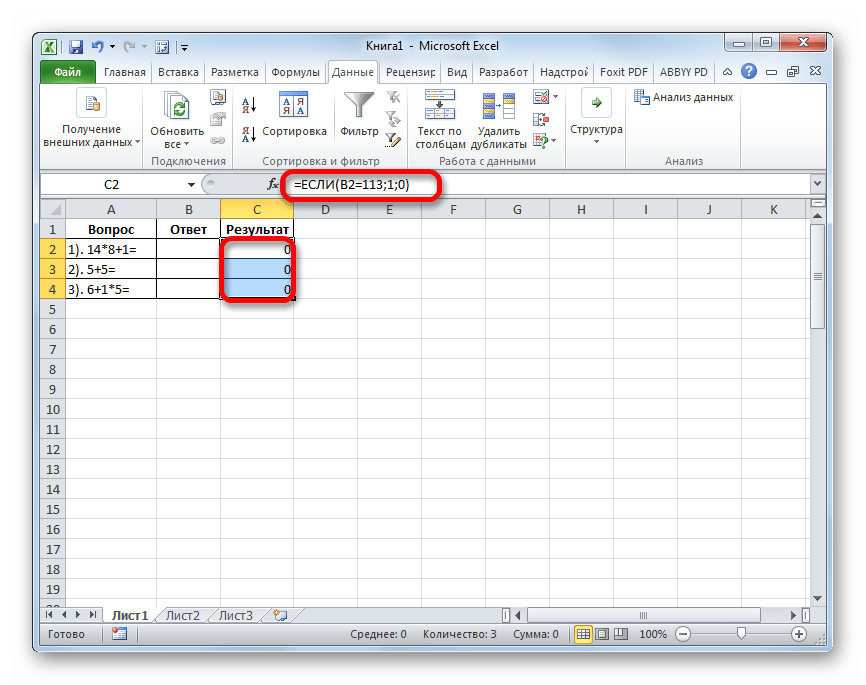
- Теперь перемещаемся на второй лист документа. Именно на нем будут располагаться правильные ответы, с которыми программа сверит данные пользователем. В одной ячейке пишем выражение «Вопрос 1», а в соседнюю вставляем функцию ЕСЛИ, которая, собственно, и будет контролировать правильность действий пользователя. Для вызова этой функции выделяем целевую ячейку и жмем на значок «Вставить функцию», размещенный около строки формул.
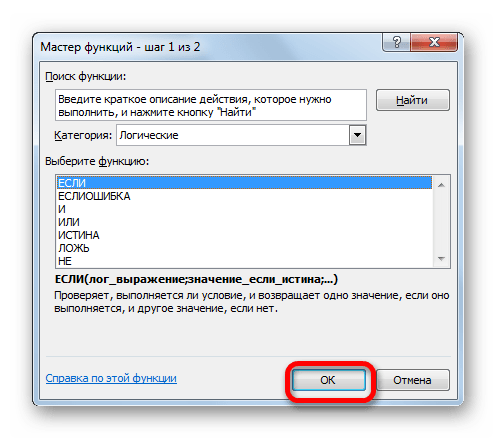
- Запускается стандартное окно Мастера функций. Переходим в категорию «Логические» и ищем там наименование «ЕСЛИ». Поиски не должны быть долгими, так как это название размещено первым в перечне логических операторов. После этого выделяем данную функцию и жмем на кнопку «OK».
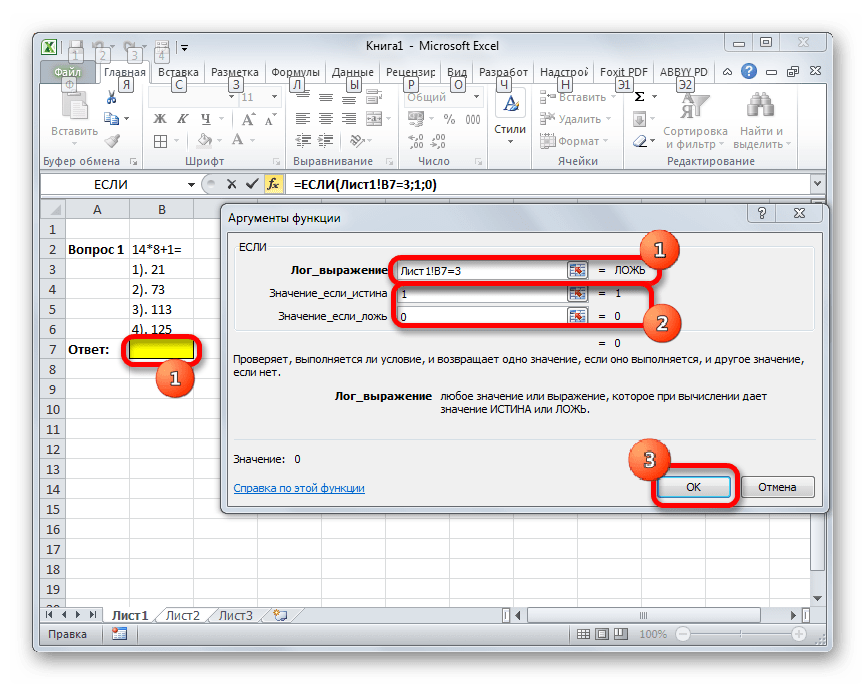
- Производится активация окна аргументов оператора ЕСЛИ. Указанный оператор имеет три поля, соответствующих числу его аргументов. Синтаксис данной функции принимает следующий вид:
=ЕСЛИ(Лог_выражение;Значение_если_истина;Значение_если_ложь)В поле «Логическое выражение» нужно вписать координаты той ячейки, в которую пользователь заносит ответ. Кроме того, в этом же поле нужно указать правильный вариант. Для того, чтобы внести координаты целевой ячейки, устанавливаем курсор в поле. Далее возвращаемся на Лист 1 и отмечаем элемент, который мы предназначили для написания номера варианта. Его координаты тут же отобразятся в поле окна аргументов. Далее, чтобы указать правильный ответ в этом же поле после адреса ячейки вписываем выражение без кавычек «=3». Теперь, если пользователь в целевой элемент поставит цифру «3», то ответ будет считаться верным, а во всех остальных случаях – неверным.
В поле «Значение если истина» устанавливаем число «1», а в поле «Значение если ложь» устанавливаем число «0». Теперь, если пользователь выберет правильный вариант, то он получит 1 балл, а если неправильный – то 0 баллов. Для того, чтобы сохранить введенные данные, жмем на кнопку «OK» в нижней части окна аргументов.
- Аналогичным образом составляем ещё два задания (или любое нужное нам количество) на видимом для пользователя листе.
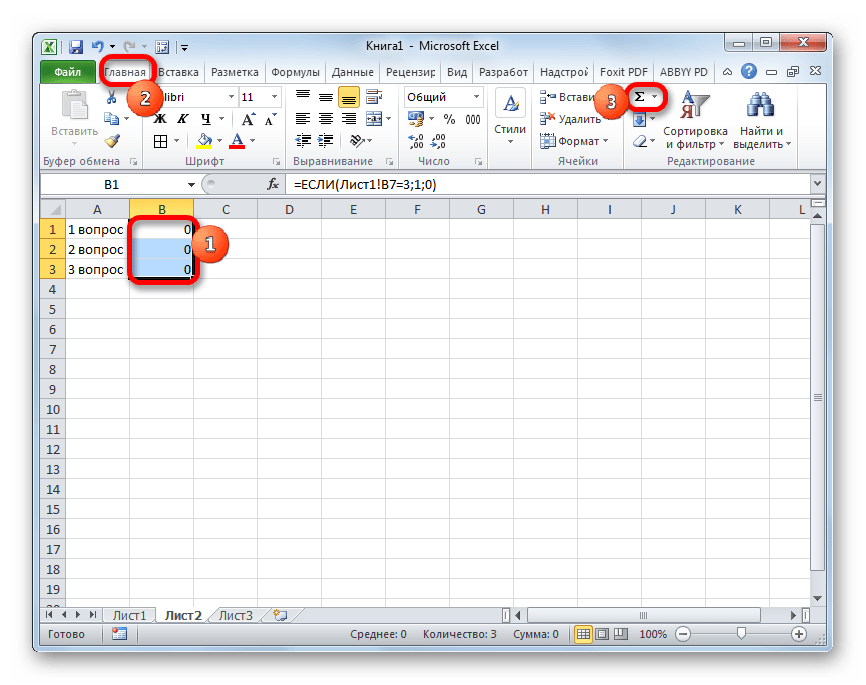
- На Листе 2 с помощью функции ЕСЛИ обозначаем правильные варианты, как мы это делали в предыдущем случае.
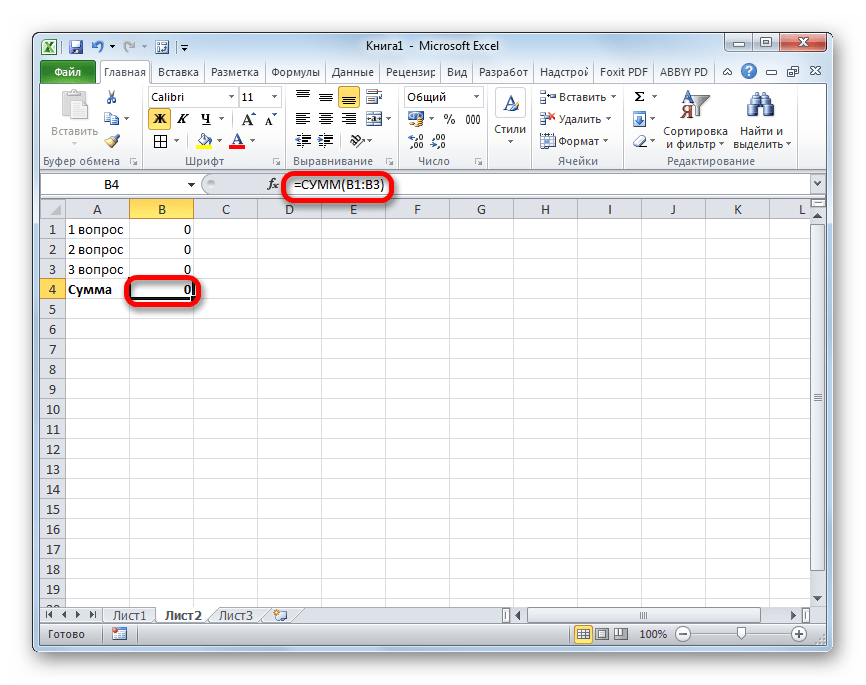
- Теперь организуем подсчет баллов. Его можно сделать с помощью простой автосуммы. Для этого выделяем все элементы, где содержится формула ЕСЛИ и жмем на значок автосуммы, который расположен на ленте во вкладке «Главная» в блоке «Редактирование».
- Как видим, пока сумма равна нулю баллов, так как мы не ответили ни на один пункт тестирования. Наибольшее количество баллов, которые в данном случае может набрать пользователь – 3, если он правильно ответит на все вопросы.
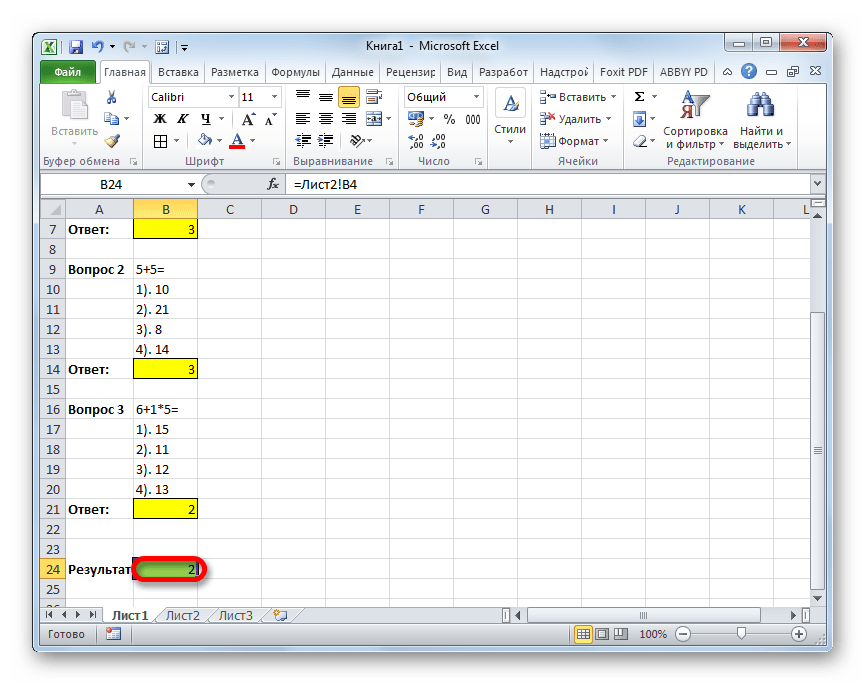
- При желании можно сделать так, что количество набранных баллов будет выводиться и на пользовательский лист. То есть, пользователь будет сразу видеть, как он справился с задачей. Для этого, выделяем отдельную ячейку на Листе 1, которую называем «Результат» (или другим удобным наименованием). Чтобы долго не ломать голову, просто ставим в неё выражение «=Лист2!», после чего вписываем адрес того элемента на Листе 2, в котором находится автосумма баллов.
- Проверим, как работает наш тест, намеренно допустив одну ошибку. Как видим, результат данного теста 2 балла, что соответствует одной допущенной ошибке. Тест работает корректно.


Урок: Функция ЕСЛИ в Экселе
Способ 2: выпадающий список
Организовать тест в Экселе можно также при помощи выпадающего списка. Посмотрим, как это выполнить на практике.
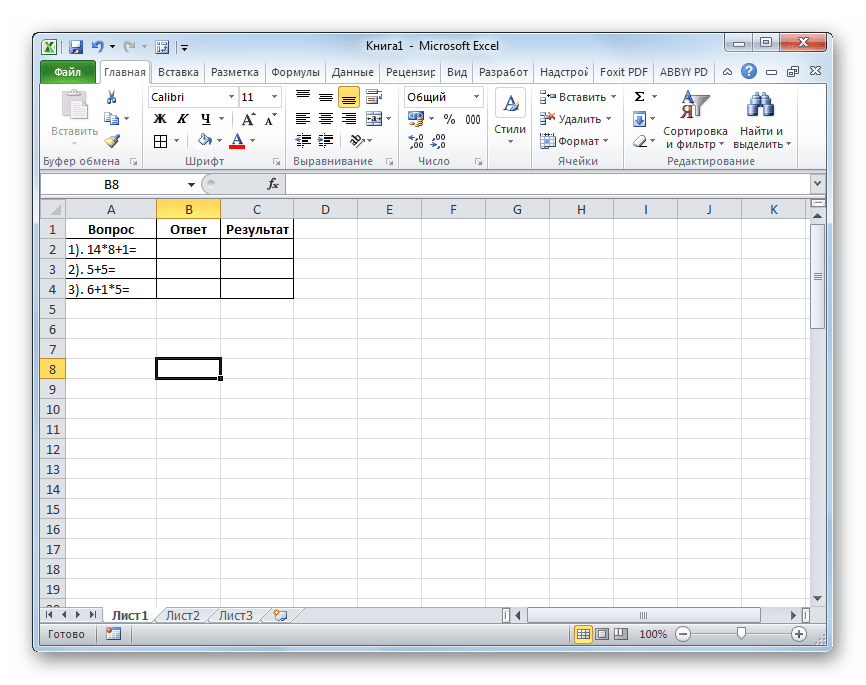
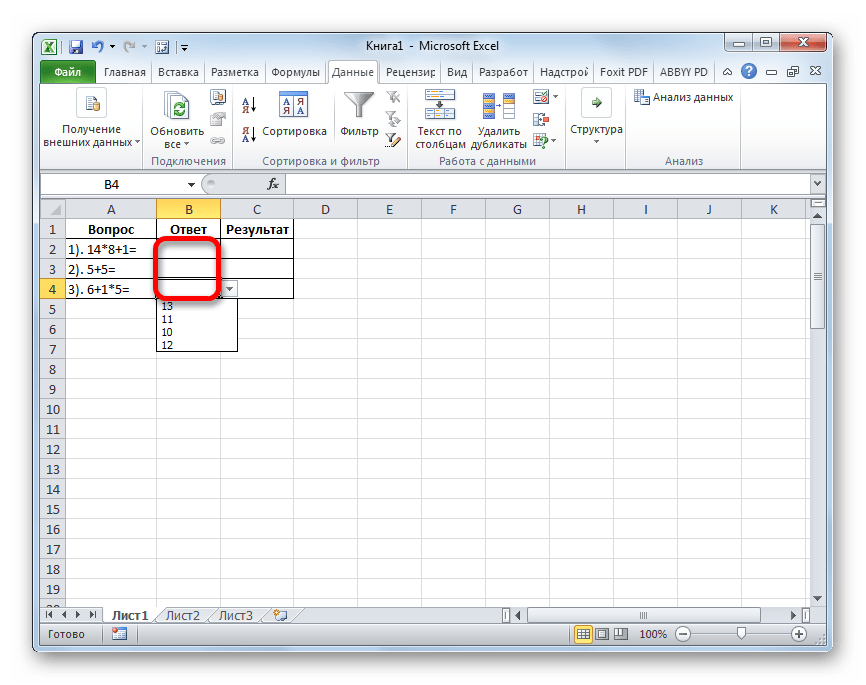
- Создаем таблицу. В левой её части будут задания, в центральной части – ответы, которые пользователь должен выбрать из предложенного разработчиком выпадающего списка. В правой части будет отображаться результат, который автоматически генерируется в соответствии с правильностью выбранных ответов пользователем. Итак, для начала построим каркас таблицы и введем вопросы. Применим те же задания, которые использовали в предыдущем способе.
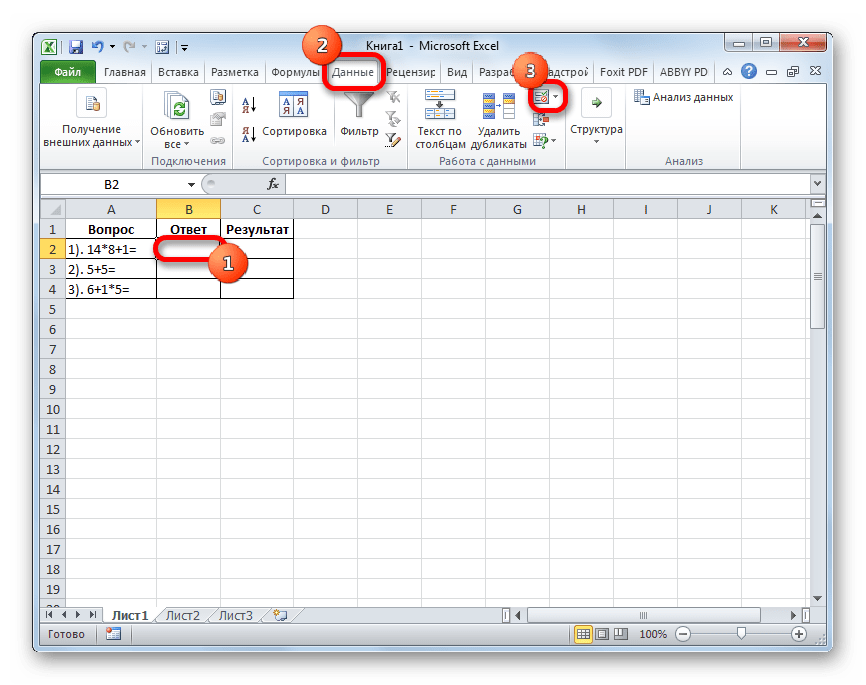
- Теперь нам предстоит создать список с доступными ответами. Для этого выделяем первый элемент в столбце «Ответ». После этого переходим ко вкладке «Данные». Далее выполняем щелчок по значку «Проверка данных», который размещен в блоке инструментов «Работа с данными».
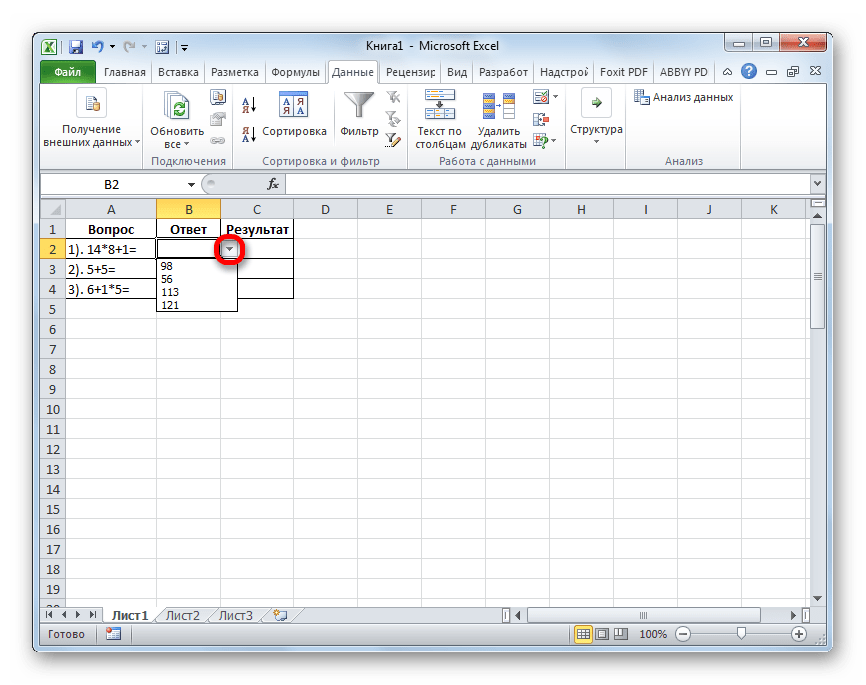
- После выполнения данных шагов активируется окно проверки видимых значений. Перемещаемся во вкладку «Параметры», если оно было запущено в какой-либо другой вкладке. Далее в поле «Тип данных» из выпадающего списка выбираем значение «Список». В поле «Источник» через точку с запятой нужно записать варианты решений, которые будут отображаться для выбора в нашем выпадающем списке. Затем щелкаем по кнопке «OK» в нижней части активного окна.
- После этих действий справа от ячейки с вводимыми значениями появится пиктограмма в виде треугольника с углом, направленным вниз. При клике по ней будет открываться список с введенными нами ранее вариантами, один из которых следует выбрать.
- Аналогичным образом составляем списки и для других ячеек столбца «Ответ».
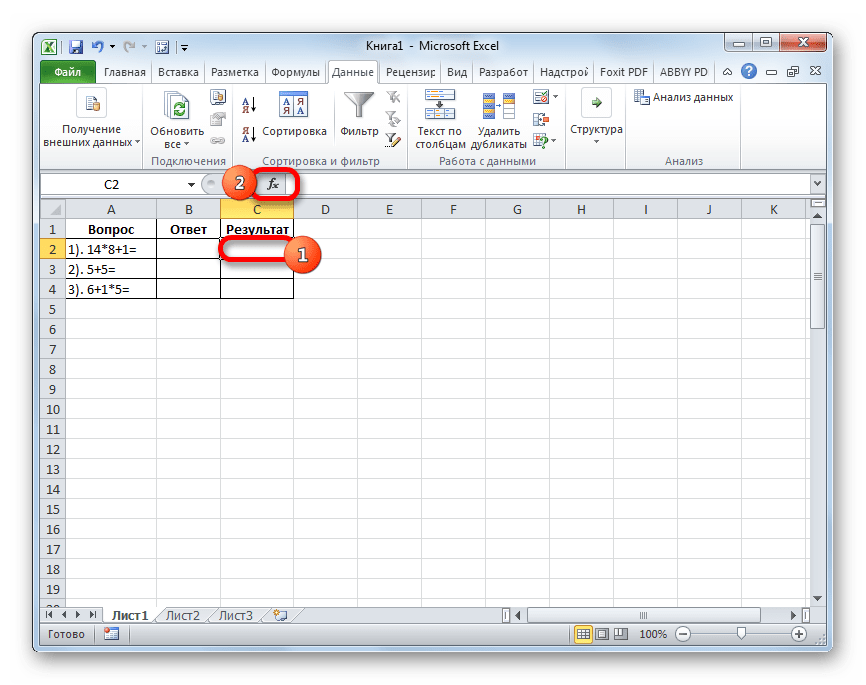
- Теперь нам предстоит сделать так, чтобы в соответствующих ячейках столбца «Результат» отображался факт того, верным является ответ на задание или нет. Как и в предыдущем способе сделать это можно при помощи оператора ЕСЛИ. Выделяем первую ячейку столбца «Результат» и вызываем Мастер функций посредством нажатия на значок «Вставить функцию».
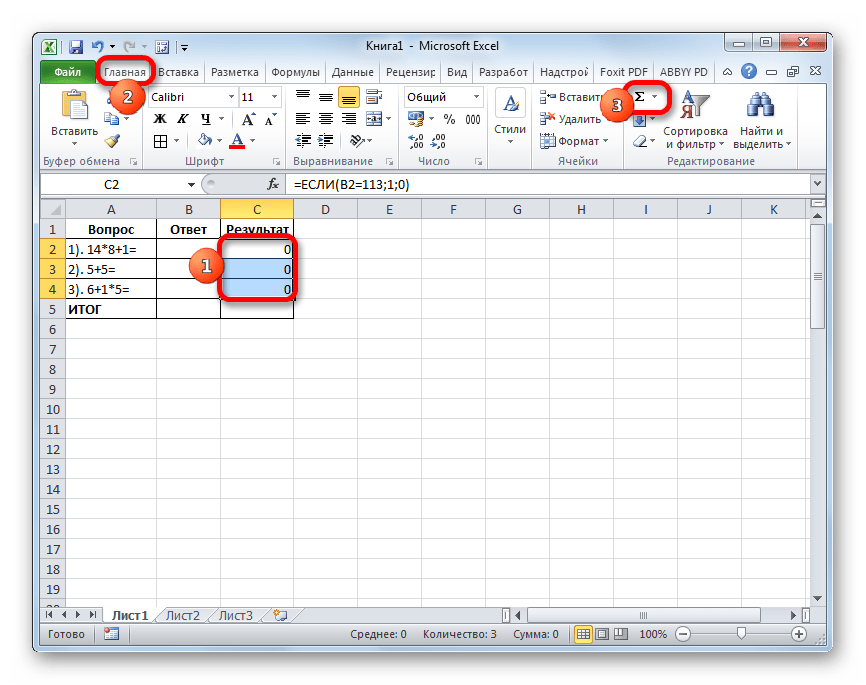
- Далее через Мастер функций при помощи того же варианта, который был описан в предыдущем способе, переходим к окну аргументов функции ЕСЛИ. Перед нами открывается то же окно, которое мы видели в предыдущем случае. В поле «Логическое выражение» указываем адрес ячейки, в которой выбираем ответ. Далее ставим знак «=» и записываем верный вариант решения. В нашем случае это будет число 113. В поле «Значение если истина» устанавливаем количество баллов, которое мы хотим, чтобы начислялось пользователю при правильном решении. Пусть это, как и в предыдущем случае, будет число «1». В поле «Значение если ложь» устанавливаем количество баллов. В случае неверного решения пусть оно будет равно нулю. После того, как вышеуказанные манипуляции выполнены, жмем на кнопку «OK».
- Аналогичным образом внедряем функцию ЕСЛИ в остальные ячейки столбца «Результат». Естественно, что в каждом случае в поле «Логическое выражение» будет собственный вариант правильного решения, соответствующий вопросу в данной строке.
- После этого делаем итоговую строку, в которой будет подбиваться сумма баллов. Выделяем все ячейки столбца «Результат» и щелкаем уже знакомый нам значок автосуммы во вкладке «Главная».
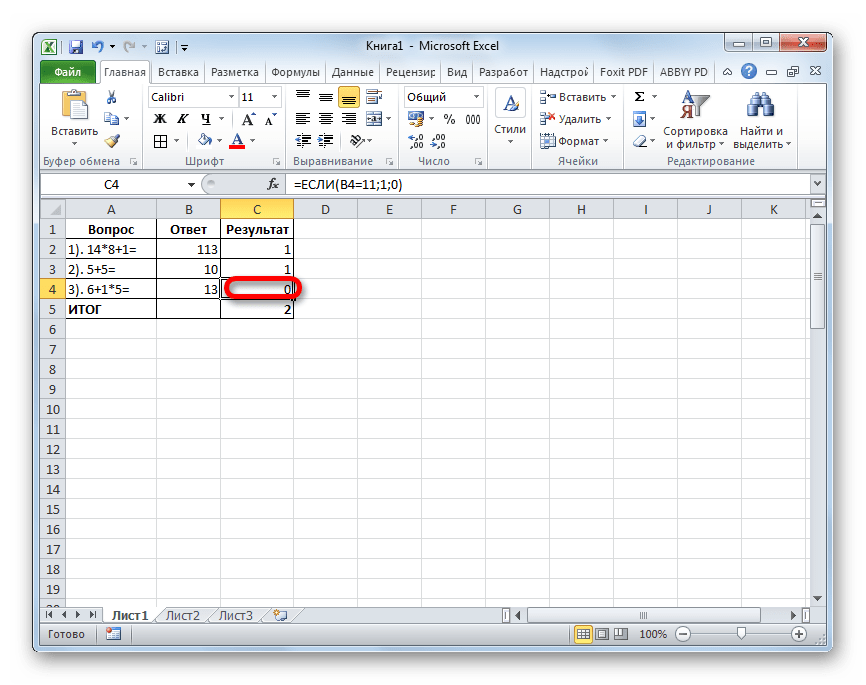
- После этого с помощью выпадающих списков в ячейках столбца «Ответ» пытаемся указать правильные решения на поставленные задания. Как и в предыдущем случае, в одном месте умышленно допускаем ошибку. Как видим, теперь мы наблюдаем не только общий результат тестирования, но и конкретный вопрос, в решении которого содержится ошибка.


Способ 3: использование элементов управления
Провести тестирование можно также, используя для выбора вариантов решения элементы управления в виде кнопки.
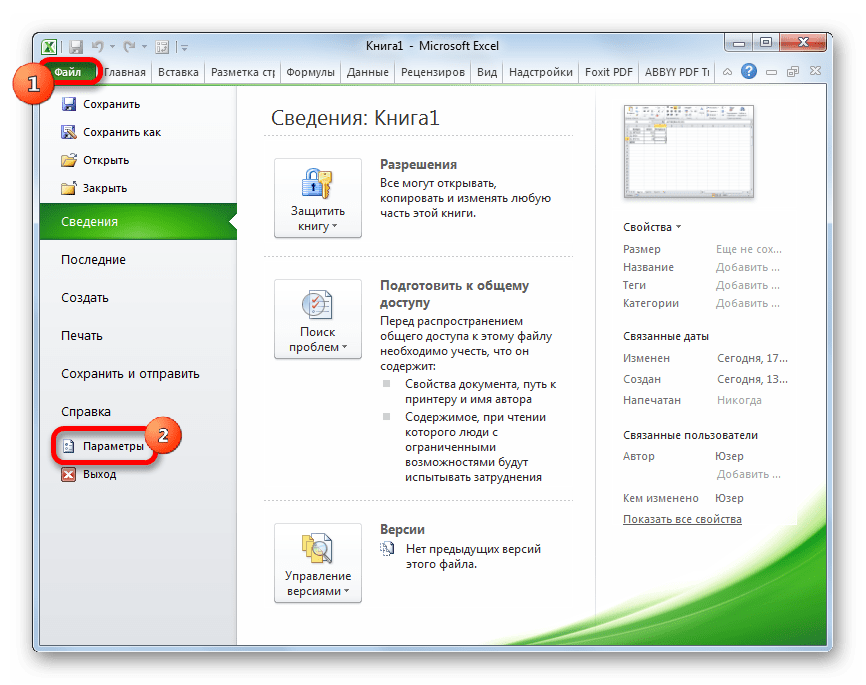
- Для того чтобы иметь возможность использовать формы элементов управления, прежде всего, следует включить вкладку «Разработчик». По умолчанию она отключена. Поэтому, если в вашей версии Excel она ещё не активирована, то следует провести некоторые манипуляции. Прежде всего, перемещаемся во вкладку «Файл». Там выполняем переход в раздел «Параметры».
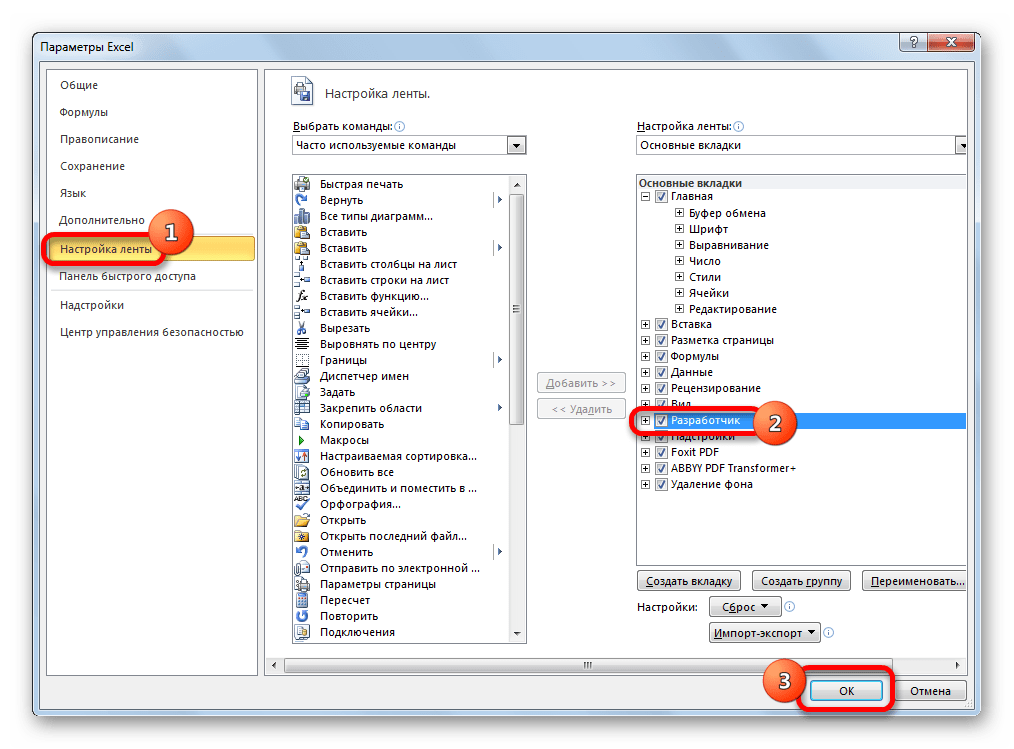
- Активируется окно параметров. В нём следует переместиться в раздел «Настройка ленты». Далее в правой части окна устанавливаем флажок около позиции «Разработчик». Для того чтобы изменения вступили в силу жмем на кнопку «OK» в нижней части окна. После этих действий вкладка «Разработчик» появится на ленте.
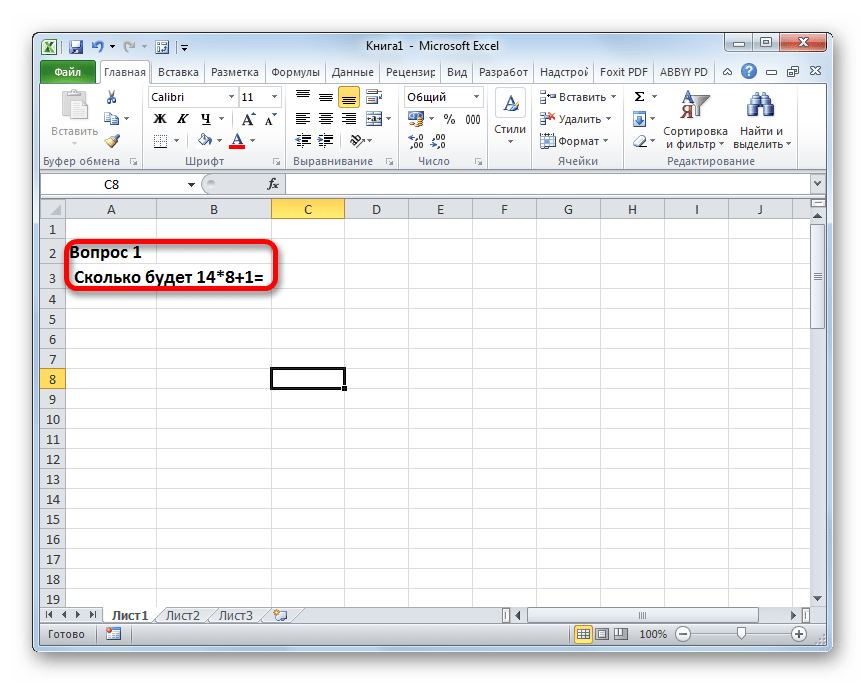
- Прежде всего, вписываем задание. При использовании данного способа каждое из них будет размещено на отдельном листе.
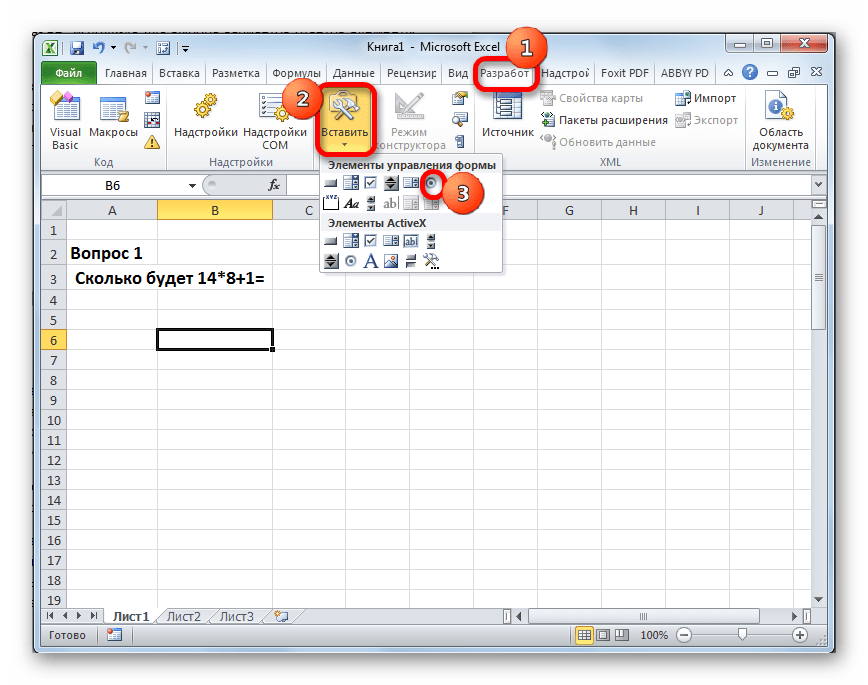
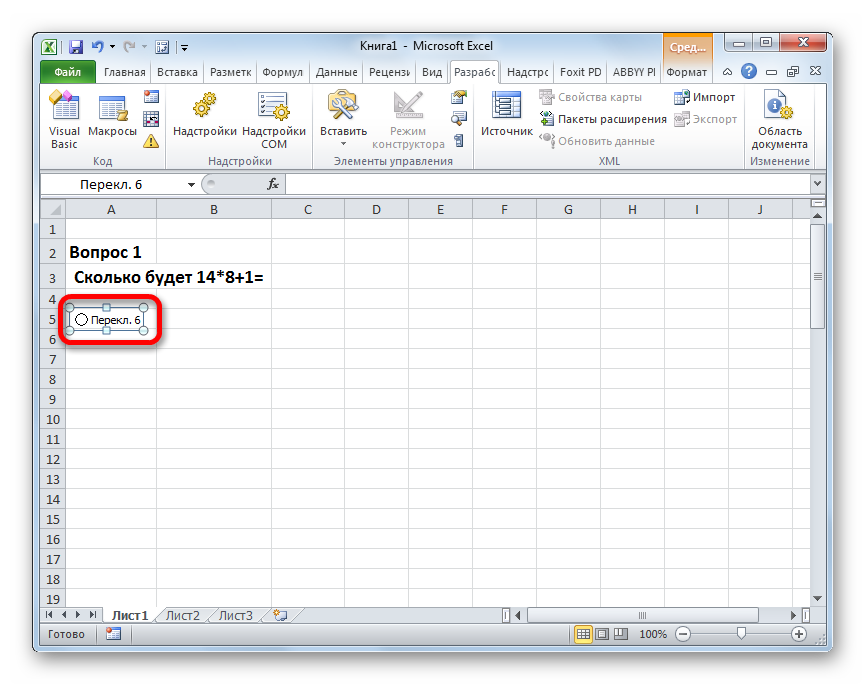
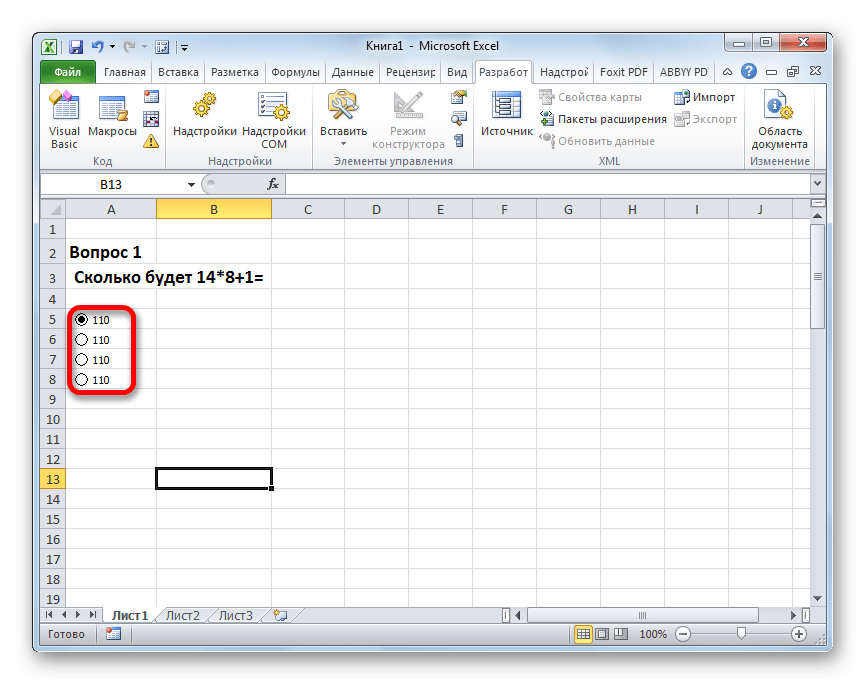
- После этого переходим в недавно активированную нами вкладку «Разработчик». Щелкаем по значку «Вставить», который размещен в блоке инструментов «Элементы управления». В группе значков «Элементы управления формы» выбираем объект под названием «Переключатель». Он имеет вид круглой кнопки.
- Кликаем по тому месту документа, где желаем разместить ответы. Именно там появится нужный нам элемент управления.
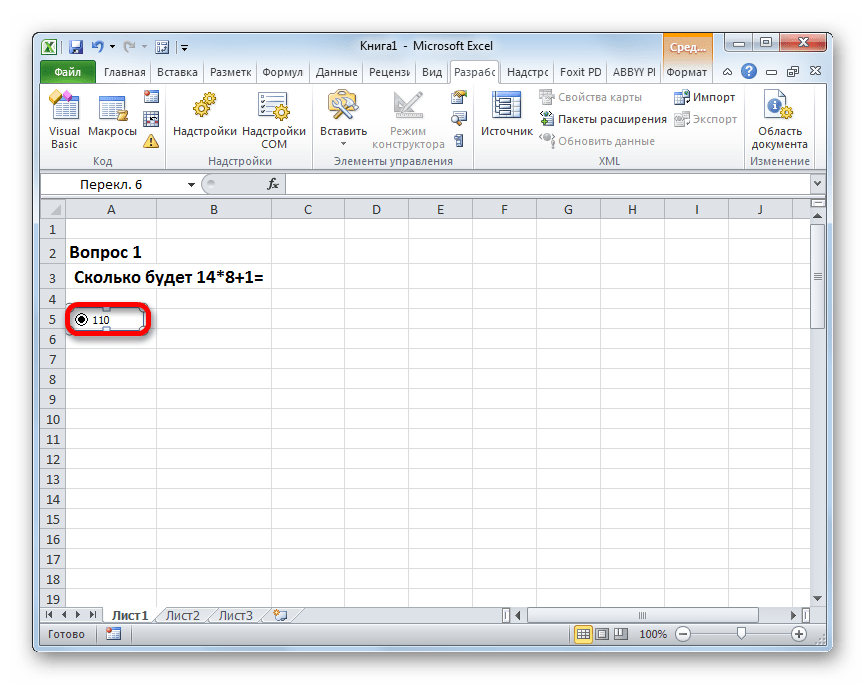
- Затем вписываем один из вариантов решения вместо стандартного наименования кнопки.
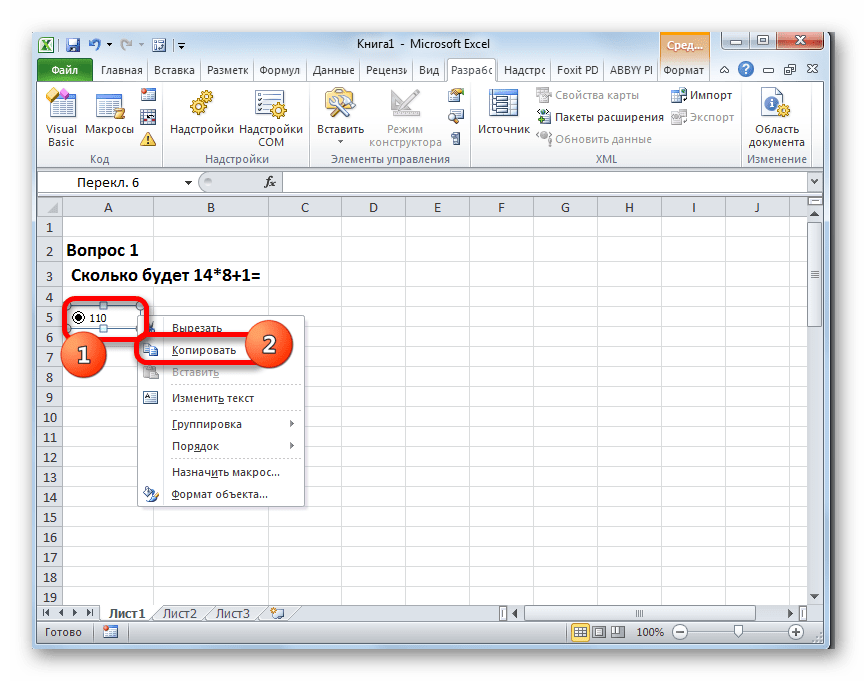
- После этого выделяем объект и кликаем по нему правой кнопкой мыши. Из доступных вариантов действий выбираем пункт «Копировать».
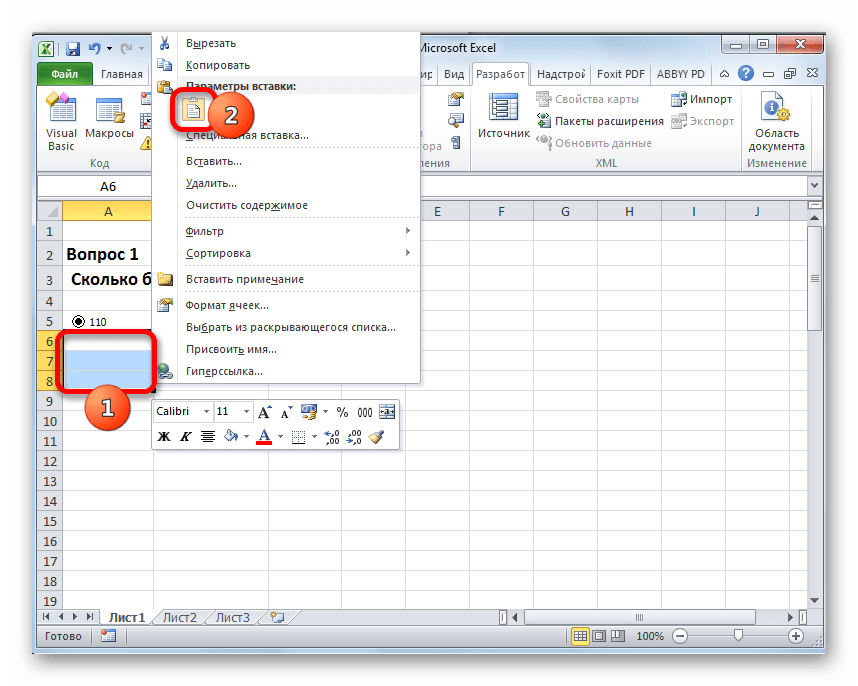
- Выделяем расположенные ниже ячейки. Затем кликаем правой кнопкой мыши по выделению. В появившемся списке выбираем позицию «Вставить».
- Далее производим вставку ещё два раза, так как мы решили, что вариантов решения будет четыре, хотя в каждом конкретном случае их число может отличаться.
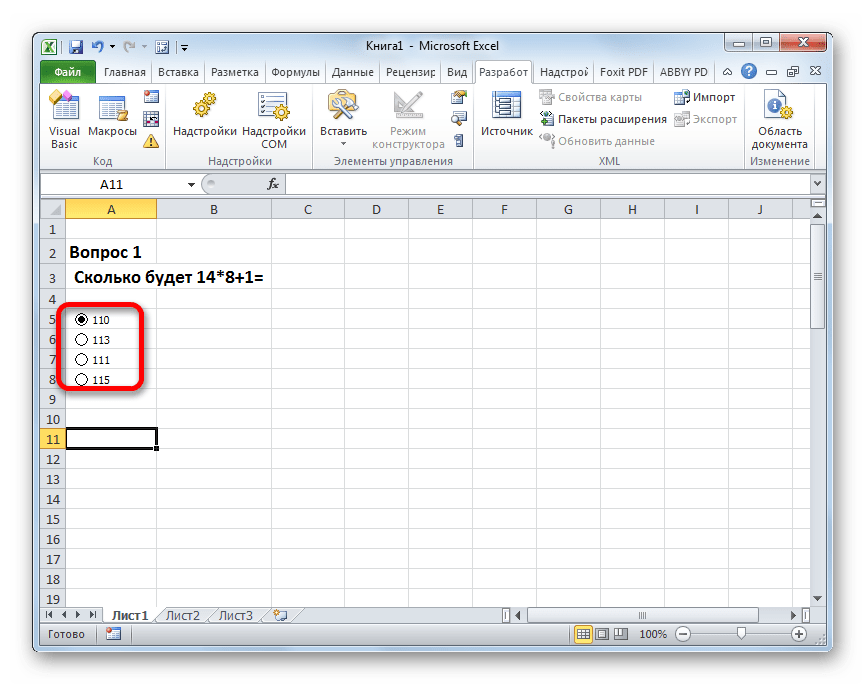
- Затем переименовываем каждый вариант, чтобы они не совпадали друг с другом. Но не забываем и о том, что один из вариантов обязательно должен быть верным.
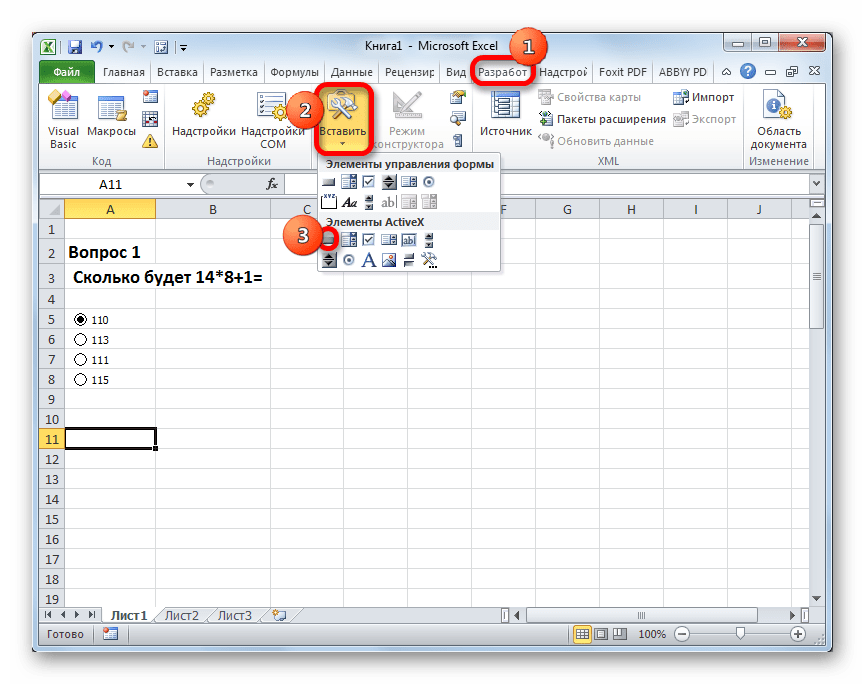
- Далее оформляем объект для перехода к следующему заданию, а в нашем случае это означает переход к следующему листу. Опять жмем на значок «Вставить», расположенный во вкладке «Разработчик». На этот раз переходим к выбору объектов в группе «Элементы ActiveX». Выбираем объект «Кнопка», который имеет вид прямоугольника.
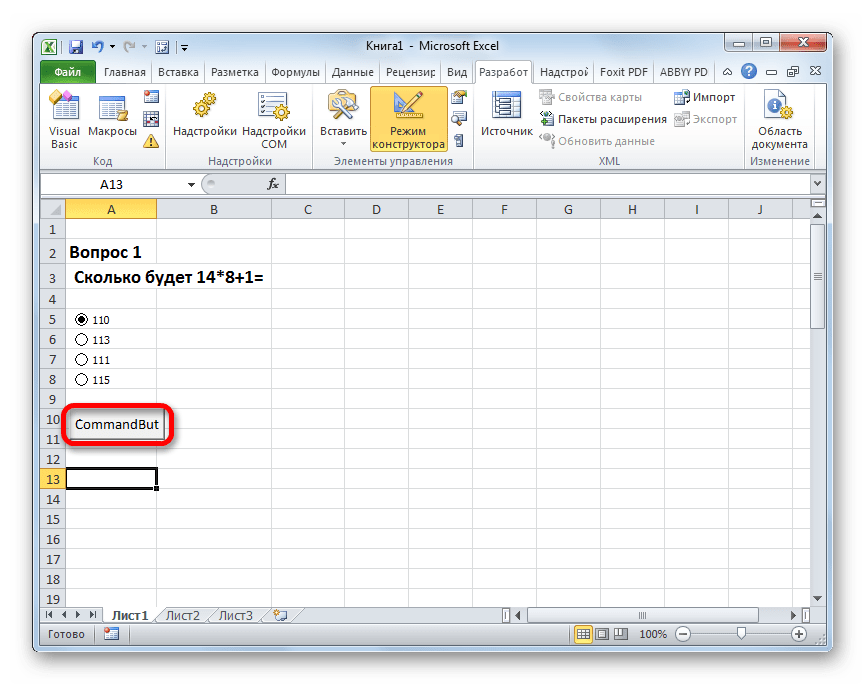
- Кликаем по области документа, которая расположена ниже введенных ранее данных. После этого на ней отобразится нужный нам объект.
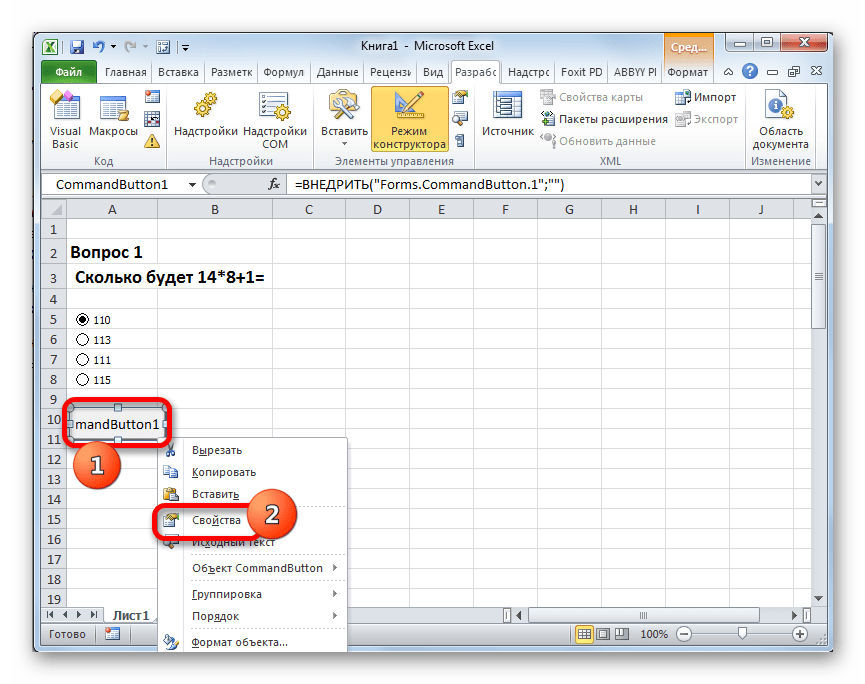
- Теперь нам нужно поменять некоторые свойства образовавшейся кнопки. Кликаем по ней правой кнопки мыши и в открывшемся меню выбираем позицию «Свойства».
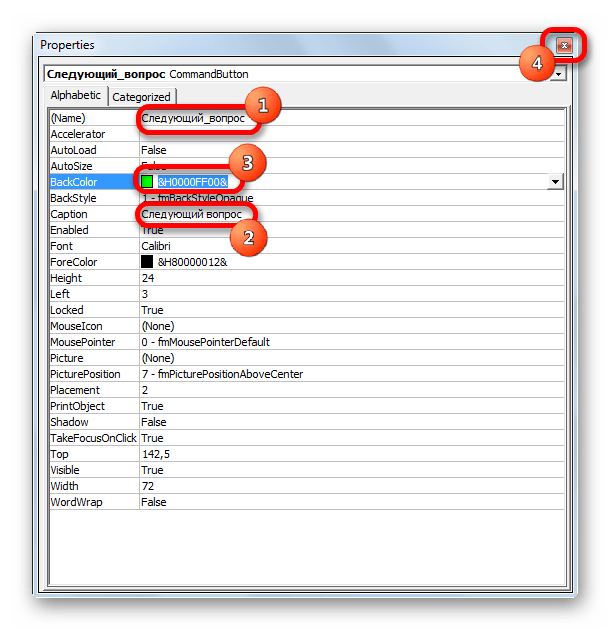
- Открывается окно свойств элемента управления. В поле «Name» меняем название на то, которое будет более актуальным для этого объекта, в нашем примере это будет наименование «Следующий_вопрос». Заметьте, что в данном поле не допускается наличие пробелов. В поле «Caption» вписываем значение «Следующий вопрос». Тут уже пробелы допускаются, и именно это наименование будет отображаться на нашей кнопке. В поле «BackColor» выбираем цвет, который будет иметь объект. После этого можно закрывать окно свойств, нажав на стандартный значок закрытия в его верхнем правом углу.
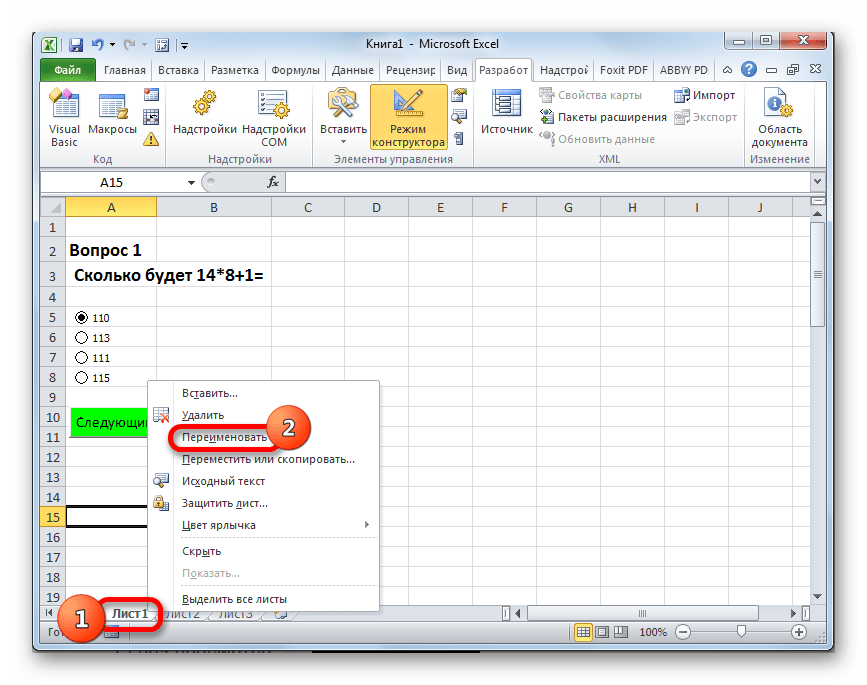
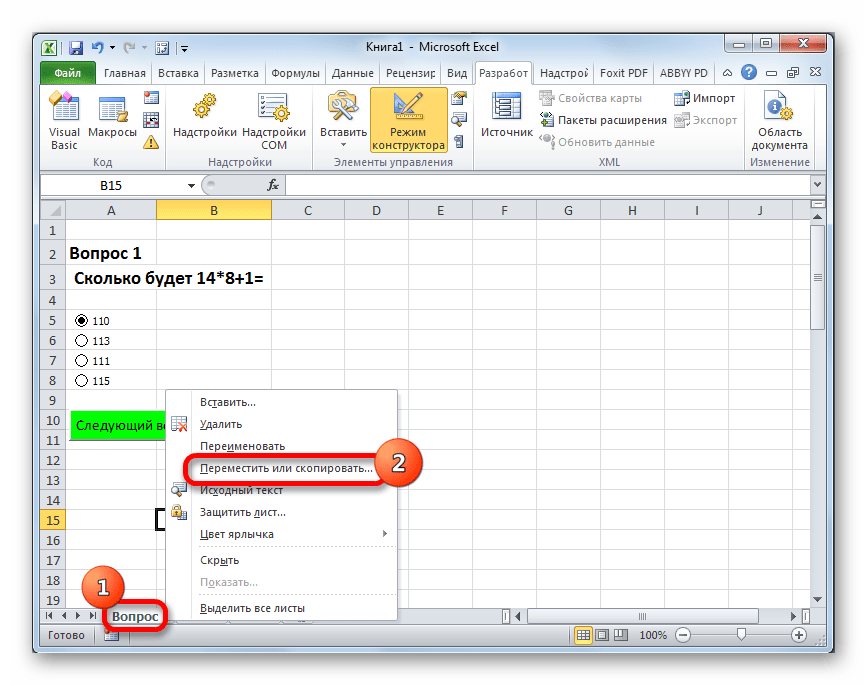
- Теперь кликаем правой кнопкой мыши по наименованию текущего листа. В открывшемся меню выбираем пункт «Переименовать».
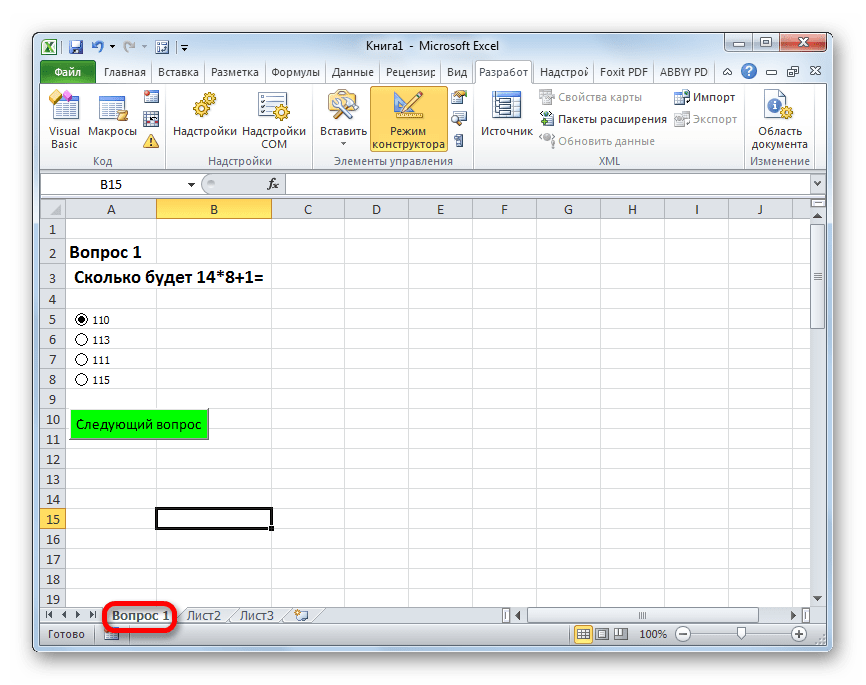
- После этого наименование листа становится активным, и мы вписываем туда новое название «Вопрос 1».
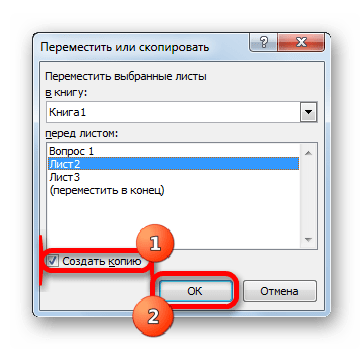
- Опять кликаем по нему правой кнопкой мыши, но теперь в меню останавливаем выбор на пункте «Переместить или скопировать…».
- Запускается окно создания копии. Устанавливаем в нем галочку около пункта «Создать копию» и жмем на кнопку «OK».
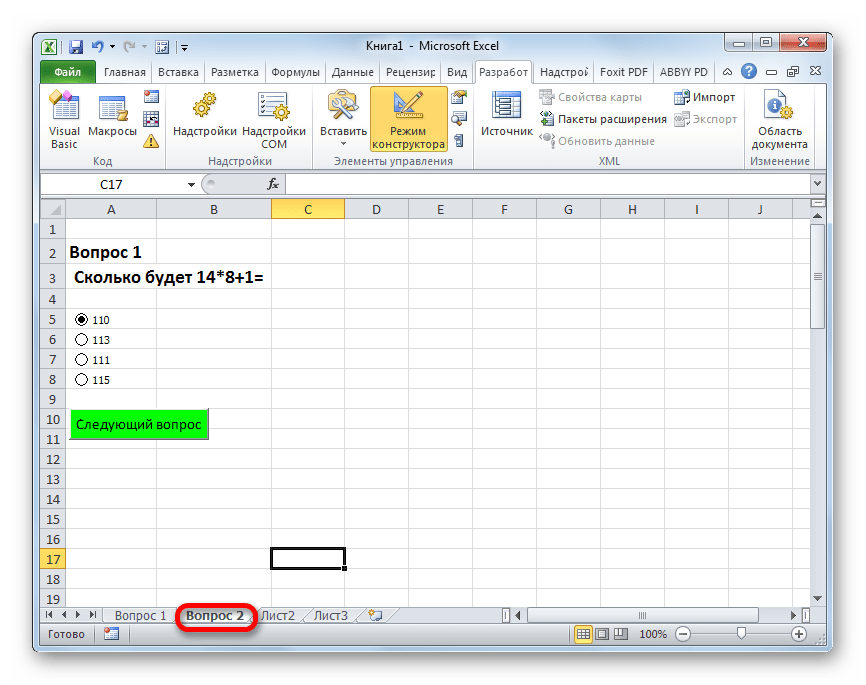
- После этого изменяем название листа на «Вопрос 2» тем же способом, как это делали ранее. Данный лист пока содержит полностью идентичное содержимое, что и предыдущий лист.
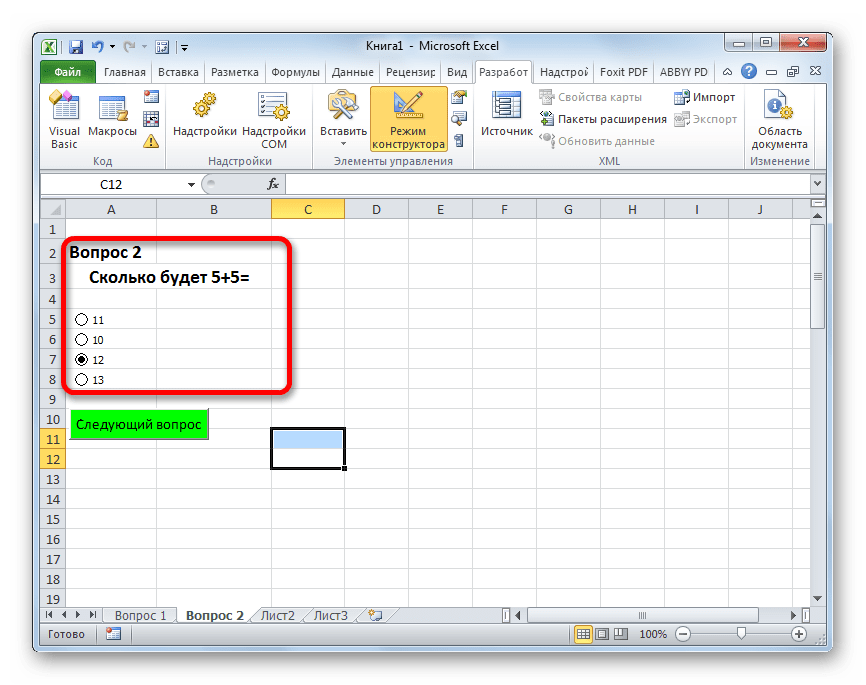
- Меняем номер задания, текст, а также ответы на этом листе на те, которые считаем нужными.
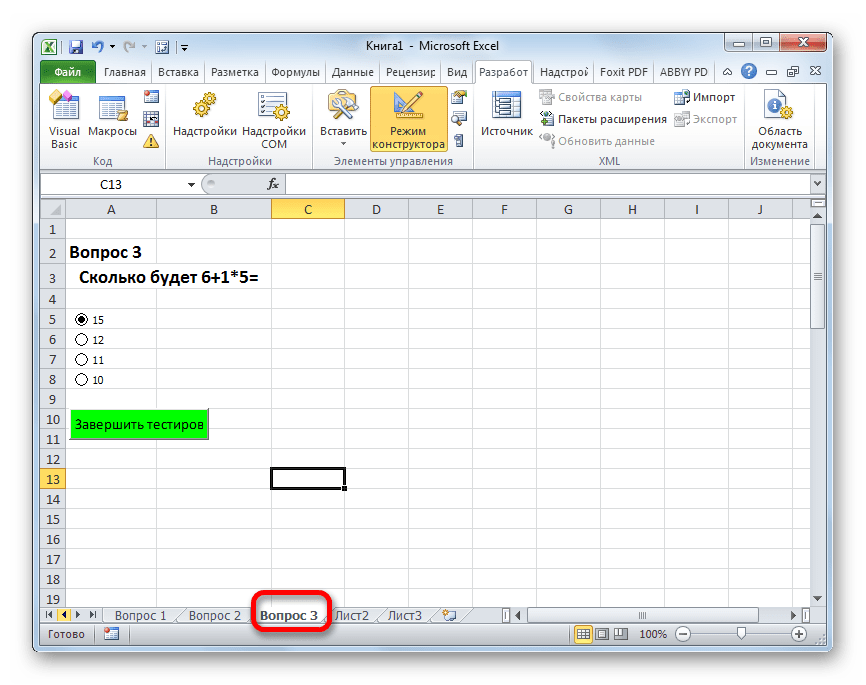
- Аналогичным образом создаем и изменяем содержимое листа «Вопрос 3». Только в нем, так как это последнее задание, вместо наименования кнопки «Следующий вопрос» можно поставить название «Завершить тестирование». Как сделать это уже обсуждалось ранее.
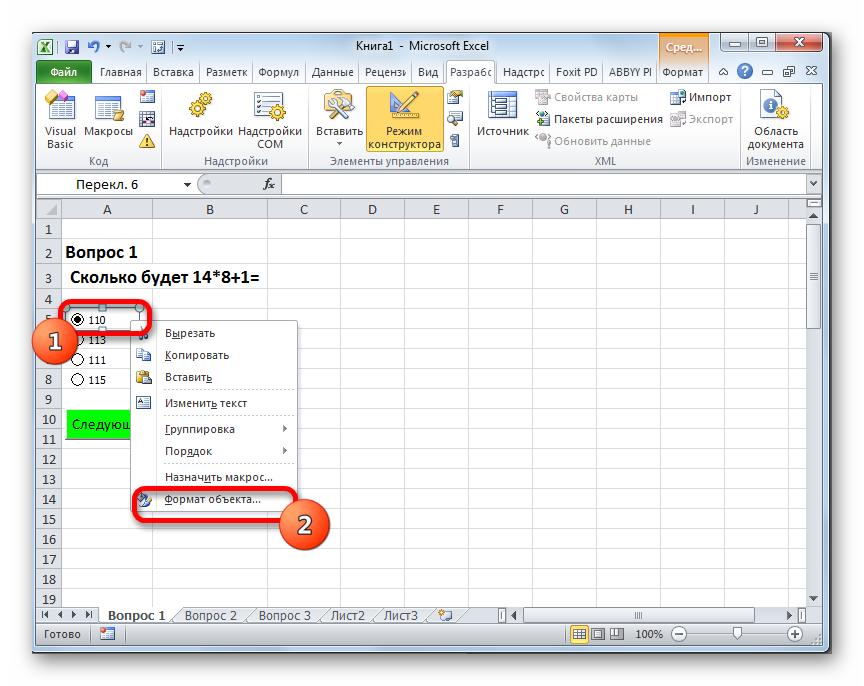
- Теперь возвращаемся на вкладку «Вопрос 1». Нам нужно привязать переключатель к определенной ячейке. Для этого щелкаем правой кнопкой мыши по любому из переключателей. В открывшемся меню выбираем пункт «Формат объекта…».
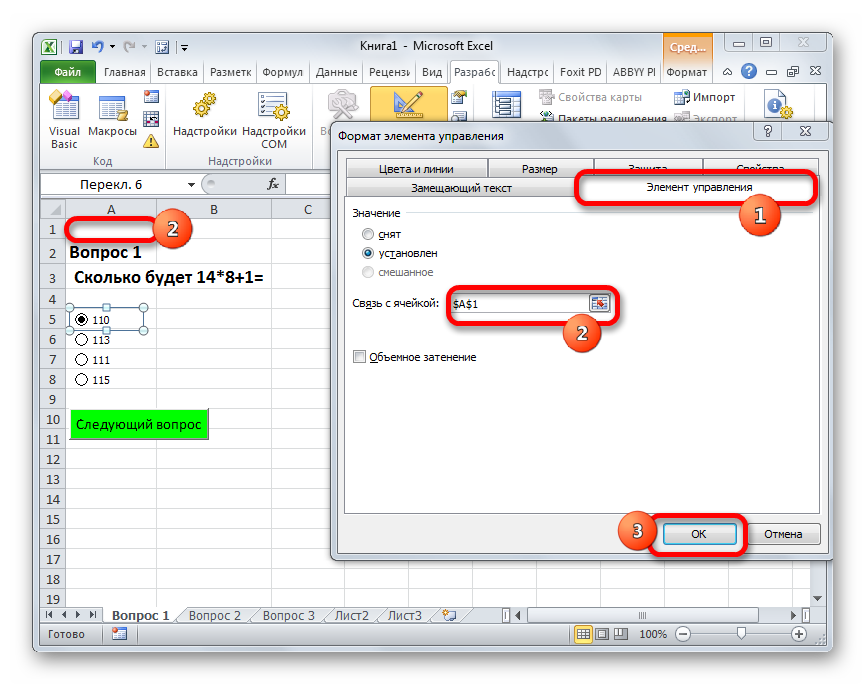
- Активируется окно формата элемента управления. Перемещаемся во вкладку «Элемент управления». В поле «Связь с ячейкой» устанавливаем адрес любого пустого объекта. В него будет выводиться число в соответствии с тем, какой именно по счету переключатель будет активен.
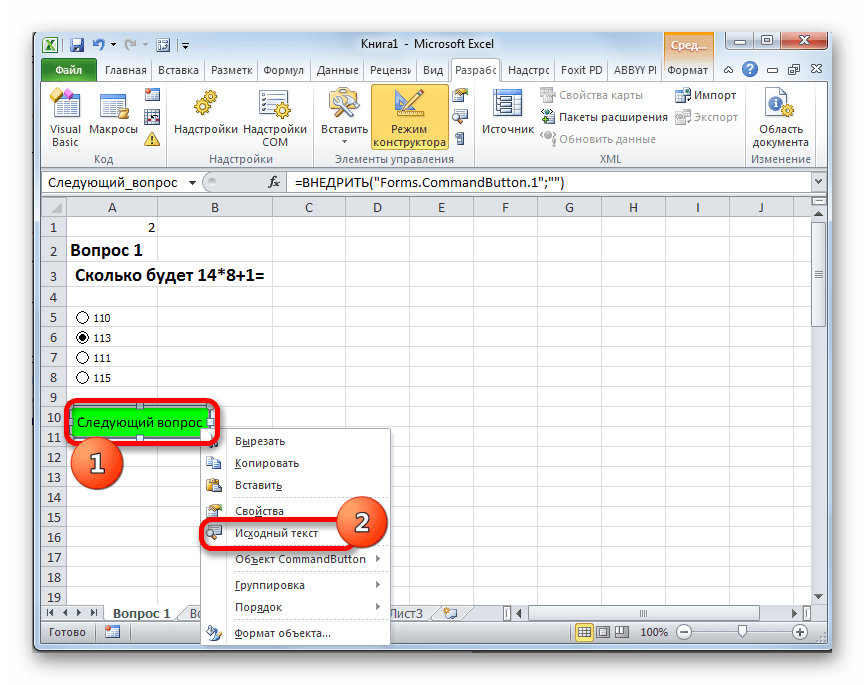
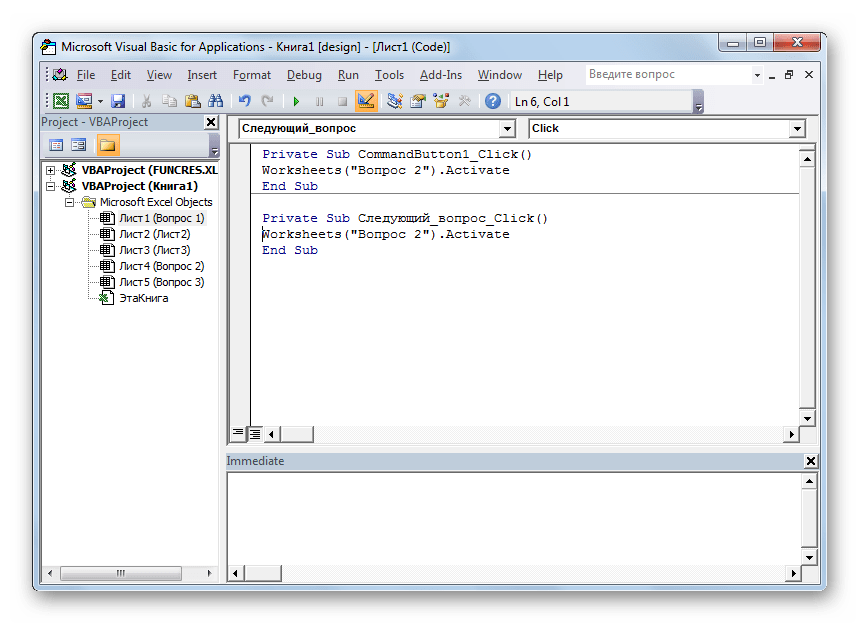
- Аналогичную процедуру проделываем и на листах с другими заданиями. Для удобства желательно, чтобы связанная ячейка находилась в одном и том же месте, но на разных листах. После этого опять возвращаемся на лист «Вопрос 1». Кликаем правой кнопкой мыши по элементу «Следующий вопрос». В меню выбираем позицию «Исходный текст».
- Открывается редактор команд. Между командами «Private Sub» и «End Sub» нам следует написать код перехода на следующую вкладку. В указанном случае он будет выглядеть так:
Worksheets("Вопрос 2").ActivateПосле этого закрываем окно редактора.
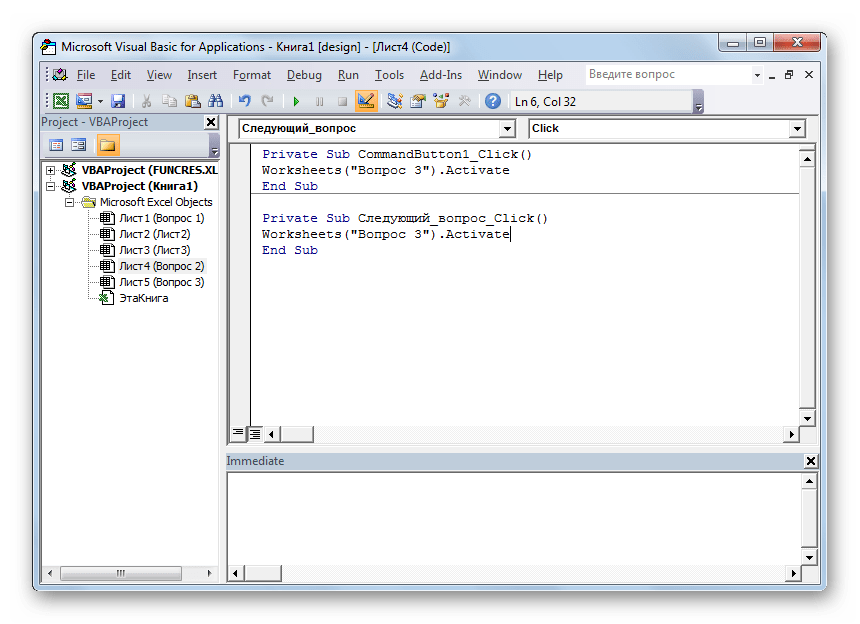
- Аналогичную манипуляцию с соответствующей кнопкой делаем на листе «Вопрос 2». Только там вписываем следующую команду:
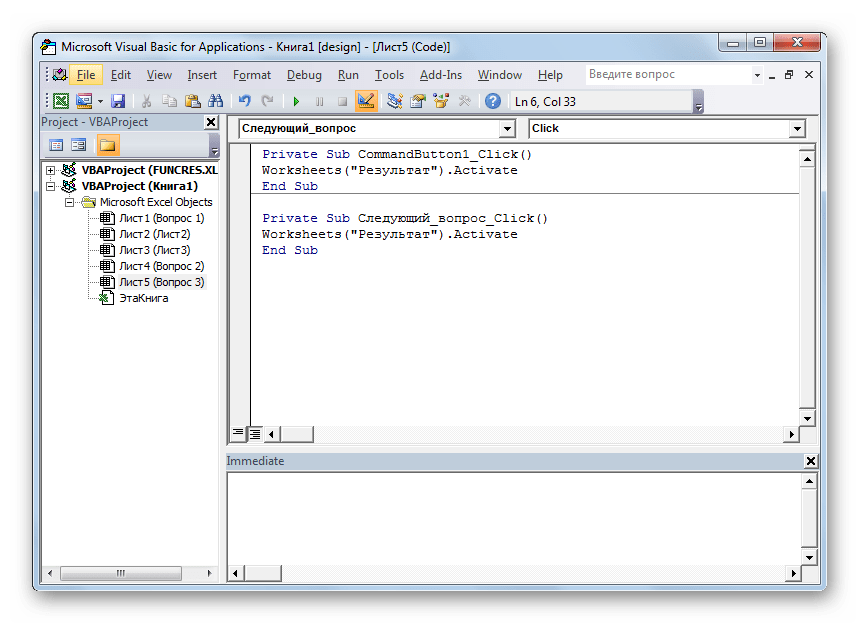
Worksheets("Вопрос 3").Activate - В редакторе команд кнопки листа «Вопрос 3» производим следующую запись:
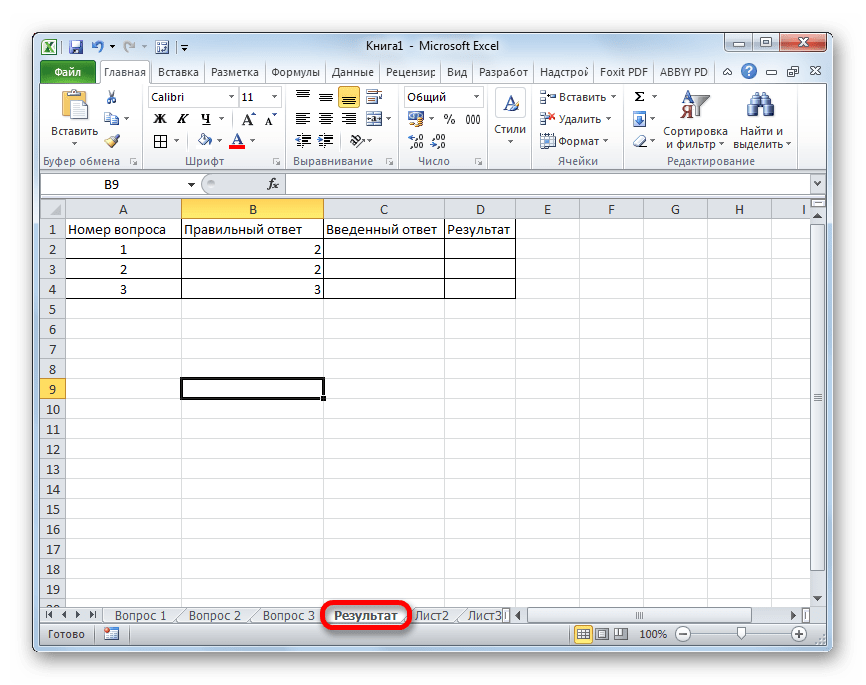
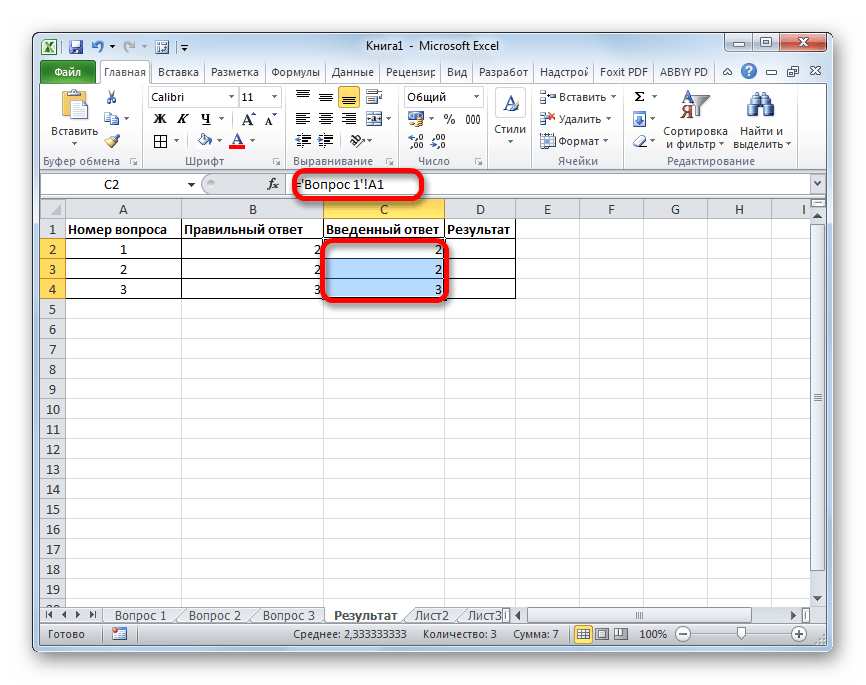
Worksheets("Результат").Activate - После этого создаем новый лист под названием «Результат». На нем будет отображаться результат прохождения теста. Для этих целей создаем таблицу из четырёх колонок: «Номер вопроса», «Правильный ответ», «Введенный ответ» и «Результат». В первый столбец вписываем по порядку номера заданий «1», «2» и «3». Во втором столбце напротив каждого задания вписываем номер положения переключателя, соответствующий правильному решению.
- В первой ячейке в поле «Введенный ответ» ставим знак «=» и указываем ссылку на ту ячейку, которую мы связали с переключателем на листе «Вопрос 1». Аналогичные манипуляции проводим с ячейками ниже, только для них указываем ссылки на соответствующие ячейки на листах «Вопрос 2» и «Вопрос 3».
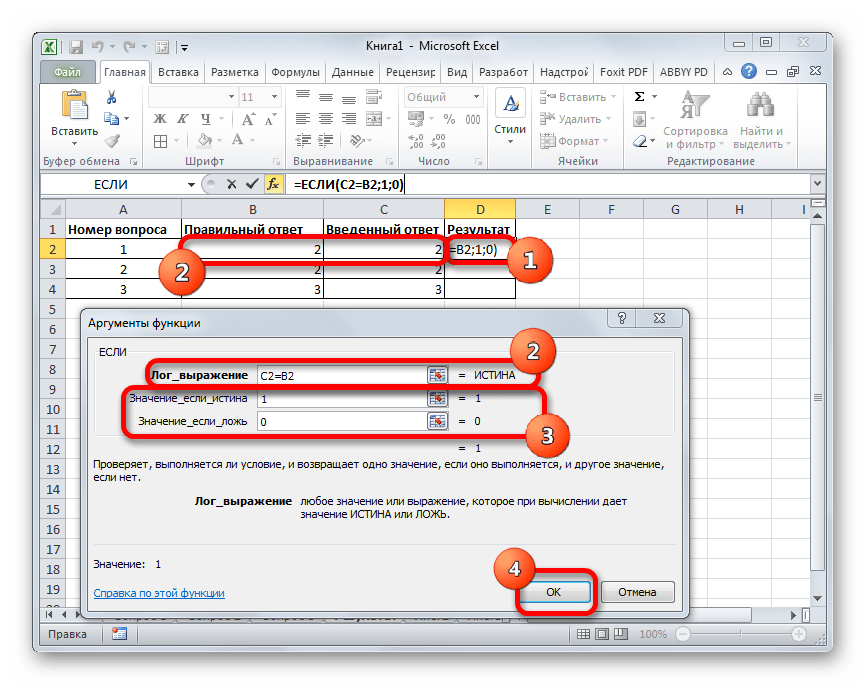
- После этого выделяем первый элемент столбца «Результат» и вызываем окно аргументов функции ЕСЛИ тем же способом, о котором мы говорили выше. В поле «Логическое выражение» указываем адрес ячейки «Введенный ответ» соответствующей строки. Затем ставим знак «=» и после этого указываем координаты элемента в столбце «Правильный ответ» той же строки. В полях «Значение если истина» и «Значение если ложь» вводим числа «1» и «0» соответственно. После этого жмем на кнопку «OK».
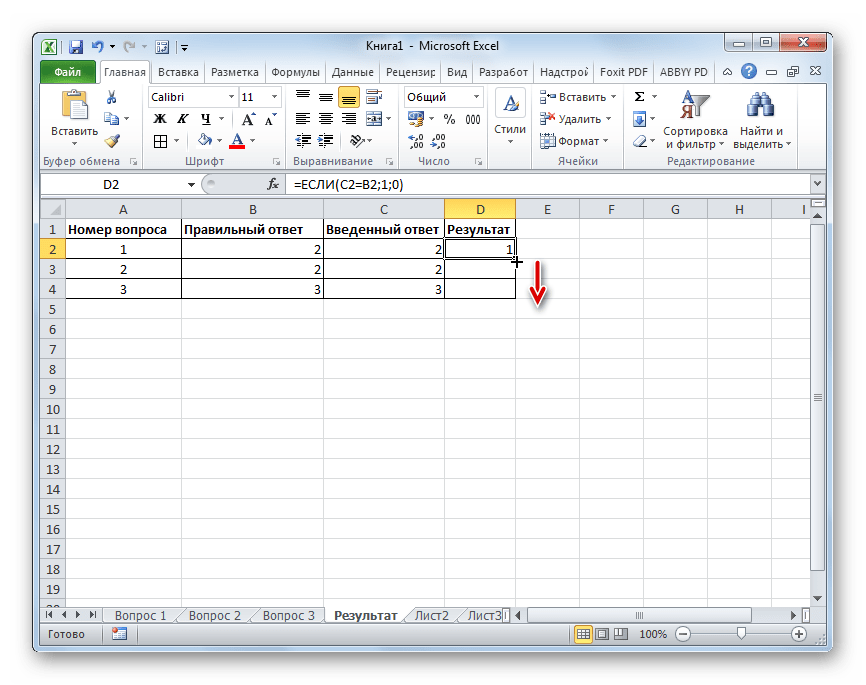
- Для того, чтобы скопировать данную формулу на диапазон ниже, ставим курсор в правый нижний угол элемента, в котором располагается функция. При этом появляется маркер заполнения в виде крестика. Жмем на левую кнопку мыши и тянем маркер вниз до конца таблицы.
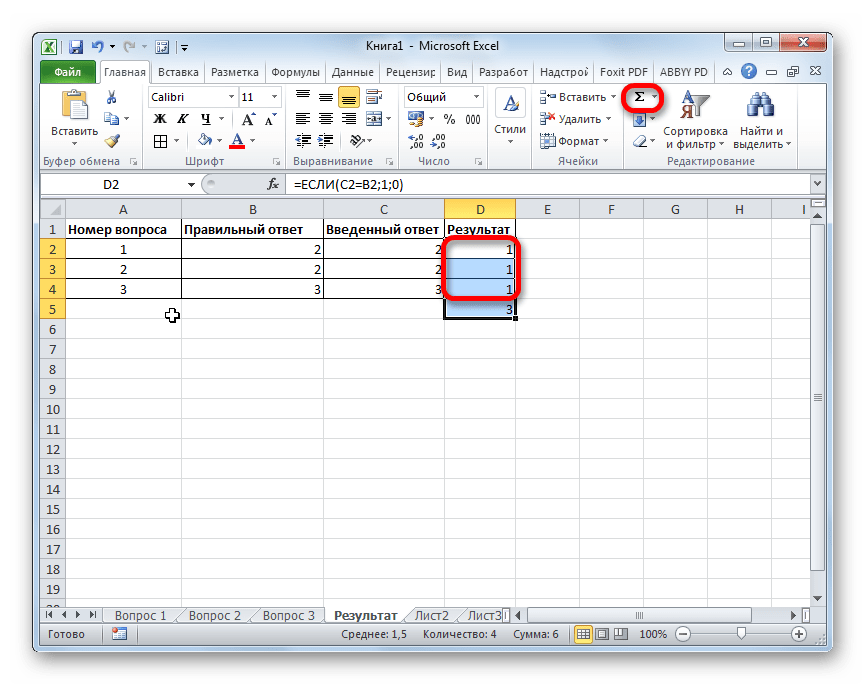
- После этого для подведения общего итога применяем автосумму, как это уже делали не один раз.
На этом создание теста можно считать завершенным. Он полностью готов к прохождению.
Мы остановили внимание на различных способах создания тестирования с помощью инструментов программы Excel. Конечно, это далеко не полный перечень всех возможных вариантов создания тестов в этом приложении. Комбинируя различные инструменты и объекты, можно создать тесты абсолютно непохожие друг на друга по функционалу. В то же время нельзя не отметить, что во всех случаях при создании тестов используется логическая функция ЕСЛИ.
Еще статьи по данной теме:
Помогла ли Вам статья?
45 Free Microsoft Excel Tests & Answer Explanations – We have the Excel Test Prep for you! Excel 2010 Training Online
Microsoft Excel Training Online
Excel 2010 Tests Index Page
10 Question Multiple Choice Tests ~ Quizzes & matching Tutorials
Excel Test Questions and Answers with Explanations
Whether you are studying for an Excel assessment test, skills test or Microsoft Excel Exam you can build your confidence & Excel skills with these free online Practice Tests written by highly qualified Excel expert trainers
without logging in!
Excel for Beginners to Advanced Excel Training. Do the Test then study the Tutorial if you need to…or do the Tutorial then Test yourself!
1. MS EXCEL SHORTCUTS – Excel Keyboard Shortcuts Tests – 7 Excel 2010 Tests
2. LEARN EXCEL BASICS – Excel for Beginners Tests – 7 Excel 2010 Tests
3. ENTERING DATA IN EXCEL TESTS – 4 Excel 2010 Tests
4. EXCEL FORMULAS & FUNCTIONS TESTS – 8 Excel 2010 Tests
5. EXCEL SPREADSHEET & WORKSHEET TESTS – 4 Excel 2010 Tests
6. CHARTS IN EXCEL TEST – 1 Excel 2010 Test
7. PRINTING EXCEL SPREADSHEETS & WORKSHEETS TESTS – 2 Excel 2010 Tests
8. MACROS IN EXCEL TEST – 1 Excel 2010 Test
9. WORKING WITH DATA IN EXCEL TESTS – 10 Excel 2010 Tests
10. IMAGES IN EXCEL & GRAPHICAL ELEMENTS TEST – 1 Test
* EXCEL RESOURCES AND ARTICLES
GO TO EXCEL 2016 TUTORIALS & TESTS
1. EXCEL SHORTCUTS TESTS
EXCEL KEYBOARD SHORTCUTS
- Free Excel 2010 Training
- 7 Online Tests
- Multiple choice Excel Test Questions & Answers with Explanations
Learn the best Excel shortcut keys from beginner to advanced
Just memorizing one pivotal keyboard shortcut could save you a heap of time!
1-1. Easy Excel Shortcuts Test
Excel Shortcut Keys for Beginners
Easy Excel Shortcuts Everyone Should Know! Excel shortcut keys make performing tasks that you frequently perform in Excel, quick and easy. A number of keyboard combinations provide quick access to specific tasks. Sharpen your Excel skills with this Excel test.
1-2. Intermediate Excel Shortcuts Test – Excel Hotkeys
Excel Keyboard Shortcuts streamline tasks that you frequently perform in Excel by allowing you to quickly access specific functions. Memorizing a couple of essential shortcut key combinations could save you time and frustration and could even assist you in using different versions of Excel as most shortcut keys have not changed in the last decade!
1-3. Excel Shortcuts for Worksheets Test
Excel Keyboard Shortcuts – Hotkeys
- Shortcuts for Moving Around Cells
- Shortcuts for Moving to the Beginning and End of Data
- Shortcuts for Selecting Rows and Columns
- Shortcuts for The Go To Dialogue Box
- Shortcuts to Undo and Redo
Part of working smarter and not harder in Excel means becoming a pro at using Excel shortcut keys to move and make selections in the worksheet. Improve your Excel skills with the free Multiple Choice Excel Test Questions and Answers Quiz (with Explanations).
1-4.
Excel Shortcuts for Cell Contents Test
Excel Keyboard Shortcuts – Hotkeys
Shortcuts to Undo and Redo- Shortcuts to Cut, Copy, Paste and Edit Cell Contents
- Shortcuts to Insert Comments and Hyperlinks
- Shortcuts to Insert Dates and Times
- Shortcuts to Display Cell Value or Formula
Part of working smarter and not harder in Excel means becoming a pro at using keyboard shortcuts to cut, copy, paste, and format the contents of the cells. Improve your Excel proficiency with the free Multiple Choice Excel Test Questions and Answers Quiz (with Explanations).
1-5. Excel Shortcuts for Inserting & Deleting Rows, Columns & Cells Excel Test
- Selecting Rows and Columns
- Deleting Rows and Columns
- Excel Insert Row Shortcut and Insert Column Shortcut
- Resizing Rows and Columns
Learn Excel shortcut keys and work smarter not harder. The Excel shortcut inset row, delete row, columns and cells as well as adjust column width and row height are ones you will use every day. Improve your Excel proficiency with this free Excel Quiz. Improve your Excel skills with the free Multiple Choice Excel Test Questions and Answers Quiz (with Explanations).
1-6. Excel Shortcuts for Formatting Numbers Test
(Excel Keyboard Shortcuts – Hotkeys)
- Shortcuts for Applying Formats
- Shortcuts for General Number & Scientific Number Formats
- Shortcuts for Time and Date Format
- Shortcuts for Percentage Format
- Shortcuts for Currency Format
Learn Excel formatting shortcuts and save yourself enough time for a well earned coffee break! Improve your Excel proficiency with the free Multiple Choice Excel Test Questions and Answers Quiz (with Explanations).
1-7. Excel Formulas Shortcuts Test
(Excel Keyboard Shortcuts – Hotkeys)
- Shortcuts for Autosum
- Shortcuts for Copy Formulas Down
- Shortcuts for Insert Functions, Formulas and Arguments
- Shortcuts for Array Formulas
- Shortcuts for Calculate the Worksheet
Part of working smarter and not harder in Excel means becoming a pro at using keyboard shortcuts to to enter formulas. Improve your Excel skills with the free Multiple Choice Excel Test Questions and Answers Quiz (with Explanations).
2. LEARN EXCEL BASICS – EXCEL FOR BEGINNERS TESTS
- Basic Excel Skills – The best way to learn Excel Online
- Free Excel 2010 Training
- 7 Online Multiple Choice Excel Tests with Answers
These multiple choice tests are a great way to prepare for
an Excel assessment test.
2-1. Excel Basics Test
- Parts of the Excel Screen
- Columns, Rows, Cells
- Parts of the Worksheet
Starting out in Excel it’s important to identify and understand all what you see on the screen. The Ribbon, Tabs, the Quick Access Toolbar, the Name Box, the Formula Bar, Column and Row Labels, Cells and Cell Addresses and the Worksheet Tabs. Test your Excel skills with the free Basic Excel Test – 10 Question Multiple Choice Excel Quiz with Answers and Answer Explanations.
2-2. Using the File Tab Excel Test
- Saving and Opening a Workbook
- Creating a New Workbook
- Recent Places
- Print Preview
An overview of the common tasks that can be completed using the File Tab aka The Backstage View including the list of recent documents, using pushpins to keep documents at the top of the list, print and print preview, and save and save as. Test your Excel skills with the free 10 Question Multiple Choice Excel Quiz with Answers and Answer Explanations.
2-3. The Views in Excel Test
- Normal View
- Page Layout View
- Page Break Preview
- Zoom Options
There are different ways to view your worksheet depending on what you want to do. Understanding and using the different views in Excel can make your work much easier. This includes Normal, Page Layout, Page Break views and the Zoom feature.Test your Excel skills with the free 10 Question Multiple Choice Excel Quiz with Answers and Answer Explanations.
2-4. Moving Around the Worksheet Excel Test
- Navigating Around a Worksheet
- Selection Methods
- The Go To Function
Excel worksheets can be quite big and contain multiple columns and rows of data. Knowing how to use the mouse, keyboard and Go To features as well as how to select columns, rows and multiple cells makes using Excel much easier and can save you a lot of time. Test your Excel skills with the free 10 Question Multiple Choice Excel Quiz with Answers and Answer Explanations.
2-5. Using the Ribbon Excel Test
- How is the Ribbon organized?
- How are Tabs organized?
- What are Contextual Tabs?
- Identifying Groups on the Ribbon
- Show/ Hide the Ribbon
The Ribbon replaces the old Menu system. Learn how the tabs are organized into groups, how to open the group dialog box and how to hide the ribbon.
2-6. Customizing the Quick Access Toolbar Test
- What is the Quick Access Toolbar?
- Move the Quick Access Toolbar
- Customize the Quick Access Toolbar
- Organize buttons on the Quick Access Toolbar
The Quick Access Toolbar can be customized with your most frequently used buttons. Learn how to add, delete and change the position of the buttons you use the most.
2-7. The Excel Screen Test
Getting to know the Excel screen like the proverbial ‘back of your hand’ will make every other part of Excel easier. Knowing the correct names for different areas on the screen will assist you in understanding tutorials and Microsoft Office help answers and is well worth investing time in.
BACK TO TOP of page
3. ENTERING DATA IN EXCEL TESTS
- Free Excel 2010 Training
- 4 Free Online Tests with Answer Explanations
3-1. Basic Data Entry and Navigation Excel Test
- Navigating a Sheet
- Entering Text and Numbers
- Editing Text and Numbers
- Deleting Text and Numbers
Nothing is more fundamental to using Excel than knowing how to enter, edit and delete text and numbers in cells. Test your Excel skills with the free 10 Question Multiple Choice Excel Quiz with Answers and Answer Explanations.
3-2. Copying and Pasting Excel Test
- Copying and Pasting
- Using the Fill Handle To Copy
- Drag And Drop
- Undo And Redo
In Excel you will frequently copy and paste text and numbers using keyboard shortcuts, the right mouse button, the fill handle and the drag and drop functions. Using the copying and pasting functions in Excel will not only save you time from having to re-enter data repeatedly, it may also ensure more accurate data entry and less frustration. Test your Excel skills with the free 10 Question Multiple Choice Excel Quiz with Answers and Answer Explanations.
3-3. Using Autofill Excel Test
- What Is Autofill?
- Autofill Day And Month Series
- Autofill Number Sequences
- Autofill Custom Lists
You type in Monday and Excel will type in the rest of the days. You can do the same with dates and numbers using the fill handle and Auto Fill feature. You can even create your own list. This is a great time saver. Test your Excel skills with the free 10 Question Multiple Choice Excel Quiz with Answers and Answer Explanations.
3-4. Formatting Text
Excel Test
* Experimenting with Font Options
* Fitting Text to a Cell
* Setting Text Alignment
* Copy Formatting
Formatting is the key. This includes changing the appearance of the data including the font, font color, text alignment, merging cells, wrapping text and using the fit to cell feature. You can copy formatting by using the Format Painter. Test your Excel skills with the free 10 Question Multiple Choice Excel Quiz with Answers and Answer Explanations.
BACK TO TOP of page
4. FORMULAS IN EXCEL – FUNCTIONS IN EXCEL TESTS
- Free Excel 2010 Training tests cover Excel Formulas & Excel Functions
- 8 Online Excel Functions and Formulas Tests with Answer Explanations
4-1. Basic Excel Formulas Test
- Understanding Cell References in Excel
- Add in Excel – SUM Function in Excel – Adding Values in Excel
- Subtract in Excel –
Subtracting Values in Excel - Multiply in Excel – Multiply Values – Divide in Excel – Divide Values
Brush up on your Microsoft Excel skills with these powerful and dynamic arithmetic formulas and functions that differentiate Excel from simply, for example, using a table in a Word document or a sheet of paper to list number values. A good place to start is with getting to know how cell references work. Experiment with getting Excel to work for you by learning how to use the Add, Subtract, Multiply, Divide, SUM and AutoSum formulas and functions. Test your Excel skills with the free 10 Question Multiple Choice Excel Quiz with Answers and Answer Explanations.
4-2. Excel Copying Formulas and using Relative and Absolute Cell References Test
- The Fill Handle Excel 2010
- Copying and Pasting Formulas in Excel
- Drag and Drop in Excel
- Absolute and Relative References in Excel
To get the math correct every time you have to understand Absolute and Relative cell references when creating, copying and moving formulas. Copying formulas using the fill handle saves a lot of time. So does knowing how to change the formula to its actual value. Test your Excel skills with the free 10 Question Multiple Choice Excel Quiz with Answers and Answer Explanations.
4-3. Formatting Numbers Excel Test
- General Formatting in Excel
- How to change Decimal Places in Excel
- How to change Currency in Excel
- Negative Numbers in Excel
- Formatting Dates in Excel – change format of date in Excel
- Formatting Fractions in Excel
You want numbers to appear correctly. This is done by formatting numbers for currency, percentage, dates, and fractions including decimal places and negative numbers. Test your Excel skills with the free 10 Question Multiple Choice Excel Quiz with Answers and Answer Explanations.
4-4. Excel Functions Test
- How to Find an Excel Function
- How to Insert an Excel Function
- How to Edit an Excel Function
- Common Excel Functions – Sum and Count
- Sum function in Excel
- Count function in Excel
Functions are predefined formulas that are the powerhouse behind Excel. Understanding functions, how Excel organizes functions, and creating functions using the Function dialog box takes Excel beyond basic math. Test your Excel skills with the free 10 Question Multiple Choice Excel Quiz with Answers and Answer Explanations.
4-5. Excel using IF, SUMIF and COUNTIF Test
- What is the purpose of IF statements?
- How to use IF
- How to use COUNTIF
- How to use SUMIF
IF functions in Excel allow you to create formulas based on true or false evaluations. The power of IF, SUMIF and COUNTIF creates dynamic worksheets that provides results based on data being entered, calculated and evaluated removing the manual task of analyzing a worksheet.
4-6. Using Nested IFs, SUMIFs & COUNTIFs in Functions (Advanced) Test
- How to Use Nested IF statements
- How to Use SUMIFs in a Function
- How to Use COUNTIFs in a Function
IF functions such as IF, COUNTIF and SUMIF in Excel allow you to create formulas based on evaluating an argument as either true or false, but what happens if you need to evaluate multiple arguments in a single function? This is where nested IF statements, COUNTIFs and SUMIFs come in.
4-7. Using Nested Functions Test
- Using a Nested IF function
- Using the OR function
- Using the AND function
- Using the NOT function
Nested functions add super powers to your normal formulas and functions and allow you to perform more complex calculations. Nested functions can contain OR, AND, NOT and multiple IF arguments.
4-8. Using Financial Functions Excel Test
- Overview of the PMT Function
- Calculate Monthly Payments (PMT)
- Calculate Interest Rate (Rate)
- Calculate Number of Payments (NPER)
- Calculate Amount You Can Afford to Loan (PV)
Do you know how to use the most popular Financial Functions? PMT (payment for a loan), PV (present value of a loan), RATE (interest rate of a loan) and NPER (number of payments that have to be made to repay a loan).
BACK TO TOP of page
5. EXCEL SPREADSHEET & WORKSHEET TESTS
- Free Excel 2010 Training
- 4 Online Multiple Choice Tests with Answer Explanations
5-1. Excel Basic Worksheet Formatting Test
- Inserting & Deleting Cells, Rows & Columns
- Setting Width & Height for Columns & Rows
- Inserting & Formatting Borders
- Inserting Headers, Footers & Page Numbers
Making your worksheets easy to read and understand is crucial. Formatting is the key. This includes changing the appearance of the worksheet including inserting and deleting columns and rows, changing column widths and row heights, cell color and borders and how to add Headers, Footers and page numbers.
5-2. Excel Advanced Worksheet Formatting Test
- Freeze Window Panes
- Split Screens
- Naming Cell Ranges
- Transposing Rows and Columns
- Inserting Comments
Use freeze panes to always see your column headings, no matter how far down you scroll. Split the worksheet to see two different parts at the same time using the Split Screen function. It can be helpful to name cells and cell ranges rather than referring to a cell by its address. Switching rows and columns gives you another view of your data. Like using a sticky note, inserting comments can help explain your data.
5-3. Protecting Worksheets Excel Test
- Password Protect a Workbook
- Protect a Worksheet from Changes
- Protect a Workbook Structure from Changes
- Unlocking Selected Cells to Allow Edits
Data in an Excel worksheet can be highly confidential when it contains, for example, personal details, salaries or bonuses of staff at a company or even your personal budget. Another security issue is when other viewers or users of the worksheet inadvertently or intentionally change formulas or data without your knowledge and thus compromise the integrity of the data. Excel provides multiple functions to protect your worksheet and data so that other people can’t change some or all of it or access it without prior authorization.
5-4. Working with Multiple Worksheets Excel Test
- Create and Delete Worksheets
- Copy and Move Worksheets
- Format Multiple Worksheets Simultaneously
- Calculate Formulas Across Worksheets
Excel workbooks can have hundreds of worksheets. You could have a worksheet for each month, or each location, or each person. You need to know how to add and delete worksheets, format multiple worksheets at the same time, insert data into multiple worksheets and calculate formulas across worksheets.
BACK TO TOP of page
6. CHARTS IN EXCEL TEST
- Free Excel 2010 Training
- 1 Online Test with Answer Explanations
6-1. Creating and Modifying Excel Charts Test
- Select and Insert a Chart
- Edit Data Ranges for a Chart
- Change Chart Type and Layout
- Formatting a Chart
Charts are a graphical representation of your data. How to create a bar or pie chart. Knowing how to format charts using the Design, Layout and Format tabs to change colors, labels and scale makes you an Excel Chart Wizard!
7. PRINTING EXCEL SPREADSHEETS & WORKSHEETS TESTS
- Free Excel 2010 Training
- 2 Online Tests with Answer Explanations
7-1. Printing Basics Excel Spreadsheets & Worksheets Test
- Print Preview
- Set Paper Size and Layout
- Repeat a Heading Row
- Page Break Preview
Usually you will need to print your worksheet or spreadsheet. Print Preview will let you see what your worksheet will look like when it’s printed. Then you can change margins, paper size and layout, page breaks and column widths and print the cell borders and column headings at the top of each page to make it easy to read.
7-2. Printing Large Excel Worksheets Test
- Scaling a Page for Printing
- Insert Page Breaks
- Move Page Breaks in Page Break Preview Window
- Set Print Area
Sometimes your whole worksheet does not print on one piece of paper. There are modifications you can make to print an Excel worksheet either on one page or at least with all of the columns on one page.
BACK TO TOP of page
8. MACROS IN EXCEL TESTS
- Free Excel 2010 Training
- 1 Online Test with Answer Explanations
8-1. Using Macros Excel Test
- Running a Macro
- Recording a Macro
- Assign a Macro to a Button
- Save a Macro-Enabled Workbook
- Delete a Macro
Macros let you perform the same steps over and over again with the click of a button. How to create and edit macros is easy and makes you an Excel pro.
9. WORKING WITH DATA IN EXCEL TESTS
- Free Excel 2010 Training
- 10 Online Tests with Answer Explanations
9-1. Sort and Filter Data in Excel Test
- Sorting Data Alphabetically or Numerically
- Sorting Data by More Than One Criterion
- Apply and Use a Data Filter
- Advanced Filters
- Removing a Filter
Data in Excel can run into the hundreds and even thousands of lines. You need tools that allow you to organize your data according to specific criteria, for example, alphabetically sort surnames or apply specific filters to a worksheet to only display data that meets specific filter criteria. The sort and filter tools in Excel allow you to organize and manipulate your data quickly and easily.
9-2. Concatenate Function, Convert Text to Columns & Remove Duplicates Excel Test
- How to Use the Concatenate Function
- Convert Text to Columns
- Remove Duplicate Values
Sometimes you need to combine the contents of different cells into one, sometimes you need to split the data in a cell into separate cells. Use the concatenate function to combine words and even numbers that are contained across different columns into one cell. The converse function of concatenate is the Text to Columns function which allows you to separate text across different columns. Excel even has a built-in function to remove duplicate values to ensure your data is free from repeat entries.
9-3. Conditional Formatting Excel Test
- What is Conditional Formatting?
- Highlight Cell Rules
- Top and Bottom Rules
- Manage Rules
- Remove Rules
Conditional Formatting lets you highlight data. You can apply different formatting to a cell or cells that meet your specific conditions i.e. all cells over $5000 or the top 10 items or all of the cells within a date range. This can help you focus on what’s really important.
9-4. Using Data Outline Tools Test
- Creating an Outline
- Viewing Sections of an Outline
- Inserting Subtotals
- Clearing an Outline
When analyzing worksheets containing multiple rows of data and different categories it can be difficult to get a quick overview of data. Outline tools such as Group and Subtotal give you quick results when looking for answers in your data.
9-5. What-If Analysis Excel Test
- Using Goal Seek
- Activating Solver
- Using Solver
- Working with Data Tables
Ever wonder what would happen if you changed a number in a formula? A What-if analysis lets you see how those changes will affect the outcome of the formula. Use Solver, data tables, and Goal Seek to test multiple values and see how the results change.
9-6. Using Data Validation Tools Excel Test
- What is Data Validation?
- Numbers, Dates & Time Validation Criteria
- Data Validation Lists
- Input Messages
- Removing a Filter
- Removing Data Validation
To analyze data in Excel, the data must be entered consistently. If you type “yes” for one instance but “Y” in another instance, you will not be able to analyze the data easily. Data analysis tools ensure that values are entered in the same format where specified throughout your worksheet.
9-7. VLOOKUP Test
INDEX-MATCH & VLOOKUP in Excel
- Excel VLOOKUP formula
- Excel INDEX-MATCH formula
- VLOOKUP vs INDEX-MATCH
Formulas like VLOOKUP, and INDEX-MATCH make it possible to look up and match data from one sheet to the next and removes the need to manually find information contained in your worksheets.
9-8. Formulas to Manipulate & Clean Data Excel Test
- Using UPPER, LOWER & PROPER to Change Text Case
- Using TRIM to Remove Extra Spaces
- Using LEFT & RIGHT Function to Extract Characters
Text is not always in exactly the right format that you need it. Sometimes you need to change the case of words to upper or lower case or remove extra spaces or characters. Doing this manually can take up a lot of time and can lead to data entry errors. Formulas allow you to perform the above functions in record time.
9-9. Data Forms Excel Test
- What are Data Forms?
- How to Enable Data Forms
- Using Data Forms to Find Entries
- Using Data Forms to Create Entries
- Using Data Forms to Edit or Delete Entries
When you have to do a lot of data entry, it may be easier and more efficient to do it in a Data Form rather than on the actual worksheet. Data Forms allow you to find data, view entries, add and delete data to a worksheet with a user-friendly form.
9-10. Pivot Tables Excel Test
- What is a Pivot Table?
- Inserting a Pivot Table
- Pivot Table Fields
- Using a Report Filter
By moving the data Pivot Tables let you organize, analyze and summarize large amounts of data in lots of different ways.
BACK TO TOP of page
10. IMAGES IN EXCEL & GRAPHICAL ELEMENTS TEST
- Free Excel 2010 Training
- 1 Online Tutorial & 1 Test with Answer Explanations
10-1. Working with Images & Graphical Elements Excel Test
- How to Insert an Image
- How to Insert Shapes
- Working with SmartArt
- Changing the Background Color
Just because a worksheet contains a lot of numbers or data does not mean it cannot look good. You can insert images and shapes, background colors and use SmartArt to make a worksheet in Excel visually more appealing.
* EXCEL RESOURCES AND ARTICLES
Excel Training
Excel Training & Excel MOS Exams Explained
Top 10 Microsoft Excel Templates for highly effective people
Packaged as part of the Microsoft Office 2016 suite as well as Office 365, Excel 2016 is a powerful productivity tool with some mind-blowing features. MS Excel spreadsheets are not only great for financial workbooks and budgets, it can also be used for creating calendars and schedules, fitness tracker, invoices, to do lists, weight loss tracker, vehicle service logs, address lists and much more.
How to use Excel – What is Microsoft Excel? What can Microsoft Excel be used for? What are the benefits of using Microsoft Excel to perform the above functions?
What MS Excel Training is best for you? Quiz.– Being aware of what kind of Excel user you are, what you wish to use the program for, how often you use it and at what level you currently are (for example Novice, Intermediate or Expert), could act as a guide for the type of training you need to pursue.
What Version of Excel are you using? Find out how to find out!