
Word for Microsoft 365 Word for Microsoft 365 for Mac Word 2021 Word 2021 for Mac Word 2019 Word 2019 for Mac Word 2016 Word 2016 for Mac Word 2013 Word 2010 Word for Mac 2011 More…Less
Text boxes and most shapes can include text in them. The text can be positioned horizontally or vertically, and it can appear on one line or wrap to multiple lines.
You can change the direction of the text, and you can also change the margins of text boxes and shapes for optimal spacing, or resize shapes for a better text fit.
Specify text direction in a shape or text box
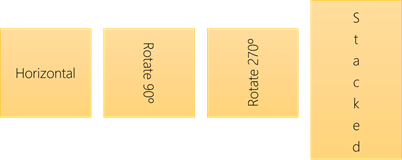
In a shape or text box, you can change the direction in which text is read. That is, you can pivot text 90 or 270 degrees so that it appears sideways.
-
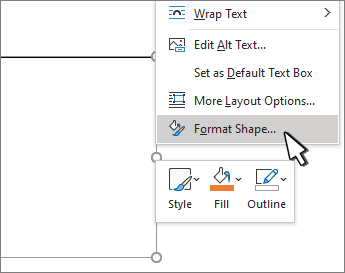
Right-click the edge of the shape or text box.
-
On the shortcut menu, select Format Shape.

-
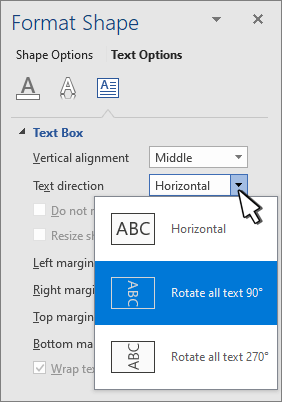
In the Format Shape pane, click Size/Layout & Properties
. -
Under Text Box, select the option that you want in the Text direction list.
 .
.
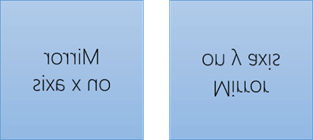
Rotate (mirror) text in a shape or text box
-
Right-click the box or shape and select Format Shape.
-
In the Format Shape pane, select Effects.
-
Select 3-D Rotation and in the X Rotation or Y Rotation box, enter 180.
-
(Optional) If your text box is filled with a color, you can remove the color in the Format Shape pane. Select Fill & Line
, select Fill, and then select No fill. -
(Optional) To remove the text box outline, right-click the text box, select Outline in the mini toolbar that appears, and choose No Outline.
 , select Fill, and then select No fill.
-
Select the paragraph, line of text, shape, or text box that you want to modify.
-
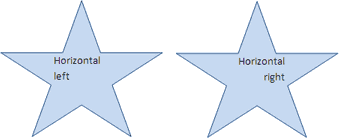
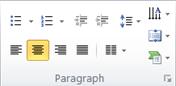
Go to Home and select the horizontal alignment option that you want.
-
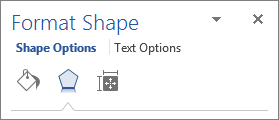
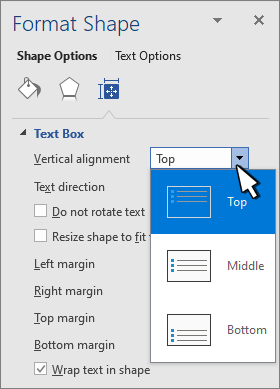
Right-click the border of the shape or text box.
-
On the shortcut menu, select Format Shape.
-
In the Format Shape pane, select Size/Layout & Properties
.
-
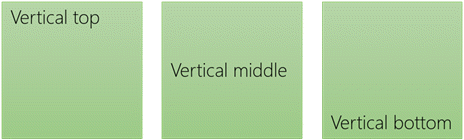
Select the option that you want in the Vertical alignment list.
When text wraps, it automatically continues on a new line as it reaches the right border of the shape or text box.
-
Right-click the border of the shape or text box that contains the text you want to wrap.
-
On the shortcut menu, select Format Shape.
-
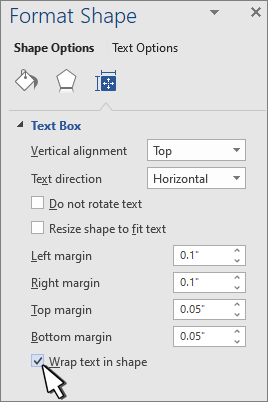
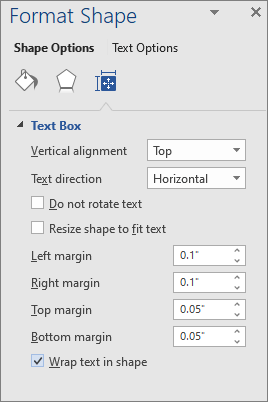
In the Format Shape pane, select Size/Layout & Properties
, and then select Wrap text in shape.
The margin is the distance between the text and the outer border of the enclosing shape or text box.
-
Right-click the border of the shape or text box.
-
On the shortcut menu, select Format Shape.
-
In the Format Shape pane, select Size/Layout & Properties
.
-
Specify a measurement in inches or millimeters (mm) for any of the following margins:
-
Left margin
Distance between the left border of a shape and the leftmost text -
Right margin
Distance between the right border of a shape and the rightmost text -
Top margin
Distance between the top border of a shape and the uppermost text -
Bottom margin
Distance between the bottom border of a shape and the lowest text
-
You can automatically increase the size of a shape or text box vertically so that the text fits inside it.
-
Right-click the border of the shape or text box.
-
On the shortcut menu, select Format Shape.
-
In the Format Shape pane, select Layout & Properties
, select Text Box, and then select Resize shape to fit text.

Tip: You can reduce the size of the text to fit it in the shape or text box by selecting Shrink text on overflow.
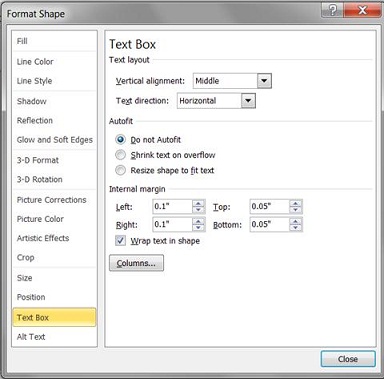
Specify text direction in a shape or text box
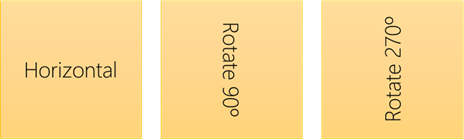
You can change direction of text in a shape or text box. For example, you can rotate text 90 or 270 degrees so that it appears sideways.
-
Right-click the edge of the shape or text box that contains the text.
-
On the shortcut menu, select Format Shape.
-
In the left pane of the dialog box, select Text Box.
-
Under Text layout, select the option that you want in the Text direction list.
-
Select Close.
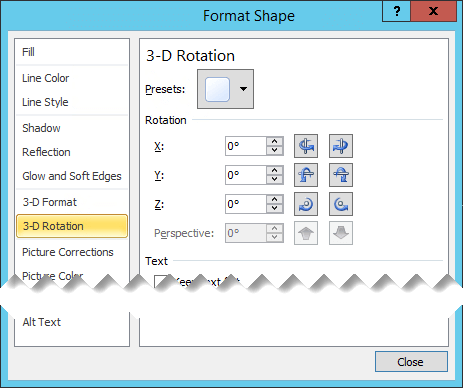
Rotate (mirror) text in a shape or text box
-
Insert a text box or shape in your document, and then type and format your text.
-
Right-click the box or shape and select Format Shape.
-
In the Format Shape dialog box, select 3-D Rotation on the left.
-
In the X box, enter 180.
-
Select Close.
-
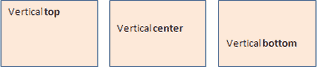
Click or tap in the paragraph, line of text, shape, or text box that you want to modify.
-
On the Home tab, select the horizontal alignment option that you want.
-
Right-click the border of the shape or text box.
-
On the shortcut menu, select Format Shape, and then select Text Box in the left pane.
-
Under Text layout, select the option that you want in the Vertical alignment list.
-
Select Close.
You can automatically increase the size of a shape or text box vertically so that the text fits inside it.
-
Right-click the border of the shape or text box that you want to resize.
-
On the shortcut menu, select Format Shape, and then select Text box in the left pane.
-
Under Autofit, select Resize shape to fit text.
-
Select Close.
Tip: You can reduce the size of the text to fit it in the shape or text box by selecting Shrink text on overflow.
The internal margin is the changeable distance between text and the outer border of a shape or text box.
-
Right-click the border of the shape or text box.
-
On the shortcut menu, select Format Shape, and then select Text Box in the left pane.
-
Under Internal Margin, choose one or more of the following:
-
Left
Specifies the distance between the left border of a shape and the text. -
Right
Specifies the distance between the right border of a shape and the text. -
Top
Specifies the distance between the top border of a shape and the text. -
Bottom
Specifies the distance between the bottom border of a shape and the text.
-
-
Select Close.
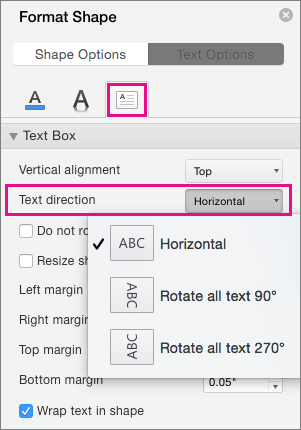
Specify text direction in a shape or text box
-
Control + Click the border of the shape or text box that contains the text, and then select Format Shape.
-
In the Format Shape pane on the right, select Text Options.
-
Select the third icon, Textbox, and then select the option that you want from the Text direction list.
Position text horizontally in a paragraph, text box or shape
-
Click or tap in the paragraph, line of text, shape, or text box that you want to modify.
-
Go to Home, and in the Paragraph group, click the horizontal alignment option that you want.

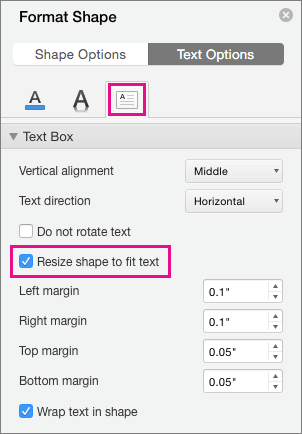
You can automatically increase the size of a text box or shape vertically so that the text fits inside it.
-
Control + Click the border of the shape or text box that you want to resize, and then select Format Shape.
-
In the Format Shape pane on the right, select Text Options.
-
Select Layout & Properties, and then select the check box next to Resize shape to fit text.
By default, the text wraps automatically as you type in a text box or shape. If you don’t want the text to wrap, do the following:
-
Control + Click the shape that contains the text, and then select Format Shape.
-
In the Format Shape pane on the right, select Text Options.
-
Select Layout & Properties, and then clear the check box next to Wrap text in shape.
Specify text direction in a shape, text box, or table cell
-
Enter the text in the shape or text box or table cell, and then select the text.
-
Ctrl+Click the selected text, and then select Format Shape. On the Text Box tab in the dialog box, choose a direction from the Text Direction box.
Position text horizontally in a shape or text box
-
Select the text in the shape or text box.
-
On the Home tab, under Paragraph, select the horizontal alignment button that you want.
(Align Left, Centered, Align Right, Justified, or Distribute Text)

-
Select the text in the shape or text box.
-
On the Home tab, under Paragraph, select
, and then select the vertical alignment that you want.
 , and then select the vertical alignment that you want.
By default, the text wraps automatically as you type in a text box or shape. If you don’t want the text to wrap, do the following:
-
Select the text in the shape or text box.
-
Go to Format > Shape.
-
On the left side of the dialog box, select Text Box.
-
Under Internal Margin, clear the Wrap text in shape check box.
-
Select the text in the shape or text box.
-
Go to Format > Shape.
On the Format menu, select Shape.
-
On the left side of the dialog box, select Text Box.
-
Under Autofit, select Resize shape to fit text.
Need more help?
 Please Note:
This article is written for users of the following Microsoft Word versions: 97, 2000, 2002, and 2003. If you are using a later version (Word 2007 or later), this tip may not work for you. For a version of this tip written specifically for later versions of Word, click here: Changing Text Orientation.
![]()
Written by Allen Wyatt (last updated July 16, 2022)
This tip applies to Word 97, 2000, 2002, and 2003
Word provides you with the capability of changing the orientation of your text, provided that the text is within an AutoShape, text box, or table cell. This means that you can rotate this type of text ninety degrees, in either direction, from its normal appearance. To change text orientation, follow these steps:
- Select the AutoShape, text box, or table cell that contains the text whose orientation you want to change.
- Choose the Text Direction option from the Format menu. Word displays the Text Direction dialog box. (See Figure 1.)
- Choose an orientation from those offered.
- Click on OK.
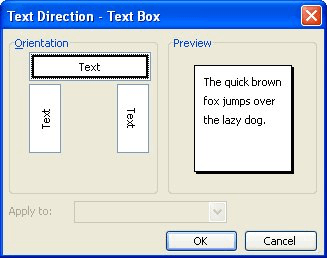
Figure 1. The Text Direction dialog box.
WordTips is your source for cost-effective Microsoft Word training.
(Microsoft Word is the most popular word processing software in the world.)
This tip (1707) applies to Microsoft Word 97, 2000, 2002, and 2003. You can find a version of this tip for the ribbon interface of Word (Word 2007 and later) here: Changing Text Orientation.
Author Bio
With more than 50 non-fiction books and numerous magazine articles to his credit, Allen Wyatt is an internationally recognized author. He is president of Sharon Parq Associates, a computer and publishing services company. Learn more about Allen…
MORE FROM ALLEN
Removing Duplicates Based on a Partial Match
Some types of data may have certain fields that contain partially identical information. In such cases you may want to …
Discover More
Formatting a PivotTable
You can format PivotTables using either manual formatting or automatic formatting. You need to be careful, however, as …
Discover More
Strip Trailing Spaces
If you get tired of documents that always seem to have extra spaces at the end of lines, here’s a quick way to get rid of …
Discover More
More WordTips (menu)
Turning Off Proofing for Superscripts
When you add superscripts to words in your document, you may not want those superscripts to be spell-checked. Here’s how …
Discover More
Automatic Blank Pages at the End of a Section
If you want to have a blank page at the end of a document section, you can insert one manually or you can use the …
Discover More
Changing Text Case Many Times
Word provides a built-in shortcut to change the case of a text selection. Understanding how that shortcut works (and the …
Discover More

99.9% of the time in English language writing, sentences start on the left hand side of the page. This is simply how we do things. But not every language uses this convention.
In Hebrew and Arabic, for instance, sentences begin at the right hand side of the page. Versions of Microsoft Word designed for these languages therefore default to right-to-left.
Whichever version of Word you’re using, though, you can adjust the text direction to suit your particular needs.
Writing in a Right-to-Left Language
If you need to write in a language that reads from right to left and your version of Word doesn’t support this, you will have to install the necessary language and keyboard settings.
If both left-to-right and right-to-left languages are enabled in a document, the ‘LTR’ and ‘RTL’ buttons should appear in the ‘Paragraph’ section of the ‘Home’ tab.
Changing the Text Direction
Even if you’re not writing in a right-to-left language, you may need to change the text direction if you’re using a version of Word where right-to-left is the default or if you’re editing a document written using this format.
In these cases, with Word 2010 or later on a Windows computer, your simplest option is to add buttons to the Quick Access Toolbar. To do this:
You can now use these buttons to set the text direction for all (or part) of a document.
Find this useful?
Subscribe to our newsletter and get writing tips from our editors straight to your inbox.
Alternatively, you can also add these buttons to the main ribbon on Microsoft Word by right clicking on the ribbon and selecting ‘Customize the Ribbon’.
This opens a menu similar to the one used to customize the Quick Access Toolbar. The main difference is that you need to create a new ‘Group’ under one of the main tabs so that the commands have somewhere to appear.
Microsoft Hates Mac Computers
It’s a melodramatic subtitle, we’ll grant you, but it’s the only explanation for why Microsoft Word on the Mac has only recently added support for right-to-left languages.
If you want to change the text direction from right-to-left to left-to-right in older versions of Word on an Apple computer, you’ll need to cheat using this workaround:
- Copy and paste your text into Pages, where it will default to left-to-right
- Copy and paste your reformatted text back into Word
You can also change the text direction from left-to-right to right-to-left using this method if you have an appropriate right-to-left script installed on Pages.
The text direction should then match the settings you chose in Pages (or other compatible program). If not, it might be time to get a PC instead.
![]()
Microsoft Word doesn’t permit changing the direction of normal paragraph text.
However, it does permit you to change the direction of text in case of Tables, shapes, or text boxes. Whether you want to change the text from Vertical to Horizontal or vice versa, it’s possible with shapes and tables.
With that being said, I’ll demonstrate how you can leverage
tables, shapes or text boxes to change text directions in Word.
To change text direction in Word using shapes or text boxes, obey the following instructions.
First insert a rectangular shape or text box that will contain the text. If you don’t know the steps to insert shapes in Word, follow the steps below:
- Click on the Insert tab.
- Click on the Shapes button in the Illustrations group.
- Select and draw the rectangle shape.
This is the shape that will contain the text. Don’t worry if you have a colored shape, I’ll soon show you how to remove the shape border and color shading so that it won’t be visible.

- Right-Click on the rectangle and select Add
Text.

- Now type your text inside the shape.

- To remove the shape color, right-click on it for the shortcut menu. Then Select the Fill drop-down and select No Fill. Alternatively, select the shape and go to Drowing Tool Format tab, under the Shape Style category, select Fill > No Fill.

The remaining steps will now show you how to change the text direction in word.
- The simplest way is to click and drug the rotate icon of the shape. (see screenshot)

For another way to change the text direction in the shape, continue with the steps below.
- Click on the Drawing Tool Format tab
- In the Text group, click on the Text Direction button.

- From the drop-down list, select how you want the
text direction to be. If you don’t like the 90° or 270° rotation, click on the Text
Direction options for more options.

As you change the text direction, the shape size will automatically
scale to accommodate your text. You may have to also adjust the shape afterward
to make the text in the shape more presentable.
NOTE: The above steps can also be used to change text
direction in text boxes in Word.
- Remove the shape color and border.
If you are new to shapes in Word, you might have problem removing the shape border and shading. If the border and shading is ok for you then ignore this step.
To remove the inside shading of the shape, click on the
shape and go to the Drawing Tool Format tab. In the shapes style group,
click on Shape Fill and select No Fill.

This will remove the color shading inside the shape.
In this case, you should change the text color in the shape
to black. White text may become invisible on a white background.
Change text direction in Word using Tables
Text in a table must not always flow from left to right.
So, to change the text direction in in a table, obey the instructions
below:
- Click inside the cell containing the text you want to change direction.
- If you want to change the text direction of a group of cells, select this group of cells by clicking and dragging over the cells.

- Click on the Table Tools Layout tab.
- In the Alignment group, click on the Text Direction button.

- Each time you click on the Text Direction button, the text changes direction by 90 degrees.

- Keep on clicking on this button until you are
pleased with the text direction.
As you change the text direction, the cell size will automatically
scale to accommodate your text. You may have to also adjust the rows and
columns afterward to make your table fit to be seen.
Download PC Repair Tool to quickly find & fix Windows errors automatically
If you are planning to arrange all the data in tables on a single page in Word, you can fall short of space. The best idea then is to rotate text inside the document. Rotating text ensures you have as narrow as possible rows in a table. See how to go about and change text direction in Microsoft Word.
Change Text Direction by rotating texts in Microsoft Word
In Microsoft Word, you can change text direction in Word from right to left. You can rotate text, change margins of text boxes and shapes for optimal spacing, or resize shapes for a better text fit by following these steps:
- Launch Microsoft Word
- Go to Insert tab
- Create Text boxes
- Select Text Direction
- Changing the text direction
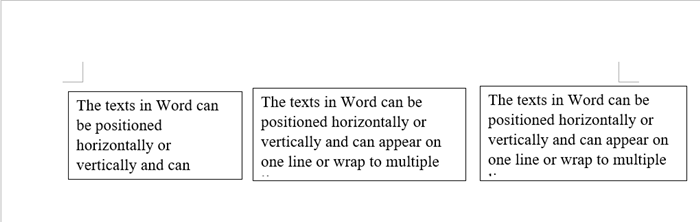
The texts in Word can be positioned horizontally or vertically and can appear on one line or wrap to multiple lines.
Create Textboxes
Open Word and go to ‘Insert’ tab.

Under ‘Text’ section, press ‘Text Box’ drop-down arrow, select ‘Draw Horizontal Text Box’.
Similarly include other text boxes in a horizontal orientation.
Here, when you cannot include more horizontal text boxes but still have some data left to be included, change the text direction of previous box in the following way.
Select Text Direction
Select the box containing the text you want to change direction.
Choose ‘Layout’ tab from the Ribbon menu.

Under ‘Page Setup’ section, go to ‘Text Direction’. Press the down-arrow and select ‘Rotate all text 90’ under ‘Text Direction Options’.
Change text direction
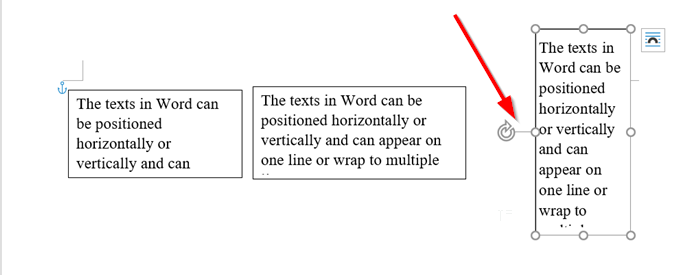
To position the box more accurately use the handle to rotate the box.
Now, you have created additional space to include text, you can insert one more box and include all the relevant data therein.
If required, you can also change the text alignment in the boxes. For instance, you can align the text to the center, to the left, to the right, to the bottom, or to the top. To do so, go to ‘Arrange’ section under ‘Layout’ tab, choose ‘Position’ > ‘More Layout Options’.
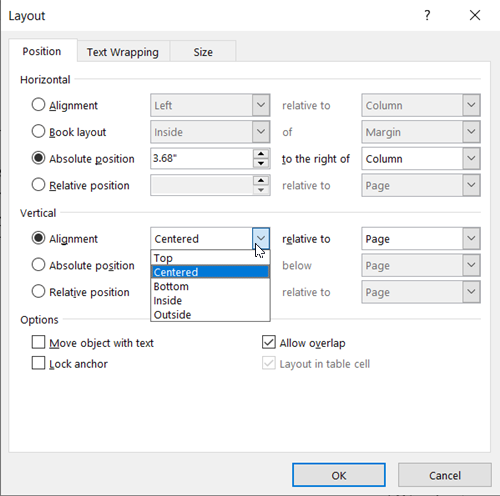
Then, under Vertical alignment click the down arrow and select Inside, Outside, center, bottom or the alignment you want to use.
I trust you can get this working smoothly.

A post-graduate in Biotechnology, Hemant switched gears to writing about Microsoft technologies and has been a contributor to TheWindowsClub since then. When he is not working, you can usually find him out traveling to different places or indulging himself in binge-watching.