
If you frequently create a certain type of document, such as a monthly report, a sales forecast, or a presentation with a company logo, save it as a template so you can use that as your starting point instead of recreating the file from scratch each time you need it. Start with a document that you already created, a document you downloaded, or a new Microsoft template you customized.
Save a template
-
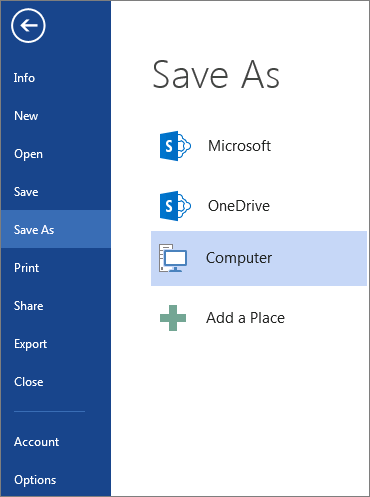
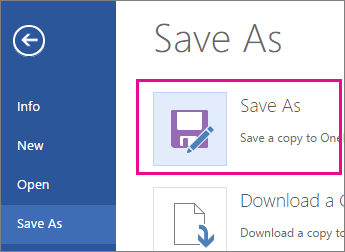
To save a file as a template, click File > Save As.
-
Double-click Computer or, in Office 2016 programs, double-click This PC.

-
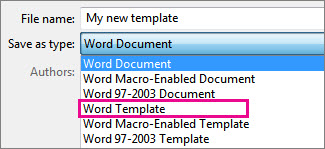
Type a name for your template in the File name box.
-
For a basic template, click the template item in the Save as type list. In Word for example, click Word Template.
If your document contains macros, click Word Macro-Enabled Template.
Office automatically goes to the Custom Office Templates folder.
-
Click Save.
Tip: To change where your application automatically saves your templates, click File > Options > Save and type the folder and path you want to use in the Default personal templates location box. Any new templates you save will be stored in that folder, and when you click File > New > Personal, you’ll see the templates in that folder.
Edit your template
To update your template, open the file, make the changes you want, and then save the template.
-
Click File > Open.
-
Double-click Computer or This PC.
-
Browse to the Custom Office Templates folder that’s under My Documents.
-
Click your template, and click Open.
-
Make the changes you want, then save and close the template.
Use your template to make a new document
To start a new file based on your template, click File > New > Custom, and click your template.
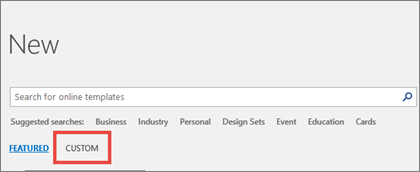
Note: If you’re using Office 2013, this button may say Personal instead of Custom.
Use your templates from earlier versions of Office
If you made templates in an earlier version of Office, you can still use them in Office 2013 and 2016. The first step is to move them into the Custom Office Templates folder so your application can find them. To move your templates quickly, use the Fix it tool.
Word
-
Open the Word document that you want to save as a template.
-
On the File menu, click Save as Template.
-
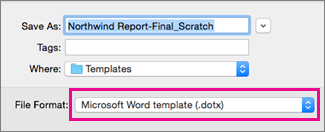
In the Save As box, type the name that you want to use for the new template.
-
(Optional) In the Where box, choose a location where the template will be saved.
-
Next to File Format, click Microsoft Word template (.dotx), or, if your document contains macros, click Microsoft Word Macro-Enabled template (.dotm).
-
Click Save.
Unless you select a different location, the template is saved in /Users/username/Library/Group Containers/UBF8T346G9.Office/User Content/Templates.
To change where Word automatically saves your templates, on the Word menu, click Preferences, and then under Personal Settings, click File Locations. Under File Locations, select User templates from the list, and then click Modify. Type the new folder and path you want to use, and Word will save any new templates in that folder.
You can customize an existing template to make it even more useful. Add static information to the existing template, and then save the file again (as a template).
-
On the File menu, click New from Template.
-
Click a template that is similar to the one you want to create, and then click Create.
Note: If you can’t find a template, you can search for it based on keywords in the Search All Templates box.
-
Add, delete, or change any text, graphics, or formatting, and make any other changes that you want to appear in all new documents that you base on the template.
-
On the File menu, click Save as Template.
-
In the Save As box, type the name that you want to use for the new template.
-
(Optional) In the Where box, choose a location where the template will be saved.
-
Next to File Format, click Microsoft Word template (.dotx), or, if your template contains macros, click Microsoft Word Macro-Enabled template.
-
Click Save.
Unless you select a different location, the template is saved in /Users/username/Library/Group Containers/UBF8T346G9.Office/User Content/Templates.
To change where Word automatically saves your templates, on the Word menu, click Preferences, and then under Personal Settings, click File Locations. Under File Locations, select User templates from the list, and then click Modify. Type the new folder and path you want to use, and Word will save any new templates in that folder.
To start a new document based on your template, on the File menu, click New from Template, and then select the template you want to use.
-
In the Finder, open /Users/username/Library/Group Containers/UBF8T346G9.Office/User Content/Templates.
-
Drag the templates that you want to delete to the Trash.
PowerPoint
-
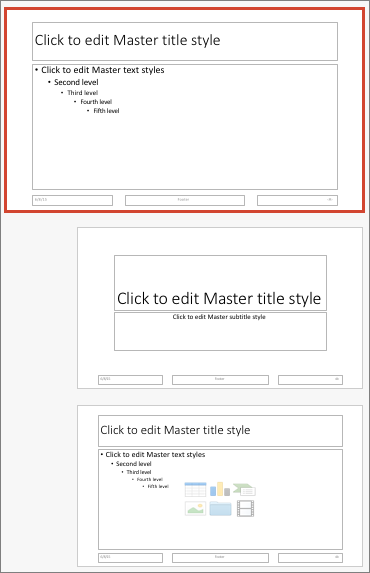
Open a blank presentation, and then on the View tab, click Slide Master.
The slide master is the largest slide image at the top of the slide thumbnail list. Associated layouts are positioned beneath it.
-
To make changes to the slide master or layouts, on the Slide Master tab, do any of these:
-
To add a colorful theme with special fonts, and effects, click Themes, and pick a theme.
-
To change the background, click Background Styles, and pick a background.
-
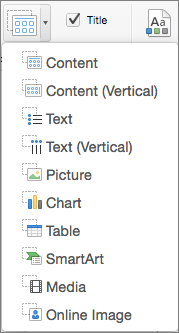
To add a placeholder for text, picture, chart, and other objects, in the thumbnail pane, click the slide layout that you want to hold the placeholder. From Insert Placeholder, pick the type of placeholder you want to add, and drag to draw the placeholder size.
-

-
Open the presentation that you want to save as a template.
-
On the File tab, click Save as Template.
-
In the Save As box, type the name that you want to use for the new template.
-
(Optional) In the Where box, choose a location where the template will be saved.
-
Next to File Format, click PowerPoint Template (.potx), or, if your presentation contains macros, click PowerPoint Macro-Enabled Template (.potm).
-
Click Save.
Unless you select a different location, the template is saved in /Users/username/Library/Group Containers/UBF8T346G9.Office/User Content/Templates.
You can customize an existing template to make it even more useful. Add static information to the existing template, and then save the file again (as a template).
-
On the File menu, click New from Template.
-
Click a template that is similar to the one you want to create, and then click Create.
Note: If you can’t find a template, you can search for it based on keywords in the Search All Templates box.
-
Add, delete, or change any text, graphics, or formatting, and make any other changes that you want to appear in all new presentations that you base on the template.
-
On the File menu, click Save as Template.
-
In the Save As box, type the name that you want to use for the new template.
-
(Optional) In the Where box, choose a location where the template will be saved.
-
Next to File Format, click PowerPoint Template (.potx), or, if your template contains macros, click PowerPoint Macro-Enabled Template (.potm).
-
Click Save.
Unless you select a different location, the template is saved in /Users/username/Library/Group Containers/UBF8T346G9.Office/User Content/Templates.
To start a new presentation based on a template, on the File menu, click New from Template, and then select the template you want to use.
-
In the Finder, open /Users/username/Library/Group Containers/UBF8T346G9.Office/User Content/Templates.
-
Drag the templates that you want to delete to the Trash.
Excel
-
Open the workbook that you want to save as a template.
-
On the File menu, click Save as Template.
-
In the Save As box, type the name that you want to use for the new template.
-
(Optional) In the Where box, choose a location where the template will be saved.
-
Next to File Format, click Excel Template (.xltx), or, if your workbook contains macros, click Excel Macro-Enabled Template (.xltm).
-
Click Save.
Unless you select a different location, the template is saved in /Users/username/Library/Group Containers/UBF8T346G9.Office/User Content/Templates.
You can customize an existing template to make it even more useful. Add static information to the existing template, and then save the file again (as a template).
-
On the File menu, click New from Template.
-
Click a template that is similar to the one you want to create, and then click Create.
Note: If you can’t find a template, you can search for it based on keywords in the Search All Templates box.
-
Add, delete, or change any content, graphics, or formatting, and make any other changes that you want to appear in all new workbooks that you base on the template.
-
On the File menu, click Save as Template.
-
In the Save As box, type the name that you want to use for the new template.
-
(Optional) In the Where box, choose a location where the template will be saved.
-
Next to File Format, click Excel Template (.xltx), or, if your template contains macros, click Excel Macro-Enabled Template (.xltm).
-
Click Save.
Unless you select a different location, the template is saved in /Users/username/Library/Group Containers/UBF8T346G9.Office/User Content/Templates.
To start a new workbook based on a template, on the File menu, click New from Template, and then select the template you want to use.
-
In the Finder, open /Users/username/Library/Group Containers/UBF8T346G9.Office/User Content/Templates.
-
Drag the templates that you want to delete to the Trash.
See also
Differences between templates, themes, and Word styles
Word
-
Open the document.
-
Add, delete, or change any text, graphics, or formatting, and make any other changes that you want to appear in all new documents that you base on the template.
-
On the File menu, click Save As.
-
On the Format pop-up menu, click Word Template (.dotx).
-
In the Save As box, type the name that you want to use for the new template, and then click Save.
Unless you select a different location, the template is saved in /Users/username/Library/Application Support/Microsoft/Office/User Templates/My Templates.
-
On the File menu, click Close.
To organize templates, use the Finder to create a new folder in /Users/username/Library/Application Support/Microsoft/Office/User Templates/My Templates, and then save your template in the new folder.
Note: If you are using Mac OS X 7 (Lion), the Library folder is hidden by default. To show the Library folder, in the Finder, click the Go menu, and then hold down OPTION.
You can customize an existing template to make it even more useful. Add static information to the existing template, and then save the file again (as a template).
-
On the Standard toolbar, click New from template
. -
In the left navigation pane, under TEMPLATES, click All.
Note: If you can’t find a template, you can search for it based on keywords in the Search box.
-
Click a template that is similar to the one that you want to create, and then click Choose.
-
Add, delete, or change any text, graphics, or formatting, and make any other changes that you want to appear in all new documents that you base on the template.
-
On the File menu, click Save As.
-
On the Format pop-up menu, click Word Template (.dotx).
-
In the Save As box, type the name that you want to use for the new template, and then click Save.
Unless you select a different location, the template is saved in /Users/username/Library/Application Support/Microsoft/Office/User Templates/My Templates.
To organize templates, use the Finder to create a new folder in /Users/username/Library/Application Support/Microsoft/Office/User Templates/My Templates, and then save your template in the new folder.
Note: If you are using Mac OS X 7 (Lion), the Library folder is hidden by default. To show the Library folder, in the Finder, click the Go menu, and then hold down OPTION.
 .
.-
On the Standard toolbar, click New from template
. -
In the left navigation pane, under TEMPLATES, click My Templates.
Note: If you created folders to organize your templates, the folders are displayed under My Templates. You need to click the folder to see the templates.
-
Click the template that you created, and then click Choose.
-
In the Finder, open /Users/username/Library/Application Support/Microsoft/Office/User Templates/My Templates.
Note: If you are using Mac OS X 7 (Lion), the Library folder is hidden by default. To show the Library folder, in the Finder, click the Go menu, and then hold down OPTION .
-
Drag the templates that you want to delete to the Trash.
PowerPoint
-
Open the presentation that you want to create the new template from.
-
Add, delete, or change any text, graphics, or formatting, and make any other changes that you want to appear in all new presentations that you base on the template.
-
On the File menu, click Save As.
-
On the Format pop-up menu, click PowerPoint Template (.potx).
-
In the Save As box, type the name that you want to use for the new template, and then click Save.
Unless you select a different location, the template is saved in /Users/username/Library/Application Support/Microsoft/Office/User Templates/My Templates.
To organize templates, use the Finder to create a new folder in /Users/username/Library/Application Support/Microsoft/Office/User Templates/My Templates, and then save your template in the new folder.
Note: If you are using Mac OS X 7 (Lion), the Library folder is hidden by default. To show the Library folder, in the Finder, click the Go menu, and then hold down OPTION.
You can customize an existing template to make it even more useful. Add static information to the existing template, and then save the file again (as a template).
-
On the Standard toolbar, click New from template
. -
In the left navigation pane, under TEMPLATES, click All.
Note: If you can’t find a template, you can search for a template based on keywords in the Search box.
-
Click a template that is similar to the one that you want to create, and then click Choose.
-
Add, delete, or change any text, graphics, or formatting, and make any other changes that you want to appear in all new documents that you base on the template.
If you want to make one change to replicate it in several slide layouts, rather than changing each layout or slide individually, you can edit slide masters.
-
On the File menu, click Save As.
-
On the Format pop-up menu, click PowerPoint Template (.potx).
-
In the Save As box, type the name that you want to use for the new template, and then click Save.
Unless you select a different location, the template is saved in /Users/username/Library/Application Support/Microsoft/Office/User Templates/My Templates.
To organize templates, use the Finder to create a new folder in /Users/username/Library/Application Support/Microsoft/Office/User Templates/My Templates, and then save your template in the new folder.
Note: If you are using Mac OS X 7 (Lion), the Library folder is hidden by default. To show the Library folder, in the Finder, click the Go menu, and then hold down OPTION.
-
On the Standard toolbar, click New from template
. -
In the left navigation pane, under TEMPLATES, click My Templates.
Note: If you created folders to organize your templates, the folders are displayed under My Templates. You need to click the folder to see the templates.
-
In the right navigation pane, you can select the colors, font, and slide size for the template.
-
Click the template that you created, and then click Choose.
-
In the Finder, open /Users/username/Library/Application Support/Microsoft/Office/User Templates/My Templates.
Note: If you are using Mac OS X 7 (Lion), the Library folder is hidden by default. To show the Library folder, in the Finder, click the Go menu, and then hold down OPTION .
-
Drag the templates that you want to delete to the Trash.
Excel
-
Open the workbook that you want to create the new template from.
-
Add, delete, or change any text, graphics, or formatting, and make any other changes that you want to appear in all new documents that you base on the template.
-
On the File menu, click Save As.
-
On the Format pop-up menu, click Excel Template (.xltx).
-
In the Save As box, type the name that you want to use for the new template, and then click Save.
Unless you select a different location, the template is saved in /Users/username/Library/Application Support/Microsoft/Office/User Templates/My Templates.
To organize templates, use the Finder to create a new folder in /Users/username/Library/Application Support/Microsoft/Office/User Templates/My Templates, and then save your template in the new folder.
Note: If you are using Mac OS X 7 (Lion), the Library folder is hidden by default. To show the Library folder, in the Finder, click the Go menu, and then hold down OPTION.
You can customize an existing template to make it even more useful. Add static information to the existing template, and then save the file again (as a template).
-
On the Standard toolbar, click New from template
. -
In the left navigation pane, under TEMPLATES, click All.
Note: If you can’t find a template, you can search for a template based on keywords in the Search box.
-
Click a template that is similar to the one that you want to create, and then click Choose.
-
Add, delete, or change any text, graphics, or formatting, and make any other changes that you want to appear in all new documents that you base on the template.
-
On the File menu, click Save As.
-
On the Format pop-up menu, click Excel Template (.xltx).
-
In the Save As box, type the name that you want to use for the new template, and then click Save.
Unless you select a different location, the template is saved in /Users/username/Library/Application Support/Microsoft/Office/User Templates/My Templates.
To organize templates, use the Finder to create a new folder in /Users/username/Library/Application Support/Microsoft/Office/User Templates/My Templates, and then save your template in the new folder.
Note: If you are using Mac OS X 7 (Lion), the Library folder is hidden by default. To show the Library folder, in the Finder, click the Go menu, and then hold down OPTION.
-
On the Standard toolbar, click New from template
. -
In the left navigation pane, under TEMPLATES, click My Templates.
Note: If you created folders to organize your templates, the folders are displayed under My Templates. You need to click the folder to see the templates.
-
Click the template that you created, and then click Choose.
-
In the Finder, open /Users/username/Library/Application Support/Microsoft/Office/User Templates/My Templates.
Note: If you are using Mac OS X 7 (Lion), the Library folder is hidden by default. To show the Library folder, in the Finder, click the Go menu, and then hold down OPTION .
-
Drag the templates that you want to delete to the Trash.
See also
Modify a slide master
Customize how Excel starts in Excel for Mac
Differences between templates, themes, and Word styles
If you think of your current document as a template, you can save it with a different name to create a new document that’s based on the current one. Whenever you want to create a document like that, you’ll open your document in Word for the web, go to File > Save As, and create a document that’s a copy of the one you started with.
On the other hand, if you’re thinking of the kind of templates you see by going to File > New, then no: you can’t create those in Word for the web.
Instead, do this:
If you have the Word desktop application, use the Open in Word command in Word for the web to open the document in Word on your desktop.

From there, create a template. When you go to File > New in the Word desktop application, you’ll be able to use your template for new documents. And if you store the documents online, you can edit them in Word for the web.
See Also
Microsoft Templates and Themes
Download free, pre-built templates
Free background templates for PowerPoint
Edit templates
Создание оригинальных документов с помощью бесплатных шаблонов Microsoft Word
Корпорация Майкрософт предлагает широко различные шаблоны Word для бесплатных и расширенных шаблонов Word для подписчиков Microsoft 365. Если вы планируете использовать праздничную вечеринку, наполняя счет учебного заведения или задайте комбинацию соответствующей буквы или сопроводительного письма, вы можете найти шаблоны для Word, которые должны замещаться.
Шаблоны документов Microsoft Word позволяют быстро создавать рекламные листовки для вашей организации, а не пополнить скидки на свой бизнес-ресивер, что позволит вам нарисовать буклет, чтобы ваши рестораны были в туалетах или в течение важных медицинских данных. Шаблоны Word также размещает огромной пополняемойе выбор связанных и титульных букв и сопроводительных писем, которые файлами были созданы для поочередного задания.
Шаблоны Microsoft Word готовы к использованию, если вы короткие время и просто филлабле структуру для листов, календаря или буклета. Они также будут полностью настраиваются, когда вы осьминожкее немного индустриаус и хотите создать более персонализированную структуру. Эти бесплатные шаблоны Word доступны всем пользователям, йоу’е знакомство с Microsoft Word или нет.
![]()
Download Article
![]()
Download Article
This wikiHow teaches you how to select or create a template in Microsoft Word for Windows and Mac. Templates are pre-formatted documents designed for specific purposes, such as invoices, calendars, or résumés.
-
1
Open Microsoft Word. Double-click the Word icon, which resembles a white «W» on a dark-blue background.
-
2
Search for a template. Scroll through the Microsoft Word home page to find a template you like, or type word into the search bar at the top of the page to search for matching templates.
- For example, if you wanted to find budget-related templates, you would type «budget» into the search bar.
- You must be connected to the Internet in order to search for templates.
Advertisement
-
3
Select a template. Click a template that you want to use. This will open it in a window where you can take a closer look at the template.
-
4
Click Create. It’s to the right of the template preview. Doing so opens the template in a new Word document.
-
5
Edit the template. Most templates have sample text; you can replace this text by deleting it and typing in your own.
- You can also edit most templates’ formatting (e.g., font, color, and text size) without ruining the template itself.
-
6
Save your document. Click File in the upper-left side of the page, click Save As, double-click a save location, enter your document’s name, and click Save.
- You can re-open this document by going to the folder where you saved it and double-clicking it.


Advertisement
-
1
Open Microsoft word. Double-click the Word icon, which resembles a white «W» on a dark-blue background. Depending on your Word settings, this will either open a new document or bring up the Word home page.
- If the Word home page opens, skip to the «search for a template» step.
-
2
Click File. It’s a menu item in the top-left side of the screen. A drop-down menu will appear.
-
3
Click New from Template. You’ll find this option near the top of the File drop-down menu. Clicking it opens the template gallery.
-
4
Search for a template. Scroll through the available templates to see pre-set options, or type a search term into the search bar in the top-right side of the page.
- For example, to find invoice-related templates, you might type «invoice» into the search bar.
- You must be connected to the Internet in order to search for templates.
-
5
Select a template. Click a template to open a preview window with the template displayed.
-
6
Click Open. It’s in the preview window. This will open the template as a new document.
-
7
Edit the template. Most templates have sample text; you can replace this text by deleting it and typing in your own.
- You can also edit most templates’ formatting (e.g., font, color, and text size) without ruining the template itself.
-
8
Save your document. Click the File menu item, click Save As, enter a name for your document, and click Save.


Advertisement
-
1
Open your Microsoft Word document. Double-click the document to which you want to apply your template.
- This will only work for recently-opened templates. If you haven’t recently opened the template you want to use, open the template and then close it before continuing.
-
2
Click File. It’s in the upper-left side of the page.
-
3
Click Options. You’ll find this in the bottom-left side of the «File» page.
-
4
Click the Add-ins tab. It’s on the left side of the Options window.
-
5
Click the «Manage» drop-down box. This box is at the bottom of the Add-Ins page. A drop-down menu will appear.
-
6
Click Templates. It’s near the middle of the drop-down menu.
-
7
Click Go…. This button is to the right of the «Manage» drop-down box.
-
8
Click Attach…. It’s in the upper-right side of the page.
-
9
Select a template. Click a template that you want to use.
-
10
Click Open. It’s at the bottom of the Template window. This will open your template.
-
11
Check the «Automatically update document styles» box. You’ll find this box below the template’s name near the top of the page.
-
12
Click OK. It’s at the bottom of the window. Doing so will apply your template’s formatting to the document.
-
13
Save your document. Click File in the upper-left side of the page, click Save As, double-click a save location, enter your document’s name, and click Save.


Advertisement
-
1
Open your Microsoft Word document. Double-click the document you want to open.
- This will only work for recently-opened templates. If you haven’t recently opened the template you want to use, open the template and then close it before continuing.
-
2
Click Tools. This menu item is on the left side of the Mac’s menu bar. Clicking it prompts a drop-down menu.
- If you don’t see Tools, click your Microsoft Word window to make it appear.
-
3
Click Templates & Add-Ins…. It’s an option near the bottom of the drop-down menu. Doing so opens a window.
-
4
Click Attach. You’ll find this in the Templates & Add-Ins window.
-
5
Select a template. Click a template that you want to apply to your document.
-
6
Click Open. Doing so will apply the template’s formatting to your document.
-
7
Save your document. Click the File menu item, click Save As, enter a name for your document, and click Save.


Advertisement
-
1
Open Microsoft Word. Double-click the Word icon, which resembles a white «W» on a dark-blue background.
- If you want to create a template from an existing document, double-click the document itself and skip to the «edit your document» step.
-
2
Click the «Blank document» template. It’s in the upper-left side of the Word window.
-
3
Edit your document. Any formatting changes you make (e.g., spacing, text size, font) will be parts of your template.
- If you’re creating a template from an existing document, you might not need to edit anything.
-
4
Click File. It’s a tab in the upper-left side of the page.
-
5
Click Save As. This option is near the top of the File pop-out window.
-
6
Select a save location. Double-click a save folder or location here to set it as the template’s storage spot.
-
7
Enter a name for your template. Type in the name you want to use for your template.
-
8
Click the «Save as type» drop-down box. It’s below the file name text box. A drop-down menu will appear.
-
9
Click Word Template. This option is near the top of the drop-down menu.
- You can also click Word Macro-Enabled Template here if you put macros in your document.
-
10
Click Save. It’s in the bottom-right side of the window. Doing so saves your template.
- You’ll be able to apply the template to other documents if you want to.


Advertisement
-
1
Open Microsoft Word. Double-click the Word icon, which resembles a white «W» on a dark-blue background.
- If you want to create a template from an existing document, double-click the document itself and skip to the «edit your document» step.
-
2
Click the New tab. It’s in the upper-left side of the home page.
- If there isn’t a home page, click the File tab and then click New from Template first.
-
3
Click the «Blank Document» template. It’s a white box. This will create a new Word document.
-
4
Edit your document. Any formatting changes you make (e.g., spacing, text size, font) will be parts of your template.
- If you’re creating a template from an existing document, you might not need to edit anything.
-
5
Click File. It’s a menu item in the top-left side of the page.
-
6
Click Save As Template. You’ll see this option in the File drop-down menu.
-
7
Enter a name for your template. Type in the name you want to use for your template.
-
8
Click the «File Format» drop-down box. It’s near the bottom of the window. A drop-down menu will appear.
-
9
Click Microsoft Word template. This option is in the drop-down menu, and has the «.dotx» extension next to it.
- You can also select Microsoft Word Macro-Enabled template if you put macros in your document.
-
10
Click Save. It’s the blue button at the bottom of the window. Doing so will save your template.
- You’ll be able to apply the template to other documents if you want to.


Advertisement
Add New Question
-
Question
How do I save an edited template as a default template in Word?

You can open HTML window in editor and you can place your code there. It will work if your editor has an edit HTML option.
-
Question
How can I use a template in Outlook?
Prepare your template and save it as .oft (Outlook template). Next time you need it, go to the Home tab and select New Items / More Items / Choose Form / Look in: User Templates in File System and select your template.
-
Question
How do I add lines inside the text box?
Draw them using the line tool in the box. On updated computers, go to insert>illustrations>shapes. On non-updated computers, go to insert>shape. You can also underline text by highlighting it, then going to home>underline text.
See more answers
Ask a Question
200 characters left
Include your email address to get a message when this question is answered.
Submit
Advertisement
-
Templates are extraordinarily helpful when invoicing or creating pamphlets.
Thanks for submitting a tip for review!
Advertisement
-
You shouldn’t have to pay for templates.
Advertisement
About This Article
Thanks to all authors for creating a page that has been read 331,425 times.
Is this article up to date?
Create, Save, Edit and Use Templates in Microsoft Word
by Avantix Learning Team | Updated February 14, 2021
Applies to: Microsoft® Word® 2013, 2016, 2019 or 365 (Windows)
You can create, save, use and edit templates in Microsoft Word for frequently-used documents such as letters, reports, proposals and manuals. Templates include basic character, paragraph and page formatting and may include text, custom styles, tables, images, macros, sections, headers and footers. If you save a document as a custom template, you can create a new document based on that template.
Recommended article: How to Check Word Count in Microsoft Word (4 Ways)
Do you want to learn more about Microsoft Word? Check out our virtual classroom or live classroom Word courses >
A document can be saved as a Word Template (dotx file) or a Word Macro-Enabled Template (dotm file).
In this article, we’ll take a look at 3 types of templates in Microsoft Word:
- Normal template (the default global template)
- Custom user templates
- Microsoft ready-made templates
Understanding the Normal template
Unless you select a different template, Word bases new documents on the Normal template by default. The Normal template is named Normal.dotm and its default style is the Normal style. It also includes built-in heading styles such as Heading 1, Heading 2 and so on.
Specifying a location for custom user templates
In Word 2013 and later versions, if you want to create your own custom user templates, you will need to specify a location for the templates so you can easily access them.
Custom user templates are typically stored in the following location (in 2013 and later versions):
C:Users[UserName]DocumentsCustom Office Templates
You will need to specify a path to the Custom Office Templates folder (which should be created automatically when you install Microsoft Office) in your Documents folder as the default storage location. If you want, you can select a different folder but this folder is easy to find and use.
To specify the default storage location for your custom user templates in Word 2013 and later versions:
- Create a folder in your Documents folder called Custom Office Templates if it does not already exist (assuming you are going to use this folder as the default personal templates location).
- In Word, click the File tab in the Ribbon.
- Click Options.
- In the left panel, click Save.
- Enter a path for the Default Personal Templates location (see the Options dialog box below).
- Click OK.
For example,
C:UsersNancyDocumentsCustom Office Templates
Note the path for the Default Personal Templates in the Options dialog box:

Some users may prefer to set the default personal templates location as the Templates or User Templates folder in the Appdata folder.
Creating a custom user template in Word
You can create your own custom user template by creating a document and then saving it as a template. If you have created a document based on an existing template, you can modify it and save it as a new template.
To save an existing document as a custom user template in the Custom Office Templates folder:
- In Word, click the File tab in the Ribbon.
- Select Save As.
- Enter a name for the template.
- Double-click This PC or Computer and then navigate to the Custom Office Templates folder (or the folder you specified as the default personal templates location).
- Select Word Template in the Save as type list. You can select Word Macro-Enabled Template if you have created macros in the file.
- Click Save.
Creating a new document based on a custom user template
If you have saved a template in the Custom Office Templates folder, you can easily create a new document based on that template.
To create a new document based on a custom user template you have created and saved in the Custom Office Templates folder:
- In Word, click the File tab in the Ribbon and then click New.
- In Word 2013 and later versions, click Personal. You must have set the file path in the Options dialog box first.
- If necessary double-click the Custom Office Templates folder.
- Double-click the desired template. Word creates a new document based on the template that you can modify.
Understanding the relationship between a Word document and its template
Every Microsoft Word document is based on a template. If you create a new, blank document, Word uses the Normal template.
When a Word document is created, it includes three elements from its template:
- Styles such as Normal, Heading 1, Heading 2 and so on
- Content such as text, tables and images
- Page settings such as margins, page breaks, section breaks, headers and footers
Once a document is created, it is no longer connected to its template so the styles, content and page settings can be modified or deleted.
A template also makes the following available in the document:
- Building Blocks such as QuickParts
- User interface customizations (including Ribbon customizations)
- Keyboard shortcuts
- Macros (if created) and the template was saved as a Macro-Enabled Template
Editing a custom user template
To edit a custom user template:
- In Word, click the File tab in the Ribbon and then click Open.
- Double-click This PC or Computer and navigate to the Custom Office Templates folder.
- Double-click the template you want to edit.
- Make changes to the template.
- Close and save the template.
Creating a document based on a Microsoft ready-made template
You can create new documents based on hundreds of Microsoft ready-made templates. These templates are normally accessed online so you must be connected to the internet to use them. There are templates for all kinds of documents including letters, brochures, flyers, reports and proposals. Templates may differ depending on your version of Microsoft Word.
To create a new document based on one of Microsoft’s ready-made templates:
- In Word, click the File tab in the Ribbon and click New.
- In the Office area, click the suggested searches or enter search criteria in the Search box and press Enter.
- Scroll through the templates.
- Double-click the template you want to use. Word creates a new document based on the template that you can modify.
In the following example, we selected New and then Business in the suggested searches (using Word 365):

Templates can be a huge timesaver, particularly if you are working on long documents like reports and proposals.
Subscribe to get more articles like this one
Did you find this article helpful? If you would like to receive new articles, join our email list.
More resources
How to Insert a Check Mark in Word (5 Ways)
How to View Word Count in Microsoft Word (4 Ways)
How to Keep a Microsoft Word Table Together on One Page
How to Insert or Type an Em Dash in Word (4 Ways with Shortcuts)
10+ Great Microsoft Word Navigation Shortcuts for Moving Around Quickly in Your Documents
Related courses
Microsoft Word: Intermediate / Advanced
Microsoft Excel: Intermediate / Advanced
Microsoft PowerPoint: Intermediate / Advanced
Microsoft Word: Long Documents Master Class
Microsoft Word: Styles, Templates and Tables of Contents
Microsoft Word: Designing Dynamic Word Documents Using Fields
VIEW MORE COURSES >
Our instructor-led courses are delivered in virtual classroom format or at our downtown Toronto location at 18 King Street East, Suite 1400, Toronto, Ontario, Canada (some in-person classroom courses may also be delivered at an alternate downtown Toronto location). Contact us at info@avantixlearning.ca if you’d like to arrange custom instructor-led virtual classroom or onsite training on a date that’s convenient for you.
Copyright 2023 Avantix® Learning
Microsoft, the Microsoft logo, Microsoft Office and related Microsoft applications and logos are registered trademarks of Microsoft Corporation in Canada, US and other countries. All other trademarks are the property of the registered owners.
Avantix Learning |18 King Street East, Suite 1400, Toronto, Ontario, Canada M5C 1C4 | Contact us at info@avantixlearning.ca
Life is too short to do the same work twice. If you work in Microsoft Word, it pays to learn how to use Word’s save as template feature so that you don’t have to rebuild Word Documents.


With a template, you’ve got the pre-built elements you need to create documents. Set templates in Word, and you start with all the fields you’re looking for.
This tutorial will teach you how to create a Microsoft Word template that’s easy to re-use. We’ll even show you how to start with premium designs and turn Word docs into templates, even if you started with .docx files. Let’s learn more.
How to Create & Save Word Templates in Microsoft Word Quickly (Video)
In this screencast we’ll show you how to create and save a template using Microsoft Word. We’ll start with a professionally designed Word template and show you how to customize it to create a Word template that’s uniquely yours.

Want to learn even more about how to create a template in Word? Read on for more detailed information and other tips.
Why You Should Learn the Word Save as Template Feature
You’re a busy person, and you’ve got no shortage of skills that you want to learn. While Word is a great tool, it’s just that: simply an app that we use to complete tasks. So, why should you dedicate your valuable time to learning Word’s save as template feature?
Here are three reasons that every user should learn how to save a template in Word:
- Standardize designs. If you lead a team or work with a group consistently, it helps if you share the same design. Use the Word save as template feature to create standard files that everyone uses.
- Share designs with the world. If you’ve got a favorite template, you can share so that others can set templates in Word easily. It’s a great bonus to offer to your readers, mailing list, or social followers.
- Save time for yourself. Building up a personal library of templates is a shortcut to success. Save Word templates and save time for yourself.


It’s easy to see why these benefits make it worthwhile to turn Word docs into templates. Read on to find out how to create a Microsoft Word template.
How to Make a Template in Word Quickly
It’s often useful to create Word template designs of your own. This lets you transform a document into a customizable file that you can use as often as you need it. It only takes a few clicks and saves you time and hard work. Let’s learn how to save a template in Word.
When you think of how to create a Microsoft Word template, consider your objective. The trick is to generate a generic document that you (or other users) can readily adapt to their own needs.
In this tutorial, we’ll create a reusable letterhead set template in Word. Save Word templates like this and use them every day. To follow along, download the Letterhead Word Template from Envato Elements.


Let’s get started:
1. Customize the Microsoft Word Templates
With Letterhead open in Word, take a look at the layout. This is a pre-written letter that you can use as a Word save as template. To create Word template files from it, the key is to make it more generic. This will save you time in the future by avoiding the need to remove large blocks of content.


The body of the letter itself, for example, can be reduced in length. Click into the text box and select its contents. Then, type over it with your own words.
A good option is to use a phrase like «Insert body of letter here.» While you’re familiar with the document layout, others who use the template may not be. This is a good way to guide them.


Then, change out the specific name details to «First Last.» Repeat this with the other placeholders, adding generic phone numbers, emails, and more. This is how to make a template in Word that works well for flexible use.
2. Add Extra Placeholders
We’ve updated the contents, showing how to create a Microsoft Word template from the file. But you can also add brand-new features to any file that you want to use for Microsoft Word templates.
For example, insert a slogan or tagline in the upper right corner of the letter. You might also want a box showing who the letter is CC’d to.
To add new placeholders, go to the Insert tab on Word’s ribbon. From there, click Text Box, then Draw Text Box. Find an open space on your document and click and drag to insert the text box.


Type in your slogan, and you’re all set. This will now appear each time when you create Word template files from the document.
Repeat the same steps to add the CC box. You can perform these same operations anywhere on your document.


You could even choose other options from the Insert tab, like photos, shapes, and more.
3. Customize the Text


When making a document, you may want to use a font besides the default throughout the document.
Start by highlighting the text you want to change. Next, click on the Home tab. Then, click on the Font Menu arrow. When you click on the arrow, a menu drops down. Choose the font.
4. Add Your Logo to the Template


To customize the logo on your template, you first need to have an already saved logo on your computer.
Click on the logo already on the template. Press Delete on your keyboard to remove it.
Next, click on the Insert tab. In the toolbar. Click on the Pictures button. When you click on the Pictures button, a menu drops down. Choose an option depending on where your image is located. Then double click on your logo image file to add it to the template. Adjust as needed.
5. How to Save a Template in Word
You’ve built a generic letterhead in Word. Now, it’s time to learn how to save a template in Word so that you can use it again. It’ll appear in the Templates gallery that opens when you launch the Word app.
Let’s save Word templates like this letter. Find the File dropdown in the upper left corner of your screen. Then, click Save As Template.


On the menu that appears, give your template a name. It’s best to use something short and easy to remember. Here, we’ll call it Letterhead. When you’re finished, click Save.


That’s how to make a template in Word. Now, when you launch the Word app, you’ll see your custom Microsoft Word templates in the Personal section.


This is the best way to create Word template designs that you can use more than once.
Where to Find the Best Microsoft Word Templates in 2022 (Envato Elements)
Chances are, you’re not a creative expert with the time to make your own Microsoft Word templates. Don’t worry: you don’t have to know how to create a Microsoft Word template to use the world’s best designs.
There’s an alternative to learning how to build Word template designs from scratch. Lean on expert designers who know how to make a template in Word that’s sure to impress.
The best place to find stunning Microsoft Word templates is Envato Elements. It’s a flat-rate subscription that offers millions of creative assets. Transform these files into customized templates with the Word save as template functionality.


What’s more: as a subscriber, you’ve got unlimited downloads. That means you can try out as many Microsoft Word templates as you want. Plus, you’ll find stock photos, custom fonts, and other assets that work great for any project.
Still searching for the best templates, but aren’t ready for a subscription? We highly recommend GraphicRiver, a pay-as-you-go marketplace. It’s another way to find the best options to create Word templates you can use, and you’ll pay only for what you download. Jump to GraphicRiver, grab a template, and start today.


As you can see, it’s easy to create Word template styles fast and customize them, thanks to Envato Elements. It takes the guesswork away from how to make a template in Word. Read on to see the best options for saved Word templates.
5 Top Downloads to Set Templates in Word
Not ready to learn how to create a Microsoft Word template? Let’s look at five of the best pre-built options. These help you set templates in Word without doing all the work from scratch:
1. Microsoft Word Certificate


A set template in Word helps you create documents fast. This certificate is a quick way to recognize achievements in style. It comes with both vertical and horizontal layouts, with print-ready graphics. It’s a perfect example of how to make a template in Word work for you. All you’ve got to do is drop key details into the pre-built text placeholders.
2. Letterhead for Microsoft Word Office

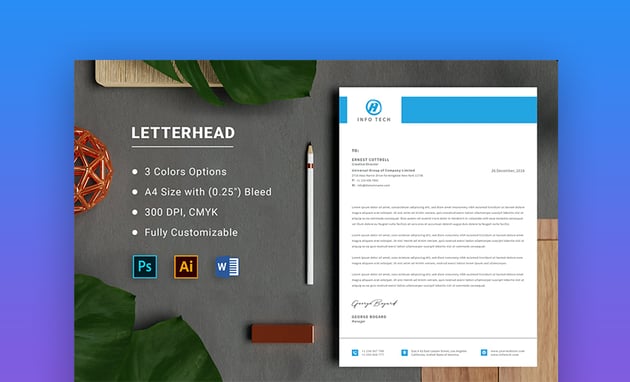

Even in our digital age, a classic letterhead helps make a winning impression. Save Word templates like this letterhead for use as print or online letters. You’ll find customizable styles that use stylish free fonts. The design aesthetic is modern and minimalist. If you need help learning how to save a template in Word like this, turn to the included help file.
3. Invoices Microsoft Word Template


Wonder how to make a template in Word that you can use as an invoice? Don’t bother—this sleek design does the work for you. With three color options, you can craft and send invoices with a few clicks. Each one helps you communicate with clients, so you’ll get paid sooner. 300-dpi CMYK print-ready graphics feature throughout.
4. Resume Word
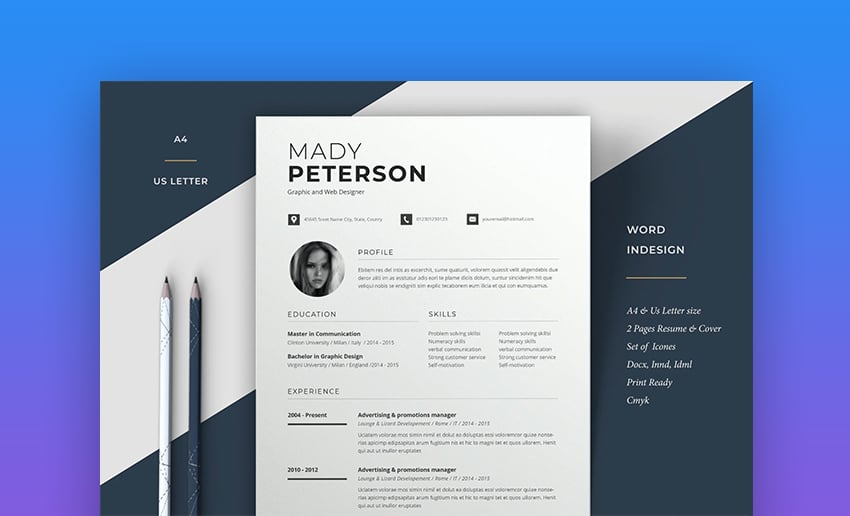


Resume Word: the title speaks for itself. Save Word templates like this one to help land your dream job. With refined, elegant hues, you can create Word template resumes sure to impress. There’s ample room for key details, with plenty of open space to ensure readability. Plus, you’ll find a matching cover letter included in this Microsoft Word templates pack.
5. A5 Landscape Company Profile, Word Template


Ever wondered how to create a Microsoft Word template brochure? A5 Landscape is a key example. This one works well as a company profile or informational flyer. You’ll have plenty of creative options, thanks to 16 custom layouts. All graphics are customizable, and there’s space to include photos and illustrations.
More Top Downloads to Set Templates in Word
There’s no such thing as too many Word templates! On Envato Tuts+, we frequently feature the top options to set templates in Word with pre-built downloads.
Check out more of the top options for designs to set templates in Word. Many of them are packaged as DOCX files. But remember: you can turn word Docs into templates with your new knowledge!
Common Microsoft Word Questions Answered (FAQ)
It’s common to have questions about Microsoft Word. So, here are some common Microsoft Word questions and answers:
1. Can I Format Text in my Word Template?
Formatting text means that you control how the text appears in your document. There are many things you can do to your text. Some of the formatting options are changing the size, color, and font. Learn more in this tutorial:
2. Can I Add a Border to my Word Document?
Yes, you can add a border to your Word document. There are several different border options that you can choose from. Borders can add visual interest to your document. For a tutorial on how to add a border to your Word document, read this article:
3. Do I Need to Add a Letterhead to my Word Document?
A letterhead can be helpful if you’re creating a letter in Word. Letterheads often include your business logo, name, business address, and contact information. Letterheads help the letter receiver know who sent them the letter immediately.
Discover how to create your own letterheads:
4. How Do I Find ClipArt?
ClipArt is an easy way to add illustrations to your document.
To find the ClipArt tool click on the Insert tab. Then click on the Pictures button, and from the menu that drops down, click on the Online Pictures… button. Type a keyword in the search bar that appears in the sidebar. Finally, click on the image that you want.
For more details, review:
5. Should I Add Page Numbers to my Word Document?
If your document is more than one page, it can be helpful to add page numbers to your document. Page numbers can help people if the printed pages get out of order. People can also refer to information on a specific page easier.
For information on how to add page numbers to your Word document, read this tutorial:
Learn More About Microsoft Word
You’ve been learning how to make a template in Word, which is certainly a useful skill. There’s no reason to stop here as you’re mastering Microsoft’s powerful documents app.
On Envato Tuts+, we want to teach you everything you need to know to feel confident while using Microsoft Word. Make sure to check out our fully featured learning guide, Learn How to Use Microsoft Word (Beginner Tutorial Guide.)
Make sure to check out these three tutorials to continue learning how to use Microsoft Word. Each of these help you add new skills that improve the way you save Word templates.
Start to Save Your Own Word Templates Today
You don’t have time to re-design every document in Word. That’s why you just learned how to create a Microsoft Word template: to use your favorite designs, save them for the future, and share them with others.
If you’re still searching for the best Word templates, don’t forget about the premium options from Envato Elements. These advanced designs are the best way to set templates in Word with no work required. Lean on pre-built designs even while learning how to save a template in Word.
Now, it’s your turn. You’ve just learned how to make a Word template and how to save a template in Word. Now, open Word, start designing, and turn your Word doc into templates.
Make sure to share with others when you get a chance—and don’t forget to teach them how to create a Microsoft Word template too!
Editor’s note: This tutorial was originally published on May 31, 2021. It’s been updated to include a video with help from Andrew Childress. The content has been updated by Sarah Joy. Andrew and Sarah are freelance instructors for Envato Tuts+.