
If you frequently create a certain type of document, such as a monthly report, a sales forecast, or a presentation with a company logo, save it as a template so you can use that as your starting point instead of recreating the file from scratch each time you need it. Start with a document that you already created, a document you downloaded, or a new Microsoft template you customized.
Save a template
-
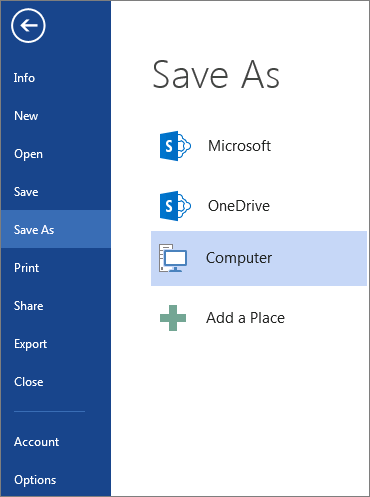
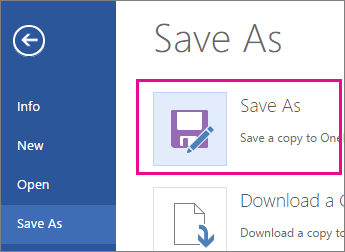
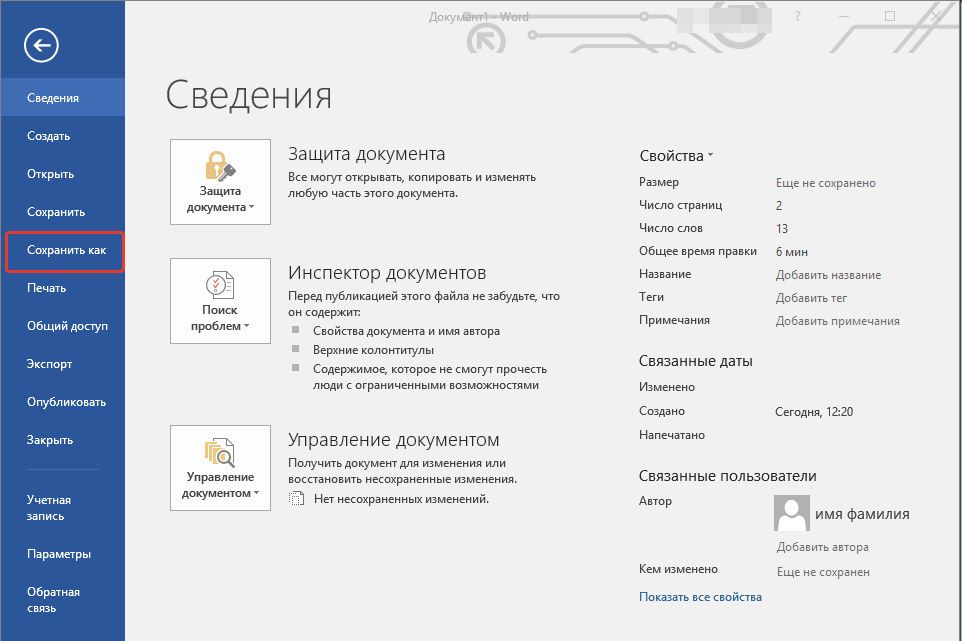
To save a file as a template, click File > Save As.
-
Double-click Computer or, in Office 2016 programs, double-click This PC.

-
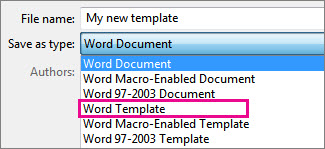
Type a name for your template in the File name box.
-
For a basic template, click the template item in the Save as type list. In Word for example, click Word Template.
If your document contains macros, click Word Macro-Enabled Template.
Office automatically goes to the Custom Office Templates folder.
-
Click Save.
Tip: To change where your application automatically saves your templates, click File > Options > Save and type the folder and path you want to use in the Default personal templates location box. Any new templates you save will be stored in that folder, and when you click File > New > Personal, you’ll see the templates in that folder.
Edit your template
To update your template, open the file, make the changes you want, and then save the template.
-
Click File > Open.
-
Double-click Computer or This PC.
-
Browse to the Custom Office Templates folder that’s under My Documents.
-
Click your template, and click Open.
-
Make the changes you want, then save and close the template.
Use your template to make a new document
To start a new file based on your template, click File > New > Custom, and click your template.
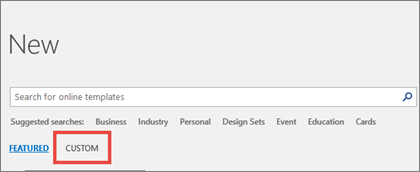
Note: If you’re using Office 2013, this button may say Personal instead of Custom.
Use your templates from earlier versions of Office
If you made templates in an earlier version of Office, you can still use them in Office 2013 and 2016. The first step is to move them into the Custom Office Templates folder so your application can find them. To move your templates quickly, use the Fix it tool.
Word
-
Open the Word document that you want to save as a template.
-
On the File menu, click Save as Template.
-
In the Save As box, type the name that you want to use for the new template.
-
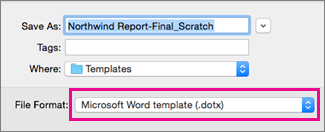
(Optional) In the Where box, choose a location where the template will be saved.
-
Next to File Format, click Microsoft Word template (.dotx), or, if your document contains macros, click Microsoft Word Macro-Enabled template (.dotm).
-
Click Save.
Unless you select a different location, the template is saved in /Users/username/Library/Group Containers/UBF8T346G9.Office/User Content/Templates.
To change where Word automatically saves your templates, on the Word menu, click Preferences, and then under Personal Settings, click File Locations. Under File Locations, select User templates from the list, and then click Modify. Type the new folder and path you want to use, and Word will save any new templates in that folder.
You can customize an existing template to make it even more useful. Add static information to the existing template, and then save the file again (as a template).
-
On the File menu, click New from Template.
-
Click a template that is similar to the one you want to create, and then click Create.
Note: If you can’t find a template, you can search for it based on keywords in the Search All Templates box.
-
Add, delete, or change any text, graphics, or formatting, and make any other changes that you want to appear in all new documents that you base on the template.
-
On the File menu, click Save as Template.
-
In the Save As box, type the name that you want to use for the new template.
-
(Optional) In the Where box, choose a location where the template will be saved.
-
Next to File Format, click Microsoft Word template (.dotx), or, if your template contains macros, click Microsoft Word Macro-Enabled template.
-
Click Save.
Unless you select a different location, the template is saved in /Users/username/Library/Group Containers/UBF8T346G9.Office/User Content/Templates.
To change where Word automatically saves your templates, on the Word menu, click Preferences, and then under Personal Settings, click File Locations. Under File Locations, select User templates from the list, and then click Modify. Type the new folder and path you want to use, and Word will save any new templates in that folder.
To start a new document based on your template, on the File menu, click New from Template, and then select the template you want to use.
-
In the Finder, open /Users/username/Library/Group Containers/UBF8T346G9.Office/User Content/Templates.
-
Drag the templates that you want to delete to the Trash.
PowerPoint
-
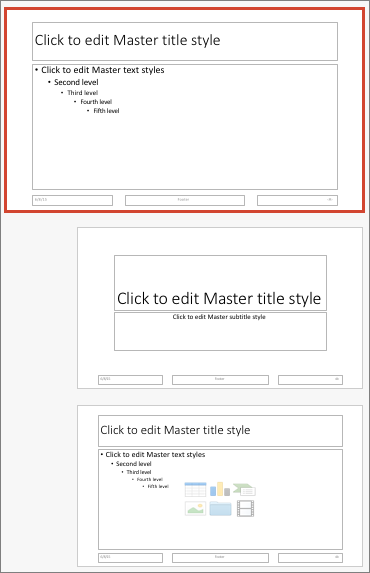
Open a blank presentation, and then on the View tab, click Slide Master.
The slide master is the largest slide image at the top of the slide thumbnail list. Associated layouts are positioned beneath it.
-
To make changes to the slide master or layouts, on the Slide Master tab, do any of these:
-
To add a colorful theme with special fonts, and effects, click Themes, and pick a theme.
-
To change the background, click Background Styles, and pick a background.
-
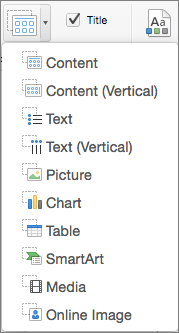
To add a placeholder for text, picture, chart, and other objects, in the thumbnail pane, click the slide layout that you want to hold the placeholder. From Insert Placeholder, pick the type of placeholder you want to add, and drag to draw the placeholder size.
-

-
Open the presentation that you want to save as a template.
-
On the File tab, click Save as Template.
-
In the Save As box, type the name that you want to use for the new template.
-
(Optional) In the Where box, choose a location where the template will be saved.
-
Next to File Format, click PowerPoint Template (.potx), or, if your presentation contains macros, click PowerPoint Macro-Enabled Template (.potm).
-
Click Save.
Unless you select a different location, the template is saved in /Users/username/Library/Group Containers/UBF8T346G9.Office/User Content/Templates.
You can customize an existing template to make it even more useful. Add static information to the existing template, and then save the file again (as a template).
-
On the File menu, click New from Template.
-
Click a template that is similar to the one you want to create, and then click Create.
Note: If you can’t find a template, you can search for it based on keywords in the Search All Templates box.
-
Add, delete, or change any text, graphics, or formatting, and make any other changes that you want to appear in all new presentations that you base on the template.
-
On the File menu, click Save as Template.
-
In the Save As box, type the name that you want to use for the new template.
-
(Optional) In the Where box, choose a location where the template will be saved.
-
Next to File Format, click PowerPoint Template (.potx), or, if your template contains macros, click PowerPoint Macro-Enabled Template (.potm).
-
Click Save.
Unless you select a different location, the template is saved in /Users/username/Library/Group Containers/UBF8T346G9.Office/User Content/Templates.
To start a new presentation based on a template, on the File menu, click New from Template, and then select the template you want to use.
-
In the Finder, open /Users/username/Library/Group Containers/UBF8T346G9.Office/User Content/Templates.
-
Drag the templates that you want to delete to the Trash.
Excel
-
Open the workbook that you want to save as a template.
-
On the File menu, click Save as Template.
-
In the Save As box, type the name that you want to use for the new template.
-
(Optional) In the Where box, choose a location where the template will be saved.
-
Next to File Format, click Excel Template (.xltx), or, if your workbook contains macros, click Excel Macro-Enabled Template (.xltm).
-
Click Save.
Unless you select a different location, the template is saved in /Users/username/Library/Group Containers/UBF8T346G9.Office/User Content/Templates.
You can customize an existing template to make it even more useful. Add static information to the existing template, and then save the file again (as a template).
-
On the File menu, click New from Template.
-
Click a template that is similar to the one you want to create, and then click Create.
Note: If you can’t find a template, you can search for it based on keywords in the Search All Templates box.
-
Add, delete, or change any content, graphics, or formatting, and make any other changes that you want to appear in all new workbooks that you base on the template.
-
On the File menu, click Save as Template.
-
In the Save As box, type the name that you want to use for the new template.
-
(Optional) In the Where box, choose a location where the template will be saved.
-
Next to File Format, click Excel Template (.xltx), or, if your template contains macros, click Excel Macro-Enabled Template (.xltm).
-
Click Save.
Unless you select a different location, the template is saved in /Users/username/Library/Group Containers/UBF8T346G9.Office/User Content/Templates.
To start a new workbook based on a template, on the File menu, click New from Template, and then select the template you want to use.
-
In the Finder, open /Users/username/Library/Group Containers/UBF8T346G9.Office/User Content/Templates.
-
Drag the templates that you want to delete to the Trash.
See also
Differences between templates, themes, and Word styles
Word
-
Open the document.
-
Add, delete, or change any text, graphics, or formatting, and make any other changes that you want to appear in all new documents that you base on the template.
-
On the File menu, click Save As.
-
On the Format pop-up menu, click Word Template (.dotx).
-
In the Save As box, type the name that you want to use for the new template, and then click Save.
Unless you select a different location, the template is saved in /Users/username/Library/Application Support/Microsoft/Office/User Templates/My Templates.
-
On the File menu, click Close.
To organize templates, use the Finder to create a new folder in /Users/username/Library/Application Support/Microsoft/Office/User Templates/My Templates, and then save your template in the new folder.
Note: If you are using Mac OS X 7 (Lion), the Library folder is hidden by default. To show the Library folder, in the Finder, click the Go menu, and then hold down OPTION.
You can customize an existing template to make it even more useful. Add static information to the existing template, and then save the file again (as a template).
-
On the Standard toolbar, click New from template
. -
In the left navigation pane, under TEMPLATES, click All.
Note: If you can’t find a template, you can search for it based on keywords in the Search box.
-
Click a template that is similar to the one that you want to create, and then click Choose.
-
Add, delete, or change any text, graphics, or formatting, and make any other changes that you want to appear in all new documents that you base on the template.
-
On the File menu, click Save As.
-
On the Format pop-up menu, click Word Template (.dotx).
-
In the Save As box, type the name that you want to use for the new template, and then click Save.
Unless you select a different location, the template is saved in /Users/username/Library/Application Support/Microsoft/Office/User Templates/My Templates.
To organize templates, use the Finder to create a new folder in /Users/username/Library/Application Support/Microsoft/Office/User Templates/My Templates, and then save your template in the new folder.
Note: If you are using Mac OS X 7 (Lion), the Library folder is hidden by default. To show the Library folder, in the Finder, click the Go menu, and then hold down OPTION.
 .
.-
On the Standard toolbar, click New from template
. -
In the left navigation pane, under TEMPLATES, click My Templates.
Note: If you created folders to organize your templates, the folders are displayed under My Templates. You need to click the folder to see the templates.
-
Click the template that you created, and then click Choose.
-
In the Finder, open /Users/username/Library/Application Support/Microsoft/Office/User Templates/My Templates.
Note: If you are using Mac OS X 7 (Lion), the Library folder is hidden by default. To show the Library folder, in the Finder, click the Go menu, and then hold down OPTION .
-
Drag the templates that you want to delete to the Trash.
PowerPoint
-
Open the presentation that you want to create the new template from.
-
Add, delete, or change any text, graphics, or formatting, and make any other changes that you want to appear in all new presentations that you base on the template.
-
On the File menu, click Save As.
-
On the Format pop-up menu, click PowerPoint Template (.potx).
-
In the Save As box, type the name that you want to use for the new template, and then click Save.
Unless you select a different location, the template is saved in /Users/username/Library/Application Support/Microsoft/Office/User Templates/My Templates.
To organize templates, use the Finder to create a new folder in /Users/username/Library/Application Support/Microsoft/Office/User Templates/My Templates, and then save your template in the new folder.
Note: If you are using Mac OS X 7 (Lion), the Library folder is hidden by default. To show the Library folder, in the Finder, click the Go menu, and then hold down OPTION.
You can customize an existing template to make it even more useful. Add static information to the existing template, and then save the file again (as a template).
-
On the Standard toolbar, click New from template
. -
In the left navigation pane, under TEMPLATES, click All.
Note: If you can’t find a template, you can search for a template based on keywords in the Search box.
-
Click a template that is similar to the one that you want to create, and then click Choose.
-
Add, delete, or change any text, graphics, or formatting, and make any other changes that you want to appear in all new documents that you base on the template.
If you want to make one change to replicate it in several slide layouts, rather than changing each layout or slide individually, you can edit slide masters.
-
On the File menu, click Save As.
-
On the Format pop-up menu, click PowerPoint Template (.potx).
-
In the Save As box, type the name that you want to use for the new template, and then click Save.
Unless you select a different location, the template is saved in /Users/username/Library/Application Support/Microsoft/Office/User Templates/My Templates.
To organize templates, use the Finder to create a new folder in /Users/username/Library/Application Support/Microsoft/Office/User Templates/My Templates, and then save your template in the new folder.
Note: If you are using Mac OS X 7 (Lion), the Library folder is hidden by default. To show the Library folder, in the Finder, click the Go menu, and then hold down OPTION.
-
On the Standard toolbar, click New from template
. -
In the left navigation pane, under TEMPLATES, click My Templates.
Note: If you created folders to organize your templates, the folders are displayed under My Templates. You need to click the folder to see the templates.
-
In the right navigation pane, you can select the colors, font, and slide size for the template.
-
Click the template that you created, and then click Choose.
-
In the Finder, open /Users/username/Library/Application Support/Microsoft/Office/User Templates/My Templates.
Note: If you are using Mac OS X 7 (Lion), the Library folder is hidden by default. To show the Library folder, in the Finder, click the Go menu, and then hold down OPTION .
-
Drag the templates that you want to delete to the Trash.
Excel
-
Open the workbook that you want to create the new template from.
-
Add, delete, or change any text, graphics, or formatting, and make any other changes that you want to appear in all new documents that you base on the template.
-
On the File menu, click Save As.
-
On the Format pop-up menu, click Excel Template (.xltx).
-
In the Save As box, type the name that you want to use for the new template, and then click Save.
Unless you select a different location, the template is saved in /Users/username/Library/Application Support/Microsoft/Office/User Templates/My Templates.
To organize templates, use the Finder to create a new folder in /Users/username/Library/Application Support/Microsoft/Office/User Templates/My Templates, and then save your template in the new folder.
Note: If you are using Mac OS X 7 (Lion), the Library folder is hidden by default. To show the Library folder, in the Finder, click the Go menu, and then hold down OPTION.
You can customize an existing template to make it even more useful. Add static information to the existing template, and then save the file again (as a template).
-
On the Standard toolbar, click New from template
. -
In the left navigation pane, under TEMPLATES, click All.
Note: If you can’t find a template, you can search for a template based on keywords in the Search box.
-
Click a template that is similar to the one that you want to create, and then click Choose.
-
Add, delete, or change any text, graphics, or formatting, and make any other changes that you want to appear in all new documents that you base on the template.
-
On the File menu, click Save As.
-
On the Format pop-up menu, click Excel Template (.xltx).
-
In the Save As box, type the name that you want to use for the new template, and then click Save.
Unless you select a different location, the template is saved in /Users/username/Library/Application Support/Microsoft/Office/User Templates/My Templates.
To organize templates, use the Finder to create a new folder in /Users/username/Library/Application Support/Microsoft/Office/User Templates/My Templates, and then save your template in the new folder.
Note: If you are using Mac OS X 7 (Lion), the Library folder is hidden by default. To show the Library folder, in the Finder, click the Go menu, and then hold down OPTION.
-
On the Standard toolbar, click New from template
. -
In the left navigation pane, under TEMPLATES, click My Templates.
Note: If you created folders to organize your templates, the folders are displayed under My Templates. You need to click the folder to see the templates.
-
Click the template that you created, and then click Choose.
-
In the Finder, open /Users/username/Library/Application Support/Microsoft/Office/User Templates/My Templates.
Note: If you are using Mac OS X 7 (Lion), the Library folder is hidden by default. To show the Library folder, in the Finder, click the Go menu, and then hold down OPTION .
-
Drag the templates that you want to delete to the Trash.
See also
Modify a slide master
Customize how Excel starts in Excel for Mac
Differences between templates, themes, and Word styles
If you think of your current document as a template, you can save it with a different name to create a new document that’s based on the current one. Whenever you want to create a document like that, you’ll open your document in Word for the web, go to File > Save As, and create a document that’s a copy of the one you started with.
On the other hand, if you’re thinking of the kind of templates you see by going to File > New, then no: you can’t create those in Word for the web.
Instead, do this:
If you have the Word desktop application, use the Open in Word command in Word for the web to open the document in Word on your desktop.

From there, create a template. When you go to File > New in the Word desktop application, you’ll be able to use your template for new documents. And if you store the documents online, you can edit them in Word for the web.
See Also
Microsoft Templates and Themes
Download free, pre-built templates
Free background templates for PowerPoint
Edit templates
Создание оригинальных документов с помощью бесплатных шаблонов Microsoft Word
Корпорация Майкрософт предлагает широко различные шаблоны Word для бесплатных и расширенных шаблонов Word для подписчиков Microsoft 365. Если вы планируете использовать праздничную вечеринку, наполняя счет учебного заведения или задайте комбинацию соответствующей буквы или сопроводительного письма, вы можете найти шаблоны для Word, которые должны замещаться.
Шаблоны документов Microsoft Word позволяют быстро создавать рекламные листовки для вашей организации, а не пополнить скидки на свой бизнес-ресивер, что позволит вам нарисовать буклет, чтобы ваши рестораны были в туалетах или в течение важных медицинских данных. Шаблоны Word также размещает огромной пополняемойе выбор связанных и титульных букв и сопроводительных писем, которые файлами были созданы для поочередного задания.
Шаблоны Microsoft Word готовы к использованию, если вы короткие время и просто филлабле структуру для листов, календаря или буклета. Они также будут полностью настраиваются, когда вы осьминожкее немного индустриаус и хотите создать более персонализированную структуру. Эти бесплатные шаблоны Word доступны всем пользователям, йоу’е знакомство с Microsoft Word или нет.
![]()
Download Article
![]()
Download Article
This wikiHow teaches you how to select or create a template in Microsoft Word for Windows and Mac. Templates are pre-formatted documents designed for specific purposes, such as invoices, calendars, or résumés.
-
1
Open Microsoft Word. Double-click the Word icon, which resembles a white «W» on a dark-blue background.
-
2
Search for a template. Scroll through the Microsoft Word home page to find a template you like, or type word into the search bar at the top of the page to search for matching templates.
- For example, if you wanted to find budget-related templates, you would type «budget» into the search bar.
- You must be connected to the Internet in order to search for templates.
Advertisement
-
3
Select a template. Click a template that you want to use. This will open it in a window where you can take a closer look at the template.
-
4
Click Create. It’s to the right of the template preview. Doing so opens the template in a new Word document.
-
5
Edit the template. Most templates have sample text; you can replace this text by deleting it and typing in your own.
- You can also edit most templates’ formatting (e.g., font, color, and text size) without ruining the template itself.
-
6
Save your document. Click File in the upper-left side of the page, click Save As, double-click a save location, enter your document’s name, and click Save.
- You can re-open this document by going to the folder where you saved it and double-clicking it.


Advertisement
-
1
Open Microsoft word. Double-click the Word icon, which resembles a white «W» on a dark-blue background. Depending on your Word settings, this will either open a new document or bring up the Word home page.
- If the Word home page opens, skip to the «search for a template» step.
-
2
Click File. It’s a menu item in the top-left side of the screen. A drop-down menu will appear.
-
3
Click New from Template. You’ll find this option near the top of the File drop-down menu. Clicking it opens the template gallery.
-
4
Search for a template. Scroll through the available templates to see pre-set options, or type a search term into the search bar in the top-right side of the page.
- For example, to find invoice-related templates, you might type «invoice» into the search bar.
- You must be connected to the Internet in order to search for templates.
-
5
Select a template. Click a template to open a preview window with the template displayed.
-
6
Click Open. It’s in the preview window. This will open the template as a new document.
-
7
Edit the template. Most templates have sample text; you can replace this text by deleting it and typing in your own.
- You can also edit most templates’ formatting (e.g., font, color, and text size) without ruining the template itself.
-
8
Save your document. Click the File menu item, click Save As, enter a name for your document, and click Save.


Advertisement
-
1
Open your Microsoft Word document. Double-click the document to which you want to apply your template.
- This will only work for recently-opened templates. If you haven’t recently opened the template you want to use, open the template and then close it before continuing.
-
2
Click File. It’s in the upper-left side of the page.
-
3
Click Options. You’ll find this in the bottom-left side of the «File» page.
-
4
Click the Add-ins tab. It’s on the left side of the Options window.
-
5
Click the «Manage» drop-down box. This box is at the bottom of the Add-Ins page. A drop-down menu will appear.
-
6
Click Templates. It’s near the middle of the drop-down menu.
-
7
Click Go…. This button is to the right of the «Manage» drop-down box.
-
8
Click Attach…. It’s in the upper-right side of the page.
-
9
Select a template. Click a template that you want to use.
-
10
Click Open. It’s at the bottom of the Template window. This will open your template.
-
11
Check the «Automatically update document styles» box. You’ll find this box below the template’s name near the top of the page.
-
12
Click OK. It’s at the bottom of the window. Doing so will apply your template’s formatting to the document.
-
13
Save your document. Click File in the upper-left side of the page, click Save As, double-click a save location, enter your document’s name, and click Save.


Advertisement
-
1
Open your Microsoft Word document. Double-click the document you want to open.
- This will only work for recently-opened templates. If you haven’t recently opened the template you want to use, open the template and then close it before continuing.
-
2
Click Tools. This menu item is on the left side of the Mac’s menu bar. Clicking it prompts a drop-down menu.
- If you don’t see Tools, click your Microsoft Word window to make it appear.
-
3
Click Templates & Add-Ins…. It’s an option near the bottom of the drop-down menu. Doing so opens a window.
-
4
Click Attach. You’ll find this in the Templates & Add-Ins window.
-
5
Select a template. Click a template that you want to apply to your document.
-
6
Click Open. Doing so will apply the template’s formatting to your document.
-
7
Save your document. Click the File menu item, click Save As, enter a name for your document, and click Save.


Advertisement
-
1
Open Microsoft Word. Double-click the Word icon, which resembles a white «W» on a dark-blue background.
- If you want to create a template from an existing document, double-click the document itself and skip to the «edit your document» step.
-
2
Click the «Blank document» template. It’s in the upper-left side of the Word window.
-
3
Edit your document. Any formatting changes you make (e.g., spacing, text size, font) will be parts of your template.
- If you’re creating a template from an existing document, you might not need to edit anything.
-
4
Click File. It’s a tab in the upper-left side of the page.
-
5
Click Save As. This option is near the top of the File pop-out window.
-
6
Select a save location. Double-click a save folder or location here to set it as the template’s storage spot.
-
7
Enter a name for your template. Type in the name you want to use for your template.
-
8
Click the «Save as type» drop-down box. It’s below the file name text box. A drop-down menu will appear.
-
9
Click Word Template. This option is near the top of the drop-down menu.
- You can also click Word Macro-Enabled Template here if you put macros in your document.
-
10
Click Save. It’s in the bottom-right side of the window. Doing so saves your template.
- You’ll be able to apply the template to other documents if you want to.


Advertisement
-
1
Open Microsoft Word. Double-click the Word icon, which resembles a white «W» on a dark-blue background.
- If you want to create a template from an existing document, double-click the document itself and skip to the «edit your document» step.
-
2
Click the New tab. It’s in the upper-left side of the home page.
- If there isn’t a home page, click the File tab and then click New from Template first.
-
3
Click the «Blank Document» template. It’s a white box. This will create a new Word document.
-
4
Edit your document. Any formatting changes you make (e.g., spacing, text size, font) will be parts of your template.
- If you’re creating a template from an existing document, you might not need to edit anything.
-
5
Click File. It’s a menu item in the top-left side of the page.
-
6
Click Save As Template. You’ll see this option in the File drop-down menu.
-
7
Enter a name for your template. Type in the name you want to use for your template.
-
8
Click the «File Format» drop-down box. It’s near the bottom of the window. A drop-down menu will appear.
-
9
Click Microsoft Word template. This option is in the drop-down menu, and has the «.dotx» extension next to it.
- You can also select Microsoft Word Macro-Enabled template if you put macros in your document.
-
10
Click Save. It’s the blue button at the bottom of the window. Doing so will save your template.
- You’ll be able to apply the template to other documents if you want to.


Advertisement
Add New Question
-
Question
How do I save an edited template as a default template in Word?

You can open HTML window in editor and you can place your code there. It will work if your editor has an edit HTML option.
-
Question
How can I use a template in Outlook?
Prepare your template and save it as .oft (Outlook template). Next time you need it, go to the Home tab and select New Items / More Items / Choose Form / Look in: User Templates in File System and select your template.
-
Question
How do I add lines inside the text box?
Draw them using the line tool in the box. On updated computers, go to insert>illustrations>shapes. On non-updated computers, go to insert>shape. You can also underline text by highlighting it, then going to home>underline text.
See more answers
Ask a Question
200 characters left
Include your email address to get a message when this question is answered.
Submit
Advertisement
-
Templates are extraordinarily helpful when invoicing or creating pamphlets.
Thanks for submitting a tip for review!
Advertisement
-
You shouldn’t have to pay for templates.
Advertisement
About This Article
Thanks to all authors for creating a page that has been read 331,425 times.
Is this article up to date?
Содержание
- Что такое шаблоны в Ворде
- Создание собственного шаблона
- Создание шаблона на основе существующего документа или стандартного шаблона
- Добавление стандартных блоков к шаблону
- Добавление элементов управления содержимым к шаблону
- Добавление элементов управления содержанием
- Добавление пояснительного текста к шаблону
- Вопросы и ответы

Если вы часто работаете в MS Word, сохранение документа в качестве шаблона наверняка вас заинтересует. Так, наличие шаблонного файла, с установленным вами форматированием, полями и прочими параметрами, может во многом упростить и ускорить рабочий процесс.
Шаблон, создаваемый в ворде, сохраняется в форматах DOT, DOTX или DOTM. Последний разрешает работу с макросами.
Урок: Создание макросов в MS Word
Что такое шаблоны в Ворде
Шаблон — это особый тип документа, при его открытии и последующем изменении создается копия файла. Исходный (шаблонный) документ при этом остается неизменным, как и его местоположение на диске.
В качестве примера того, каким может быть шаблон документа и зачем вообще он нужен, можно привести бизнес-план. Документы этого типа довольно часто создаются в Word, следовательно, используют их тоже довольно часто.
Так, вместо того, чтобы каждый раз заново создавать структуру документа, выбирать подходящие шрифты, стили оформления, устанавливать размеры полей, можно просто использовать шаблон со стандартным макетом. Согласитесь, такой подход к работе куда более рационален.
Урок: Как добавить новый шрифт в Ворд
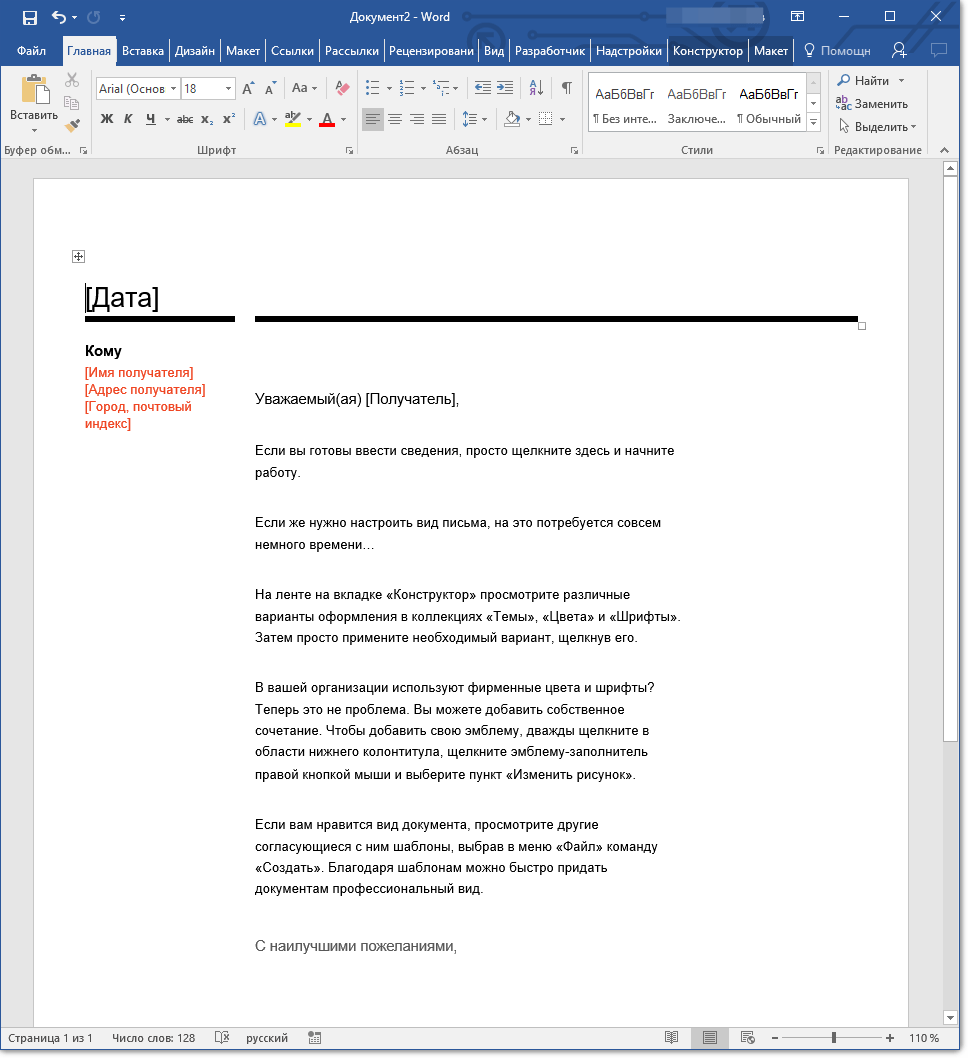
Документ, сохраненный в качестве шаблона, можно открыть и заполнить необходимыми данными, текстом. При этом, сохраняя его в стандартных для Word форматах DOC и DOCX, исходный документ (созданный шаблон), будет оставаться неизменным, как уже было сказано выше.
Большинство шаблонов, которые могут вам понадобиться для работы с документами в Ворде, можно найти на официальном сайте (office.com). Кроме того, в программе можно создавать собственные шаблоны, а также изменять уже существующие.
Примечание: Часть шаблонов уже встроена в программу, но часть из них, хоть и отображается в списке, на самом деле находится на сайте Office.com. После того, как вы нажмете на такой шаблон, он будет мгновенно скачан с сайта и доступен для работы.
Создание собственного шаблона
Проще всего будет начать создание шаблона с пустого документа, для открытия которого достаточно просто запустить Word.

Урок: Как в Ворде сделать титульный лист
Если вы используете одну из последних версий MS Word, при открытии программы вас будет встречать стартовая страница, на которой уже можно будет выбрать один из доступных шаблонов. Особенно радует то, что все они удобно рассортированы по тематическим категориям.
И все же, если вы сами хотите создать шаблон, выберите “Новый документ”. Будет открыт стандартный документ с установленными в нем параметрами по умолчанию. Эти параметры могут быть, как программными (заданными разработчиками), так и созданными вами (если ранее вы сохраняли те или иные значения в качестве используемых по умолчанию).

Используя наши уроки, внесите необходимые изменения в документ, который в дальнейшем будет использоваться в качестве шаблона.
Уроки по работе с Word:
Как сделать форматирование
Как изменить поля
Как изменить интервалы
Как изменить шрифт
Как сделать заголовок
Как сделать автоматическое содержание
Как сделать сноски

Помимо выполнения вышеперечисленных действий в качестве параметров по умолчанию для документа, который будет использоваться как шаблон, можно также добавить подложку, водяные знаки или любые графические объекты. Все, что вы измените, добавите и сохраните в дальнейшем будет присутствовать в каждом документе, созданном на основе вашего шаблона.
Уроки по работе с Ворд:
Вставка рисунка
Добавление подложки
Изменение фона в документе
Создание блок-схем
Вставка знаков и специальных символов
После того, как вы внесете необходимые изменения, зададите параметры по умолчанию в будущий шаблон, его необходимо сохранить.
1. Нажмите кнопку “Файл” (или “MS Office”, если используете старую версию Word).
2. Выберите пункт “Сохранить как”.
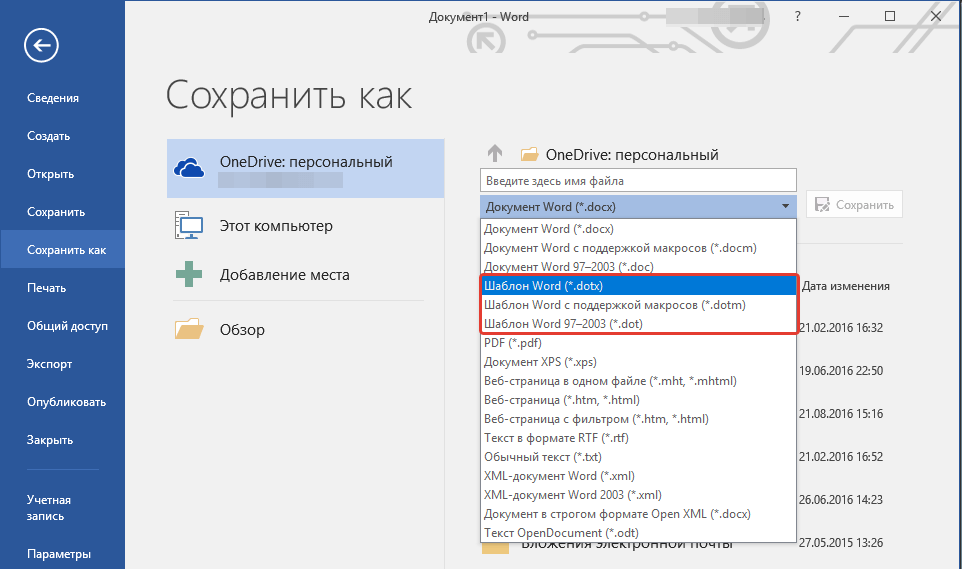
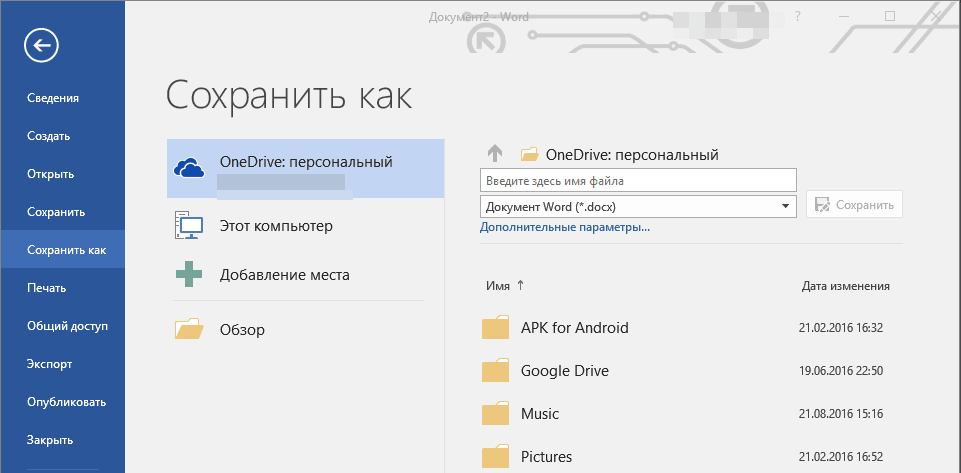
3. В выпадающем меню “Тип файла” выберите подходящий тип шаблона:
- Шаблон Word (*.dotx): обычный шаблон, совместимый со всеми версиями Ворда старше 2003 года;
- Шаблон Word с поддержкой макросов (*.dotm): как понятно из названия, данный тип шаблонов поддерживает работу с макросами;
- Шаблон Word 97 — 2003 (*.dot): совместим со старыми версиями Ворд 1997 — 2003.
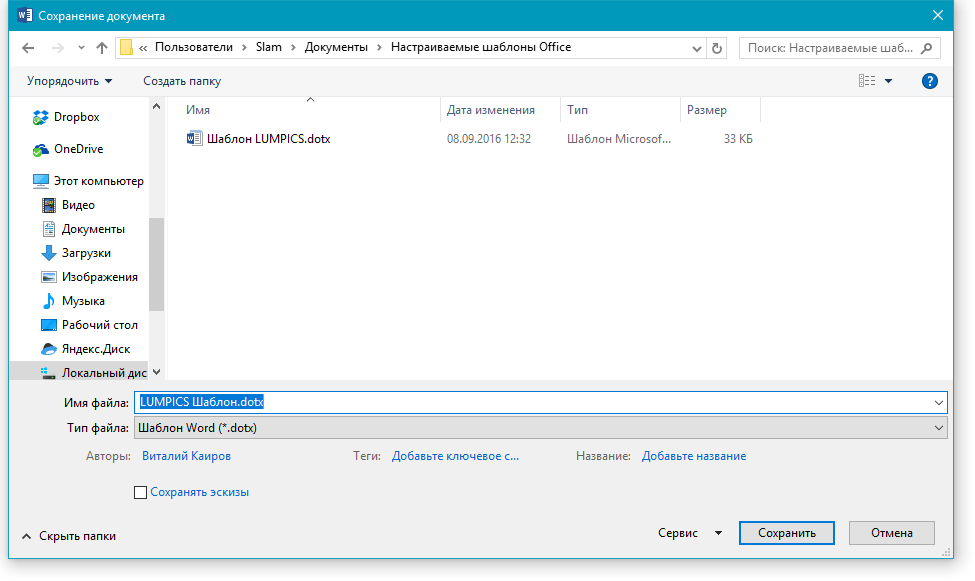
4. Задайте имя файла, укажите путь для его сохранения и нажмите “Сохранить”.
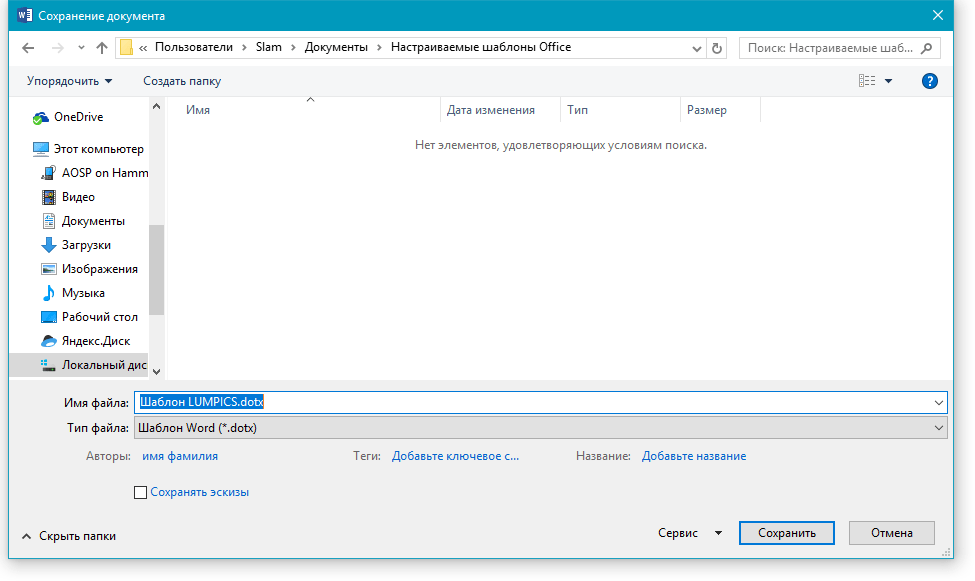
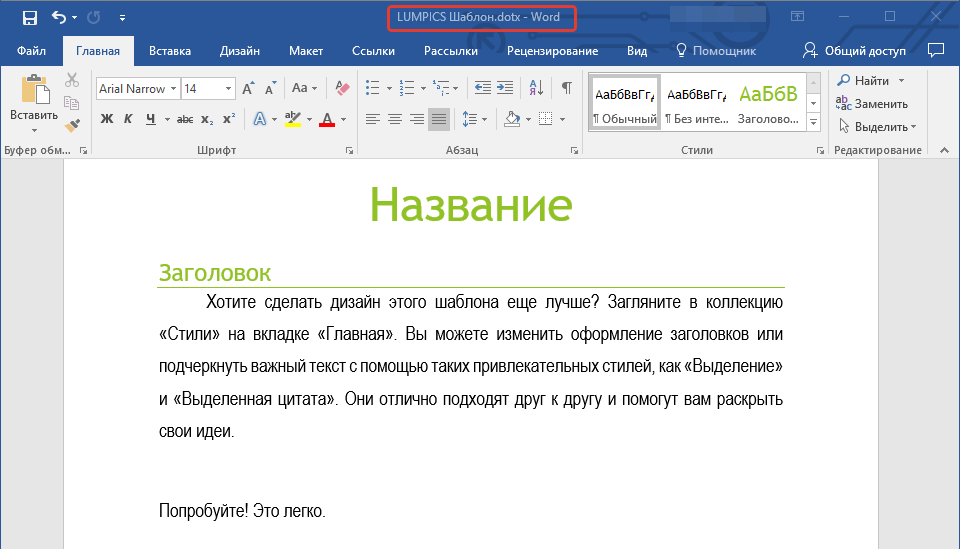
5. Созданный и настроенный вами файл будет сохранен в качестве шаблона в заданном вами формате. Теперь его можно закрыть.
Создание шаблона на основе существующего документа или стандартного шаблона
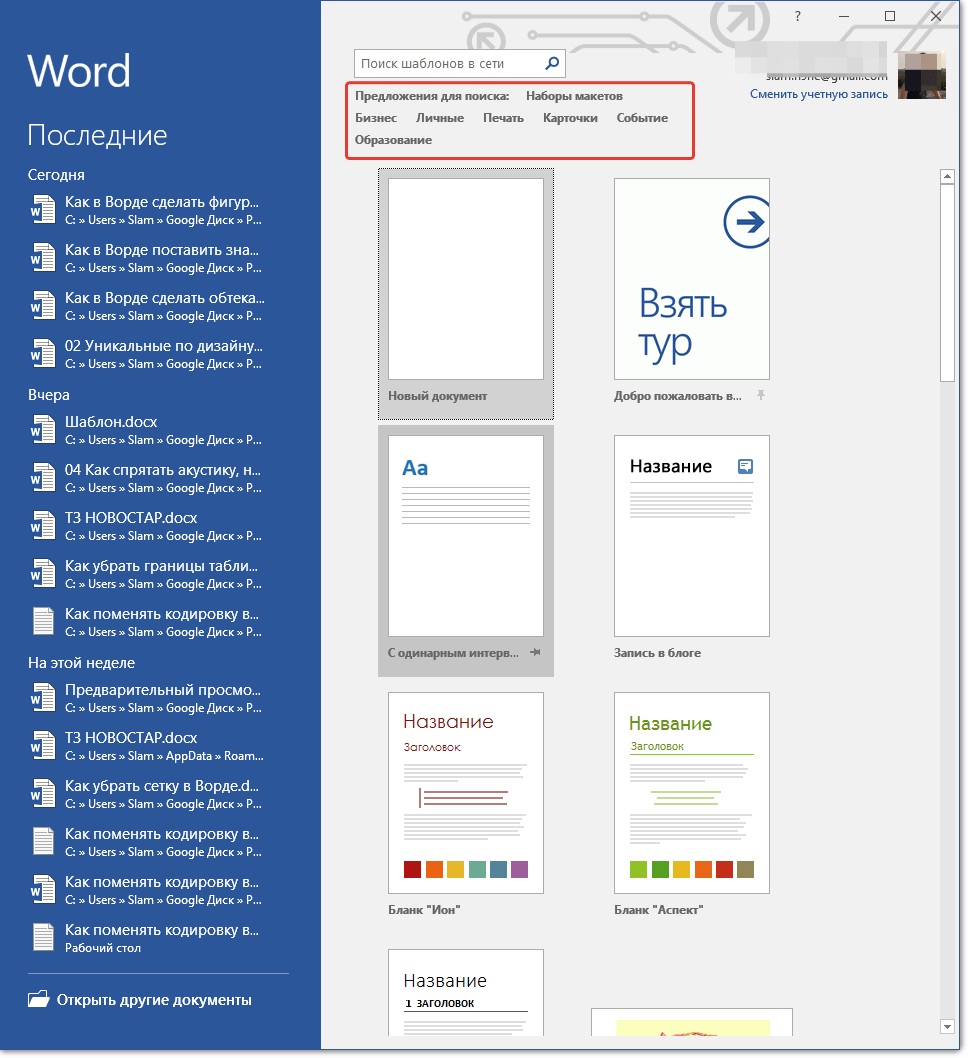
1. Откройте пустой документ MS Word, перейдите во вкладку “Файл” и выберите пункт “Создать”.
Примечание: В последних версиях Ворда при открытии пустого документа пользователю сразу предлагается перечень шаблонных макетов, на основе которых можно создать будущий документ. Если вы хотите получить доступ ко всем шаблонам, при открытии выберите “Новый документ”, а затем уже выполните действия, описанные в пункте 1.
2. Выберите подходящий шаблон в разделе “Доступные шаблоны”.
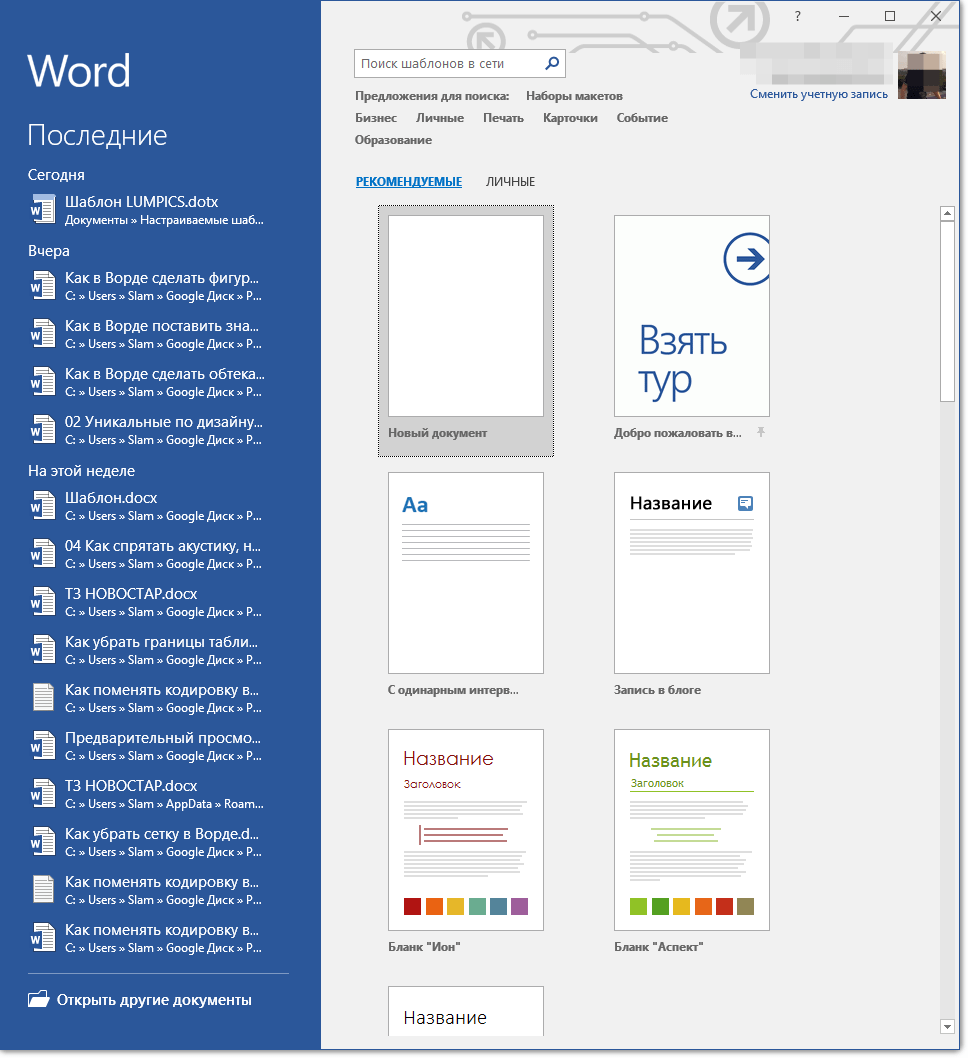
Примечание: В последних версиях Word ничего выбирать не нужно, список доступных шаблонов появляется сразу после нажатия на кнопку “Создать”, непосредственно над шаблонами находится перечень доступных категорий.
3. Внесите в документ необходимые изменения, воспользовавшись нашими советами и инструкциями, представленными в предыдущем разделе статьи (Создание собственного шаблона).
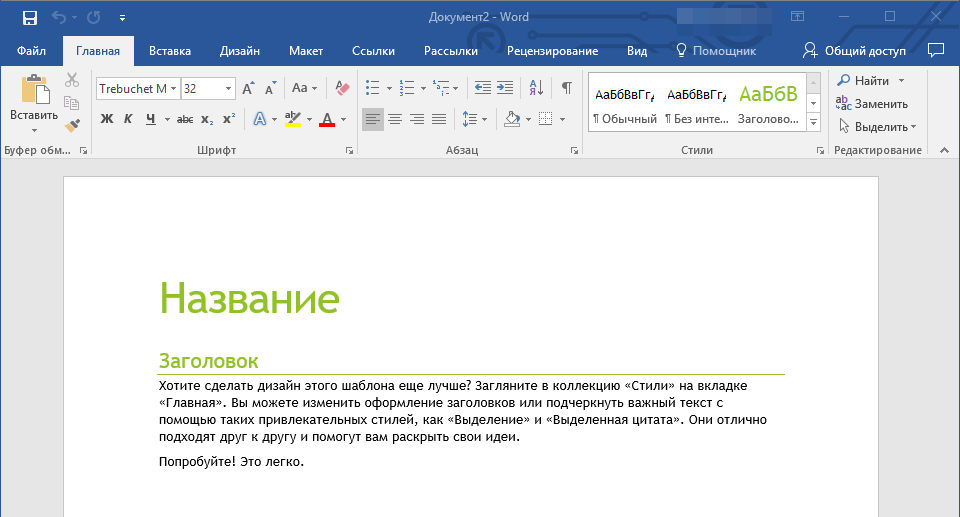
Примечание: Для разных шаблонов стили оформления текста, которые доступны по умолчанию и представлены во вкладке “Главная” в группе “Стили”, могут быть разными и заметно отличаться от тех, что вы привыкли видеть в стандартном документе.
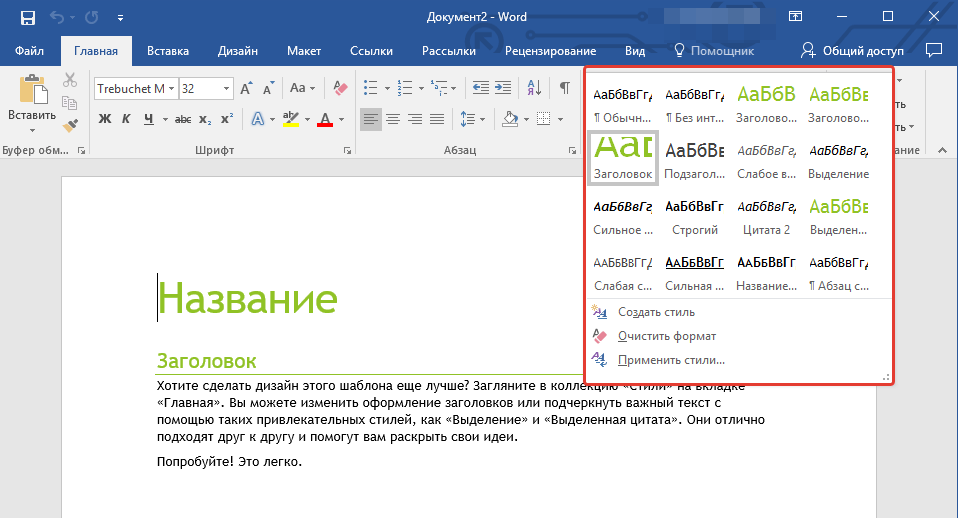
- Совет: Воспользуйтесь доступными стилями для того, чтобы сделать свой будущий шаблон действительно уникальным, не похожим на остальные документы. Конечно, делайте это лишь в том случае, если вас не ограничивают требования к оформлению документа.
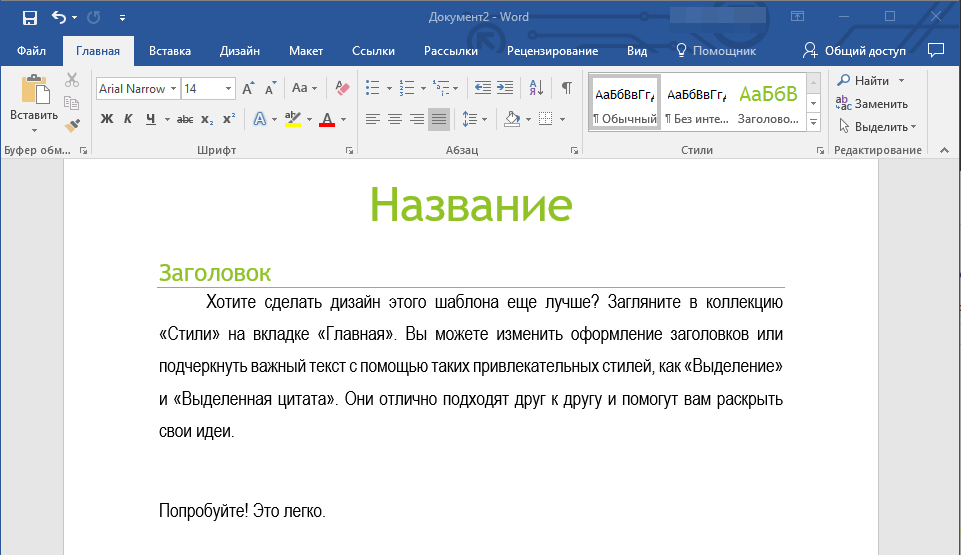
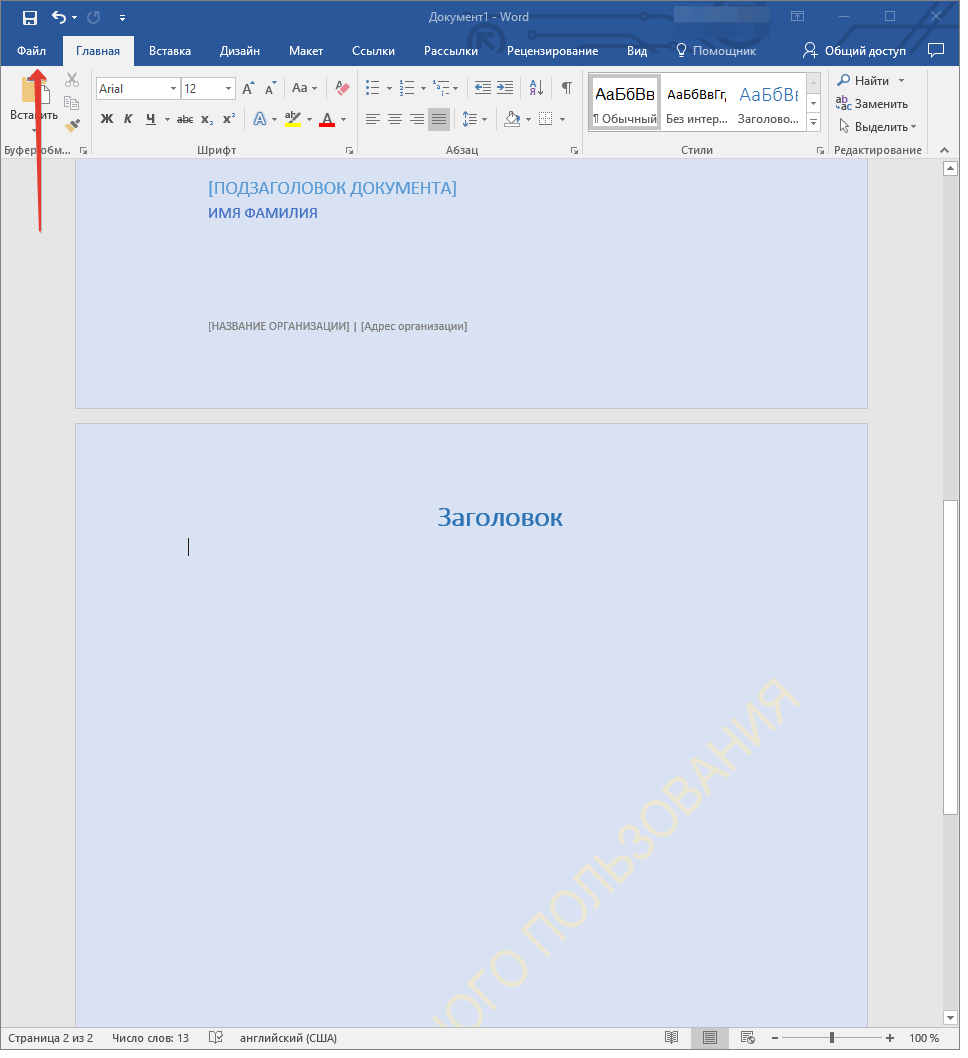
4. После того, как вы внесете необходимые изменения в документ, выполните все те настройки, которые посчитаете нужными, сохраните файл. Для этого нажмите на вкладку “Файл” и выберите “Сохранить как”.
5. В разделе “Тип файла” выберите подходящий тип шаблона.
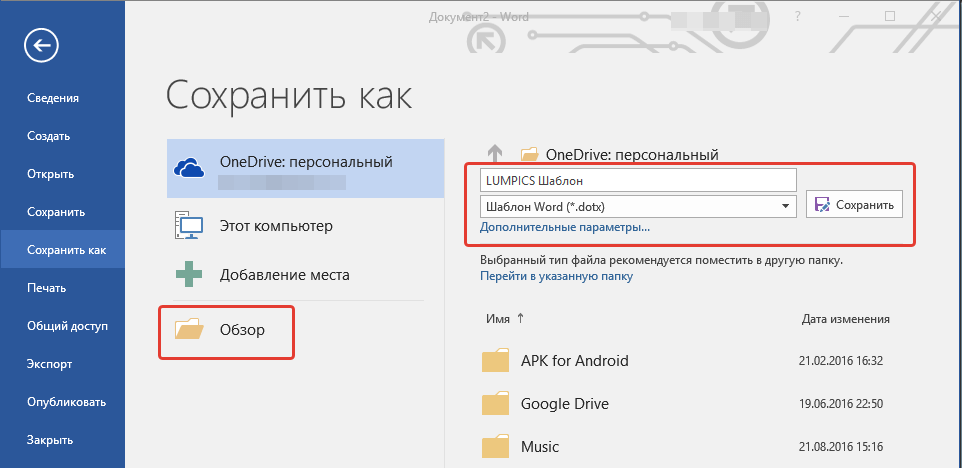
6. Задайте имя для шаблона, укажите через “Проводник” (“Обзор”) путь для его сохранения, нажмите кнопку “Сохранить”.
7. Шаблон, созданный вами на основе существующего, будет сохранен вместе со всеми внесенными вами изменениями. Теперь этот файл можно закрыть.
Добавление стандартных блоков к шаблону
Стандартными блоками называют многократно используемые элементы, содержащиеся в документе, а также те компоненты документа, которые хранятся в коллекции и доступны для использования в любое время. Хранить стандартные блоки и распространять их можно с помощью шаблонов.
Так, используя стандартные блоки, вы можете создать шаблон отчета, в котором будут содержаться сопроводительные письма двух и более типов. При этом, создавая новый отчет на основе данного шаблона, другие пользователи смогут выбрать любой из доступных типов.
1. Создайте, сохраните и закройте шаблон, созданный вами с учетом всех требований. Именно в этот файл будут добавляться стандартные блоки, которые в дальнейшем будут доступны другим пользователям созданного вами шаблона.
2. Откройте шаблонный документ, к которому необходимо добавить стандартные блоки.
3. Создайте необходимые стандартные блоки, которые в дальнейшем будут доступны для других пользователей.
Примечание: При введении сведений в диалоговое окно “Создание нового стандартного блока” введите в строке “Сохранить в” имя шаблона, к которому их необходимо добавить (это тот файл, который вы создали, сохранили и закрыли согласно первому пункту данного раздела статьи).
Теперь созданный вами шаблон, содержащий стандартные блоки, может быть предоставлен другим пользователям. Сами же блоки, сохраненные вместе с ним, будут доступны в заданных коллекциях.
Добавление элементов управления содержимым к шаблону
В некоторых ситуациях требуется придать шаблону вместе со всем его содержимым некоторую гибкость. Например, шаблон может содержать раскрывающийся список, созданный автором. По тем или иным причинам этот список может не устроить другого пользователя, которому доведется с ним работать.
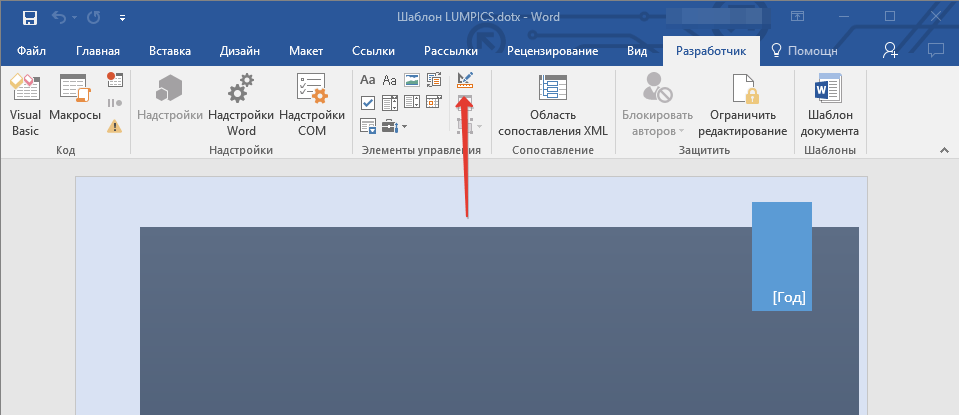
Если в таком шаблоне будут присутствовать элементы управления содержимым, второй пользователь сможет подкорректировать список под себя, оставив его неизменным в самом шаблоне. Чтобы добавить в шаблон элементы управления содержимым, необходимо включить вкладку “Разработчик” в MS Word.
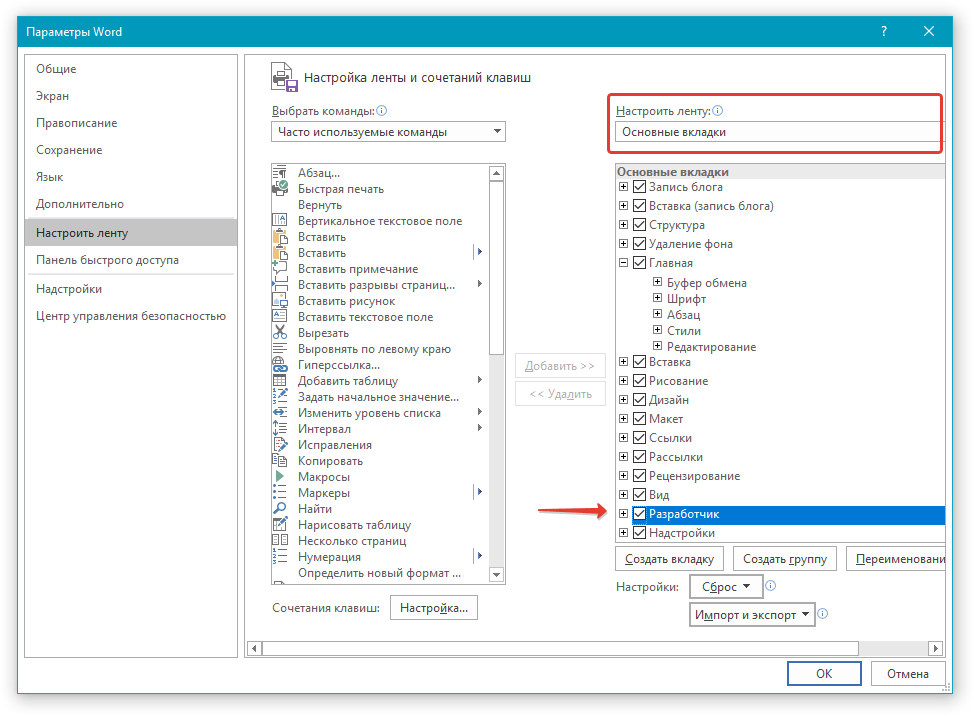
1. Откройте меню “Файл” (или “MS Office” в более ранних версиях программы).

2. Откройте раздел “Параметры” и выберите там пункт “Настройка ленты”.
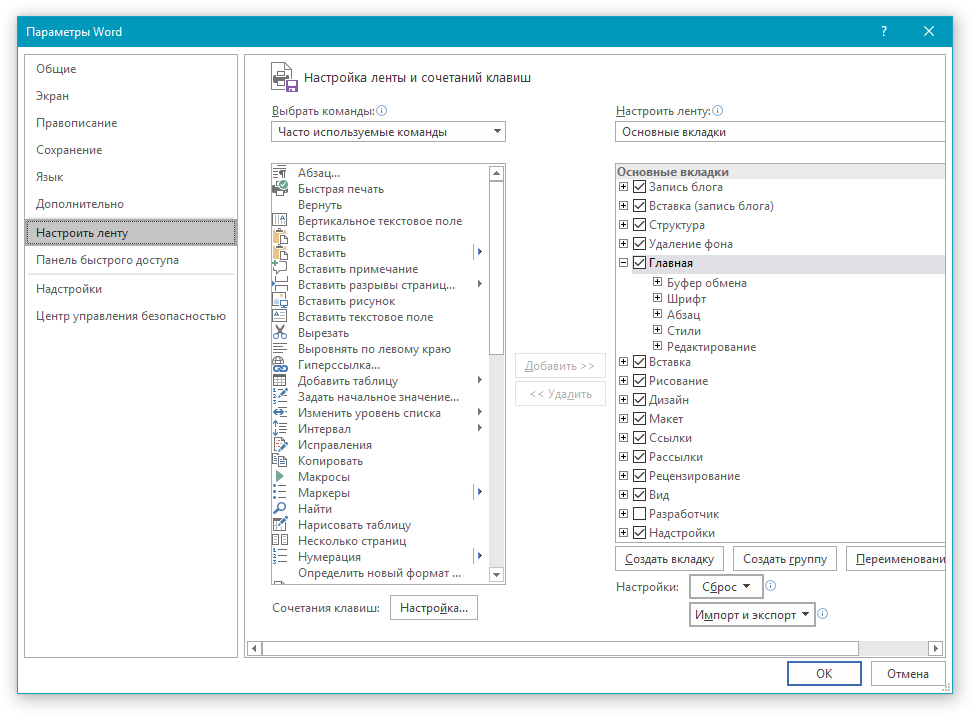
3. В разделе “Основные вкладки” установите галочку напротив пункта “Разработчик”. Для закрытия окна нажмите “ОК”.
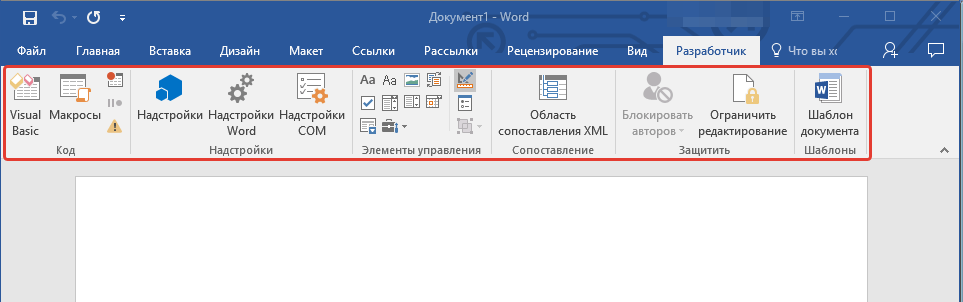
4. Вкладка “Разработчик” появится на панели управления Ворд.
Добавление элементов управления содержанием
1. Во вкладке “Разработчик” нажмите на кнопку “Режим конструктора”, расположенную в группе “Элементы управления”.
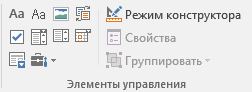
Вставьте в документ необходимые элементы управления, выбрав их из представленных в одноименной группе:
- Форматированный текст;
- Обычный текст;
- Рисунок;
- Коллекция стандартных блоков;
- Поле со списком;
- Раскрывающийся список;
- Выбор даты;
- Флажок;
- Повторяющийся раздел.
Добавление пояснительного текста к шаблону
Сделать шаблон более удобным в использовании можно с помощью пояснительного текста, добавленного в документ. Если это необходимо, стандартный пояснительный текст всегда можно изменить в элементе управления содержимым. Для настройки пояснительного текста по умолчанию для пользователей, которые будут использовать шаблон, необходимо выполнить следующие действия.
1. Включите “Режим конструктора” (вкладка “Разработчик”, группа “Элементы управления”).
2. Кликните по тому элементу управления содержимым, в котором необходимо добавить или изменить пояснительный текст.
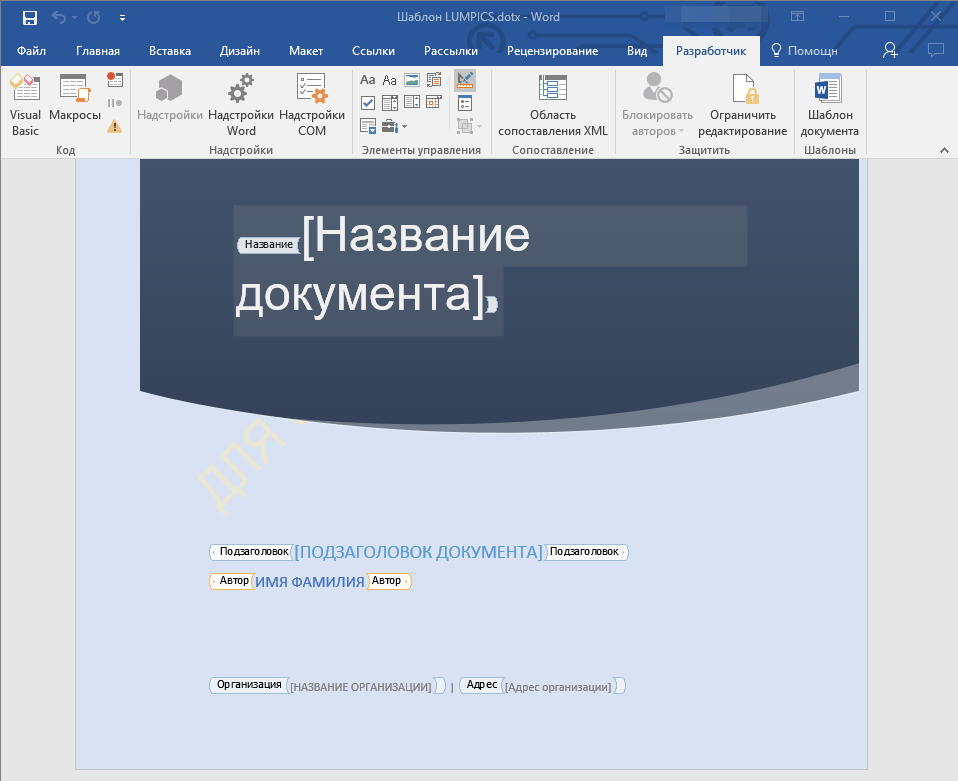
Примечание: Пояснительный текст по умолчанию находится в небольших блоках. Если “Режим конструктора” отключен, эти блоки не отображаются.
3. Измените, отформатируйте замещающий текст.
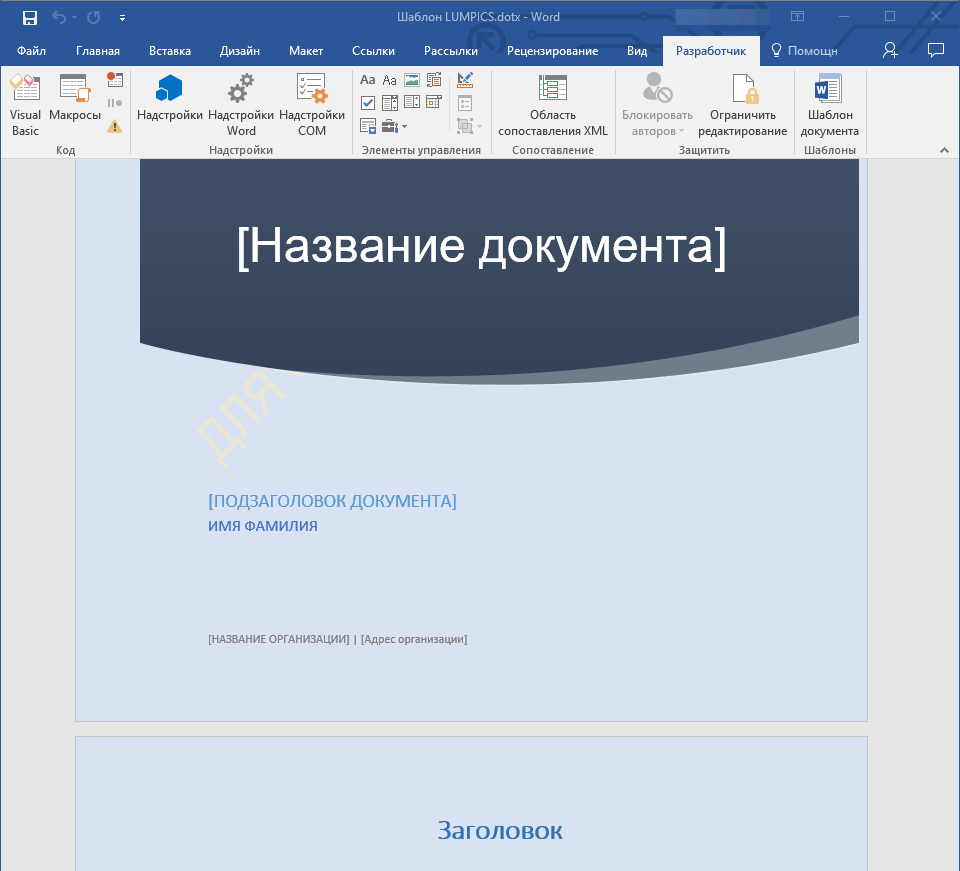
4. Отключите “Режим конструктора” повторным нажатием на эту кнопку на панели управления.
5. Пояснительный текст будет сохранен для текущего шаблона.
На этом мы закончим, из этой статьи вы узнали о том, что представляют собой шаблоны в Microsoft Word, как их создавать и изменять, а также обо всем том, что с ними можно делать. Это действительно полезная функция программы, во многом упрощающая работу с ней, особенно, если над документами работает не один, а сразу несколько пользователей, не говоря уже о крупных компаниях.
-
Home
- Computing
- Guides

Once is often more than enough, particularly when creating a lengthy or comprehensive template. Each template, though differing in format and layout, is essentially a pre-constructed document in which users can input their own information in lieu of repeatedly designing the page themselves. They’re incredibly convenient and time-saving — likely the reason why most versions of Microsoft Word come pre-loaded with a venerable swath of the framed documents — while delivering robust layout options for all manners of copy, whether you’re looking to create that knockout resume, hefty business brochure or real tearjerker of a card reserved for that special someone in your life. Thankfully, the American tech giant has made implementing Word templates a simple, three-click process (though the same can’t always be said for creating and saving them for later use in Word).
Here’s our straightforward guide on how to use document templates in Microsoft Word, regardless of whether you’re simply opening a preexisting document or looking to create your own from scratch. Also, check out our top picks for the best Microsoft Office alternatives if you’re looking for a non-Microsoft workaround. There’s also our guide on how to convert a PDF file to Word if you need a simple means of converting PDF files to a more accessible format on either Windows or Mac OS X.
Skip ahead to creating a Microsoft Word template.
Opening and using a Microsoft Word template
Step 1: Launch Microsoft Word — Open Word from the dock or main Applications folder in Mac OS X or launch the software using the main Taskbar or Start menu in Windows. Alternatively, search and launch the program using either operating system’s search utility, dubbed Spotlight and Windows Search, respectively.

Step 2: Select a template — Depending on which version of Microsoft Word you’re using, you may be presented with a pop-up window presenting the various template choices available at your disposal. If using Mac OS X, click the File menu in the application Taskbar, select New from Template near the top of the resulting drop-down menu, and select your desired template from the resulting list of options prior to clicking the gray Choose button in the bottom-right corner of the window. If using Windows, click the File menu in the application toolbar, select the New panel on the left-hand side and double-click your desire template from the resulting list of options. Regardless of your OS, each version of Word should present a healthy selection of template options culled from assorted categories including Calendars, Stationary, Newsletters, Resumes, Proposals, and the like.

Step 3: Input your own copy — Each individual template serves a different purpose, but almost each one operates as a blank slate within a specified framework. Whether you previously chose a simple resume template, a more elaborate brochure template or a different option entirely, you’ll have the option to edit the content within. Change the images, font, colors, or any other facet of the template, and replace the default placeholder text or instructions with information of your own. Keep in mind the changes will not affect the original template, and when done, name and save the file as you would any other blank Word document.

Creating a Microsoft Word template
Step 1: Launch Microsoft Word — Open Word from the dock or main Applications folder in Mac OS X or launch the software using the main Taskbar or Start menu in Windows. Alternatively, search and launch the program using either operating system’s innate search utility, dubbed Spotlight and Windows Search, respectively.

Step 2: Open a blank document — Open a blank document once Word launches. If using Mac OS X, click the File menu in the application taskbar, select New Blank Document at the top of the resulting drop-down menu. If using Windows, click the File menu in the application toolbar, select the New panel on the left-hand side and double-click Blank document near the top of the resulting section, directly above the slew of available templates.

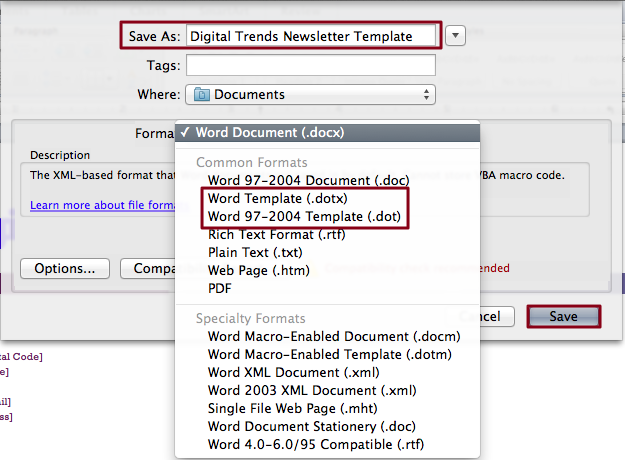
Step 3: Create the template — There’s no one way to create a Word template. Like the Microsoft-culled templates already available within the software, each template you create will likely serve a different purpose and fit your individual aesthetics. However, whether you’re creating a business newsletter or resume, it’s important you initially format the document so you’ll be able to quickly alter its content for whatever occasion it may warrant. A template should be specifically designed to be void of specifics, while keeping it as generic and clear as possible so you can later add the tailored content in the appropriate spot. For instance, avoid inserting specific dates and addresses as they may frequently change. Instead, stick with something like “[Date]” and “[Street Address],” while incorporating placeholder text to better visualize the template’s overall appearance without delving into the specifics. Remember, it’s intended to be bare bones.

Step 4: Save the template — If using Mac OS X, click the File menu in the application Taskbar and select Save As near the middle of the resulting drop-down menu. If using Windows, click the File menu in the application toolbar and select Save As from the left-hand column. Afterward, appropriately name the file, chose a save location, and select the template format suited best for your particular software suite. Word Template (.dotx) will suffice in most cases, but you may want to consider saving the template as either a Word 97-2003 Document (.dot) or Word 97-2004 Document (.doc) if you plan on utilizing the template on an older system. When finished, click the Save button in the bottom-right corner of the window. The newly-minted template will be available in either the My Templates or Personal sections depending on which incarnation of Word you’re using to open the new document from a template.
What do you think of our simple guide on how to use document templates in Microsoft Word? Still perplexed by any one facet of our article? Let us know in the comments below.
Editors’ Recommendations
-
How to factory reset Windows 10 or Windows 11
-
How to use Bing Image Creator to generate AI images for free
-
Microsoft’s Bing Chat waitlist is gone — how to sign up now
-
Microsoft continues its unabashed embrace of ChatGPT and AI
-
Microsoft Word vs. Google Docs
-
Deals
Best Microsoft Office deals for January 2023

Mircosoft Office is so ubiquitous these days that it’s practically a necessity for anyone who writes, manages spreadsheets or gives presentations for a living. Surely you’ve heard of Microsoft Office, even if you’ve never had the pleasure (if you’d call it that) of using it yourself. The Office suite has a lot more to offer than just Word, Excel, and PowerPoint, though, so if you need help finding the right package for your needs, our roundup of the best Microsoft Office deals can make things a bit easier — and hopefully save you some cash.
Today’s best Microsoft Office deals
Microsoft 365 Personal (1-year) — $59, was $70
This license includes a 12-month subscription to Microsoft 365 Personal for a single user, allowing access to the entire Office Suite, including Word, Excel, PowerPoint, Outlook, and more. You’ll also get up to 1TB of OneDrive cloud storage space — so you can move files seamlessly between your local devices and the cloud. It’s compatible with both PC and Mac. It is a great option for students, professionals working from home, and anyone that needs access to the Microsoft Office Suite from a personal computer.
Read more
-
Computing
Microsoft might put ChatGPT into Outlook, Word, and PowerPoint

Microsoft is currently testing the GPT AI language that was developed by the technology brand OpenAI to potentially be used in its Office suite of products, including Word, Outlook, and PowerPoint.
OpenAI’s intuitive technology products, including ChatGPT and Dall-E 2, have become internet sensations for their text- and image-generating prowess. Many have speculated about how ChatGPT can practically and morally be used. However, Microsoft is looking to use the company’s AI models in a more functional manner. The company has already implemented a version of the OpenAI GPT text-generator model as an update to its autocomplete feature, according to The Information.
Read more
-
Deals
Microsoft Word Free Trial: Get a month of service for free

Windows may be a staple Microsoft product, but even as a software company it delivers far more than the popular operating system. Microsoft also dominates the enterprise software space with its Office app suite, which is relied on by millions of professionals, students, and average folks around the world every single day. One of the more renowned Office apps is Microsoft Word, a versatile and capable word processor that’s essential for typing and editing written documents, among other things (and there’s a lot of things you probably didn’t know you could do in Microsoft Word). Microsoft Office is paid software, however, Word included, and for some, the cost may seem high even with some of the best Microsoft Office deals floating around. So, if you’re wondering if there’s a Microsoft Word free trial or any other way to get it for free, read on to find out.
Is there a Microsoft Word free trial?
Microsoft Word is actually part of the company’s wider Office app suite. Now known simply as Microsoft 365 (formerly Microsoft Office), Microsoft’s enterprise software is available in a number of different packages that are now subscription-based; the company has retired the older bundles that were available for a one-time payment. That means if you want a Microsoft Word free trial, you’ll need to sign up for the Microsoft 365 trial, which includes the Word app along with Excel, PowerPoint, Outlook, Teams, OneDrive, and Editor.
Read more