
Содержание
- Выбор шрифта и типа написания текста
- Выделение заголовка
- Выравнивание текста
- Изменение интервалов
- Добавление маркированных и нумерованных списков
- Дополнительные операции
- Вопросы и ответы
![]()
Мы уже неоднократно писали об инструментах для работы с текстом в MS Word, о тонкостях его оформления, изменения и редактирования. О каждой из этих функций мы рассказывали в отдельных статьях, вот только для того, чтобы сделать текст более привлекательным, удобным для чтения, понадобится большинство из них, причем, выполненных в правильном порядке.
Урок: Как добавить новый шрифт в Ворд
Именно о том, как правильно выполнить форматирование текста в документе Microsoft Word и пойдет речь в данной статье.
Выбор шрифта и типа написания текста
О том, как изменять шрифты в Ворде мы уже писали. Вероятнее всего, вы изначально набирали текст в понравившемся шрифте, выбрав подходящий размер. Более подробно о том, как работать со шрифтами, вы можете узнать в нашей статье.
Урок: Как изменить шрифт в Word

Выбрав подходящий шрифт для основного текста (заголовки и подзаголовки пока что не торопитесь изменять), пройдитесь по всему тексту. Возможно, некоторые есть фрагменты нужно выделить курсивом или полужирным шрифтом, что-то нужно подчеркнуть. Вот пример того, как может выглядеть статья на нашем сайте.
Урок: Как подчеркнуть текст в Ворде
Выделение заголовка
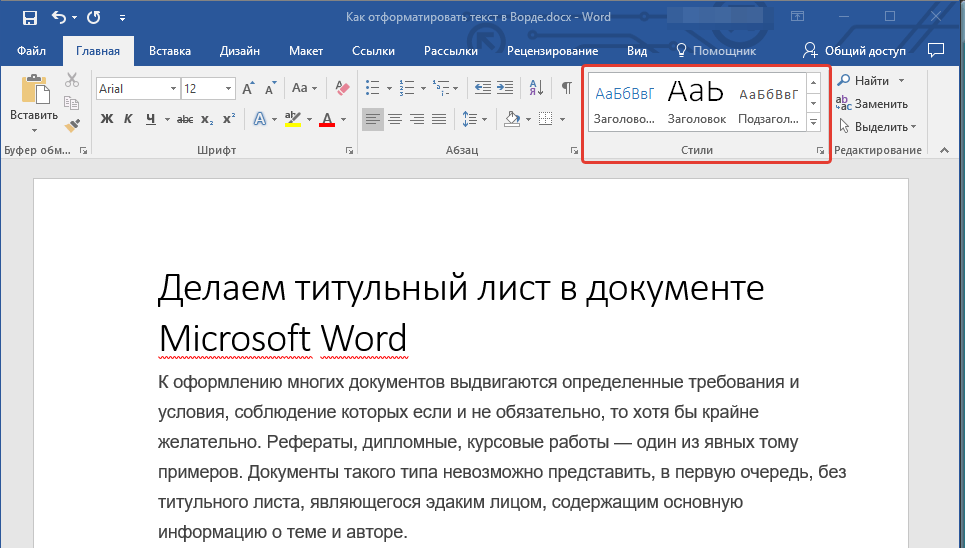
С вероятностью в 99,9% у статьи, которую вы хотите отформатировать, есть заголовок, и, скорее всего, подзаголовки в ней тоже имеются. Конечно же, их нужно отделить от основного текста. Сделать это можно с помощью встроенных стилей Word, а более подробно с тем, как работать с этими инструментами, вы можете ознакомиться в нашей статье.
Урок: Как сделать заголовок в Ворде
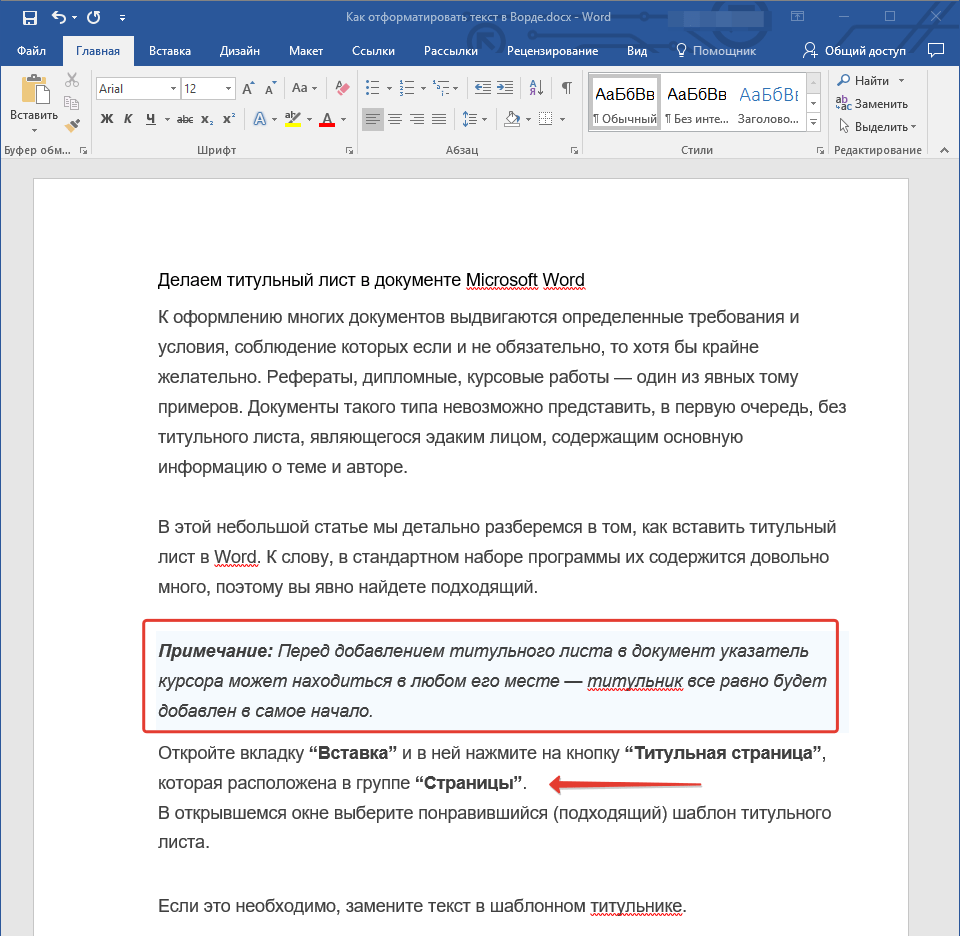
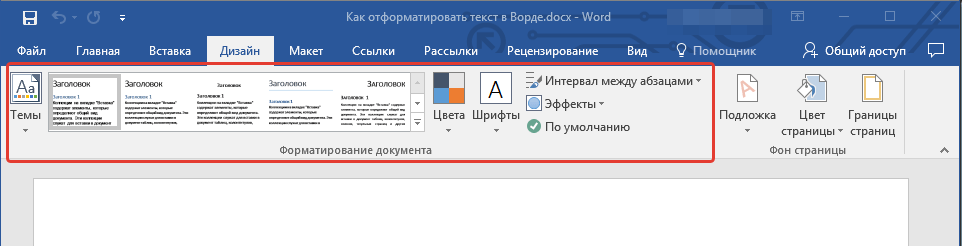
Если вы используете последнюю версию MS Word, дополнительные стили для оформления документа вы можете найти во вкладке “Дизайн” в группе с говорящим названием “Форматирование текста”.

Выравнивание текста
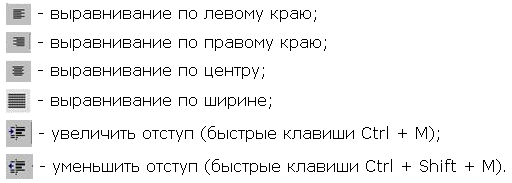
По умолчанию текст в документе выравнивается по левому краю. Однако, если это необходимо, вы можете изменить выравнивание всего текста или отдельно выделенного фрагмента так, как вам это необходимо, выбрав один из подходящих вариантов:
Урок: Как выровнять текст в Ворде
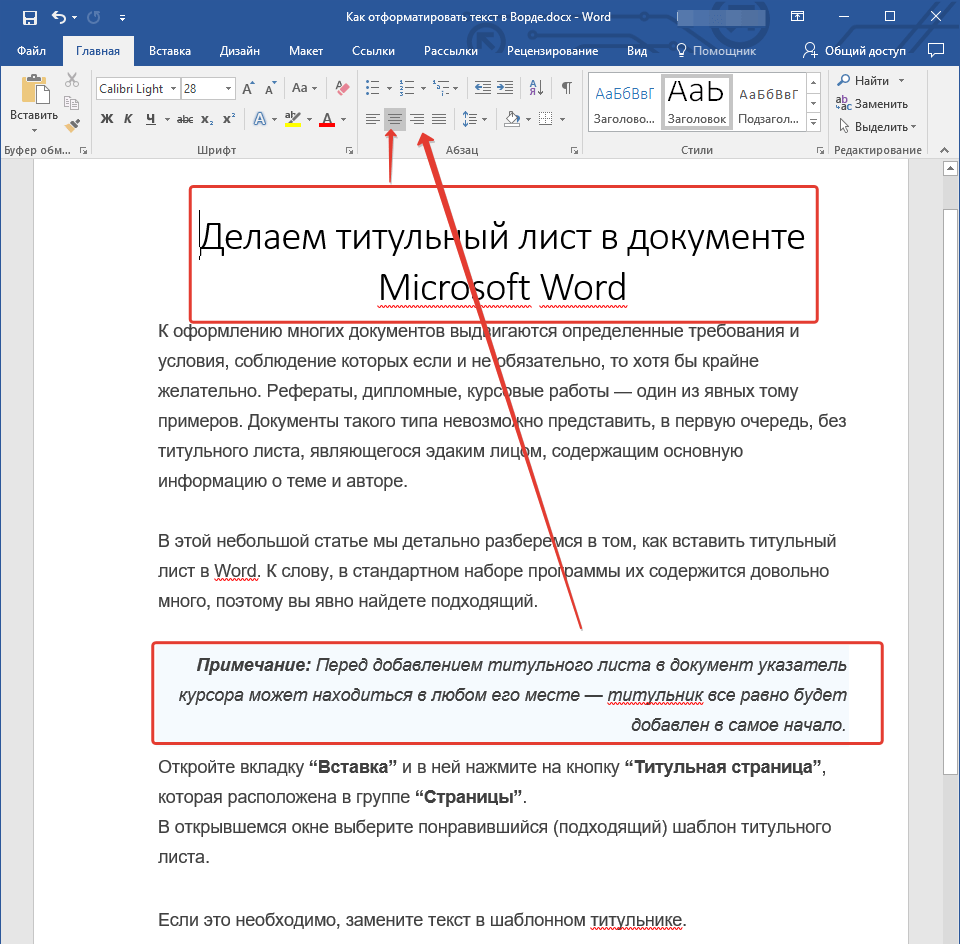
Инструкция, представленная на нашем сайте, поможет вам правильно расположить текст на страницах документа. Выделенные красным прямоугольником фрагменты текста на скриншоте и связанные с ними стрелки показывают, какой стиль выравнивания выбран для данных частей документа. Остальное содержимое файла выровнено по стандарту, то есть, по левому краю.
Изменение интервалов
Расстояние между строчками в MS Word по умолчанию составляет 1,15, однако, его всегда можно изменить на большее или меньшее (шаблонное), а также вручную задать любое подходящее значение. Более подробную инструкцию касательно того, как работать с интервалами, изменять и настраивать их вы найдете в нашей статье.
Урок: Как изменить межстрочный интервал в Ворде

Помимо интервала между строками, в Word также можно изменить и расстояние между абзацами, причем, как до них, так и после. Опять-таки, вы можете выбрать шаблонное значение, которое вас устраивает, или задать собственное вручную.
Урок: Как изменить интервал между абзацами в Ворде
Примечание: Если заголовок и подзаголовки, которые имеются в вашем текстовом документе, оформлены с помощью одного из встроенных стилей, интервал определенного размера между ними и следующими абзацами задается автоматически, а зависит он от выбранного стиля оформления.
Добавление маркированных и нумерованных списков
Если в вашем документе содержатся списки, незачем нумеровать или уж тем более маркировать их вручную. В Microsoft Word для этих целей предусмотрены специальных инструменты. Они, как и средства для работы с интервалами, расположены в группе “Абзац”, вкладка “Главная”.

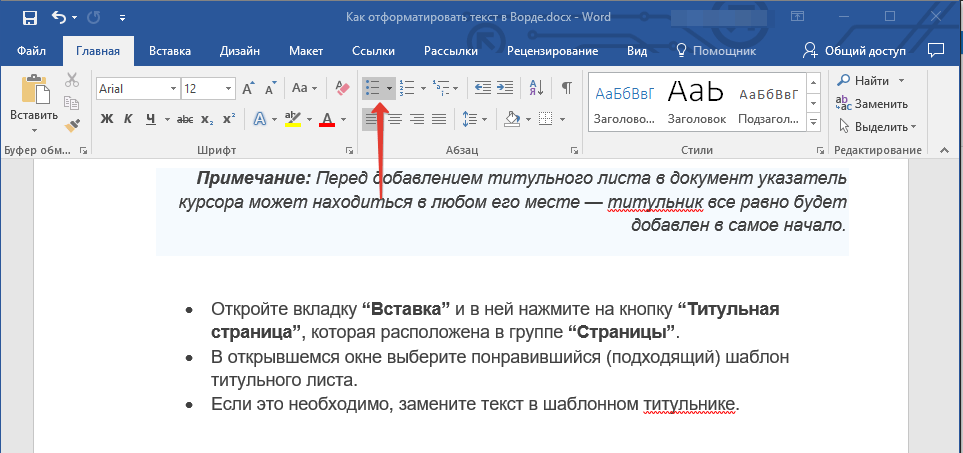
1. Выделите фрагмент текста, который необходимо преобразовать в маркированный или нумерованный список.

2. Нажмите одну из кнопок (“Маркеры” или “Нумерация”) на панели управления в группе “Абзац”.
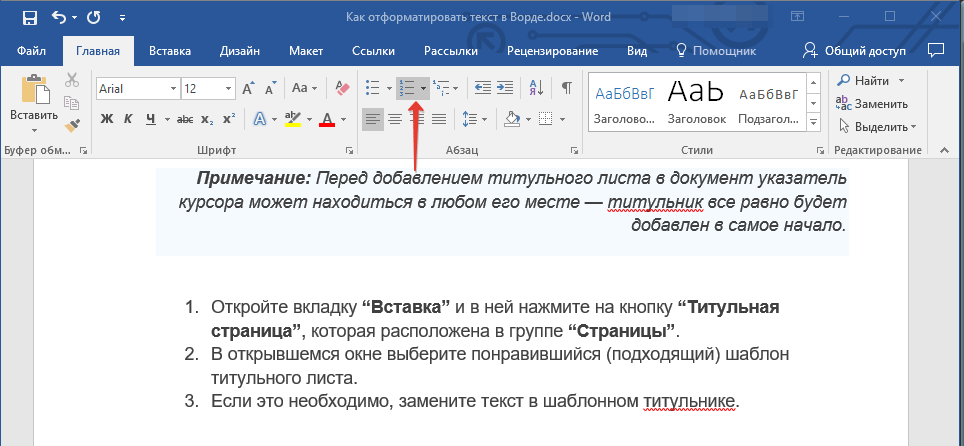
3. Выделенный фрагмент текста преобразуется в красивый маркированный или нумерованный список, в зависимости от того, какой из инструментов вы выбрали.
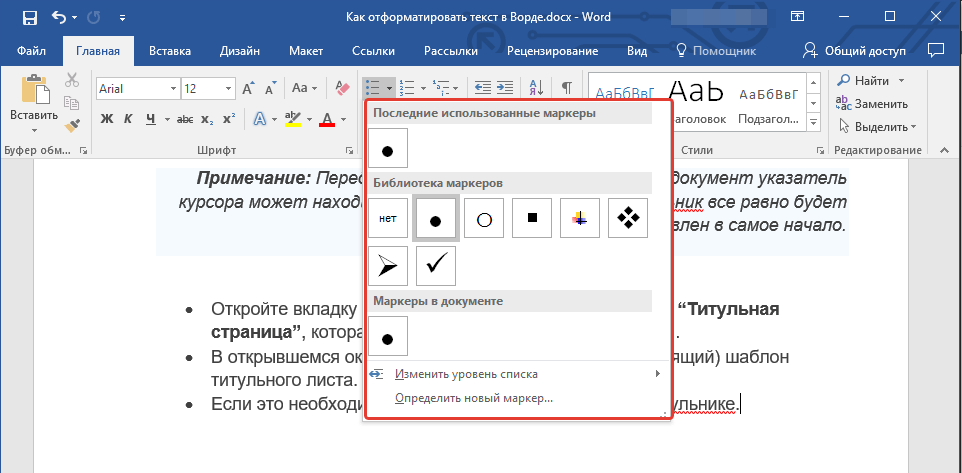
- Совет: Если развернуть меню кнопок, отвечающих за списки (для этого нужно нажать на небольшую стрелочку справа от значка), вы можете увидеть дополнительные стили оформления списков.
Урок: Как в Ворде сделать список в алфавитном порядке
Дополнительные операции
В большинстве случаев того, что мы уже описали в данной статье и остальном материале по теме форматирования текста более, чем достаточно для оформления документов на должном уровне. Если же вам этого будет мало, либо же вы просто пожелаете внести какие-то дополнительные изменения, коррективы и т. д. в документ, с большой вероятность, вам будут очень полезны следующие статьи:
Уроки по работе с Microsoft Word:
Как сделать отступы
Как сделать титульный лист
Как пронумеровать страницы
Как сделать красную строку
Как сделать автоматическое содержание
Табуляция
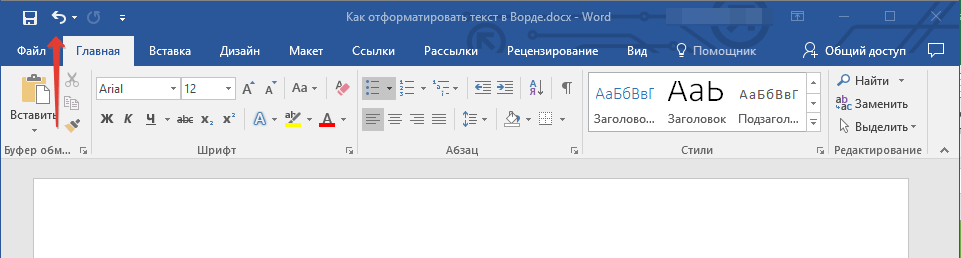
- Совет: Если во время оформления документа, при выполнении той или иной операции по его форматированию, вы допустили ошибку, ее всегда можно исправить, то есть, отменить. Для этого просто нажмите на закругленную стрелку (направленную влево), расположенную возле кнопки “Сохранить”. Также, для отмены любого действия в Ворде, будь то форматирование текста или любая другая операция, можно использовать комбинацию клавиш “CTRL+Z”.
Урок: Горячие клавиши в Word
На этом мы смело можем закончить. Теперь вы точно знаете, как отформатировать текст в Ворде, сделав его не просто привлекательным, а хорошо читабельным, оформленным в соответствии с выдвигаемыми требованиями.
Microsoft Word предоставляет несколько
способов форматирования текста. Условно
форматирование текста можно разделить
на две большие категории: форматирование
символов и форматирование абзацев.
Форматирование символов
Форматирование символов подразумевает
изменение внешнего вида выделенного
текста. Например, к нему можно отнести
следующее:
-
изменение шрифта и его размера;
-
изменение цвета текста;
-
изменение начертания шрифта (полужирное,
курсивное и т.п.); -
применение к шрифту эффектов (верхний
индекс, нижний индекс, малые прописные
буквы, подчеркивание и т.д.).
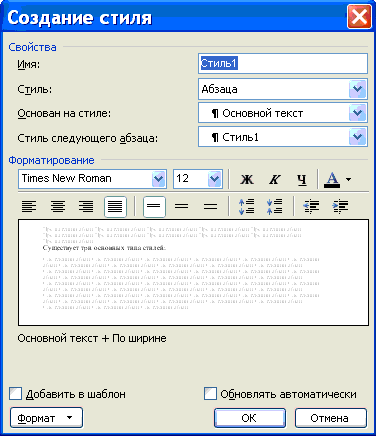
Все эти изменения можно придать
выделенному фрагменту текста с помощью
диалогового окна команды ШрифтменюФормат(рис.2.1).

Рис. 2.1. Диалоговое окно команды Формат
При наборе текста рефератов, пояснительных
записок к курсовым работам и проектам
обычно рекомендуется использовать
шрифт Times New Roman, размер букв – 12 или 14
пт.
Для быстрого внесения изменений на
панели инструментов Форматированиеесть специальные средства:

Удобно для этих целей пользоваться
«быстрыми клавишами», дублирующими
нажатие часто используемых кнопок.
Наиболее распространенные сочетания
таких клавиш приведены в табл.2.1.
Таблица 2.1

Форматирование абзацев
Текст документов состоит из абзацев,
фрагментов текста, которые заканчиваются
нажатием клавиши Enter. При наборе текста
в Microsoft Word нет нужды заботиться о переходе
на новую строку, этот переход осуществляется
автоматически, кроме того, Microsoft Word может
выполнять и автоматический перенос
слов. Для этого выберите команду
Расстановка переносовв менюСервис(подменюЯзык). В открывшемся
диалоговом окне активизируйте флажокАвтоматическая расстановка переносов.
Форматирование абзацев включает в себя:
-
задание отступов абзаца;
-
задание выравнивания (например, по
левому краю, по центру и т.п.); -
задание межстрочных интервалов и
интервалов между абзацами; -
применение обрамления (границ) и/или
заливки абзацев.
Наиболее полно все эти настройки можно
выполнить с помощью диалогового окна
команды АбзацменюФормат. Это
окно содержит две вкладки:Отступы и
интервалыиПоложение на странице.
Производить настройки с помощью этого
окна несложно, т.к. в нижней части окна
расположен образец, на котором отражаются
все выбранные вами изменения.
На вкладке Отступы и интервалызадаются:
-
отступы (границы абзацев) слева и справа
от края печатного листа; -
положение первой строки абзаца: отступ
(«красная строка»), выступ («висячая
строка»); -
межстрочный и межабзацный интервалы;
-
способ выравнивания текста (по левому
краю, по правому краю, по центру, по
ширине).
Вкладка Положение на страницеопределяет правила разбиения строк
абзаца на страницы:
-
запрет висячей строки – нельзя печатать
одну первую или одну последнюю строку
абзаца на другой странице (можно не
менее двух строк); -
не разрывать абзац, т.е. весь абзац
должен располагаться в пределах одной
страницы; -
не отрывать от следующего, т.е. текущий
и следующий абзац печатаются на одной
странице; -
запрет автоматического переноса слов
– для данного абзаца будет отключена
опция автоматического переноса слов
(этот параметр обязательно должен быть
активным для заголовков, т.к. в заголовках
перенос слов не допускается).
Быстро выполнять форматирование можно
и с помощью кнопок панели инструментов
Форматирование.
Рекомендуемые параметры абзаца при
выполнении рефератов, пояснительных
записок и др.:
выравнивание – по ширине;
отступы слева и справа – 0 см;
первая строка – отступ на 1,27 см;
межстрочный интервал – одинарный.
Для абзацев-заголовков на вкладке
Положение на страницеактивизировать
флажки:
не разрывать абзац;
не отрывать от следующего;
запретить автоматический перенос
слов,
а также при необходимости флажок с
новой страницы(например, для начала
новой главы документа).
Соседние файлы в предмете [НЕСОРТИРОВАННОЕ]
- #
- #
- #
- #
- #
- #
- #
- #
- #
- #
- #
Практическая
работа №7
Создание
и форматирование документов в Microsoft Word
Цель: научиться
создавать и форматировать документы применяя различные шрифты и расположение
текста
Теоретический
материал
Основные средства форматирования текста, абзацев и
таблиц помещены на вкладке Главная. Для быстрого форматирования вручную
символов (текста) и абзацев можно использовать команды в группе Шрифт и Абзац
на вкладке Главная.

Рис. 1
Кроме того, команды форматирования доступны на
Мини-панели инструментов, которая появляется при наведении указателя мыши на
выделенный фрагмент текста.

Рис. 2
Необходимо отметить, что существует еще один
инструмент для быстрого форматирования текста — это кнопка «Формат по
образцу» в группе «Буфер обмена» на вкладке «Главная»,
которая позволяет копировать параметры форматирования одного фрагмента и
переносить на другой фрагмент текста при его выделении.

Рис. 3
Для быстрого и одновременного изменения нескольких
атрибутов форматирования символов и абзацев можно использовать Экспресс-стили
из группы стили на вкладке Главная.

Рис. 4
Стили предназначены для оформления текста документа
и его абзацев. Для форматирования символов и абзацев вручную используют не
только кнопки для быстрого форматирования, но и окна диалога Шрифт и Абзац,
которые активизируются кнопками на вкладке Главная в группах Шрифт и Абзац
соответственно.
Пошаговая инструкция форматирования текста
По умолчанию новый документ создается в стиле
Обычный, а это означает, что весь текст выглядит одинаково. Но с помощью
средств форматирования всегда можно изменить внешний вид документа. Для этого
необходимо выделить символ, фрагмент или абзац и щелкнуть указателем мыши на
требуемую кнопку, чтобы применить другой формат.
Отформатируем текстовый документ, который мы создали
и отредактировали представлен на рис.5.

Рис. 5
Этапы
форматирования текста документа:
§ открываем
отредактированный документ и меняем стиль «Обычный» на «Без
интервала», для этого щелкаем на кнопке «Без интервала» в группе
стили;
§ устанавливаем
шрифт (гарнитуру шрифта) Times New Roman, размер 12 пунктов — выделяем весь
текст, наводим на него указатель мыши и в появившейся Мини-панели инструментов
выбираем шрифт: Times New Roman и размер 12 пунктов;
§ выравниваем
текст по ширине, для этого выделяем весь текст и щелкаем на кнопке По ширине в
группе Абзац;
§ устанавливаем
отступ первой строки, для этого выделяем текст, щелкаем на кнопке Абзац и в
открывшемся окне диалога устанавливаем величину отступа первой строки 1, 25 см;
§ добавляем
к тексту заголовок (Мой первый документ), устанавливаем ему уровень заголовка:
Заголовок 1 и выравниваем его по центру, для этого выделяем заголовок, щелкаем
на кнопке Заголовок 1 в группе стили (заголовок форматируются с помощью
встроенного стиля заголовков «Заголовок 1»), а затем на кнопке По центру в
группе Абзац;
§ в
первом абзаце фрагменту текста (Мой первый документ) назначить начертание —
курсив, подчеркнутый, для этого выделяем указанный фрагмент и щелкаем на
кнопках Курсив и Подчеркнутый;
§ устанавливаем
размеры полей страницы: верхнее и нижнее — 2 см, левое — 2,5 см, правое — 1,5
см, для этого на вкладке «Разметка страницы» щелкаем на кнопке
запуска окна диалога «Параметры страницы» в группе «Параметры
страницы».
В результате получим отформатированный текст
документа, скриншот которого представлен на рисунке 6.

Рис. 6
Для больших документов (рефератов, курсовых и дипломных
работ) кроме форматирования символов, абзацев и страниц выполняется
форматированию разделов и документа в целом. Эти этапы форматирования большого
документа рассмотрим в разделе: Работа с большими документами в Word.
Большие документы (структурированные документы,
содержащие несколько страниц), как правило, разбиваются на разделы. Создание
новых разделов со следующей страницы или на текущей странице, вставка верхнего
и нижнего колонтитулов для предыдущего и следующего разделов, создание газетных
колонок — все это относится к этапам форматирования документа.
Разрывы разделов выполняются на вкладке Разметка
страницы в группе Параметры страницы, кнопка Разрывы. Вставка колонтитулов
выполняется на вкладке Вставка в группе Колонтитулы, а работа с колонтитулами
выполняется на вкладке Конструктор, которая появляется на Ленте при работе с
колонтитулами.
Форматирование документа в целом — это
форматирование номеров страниц, оформление автособираемого или ручного
оглавления и т.д. Номера страниц вставляются на вкладке Вставка в группе
Колонтитулы. В диалоговом окне необходимо установить параметры формата номера
страницы: Формат номера, Включить номер главы, Нумерация страниц (Продолжить
или Начать с). Оглавление добавляется в документ на вкладке Ссылки в группе
Оглавление, кнопка Оглавление.
Задание:
1.Наберите следующий текст «Я умею
форматировать текст»
2.Создайте 10 копий данного текста на этом
листе.
3.Используя кнопки форматирования получите
следующую текстовку:
Я
умею форматировать текст
Я умею форматировать текст
Я умею форматировать текст
Я умею форматировать текст
Я
умею форматировать текст
ß óìåþ
ôîðìàòèðîâàòü òåêñò
ß óìåþ
ôîðìàòèðîâàòü òåêñò
ß óìåþ
ôîðìàòèðîâàòü òåêñò
ß óìåþ
ôîðìàòèðîâàòü òåêñò
Я
умею форматировать текст
�������������� ��������� � ��� ��������� ��� �������� ����. WORD
������������ �������������� ���������� �� ���� ��������� �������:
- ��
������ �������� (��������� ���������, ����������, ������� � �����
������, ������������� ��������� � �����, �������� � �.�.) - �� ������ �������
(������������ �� ������ ����, �� ������� ����, �� ������ � �� ������;
������� ������ � �����; ������ ������ ������; ������� �� � ����� ������;
����������� ��������, ���������� ��������� �� �������� � �.�.) - �� ������ ������� (���������
�������, ���������� �������, �����, ����������� ������ ��������, ������
� �������� ������� � �.�.) - �� ������ ��������
(������������ �������� �� ��������� �������� ��� �� ������� ��������,
��������� ������ �� ������� � �.�.) - �� ������ ��������� (������
�������, ���������� � �.�.).
����� � ��� �������� ������, ������� �������������
������������ �������� ��� �������� ������, ������� ����� ��������
������������� �������� �� ������� ����� Enter. � ������ ���������: �����
��������� ������, ���������, ����������, ������ (������������ �
�������������) � �.�.
��� �������������� ��������
����������� ���������� ���� ����� (������ / �����) ��� ������� �� ������
������������ ��������������. �������������� ������� �������������� � �������
���� ������� �����, ������� ����������� �������� ������ / �����.
���������� ��������������
����������� ������ ����� � ������� �����, �������� ������� ������ / ��������
��������������.
����� ������������� ��� ��������
���������� ��������� � ��� �������, �.�. ����� ������������ ���
�������������� ���������. ����� — ��� ����� ������������� ������,
����������� ��� ���������� ������ ��� ������������� �������������.
�������������� ������ � ������� ����� ����������� �������, ��� �������������
������� ������ ������� ������, ��� ��� ���� ������� (�����) �������������
����������� ������ ���������� ������.���������� ��� �������� ����
������:
- ����� ������� ��������
��������� �������������� ��������, ������� �����, ������, ����������,
��������� � ��������� - ����� ������ ��������
��������� �������������� �������, ����� ��� ������������� ���������,
�������, ������������ � ������� ���������. ����� ������� ����� �����
��������� ����� ��� ��������� �������������� ��������. �����������
������, ������������ � Word, �������� ������� �������
����� ������� �������� ���������
�������������� ������ (��� ������� �������, �� �� ��������� �����������
����� � ����� �������).��� �������� ������ ���������
«�������� 1» �� ���� ������� �������, �� �������� ����� ������ ������ ��
�������� ����� ������ ������ ���������� (�� ���������� ������): �������,
��������� 1, 2, 3.
����� ���� ���
���� ������ � �������� ��������, � ����� ��������������, �������������
��������������� �������� ���������� ��� ��������� �������� ���� �����
���������.��� ��������������
�������������� ��������� ������� ������ ����������� ���� �� ������ Word.
��������, ��������� ����� ���� �������� ����� ��������� 1 ��� ��������� 2 ,
������ ��������� ������ � ����� �������� �����, � ������, ��������� � ������
— ����� ������. ����������� ����������� ����� ����� ����������, �������
������������ � ����� ������� ����������, � ������� ������� � ����� �����
�������� � �.�. ���������� ������� ���������
����������� ������ Word ������������ ������� ��������� �������� ����
���������� ��������� �� ���� ���������� ������ �� ���������� ������.
���������� ����� ������������ �������������� ���������� ��������� ������� �
��������� ������������� ������������� ��������� ��������� � ������
���������, � ����� ������ ������� ����������.����� ����, ���� ���
����������� ������� ��������� ������������ ����� �������� �����, � ��
�������, �� ������� ����� ����������������� ������ ����� ��������� ������,
�� ���������� ��� ���� ����� ���������� ������.
�������� �� ������� � ������� ����� ����� � ��������������
����� ����� �������� � ��������� �����. ����� ����, �����
��������� ������ ����� (�������� �����) � ��� ������������������ ������, �.�.
����������������� ���.
��� ����� ���������� ������� ������� ������ / ����� �
��������������, �������� ������� ����� � ������ ������ � ��������������.
���������� ������ � �����, ������� ���������� �����������������, � � �������
����� � ������� ��������� �������������� ��� ����������� �������� ��
��������� �����, ����� ��� �������� ����������������� �� ��������� �����.
���� ���������� �������� ����� ��� ������� ����� �����, ��
���������� ������ � �����, ����� ������� ���������� ��������, � �������
����� � ������� ��������������� ����������� ������ ����� ������������ �����
������ ��� ��������. ����� ���������� �������� ��������� ���� � ��������
����� � �������� �� ����������� ������ �������, ��������� ������ ������:
�������� ������, �������� �����, ������� �����. �������� ��������� ������� (��������
��� ������� �����), �������� ��������������� ���� �������, � ������� �����
����������� ��������� ��� �������� �����.
����� ������� �������� ������� ��� ����������� ������ ������
������, ������� ��� ��������� ����� ������� ��������� ��� ���������� �� ���
�����.
����� ������� �� ������� �� �� ����� �� ������.
�������� ��������� ����������, ������� �������� � �������� �
�������� ��� �������������� � ��������������:
����������� (��� / �����������)
������ (������; �������� ��������, ������,
������; ������������ ������; ���������� � ���������). ���������� ��������
������� / ������
���������� (������� / ����������)
����������� (������� / �����������)
�������� (������� / ��������)
����, �������� � ���� (������ / ���, ������ /
����).
���������� � ��� ����� ��� ������� (�����
��������, ���� ������ ���������, �������� ���������, ������� ������, �������
� �. �.), ������� ���������� ����� ��� ������ ������ �������� ���������. �
����������� �� ����� ������������ (�� ������� ��� �� ������ ���� ��������)
����������� ������ �������� � �������.��� �������� �����������
���������� ��������� ������� ��� / �����������. �����������, ��� � ���
���������, � ����� ����, ������ � ���������� �������, ������ �������,
������� ������� � �������� ��������� � ��������� �������� ���� ������� �
���������.
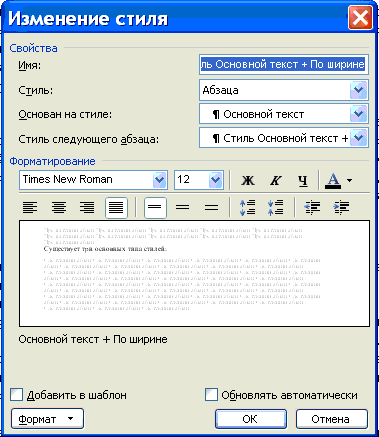
�������� ������������ (���������� � ����������) � Word
�������� ���������� (������������)
� ��� �������� ���������, ����������� ��������� � ��������� ��������� ���� �
���������. �������� ���������� ����� � ����������� ��������� �� ��������,
������ ����������� ����� ��� ���� ����������. ����� ����� ����� ����������
�����, ���������������� ��� ��� ������� � �������.
�������� ���������� � ��� ��������
�������������� � �������������� ������ ������ (����������������� �����������
� ����������, �������� ���������� ���������).
���������� ��������� �������� ��������
������������:
���������� ��� ����� ������
����������.����� ���������� �������������� ��������
������������ � ����������, ��������� ���������: �������� ������� ������/���������
� � ����������� ���� �������� �� ������� ������������. ���������� ������
������������� ��������� ���������� � ������������� ��������� ����������.��� ������ �������� ���������� � ����������
���������� ������� ������� ������/������������, �������� ���� ������� ������������,
� ������� �������� ����� ��������� ��������� ��������.
![]()
Download Article
Learn the basics of formatting a Microsoft Word document
![]()
Download Article
- Formatting the Layout
- Formatting Text
- Adding Pictures, Graphs, & Tables
- Using a Formatted Template
- Saving in Other Formats
- Q&A
|
|
|
|
|
Microsoft Word is the world’s most popular word processing app. Depending on what kind of legal, formal, or personal paper you’re writing, each has its own formatting guidelines. Fortunately, Microsoft Word makes it easy to format the layout, text, and other objects in your document. If you’re new to using Microsoft Word, don’t worry. You can be formatting your document like a pro in no time. This wikiHow guide will teach you simple ways to format a Word document on your PC or Mac computer.
Things You Should Know
- You can find most of the formatting tools you’ll need in the Ribbon menu at the top of your document.
- If you don’t want to do all the formatting from scratch, try using one of Word’s premade templates.
- Save your document in different file formats using the Save a Copy or Save As menu.
-

1
Explore the Word user interface. You can access most of Word’s formatting tools from the Menu Bar or the Ribbon at the top of the window. You can modify which tools are visible using the View menu.
- The Menu Bar is the area at the top of the screen where you will find File, Edit, View, and other important menu commands.
- The Ribbon is at the top of your workspace and contains icons, menus, and shortcuts to common tasks.
-
2
Align your document. Different types of documents call for different text alignments. You can choose whether to align your entire document to the left, right, or at the center on the Home tab by clicking the Alignment buttons in the «Paragraph» section.
- These are the buttons that look like a small version of a document, with small black lines arranged according to their button’s alignment function.
- You can also adjust alignment by selecting the text and objects you want to align, right-clicking the selection, and choosing Paragraph. Select your preferred alignment from the Alignment menu under the General header.
- You can either set the alignment for the whole document or just a selected piece of text.
Advertisement
-
3
Set the line spacing of your document. Need to change your document to single or double-space? You can adjust the spacing of your entire document, or for selected text.
- If you haven’t begun typing or adding content to your Word document, click the Home tab, click the «Line and Paragraph Spacing» icon (a row of lines with vertical arrows to the left of the lines pointing up and down, and select an option.
- If your document already has text or other content, press Ctrl + A (PC) or Cmd + A (Mac) to select everything in the document, right-click the selection, and choose Paragraph. You can then choose your desired spacing from the «Line Spacing» menu.
- For a single-spaced document, choose 1.0. For double-spacing, choose 2.0.
- Many professional documents, like college essays and cover letters, should be double-spaced.
-
4
Adjust the page orientation. If you need to write the document in a different orientation, click the Layout tab at the top of Word, select Orientation, and choose either Portrait or Landscape.
-
5
Change the size of the paper. If you need to print the document on a specific paper size, click the Layout tab, click Size, and then select your desired size from the drop-down list.
- This will change the virtual size of the document you’re writing as well as the actual size of the printout.
-
6
Adjust the headers and footers. A header contains details that will appear on every page of the paper, such as page numbers, your name, or the document title.
- To set the header of your document, double-click on the topmost part of the page, and the header field will appear. You can also click the Insert tab and select Header.
- Footers are just like headers. All text in the footer will appear at the bottom of each page of your document. To set the footer, double-click on the bottommost part of the page, and the footer field will appear. You can also use the Footer button on the Insert tab.
- You can also format your headers and footers by selecting the View tab and clicking Header and Footer on the list. This action will open the headers and footers on your page and allow you to edit them.
-
7
Insert page or section breaks with the Breaks menu. Go to the Layout tab in the and click Breaks if you want to start a new page or section in your document. You can choose from a variety of types of breaks, including Page, Column, and Section. This is a very useful tool if you need to format different sections of your document in different ways.[1]
- For example, you can use section or page breaks to help you format your page numbers so that the numbering restarts with each new section.
-
8
Adjust the margin size with the Margins tool. Click the Margins button in the Layout tab and select a margin from the pre-defined margin settings listed on the drop-down list.
- If you want to use your own margin measurements, click Custom Margins at the very bottom of the drop-down list to set your own.
-
9
Add columns to split your text vertically on the page. If you need to create a newspaper-like document, you can do so by adjusting the format of the document to columns. Click the Layout tab, select the Columns option, and choose the number and alignment of columns from the drop-down list.
- The Columns button looks like a rectangle with two vertical columns of blue lines on it.
- If you want to create one, two, or three columns, you can do so from the preset options. If you’d like to create more, you’ll need to choose More Columns from the bottom of the dropdown menu.
- Note that this column option is different from the columns you get when you insert items like tables on your document.
-
10
Add bullets and numbers to make lists. Highlight the text that you would like to be numbered or bulleted and click the Numbering or Bullets button on the Home tab of the Ribbon.
- These buttons can be found side by side on the Ribbon, near the alignment buttons. The Numbering button displays three small lines with numbers to the left of the lines and the Bullets button displays three small lines with bullet points to the left of the lines.
- There’s also a third button that allows you to create more elaborate multi-level list styles, which is useful for formatting outlines.
-
11
Experiment with document styles. All documents have standard built-in styles (for example, Normal, Title, Heading 1). The default style for text is Normal. The template that a document is based on (for example, Normal.dotx) determines which styles appear on the Ribbon and on the Styles tab. You can see the current style presets for your document in the Home tab of the Ribbon.
- Before you apply a style, you can see all of the available styles and preview how they will appear when applied.
- On the Home tab, click a style to apply it to selected text.
- Click the Styles Pane button (the arrow pointing down and to the right) to view and select from advanced Style options.
- By default, Word applies a paragraph style (for example, Heading 1) to the entire paragraph. To apply a paragraph style to part of a paragraph, select only the specific part that you wish to modify.
-
12
Reveal hidden formatting symbols if you’re having trouble. Word documents often contain hidden code that can cause frustrating problems when you’re trying to modify your formatting. For instance, an invisible extra paragraph mark or section break can create unwanted spaces between paragraphs or lines of text. To see formatting symbols that are normally hidden so you can delete or modify them, you can click the ¶ button in the Home tab, or try one of the following:[2]
- On Windows, open File, select Options, and click Display. Tick the box next to Show all formatting marks.
- In Word for Mac, open the Word menu, then Preferences, then View. Check the box next to All in the Show Non-Printing Characters section of the View menu.
-
13
Use the View menu to change your view of the document. The View menu can let you change how your document looks in Word without actually making changes to the format. For example, Print Layout will show approximately what your document will look like when it’s printed out, while Web Layout will display the whole document in one long chunk without any page breaks.
- The View menu also lets you zoom in and out on your document.
- You can also change your view with the buttons and zoom slider at the bottom right side of the document pane, or with the View tab in the Ribbon.


Advertisement
-
1
Change the font face. On the Home tab, you will a drop-down menu containing a list of fonts to choose from. Use your mouse to select the text you want to change, then choose a font from the list.
-
2
Change font size and color. Also on the Home tab, you can change the size, color, and highlighting for your font. Select the text you want to format, then choose your options.
- By default, they will be set to the size and font associated with your document’s current Style settings. For example, if you’re using Word’s default template, the Normal style will use Calibri as the default font and 12 pt. as the default text size.
- Always consider the formatting guidelines of the document you are writing when choosing the font style and size.
- The standard font for most college and professional papers is Times New Roman font, text size 12.
-
3
Make text bold, underlined, or italicized. Besides setting the font style and size, you can also adjust the emphasis of words and lines in your document. Near the font and text size menus, you will see the Bold, Italics, and Underline buttons.
- Just click the buttons to make your text bold, underlined, or italicized.
- In this section, you can also find special text formatting options such as Strikethrough, Subscript, and Superscript.
-
4
Highlight text on the page. If you would like to change the background color behind selected text, similar to using a highlighter on a printed page, click the Text Highlight icon, which is a pen above a colored line.
- You can also add special text effects with the Text Effects button, which looks like a capital A with a glowing blue border.


Advertisement
-
1
Drag an image into your document. This is a quick way to add a picture to your Word document. Simply select an image on your desktop and drag and drop it into the document window. Make sure your image is placed exactly where you want it before you drop it.
- You can also insert an image by going to the Insert tab, then clicking Pictures. Select one of the options to browse for images on your computer, the web, or Word’s gallery of stock photos.
- You can also insert graphics or other media (such as video or audio clips) using the Shapes, Icons, or 3D Models, and Media buttons.
-
2
Enable text wrapping. Text wrapping changes the layout of your document, allowing the text to flow around the image no matter where it is placed. To turn on text wrapping:
- Right-click (or ctrl-click, on a Mac) on the image and hover over Wrap Text. Select the alignment that best suits your document. You will see a preview as you hover over each option.
- To change the location of the image in the document, select the image and then hold the Ctrl key. While holding the key, use the arrow keys to move the picture around the document.
- When you right-click or ctrl-click your image, you’ll also see an option in the context menu to add a caption under your image.
-
3
Edit your image in the Picture Format tab. Once you insert your image, you can select it to open a new Picture Format tab in the ribbon. From there, you can choose from a variety of tools, such as:
- Making corrections or adding artistic filters to the image
- Adding style effects, such as a drop shadow or frame, to the picture
- Entering alt text
- Tweaking the position of your image or changing the text-wrap settings
-
4
Add a graph or chart in the Insert tab. Click the Insert tab on the Ribbon, and then click the Chart option. Choose your preferred type of graph, such as a pie or bar chart, from the dropdown menu.
- Depending on the type of chart or graph you choose, Word may automatically launch Excel and create a new spreadsheet, where you can enter data for your chart.
-
5
Modify your graph. When you choose a graph type, a new tab will appear in the Ribbon menu called Chart Design. Navigate to that tab with the chart selected to make changes to the look of your graph or chart, or choose the Edit in Excel button to make changes to the data in your chart.
-
6
Use the Table tool to insert a table. If you want to add a table to your document, head over to the Insert tab and click the Table button. A menu will pop open where you can either scroll over a grid of squares to select your number of rows and columns, or select an option like Insert Table or Draw Table.
- Insert Table opens a pop-up menu where you can specify parameters like the number of rows and columns and whether or not the contents of the table autofit your document window.
- The Draw Table tool allows you to draw the table with your mouse directly in the document.
- Once you start creating a table, you’ll see several new table editing tools in the Layout tab.


Advertisement
-
1
Choose a template from the New Documents pane. Templates are a great way to create a nice-looking document without having to do all the formatting from scratch. To use one, open Word and select New from the side menu to create a new document, or select New from Template from the File menu. Click one of the templates on the screen to select it.[3]
- If you don’t see a template you like, use the Search bar at the top of the window to find one that fits your needs. For instance, use keywords like “flyer,” “resume,” or “research paper” to find different styles of templates.
-
2
Click Create to open the template. The template will open as a new document.
-
3
Select text within the template to modify it. Word templates are simply preformatted documents with text, graphics, and other elements already in place. To add your own text, select text anywhere on the document and type in your own. The new text will have the same format as whatever text you selected and replaced. You can also click on a blank area of the document and start typing to add new text.
- To select a single word, double-click it. You can select longer pieces of text by clicking and dragging your mouse, or positioning your cursor at the start of the selection and holding down Shift while pressing the Right Arrow key.
- You can also select and move, delete, or replace other elements in the template, such as images, graphs, or tables.
-
4
Modify your template with the Styles pane. Templates use styles to create their distinctive looks. If you want to change the look of the template, click the Styles button in the Home tab of the ribbon toolbar. Click the down arrow next to any of the style elements and select Modify Style… to make changes.
- You can also make any other types of changes you like using the rest of the tools in the ribbon menu or Format menu.
-
5
Save your modified template as a document. When you’ve made the changes you want to the template, save it the same way you would any other Microsoft Word document.


Advertisement
-
1
Click the file menu and select Save a Copy…. If you want to save a document as a file type other than .DOCX, you can do so with the Save a Copy function.
- If it’s a brand-new document that you haven’t already saved, select Save As… instead.
-
2
Open the File Format dropdown menu. You’ll see this menu at the bottom of the Save a Copy or Save As window.
-
3
Select the format you want from the menu. In addition to common formats like .DOC, .DOCX, .TXT and .RTF, you can also save your document as a PDF, an XML file, or a macro-enabled Word file.
- Check out the list of file formats that are supported in word here.


Advertisement
Add New Question
-
Question
What is Microsoft publishing?

UK_Gamer05
Community Answer
Publisher is a tool for making posters, leaflets, booklet,s etc. It’s for when you need to create something that isn’t a standard document.
-
Question
How do I move from page one to page two of a Word document?
UK_Gamer05
Community Answer
In Word 2016, on the insert tab, either select insert new page or page break.
Ask a Question
200 characters left
Include your email address to get a message when this question is answered.
Submit
Advertisement
Thanks for submitting a tip for review!
Tip
- Unless free-handedly writing your paper, consult the guidelines of your document first before adjusting its format.
- Besides the header, footer, and page layout formats (which affect the entire document), all the other formatting tools can be applied only on specific parts of the document.
About This Article
Thanks to all authors for creating a page that has been read 310,436 times.