
There are many reasons to listen to a document, such as proofreading, multitasking, or increased comprehension and learning. Word makes listening possible by using the text-to-speech (TTS) ability of your device to play back written text as spoken words.
Listen with Read Aloud
 Read Aloud is only available for Office 2019, Office 2021, and Microsoft 365.
-
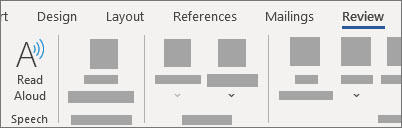
On the Review tab, select Read Aloud.

-
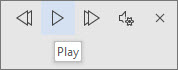
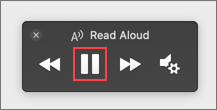
To play Read Aloud, select Play in in the controls.
-
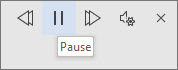
To pause Read Aloud, select Pause.
-
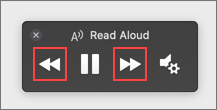
To move from one paragraph to another, select Previous or Next.
-
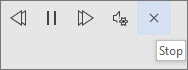
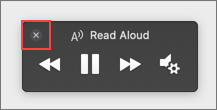
To exit Read Aloud, select Stop (x).

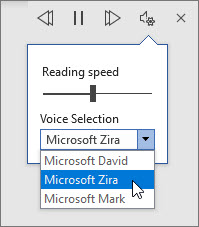
Change Read Aloud settings
-
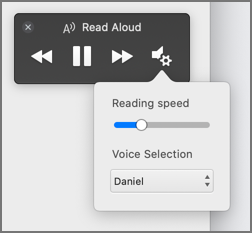
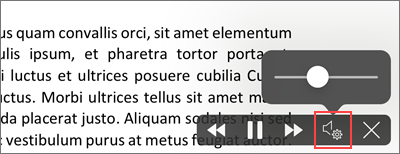
Select the gear icon in the controls at the top right.
-
Use the Reading speed slider to change the reading speed.
-
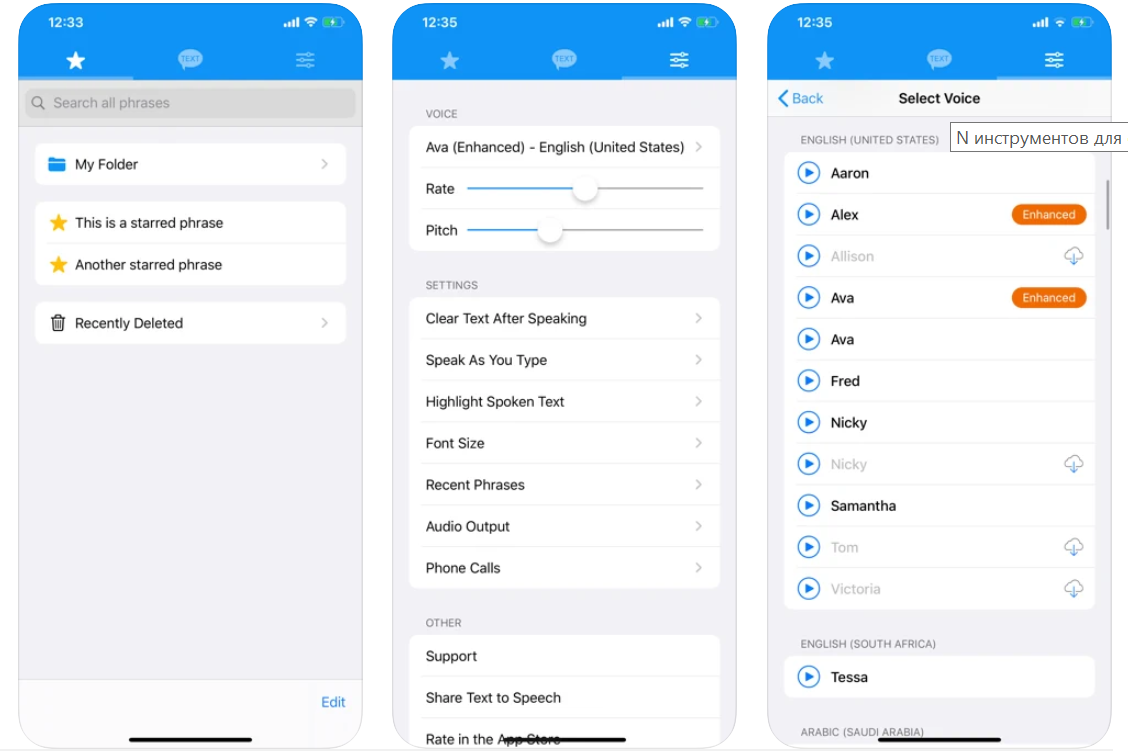
Under Voice Selection, select the voice you want.
-
Listen to selected text with Read Aloud.
Select the text to be read aloud.
Start Read Aloud from Review tab or shortcut or select play on Read Aloud UI.
Keyboard shortcuts
You can easily control Read Aloud using the following keyboard shortcuts in Windows:
|
CTRL + Alt + Space |
Start Read Aloud |
|
CTRL + Space |
Play or pause Read Aloud |
|
CTRL + Left Arrow |
Skip to start of current paragraph |
|
CTRL + Left Arrow + Left Arrow |
Skip to start of previous paragraph |
|
CTRL + Right Arrow |
Skip forward to start of next paragraph |
|
Alt + Left Arrow |
Decrease reading speed |
|
Alt + Right Arrow |
Increase reading speed |
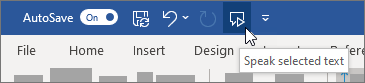
Listen to your documents with Speak
Speak is a built-in feature of Word, Outlook, PowerPoint, and OneNote. Speak reads aloud only the text you select. Read Aloud reads the entire document starting from your cursor location like an audiobook.
To use Speak:
-
Select a word or block of text in your document.
-
In the Quick Access Toolbar, select the Speak selected text icon.
Supported languages
Read Aloud uses the proofing language set for the document. To change the language, see the help article Fix text-to-speech reading in wrong language.
Voices
Depending on your platform, text-to-speech (TTS) uses software that comes built into your device or through a Microsoft service. The voices available will differ between TTS services. If you’re using Immersive Reader, see the help article Download voices for Immersive Reader, Read Mode, and Read Aloud for more information.
Our team is working on making voices sound more natural, so keep looking for improvements.
Troubleshooting
If you don’t see Read Aloud available, make sure that you’re signed into your Microsoft 365 account, and then try restarting the Word app or logging out and back in.
If you are unable to access Neural Voices, make sure you have a stable internet connection and are signed into your Microsoft 365 account.
Privacy
Read Aloud doesn’t store your content or audio data. Microsoft uses your content only to provide you with audio results. For more information about experiences that analyze your content, see Connected Experiences in Office.
In MacOS you can listen to documents using Read Aloud or Speech.
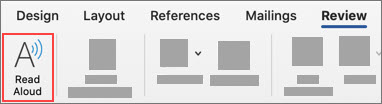
Listen with Read Aloud for MacOS
Read Aloud is only available for Office 2019, Office 2021, and Microsoft 365.
-
On the Review tab, select Read Aloud.
-
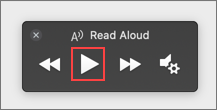
To play Read Aloud, select Play in in the controls.
-
To pause Read Aloud, select Pause.
-
To skip from one paragraph to another, select Previous or Next.
-
To exit Read Aloud, select Stop (x).
Change Read Aloud settings
-
Select the gear icon in the controls to open the settings.
-
Use the Reading speed slider to change the voice speed.
-
Under Voice Selection, select the voice you want.
-
Listen to selected text with Read Aloud.
Select the text to be read aloud.
Start Read Aloud from Review tab or shortcut or select play on Read Aloud UI.
Keyboard shortcuts
You can easily control Read Aloud using the following keyboard shortcuts in MacOS:
|
CTRL + Option + Space |
Start Read Aloud |
|
Option + Space |
Play or pause Read Aloud |
|
Option + up arrow |
Skip to start of previous paragraph |
|
Option + down arrow |
Skip forward to start of next paragraph |
Listen to your documents with Speech
Speech is a built-in accessibility feature of MacOS. After you activate Speech for your Mac, you can select text and have it read by pressing a keyboard combination you’ve defined.
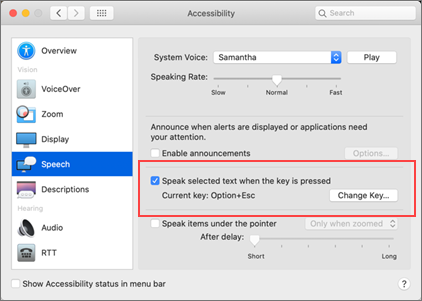
To activate Speech, do the following:
-
On the Apple menu, select System Preferences.
-
In the System Preferences window, select Accessibility.
-
In the list, select Speech, and then select the check box next to Speak selected text when the key is pressed.
In the Speech settings, you can also change the keyboard combination, select a different system voice, and adjust the speaking rate.

Supported languages
Read Aloud uses the proofing language set for the document. To change the language, see the help article Fix text-to-speech reading in wrong language.
Voices
Depending on your platform, text-to-speech (TTS) uses software that comes built into your device or by a Microsoft service. The voices available will differ between TTS services. If you’re using Immersive Reader, see the help article Download voices for Immersive Reader, Read Mode, and Read Aloud for more information.
Our team is working on making voices sound more natural, so keep looking for improvements.
Troubleshooting
If you don’t see Read Aloud available, make sure that you’re signed in to your Microsoft 365 account, and then try restarting the Word app or logging out and back in.
If you are unable to access neural voices, please make sure you have a stable internet connections and are signed in to your Microsoft 365 account.
Privacy
Read Aloud doesn’t store your content or audio data. Microsoft uses your content only to provide you with audio results. For more information about experiences that analyze your content, see Connected Experiences in Office.
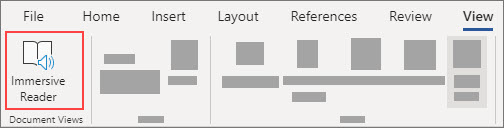
In Word for the Web, you can listen to your documents using Immersive Reader.
Using Immersive Reader
-
On the View tab, go to Document Views and select Immersive Reader.
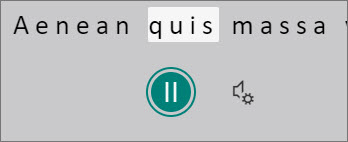
-
In Immersive Reader, select the Play button at the bottom.
-
To pause reading, select the Pause button at the bottom.
-
To exit Immersive Reader, select the arrow at the top left.


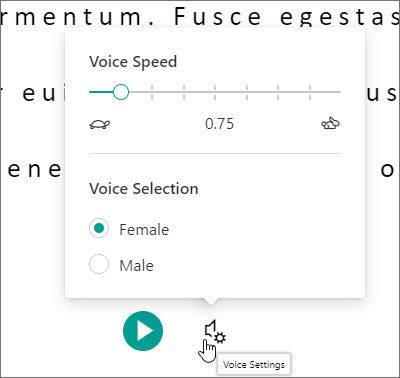
Change Immersive Reader settings
You can change the voice speed and selection for Immersive Reader.
-
Select the gear icon at the bottom to open Voice Settings.
-
Use the Voice Speed slide to change the voice speed.
-
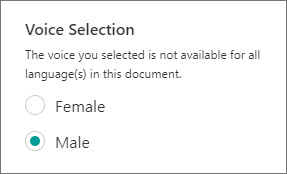
Select Female or Male for the voice. Note that some languages will be available in only one voice.
Voices
Depending on your platform, text-to-speech (TTS) uses software that comes built into your device or through a Microsoft service. The voices available will differ between TTS services. If you’re using Immersive Reader, see the help article Download voices for Immersive Reader, Read Mode, and Read Aloud for more information.
Our team is working on making voices sound more natural, so keep looking for improvements.
Troubleshooting
If you don’t see Read Aloud available, make sure that you’re signed in to your Microsoft 365 account, and then try restarting the Word app or logging out and back in.
Privacy
Read Aloud doesn’t store your content or audio data. Microsoft uses your content only to provide you with audio results. For more information about experiences that analyze your content, see Connected Experiences in Office.
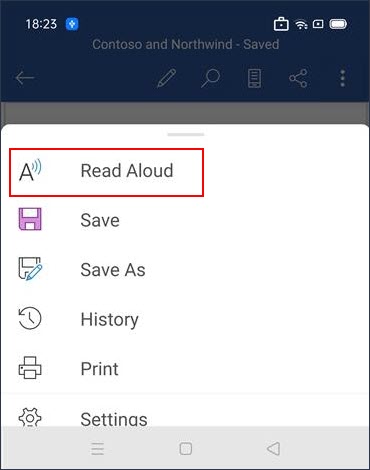
Listen with Read Aloud in Word for iPad
-
Tap the menu icon at the top.
-
To play Read Aloud, tap Play in in the controls.
-
To pause Read Aloud, tap Pause.
-
To move from one paragraph to another, tap Previous or Next.
-
To exit Read Aloud, tap Stop (x).
-
Listen to selected text with Read Aloud.
Select the text to be read aloud.
Start Read Aloud from Review tab or overflow menu or select play on Read Aloud UI.


Change Read Aloud settings for iPad
-
In the Read Aloud controls, tap the gear icon.
-
Use the slider to increase or decrease the reading speed.
Listen with Read Aloud in Word for iPhone
-
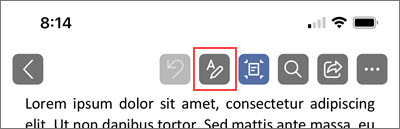
Tap the pen icon at the top to open the ribbon.
-
Tap the Review tab.
-
Tap the gear icon, and then tap Read Aloud.
-
To play Read Aloud, tap Play.
-
To pause Read Aloud, tap Pause.
-
To move from one paragraph to another, tap Previous or Next.
-
To exit Read Aloud, tap Stop (x).


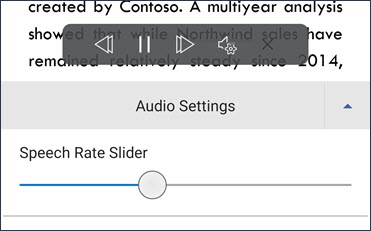
Change Read Aloud settings for iPhone
-
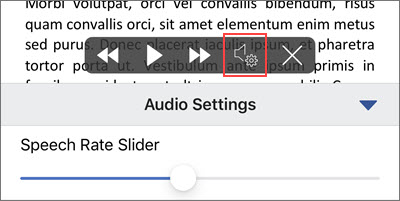
To change the speech rate, in the Read Aloud controls, tap the gear icon.
-
Under Audio Settings, user the Speech Rate Slider to increase or decrease the reading speed.
Supported languages
When you’re online, Read Aloud tries to detect the language of the text and can support multiple languages in a single document. For the full list of supported languages, see the help article Language and voice support for the Speech service.
Voices
Depending on your platform, text-to-speech (TTS) uses software that comes built into your device or through a Microsoft service. The voices available will differ between TTS services. If you’re using Immersive Reader, see the help article Download voices for Immersive Reader, Read Mode, and Read Aloud for more information.
Our team is working on making voices sound more natural, so keep looking for improvements.
Troubleshooting
If you don’t see Read Aloud available, make sure that you’re signed in to your Microsoft 365 account, and then try restarting the Word app or logging out and back in.
Privacy
Read Aloud doesn’t store your content or audio data. Microsoft uses your content only to provide you with audio results. For more information about experiences that analyze your content, see Connected Experiences in Office.
Listen with Read Aloud in Word for Android phone
-
At the top, tap the menu icon.
-
Tap Read Aloud.
-
To play Read Aloud, tap Play.
-
To pause Read Aloud, tap Pause.
-
To move from one paragraph to another, tap Previous or Next.
-
To exit Read Aloud, tap Stop (x).
-
Listen to selected text with Read Aloud.
Select the text to be read aloud.
Start Read Aloud from Review tab or overflow menu or select play on Read Aloud UI.


Change Read Aloud settings for Android phone
-
To change the speech rate, in the Read Aloud controls, tap the gear icon.
-
Under Audio Settings, adjust the Speech Rate Slider to increase or decrease the reading speed.
Supported languages
For the full list of supported languages, see the help article Language and voice support for the Speech service.
Voices
Depending on your platform, text-to-speech (TTS) uses software that comes built into your device or through a Microsoft service. The voices available will differ between TTS services. If you’re using Immersive Reader, see the help article Download voices for Immersive Reader, Read Mode, and Read Aloud for more information.
Our team is working on making voices sound more natural, so keep looking for improvements.
Troubleshooting
If you don’t see Read Aloud available, make sure that you’re signed in to your Microsoft 365 account, and then try restarting the Word app or logging out and back in.
Privacy
Read Aloud doesn’t store your content or audio data. Microsoft uses your content only to provide you with audio results. For more information about experiences that analyze your content, see Connected Experiences in Office.

Идеи
15 инструментов для озвучки текста
Недавно мы рассказали, как превратить устную речь в письменный текст. Но бывает наоборот — надо озвучить то, что написано. Например, чтобы создать аудиосопровождение для курса, записать подкаст или аудиокнигу, добавить голосовые подсказки в мобильные приложения.
Раньше для этого требовалось участие человека. Сейчас необязательно искать профессионального диктора или записывать свой голос, если нужно что-то озвучить. На фоне развития Text-to-Speech технологий общедоступными стали синтезаторы речи.
Расскажу, какие есть инструменты для озвучки текста и как ими пользоваться.
| Название | Тип | Скачивание записи в аудиоформате | Наличие бесплатной версии |
| Text-to-Speech | Онлайн-сервис | Да | Да |
| iSpeech | Онлайн-сервис | Да, после регистрации и оплаты | Демо-версия с рекламой |
| Oddcast | Онлайн-сервис | Нет | Да |
| 2уха | Онлайн-сервис | Да | Да |
| Voicemaker | Онлайн-сервис | Да | Да |
| Apihost | Онлайн-сервис | Да | Да |
| Text to Speech Online | Онлайн-сервис | Да | Да |
| Texttospeech.ru | Онлайн-сервис | Да | Да |
| VoxWorker | Онлайн-сервис | Да | Да |
| Retell | Сервис интеграции для сайтов | Условно да, при потоковой обработке | Тестовый период после регистрации |
| Talk Free | Приложение для Android | Да | Да |
| Text to Speech | Приложение для ioS | Да | Да |
| NaturalReader | Онлайн-сервис
Мобильные и настольные приложения |
Да, на платном тарифе | Демо-доступ |
| Microsoft Word | Мобильные и настольные приложения | Нет | Да |
| Google Docs | Онлайн-сервис | Нет | Да |
Text-to-Speech
Бесплатный онлайн-сервис помогает преобразовать в аудио текст объёмом меньше 500 символов. Text-to-Speech поддерживает 15 языков. На русском текст будет озвучен женским голосом, который звучит достаточно реалистично. Минусы озвучки — есть небольшой акцент, а в некоторых словах неверно ставится ударение. В целом создаётся впечатление, что текст читает женщина-иностранка.
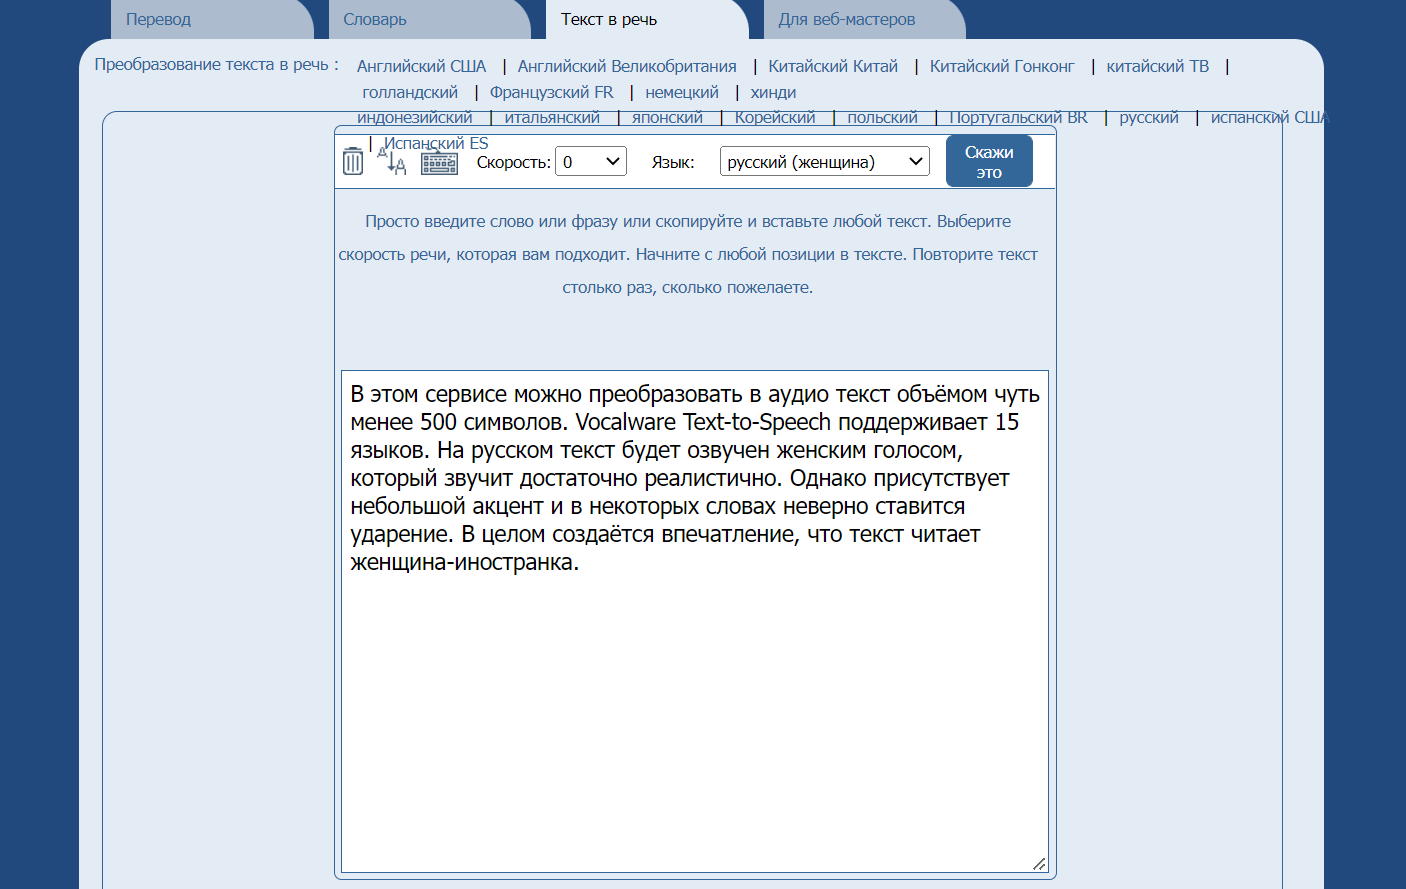
Для преобразования текста в голос достаточно нескольких секунд. Есть настройка скорости воспроизведения. Аудиозапись можно прослушивать неограниченное число раз. Чтобы сохранить результат, откройте контекстное меню и кликните «Сохранить аудио как». Запись сохранится в формате WAV.
iSpeech
Онлайн-инструмент с поддержкой 28 языков, в том числе и русского. Доступны мужской и женский голоса и три скорости воспроизведения. В бесплатной версии можно озвучить текст до 150 символов, в конце аудиозаписи прозвучит реклама сервиса. Скачивание записанного текста доступно только после регистрации и оплаты.
Платная версия позволяет озвучивать любой объём текста с оплатой по факту. Стоимость варьируется от $0,025 за слово и меньше — зависит от суммы предоплаты. Помимо онлайн-версии, есть мобильные приложения, плагин WordPress и бесплатные решения для разработчиков.
Oddcast
Онлайн-сервис позволяет озвучить до 600 символов за один раз. Среди 32 языков есть русский с выбором из трёх голосов — одного мужского и двух женских. Интересная фишка сервиса — можно добавить эффекты озвучки: скорость, эхо, реверберацию и другие. Визуально Oddcast привлекает тем, что текст зачитывает анимированный диктор, причём с помощью рандомайзера можно даже изменить его внешность.
Для профессионального использования сервис предлагает воспользоваться онлайн-API. С его помощью можно включить речь в любом онлайн- или мобильном приложении. После регистрации доступна 15-дневная бесплатная версия, дальше оплата взимается по факту использования. Минимальный платёж начинается от $99,50 — этого хватает на 40 000 минут аудиозаписи.
2уха
Российский бесплатный сервис с довольно старомодным интерфейсом, но качественным результатом озвучки. Чтобы запустить перевод текста в голос, нужно загрузить исходный файл или написать текст в специальном поле. Можно настроить звучание: выбрать мужской или женский голос, изменить высоту тона и громкость, указать нужный формат файла на выходе (MP3 или AWB), озвучить знаки препинания. Также сервис позволяет указывать ударение при произношении — для этого нужно проставить знак «+» перед ударным слогом.
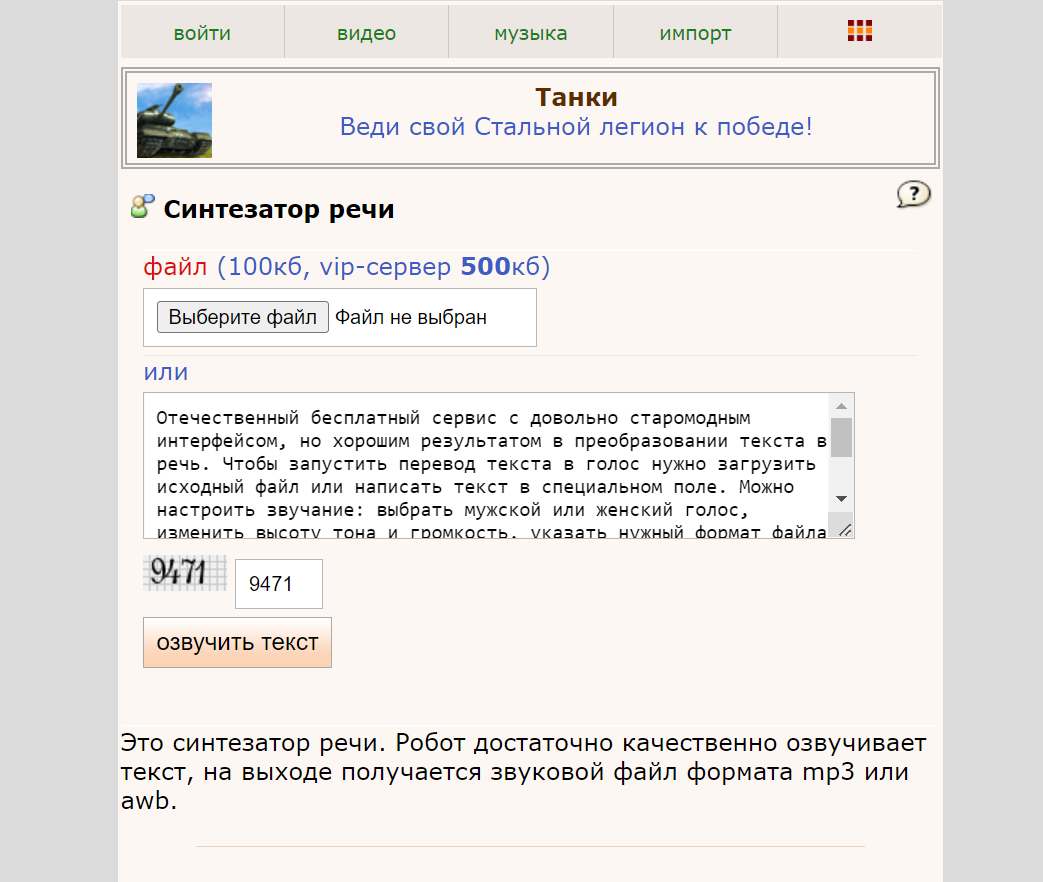
Без регистрации можно обработать файл до 100 КБ. После регистрации доступна конвертация файлов размером больше 100 MБ и сохранение истории загрузок.
Voicemaker
Этот онлайн-синтезатор позволяет бесплатно перевести в речь до 250 символов текста. Можно выбрать мужской или женский голос, настроить эффекты воспроизведения. Результат звучит вполне естественно. После обработки доступно скачивание файла в формате MP3.
Стоимость платной версии начинается от $5 в месяц — доступно для озвучки 500 000 символов, до 3 000 символов на одну конвертацию. Бизнес-тариф обойдётся в $20 ежемесячно за объём до 1 млн озвученных символов.
Apihost
В этом российском сервисе доступно огромное количество голосов — только в демо-версии их 16. Доступны женские и мужские голоса. Есть настройки, которые позволяют добиться максимально естественного звучания: обозначение ударения и пауз, настройка скорости речи и длины пауз, высоты голоса и даже интонации. Синтезированный голос очень похож на речь живого человека. Результат можно скачать в формате MP3 или WAV.

Владельцы сервиса не запрещают использовать результаты бесплатной озвучки в коммерческих целях, но не дают правовых гарантий. Кроме того, ограничен доступный объём текста для озвучки. На платном тарифе стоимость 1 000 символов варьируется в пределах 0,6 – 6,5 рублей. Есть безлимитный тариф от 5000 ₽/месяц.
Text to Speech Online
Полностью бесплатный онлайн-инструмент, который позволяет конвертировать текст в голос и скачивать результат в MP3. Сервис поддерживает русский язык и предлагает выбор из 23 возможных голосов. Также можно изменить скорость или добавить эмоции в текст.
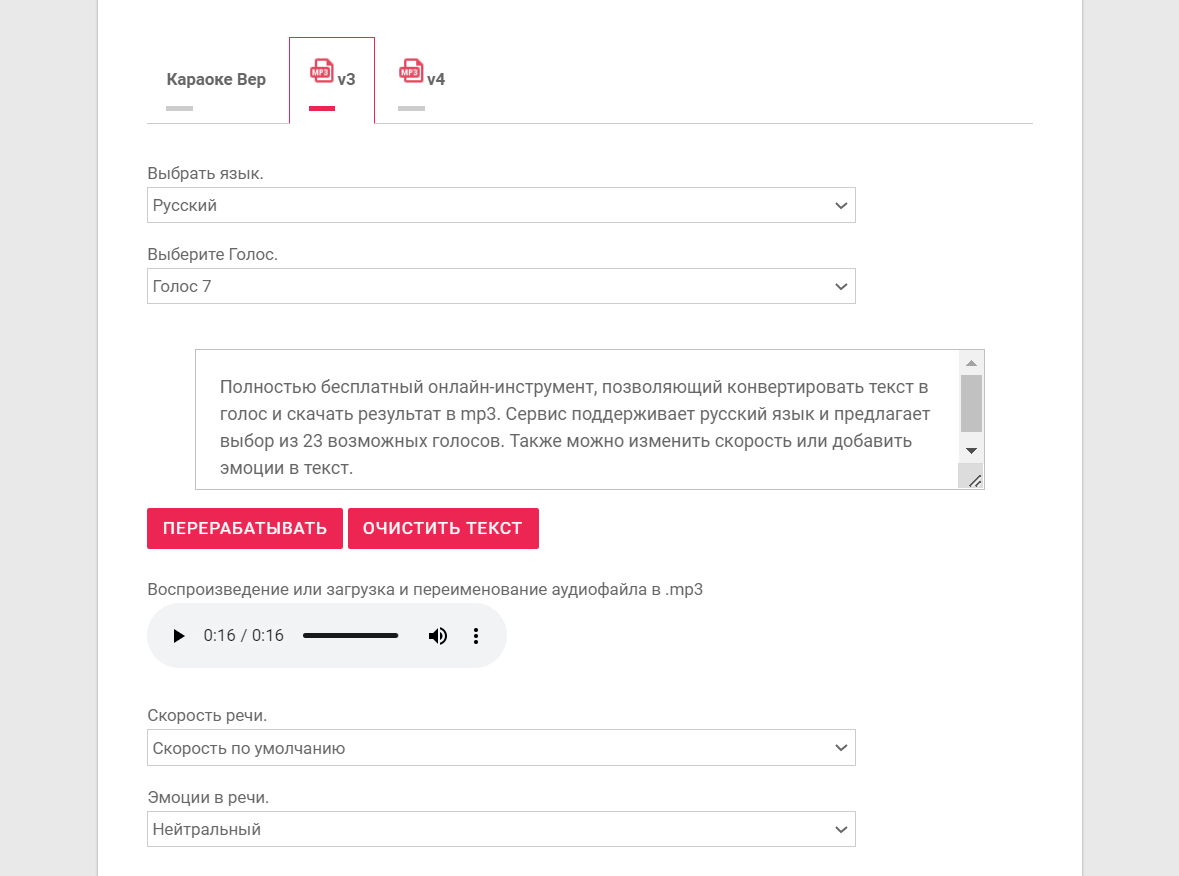
Речь, синтезированная в Text to Speech Online, звучит с естественной интонацией и правильным произношением. Минус сервиса: максимальный объём для единовременной озвучки — всего 2 000 символов. Поэтому большие тексты придётся озвучивать частями.
Texttospeech.ru
Российский онлайн-синтезатор речи с большим количеством голосов и демо-доступом. Бесплатно можно озвучить до 1 000 символов. Результат скачивается в формате MP3 или WAV. Есть настройки скорости и тона голоса.
В платной версии стоимость озвучки — 1 или 3 рубля за 1 000 символов, за голос «Стандарт» и «Премиум» соответственно. При положительном балансе голоса с пометкой «FREE» можно использовать бесплатно и без ограничений.
VoxWorker
Сервис помогает качественно конвертировать русский текст в речь. При озвучке соблюдается интонация, почти все слова произносятся правильно. Чтобы улучшить результат, можно добавить паузу или ударение, выбрать скорость речи и высоту голоса. Доступны для выбора три женских и два мужских голоса. Результат можно сохранить в файл формата MP3.
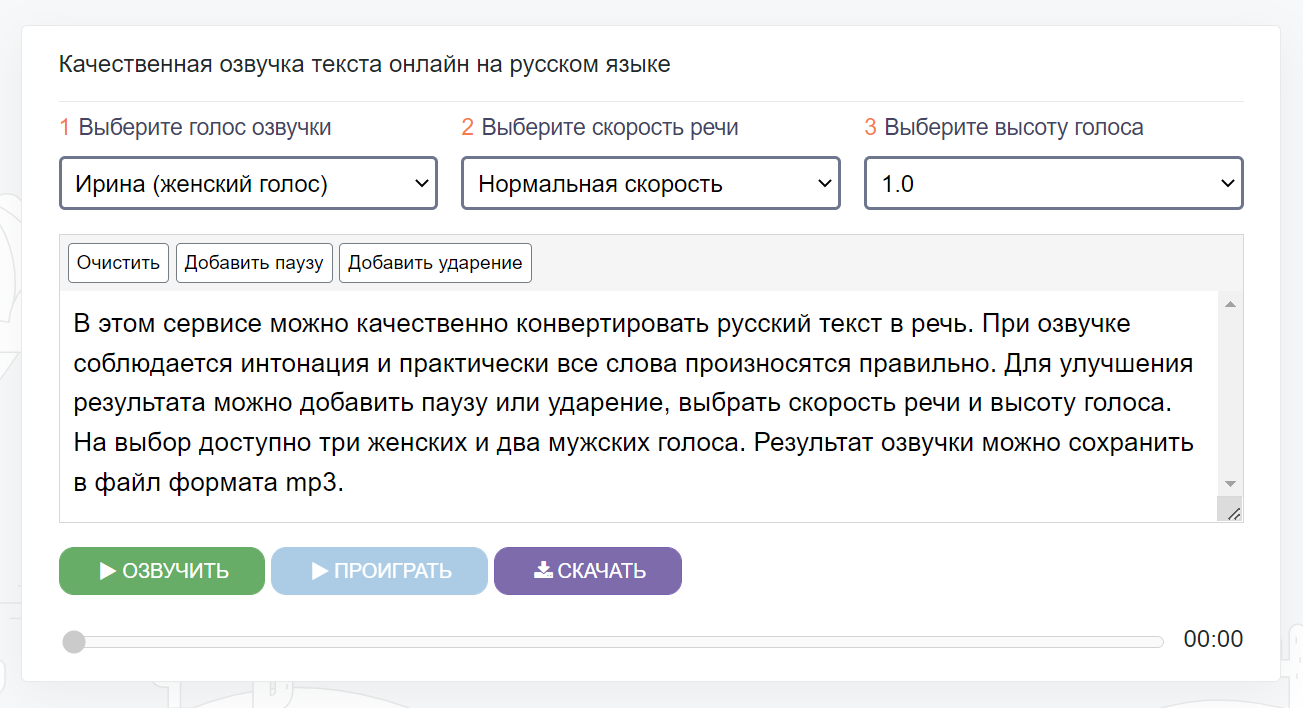
В бесплатной версии после регистрации можно озвучивать до 5 000 символов в сутки, причём весь объём можно обработать за один раз. На платном тарифе лимита на дневной объём нет. Максимальная длина одного текста — 10 000 символов, стоимость рассчитывается по факту: 1 000 символов = 1 рубль.
Retell
Сервис конвертирует тексты онлайн-изданий в аудиостатьи. Отличие Retell в том, что он не предназначен для разовой конвертации — синтезатор предлагает потоковую обработку текстов. Сервис быстро подключается к сайту при наличии стандартного RSS-фида. Для озвучки доступны больше 100 голосов на 50 языках. В готовые аудиотексты можно встраивать рекламу. В личном кабинете пользователь может отслеживать статистику прослушиваний.
Судя по тарифам на сайте, конвертация в речь текста до 500 000 символов бесплатна. За $50/месяц можно озвучивать миллион символов, если больше — цена по запросу.
Talk Free для Android
Бесплатное приложение позволяет записать и сразу озвучить текст. Результат сохраняется в формате WAV и доступен для экспорта. Помимо русского, Talk Free поддерживает много других языков.
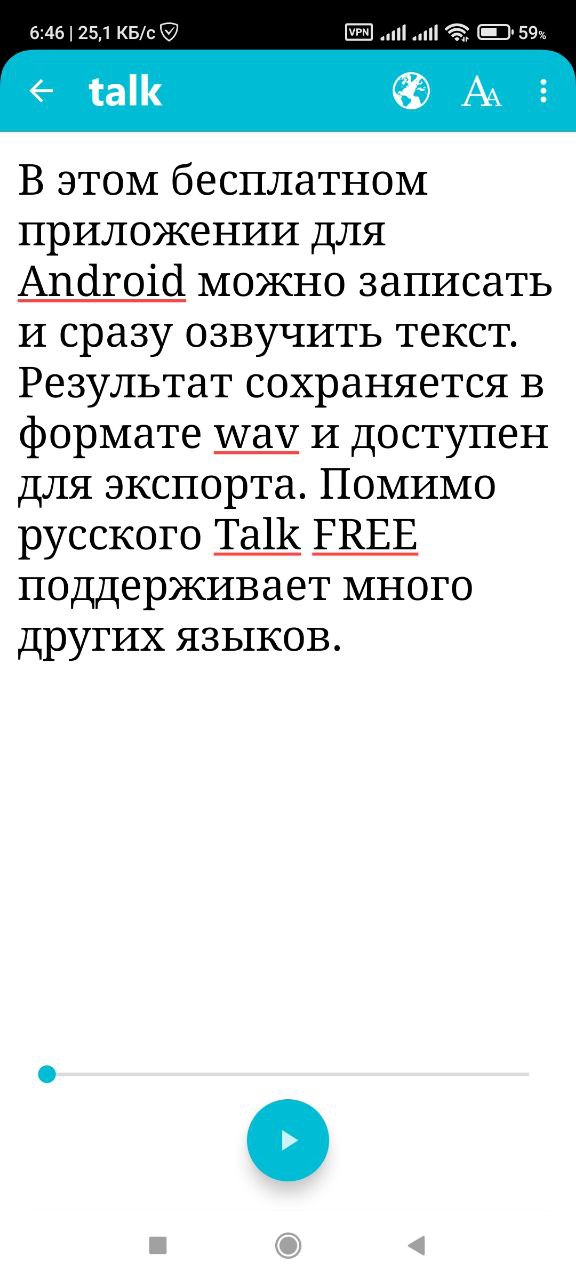
Через функцию «Поделиться» можно импортировать в сервис веб-страницы или текст из других приложений.
Text to Speech для iOS
Ещё одно мобильное приложение, причём для его работы не требуется интернет. В сервисе доступны 95 голосов на 38 языках. Можно перевести в голос написанный текст или импортировать нужный фрагмент для озвучки. Результат сохраняется на устройстве в виде аудиофайла.
В Text to Speech для iOS можно настроить высоту тона и скорость произношения — и создать речь, максимально приближенную к естественной.
NaturalReader
Синтезатор голоса позволяет читать PDF, DOCX и любые текстовые документы, умеет считывать текст с отсканированных документов, читает с веб-страниц и настольных приложений. Текст можно преобразовать в аудиофайлы, файлы MP3 для Windows или Mac.
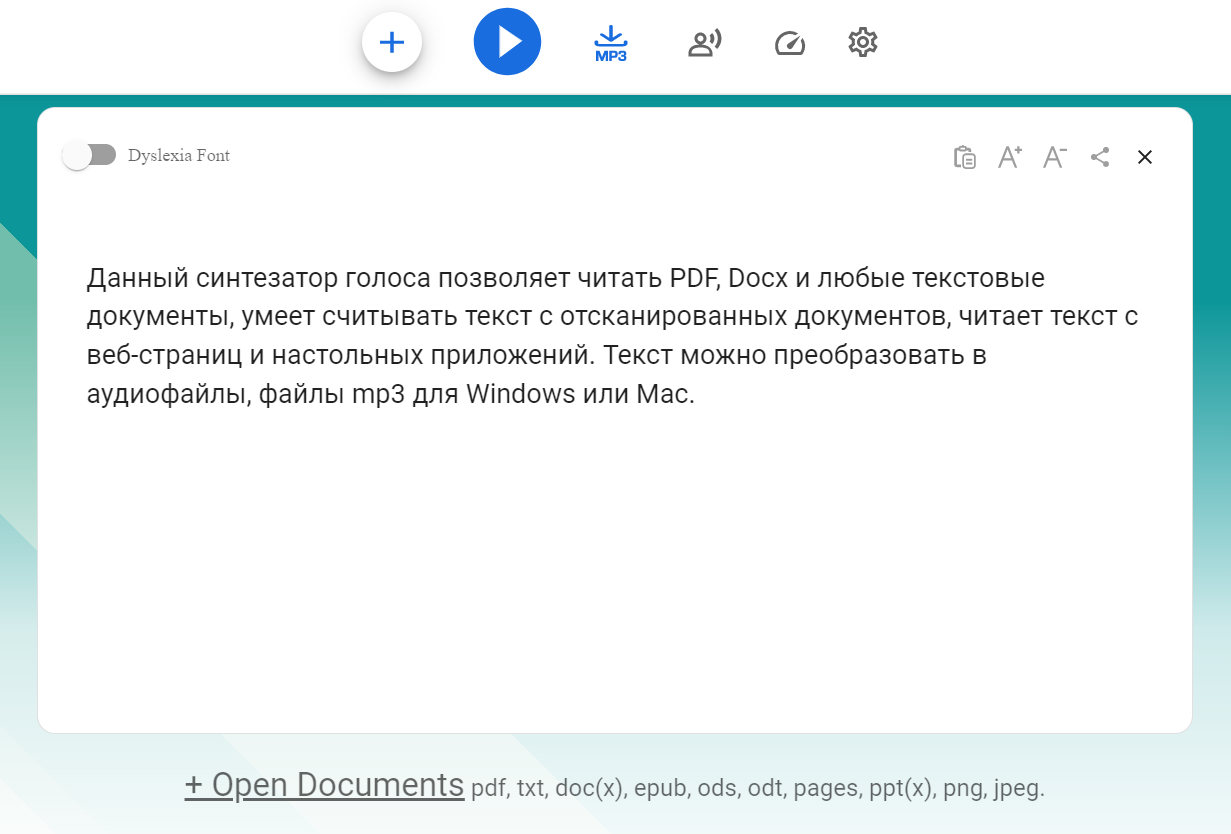
Сервис можно использовать в веб-формате, в виде Android или iOS приложения, настольного приложения для Mac или Windows, браузерного расширения. Бесплатные компьютерные версии не позволяют конвертировать файлы — их можно использовать только для чтения вслух. Платная программа переводит текст в голос и сохраняет в формате MP3. Для этого нужно приобрести лицензию стоимостью от $99,50 до $199,50.
Microsoft Word или Google Документы
Если вам нужно просто озвучить текст в личных целях и без преобразования текста в аудиофайл, можно использовать обычный Word или Google Docs.
В Word есть встроенная функция озвучки текста. Для её активации откройте раздел «Параметры» и выберите пункт «Настроить ленту». В левом столбце инструментов «Выбрать команды» кликните на «Все команды» и найдите «Проговорить». Выделите команду и добавьте её.
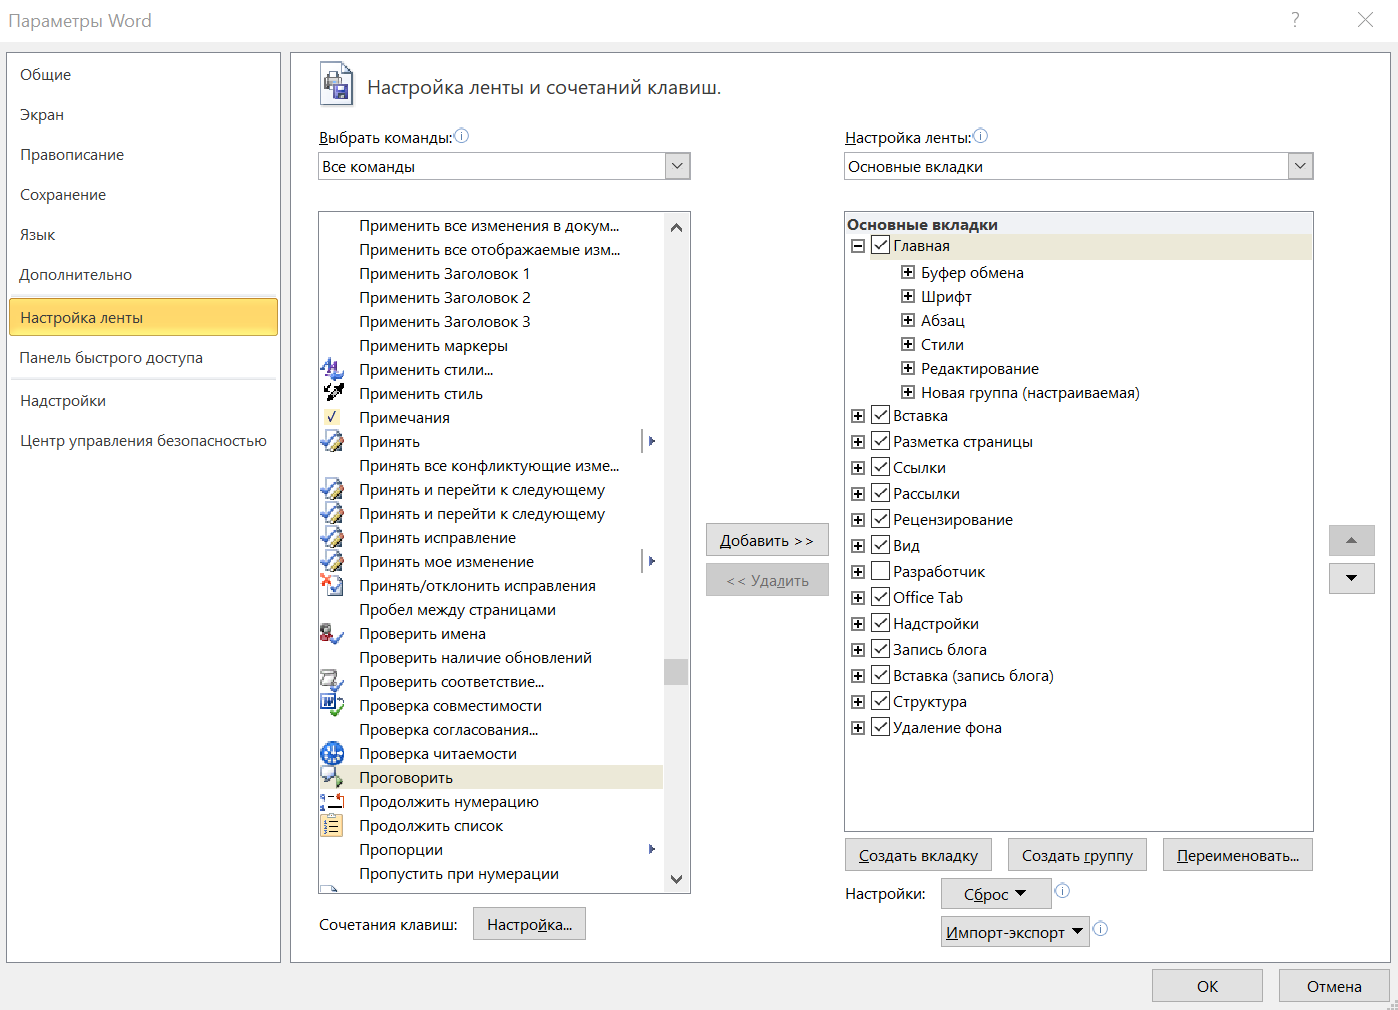
С правой стороны на панели редактора появится команда «Проговорить».
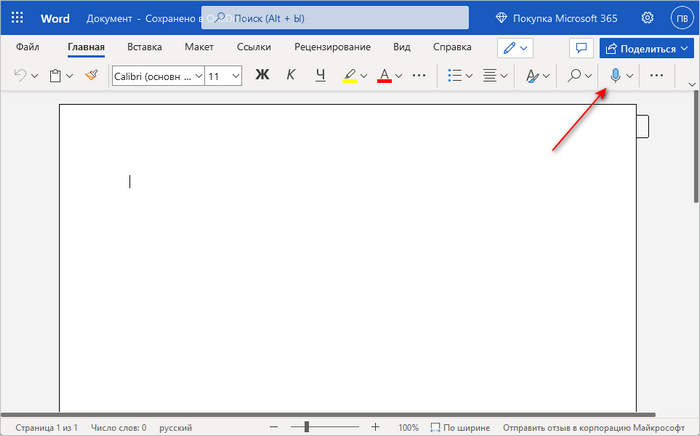
Теперь выделите нужный фрагмент текста и активируйте прочтение.
В Google Документах потребуется установить специальный плагин. Для этого перейдите в раздел «Расширения», выберите «Дополнения» и «Установить дополнения». Когда откроется окошко Google Workspace Marketplace, через поиск найдите расширение Read Aloud TTS и установите его.
Чтобы Google Docs прочитал текст вслух, выделите нужный фрагмент, кликните «Расширения», затем «Читать вслух ТТС» и «Открыть боковую панель». На открывшейся панели можно выбрать язык, голос, скорость прочтения.
Текст, озвученный в Microsoft Word или Google Document, можно записать на встроенный диктофон мобильного устройства.
ЭКСКЛЮЗИВЫ ⚡️
Читайте только в блоге
Unisender
Поделиться
СВЕЖИЕ СТАТЬИ
Другие материалы из этой рубрики
![]()
![]()
Не пропускайте новые статьи
Подписывайтесь на соцсети
Делимся новостями и свежими статьями, рассказываем о новинках сервиса
«Честно» — авторская рассылка от редакции Unisender
Искренние письма о работе и жизни. Свежие статьи из блога. Эксклюзивные кейсы
и интервью с экспертами диджитала.
Во время создания документа Word вы можете попробовать печатать голосом в Ворд, просто диктуя текст без использования клавиш клавиатуры компьютера. Для многих пользователей голосовой набор в Ворде — очень полезная и востребованная функция текстового редактора.
В некоторых случаях легче напечатать тест голосом в Ворде, чем использовать обычный классический метод набора с клавиатуры. Например, в том случае если вы хотите дать своим пальцам отдохнуть, или вы по разным причинам испытываете затруднения с обычным способом ввода. Набор голосом в Word может вам в этом помочь.
Содержание:
- Как записывать в Ворд голосом в Word для Microsoft 365
- Голосовой ввод Ворд онлайн
- Как печатать голосом в Ворде с помощью средства Windows 11
- Как в Ворде набирать голосом: несколько советов
- Выводы статьи
- Голосовой ввод текста в Word (видео)
На самом деле, в зависимости от вашей скорости печати, вы можете быстрее произнести текст, чем набрать его с клавиатуры. Кроме того, вам даже не нужно дополнительное оборудование: для этого подойдет встроенный или подключенный микрофон вашего компьютера.
Голосовой набор текста в Word отлично подходит для создания набросков и черновиков. Этот метод подходит для ведения заметок или просто для выражения ваших мыслей. Возможно, вам не нравится печатать. Нет необходимости в клавиатуре, когда вы можете диктовать все, что вам нужно для ввода текста.
Если вы используете текстовый процессор Microsoft Word на компьютере с операционной системой Windows, у вас есть несколько вариантов распознавания голоса, с помощью которых вы можете напечатать текст голосом в Ворде.
Преобразовать голос в текст в Ворде можно несколькими способами:
- В приложении или на сервисе Word для Microsoft
- Бесплатно в Word онлайн в Интернете.
- С помощью функции голосового ввода Windows.
Чтобы набирать текст голосом необходимо соблюдать следующие условия:
- На компьютере должен быть встроенный в ноутбук или подключенный к вашему устройству внешний микрофон.
- Обеспечено подключенное соединение с Интернетом.
- Наличие подписки на Microsoft 365 для использования одноименного приложения на компьютере.
- На ПК должна быть установлена Windows 11, чтобы вы могли воспользоваться системным средством, если у вас нет подписки на Microsoft
В этом руководстве мы расскажем, как в Ворде включить голосовой ввод несколькими способами: используя встроенные инструменты в Word для Microsoft 365 и Word Online, или с помощью системного средства Windows 11 в обычном редакторе Microsoft Word.
Как записывать в Ворд голосом в Word для Microsoft 365
Этот метод работает в Word для Microsoft 365, на который у вас должна быть подписка. В обычных версиях Microsoft Office функция диктовки отсутствует.
Чтобы использовать в Ворд голосовой ввод текста, вам потребуется микрофон и подключение к сети.
Ввод текста голосом в Word на ПК с Windows выполняется следующим образом:
- Войдите в Microsoft 365 на своем устройстве.
- Поместите курсор мыши в то место, откуда вы хотите начать диктовать.
- Перейдите во вкладку «Главная» и нажмите на кнопку «Диктовать».

- В нижней части экрана появится окно, в котором написано «Слушаю…» с активным микрофоном, потому что диктовка текста Ворд уже включена.

- Начните говорить четко и в обычном темпе, чтобы текст появился на экране.
Вы можете остановить в Word ввод голосом в любой момент, нажав на кнопку микрофона, после чего он станет неактивным. Чтобы продолжить в Word запись голосом, снова нажмите на значок микрофона, там будет надпись «Нажмите микрофон, чтобы продолжить».
Чтобы завершить работу с диктовкой текста закройте окошко внизу экрана.
Голосовой ввод Ворд онлайн
Вы можете бесплатно использовать голосовой набор в Ворде в онлайн версии Microsoft Office. Не все пользователи знают, что у них есть возможность использовать бесплатные версии офисных приложений непосредственно из браузера.
Несмотря на то, что это несколько урезанные версии, их возможностей хватает в большинстве случаев. Веб-приложения доступны в Интернете из облачного хранилища OneDrive или электронной почты Outlook.com с помощью учетной записи Майкрософт.
Выполните следующие действия в Word онлайн:
- Сначала убедитесь, что к компьютеру подключен микрофон. Он может быть встроенным на ноутбуке, или внешним микрофоном, который вы подключаете к USB- или аудио разъему своего компьютера.
- В Word Online откройте новый пустой документ или существующий файл, который необходимо предварительно загрузить в облако OneDrive.
- На вкладке «Главная» в верхней части экрана справа нажмите «Диктовать».
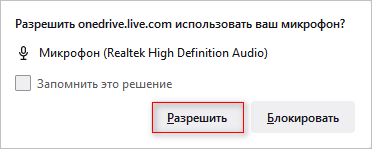
- В открывшемся сообщении разрешите использовать ваш микрофон нажав на кнопку «Разрешить». Можно поставить галку в пункте «Запомнить это решение», чтобы в следующий раз микрофон использовался автоматически.
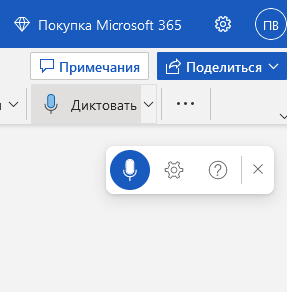
- Вы услышите звуковой сигнал, а кнопка диктовки окрасится синим индикатором записи в плавающем окне, которое можно перемещать по документу. Голосовой набор Word готов к использованию, он слушает вашу речь.
- Говорите четко, а ваш голос сразу преобразуется в текст в Word Online. Инструмент должен расшифровать все, что вы говорите и напечатать текст в текущем документе.
Во время диктовки произносите знаки препинания вслух. Вы также можете сказать «новая строка». Это будет иметь тот же эффект, что и нажатие клавиши «Enter» на клавиатуре.
- Когда вы закончите диктовать, снова нажмите на значок «Диктовать». Затем вы услышите звуковой сигнал, оповещающий вас о том, что голосовой набор текста в Ворде отключен.
Вы по-прежнему можете печатать с клавиатуры, когда набор голосом в Ворде включен. Но если вы щелкнете мышью за пределами окна документа Word или переключитесь на другую программу, то запись текста с голоса в Word автоматически отключается.
Нажмите на кнопку «Параметры диктофона» (шестеренку), чтобы войти в настройки. Здесь можно выбрать язык речи, микрофон, включить автоматическую расстановку знаков препинания, фильтровать фразы деликатного характера.

Как печатать голосом в Ворде с помощью средства Windows 11
Сейчас мы рассмотрим голосовой набор в Ворде на компьютере, работающим в операционной системе Windows 11 без использования сторонних программ. В специальные возможности Windows 11 встроена функция голосового ввода.
Интегрированная служба распознавания голоса будет работать в любом приложении Windows, включая Microsoft Word. Функция «Распознавание речи Windows» не поддерживается для русского языка.
Проделайте следующее:
- Откройте файл Word, а затем переместите курсор мыши в ту часть документа, которую вы сейчас редактируете.
- Переключите раскладку клавиатуры на русский язык.
- Нажмите на клавиши «Win» + «H».
- В нижней части экрана откроется окно с надписью «Прослушивание…». Это окно можно перемещать по экрану компьютера в любое место.
- Инструмент готов к использованию, начните говорить.

- После завершения набора текста, нажмите на микрофон еще раз, чтобы отключить голосовую диктовку.
Функция набора голосом отключается если нажать на любую клавишу клавиатуры, после открытия окна другого приложения или по щелчку мышью за пределами окна текущего документа Word.
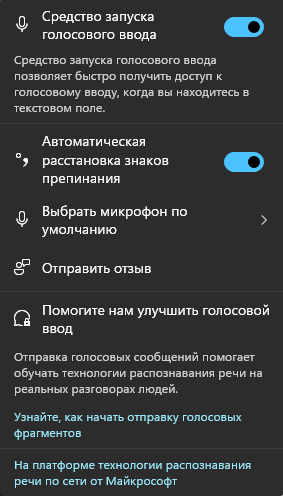
Нажмите на значок «Параметры» (шестеренка) в окне диктофона, чтобы перейти к настройкам. Здесь можно отключить средство запуска голосового ввода, включить автоматическую расстановку знаков препинания, выбрать микрофон по умолчанию.
Как в Ворде набирать голосом: несколько советов
Вы должны понимать, что средство голосового ввода работает не идеально, часто набранный текст необходимо подредактировать или исправить.
Проявляйте терпение, когда пробуете эту функцию в первый раз. Диктовка текста в Word требует практики, но она окупается — лучше всего читать абзацы из книги, чтобы научиться слышать свой голос и видеть, как на экране появляется напечатанный текст.
Попробуйте произносить знаки препинания в Word, например, «точка», «запятая», «новая строка», «новый абзац». Имейте в виду, что пока не все знаки препинания поддерживаются при голосовом вводе на русском языке.
После произнесения «удалить это» из текста удаляется последнее произнесенное высказывание. Скажите «удалить», чтобы удалить последнее набранное слово.
Выводы статьи
В некоторых случаях во время работы с текстовым редактором Microsoft Word пользователям необходимо знать, как в Ворде записать текст голосом. С помощью диктовки вы сможете набирать текст на странице документа Word. Существует несколько способов голосового набора текста с помощью встроенных средств приложения или операционной системы Windows, которые можно использовать без применения стороннего программного обеспечения.
Голосовой ввод текста в Word (видео)
Похожие публикации:
- Режим чтения Word: как включить или как убрать
- Как убрать пустую страницу в Ворде — 6 способов
- Как удалить примечание в Ворде — 5 способов
- Как вставить GIF в Word — 3 способа
- Встроенный переводчик Word: перевод текста документа

Whether out of necessity or convenience, you can give your keyboard a break and dictate a document in Microsoft Word. You can use the feature in the desktop app, Word for the web, and in the mobile app.
Note: You will need a Microsoft 365 subscription in order to dictate. If you’re using Microsoft Office, you may not have the dictation feature. 365 for the web, however, is free for anyone with a Microsoft account.
RELATED: Microsoft Office vs. Microsoft 365: Which One Should You Buy?
Dictate a Document on Your Desktop
With your computer’s internal microphone, or with a USB microphone in hand, you can dictate your document in Word on both Windows and Mac. Head to the Home tab and click “Dictate.”

When the microphone icon appears, you can drag to move it anywhere you like. Click the icon to begin dictating, click again to stop or pause. You can also say “Pause dictation” or “Stop dictation” and can click the icon to resume.
To enable auto-punctuation, change the dialect, or filter sensitive language, click the gear icon to open the Settings.
If you need help with what you can say for things like punctuation, symbols, making corrections, or controlling dictation, click the question mark icon near the microphone to open the Help sidebar.
To stop using dictation, click the “X” in the corner of the icon’s window to close it.
RELATED: How to Use Voice Dictation on Windows 10
Dictate a Document on the Web
The web version of Microsoft Word is free, as long as you have a Microsoft account. The dictation feature is currently available when using Edge, Firefox, Chrome, and Brave web browsers.
Visit Microsoft Word for the web, sign in, and open your document or create a new one. Go to the Home tab and click the Dictate icon. If it’s your first time using the feature, you’ll be prompted to allow access to your microphone.
Just like in the desktop application, you’ll see a small microphone icon at the bottom. You can move the icon by dragging it. Simply click the icon and begin speaking.
You can pause or stop by clicking the icon again or by saying, “Pause dictation” or “Stop dictation.” Then click the icon to continue when you’re ready.
To adjust the language, microphone, or other options, click the gear icon near the microphone icon to open the Dictation Settings. Make your changes and click “OK” to save them.
For help with what you can say or specific commands for controlling dictation, click the question mark icon to open the Help panel on the right.
When you finish using dictation, click the “X” in the corner of the icon’s window to close it.
RELATED: How to See Which Apps Are Using Your Microphone on Windows 10
Dictate a Document on Your Mobile Device
If you use Word on your Android device, iPhone, or iPad, dictation can be handy, especially when you’re on-the-go. Open your document and tap the microphone icon.
Begin speaking, tap the icon to pause or stop, or say “Pause dictation” or “Stop dictation” just like the desktop and web applications.
To change the settings, tap the gear icon. Make your adjustments and tap the X to save them and return to your document.
For additional help with dictation on your mobile device, tap the question mark icon.
To stop dictating and type instead, simply tap the keyboard icon.
If you enjoy using the dictation feature in Microsoft Word, be sure to check out how to transcribe audio in Word too.
RELATED: How to Use Microsoft Word’s Hidden Transcription Feature
READ NEXT
- › 7 Awesome Microsoft Word Features You Should Be Using
- › HoloLens Now Has Windows 11 and Incredible 3D Ink Features
- › The Best Steam Deck Docks of 2023
- › How Long Do CDs and DVDs Last?
- › How to Install Unsupported Versions of macOS on Your Mac
- › Liquid Metal vs. Thermal Paste: Is Liquid Metal Better?
- › This New Google TV Streaming Device Costs Just $20
Master the skill of speech to text in Microsoft Word and you’ll be dictating documents with ease before you know it. Developed and refined over many years, Microsoft’s speech recognition and voice typing technology is an efficient way to get your thoughts out, create drafts and make notes.
Just like the best speech to text apps that make life easier for us when we’re using our phones, Microsoft’s offering is ideal for those of us who spend a lot of time using Word and don’t want to wear out our fingers or the keyboard with all that typing. While speech to text in Microsoft Word used to be prone to errors which you’d then have to go back and correct, the technology has come a long way in recent years and is now amongst the best text-to-speech software.
Regardless of whether you have the best computer or the best Windows laptop, speech to text in Microsoft Word is easy to access and a breeze to use. From connecting your microphone to inserting punctuation, you’ll find everything you need to know right here in this guide. Let’s take a look…
How to use speech to text in Microsoft Word: Preparation
The most important thing to check is whether you have a valid Microsoft 365 (opens in new tab) subscription, as voice typing is only available to paying customers. If you’re reading this article, it’s likely your business already has a Microsoft 365 enterprise subscription. If you don’t, however, find out more about Microsoft 365 for business via this link (opens in new tab).
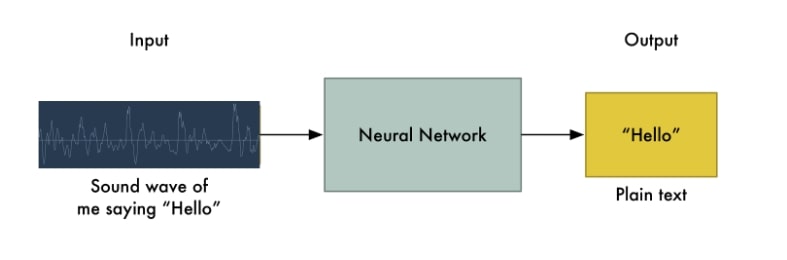
The second thing you’ll need before you start voice typing is a stable internet connection. This is because Microsoft Word’s dictation software processes your speech on external servers. These huge servers and lighting-fast processors use vast amounts of speech data to transcribe your text. In fact, they make use of advanced neural networks and deep learning technology, which enables the software to learn about human speech and continuously improve its accuracy.
These two technologies are the key reason why voice typing technology has improved so much in recent years, and why you should be happy that Microsoft dictation software requires an internet connection.
Once you’ve got a valid Microsoft 365 subscription and an internet connection, you’re ready to go!
Step 1: Open Microsoft Word
Simple but crucial. Open the Microsoft Word (opens in new tab) application on your device and create a new, blank document. We named our test document “How to use speech to text in Microsoft Word — Test” and saved it to the desktop so we could easily find it later.

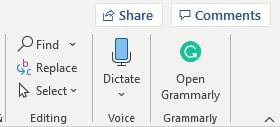
Step 2: Click on the Dictate button
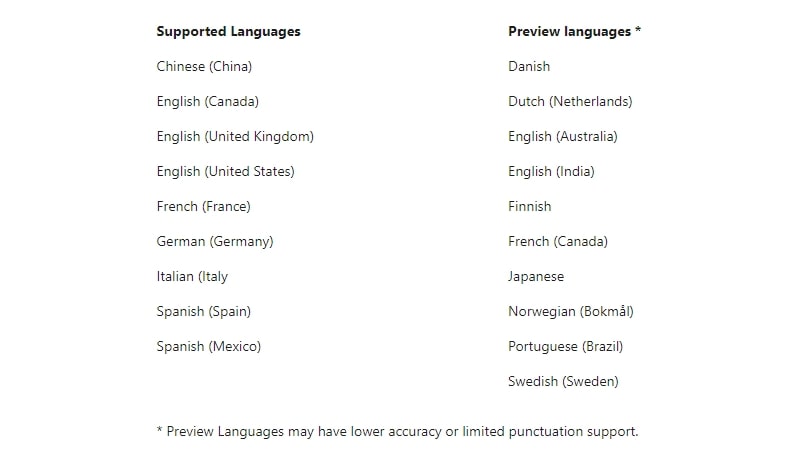
Once you’ve created a blank document, you’ll see a Dictate button and drop-down menu on the top right-hand corner of the Home menu. It has a microphone symbol above it. From here, open the drop-down menu and double-check that the language is set to English.
One of the best parts of Microsoft Word’s speech to text software is its support for multiple languages. At the time of writing, nine languages were supported, with several others listed as preview languages. Preview languages have lower accuracy and limited punctuation support.
Step 3: Allow Microsoft Word access to the Microphone
If you haven’t used Microsoft Word’s speech to text software before, you’ll need to grant the application access to your microphone. This can be done at the click of a button when prompted.
It’s worth considering using an external microphone for your dictation, particularly if you plan on regularly using voice to text software within your organization. While built-in microphones will suffice for most general purposes, an external microphone can improve accuracy due to higher quality components and optimized placement of the microphone itself.
Step 4: Begin voice typing
Now we get to the fun stuff. After completing all of the above steps, click once again on the dictate button. The blue symbol will change to white, and a red recording symbol will appear. This means Microsoft Word has begun listening for your voice. If you have your sound turned up, a chime will also indicate that transcription has started.
Using voice typing is as simple as saying aloud the words you would like Microsoft to transcribe. It might seem a little strange at first, but you’ll soon develop a bit of flow, and everyone finds their strategies and style for getting the most out of the software.
These four steps alone will allow you to begin transcribing your voice to text. However, if you want to elevate your speech to text software skills, our fifth step is for you.
Step 5: Incorporate punctuation commands
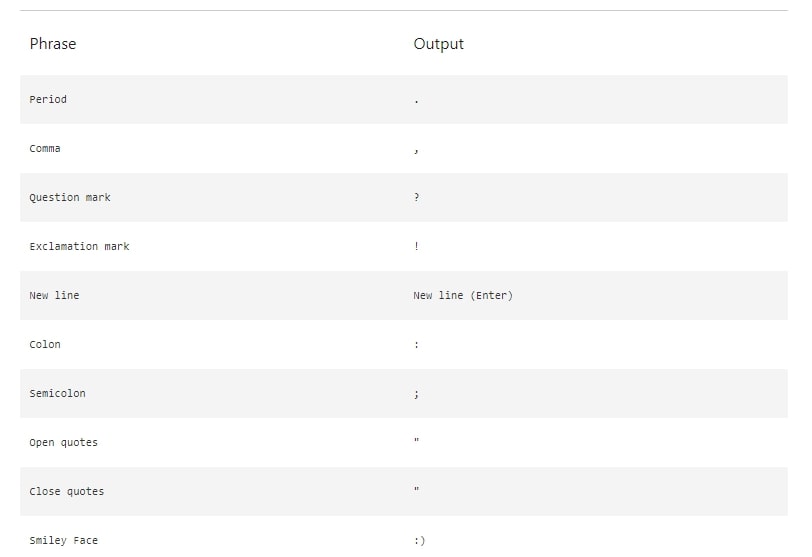
Microsoft Word’s speech to text software goes well beyond simply converting spoken words to text. With the introduction and improvement of artificial neural networks, Microsoft’s voice typing technology listens not only to single words but to the phrase as a whole. This has enabled the company to introduce an extensive list of voice commands that allow you to insert punctuation marks and other formatting effects while speaking.
We can’t mention all of the punctuation commands here, but we’ll name some of the most useful. Saying the command “period” will insert a period, while the command “comma” will insert, unsurprisingly, a comma. The same rule applies for exclamation marks, colons, and quotations. If you’d like to finish a paragraph and leave a line break, you can say the command “new line.”
These tools are easy to use. In our testing, the software was consistently accurate in discerning words versus punctuation commands.
Summary
Microsoft’s speech to text software is powerful. Having tested most of the major platforms, we can say that Microsoft offers arguably the best product when balancing cost versus performance. This is because the software is built directly into Microsoft 365, which many businesses already use. If this applies to your business, you can begin using Microsoft’s voice typing technology straight away, with no additional costs.
We hope this article has taught you how to use speech to text software in Microsoft Word, and that you’ll now be able to apply these skills within your organization.