
Word Processing
Andrew Prestage, in Encyclopedia of Information Systems, 2003
I. An Introduction to Word Processing
Word processing is the act of using a computer to transform written, verbal, or recorded information into typewritten or printed form. This chapter will discuss the history of word processing, identify several popular word processing applications, and define the capabilities of word processors.
Of all the computer applications in use, word processing is by far the most common. The ability to perform word processing requires a computer and a special type of computer software called a word processor. A word processor is a program designed to assist with the production of a wide variety of documents, including letters, memoranda, and manuals, rapidly and at relatively low cost. A typical word processor enables the user to create documents, edit them using the keyboard and mouse, store them for later retrieval, and print them to a printer. Common word processing applications include Microsoft Notepad, Microsoft Word, and Corel WordPerfect.
Word processing technology allows human beings to freely and efficiently share ideas, thoughts, feelings, sentiments, facts, and other information in written form. Throughout history, the written word has provided mankind with the ability to transform thoughts into printed words for distribution to hundreds, thousands, or possibly millions of readers around the world. The power of the written word to transcend verbal communications is best exemplified by the ability of writers to share information and express ideas with far larger audiences and the permanency of the written word.
The increasingly large collective body of knowledge is one outcome of the permanency of the written word, including both historical and current works. Powered by decreasing prices, increasing sophistication, and widespread availability of technology, the word processing revolution changed the landscape of communications by giving people hitherto unavailable power to make or break reputations, to win or lose elections, and to inspire or mislead through the printed word.
Read full chapter
URL:
https://www.sciencedirect.com/science/article/pii/B0122272404001982
Computers and Effective Security Management1
Charles A. Sennewald, Curtis Baillie, in Effective Security Management (Sixth Edition), 2016
Word Processing
Word processing software can easily create, edit, store, and print text documents such as letters, memoranda, forms, employee performance evaluations (such as those in Appendix A), proposals, reports, security surveys (such as those in Appendix B), general security checklists, security manuals, books, articles, press releases, and speeches. A professional-looking document can be easily created and readily updated when necessary.
The length of created documents is limited only by the storage capabilities of the computer, which are enormous. Also, if multiple copies of a working document exist, changes to it should be promptly communicated to all persons who use the document. Specialized software, using network features, can be programmed to automatically route changes to those who need to know about updates.
Read full chapter
URL:
https://www.sciencedirect.com/science/article/pii/B9780128027745000241
Globalization
Jennifer DeCamp, in Encyclopedia of Information Systems, 2003
II.D.2.c. Rendering Systems
Special word processing software is usually required to correctly display languages that are substantially different from English, for example:
- 1.
-
Connecting characters, as in Arabic, Persian, Urdu, Hindi, and Hebrew
- 2.
-
Different text direction, as in the right-to-left capability required in Arabic, Persian, Urdu, and Hindi, or the right-to-left and top-to-bottom capability in formal Chinese
- 3.
-
Multiple accents or diacritics, such as in Vietnamese or in fully vowelled Arabic
- 4.
-
Nonlinear text entry, as in Hindi, where a vowel may be typed after the consonant but appears before the consonant.
Alternatives to providing software with appropriate character rendering systems include providing graphic files or elaborate formatting (e.g., backwards typing of Arabic and/or typing of Arabic with hard line breaks). However, graphic files are cumbersome to download and use, are space consuming, and cannot be electronically searched except by metadata. The second option of elaborate formatting often does not look as culturally appropriate as properly rendered text, and usually loses its special formatting when text is added or is upgraded to a new system. It is also difficult and time consuming to produce. Note that Microsoft Word 2000 and Office XP support the above rendering systems; Java 1.4 supports the above rendering systems except for vertical text.
Read full chapter
URL:
https://www.sciencedirect.com/science/article/pii/B0122272404000800
Text Entry When Movement is Impaired
Shari Trewin, John Arnott, in Text Entry Systems, 2007
15.3.2 Abbreviation Expansion
Popular word processing programs often include abbreviation expansion capabilities. Abbreviations for commonly used text can be defined, allowing a long sequence such as an address to be entered with just a few keystrokes. With a little investment of setup time, those who are able to remember the abbreviations they have defined can find this a useful technique. Abbreviation expansion schemes have also been developed specifically for people with disabilities (Moulton et al., 1999; Vanderheiden, 1984).
Automatic abbreviation expansion at phrase/sentence level has also been investigated: the Compansion (Demasco & McCoy, 1992; McCoy et al., 1998) system was designed to process and expand spontaneous language constructions, using Natural Language Processing to convert groups of uninflected content words automatically into full phrases or sentences. For example, the output sentence “John breaks the window with the hammer” might derive from the user input text “John break window hammer” using such an approach.
With the rise of text messaging on mobile devices such as mobile (cell) phones, abbreviations are increasingly commonplace in text communications. Automatic expansion of many abbreviations may not be necessary, however, depending on the context in which the text is being used. Frequent users of text messaging can learn to recognize a large number of abbreviations without assistance.
Read full chapter
URL:
https://www.sciencedirect.com/science/article/pii/B9780123735911500152
Case Studies
Brett Shavers, in Placing the Suspect Behind the Keyboard, 2013
Altered evidence and spoliation
Electronic evidence in the form of word processing documents which were submitted by a party in litigation is alleged to have been altered. Altered electronic evidence has become a common claim with the ability to determine the changes becoming more difficult. How do you know if an email has been altered? What about a text document?
Case in Point
Odom v Microsoft and Best Buy, 2006
The Odom v Microsoft and Best Buy litigation primarily focused on Internet access offered to customers in which the customers were automatically billed for Internet service without their consent. One of the most surprising aspects of this case involved the altering of electronic evidence by an attorney for Best Buy. The attorney, Timothy Block, admitted to altering documents prior to producing the documents in discovery to benefit Best Buy.
Investigative Tips: All evidence needs to be validated for authenticity. The weight given in legal hearings depends upon the veracity of the evidence. Many electronic files can be quickly validated through hash comparisons. An example seen in Figure 11.4 shows two files with different file names, yet their hash values are identical. If one file is known to be valid, perhaps an original evidence file, any file matching the hash values would also be a valid and unaltered copy of the original file.

Figure 11.4. Two files with different file names, but having the same hash value, indicating the contents of the files are identical.
Alternatively, Figure 11.5 shows two files with the same file name but having different hash values. If there were a claim that both of these files are the same original files, it would be apparent that one of the files has been modified.

Figure 11.5. Two files with the same file names, but having different hash values, indicating the contents are not identical.
Finding the discrepancies or modifications of an electronic file can only be accomplished if there is a comparison to be made with the original file. Using Figure 11.5 as an example, given that the file having the MD5 hash value of d41d8cd98f00b204e9800998ecf8427e is the original, and where the second file is the alleged altered file, a visual inspection of both files should be able to determine the modifications. However, when only file exists, proving the file to be unaltered is more than problematic, it is virtually impossible.
In this situation of having a single file to verify as original and unaltered evidence, an analysis would only be able to show when the file was modified over time, but the actual modifications won’t be known. Even if the document has “track changed” enabled, which logs changes to a document, that would only capture changes that were tracked, as there may be more untracked and unknown changes.
As a side note to hash values, in Figure 11.5, the hash values are completely different, even though the only difference between the two sample files is a single period added to the text. Any modification, no matter how minor, results in a drastic different hash value.
The importance in validating files in relation to the identification of a suspect that may have altered a file is that the embedded metadata will be a key point of focus and avenue for case leads. As a file is created, copied, modified, and otherwise touched, the file and system metadata will generally be updated.
Having the dates and times of these updates should give rise to you that the updates occurred on some computer system. This may be on one or more computers even if the file existed on a flash drive. At some point, the flash drive was connected to a computer system, where evidence on a system may show link files to the file. Each of these instances of access to the file is an opportunity to create a list of possible suspects having access to those systems in use at each updated metadata fields.
In the Microsoft Windows operating systems, Volume Shadow Copies may provide an examiner with a string of previous versions of a document, in which the modifications between each version can be determined. Although not every change may have been incrementally saved by the Volume Shadow Service, such as if the file was saved to a flash drive, any previous versions that can be found will allow to find some of the modifications made.
Where a single file will determine the outcome of an investigation or have a dramatic effect on the case, the importance of ‘getting it right’ cannot be overstated. Such would be the case of a single file, modified by someone in a business office, where many persons had common access to the evidence file before it was known to be evidence. Finding the suspect that altered the evidence file may be simple if you were at the location close to the time of occurrence. Interviews of the employees would be easier as most would remember their whereabouts in the office within the last few days. Some may be able to tell you exactly where other employees were in the office, even point the suspect out directly.
But what if you are called in a year later? How about 2 or more years later? What would be the odds employees remembering their whereabouts on a Monday in July 2 years earlier? To identify a suspect at this point requires more than a forensic analysis of a computer. It will probably require an investigation into work schedules, lunch schedules, backup tapes, phone call logs, and anything else to place everyone somewhere during the time of the file being altered.
Potentially you may even need to examine the hard drive of a copy machine and maybe place a person at the copy machine based on what was copied at the time the evidence file was being modified. When a company’s livelihood is at stake or a person’s career is at risk, leave no stone unturned. If you can’t place a suspect at the scene, you might be able to place everyone else at a location, and those you can’t place, just made your list of possible suspects.
Read full chapter
URL:
https://www.sciencedirect.com/science/article/pii/B9781597499859000113
When, How, and Why Do We Trust Technology Too Much?
Patricia L. Hardré, in Emotions, Technology, and Behaviors, 2016
Trusting Spelling and Grammar Checkers
We often see evidence that users of word processing systems trust absolutely in spelling and grammar checkers. From errors in business letters and on resumes to uncorrected word usage in academic papers, this nonstrategy emerges as epidemic. It underscores a pattern of implicit trust that if a word is not flagged as incorrect in a word processing system, then it must be not only spelled correctly but also used correctly. The overarching error is trusting the digital checking system too much, while the underlying functional problem is that such software identifies gross errors (such as nonwords) but cannot discriminate finer nuances of language requiring judgment (like real words used incorrectly). Users from average citizens to business executives have become absolutely comfortable with depending on embedded spelling and grammar checkers that are supposed to autofind, trusting the technology so much that they often do not even proofread. Like overtrust of security monitoring, these personal examples are instances of reduced vigilance due to their implicit belief that the technology is functionally flawless, that if the technology has not found an error, then an error must not exist.
Read full chapter
URL:
https://www.sciencedirect.com/science/article/pii/B9780128018736000054
Establishing a C&A Program
Laura Taylor, Matthew Shepherd Technical Editor, in FISMA Certification and Accreditation Handbook, 2007
Template Development
Certification Packages consist of a set of documents that all go together and complement one another. A Certification Package is voluminous, and without standardization, it takes an inordinate amount of time to evaluate it to make sure all the right information is included. Therefore, agencies should have templates for all the documents that they require in their Certification Packages. Agencies without templates should work on creating them. If an agency does not have the resources in-house to develop these templates, they should consider outsourcing this initiative to outside consultants.
A template should be developed using the word processing application that is the standard within the agency. All of the relevant sections that the evaluation team will be looking for within each document should be included. Text that will remain constant for a particular document type also should be included. An efficient and effective C&A program will have templates for the following types of C&A documents:
- ▪
-
Categorization and Certification Level Recommendation
- ▪
-
Hardware and Software Inventory
- ▪
-
Self-Assessment
- ▪
-
Security Awareness and Training Plan
- ▪
-
End-User Rules of Behavior
- ▪
-
Incident Response Plan
- ▪
-
Security Test and Evaluation Plan
- ▪
-
Privacy Impact Assessment
- ▪
-
Business Risk Assessment
- ▪
-
Business Impact Assessment
- ▪
-
Contingency Plan
- ▪
-
Configuration Management Plan
- ▪
-
System Risk Assessment
- ▪
-
System Security Plan
- ▪
-
Security Assessment Report
The later chapters in this book will help you understand what should be included in each of these types of documents. Some agencies may possibly require other types of documents as required by their information security program and policies.
Templates should include guidelines for what type of content should be included, and also should have built-in formatting. The templates should be as complete as possible, and any text that should remain consistent and exactly the same in like document types should be included. Though it may seem redundant to have the exact same verbatim text at the beginning of, say, each Business Risk Assessment from a particular agency, each document needs to be able to stand alone and make sense if it is pulled out of the Certification Package for review. Having similar wording in like documents also shows that the packages were developed consistently using the same methodology and criteria.
With established templates in hand, it makes it much easier for the C&A review team to understand what it is that they need to document. Even expert C&A consultants need and appreciate document templates. Finding the right information to include the C&A documents can by itself by extremely difficult without first having to figure out what it is that you are supposed to find—which is why the templates are so very important. It’s often the case that a large complex application is distributed and managed throughout multiple departments or divisions and it can take a long time to figure out not just what questions to ask, but who the right people are who will know the answers.
Read full chapter
URL:
https://www.sciencedirect.com/science/article/pii/B9781597491167500093
Speech Recognition
John-Paul Hosom, in Encyclopedia of Information Systems, 2003
I.B. Capabilities and Limitations of Automatic Speech Recognition
ASR is currently used for dictation into word processing software, or in a “command-and-control” framework in which the computer recognizes and acts on certain key words. Dictation systems are available for general use, as well as for specialized fields such as medicine and law. General dictation systems now cost under $100 and have speaker-dependent word-recognition accuracy from 93% to as high as 98%. Command-and-control systems are more often used over the telephone for automatically dialing telephone numbers or for requesting specific services before (or without) speaking to a human operator. Telephone companies use ASR to allow customers to automatically place calls even from a rotary telephone, and airlines now utilize telephone-based ASR systems to help passengers locate and reclaim lost luggage. Research is currently being conducted on systems that allow the user to interact naturally with an ASR system for goals such as making airline or hotel reservations.
Despite these successes, the performance of ASR is often about an order of magnitude worse than human-level performance, even with superior hardware and long processing delays. For example, recognition of the digits “zero” through “nine” over the telephone has word-level accuracy of about 98% to 99% using ASR, but nearly perfect recognition by humans. Transcription of radio broadcasts by world-class ASR systems has accuracy of less than 87%. This relatively low accuracy of current ASR systems has limited its use; it is not yet possible to reliably and consistently recognize and act on a wide variety of commands from different users.
Read full chapter
URL:
https://www.sciencedirect.com/science/article/pii/B0122272404001647
Prototyping
Rex Hartson, Pardha Pyla, in The UX Book (Second Edition), 2019
20.7 Software Tools for Making Wireframes
Wireframes can be sketched using any drawing or word processing software package that supports creating and manipulating shapes. While many applications suffice for simple wireframing, we recommend tools designed specifically for this purpose. We use Sketch, a drawing app, to do all the drawing. Craft is a plug-in to Sketch that connects it to InVision, allowing you to export Sketch screen designs to InVision to incorporate hotspots as working links.
In the “Build mode” of InVision, you work on one screen at a time, adding rectangular overlays that are the hotspots. For each hotspot, you specify what other screen you go to when someone clicks on that hotspot in “Preview mode.” You get a nice bonus using InVision: In the “operate” mode, you, or the user, can click anywhere in an open space in the prototype and it highlights all the available links. These tools are available only on Mac computers, but similar tools are available under Windows.
Beyond this discussion, it’s not wise to try to cover software tools for making prototypes in this kind of textbook. The field is changing fast and whatever we could say here would be out of date by the time you read this. Plus, it wouldn’t be fair to the numerous other perfectly good tools that didn’t get cited. To get the latest on software tools for prototyping, it’s better to ask an experienced UX professional or to do your research online.
Read full chapter
URL:
https://www.sciencedirect.com/science/article/pii/B9780128053423000205
Design Production
Rex Hartson, Partha S. Pyla, in The UX Book, 2012
9.5.3 How to Build Wireframes?
Wireframes can be built using any drawing or word processing software package that supports creating and manipulating shapes, such as iWork Pages, Keynote, Microsoft PowerPoint, or Word. While such applications suffice for simple wireframing, we recommend tools designed specifically for this purpose, such as OmniGraffle (for Mac), Microsoft Visio (for PC), and Adobe InDesign.
Many tools and templates for making wireframes are used in combination—truly an invent-as-you-go approach serving the specific needs of prototyping. For example, some tools are available to combine the generic-looking placeholders in wireframes with more detailed mockups of some screens or parts of screens. In essence they allow you to add color, graphics, and real fonts, as well as representations of real content, to the wireframe scaffolding structure.
In early stages of design, during ideation and sketching, you started with thinking about the high-level conceptual design. It makes sense to start with that here, too, first by wireframing the design concept and then by going top down to address major parts of the concept. Identify the interaction conceptual design using boxes with labels, as shown in Figure 9-4.
Take each box and start fleshing out the design details. What are the different kinds of interaction needed to support each part of the design, and what kinds of widgets work best in each case? What are the best ways to lay them out? Think about relationships among the widgets and any data that need to go with them. Leverage design patterns, metaphors, and other ideas and concepts from the work domain ontology. Do not spend too much time with exact locations of these widgets or on their alignment yet. Such refinement will come in later iterations after all the key elements of the design are represented.
As you flesh out all the major areas in the design, be mindful of the information architecture on the screen. Make sure the wireframes convey that inherent information architecture. For example, do elements on the screen follow a logical information hierarchy? Are related elements on the screen positioned in such a way that those relationships are evident? Are content areas indented appropriately? Are margins and indents communicating the hierarchy of the content in the screen?
Next it is time to think about sequencing. If you are representing a workflow, start with the “wake-up” state for that workflow. Then make a wireframe representing the next state, for example, to show the result of a user action such as clicking on a button. In Figure 9-6 we showed what happens when a user clicks on the “Related information” expander widget. In Figure 9-7 we showed what happens if the user clicks on the “One-up” view switcher button.
Once you create the key screens to depict the workflow, it is time to review and refine each screen. Start by specifying all the options that go on the screen (even those not related to this workflow). For example, if you have a toolbar, what are all the options that go into that toolbar? What are all the buttons, view switchers, window controllers (e.g., scrollbars), and so on that need to go on the screen? At this time you are looking at scalability of your design. Is the design pattern and layout still working after you add all the widgets that need to go on this screen?
Think of cases when the windows or other container elements such as navigation bars in the design are resized or when different data elements that need to be supported are larger than shown in the wireframe. For example, in Figures 9-5 and 9-6, what must happen if the number of photo collections is greater than what fits in the default size of that container? Should the entire page scroll or should new scrollbars appear on the left-hand navigation bar alone? How about situations where the number of people identified in a collection are large? Should we show the first few (perhaps ones with most number of associated photos) with a “more” option, should we use an independent scrollbar for that pane, or should we scroll the entire page? You may want to make wireframes for such edge cases; remember they are less expensive and easier to do using boxes and lines than in code.
As you iterate your wireframes, refine them further, increasing the fidelity of the deck. Think about proportions, alignments, spacing, and so on for all the widgets. Refine the wording and language aspects of the design. Get the wireframe as close to the envisioned design as possible within the constraints of using boxes and lines.
Read full chapter
URL:
https://www.sciencedirect.com/science/article/pii/B9780123852410000099
Word processing is the process of adding text to a word processing unit such as a computer or typewriter. The typed words are stored in the computer or word processor temporarily to allow for editing before a hard copy of the document. The term «word processing» is a fairly general term, so it may refer to several types of writing without the use of pen and paper. Typewriters, for example, process words directly onto a paper without storing the data, while computers use specific programs to store the typed data before printing.
Modified typewriters have been commonly used in the past for word processing. The typewriter would store the data — usually with the use of a computer chip — before printing the words onto a page. The person using the word processor could then check the writing for errors before printing the final draft. When computers became common in the workplace and at home, word processors became mostly obsolete, though some models are still used for a wide range of purposes, including as educational devices for students with special needs.
Computers have generally taken over word processing duties. The computers feature specific programs in which a person can type manuscripts of any length. The data is stored as an electronic document that can be opened, closed, saved, and edited at any time. This allows the user to make corrections or changes to a document multiple times before printing out a hard copy of the document. In many cases, the document is not printed out onto hard copy paper at all; instead, it can be used on the internet, in e-mails, or for other digital purposes.

Simpler programs, such as text editors or notepads, can be used to record text quickly without excess formatting options, such as multiple fonts or font sizes. Such programs are easy to use and do not come loaded with formatting features, such as color, multiple fonts, line spacing options, and so on. They are meant to be used for quick word processing that will not need to be formatted for presentation.
Word processing software often includes several features unavailable on typewriters or older word processors. Such features may include the ability to manipulate the layout of the text, the size and color of the font, the type of font used, line spacing, margin adjustments, and the ability to insert photos, web links, graphs, charts, and other objects directly into the document.
Back to: COMPUTER SCIENCE SS1
Welcome to class!
In today’s class, we will be talking about word processing. Enjoy the class!
Word Processing

Word processing is the phrase used to describe using a computer to create, edit and print documents. It is also the creation, input, editing and production of a document with a computerized device. A word processing package enables you to type in and manipulate text. It helps you to enter, store, format, copy and print text. It is software that turns the computer into a sophisticated typewriter. The word processing software allows you to determine how you want the finished page to look i.e. page size, line, width, margin etc. Once you are satisfied that everything looks all right, you can print out any number of copies on paper.
Basic features
The basic functions are
- Text editing
- Word wrap
- Creating documents.
- Text can be typed, inserted, deleted.
- Text can also be centred between the left and right margins.
- Headers and footers
- Page numbering.
Functions include layout setting, copy, move, search and replace text can be copied or moved within the document and any occurrence of text can be replaced with another block of text.
The simplest programs that do word processing are known as text editors. These programs are designed to be small, simple and cheap. Almost all operating system made comes with at least one text editor built-in. most editors are saved files in a special format called ASCII (American Standard Code for Information Interchange).

Evaluation
- What is word processing?
- What is the difference between a text editor and a notepad?
Uses of word processing
- It allows saving of works for future purposes.
- Word processing packages come with many handy features such as borders, text layout etc.
- It allows plenty of professional-quality document templates.
- Easy to detect and correct mistakes.
- It allows correction of spellings and grammar.
- Inserting elements from other software such as illustrations and photographs.
Evaluation
- What is the difference between a text editor and a notepad?
- List THREE basic functions of a word processing.
Examples of the word processor
A word processor is a computer software application that performs the task of creation and printing of electronic documents. There are several types of word processors; they include Word Perfect, Word Star, MS-Word, Loco Script, Ami-Pro, Word Craft, and WordPad etc.
- Microsoft Word: it is part of the Microsoft office suite. Word consistently wins the title of the most widely word processing program worldwide. Besides basic word processing functions. Word also has desktop publishing capabilities. All the Microsoft office programs have the capacity to work together. An excel worksheet can exist within a word document. Word also has the power to easily merge with Excel lists or from access database files.
- Corel Word Perfect: word perfect suite contains several software programs essential for business and home users. The suite comes with WordPerfect word, Quattro Pro spreadsheet program, Corel presentations and WordPerfect mail.
- OpenOffice: The OpenOffice suite includes a word processor, spreadsheet, presentation program, database and graphics editor. As with Microsoft Office, the OpenOffice programs also work with one another.
Evaluation
- Define word processor.
- List the types of word processors.
The simplest programs that do word processing are known as text editors. These programs are designed to be small, simple and cheap. Almost all operating system made comes with at least one text editor built-in. most editors are saved files in a special format called ASCII (American Standard Code for Information Interchange). Text editors are wonderful programs. The most common text editor is the notepad which comes with windows. Others are:
- Edit which comes with Disk Operating System (DOS).
- SimpleText which comes with Macintosh.
The major difference between a text editor and word processor is that word processors have special features that are used to beautify texts. They have varieties of colours and other icons while the text editors can only accept text with little features such as changing of font’s colours, sizes, etc. The common type of text editor is the notepad that comes with window systems.
Creating a word document
Click on the start icon to display the start menu and then click on the Microsoft word icon. The program gives you an empty one to type.
How to save a document
- Start a new document in Word and type your text.
- Click the file in the top left-hand corner of the screen.
- From the menu, choose to save as.
- A ‘Save As’ dialogue box will come up. It will show the folder where you will be saving.
- Type in the name of your document and click Save.
NOTE: You can also save your document using the shortcut “Ctrl S”

Saving formats
Documents can be saved in different file formats depending on what purpose you intend to use it for. Click on the down arrow to the right save in section of the dialog box, which will display a drop-down menu, choose the file format you want for your document. File formats include HTML, PDF, RTF etc.
Opening MS-word document
- On the menu bar, click File and then click the open icon.
- Click the folder and the file you want to open.
- Click the file.
- Click open.
Evaluation
- Highlight steps in loading word document.
- Explain how to create Ms word document.
In our next class, we will be talking about Presentation Package. We hope you enjoyed the class.
Should you have any further question, feel free to ask in the comment section below and trust us to respond as soon as possible.
How Can We Make ClassNotesNG Better — CLICK to Tell Us💃
Pass WAEC, JAMB, NECO, BECE In One Sitting CLICK HERE!
Watch FREE Video Lessons for Best Grades & Academic Success💃
Contents
Chapter 1 Introduction to Word Processing
Word
Processing Basics
Terminology
The word
processor screen
Creating a
document
Saving a
file
Paragraph
formatting
Footnotes
Spell
Checker
Margins
Print
Preview
Modifying a
document
Replace
What�s
wrong with this Document
Summary of
Word Processing Basics
Summary of
Computer Basics
Word Processing Basics
Basics that apply to all
word processors.
1.
Only hit the Enter Key at the end of the paragraph.
2.
Use the Indent option to start paragraphs and
when appropriate.
3.
Use the Spacing option to space your lines
and paragraphs.
4.
Use the TAB key Once and set the tab stops.
General Computer Basics
1.
Use a Virus Checking program.
2.
Use the Spell Checker before you print.
3.
Use Print Preview before you print.
4.
Save BEFORE
you type anything and often while you are working.
Figure
1
Computers have made typing papers a breeze for those of us
who do not know how to type! We can make mistakes left and right and be able to
fix them on the computer before we print the paper. We can save a paper as a
file on a diskette and keep it for future reference. We can modify papers in a
flash and we can even include pictures in our papers.
When using a word processor you should be aware that you can
move an entire paragraph or simply one word very easily in your paper. You can
also include a new paragraph, a new sentence or just a new word anyplace within
your paper. This ability to manipulate your text is the prime advantage and
difference between using a word processor and a typewriter. The word processor
also allows you to make modifications relatively easily. Especially if you have
followed the simple basics as outlined in Figure 1.
The basics of word processing are guidelines to follow to
make it easier to change and modify your document. They all relate to something
called paragraph formatting features. The four computer Basics are common to
all applications not just the word processor.
Most word processors are similar, so I want to introduce you
to some of the things in general that can be done using a word processor. What
I want to stress is the correct way to use a word processor, which is by
following the basics that are listed in Figure 1. Anyone can sit down on a
computer and type in a paper, but not everyone knows how to type in the paper
correctly. If you ever need to modify the paper in some way it will be easier
to do if you have followed the basic guidelines.
Terminology
Let�s start with a little word processing terminology so
that we are all working from the same reference point.
Cursor�/
Insertion Point�—
The cursor, or insertion point, is a flashing vertical bar on the screen. This
is where your text will appear when you start to type. The mouse pointer will
be an I-beam on your document window and can be used to move the insertion
point by clicking the left mouse button.
Word-wrap�—
When using a word processor we want to take advantage of word-wrap. When you
reach the end of the line, the computer will automatically go to the next line;
this is called word-wrap. If you were trained to use a typewriter, your most
common mistake will be hitting the carriage return key at the end of every
line. In word processing, we only want to hit the return (enter) key at the end
of the paragraph.
Cursor Movement Keys
Arrow
keys
� Left arrow — moves cursor one space
to the left.
� Ctrl + Left arrow — moves cursor one word to
the left.
� Right arrow — moves cursor one space
to the right.
� Ctrl + Right arrow — moves cursor one word to
the right.
� Up arrow — moves cursor one line
up.
� Down arrow — moves cursor one line
down.
Other
Keys
� Home — Moves the cursor to the
beginning of the current line.
� Ctrl + Home — Moves the cursor to the
beginning of the document.
� End — Moves the cursor to the
end of the current line.
� Ctrl + End — Moves the cursor to the
end of the document.
� Page Up — scrolls the screen up
one page.
� Ctrl + Page Up — moves the cursor to the
top of the screen.
� Page Down — scrolls the screen down
one page.
� Ctrl + Page Down — moves the cursor to the
bottom of the screen.
Figure
2
Paragraph�—
A paragraph is defined as going from one enter key stroke to the next time you
hit the enter key. So, every time you hit the enter key, you create a new
paragraph.
Formatting��—
With word processing, you can change the appearance of your text by formatting
the text. There are two kinds of formatting features:
1. Features that effect characters
or only what is highlighted.
2. Features that effect the entire paragraph.
Highlighted�or
Selected�—
Generally speaking, whatever you have highlighted will be affected by the
formatting feature that you do, or will be deleted, or will be moved, or will
be copied, etc. Highlighted text appears with text in the background color
(usually white) and the background color as the text color (usually black). You
can highlight text by clicking with the mouse (holding down the left mouse
button) and dragging the mouse cursor over the text. Oftentimes when
highlighting text in this manner, you may let go of the mouse button too early
and miss a letter or two. No problem. Simply hold the shift key down and press
the arrow keys to move the highlight in the direction that you want. In fact,
you can use any of the cursor movement keys (Figure 2) combined with holding
down the shift key to highlight text. Also, if you place the mouse pointer on
the extreme left side of the document window you can then click to highlight
the entire line.
Toggle�—
Many features in word processing work as a toggle, which means it is a switch
that can be turned on or off. If you decide you do not like the option you
simply turn it off. Some of the toggle options include BOLD, Underline, and Italics.
These can all be turned on or off. If you have something bold and you do not
want it bold, you simply highlight the text and then click the bold switch to
turn it off.
 Non-Printing Characters�Figure 3 — There are several key strokes that you use all the time that do
not print. These would include hitting the space bar, tab key, and enter key.
All of these characters can be shown on the screen. It is sometimes helpful to
see these characters so that you know what is happening in your document. I
will talk about the non-printing characters more when I talk about the basics
of word processing.
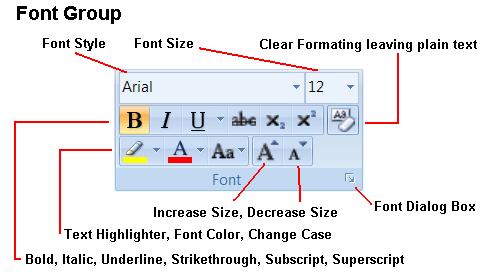
 Font�Figure 4
— The style of character that your text is in. I am using Arial at the
moment. You can have as many fonts in a document as you want. In fact, you can
make each letter a different font! One very important point about fonts is that
the fonts that are available to you are dependent upon the printer that you
have. So if you don�t see any of the fonts that I have here, that simply means
your printer does not have those fonts. You can buy fonts for your printer and
then you would be able to use them in your documents. You should also know that
you can make your computer think it has a laser printer (has a lot of fonts) by
just setting the option as if you had that printer. Your computer will not know
the difference. You will not be able to print them on your computer but you can
save the file on a disk and bring it to a computer that does have that printer.
The bottom font is Wingding. In fact if
you type a lower case L and change the font to Wingding
you will get a bullet l.
Font Size�— The
size is how big or small your text is. The larger the number selected the
larger the size. Some fonts have more sizes available to them. Again size, just
like font, is printer dependent. You can also use as many sizes as you feel
like in your papers.

The
word processor screen
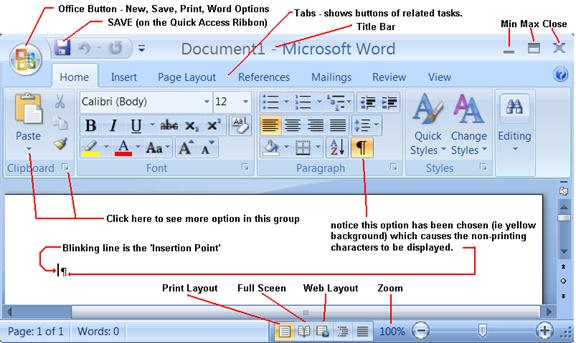
In Figure 5 above you can see what a new word processing
file will look like in Microsoft Word. Let me describe the various parts for
you. You should begin to recognize some of them. Also, as you practice your
word processing, pay attention to how the program works. Most Windows programs
work in a similar fashion. For example, opening or saving a file is done in the
same way for most applications. You would click on the Save Icon (looks like a
floppy diskette that no-one uses anymore :).
 Title
Title
Bar�— This is something that you have seen before.
In this case the title bar is showing you the name of the application that you
are using (Microsoft Word) and the name of the file (Document1). In this case the name of the file is the default name[1].
You should notice the Minimize —
Maximize and Close button on the
title bar for the application. The buttons on the menu bar are for the
document.
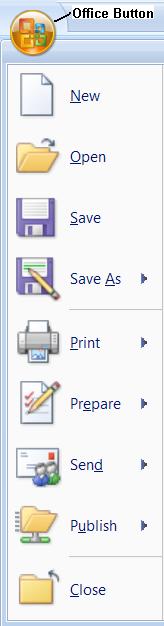
Office Button �
The Office Button shown to the left has the options to create a New File, Open
an existing file and Save or Save As a file. You choose Save As when you want
to specify the drive letter, folder, name and type (as described later on). We
will also use Print and Close however the rest of the buttons are up to you to
learn about. If you right click any option you will get a pop-up menu that one
choice is to add this button to the Quick Access Bar. In Fact you should add
your most common buttons to the Quick access bar.
Tabs�— The
different tabs group like items together, most of the common formatting
features are on the Home tab, which also looks more or less the same in all the
office applications. Insert Tab allows you to put things into your document (no
real need for me to describe them to, just take a look). Page layout is where
you would go to change your margins etc. The more you use Office the more you
remember where to look for the various options. One of the problems with the
tabs is in trying to remember what those cute little buttons stand for.
Software companies have helped this problem by supplying mouse tips. When you
place the mouse pointer over a button on the toolbar and wait a few seconds, a
small description will pop up on the screen.
Status Bar�—
The status bar gives information about our position within the document. Page 1
is the page we are on, of 1 page total in our file. Along with how many words
you have. It�s just handy to be able to �see at glance�. To get a groovy
description of the status bar simply click the help icon (top right ?) and type
in status bar!
Scroll Bar�—
The scroll bar simply allows you to scroll through the document. If you click
the scroll arrow you will move 1 line at a time. If you click in the scroll bar
itself you move one screen at a time. The square box indicates your position in
the document. If you click above the square box you will move up, if you click
below it you will move down. You can also drag the square box to where you
think you want to go.
Document
Window�—
This is simply the window that your document will be in.
Insertion Point�—
The insertion point is the place where once you start typing, the text will
begin. The text will be inserted to the left of the insertion point. The
insertion point is also known as the cursor.
![]() Paragraph Marker�—
Paragraph Marker�—
Our document already has a paragraph even though we have not typed in a single
word. The paragraph marker may not be showing on your screen. It is a toggle to
display non-printing characters or not to display them. Look for the show/hide
button on the toolbar to turn this option on or off[2].
Mouse Pointer�/
I-Beam�—
These show the location of your mouse. If you are moving the mouse pointer and
you run out of desk space to slide the mouse on, simply pick the mouse up in
the air and move it to a place you can reach. The mouse pointer will not move
unless the mouse is on the desk. It is helpful to use a mouse pad when using a
mouse. A book or some paper makes a quick mouse pad if you do not have one.
Ruler�—
The ruler is one of the most important
things to understand in word processing as it tells you what is happening. To
have your ruler display, choose the View Tab, Show hide button and check ruler.
Looking at Figure 7, the ruler is telling us that we have 6� inches of working
area, no tabs set (only default at every 0.5�), and no left or right indent
set.
 |
The zero mark on the ruler is at the left margin. When the layout of the text
is wrong the ruler is the first place to look. You may have an incorrect tab
setting or indent.
We have just been talking about Microsoft WORD 2007 but looking
at most any other word processor screen will be the same.
The big difference between programs tends to be �how� to do
things and most of that is really WHERE the option is located. So just because
we are learning one specific application package remember that what we learn is
applicable to many other software products as well. Have confidence in your own
ability and try the different packages. If worst comes to worst, simply close
the program (Click on the X)! If things are really bad turn the computer off,
but do this as your last alternative. You will not break anything (that can�t
be fixed) but turning a computer off when it is still running a package leaves
a lot of extra temporary files[3] on
the computer that normally get deleted.
Creating a document
Well let�s try to create a simple word processing document.
Remember to use word wrap, so just keep typing until you get to the end of the
whole paragraph and then hit the enter key to start a new paragraph.
When you set formatting attributes you have two choices: one
is to set the attribute and then type in the text, the second is to type the
text first and then go back and highlight the text and set the attribute. You
can use either method. I use a combination of the two techniques myself.
Start up the word processor that you will be using. Some
word processors will automatically start a new document for you and some will
not (check the title bar for a default document name). If there is not an empty
word processing file on your screen, create a new one (Click on the Office
button and choose new).
Saving a file
The first thing I want you to do is to save this blank
document! When using computers you should save often; the more you save, the
better off you will be. I am guilty myself of typing for an hour and losing all
of my information. One thing that can happen is that there may be an error on
your disk drive[4].
It is better to find this out before you start typing than after you have been
typing for an hour. So, the first time you should save a file is BEFORE you
type anything. Another more common problem is that you may turn the computer
off by mistake (or the electricity goes off) and then lose all of your
information. To save your file, simply click the save icon (either under the Office Button or directly
on the Quick start bar). This will give you a
dialog box as shown below.
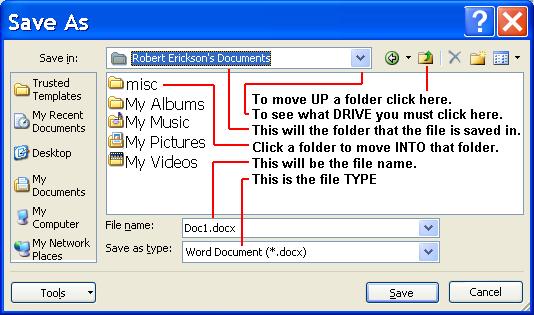 �Be sure to pick the correct drive and folder
to save in. When giving files a name, pick a name that will best describe the
file so that you can find it easily in the future.
In the figure above the file will be saved as Doc1.docx in the folder Robert Erickson�s Documents.
To see which drive it will be saved on, you must click the arrow ![]() �to see the drop down list box. Technically it
�to see the drop down list box. Technically it
still doesn�t show you exactly which drive it is being saved in! In this
example I can click on the Hard drive C: go to documents and settings folder,
find Robert Erickson, click on my documents which will take me to Robert
Erickson�s Documents. The reason I mention this is that some computers are set
up to save your files to a network drive. You should look to find out how your
computer is set up.
After you pick (or verify) the drive you then choose the
correct folder(s) by double clicking the folder (easier to double click the
icon of the folder instead of the name).
To change the file name, you simply type in the name desired.
If you need to change the File Type you do so by picking the
correct type in the drop down list box.
Once you are all set, go ahead and choose the Save command button. As you type
your document, be sure to click the save icon ![]() �every now and then. So remember that when you
�every now and then. So remember that when you
save a file you must specify the DRIVE,
FOLDER, NAME and the File Type (if needed).
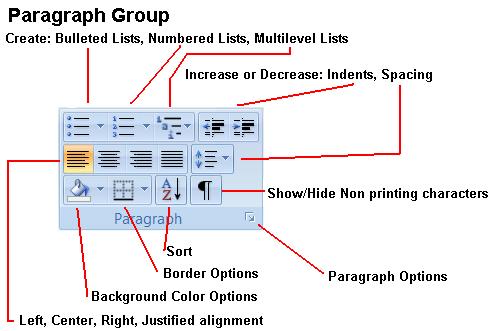
Paragraph formatting
Okay, now that we have given our file a name, let�s start
typing it. I want you to type in the following memo just as it appears in
Figure 11. I have shown you the non-printing characters so you know when to hit
enter. There are 10 paragraphs in this document (remember, every time you hit
the enter key you create a new paragraph).
I want you to format the document to look like my sample shown
in Figure 12 (This file is done correctly). We will be using the Paragraph Group on the Home Tab.
Start by selecting the first four paragraphs. The easy way
to do this is to put the mouse cursor to the left of the first paragraph (on
the extreme left of the document), then with a click and drag motion highlight
all four.
Currently the first 4 paragraphs are left aligned; meaning the left side is smooth on
the left indent. To change this to center
aligned,
simply click the center align icon. This will center the paragraph between the
left and right indents. If you forget which button this is just leave the mouse
pointer on top of the button for a couple of seconds and you should see a mouse
tip that will tell you.
We also want to change the font for these paragraphs to
Arial. Since they are still highlighted we can simply click the drop down list
box for the Font (top of the FONT Group: See
figure below) to get the list for the different fonts available. Scroll to the
top of the list and click on Arial. You should note that whatever is selected
is going to be changed. If the size is not 12, simply change the size to 12 by
clicking on the size list box and choosing 12. If you do not have Arial, simply
choose a font that you do have.
Now I want you to make the first paragraph larger than the
rest. So we will need to highlight just the first paragraph. Simply double
click[5] to
the left of the paragraph; this will highlight the entire paragraph. Now change
the Size to 20. I want the rest of the document (from Hillary on) set to a size
of 14. Simply click the mouse pointer to the left of the fifth paragraph. This
will highlight that one line only. Now to get the rest of the document
highlighted we will use the keyboard. Remember that we can highlight by holding
the shift key down and using the cursor movement keys. I know that if I choose
Ctrl + End it will take me to the end of the document. So I want you to press
Shift + Ctrl + End. This will highlight from the cursor�s current position, to
the end of the document. Now go ahead and change the size to 14. If the Font is
not Times New Roman, change that now as well.
A few more things to do and then you will be done. You will
notice that there are no paragraph markers between the paragraphs. This is
because I have set my paragraph spacing correctly. You will also notice that
there is no tab mark at the beginning of each paragraph. I have used a feature
called first line indent. The file in Figure 12 is
done correctly following the basics of word processing. We can set the line
spacing and the first line indent at the same time. Before we do this let�s
make sure we have the correct paragraphs highlighted. Click the mouse just
before Dear and highlight to the end of the document.
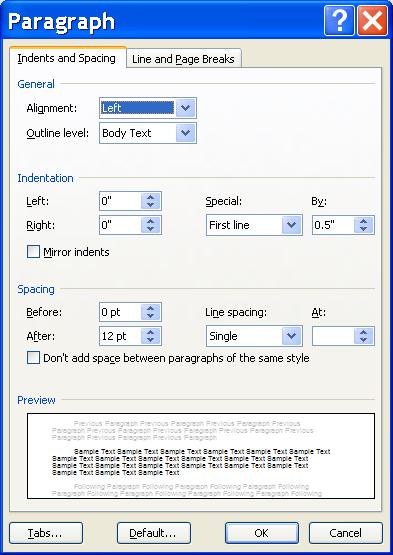 Now choose Paragraph
on the Paragraph Group of the Home Tab
and click on:
![]()
This will give you the Paragraph
dialog box. Be sure you are looking at the indents and spacing tab as shown. I
have set this dialog box to the correct options and this is what I want you to
do as well. Set the First Line Indent to 0.5. Looking at the Special list box
choose first line (you may just have a first line text box and that is the same
thing). You can type in .5 or click the up arrow till 0.5 shows.
Your first line
indent is always measured from your left
indent. Your left indent is measured
from the left margin (the zero mark on
the ruler).
Your right indent�is measured from the right margin. If you were
to set your left indent to 0.5� with a first line indent of 0.5�, your first line
indent marker would be at the 1� mark as shown in this example.
![]()
For spacing I want you to set the Spacing After�to 12 pt. 12 points is the standard size for 1
Line. You can set the spacing to whatever number you want as long as it is in
the same form of measurement. For example if I wanted 1 and a half line I would
type in 18 pt.
Notice that the Alignment�is set to the left. We changed the alignment
earlier by using the icon. Also notice the little preview section. If you hit
the tab key (to move the focus to another option in the dialog box), it will
put into effect your last change in the preview section so you can get an idea
of how it will look when you choose OK.
One last thing before you choose OK and that is the Help icon, choose it now and read all there is to read about
the paragraph dialog box (it will explain a lot). When you are done reading
Help, click the Help�s Close icon. When you are ready, go ahead and choose the
OK command button. Your document is all set and done correctly.
Let�s take a look at Figure 15, which shows the same
file, but this time it was done incorrectly. What was done wrong is that the
enter key was used to insert the blank lines for paragraph spacing and the tab
key was used to start the paragraphs. If we were not looking at the
non-printing characters we would not be able to see any difference whatsoever.
I admit it would not make much difference in this example because this is a
short one to type in. However you might as well learn the correct way now, so
that when you type in a longer document you will be able to make multiple
spacing and indent changes much more rapidly than if you had not used your word
processor correctly.
Okay, my point is a simple one. When we want to make a
change (if we have used the word processor correctly) we can make them quickly
and easily and our document will look the way we want it to. Suppose I were to
say to you that I wanted 1.5 spaces between each paragraph and I did not want
the first line indented. If you have used your word processor correctly than
all you have to do is:
����������� 1) Highlight the paragraphs.
����������� 2) Choose Format, Paragraph
����������� 3) Set your spacing to 18 pt
����������� 4) Set your Special Indent
(First Line) to none.
If you have not used the word processor correctly than you
would need to delete all the tabs at the beginning of each paragraph. How would
you set the line spacing to 1.5 without formatting the paragraphs, I am not
sure[6].
If your document were 20 pages long, this would be a real hassle. However if
done correctly, it makes no difference how many pages there are because it
requires the same number of steps and the same amount of time.
 Now modify your memo a little by putting
your name, lecture, lab and the date at the top in block format. Simply place
your insertion point at the beginning of the document. You may find it easier
to hit enter and give yourself a blank paragraph. It is okay to hit enter a few
times and create blank paragraphs, just remember to delete any extra ones you
may have. Move your insertion point before this blank paragraph and start
typing. If you find you are typing in the center of the page choose the left
aligned button to bring the text over to the left margin. For the date I want
you to insert a date field. The date field will always print the
current date. For example: if you print this document on May 1, 2525, then that
will be the date that prints. On the other hand if you print this document on
May 31, 2525 that would be the date that would print. To insert the date field,
all you need to do is choose Insert tab, look for
the Quick Parts in
the Text Group, and choose Field.
It is easiest to click on Categories and then choose dates. Now just pick the format
that you want for the date and choose ok. Your document will look like this
when you are done:
TO:����� Professor’s
name
FROM:���������� Your
name
LECTURE:��� Your
Lecture
LAB:�� Your lab
DATE:����������� May 15, 2525
 In Figure 16 we can see the top half looks
correct, however it is done incorrectly. You do not want to hit the tab twice
in a row in order to line up your information. The bottom half of the diagram
is done correctly as far as how it was typed in by hitting the tab key only
once. We would now need to highlight the 5 paragraphs and set a tab stop to 1
inch. �Notice in Figure 17 I have
highlighted portions of all the paragraphs. This is ok since tabs are a
paragraph formatting feature you only need to have a part of the paragraph
highlighted since the formatting will affect the whole paragraph.
To set the tab stop all you need to do is to click the mouse
just below the number 1 on the ruler (be sure to highlight the 5 paragraphs
first). This will put in a left aligned tab at one inch and align your text
like shown in Figure 17. If you need to move the tab simply click and drag it
to the desired location. If you want to delete the tab stop simply drag the tab
above the ruler.
Now would be a good time to save your document again!
TO:���������������� Professors name
FROM:���������� Your name
LECTURE:��� Your Lecture
LAB:�������������� Your lab
DATE:����������� May 15, 2525
Figure 18
Let�s make the TO paragraph bold. This is easy to do, as all
you have to do is highlight the TO paragraph and click on the ![]() �bold button on the Font Group
�bold button on the Font Group
under the Home Tab. Again, what you have highlighted
will be changed. Let�s practice this a little more by making the FROM paragraph
bold as well. You can format your text as many ways as you like, so for
practice let�s underline only your name. Simply highlight your name and
click the ![]() �underline button on the toolbar. Try something
�underline button on the toolbar. Try something
on your own. Make your lecture section and lab section Italics. It should look
like the sample (Figure 18) when you are done.
Footnotes
 Looking
back at the memo I realize that Hillary may not know where our headquarters are
located. Our headquarters are actually located in Kansas, Vermont though our mailing address is Manchester, Vermont.
We will be sending her an information packet that gives complete directions to
our lodge, so I really do not want to give the directions in the memo. What I
want to do is to use a footnote so that I can explain that directions will be
forthcoming.
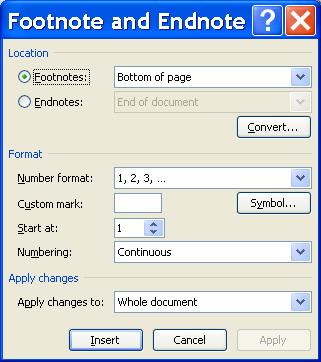
 Inserting footnotes into a document is
very easy. You simply place the cursor where you want to mark the footnote,
choose the References Tab, and look for Insert Footnote.
This will put the footnote mark where your cursor is and jump you to the bottom
of the page so you can type in your footnote. If you want to get more options,
simply click the ![]() �icon to get the footnote dialog box as shown
�icon to get the footnote dialog box as shown
in Figure 19. You have your choice of a footnote
which shows up at the bottom of the page that the mark is on, or endnotes�( ![]() �icon) which show up at the end of the
�icon) which show up at the end of the
document. We are going to use footnotes and Autonumber�for this class. As always, to learn more about
the various footnote options simply choose Help.
The computer handles the numbering for the footnote marks
both in the document text and the footnote window. If you have two footnotes on
a page and add a third one in the middle, it will be numbered in order as two.
The same is true if you delete[7] a
footnote, then the existing footnotes would automatically be renumbered.
In the footnote paragraph you can do any formatting feature
that you normally would do. You can change the font and size. You can bold,
underline, or italicize text. You can set tabs, indents, and spacing. Basically
you can do most anything, just try it. If the computer will not let you do
something then I guess you can�t, at least try it first. Who knows, maybe
someday you will be able to!
The style of footnote that I like to use is the MLA — Modern
Language Association Guidelines (http://www.mla.org/style)
for footnotes. The footnote should be a different font and a smaller size than
your main document. You should use a first line indent of 0.5� for each
separate footnote. Other than that, there really is nothing to it.
Spell Checker
Unless you are a perfect typist and never make any mistakes,
chances are that you have made a spelling or typo mistake. I have a tendency to
make a million of them when I type! Luckily, word processors come with a spell
checking feature that works great. If you made a mistake while typing you may
have noticed that the incorrect word was underlined with a red squiggly line.
If not type a word incorrectly now to see it. This shows you that a word is
spelled incorrectly or is unrecognizable by the computer. You may notice a
green squiggly line, which indicates that you have a grammar error. You can
continue typing and then check your spelling and grammar at the end or you can
fix the words as you go.
It is a good idea to save your document before you run the
spell checker[8].
The spell checker is a neat feature as it will check every word in your
document and compare it to the internal dictionary to see if it matches any
words. So that means the spell checker will look �I� up in the dictionary to be
sure you spelled it right! I do not think I would have the patience to
literally look every word up in the dictionary. The spell checker will also
find repeated words, for example if you type type
a word twice, the spell checker will ask if you want to delete one. Also if you
type «i» the spell checker will
ask you if you want to capitalize it. However the spell checker will not check
your grammar so you may spell �two� when you meant to spell �to� and the spell
checker will not say anything. The grammar checker will put a green squiggly
line under the words.
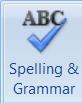 You can look on the status bar for the spell check symbol to see if you need to run the
spell checker. The blue check ![]() �means it is okay, however the red check �
�means it is okay, however the red check �![]() �means you have misspelled word(s). To run the
�means you have misspelled word(s). To run the
Spelling and Grammar checker choose Review tab and click
on the Spelling and Grammar icon.
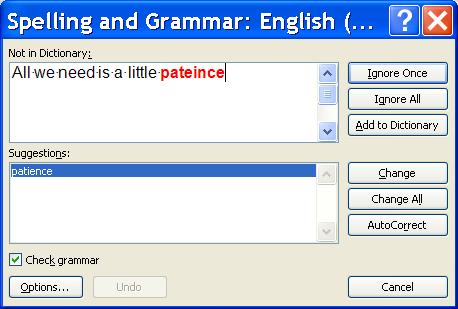 When the spell checker finds a word that
it cannot match, it will give you a dialog box with several options for you to
choose (most spell checkers work pretty much the same). In Figure 20 you can
see that patience is misspelled. You will be shown how you spelled the word
with a list of possible correct spellings. You can Ignore the spelling if the word is spelled correctly as,
some words will not be in the dictionary. For example, your last name is
spelled correctly but will not be found in the dictionary. If you have used
your last name throughout the document you may want to Ignore All, which means the spell checker will not stop at
that word again. If you see the correct spelling in the list simply click on
the correct spelling and choose Change.
This will change the spelling in your document. If you are a consistent bad
speller like myself you may want to choose Change
All so that the spell checker will just automatically change the
word throughout the rest of the document. If you are using your own computer
you may want to Add a
correctly spelled word such as your last name to the dictionary. You simply
double check to be sure it is spelled correctly and choose the add button to
add the word to your CUSTOM.DIC. If you
accidentally added a misspelled word you can open the file called CUSTOM.DIC[9]
and fix the spelling. After you have finished, be sure to save your file again
so you do not lose your corrections.
A couple of notes about the spell checker. When you click on
the spell check button, the computer will begin to check the spelling from the
cursor and go down to the end of your document. After the spell checker
finishes with the main document it will then check your footnotes. If you have
started the spell checker someplace in the middle, when the spell checker
reaches the end of your document, it will ask if you want to check the rest of
the document. If you want to just check a word or paragraph simply highlight
what you want to be checked and then run the spell checker (remember what is
highlighted will be affected).
 Margins
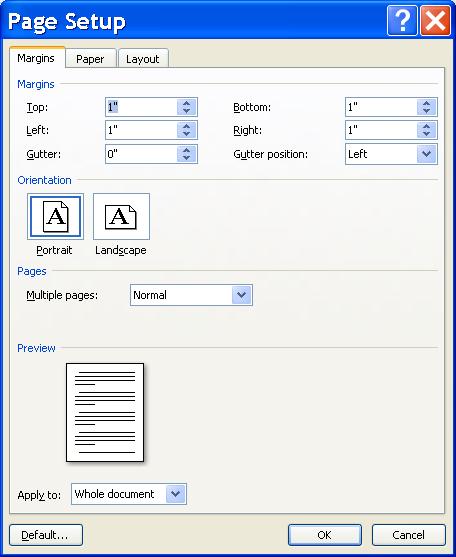
The margin�default is finally set to the standard 1�!
However if you need to change your margins it is not hard. Choose the Page Layout tab and click on any of the standard settings.
If you choose Page Setup ![]()
to get the dialog box that looks like Figure 21. Be sure that the Apply To: list box has Whole Document in it. If it only
applies to the selected text you will wind up putting in section breaks
(Chapter 3).
Print Preview
Now that we have finished our document, proofread it on the
computer, checked the spelling and saved it again we are ready to see what it
looks like printed. Word processors come with an option called Print Preview�that will show you what your document will
look like on a piece of paper. Choose the Print icon on the Office Button, and then choose the preview icon.� This will show you (more or less) how your
document will look on a piece of paper. You most likely will not be able to
read the document but you can see the layout. Actually if you move your mouse
cursor over the paper it will turn into a magnifying glass. When you click the
left mouse button it will Zoom In and enlarge that section so you can read it.
Print preview helps you to see the format of your document on paper. It is
faster to look at your document in print preview than it is to print the
document, look at the printout, make any necessary changes and then reprint the
document. It also saves paper!
Some things to look for in print preview are blank pages (we
do not want to waste paper). To check for blank pages simply press the page
down button until the computer �beeps�. This means there are no more pages. If
there are blank pages, you need to go back to the document and fix whatever is
wrong. Most likely there are several paragraph marks at the end of your
document that should be deleted (remember to look for the end of document
marker). If on the other hand everything looks fine simply choose the print
button on the tool bar. I never use the print button on the standard toolbar as
I can easily use the print button found in print preview. You should always
check print preview before you print to spot any possible errors.
If you notice that you have only one or two lines showing up
on the second page you may as well change your margins or line spacing to get
the information to print on one page. Try changing your margins to 0.8� (top,
bottom, left and right). This will be close to 1� and is worth the sacrifice
from the standard to get your document on one page. You could also change your
paragraph spacing to 8 pt instead of 12 pt. The point is that you can do this
easily as long as you have used your word processor correctly. The actual
numbers that you use, i.e. 8 pt vs. 12 pt, 1� vs. 0.8� are not that important
in life. Experiment and use what works the best. However for this class be sure
to follow the directions as given.
Modifying a document
No matter how hard you try invariably you will find that
sometimes you want to change something after you print your document. The nice
thing about using a word processor is that you can easily go back and revise
your document and print it again! If you need to add a paragraph simply place
the cursor where you want the information to go and just begin typing[10].� If you decide you do not like a sentence
simply delete it. You can also move paragraphs by simply highlighting them and
then clicking on the ![]() Cut icon.
Cut icon.
This will take the highlighted section out of the document and store it in the
computer’s memory. Now place your cursor where you want the information to go
and choose the ![]() �Paste
�Paste
icon (both are on the Home tab).
This will take the information you just cut and place it back into your
document where you have specified by the cursor location.
I hope that you have noticed a pattern about all the dialog
boxes we have seen. Every dialog box has a help command button. If you are not
sure of what you are doing simply click the help button and read the
information available to you. If you are not sure what to look for use the help
feature like a book and search for the key word. If you have the time you may
just want to go through the On-line tutorial available with the program itself.
The other points that are important are following the basics
of word processing and saving your documents often! I have tried to demonstrate
the reason behind the basics but if you do not understand please ask me to
explain again until you do.
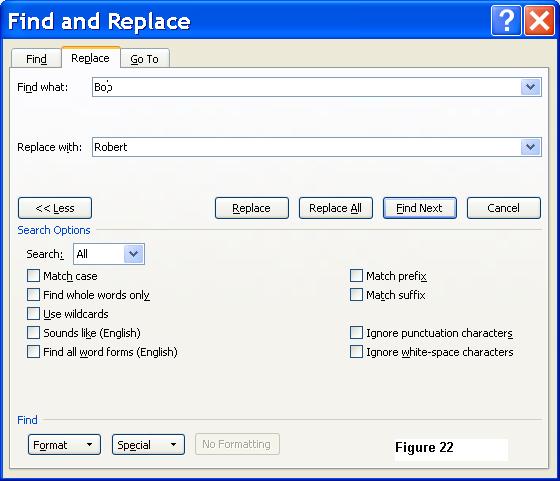
Replace
Replace is a handy feature found in both the word processor
and spreadsheet. What it does, is search for a word or series of characters
that you specify and replaces those with whatever you want. The Find feature works the same way, only
it does not replace anything, it just finds it. The search will start from
where the cursor is and goes to the end of the document (unless you have a
highlighted section in which case it would only look in what you have
highlighted). So choose the Home tab, Editing Group and then Replace
to get the dialog box shown in Figure 22. Let�s talk about the dialog box for a
minute. I have filled in the Find
What with �Bob� and Replace With:
�Robert� so I can change every �Bob� to �Robert�. I have a couple options that
I can change. The Search�specifies how to search, Down means from the
cursor to the end of the document. The Match
Case�check
box specifies that I have to find �Bob� and not �bob�. Find Whole Words Only�means that what you are trying to find must
have a space before and after it. In other words Bobbie would not be
replaced with Robert.
The command buttons are also important in what they do. Find Next�will
simply look for the occurrence of the word in the Find What text box. The computer will simply stop when it finds the
word. You can at that point click on Replace to actually change the word.
Replace�will simply find the next word and
automatically replace it without asking. You can choose Replace again to move
on to the next word.
Replace All�will find all the words and replace every
single one without asking.
A strong suggestion is to save your document BEFORE you do a
replace just in case the results are not what you expected. For example, if you
replace the word US with United States without checking any of the options, the
word �just� will become jUnited Statest!
You need to match case and whole word only.
I do not want to get into �Use Wildcards� or �Sounds like�,
so I will leave that up to you to read about in help if you would like. The
added feature you have in the word processor (not in the spreadsheet) is the
ability to format your Replaced word in any way you like. You can change not
only Font characteristics but also Paragraph characteristics (A very powerful
feature, check it out). For a simple replace there is no difference in the word
processor or spreadsheet so use them wisely and to your advantage. Just be sure
to save your file first! Remember you can usually Undo your replace if you do it right away.
What�s wrong with this Document
Looking
at the document in Figure 23, you should see several things that are incorrect.
The first thing I see is that the enter key was used to put in a space between
paragraphs. You should use the Space Before/After option (home tab)
found in the spacing icon ![]() .
.
The next thing that I notice is the Main paragraph was started using the tab
key. You should use First Line Indent option (home tab, Paragraph dialog box or
ruler). The last thing that I see is all that junk near the end of the
document? That is all extra and should be deleted. That extra junk can cause a
blank page to print out with nothing on it (they are all non-printing
characters but that only means they do not show on the page). If this were your
document, you would lose points for all of these mistakes. These are the things
that I will be checking when I grade your work.
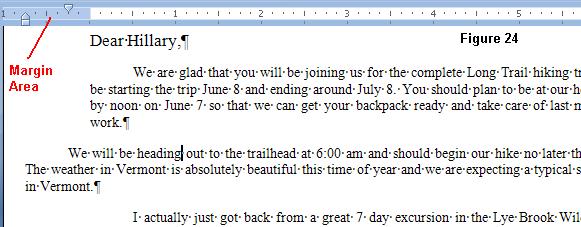
Notice
how the first paragraph goes over too far to the left in Figure 24? This is
caused by the fact that you have a negative left indent. When you look at the
ruler the white area is your working area. The light blue area on the ruler is
the margin area on your paper. You should
not have text in the margin area. To fix this problem, simply choose the
home tab and click on the Paragraph bar
(to get the paragraph dialog box) and
set the left indent to 0� (you could also just move the indent on your ruler).
You probably did not mean to do this but it happens a lot when you use your
mouse to set your first line indent. It is pretty easy to fix.
Summary of Word Processing Basics
1. Only
hit the enter key at the end of the paragraph. You do this in
order to utilize the word wrap feature. If you hit enter at the end of every
line and then change your margins, your paper will not adjust to the new margins
the way that you would like.
2. Use
the indent option to start
paragraphs and when appropriate. This is so that you can change the indents for
your document easily. Suppose you hit the tab key to start your paragraphs and
later you are asked to have no indentation. You would need to delete all the
tab marks, whereas if you used the indent feature you could simply highlight
the document and remove the indents in a few easy steps.
3. Use
the spacing option to space your
lines and paragraphs. This is related to using the indent option, since when
you need to change the spacing it can be done easily provided you have used the
spacing option. If you chose to use the enter key for your spacing you would
need to go back and adjust the spacing with each enter key individually, which
could be a lengthy process.
4. Use
the TAB key once and set the tab stops. This enables you to be able to align
your text up so that it is even. If you have to change the alignment it can be
accomplished easily. If you used the space bar to align your text it most
likely will not be aligned when you print.
Summary of Computer Basics
1. Use
a Virus Checking program. Today viruses
are prevalent so be sure to have a CURRENT virus checking program installed on
your computer.
2. Use
the spell checker before you print.
This just makes sense! Why print only to find simple spelling errors. That is
just a waste of paper and time.
3. Use
print preview before you print. This
also makes sense so that you can see the layout of your document before you
print it. You may find your document has 2 pages. If so, you can change your
margins and have your document fit all on one page.
4. Save BEFORE you type anything. Hey it�s
your work why risk losing it!
Goals
- Students will recognize the major types of word processing programs.
- Students will discriminate the types of problems that are best solved
with various types of word processors. - Students will recognize the major tools that are available in word
processor application programs. - Students will use a text editor to create and modify a simple ASCII
text file. - Students will use a high end word processing program to practice
common text formatting problems.
Prereqs
- Comfort with the keyboard and mouse
- Experience with the STAIR process for solving problems
- Familiarity with principles of data encoding
- Familiarity with differences between hardware and software
- Understanding of the attributes of RAM
- Familiarity with operating systems, file names and directories
Discussion
Word processing is one of the most common applications for computers
today. It would be difficult to spend a day in a modern office or
university without coming into contact with a word processing program.
Most people have had some contact with word processing. We shall
examine the concept in some detail, so you will be familiar with a
number of levels of word processing software applications, the types
of tools such programs make available to you, and so you will know
what kinds of problems are best solved with this type of program.
How Word Processors Work
The advantages of word processing programs can best be illustrated by
thinking of some of the disadvantages of typewriters. When we use a
typewriter to create a document, there is a direct connection between
the keys and the paper. As soon as you press a key on the keyboard,
there is an impact on the paper, and the document has been modified.
If you catch a mistake quickly, you can fix it with correction tape or
white-out. If your mistake is more than one character long, it is
much harder to fix. If you want to add a word, move a
paragraph, or change the margins, you have to completely retype the
page. Sometimes this necessitates changes on other pages as well. A
one word change could lead to retyping an entire document.
Word processing is a type of software that focuses on the ability to
handle text. The computer does this by assigning each letter of the
alphabet and each other character on the keyboard a specific numeric
code. These numeric codes are translated into computer machine language,
and stored in the computer’s memory. Because the information is in memory,
it is very easy to change and manipulate. This is the key to the
success of word processing.
Example
Information in memory can be moved very quickly and easily. If we
want to change a word in a document, what happens in the computer is
something like this:
Imagine Darlene has started out her resume with the following word:
REUME
Obviously she has forgotten a letter. If she were using a typewriter,
the page would be trashed, and she would have to start over. Since
this is a word processor, Darlene can manipulate the memory containing
codes for the word «REUME» and add the «S» to it. When she tries, the
following things happen:
She moves her cursor to the spot in the text where she wants the S to
show up. The «cursor» is a special mark on the screen that indicates
at which place in the document the computer is currently focused. In this
case, Darlene wants to put an S between the E and the U. Her word
processor won’t let her put the cursor between two letters (although
some will), so she puts it on the U.
By moving the cursor, Darlene is telling the program to move around in
memory as well. When she place her cursor on the U on the screen, she
is telling the program to point to the corresponding spot in the
computer’s memory. The computer is now concentrating on the memory
cell that contains the code for the character «U».
She checks to be sure she is in insert mode (more on that later),
and she types the letter «S».
When Darlene does this, the computer shifts all the letters one memory
cell to the right, and inserts the code for the S in its proper
place.
Word processors and RAM
It sounds like a lot is happening. That’s true, but computers do all
these things so quickly that it seems instantaneous to us. You don’t
really have to know exactly where the stuff is in memory, or how it
gets moved around. The important thing to understand is that all the
information in your document is stored in some kind of digital
format in the computer’s memory. When you modify a document, you are really
modifying the computer’s memory. A word processing program handles
all the messy memory manipulation, so all you have to do is concentrate
on writing your paper.
RAM (Random Access Memory), where all the action is happening, has
one serious drawback. It only lasts as long as the computer is receiving
electrical power. Obviously this will cause some problems, because you
can’t just carry a computer around to show people your documents.
(Imagine the extension cord!) You also might run into some serious
problems if your computer were suddenly hit by a monsoon or something,
and you lost electrical power. In short, you cannot count on RAM memory
alone.
Word processing programs (as well as almost every type of program) are
designed to allow you to copy your information. Computer scientists
refer to the information your program is using as data. The data in
RAM can easily be duplicated to floppy disks or a hard drive. This is
called saving. Copying the data from RAM to a printer is called
printing. You can also copy data from other places to RAM. Copying the data
from the disk is referred to as loading the data. You might already
know what saving and printing are. We don’t mean to insult you by
telling you again. We just want to illustrate that it all boils down
to copying binary information to and from RAM.
Types of Word Processing Programs
There are many flavors of word processing programs. Different
programs are better for different types of jobs. One common problem
is deciding which program you will use to do a certain type of job.
It is important to know your options.
Text Editors
The simplest programs that do word processing are known as text
editors. These programs are designed to be small, simple, and cheap.
Almost every operating system made has at least one built in text
editor. Most text editors save files in a special format called
ASCII (American Standard Code for Information Interchange — Whew!)
ASCII is a coding convention that almost all computers understand.
Each letter is assigned a numeric value that will fit in eight digits
of binary notation. «a» is 97 in ASCII, and «A» is 65. All the
numeric digits, and most punctuation marks also have numeric values in
ASCII. You certainly don’t need to memorize all the codes, (That’s
the text editor’s job.) but you should recognize the word « ASCII».
The biggest advantage of this scheme is that almost any program
can read and write ASCII text.
Text editors can be wonderful programs. The biggest advantage is the
price. There is probably already one or more installed on your
computer. You can find a number of text editors for free on the
Internet. Text editors are generally very easy to learn. Since they don’t
do a lot of fancy things, they are generally less intimidating than
full fledged word processor packages with all kinds of features.
Finally, text editors are pretty universal. Since they almost all use
the ASCII standard, you can read a text file written on any text
editor with just about any text editor. This is often not the case
when using fancier programs.
The ability to write ASCII text is the biggest benefit of text
editors. ASCII is also the biggest disadvantage of most text editors.
It is a very good way of storing text information, but it has no way
of handling more involved formatting. Text editors generally do not
allow you to do things like change font sizes or styles, spell
checking, or columns. (If you don’t know what those things are, stay
tuned. We will talk about them later in this chapter.)
Text editors aren’t all simple, though. Text editors are actually the
workhorses of the computing world. Most computer programs and web
pages are written with specialized text editors, and these programs
can be quite involved. You won’t need to learn any hard-core text editors
for this class, but you may end up learning one down the road.
If all you want to do is get text written, and you aren’t too
concerned about how fancy it looks, text editors are fine. (In fact,
this book was written entirely in emacs, a unix-based text editor.)
Common text editor programs:
- Windows: Notepad
- Macintosh: SimpleText
- Linux: vi, emacs
- Multi-platform: notepad++, jedit, synedit, many more
Integrated Packages
Frequently these software packages are included when a person buys a
new computer system. An integrated package is a huge program that
contains a word processor, a spreadsheet, a database tool, and other
software applications in the same program. (Don’t worry if you don’t
know what a spreadsheet or a database is. We’ll get there soon
enough!) An integrated application package is kind of like a «Swiss
army knife» of software.
The advantages of an integrated package derive from the fact that all
the applications are part of the same program, and were written by the
same company. It should be relatively easy to use the parts of an
integrated package together. These programs tend to be smaller, older
versions of larger programs, so they might be less complicated to use.
Since they were presumably written together, they should all have the
same general menu structure, and similar commands. (The command to
save a file would be the same set of keystrokes in all the programs,
for example.) Integrated packages are often designed with casual
users in mind. This might make them easier to use than more robust
programs. The word processor built into an integrated package is
probably more powerful than a typical text editor. Integrated
packages are often already installed on new computers, so they might
not cost you any more than the original purchase price of the
computer. The word processor on an integrated package will almost
certainly give you some features you would not expect to find on plain
text editors.
Integrated packages have some disadvantages. With the advent of
graphic user interfaces and modern operating systems, programs have
become more and more standard even if they were written by completely
different companies. Almost every program for Windows uses Alt-F-S to
save, for example. Also, as in the Swiss army knife analogy, the
programmers had to make some compromises in order to make all the
applications fit in one program. A Swiss army knife does contain a
saw, but if you had to cut down a tree, wouldn’t you rather use a real
saw? The programs in an integrated package are usually stripped down
or older versions of the company’s high end software. They certainly
have fewer features, and might be less friendly. Word processing
programs that are part of integrated packages generally have their own
special code for storing text information, although they can usually
read and write ASCII as well. (However, if you choose to save in
ASCII, you cannot save all the special formatting commands).
Common Integrated Packages:
- Microsoft Works
- Lotus Works
- Claris Works
Today the trend is to package all the high-level programs together, so
MS-Office and OpenOffice.org both contain fully-featured Word
Processors, Databases, Spreadsheets, and more.
High-End Word Processors
Word processing programs have evolved a great deal from the early
days of computing. A modern word processing program can do many
things besides simply handling text.
Since the early ’90s, most word processors feature a WYSIWYG
interface. WYSIWYG (pronounced «whizeewig») stands for «What You See
Is What You Get.» This means that the screen will look reasonably
like the printed document. This feature is important because the
real strength of word processors is in the formatting they allow.
Formatting is the manipulation of characters, paragraphs, pages, and
documents. Most of the word processor features we will discuss below
are various ways of formatting the text, or changing the way it looks
on the page. Formatting was possible before WYSIWYG, but it required
more imagination from the writer, because you couldn’t see the effects
of the formatting until you printed out the document.
Modern word processors also are designed to have numerous features for
advanced users. Since a large portion of most people’s computer time
is spent with a word processing program, it is important that these
programs have features to make editing documents easier. Some of the
additional features that one can expect to find on a modern word
processor are spelling and grammar checkers, ability to handle
graphics, tables, and mathematical formulas, and outline editors. The
word processing market is a very competitive one, and the major
software companies are always competing to have the word processor
with the most advanced features available.
Software companies are also interested in making their programs as
easy to learn as possible. With this goal in mind, most word
processors come with tutorial programs, extensive on-line help, and
clear menus.
These full featured word processors sound wonderful, and they are.
You might wonder if they have any drawbacks. Of course they do.
Word processing programs as have been described often cost hundreds of
dollars. The cost seems prohibitive for something that doesn’t even
have a physical presence! Many of the features of full-fledged
word processors are not needed by casual users. Sometimes the sheer
number of unneeded features can be intimidating. Using a full-power
word processor just to write a couple of letters a week is like
killing flies with a chain saw. You simply might not need that much
power to do the job properly. High end word processing programs
almost always save documents in special proprietary codes rather than
as ASCII code. This means the programs can save all the special
formatting that ASCII cannot handle (like font sizes, columns,
graphics, and so on.) It also means that if you write a document in
WordPerfect, you may not be able to read it in Word. Even
different versions of the same program might not be able to read each
other’s documents directly. There are ways you can work around this
problem, but you should know it exists.
High-end Word Processing Packages:
- WordPerfect
- Microsoft Word
- OpenOffice.org Write
Ironically, there is now a trend away from WYSIWYG towards
«semantic markup.» The idea is not to put all the formatting details
in place, but to explain the meaning of the text in the document. The
actual markup of each meaning is defined in a separate document. For
example, here’s the semantic markup of this paragraph:
<p class = "update">
Ironically, there is now a trend away from WYSIWYG towards
"semantic markup."  The idea is not to put all the formatting details
in place, but to explain the meaning of the text in the document. The
actual markup of each meaning is defined in a separate document.  For
example, here's the semantic markup of this paragraph:
</p>
In another part of the document I describe how to format «updates»:
  .update {
    border: 1px black solid;
    background-color: #FFFFCC;
    padding-left: .5em;
  }
It’s completely OK if you don’t understand any of the code. The
important idea is how markup can be separated from meaning.
Desktop Publishing
Another classification of programs you should know about has an
uncertain future. These programs are called desktop publishing
applications. Desktop publishing takes text that has already been
created, and applies powerful formatting features to that text.
Traditionally, applications that allowed the integration of text and
graphics, and allowed the development of style sheets were thought of
as desktop publishing. Such a program makes it easy to create other
kinds of documents rather than just plain pages. With a desktop
publisher, there are already style sheets developed to help you create
pamphlets, cards, signs, and other types of documents that you wouldn’t
be able to create on a typewriter.
The higher end word processing programs give you most of the features
you could want in a desktop publishing program. It is possible to do
many of the same things. Desktop Publishers are still very popular in
certain specialty fields (graphic arts, printing, and publishing,) but
the effects can be duplicated with skillful use of a word processing
program.
Common Desktop Publishing programs:
- Pagemaker
- Microsoft Publisher
Sign / Banner Programs
Another level of desktop publishing that has become very popular is
the advent of specialty printing programs such as «The Print Shop» or
«Print Master +». These programs are designed specifically to help the
user create signs, banners, and greeting cards. They are very easy to
use, and much less expensive than full-feature desktop publishing
applications, but again the effects can be duplicated with a higher
end word processor.
How Do You Choose Which Word Processor You Use?
As always, the critical question is: «What kinds of problems are you
trying to solve?» For most beginners, the lower end word processor
that came with their computer is a fine start. If it does what you
need, and you are happy with it, don’t spend money unnecessarily.
Many people find that if they do a lot of writing, they begin to yearn
for the features of a more powerful word processing program. As you
gain experience, you will find a favorite program and learn its
commands and idiosyncrasies well. You will find if you concentrate on
the concepts, that all word processors of a certain level are pretty
much the same, although the exact layout and command structure may
differ. You will also probably discover if you do a lot of writing
with the computer that you have several programs you use
interchangeably. A skilled computer user often chooses the program to
solve a specific problem much like a golfer chooses a different club
for each type of shot. Sometimes a text editor is sufficient, and
sometimes only the best, most powerful, and most expensive program
will do the job properly. Learning what is best for you is part of
the process.
Layout of Word Processors
Word processing programs of any type usually share the most basic
features. They universally reserve most of the screen for the text
being edited. Most word processing programs also contain a
menu structure with most of the programs commands available in a
hierarchical organization scheme. Many word processors have graphic
toolbars with icons representing the most critical commands. Almost
all such programs have scroll bars or some other mechanism for
allowing the user to move around in large documents. All word
processors also have a cursor, which is usually a small box or line,
which shows the user where in the document she is currently typing.
Commands Available In Most Word Processing Programs:
Different types of word processing programs will have different
commands available. Generally, text editors have the fewest commands.
More complex programs often start with the same types of commands and
add to them. Commands may be available in a number of ways; by
locating them on the menu system, by looking up shortcut keys, or by
pressing an icon on a graphic tool bar. If in doubt, utilize the
on-line help to locate the command you want.
File Handling Commands
Any level of text editor or word processor will have commands to save,
load, and print your text. These commands are so frequent that you
will usually see many ways to invoke them.
- Save Document
-
Allows you to save your document onto some kind of disk.
If you have already saved this document at least once, it will save
the document to the same drive, directory, and file name you used last
time. Saving a document really means making a copy of the codes in
memory that represent the document, and copying those codes onto a
disk file. If you have never given this document a name, a Save
command often acts like a Save As. (see below) You might also look for
a Write command, a picture of a disk, or a Save As command. - Save As…
-
Often you will see this command in addition to a save command. There
is a subtle difference between the two commands. Save As {it always}
asks you for the name and location of your file. Most of the time,
the Save command does not ask for this information. If the Save
command does not know what to call the file (because you have never
saved it before) it will automatically invoke a Save As. The only
time you absolutely must use a Save As is when you want to load a
file, make some changes to it, and save it as a NEW file with a
DIFFERENT name. If you use the Save command, the new changes will be
written on top of the old document. With Save As, you can force the
changed document to be in a new file. This really doesn’t happen very
much. Many people spend their whole lives using nothing but Save. - Load or Open
-
You will almost always see a command that allows you to open or load a
document. These terms usually mean the same thing. You will usually
get some sort of a dialog box asking you for the directory and file
name of a text document, and the program goes to the disk, grabs the
file, and loads it into the editing area of the screen. (Actually, it
loads the file into memory, and then shows a copy of the memory onto
the screen.) -
A print command takes the document and copies it to the printer.
Obviously, for this to work, you must have a printer attached to your
machine. There are occasional variations to this command. You might
get a dialog box that asks you which pages to print, how many copies you
want, which printer you want to use (if more than one is set up on
your computer), and so on. You might also see a Print Preview command
that shows a picture of what the page will look like when printed.
This is especially useful when you are using a program that does not
support WYSIWYG.
Editing Commands and Block Manipulation
There are a number of commands you will find on nearly any word
processor that enable you to manipulate text in special ways.
Frequently you will find these commands on an Edit menu. The editing
commands are based on a concept called block manipulation.
Block manipulation simply means taking a «chunk» of text and marking
it in some way so it can be treated as one unit. Once a block of text
is marked as such, it can be deleted or manipulated easily.
- Marking a Block
-
Many modern programs allow you to mark a block of text with the mouse.
Simply point the mouse at the beginning of the text you want to mark,
hold down the mouse button, and drag to the end of the block. You
will probably see the text you have dragged over change color. Some
programs put highlighted text in inverse video. Many programs also
allow you to select text with the Shift key and the arrow keys in
combination. This is sometimes more precise than the mouse
techniques. Some older programs require you to move the cursor to the
beginning of the text, mark it as the beginning of a block, move to
the end of the text you want to manipulate, and mark it as the end of
the block. Learn how your program does it. It is worth the effort. - Copying a Block
-
You will usually find some kind of command called Copy. It only works
after you have marked a block of text. Copy by itself doesn’t do
anything on the screen, but it is still a very important command.
What it does is to take the block of text and make a copy of it in a
special part of memory called the clipboard (or sometimes the buffer).
The copy command does not change the original text; it just places a
copy of the text in the clipboard. - Cutting a Block
-
Cutting is very similar to copying. You must start by marking a block
of text. When you activate a cut command, the original block will
disappear. It isn’t gone forever, though. A copy of it has been made
in the clipboard. - Pasting a Block
-
The paste command doesn’t make much sense until you have cut or copied
a block of text into the clipboard. The paste command copies the
contents of the clipboard into the document at whatever point the
cursor was sitting when the paste command was activated. - How Block Manipulation Works
-
These commands really need to be used together to be useful. Which
ones you use depend on the kind of problem you are trying to solve.
If you had to write «I will not talk out in class» 100 times, you
might write the phrase once, mark it as a block, copy it, and then
paste it 99 times.
If you have written a document and realize that the last line really
belongs at the beginning of the document, you might mark the line you
want to move as a block, cut the block move the cursor to the
beginning of the document, and activate the paste command.
Formatting Commands
Another set of commands are found less frequently on text editors, but
are common on higher-level word processors. These commands are for
formatting various elements of a document. You may find a format
menu. Many of these commands also are available on toolbars.
Formatting a Character
A character is one letter or other symbol. There are many ways to
format characters in word processing programs. It is possible to make
characters bold, italic, underlined, or perhaps some other attribute.
Not all word processors will do all these things, but most will do
bold, italic, and underline. Often you activate the command by
choosing it from a menu, clicking on a toolbar icon, or activating a
key sequence. Once you have started the command, anything you type
will be typed in that style. When you want to go back to standard
letters, you activate the same command again. Commands that turn off
and on like this are called toggles, because they are reminiscent of
toggle switches. Many word processors allow you to enter the text
without any format, then to select a set of characters as a block
(like you did to copy and paste), then to activate the command.
Experiment with your word processor to see how it works.
Word processors that feature WYSIWYG frequently support the use of
fonts. A font is defined in computing as a combination of a special
character set and type size. In the typewriter world, you were pretty
much stuck with the size and style of letters the typewriter came
with. Some of the later typewriters had the characters on a ball you
could change, but you still had very little control of exactly how the
letters looked. In a modern word processing application, you have a
great deal of control. You can choose different type faces that look
like script, handwriting, Old English, or whatever. After you have
chosen a basic look for your letters, you can choose what size the
letters are.
Fonts are measured by typesetters in points. 72.25 points is
equivalent to an inch. Most standard text is 10 points. A newspaper
headline might be 200 points. You may be able to control other
attributes of each letter, such as its color, a shadow, and other advanced
features.
Formatting Paragraphs}
Most writing is organized into paragraphs. These divisions make a
document easier to read. There are ways you can control how
paragraphs look on the screen. You can control how your program
handles indention. You can often force the computer to indent the
first line of every paragraph automatically. You can also frequently
control the line spacing inside the paragraph, the amount of spacing
between paragraphs, and the justification.
Justification refers to how the text is lined up between the margins.
Most documents created with a typewriter or word processor are
left-justified. That means that the left margin is lined up perfectly, but
the right margin is a little ragged. The computer keeps track of the
right margin for you when you use a word processor, so you don’t have
to press the «Enter» key at the end of every line (in fact you
shouldn’t press «Enter» at the end of every line. The only time you
should press «Enter» is when you want to end a paragraph!) The
automatic process the computer uses to send text to the next line is
called word wrap. If you want to have the right margin line up
cleanly, but let the left one be a little ragged (Maybe as you type
the return address and date of a business letter) you can choose a
right justify command. If you look at books and magazines, you will
see that both the right and left columns are justified. Many word
processors will allow you to justify both margins. This works by
adjusting the amount of space between letters and words so the margins
work out perfectly. The computer does it automatically when you ask
it to do so. Another form of justification is centering. When you
center a line, you tell the program to give it equal left and right
margins, regardless of the length of the line. Centering is useful
for headlines, but is often distracting when used for body text.
The other major element of a document is the page. There are some
page formatting commands you should be able to find in any word
processor as well. You will probably have some way to adjust the
margins of the page. Note that there are top and bottom margins, as
well as left and right margins.
You can also frequently find some kind of header/footer command.
Headers and footers are special areas at the top and bottom,
respectively, of the page. These areas are not used for regular text,
but reserved for special things like a title at the top of every page,
page numbers, and footnotes. You will have to experiment a little
to see how your word processor handles these features, but they are
well worth learning. You will never go back to the old way of writing
footnotes once you have mastered using footers to automate the
process.
One more page formatting command you might find useful is page
orientation. Many word processors allow you to choose how information
is printed on the page. The «up and down» orientation we are used to
seeing on typewritten documents is called portrait mode. (If you
think about painted portraits, they are usually up-and-down rectangles.)
When your document is printed «sideways» it is referred to as landscape
mode. (Landscape paintings are often oriented in this way.)
       __________
       |  ___   |       ________________
       | /o o  |       |              |
       ||  L  | |       |    /WWW     |
       ||___/| |       |  /          |
       |    /  |       |/            |
       |_/_____|       |______________|
       Portrait             Landscape
         mode                 mode
Most of the time you should use portrait mode, but sometimes landscape
mode is appropriate, especially when you are doing something special
like tables, graphics, or fancy desktop publishing.
Commands Found in More Advanced Programs
High-End Formatting Tools
There are a few more elaborate formatting tools generally found
only in the higher end word processors. These tools border on desktop
publishing, and allow you better control of your document. You
probably won’t use them every day, but they are wonderful when you
need them.
- Tables
-
On a typewriter, creating a table required judicious use of the TAB
key and very careful planning. Most advanced word processors allow
you to create tables very easily. You can usually select the number
of rows and columns, change the size and format of rows and columns,
and easily copy and paste specific cells. The table tool is worth
learning. - Columns
-
Sometimes you will want to have a page formatted into two or more
vertical columns. This was quite tedious on a typewriter, but there
is usually some kind of tool to make column creation easier on a
modern word processor. - Lists
-
You will frequently find tools for making lists. Lists can have
automatic numbering (like an outline) or each list item might have a
small icon marking, called a bullet. Most modern word processing
programs have some kind of tool to make list management easier. - Graphics
-
Most high-end word processing programs enable you to incorporate
graphics into text documents with relative ease. Often they
incorporate small painting programs so you can generate your own
graphics as well. To make graphics and text easier to work with, many
word processing programs include frames, which are boxes on the screen
that can hold text and graphics. When you mix text and graphics on a
page, you may want to investigate frames in the on-line help so you can
have more control over how the text and graphics interact.
Composition Tools
Many word processors have other advanced features that help a writer
with the mechanics of writing properly. These tools can be
instrumental in avoiding common writing mistakes.
- Spell Checking
-
A spell checker is a program that looks at a document and compares
each word in the document to an electronic dictionary. If it finds
the word in the dictionary, it moves on to the next word. If it does
not find the word, it stops and asks the user for guidance. Good
spell checkers try to guess what word the user was trying to type and
make suggestions. Even if you are a very good speller, you should get
in the habit of running your materials through a spell checker. It is
a quick and relatively painless way to keep typos from marring your
paper.Keep in mind that spelling checkers are not perfect, and they cannot
catch every mistake. The following poem excerpt points out the
problem:Ode To The Spell Checker I have a spelling checker. It came with my PC. It plane lee marks four my revue, Miss steaks aye can know sea. Eye ran this poem threw it, Your sure reel glad two no. Its vary polished in it's weigh, My checker tooled me sew.(This poem can be found in its entirety at:
http://selma.ucd.ie/~pdurkin/Jokes/spellcheck.html It is attributed
to Jerry Zar, the Dean of the Graduate School, NW Ill. U) - Grammar Checkers
-
There are also tools available on most high end word processors that
will check your grammar for common mistakes. Grammar checkers are
wonderful at catching mechanical problems like incomplete sentences
and subject-verb agreement. Grammar tends to be more subjective
than spelling, so the advice of a grammar checker might or might not
be useful to you. It is worth running to check your mistakes, but it
will never replace the lessons you learned from your English teachers
or a skilled editor. When grammar checkers first came on the market,
a reporter tried testing the Gettysburg Address by Abraham Lincoln.
The program gave the speech extremely poor marks. Many people
consider it to be one of the most beautiful passages of American
English ever. Use a grammar checker if you have one, but also use
your judgment. - Outline Editors
-
These features allow you to organize your thoughts in outline format.
The advantage is that you can choose to see only your main ideas or
headings, and have all the text hidden. This feature allows you to
move the main headings around and all the text associated with the
headings will automatically move appropriately. If you are going to
do term papers or other serious writing, you should investigate this
feature.
Vocabulary/Important Ideas
- Word Processing
-
A type of software that specializes in handling text. Word processing
programs typically contain commands for handling and formatting text
documents. - Insert/Overwrite Modes
-
Most word processors allow you to choose one of these modes. When you
are in {bf insert} mode, any text you type is inserted into the
document at the cursor position. {it Overwrite} mode also types text
at the cursor position, but it writes over the top of existing text,
much like a typewriter with correcting tape. Most experienced word
processor users prefer insert mode for most of their work. - Text Editors
-
A classification of word processing software characterized by its low
cost, ready availability, tendency to work only in ASCII format, and
inability to do high-powered formatting. - ASCII
-
American Standard C}ode for Information
Interchange. A standard convention used to encode text, numbers, and
common punctuation in numeric format so they can be stored in a
computer’s memory. Nearly all computers and programs can work with
some form of ASCII. Text editors are designed especially to work with
ASCII-based documents. - Integrated Packages
-
Programs that contain all the major applications within one «super
application». These programs are useful, but often lack some of the
more advanced features of full-fledged application packages. - WYSIWYG
-
What You See is What You Get.
A capability often found on higher-level word processing
programs. The screen mimics the output of the printer, so the typist
can see pretty much what the final output of the document will be. - Proprietary
-
The term {it proprietary} is frequently used when discussing software to
denote a certain idea that is particular to a specific brand of
software. When a program uses a proprietary scheme to save word
processing documents, for example, other programs may not be able to
read these documents without some kind of translation. - Desktop Publishing
-
A classification of word processing software that concentrates on
incorporation of graphics, powerful formatting, and development of
complex styles including newsletters, signs, and pamphlets. - Style Sheet
-
In desktop publishing, a template that specifies how a certain type of
document will be created. Style sheets are used to define a uniform
look and feel for documents of the same general type. For example, a
company might issue a standard style sheet for intra-corporation
memoranda. Many high-end word processors incorporate this feature.
Sometimes style sheets are referred to as templates. - Scroll Bars
-
Horizontal or vertical bars which indicate the cursor position in a
document. Usually scroll bars can be used with the mouse to
facilitate moving through the document. - Cursor
-
A small mark on the screen, usually a rectangle, underline, or
I-shaped design. The cursor indicates the exact position within the document
(and memory) where any commands and typing will be executed. - Save
-
The Save command saves a document without prompting for the file
name, unless the file has never been saved before. If this is the
case, it invokes a Save As command instead. - Save As
-
This command always prompts for a file name. It is used when
you want to save the changes to file without changing the file already
saved on the disk. - Load (or Open)
-
This command prompts the user for a file name, then loads the document
into the application. -
A print command is used to send a copy of the document to the
printer. - Print Preview
-
This command is especially useful in non-WYSIWYG environments. It
allows you to see a preview of the document exactly as it will be
printed. It is often a good idea to invoke this command before you
print a document, to be sure it will turn out exactly as you plan. - Block Manipulation
-
The process of defining a section of text so it can be copied, pasted,
or otherwise manipulated as one unit. - Copy
-
A copy command takes a block of text and copies it to a memory
buffer without removing the original text. Used to it
duplicate sections of a document. - Cut
-
This command copies a block of text to a memory buffer, and removes
the original text from the document. Used to {it move} sections of a
document. - Paste
-
This command takes the block of text last placed in the buffer by a
cut or copy command, and inserts it into the document at the current
cursor position. - Formatting
-
The process of defining how a document will look. Formatting can
occur at the character level, as well as at the paragraph and page
level. - Character Attributes
-
The special modifications to letters, such as {bf boldface} and {it
italic} - Font
-
The combination of character set and size that defines how an
individual character looks. Most word processing packages allow the
user to choose from many fonts. - Toggle
-
A command is referred to as a {it toggle} if repeated execution of
the command causes something to switch between two modes. Insert
and Overwrite modes are good examples of toggles. Often character
attributes are also considered toggles. - Point
-
A point is a type setter’s measurement of character size. Officially,
there are 72.25 points to an inch. - Justification
-
The way the lines of text are arranged on the page. The usual options
are left-justified, right-justified, centered, and both-justified. - Left-Justified
-
The text is lined up so that the left margin is even. The right
margin will not be even in left-justified text. - Right-Justified
-
The text is lined up so that the left margin is ragged, but the right
margin is even. Often used to line up dates and return addresses on
business letters. - Both-Justified
-
The text is lined up so that both the left and right margins are lined
up, as in a newspaper or magazine. - Centered
-
The text is lined up with an equal distance from the left and right
margins. Usually used in headlines. - Word Wrap
-
A behavior of word processing programs which automatically moves words
too large to fit the current line onto a new line. Eliminates the
need to press «return» at the end of each line. - Headers, Footers
-
Special areas at the top and bottom of word processing documents.
These sections are reserved for information that will appear on {it
each page} of the document. Usually page numbers, document name, or
document author will be in the header/footer area. The footer is
also useful for holding footnotes. - Landscape Mode
-
Documents in this mode print the long part of the page horizontally, as
in a landscape painting. - Portrait Mode
-
Documents in this mode print the long part of the page vertically,
as in a portrait painting. - Table
-
A section of a document organized into rows and columns. Higher-end
word processors often have a number of tools to help make tables
easier to create and manage. - Column
-
Vertical separation of text into two or more sections. Newspapers and
newsletters are often arranged in columns. High-end word processing
programs and desktop publishing programs usually include some tools to
make column manipulation easier. - Spell Checker
-
A feature of higher-end word processing programs that compares each
word in a document to a dictionary of proper spellings. Most spell
checkers «guess» which word the user was trying to type and give the
user some guesses to choose from. - Grammar Checker
-
A feature in word processing programs that checks a document for
common grammatical errors. Grammar checkers can also grade documents
for readability and complexity. Sometimes grammar checkers are
separate programs. - Outline Editors
-
A feature or program that easily enables the user to create and
manipulate outlines. Most of these programs allow you to hide the
body text so you can see and modify the subject headings. The
associated body text is automatically moved with the appropriate heading.
Summary
Word processing programs are a type of software that make
it easier to create and modify text documents. Word Processing
applications are organized into a number of categories according to
their complexity: Simple programs that manipulate ASCII are called
Text Editors. More complex programs that feature formatting commands
are called Word Processors. Some word processors are included in
integrated application packages, which also feature other application
programs. Such packages are convenient, but may not have all the
features of larger programs. Full-featured word processing programs
contain many options for formatting text and documents. They also
might contain special utilities for more complex formatting and
composition. Desktop publishing programs are designed for more
complex formatting, especially the integration of text and graphics.
Most word processing programs contain the same types of commands,
although the exact ways to access these commands may vary. You will
almost always see file handling commands, including commands to Load,
Save, Save As, and Print. Frequently, you will also see commands for block
manipulation, including Copy, Cut, and Paste. More advanced programs
may contain special commands for formatting characters and paragraphs,
as well as other commands to deal with tables, columns, and lists.
The fanciest word processing programs may also contain commands to
assist with composition, such as spelling and grammar checkers and
outline editors.