
Excel для Microsoft 365 Excel 2021 SharePoint Server по подписке Excel 2019 SharePoint Server 2019 Excel 2016 SharePoint Server 2016 Excel 2013 SharePoint Server 2013 SharePoint в Microsoft 365 Excel 2010 SharePoint Server 2010 Excel 2007 Еще…Меньше
Данные из таблицы Excel можно экспортировать в список SharePoint. При экспорте списка Excel создает на сайте новый список SharePoint. После этого вы можете работать с данными на сайте, как с любым другим списком SharePoint.
Примечание: При экспорте таблицы в список не создается подключение к данным списка SharePoint. Если обновить таблицу в Excel после экспорта, изменения не отразятся в списке SharePoint.
Для экспорта таблицы Excel в список на сайте SharePoint вам необходимы:
-
Сайт SharePoint, на котором создается список.
-
Разрешение на создание списков на этом сайте. Если вы сомневаетесь, что оно у вас есть, обратитесь к администратору сайта SharePoint.
Для просмотра списка в режиме таблицы на сайте SharePoint вам необходимы:
-
Excel или Access. Эти приложения нужны для использования режима таблицы на сайте SharePoint.
Примечание: Режим таблицы не поддерживается в 64-разрядной версии Microsoft Office. Если вам нужно использовать режим таблицы для списка на сайте SharePoint, установите 32-разрядную версию Office.
Экспорт таблицы в список SharePoint
-
Щелкните внутри таблицы.
-
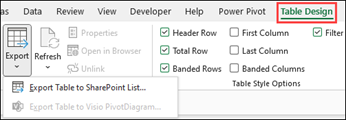
Щелкните Конструктор таблиц > Экспорт > Экспорт таблицы в список SharePoint.

-
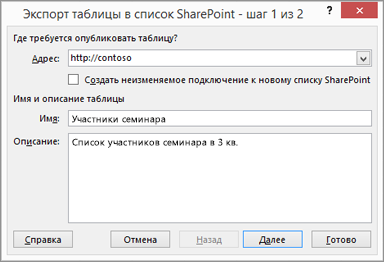
В поле Адрес введите URL-адрес сайта SharePoint.
Важно: Введите все, что находится в веб-адресе, перед параметром «/default.aspx». Например, если адрес http://contoso/default.aspx, введите http://contoso. Если адрес http://contoso/teams/accounting/sitepages/home.aspx, введите http://contoso/teams/accounting.
-
В поле Имя введите уникальное название списка.
-
При желании можете ввести описание в поле Описание.
-
Нажмите кнопку Далее.
Примечание: Вам может быть предложено ввести Microsoft 365 учетные данные, учетные данные домена организации или и то, и другое.
-
Проверьте данные в разделах Столбцы и Типы данных, затем нажмите кнопку Готово.
-
Нажмите кнопку ОК.
Появится сообщение о том, что ваша таблица опубликована, а также унифицированный указатель ресурсов (URL-адрес). Чтобы перейти к списку, щелкните URL-адрес. Добавьте URL-адрес в избранное в своем браузере.
Примечание: Можно открыть список и другим способом. Перейдите на сайт SharePoint, в правом верхнем углу щелкните значок шестеренки и выберите элемент Контент сайта.
Поддерживаемые типы данных
Некоторые типы данных Excel невозможно экспортировать в список на сайте SharePoint. При экспорте таких данных они преобразуются в типы, совместимые со списками SharePoint. Например, формулы, созданные в Excel, преобразуются в значения списка SharePoint. После преобразования данных вы можете создать формулы для столбцов на сайте SharePoint.
При экспорте таблицы Excel на сайт SharePoint каждому столбцу в списке SharePoint назначается один из следующих типов данных:
-
Текст (однострочный)
-
Текст (многострочный)
-
Денежный
-
Дата и время
-
Числовой
-
Гиперссылка (URL-адрес)
Если столбец содержит ячейки с разными типами данных, применяется тип данных, который может использоваться для всех ячеек. Например, если столбец содержит числа и текст, в списке SharePoint будет использоваться текстовый тип.
Нужна дополнительная помощь?
Is it possible to import an excel list or excel data into a SharePoint List that has already been created? Not create a new list.
I know you can import a spreadsheet which will create a new list, but I don’t want that because I have created columns already that do calculations and such and I don’t want to recreate them….
It can be either an excel or access list, but I want to make sure the pre-existing columns in still my SharePoint list.
asked Jan 13, 2015 at 22:01
![]()
1
You can open the list in datasheet view (or create a datasheet view) and just copy & paste your excel sheet rows into the list. Just be careful that the columns are in the same order as in your sheet.
If this is not possible, you need to use script or code. The problem here is to use the right format for your fields.
Example:
(src: http://social.technet.microsoft.com/wiki/contents/articles/18830.sharepoint-2010-import-data-from-excel-into-a-list-using-powershell.aspx)
#Get the CSV file and connect to the SharePoint list
$vessellist = import-csv -Path "C:TempVesselInPortReport.csv"
#Get the list used to import the data to
$l = (Get-Spweb "http://test").GetList("http://test/Lists/yourlist")

#Get the lists EmployeeType field (choice)
$employeeType = $l.Fields["EmployeeType"] -as [Microsoft.SharePoint.SPFieldChoice]

#Loop through the items and add them to the list
$r = 1;
$itemCount = $vessellist.Count;
$currentItem = 1;
foreach($item in $vessellist)
{
    Write-Progress -Id 1 -ParentId 0 -Activity "Importing Data From CSV into SharePoint" -PercentComplete (($currentItem/$itemCount)*100) -Status "Adding item $currentItem or $itemCount";
    $currentItem++;
    $ni = $l.items.Add();
    #Add the Title, using the rows VESSEL_NAME column
    $ni["Title"] = $item.VESSEL_NAME;

    #Add the "Date Recorded" field, using the csv rows "RPT_DATE" column
    [DateTime]$rd = New-Object System.DateTime;
    if([DateTime]::TryParse($item.RPT_DATE, [ref]$rd)){
        $ni["Date Recorded"] = $rd;
    }

    #Add the csv rows "TRIP_NO" column to the new list items "Trip Id" field (SPFieldNumber)
    [Int64]$tn = New-Object System.Int64;
    if([Int64]::TryParse($item.TRIP_NO, [ref] $tn)){
        $ni["Trip Id"] = $tn;
    }

    #Add some other text properties
    $ni["Flag"] = $item.FLAG;
    $ni["Agent Name"] = $item.AGENT_NAME;
    $ni["Current Location"] = $item.CURRENT_LOCATION;

    #Add user information
    $ni["employee"] = $w.EnsureUser($item.EMPLOYEE); #In this case, the $item.EMPLOYEE value from the spreadsheet is a persons name. Eg. "Matthew Yarlett"
    $employeeType.ParseAndSetValue($ni,$item.EMPLOYEE_TYPE); #In this case, the $item.EMPLOYEE_TYPE value from the spreadsheet is valid choice present in the EmployeeType list field. Eg. "Manager"

    #Update the item
    $ni.Update()
    $r++;
}
I recommend just creating a new list from the sheet, it’s less painful.
answered Jan 14, 2015 at 12:56
![]()
GwnyGwny
1,2241 gold badge7 silver badges16 bronze badges
6
There is no out of the box way to achieve this. Possible work arounds
- Export the existing data into excel. Append the new data into the same excel file. Then edit the list in data sheet view, copy and paste the data from excel file
- Open the list in Access application and then do a copy and paste of missing row.
- Using programming
- Powershell
- VB Script
- Client Side Object Model
answered Jan 13, 2015 at 22:34
![]()
Amal HashimAmal Hashim
28.2k5 gold badges30 silver badges61 bronze badges
1
answered May 25, 2017 at 8:29
![]()
SharePoint
Рекомендация: подборка платных и бесплатных курсов PR-менеджеров — https://katalog-kursov.ru/
Я – студент старших курсов одного из столичных технических вузов, который по долгу службы тесно связан с настройкой и разработкой корпоративных порталов на платформе SharePoint 2013. В этой статье я хочу рассказать и показать, как можно с помощью Excel файла наполнить и очистить список SharePoint, а также выгрузить необходимое содержимое.
А зачем это, собственного говоря, надо? Давайте представим ситуацию, что у нас есть крупная организация «Бендер и Ко», которая включает в себя некоторое число независимых филиалов, для простоты эксперимента ограничимся двумя – «Рога» и «Копыта». Организации быстро растут, приходят новые сотрудники, нужно вносить о них информацию, содержащую порядка 10 атрибутов. Времени на занесение 2-3 человек в список SharePoint вручную много не потребуется, а если таких 20 или 50? Да и Excel пользователям пока ближе, чем SharePoint. Таким образом, с целью экономии времени, я предлагаю экспортировать данные из Excel.
Импорт, экспорт и удаление данных будем осуществлять с помощью собственной веб-части SharePoint.
Итак, поехали.
1. Создаем список «Сотрудники» в SharePoint и подготавливаем шаблон Excel документа для загрузки пользователей
Мой список, выглядит вот так:

Прошу обратить внимание, что данные 3 элемента являются папками, внутрь которых мы будем добавлять сотрудников.
А шаблон Excel — вот так:

Стоит обратить внимание на то, что тип данных столбца в списке SharePoint должен совпадать с типом данных соответствующего атрибута в документе Excel. Я все поля сделал текстовыми.
2. Создаем проект SharePoint 2013
New Project -> SharePoint Solutions -> SharePoint 2013 — Empty Project -> ОК.

Далее указываем узел, выбираем Deploy as a farm solution и нажимаем Finish.

Следующим шагом необходимо добавить Visual Web Part. Клик правой кнопкой мыши на решение -> Add -> New Item -> Visual Web Part -> Add.

3. Разрабатываем внешний вид веб-части
За внешний вид отвечает файл .ascx, который открывается перед нами сразу после нажатия кнопки Add из предыдущего пункта. В своем примере я ограничусь 2 лейблами для вывода информации в ходе работы веб-части; элементом FileUpload, который позволит выбрать файл для загрузки; DropDownList — выпадающий список, содержащий главную организацию и филиалы; 3 кнопки для добавления, удаления и экспорта элементов списка. После добавления следующего кода:
<asp:Label ID="Label1" runat="server" Text="" EnableViewState="false"></asp:Label>
<asp:Label ID="Label2" runat="server" Text=""></asp:Label>
<div id="dvSource" runat="server">
   	<fieldset style="width:51%; max-width:600px; min-width:600px;">
   	<legend></legend>
   	<table>
       	<tr>
           	<td>Выберите Excel файл :  </td>
           	<td>
               	<asp:FileUpload ID="FileUpload1" runat="server" Width="453px" />
           	</td>
        	</tr>
        	<tr>
           	<td>Выберите филиал : </td>
           	<td>
               	<asp:DropDownList ID="DropDownList1" runat="server" Width="238px">
               	<asp:ListItem Enabled="true" Text="" Value="-1"></asp:ListItem>
                   	<asp:ListItem Text="Бендер и Ко" Value="1"></asp:ListItem>
                   	<asp:ListItem Text="Рога" Value="2"></asp:ListItem>
                   	<asp:ListItem Text="Копыта" Value="3"></asp:ListItem>
               	</asp:DropDownList>
           	</td>
       	</tr>
     	</table>
<div style="float:left; margin-top:20px; width:80%; margin-left:122px">
   <asp:Button ID="Button1" runat="server" OnClick="btnUpload_Click" Text="Загрузить данные"  />
   <asp:Button ID="Button2" runat="server" OnClick="btnRemove_Click" Text="Загрузить данные на удаление" />
   <asp:Button ID="Button3" runat="server" OnClick="btnUnload_Click" Text="Выгрузить данные в Excel"  />
           	</div>
	</fieldset>
</div>
Мы получим вот такую веб-часть:

4. В файле .webpart, если необходимо, меняем Title и Description веб-части
5. Подключаем библиотеку EPPlus
Для того, чтобы работать с документами Excel скачаем и добавим к проекту .net библиотеку EPPlus. Клик правой кнопкой мыши на решение -> Add Reference -> Browse -> Выбираем EPPlus.dll -> OK.

Также необходимо добавить EPPlus.dll в wsp пакет. Левой кнопкой мыши двойной клик на папку Package -> Advanced -> Add -> Add Existing Assembly -> Выбираем EPPlus.dll -> OK.

Последний шаг состоит в подключении
using OfficeOpenXml;
using Microsoft.SharePoint;
using System.IO;
using System.Collections.Generic;
в файл .ascx.cs.
6. Пишем функциональный код
6.1. Создаем связь между полями документа Excel и столбцами списка SharePoint с помощью Dictionary
private Dictionary<int, string> GetColumnMapping()
   {
	       	Dictionary<int, string> map = new Dictionary<int, string>();
	       	map.Add(0, "ИД");
	       	map.Add(1, "ФИО");
	       	map.Add(2, "Должность");
	       	map.Add(3, "E-mail");
	       	map.Add(4, "Номер факса");
	       	map.Add(5, "Внутренний номер");
	       	map.Add(6, "Служебный телефон");
	       	map.Add(7, "Адрес");
	       	map.Add(8, "Номер сотрудника");
	       	map.Add(9, "День рождения");
	       	return map;
   }
Первым параметром при вызове метода Add является индекс столбца в таблице Excel, вторым — Display Name столбца в списке SharePoint.
Теперь мы полностью готовы к написанию основного кода.
6.2. Обработка события при нажатии на кнопку «Загрузить данные»
protected void btnUpload_Click(object sender, EventArgs e)
        {
            if (!FileUpload1.HasFile)
            {
                Label1.Text = "Вы не выбрали Excel файл!";
                return;
            }
            try
            {
                string Url = SPContext.Current.Web.Url;
                using (SPSite spSite = new SPSite(Url))
                {
                    using (SPWeb spWeb = spSite.OpenWeb())
                    {
                        spWeb.AllowUnsafeUpdates = true;
                        SPList list = spWeb.Lists["Сотрудники"];
                        var folderDZO = list.RootFolder.SubFolders[DropDownList1.SelectedItem.Text].ToString();
                        SPFolder folder = spWeb.GetFolder(folderDZO);
                        string LoginName = SPContext.Current.Web.CurrentUser.LoginName;

                        if (CheckPermission(LoginName, folder.Item, spWeb) == false)
                        {
                            Label2.Text += "У Вас нет доступа на редактирование элементов данной папки!";
                            return;
                        }
                        else
                        {
                            try
                            {
                                byte[] fileData = FileUpload1.FileBytes;
                                using (MemoryStream memStream = new MemoryStream(fileData))
                                {
                                    memStream.Flush();
                                    using (ExcelPackage pck = new ExcelPackage(memStream))
                                    {
                                        if (pck != null)
                                        {
                                            CreateListItem(pck, list, spWeb);
                                        }
                                    }
                                }

                                Label1.Text = "Данные успешно загружены...";
                            }
                            catch (Exception Ex1)
                            {
                                Label1.Text = "Возникла ошибка
" + Ex1.Message;
                            }
                        }
                    }
                }
            }
            catch (Exception Ex)
            {
                Label1.Text = "Возникла ошибка
" + Ex.Message;
            }
        }
Как я уже говорил в самом начале, организация включает в себя главную организацию и 2 филиала. Естественно предположить, что администраторы, добавляющие сотрудников в свои филиалы, будут разными, следовательно, у папок будут уникальные права доступа. Таким образом, прежде чем выполнить операцию создания элемента, неплохо бы убедиться в том, что у нас есть права на изменение элементов конкретной папки. Проверку осуществляет простенькая функция CheckPermission.
public static bool CheckPermission(string userName, SPListItem folders, SPWeb spWeb)
        {
            bool perm = false;
            SPUser oUser = spWeb.CurrentUser;
            perm = (bool)folders.DoesUserHavePermissions(oUser, SPBasePermissions.EditListItems);
            return perm;
        }
Все возможные значения параметра SPBasePermissions вы можете просмотреть тут.
Далее используется функция CreateListItem, которая непосредственно производит добавление пользователя.
private void CreateListItem(ExcelPackage pck, SPList list, SPWeb spWeb)
        {
            Dictionary<int, string> column = GetColumnMapping();
            ExcelWorksheet ws = pck.Workbook.Worksheets[1];
            int rowCount = ws.Dimension.End.Row + 1;
            int colCount = ws.Dimension.End.Column + 1;
            var folderDZO = list.RootFolder.SubFolders[DropDownList1.SelectedItem.Text];
            SPListItemCollection itemColl = list.Items;

            for (int i = 2; i < rowCount && ws.Cells[i, 1].Value != null; i++)
            {
                if (IsPeople(ws.Cells[i, 1].Value.ToString(), list) == false)
                {
                    SPListItem item = list.AddItem(folderDZO.ServerRelativeUrl, SPFileSystemObjectType.File, null);
                    for (int j = 1; j < colCount; j++)
                    {
                        if (column.ContainsKey(j))
                            item[column[j]] = ws.Cells[i, j].Value.ToString();
                    }
                    item.Update();
                }
                else Label2.Text += " Пользователь " + ws.Cells[i, 1].Value.ToString() + " не был добавлен, поскольку он уже существует!";
            }
        }
Внутри этого метода мы обращаемся к функции IsPeople, которая проверяет не был ли данный пользователь добавлен ранее.
public static bool IsPeople(string fio, SPList list)
        {

            foreach (SPListItem item in list.Items)
            {
                if (item["ФИО"].ToString() == fio)
                    return true;
            }

            return false;
        }
Поскольку я знаю, что людей с одинаковой фамилией, именем и отчеством в моем примере нет, то в качестве атрибута для проверки я выбрал столбец ФИО. В реальной же ситуации необходимо выбрать столбец, который однозначно подчеркнет уникальность записи, например, E-mail.
6.3. Обработка события при нажатии на кнопку «Загрузить данные на удаление»
Непосредственно обработка точно такая же как и в предыдущем пункте. Однако функция CreateListItem немного модифицирована.
private void RemoveListItem(ExcelPackage pck, SPList list, SPWeb spWeb)
        {
            Dictionary<int, string> column = GetColumnMapping();
            ExcelWorksheet ws = pck.Workbook.Worksheets[1];
            int rowCount = ws.Dimension.End.Row + 1;
            int colCount = ws.Dimension.End.Column + 1;
            var folderDZO = list.RootFolder.SubFolders[DropDownList1.SelectedItem.Text];
            SPListItemCollection itemColl = list.Items;

            for (int i = 2; i < rowCount && ws.Cells[i, 1].Value != null; i++)
            {
                if (IsPeople(ws.Cells[i, 1].Value.ToString(), list) == true)
                {

                    foreach (SPListItem item in list.Items)
                    {
                        if (ws.Cells[i, 1].Value.ToString() == item["ФИО"].ToString())
                        {
                            item.Delete();
                            break;
                        }
                    }
                    list.Update();
                }
                else Label2.Text += " Пользователь " + ws.Cells[i, 1].Value.ToString() + " не был удален, поскольку его не существует!";
            }
        }
6.4. Обработка события при нажатии на кнопку «Выгрузить данные в Excel»
 protected void btnUnload_Click(object sender, EventArgs e)
        {
            string Url = SPContext.Current.Web.Url;
            using (SPSite spSite = new SPSite(Url))
            {
                using (SPWeb spWeb = spSite.OpenWeb())
                {
                    spWeb.AllowUnsafeUpdates = true;
                    SPList list = spWeb.Lists["Сотрудники"];
                    SPFolder folder = list.RootFolder.SubFolders[DropDownList1.SelectedItem.Text.ToString()];

                    SPQuery query = new SPQuery();
                    query.Folder = folder;
                    SPListItemCollection listitem = list.GetItems(query);

                    ExcelPackage pck = new ExcelPackage();
                    var ws = pck.Workbook.Worksheets.Add("Сотрудники");

                    int rowIndex = 1;
                    ws.Cells[rowIndex, 1].Value = "ИД";
                    ws.Cells[rowIndex, 2].Value = "ФИО";
                    ws.Cells[rowIndex, 3].Value = "Должность";
                    ws.Cells[rowIndex, 4].Value = "E-mail";
                    ws.Cells[rowIndex, 5].Value = "Номер факса";
                    ws.Cells[rowIndex, 6].Value = "Внутренний номер";
                    ws.Cells[rowIndex, 7].Value = "Служебный телефон";
                    ws.Cells[rowIndex, 8].Value = "Адрес";
                    ws.Cells[rowIndex, 9].Value = "Номер сотрудника";
                    ws.Cells[rowIndex, 10].Value = "Дата рождения";
                    rowIndex++;

                    for (int i = 0; i < listitem.Count; i++)
                    {
                        SPListItem item = listitem[i];
                        ws.Cells[rowIndex, 1].Value = item["ИД"];
                        ws.Cells[rowIndex, 2].Value = item["ФИО"];
                        ws.Cells[rowIndex, 3].Value = item["Должность"];
                        ws.Cells[rowIndex, 4].Value = item["E-mail"];
                        ws.Cells[rowIndex, 5].Value = item["Номер факса"];
                        ws.Cells[rowIndex, 6].Value = item["Внутренний номер"];
                        ws.Cells[rowIndex, 7].Value = item["Служебный телефон"];
                        ws.Cells[rowIndex, 8].Value = item["Адрес"];
                        ws.Cells[rowIndex, 9].Value = item["Номер сотрудника"];
                        ws.Cells[rowIndex, 10].Value = item["День рождения"];
                        rowIndex++;
                    }

                    pck.SaveAs(this.Page.Response.OutputStream);
                    this.Page.Response.ContentType = "application/vnd.openxmlformats-officedocument.spreadsheetml.sheet";
                    this.Page.Response.AddHeader("content-disposition", "attachment;  filename=List_of_Employees_as_on_" + DateTime.Now.ToString("dd_MMM_yyyy_HH_mm_ss") + ".xlsx");
                    this.Page.Response.Flush();
                    this.Page.Response.End();

              }
          }
      }
На этом кодить закончили.
7. Развернем решение и добавим веб-часть на страницу
Сначала убедимся, что наш элемент Visual Web Part добавлен в фичу. В окне Solution Explorer переходим в папку Feature и двойной клик по Feature1. Если элемент уже добавлен в фичу — Items in the Feature, то можно идти дальше, если нет – нужно переместить элемент из левого окошка в правое.

Далее правой кнопкой мыши кликаем на решение ->Deploy. Дожидаемся сообщения Deploy succeeded. Теперь решение развёрнуто на портале. Веб-часть располагается в папке Custom.

8. Проверим работу веб-части
8.1. Добавим сотрудников


8.2. Протестировать удаление можно шаблоном, который мы использовали в предыдущем пункте
8.3. Выгрузим сотрудников


Заключение. Потратив некоторое время на разработку веб-части, мы значительно сэкономили время администраторов филиалов, которым пришлось бы вручную заносить сотрудников в список. Таким образом, кнопочная форма и Excel сделали работу SharePoint еще проще и быстрее.
Решение можно скачать тут.
Спасибо за внимание.
A while back, I published a post where I explained how to export SharePoint lists from SharePoint to Excel. Today, I am going to cover the opposite of this – how to import Excel to SharePoint. Say, you have an Excel list/table and want to bring it to SharePoint (because SharePoint custom list kicks ass!). How do you achieve this? Well, let me explain. You have a few options to choose from!
July 2020 Update – READ THIS FIRST!
Below techniques describe the “old way” of importing Excel to SharePoint. If you are in SharePoint on-premises, below tips are the only options you have. However, if you are in SharePoint Online (Office 365), we now have a new and easier way to import Excel data, which would be the easiest and preferred option to use. Please reference this most recent post for instructions.
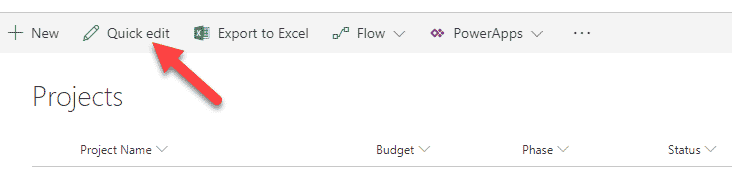
Option 1: Import using Quick Edit
The first option assumes that you already have a SharePoint list with all the corresponding columns, and just need to copy/paste the content from Excel to SharePoint. Here is what you need to do to achieve this:
- Build out all the columns exactly as they appear in Excel

- Make sure columns in a view are in the same order as in Excel (otherwise when you do copy/paste, you will get a mismatch)

- If you are taking advantage of metadata (drop-downs), make sure to populate all the possible choices into respective columns (otherwise, when you paste, and pasted text does not match the drop-down choice, the row will be rejected)
- Open your list in Quick Edit (Datasheet view for those in SharePoint 2010)

- Copy the rows you want to copy from Excel
- Paste into Quick Edit View
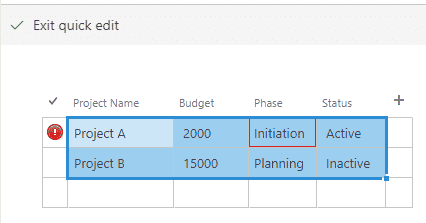
- You will notice the rows being pasted one by one. You might need to give it some time if you have lots of rows. In case you get a mismatch in data being imported, you will get a red warning just like in the image below

- When all data is successfully pasted/mismatches resolved, just click on Exit Quick Edit. You are all set!
Pros
- Allows to take advantage of metadata and different types of columns in the existing list (i.e., Text, Choice, Date, Currency, etc.)
Cons
- It takes time to set up the list and view before you can import/paste
- Might not be a good technique for importing large data sets
- Error handling capabilities are limited (if you have a row that fails, might take time to figure out the issue/field causing the issue and you might need to redo the whole import)
- Import will not work if you set up metadata drop-down using Term Store (managed metadata). Click here to read more about this issue

Option 2: Import Spreadsheet Web part
Another option that is available to import Excel to SharePoint is to use a Web Part called “Import Spreadsheet.” These are the steps to follow:
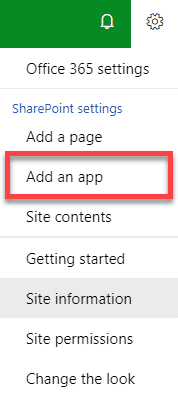
- Gear Icon > Add an App

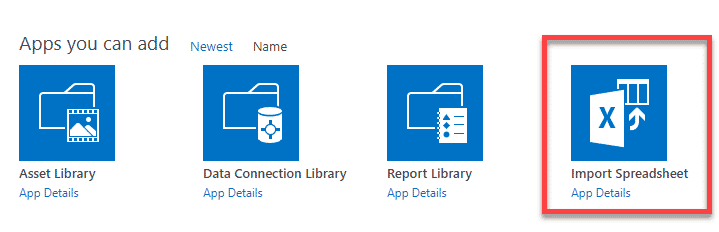
- Scroll down to Import Spreadsheet App. Click on it.

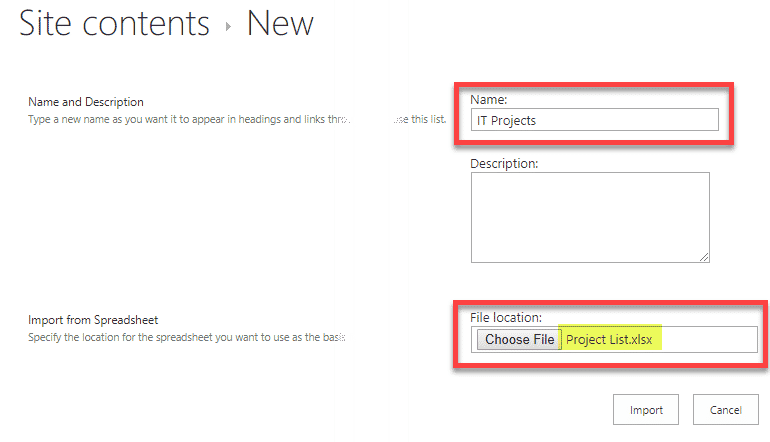
- On the next screen, give your new app/list a name, then choose an Excel file. Click Import

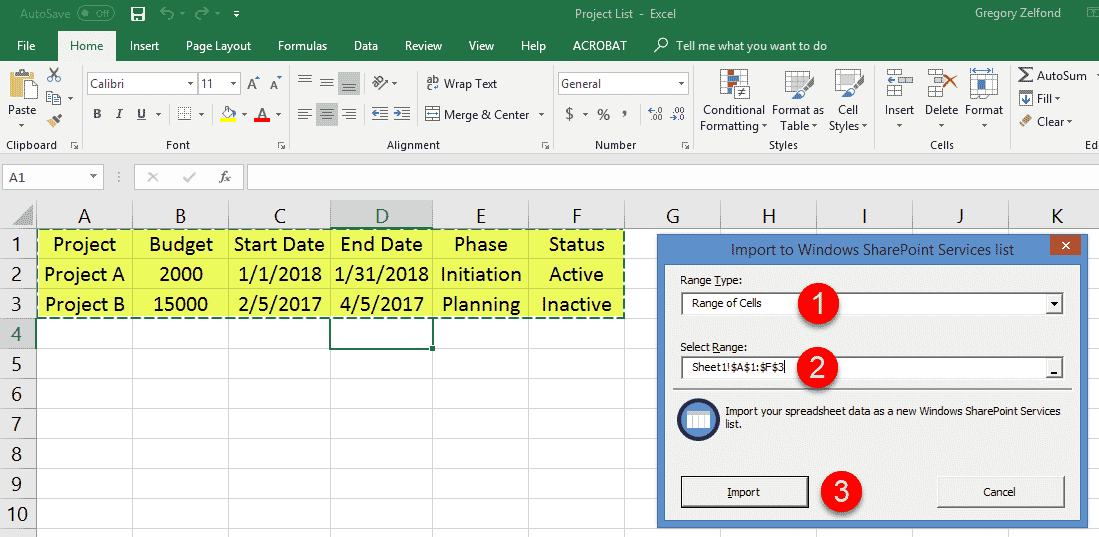
- You will now notice an Excel file open up with a pop-up window where you need to select a range of cells to import. Once you choose the range of cells in the pop-up, click Import.

- The table will now be imported to SharePoint. It will go ahead and create a custom list with proper column headers and values.


Pros
- Relatively easy to use
- Does not require much prep time like Option 1
Cons

Option 3: Import directly from Excel
Another great option is to import data right from within Excel. This is what you have to do:
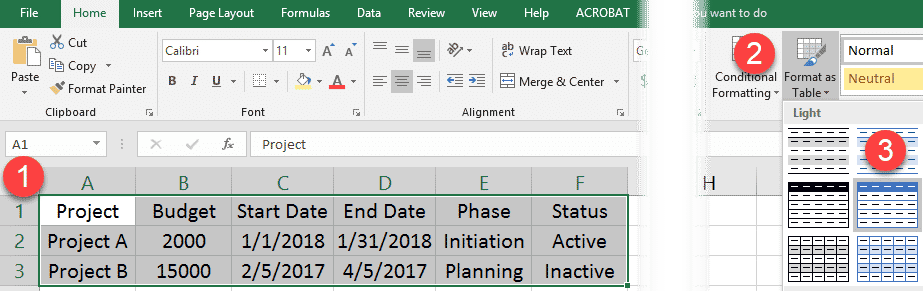
- In Excel spreadsheet, select the data range and Format it as a Table

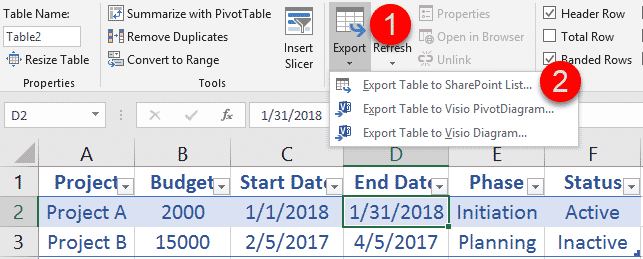
- While still in Excel, highlight the table, then choose Export from the top ribbon, then Export Table to SharePoint list

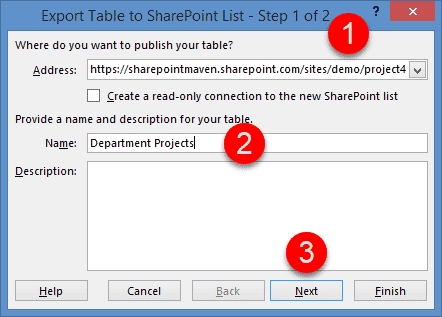
- From the pop-up that appears, specify the URL of the site you are importing to, then give the list a name, then hit Next. You can also (optionally) check the box next to Create a read-only connection to the new SharePoint list. What it does is make your Excel physically linked to SharePoint list. Any changes in the SharePoint list will propagate down to Excel when you refresh the data there.

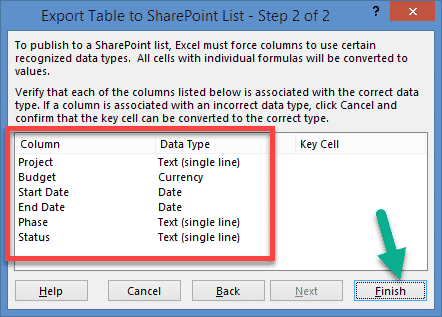
- On the next screen, you will see all the columns with corresponding recognized column types (Currency, Date, etc.). Just click Finish
- You should be getting a success message/pop-up.

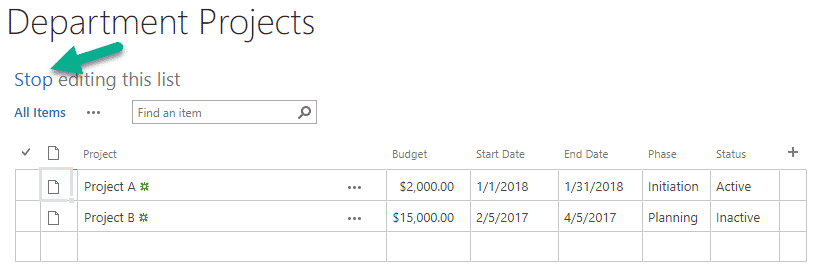
- You should now see your list created in SharePoint. It will default to Datasheet view, just click Stop to view it as a normal list.


Pros
Same as Option 2
Cons
- Same as with Option 2, some drop-down choices are recognized as Text.
- The list created is a classic list and not a modern one (for those who are in SharePoint Online)
- By default, the list opens up in Datasheet view. You always have to click Stop Editing to see a “normal” list

Импорт данных из электронных таблиц Excel 2007 в списки SharePoint
Часто встречаются такие ситуации, когда данные уже введены в электронные таблицы, но их нужно предоставить в совместное пользование другим членам группы. Службы SharePoint предоставляют возможность импорта данных из таблиц Excel 2007 в списки SharePoint. Пользователи, имеющие соответствующие разрешения, могут читать списки SharePoint или даже добавлять данные. Импортировать можно все данные рабочего листа, диапазон ячеек, именованный диапазон или отдельную таблицу Excel 2007.
В следующем упражнении вы используете обозреватель для создания настраиваемого списка SharePoint, содержащего данные, импортированные из электронной таблицы Excel 2007.
Откройте узел SharePoint, на который хотите импортировать данные из электронной таблицы Excel 2007. Помните, что вместо узла http://wideworldimporters можно использовать любой другой узел. Если потребуется, введите имя пользователя и пароль, после чего щелкните ОК.
Используйте документ Furniture_Price.xlsx, расположенный в папке с файлами занятий для этой главы. Файлы занятий находятся в папке DocumentsMicrosoft PressSBS_WSSv3Chapter 12.
Убедитесь, что на вашем компьютере установлен и активирован пакет приложений Microsoft Office 2007, необходимый для выполнения всех упражнений этой главы.
Убедитесь, что имеете достаточно прав для создания списка. Если сомневаетесь, обратитесь к Приложению.
Совет. Это упражнение можно выполнять не только с Excel 2007, но и с Excel 2003. Однако в последнем случае необходимо установить пакет обеспечения совместимости с Microsoft Office 2007, чтобы можно было импортировать файл xlsx.
1. В меню Действия узла (Site Actions) выберите команду Создание (Create). Откроется страница Создание (Create).
2. В секции Настраиваемые списки (Custom Lists) щелкните на ссылке Импортировать электронную таблицу (Import Spreadsheet). Откроется страница Создание (New).
3. В поле Имя (Name) введите Мебель_Прайс.
Совет. Любой адрес URL на узлах SharePoint ограничен 260 символами. Текст, введенный в это поле, представляет как название списка, так и его адрес URL. Далее в этом упражнении вы дадите списку более дружественное имя.
4. В текстовом поле Описание (Description) введите Этот список содержит записи о мебели, ее количестве на складе и стоимости за единицу.
Внимание! Если импортировать электронную таблицу на узел, основанный на шаблоне Рабочая область для собраний (Meeting Workspace), на странице Создание (New) появится возможность сделать элементы доступными для всех собраний. Если эту возможность не использовать, для каждого собрания будет отображаться список только с одним элементом, добавленным для соответствующей даты. Если элементы станут серией элементов для списка, уже нельзя будет разделить список элементов по датам.
5. Щелкните на кнопке Обзор (Browse). Откроется диалоговое окно выбора файлов.
В этом диалоговом окне откроется папка Documents или папка, которую открывали последней.
6. Если открылась не папка Documents, щелкните на значке Documents в группе Избранное (Favorites).
7. Откройте папку Microsoft PressSBS_WSSv3Chapter 12, после чего дважды щелкните на файле FurnitureJPrice.xlsx.
8. На странице Создание (New) щелкните на кнопке Импорт (Import).

Файл Furniture_Price.xlsx откроется в Excel 2007. Появится диалоговое окно Импорт в список Windows SharePoint Services (Import to Windows SharePoint Services).
9. Убедитесь, что в раскрывающемся списке Тип диапазона (Range Туре) выбран элемент Диапазон таблицы (Table Range).
10. В раскрывающемся списке Выберите диапазон (Selected Range) выберите Stock! FurniturePriceTable и щелкните на кнопке Импорт (Import).

Список Мебель_Прайс будет открыт в представлении Все элементы (All Items). В строке адреса будет отображаться URL http://wideworldimporters/Lists/FumiturePrice/AllItems.aspx.
Совет. Если при импорте диапазона ячеек из электронной таблицы Excel 2007 вы хотите, чтобы имена столбцов таблицы стали именами столбцов списка SharePoint, сначала нужно отредактировать электронную таблицу и преобразовать диапазон ячеек в таблицу Excel 2007. Инструкции по преобразованию диапазона ячеек в таблицу Excel 2007 см. в последнем упражнении этой главы.
11. Чтобы изменить заголовок списка, в меню Параметры (Settings) выберите команду Список: Параметры (List Settings).
12. На открывшейся странице в секции Общие параметры (General Settings) щелкните на ссылке Название, описание и переходы (Title, description and navigation). Откроется страница общих параметров списка.
13. В секции Имя и описание (Name and Description) в поле Имя (Name) введите Прайс-лист Мебель.
14. В секции Переходы (Navigation) установите переключатель Да (Yes), чтобы включить ссылку на этот список в область быстрого запуска.
15. Щелкните на кнопке Сохранить (Save) в нижней части страницы. Откроется страница настройки списка Прайс-лист_Мебель.
16. Щелкните на ссылке Прайс-лист_Мебель в пути навигации. Список откроется в представлении Все элементы (All Items).
Название списка изменилось на Прайс-лист_Мебель, но адрес URL остался тем же: http://wideworldimporters/Lists/FurniturePrice/Allltems.aspx.
Закройте обозреватель.
Читайте также
3.4. Microsoft Office SharePoint Server 2007
3.4. Microsoft Office SharePoint Server 2007
Возможности совместной работы, предоставляемые MOSS, заключаются в создании узла рабочих областей для документов. С его помощью вы сможете автоматически получать обновления таких файлов, как документы и XML-файлы Word, веб-страницы MHTML, книги и XML-файлы
Глава 11 Использование служб SharePoint совместно с Outlook 2007
Глава 11 Использование служб SharePoint совместно с Outlook 2007
В этой главе вы научитесь:• подключать список SharePoint к Microsoft Office Outlook 2007;• перемещать контакты из Office Outlook 2007 в список SharePoint;• копировать контакты SharePoint в Outlook 2007;• отправлять сообщения электронной почты, используя
Подключение списка SharePoint Контакты к Outlook 2007
Подключение списка SharePoint Контакты к Outlook 2007
Чтобы начать использовать возможности интеграции списков и библиотек SharePoint с Outlook 2007, необходимо подключить список или библиотеку. Подключить к Outlook 2007 можно большинство типов списков и библиотек SharePoint. Подключение к Outlook 2007 не
Перемещение контакта Outlook 2007 в список SharePoint Контакты
Перемещение контакта Outlook 2007 в список SharePoint Контакты
Подключив список SharePoint Контакты (Contacts) к Outlook 2007, вы создали в Outlook папку Контакты (Contacts). Теперь можно копировать контактную информацию из этой папки Outlook в список SharePoint Контакты (Contacts). Новые контакты из папки Контакты
Копирование контактов SharePoint в Outlook 2007
Копирование контактов SharePoint в Outlook 2007
Из списка SharePoint можно скопировать в Outlook 2007 любой одиночный контакт или элемент события. Элемент, скопированный в папку Контакты (Contacts), становится независимым от элемента из списка SharePoint Контакты (Contacts), т.е. связи между этими двумя
Управление оповещениями SharePoint в Outlook 2007
Управление оповещениями SharePoint в Outlook 2007
При создании оповещения для элемента, такого как документ, элемент списка, библиотека документов, список, опрос или результаты поиска, вы немедленно получаете по электронной почте уведомление о том, что оповещение было успешно
Глава 12 Использование служб SharePoint совместно с Excel 2007
Глава 12 Использование служб SharePoint совместно с Excel 2007
В этой главе вы научитесь:• импортировать данные из электронных таблиц Microsoft Office Excel 2007 в службы SharePoint;• использовать веб-таблицы данных Access;• экспортировать списки SharePoint в электронные таблицы Office Excel 2007;•
Экспорт списка SharePoint в электронную таблицу Excel 2007
Экспорт списка SharePoint в электронную таблицу Excel 2007
В электронные таблицы Excel 2007 можно экспортировать содержимое списков SharePoint, результаты опросов и библиотеки документов. Экспортированный список или библиотека – это веб-запрос, который сохраняется обновленным, с
Экспорт таблицы Excel 2007 на узел SharePoint
Экспорт таблицы Excel 2007 на узел SharePoint
Операцию создания списка SharePoint из Excel 2007 называют экспортом таблицы Excel. В Excel 2003 это называлось публикацией списка Excel. После размещения данных на узле SharePoint пользователи могут просматривать данные Excel 2007, не открывая Excel 2007. Как и в
Глава 13 Использование служб SharePoint совместно с Access 2007
Глава 13 Использование служб SharePoint совместно с Access 2007
В этой главе вы научитесь:• экспортировать данные из базы данных Microsoft Office Access 2007 в список SharePoint;• импортировать таблицу Access 2007 в список SharePoint;• перемещать данные из базы данных Access 2007 на узел SharePoint;• работать в
Экспорт данных из базы данных Access 2007 в список SharePoint
Экспорт данных из базы данных Access 2007 в список SharePoint
Access 2007 позволяет экспортировать таблицу или другой объект базы данных в различных форматах, таких как внешний файл, база данных dBase или Paradox, файл Lotus 1–2–3, рабочая книга Excel 2007, файл Word 2007 RTF, текстовый файл, документ XML
Импорт списка в таблицу Access 2007
Импорт списка в таблицу Access 2007
Используя Access 2007, можно создать таблицу, импортируя данные из внешнего источника данных, такого как файл Lotus 1–2–3, база данных Paradox или dBase, рабочей книги Excel 2007, Office Outlook 2007 или папки Microsoft Exchange, документа XML, источника данных ODBC или веб-узла
Связь таблицы Access 2007 со списком SharePoint
Связь таблицы Access 2007 со списком SharePoint
В предыдущих двух упражнениях вы копировали данные так, что отдельные копии этих данных хранились и в базе данных Access 2007, и на узле SharePoint. Однако синхронизация этих двух наборов данных не выполнялась. Если вы не хотите хранить две
Перемещение данных из базы данных Access 2007 на узел SharePoint
Перемещение данных из базы данных Access 2007 на узел SharePoint
Потребности многих приложений Access 2007 превышают простую потребность в управлении и сборе данных. Часто такие приложения используются многими пользователями организации, а значит, имеют повышенные потребности в
Глава 14 Использование служб SharePoint совместно с InfoPath 2007
Глава 14 Использование служб SharePoint совместно с InfoPath 2007
В этой главе вы научитесь:• создавать библиотеку форм при помощи Microsoft Office InfoPath 2007;• изменять существующую библиотеку форм;• заполнять форму;• изменять существующую форму;• создавать тип содержимого при помощи Office
5.3. Импорт таблиц
5.3. Импорт таблиц
Иногда может возникнуть необходимость импортировать в Word таблицу, созданную в другой программе, например некоторых других текстовых процессорах, а также файлы электронных таблиц Microsoft Excel и Lotus. При импортировании электронных таблиц функции и формулы,
Many users who use SharePoint Online like to use lists because SharePoint lists look just like Excel tables. For better integration, Microsoft allows you to export Excel tables to SharePoint lists and vice versa. Users usually ask: How do I import data from SharePoint to Excel? How do I extract data from SharePoint? How do I create a SharePoint list in Excel? This blog post can help you answer these questions and explains how to export tables from Excel to SharePoint lists and vice versa. Four methods of exporting data from Excel and one method of exporting data from SharePoint lists are covered.
Method 1 – How to Export Data from Excel to SharePoint Lists Manually
The idea of the first method is that you should create an empty list that contains the same columns as in the Excel table. The data format of columns must be the same to preserve data consistency. Then you should manually copy data from each column of the Excel table and paste this data to the appropriate column of the SharePoint list.
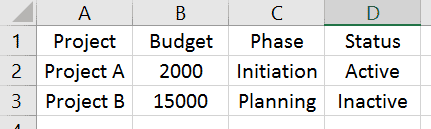
Open an XLS, XLSX, CSV file, or a file of another format that contains a table in Microsoft Excel that is installed on your computer. In my example, I’ve created a simple table for demonstration. You can see this table opened in Excel in the screenshot below.

Open a web browser and log into your Office 365 account (Microsoft 365 account). Open your team site in SharePoint Online, and create a new list. Let’s call our test list List02 and enter a description, for example, Import Excel into SharePoint list. You can also read this blog post about SharePoint Online to learn more about sites, lists, and libraries.

Once you have created a new SharePoint list, create the appropriate columns by clicking +Add column. The columns must have the same names and data format as the columns in the source Excel table.

In the window that opens, enter a name, description, and type, and define other needed parameters for a column. Then hit Save.

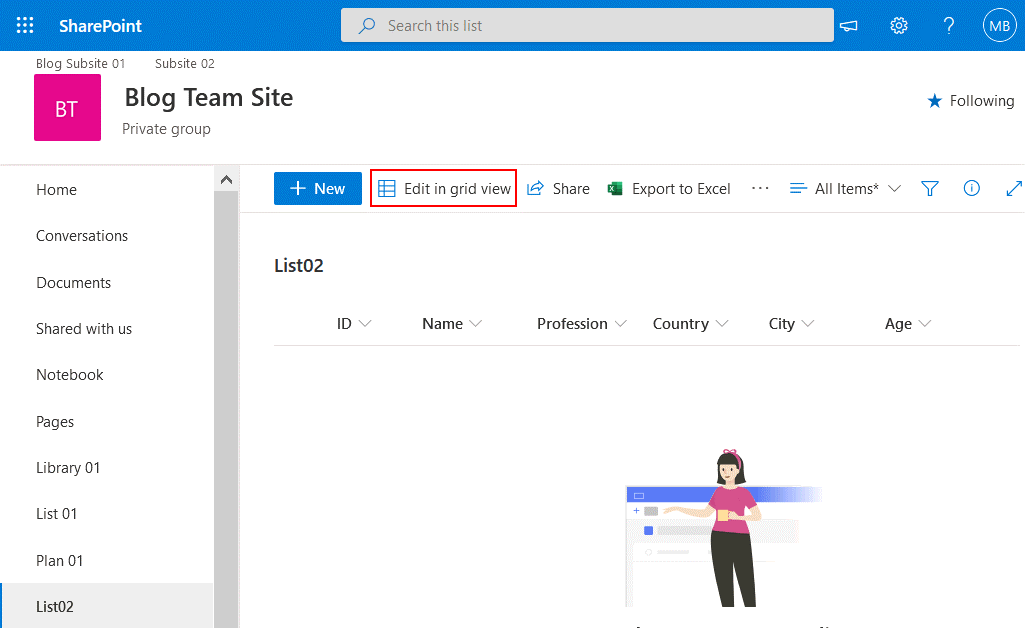
The list now contains all the needed columns but remains empty. To start copying data to a SharePoint list, you have to view the list as a table. To do this, click Edit in grid view. You are ready to copy data from Excel to SharePoint list.
Select data in a column of an Excel table, and press Ctrl+C to copy the selected data to clipboard. On the screenshot below you can see the data in the Name column selected.

You can move columns (left and right) after creating them in a SharePoint list. Select the empty cell in the needed column (the Names column in our case), and press Ctrl+V to paste data you have copied to the clipboard. The Name column now contains all the needed data in our example. Similarly copy paste data for the other columns.

Once you have transferred data to all columns of your SharePoint list, you can exit grid view. We have finished copying data from an Excel table to a SharePoint list. On the screenshot below you can see how our list looks after copying all the data.

The advantage of this method is that it’s easy to use when you don’t have that many tables or columns.
The disadvantage is that it’s time-consuming and inconvenient when you have too many columns and tables to copy.
Method 2 – How to Export Data Directly from Excel to a SharePoint List
The idea of this method is that you should export your table to a SharePoint list directly from Excel installed on your computer. Excel must be able to connect to your SharePoint site. You should provide your credentials, and your Office 365 account must have sufficient permissions to create a SharePoint list on a SharePoint site.
Open Microsoft Excel installed on your computer, and open the table you want to export to SharePoint Online. Let’s create a test table for our blog post with some equipment items and create columns with vendors who manufactured these items, users who are owners of the appropriate item, and the price for each item.
Convert a spreadsheet to a table before you start exporting. Click Insert > Table.

In the Create Table window, you can leave default values and hit OK.

Now the view of the table is a little bit different, as headers are marked with another color.
Select any column name in your table, go to the Design tab (Table Tools), and enter a table name, for example, TestTable01. There should be no spaces in the name.
Select the Design tab, click Export, then click Export Table to SharePoint List…

A pop-up window is displayed. There are two steps to complete.
Enter the address of your team site in SharePoint, which is the destination for the Excel table that you want to export. In my case, I’m using the following address: https://nakivo.sharepoint.com/sites/BlogTeamSite
Enter a name for your table, for example: Excel to SharePoint list. This name will be used as the SharePoint list name after export.
Enter a description, for example: Import Excel to SharePoint list.
Hit Next to continue.

Define the correct data types for each column of the exported table, then hit Finish.

Now Microsoft Excel connects to your SharePoint site you have selected as destination to export the Excel table into a SharePoint list. Excel needs to pass authentication in Office 365 to export a table to a SharePoint list. You should enter the username and password for your Office 365 account.

If everything is correct, the export process will be completed successfully, and you should see the message:
The table was successfully published and may be viewed on: <address>

Open the link provided in the window in a web browser.
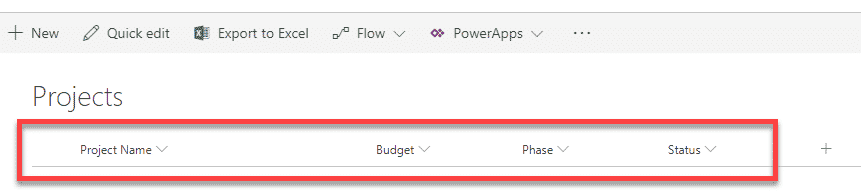
Now you can see the exported Excel table as a list in SharePoint Online.

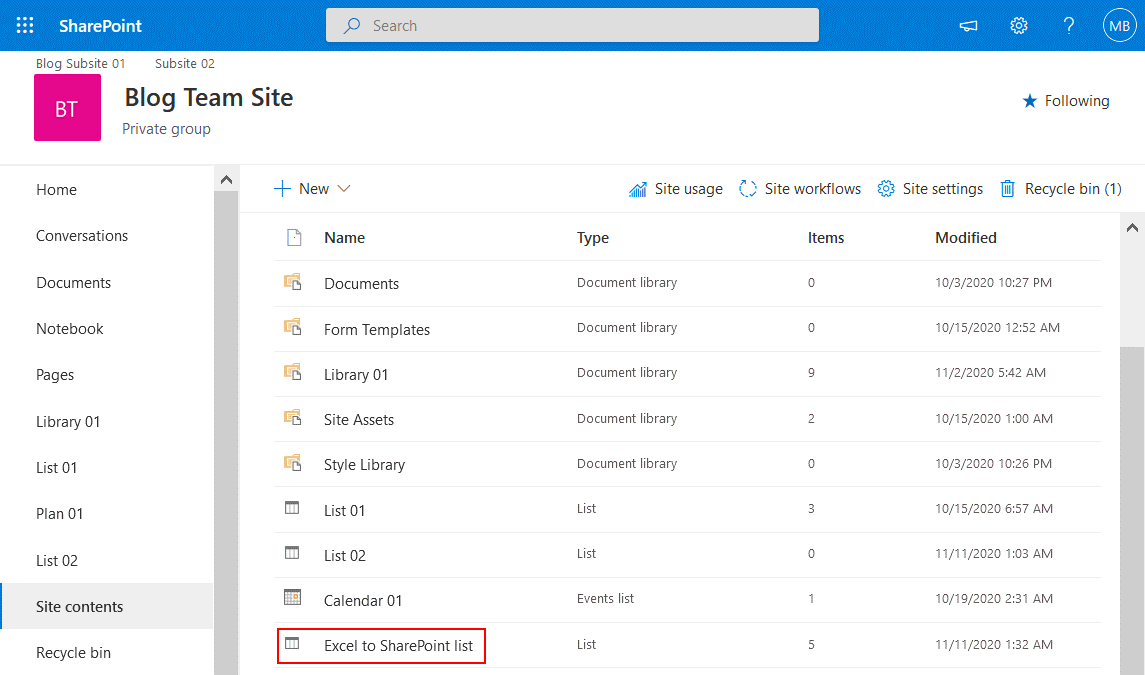
You can open this list manually in SharePoint Online by opening your team site and going to the Site Contents section in the navigation pane of the web interface.
The advantage of this method is that it’s convenient to export data directly from Excel to a SharePoint list. All you need is Excel and access to SharePoint Online. No third-party apps are required.
Method 3 – How to Export Data from Excel to a SharePoint List with an App
The idea of the third method is that you should use a special SharePoint App to import spreadsheets from Excel to SharePoint lists. You need the Import Spreadsheet app and a web browser that supports ActiveX controls, for example, Internet Explorer.
Open your team site in SharePoint Online, click the Settings icon, and, in the menu that opens, hit Add an app.

In the window that opens, you can see a list of different SharePoint apps. Type “import” in the search field on this page. When the Import Spreadsheet app is found, click it.

On the page that opens, you should enter a name and description of the new SharePoint list that is created after import with the app.
Name: Excel to SharePoint list
Description: Import Excel to SharePoint list
Click Browse, and select the XLSX file (or another Excel file format that is supported by the app) that you want to import to SharePoint as a list.
Hit Import.

ActiveX controls must be enabled in your web browser. If ActiveX controls is not enabled, you will see a warning message in your web browser. Refer to documentation for your web browser to learn how to enable ActiveX controls. ActiveX controls is a piece of software allowing you to interact with content you browse in the web. They can have access to your computer and may lead security issues. ActiveX controls are also known as plug-ins for Internet Explorer.
The advantage of this method is that it doesn’t take much manual intervention.
The disadvantages of the method are that you need to configure ActiveX controls that can be difficult or not supported in your web browser and that you need to use a special web app for SharePoint.
Method 4 – How to Export Data from Excel when Creating a New SharePoint List
There is one more method that allows you to import an Excel table to a SharePoint list when creating a new list in SharePoint Online. You don’t need Excel or other applications to use this method. Just open your web browser and log in to SharePoint Online with your Office 365 account (Microsoft 365) credentials.
Open you team site in SharePoint Online, click the Settings icon, and hit Site contents.

On the Site contents page that opens, click New > List.

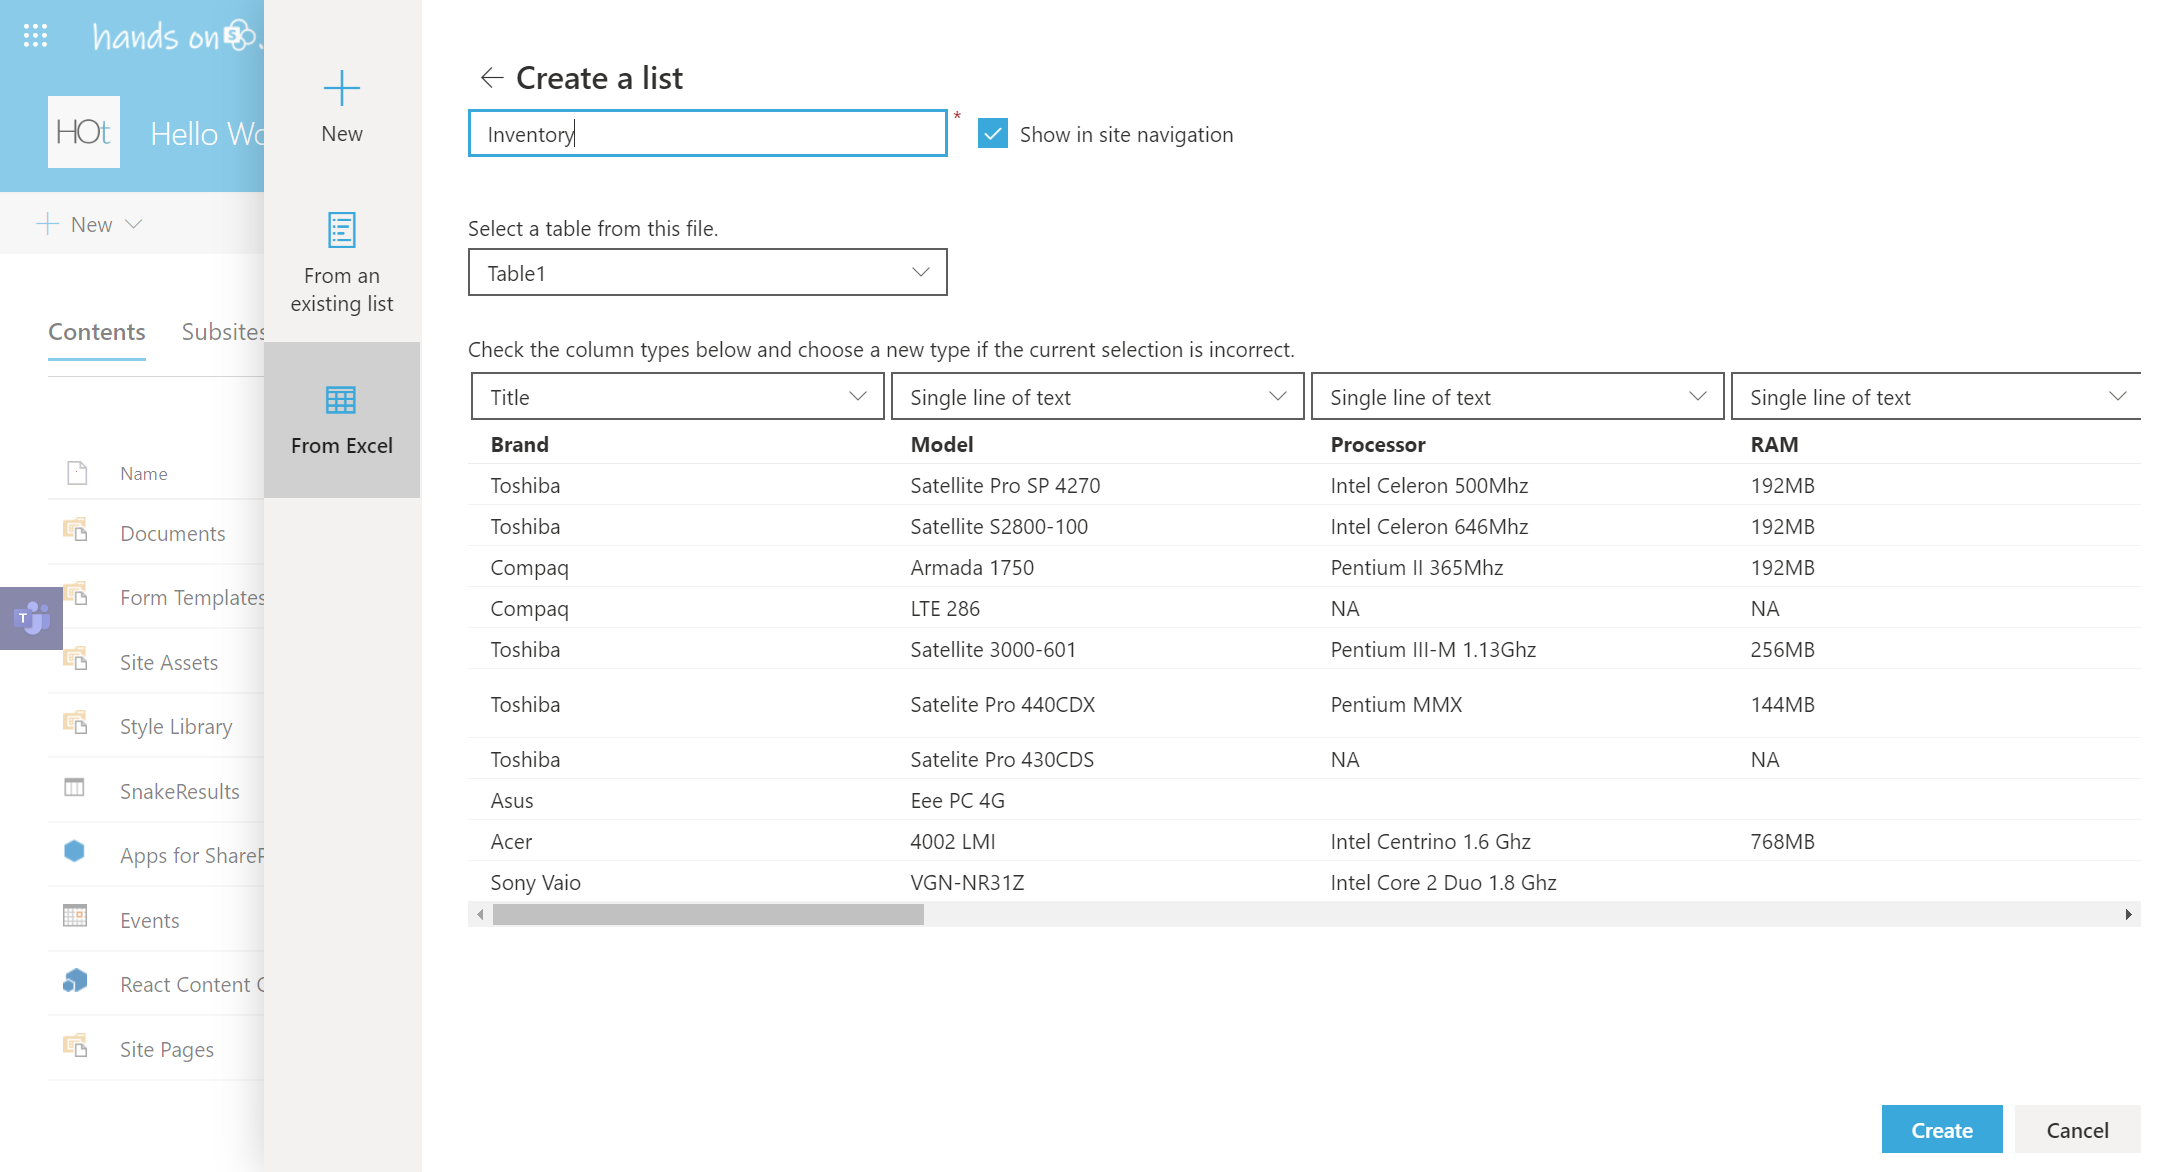
A new page opens suggesting that you create a list. On the left side of the page, select From Excel to create a list from Excel. Enter a name for your new list, for example, SharePoint import Excel. Click Upload file, and select an Excel file (XLS, XLSX, or other supported formats) you want to import as a SharePoint list to SharePoint Online. As an alternative, you can select a file that has been already uploaded to a SharePoint site. Hit Next to continue.

A table in the file we have uploaded is recognized. Check the column types and make sure that the data format is correct to preserve consistency. Hit Create when ready to finish.

A SharePoint list has been created successfully and data has been exported from an Excel table to a SharePoint list.

The advantages of this method is that you don’t need to install Excel on your computer to export a table to SharePoint as a list and you don’t need to use a SharePoint app.
How to Export SharePoint List to Excel
You can export a SharePoint list to an Excel table with a few clicks by using a web interface of SharePoint Online.
Open your team site in SharePoint Online, then open the SharePoint list you want to export. Click Export to Excel.

A window notifies you that query.iqy must be opened in Excel. Select Excel as an application to open the downloaded query.iqy file, and hit OK. A Microsoft Excel security notice is displayed when you open a file downloaded from the internet in Microsoft Excel. The purpose of this notification message is to reduce risks of ransomware attacks and infection with other viruses. Click Enable to open the SharePoint list you are exporting to an Excel table.

Now a table opens in Excel and the export of the SharePoint list is finished. Save the table as a file in the needed format, for example, XLS or XLSX.

Refreshing data in Excel
If changes are written to your SharePoint list stored on a team site in SharePoint Online, you can refresh data in the table you have imported to Excel and update your table without the need to perform a new export/import operation. The data in Excel is not refreshed automatically right after changes are saved in a SharePoint list; you should perform one manual operation to do this. You should know how to connect Excel to SharePoint lists in this case.
Let’s add a new Switches line in the SharePoint list.

As you can see, the Excel table we have imported before is not updated automatically with the data we added to our SharePoint list (the Switches line). We need to update it by going to the Data tab and clicking Connections in Excel.

The Workbook Connections window opens. Click Refresh to refresh the data in your Excel table, then you can close this window.

Data has been updated in Excel, and the Switches line is added in the bottom of our Excel table without the need to re-export all data.

Be aware that data is refreshed only in one direction. If you change data in your Excel table and click Refresh, the SharePoint list is not updated.
If you don’t need to update data in the current Excel table, go to Data > Connections, select a query, and click Remove.

Conclusion
Microsoft provides good integration between SharePoint Online and Excel as they both are Microsoft products. There are at least four methods to export data from Excel tables to SharePoint lists. Methods covered in this blog post have advantages and disadvantages you should be aware of when selecting a method that is suitable for you. Select the right method depending on whether you want to do it manually, use Excel, or use another app. Data export from a SharePoint list to Excel is straightforward and affordable for all SharePoint Online users.
When you use SharePoint Online and Office 365 in general, don’t forget to back up your data. NAKIVO Backup & Replication supports Office 365 data backup for Exchange Online, OneDrive for Business, and SharePoint Online. Download the latest version of the product, and back up all needed data in your environment.
By
May 31, 2020
SharePoint
4 Comments
Excel and SharePoint lists were always connected and have a lot in common however the available methods to transform a spreadsheet into a list were outdated and not compliant with the latest web standards.
During the last Microsoft Build the world was introduced to the new Microsoft Lists, a new application in the Microsoft 365 ecosystem that will leverage the power of SharePoint list. While we don’t have the chance to play with Microsoft Lists a new feature to import Excel spreadsheets has landed on SharePoint.

The new import feature takes advantage of the modern SharePoint and has support in all major modern browsers.
How to create SharePoint lists from Excel files using modern SharePoint
The process to create SharePoint lists from Excel file is quite simple yet very powerful, to use it you have to do the following:
- On your modern SharePoint site go to Site Contents
- Click on New
- On the Create a list pane click on From Excel
- Provide a name for your list
- Upload your Excel file
- Select one of the available tables in the file
- Define a column type for each one of your columns, or remove them from the import
- After a few seconds SharePoint will open your new list with the content you had in the Excel spreadsheet

To view the entire process in action check out the video below.
Time vector created by stories – www.freepik.com
Это статья серии “Введение в SharePoint 2010”
В предыдущей главе рассматривалась работа с рабочими процессами в SharePoint 2010.
В этой главе рассматривается интеграция с офисными приложениями.
В этой части руководства рассматриваются следующие темы
- Введение
- Office Web Apps
- Excel 2010
- Импорт данных из электронной таблицы в список
- Веб-часть импорта таблицы
- Экспорт из Excel 2010
- Экспорт списка/библиотеки в Excel
- Импорт данных из электронной таблицы в список
Введение
Одно из самых важных преимуществ SharePoint 2010 – его интеграция с Microsoft Office 2010. Самый простой способ интеграции – в офисных приложениях при сохранении документа можно указать сайт SharePoint. Рассмотрим подробнее возможные сценарии работы в Office 2010 и SharePoint 2010.
Office Web Apps
SharePoint 2010 используется как централизованное хранилище документов. Естественное желание пользователей – просматривать и редактировать документы в браузере. Но данная возможность отсутствует в поставке по умолчанию.
На помощь могут прийти Office Web Apps, которые позволяют работать с Microsoft Word, Excel, PowerPoint и OneNote (аналогично тому, как работает SkyDrive). Статьи по развертыванию веб-приложений Office Web Apps и ссылки на загрузки можно найти здесь. После развертывания пользователи получают инструментарий, позволяющий работать с документами прямо в браузере, в том числе с мобильных устройств. Также можно отметить удобный механизм совместной работы над документами, который появился в первом пакете обновления. Замечу, что Office Web Apps уже настроены для использования в SharePoint Online.
Excel 2010
Как уже было сказано, SharePoint 2010 тесно интегрирован с Office 2010, в частности, Excel 2010. Рассмотрим ниже некоторые сценарии интеграции.
Импорт данных из электронной таблицы в список
Рассмотрим два способа для выполнения указанной задачи.
Веб-часть импорта таблицы
Откройте сайт, на который вы хотите импортировать данные. Кликните на Действия сайта, затем на Дополнительные параметры. В появившемся окне нужно выбрать Импорт из электронной таблицы, и кликнуть Создать (рис. 7.1).

Рис. 7.1. Окно выбора шаблона списка
После чего нужно указать имя нового списка, описание и расположение файла (рис. 7.2). Если у вас при импорте появилась ошибка “Указанный файл не является допустимой электронной таблицей или не содержит данных для импорта”, то способ ее исправления можно найти здесь.

Рис. 7.2. Страница создания списка с помощью импорта из Excel
Далее открывается указанная книга Excel, и нужно указать, какие данные будут импортированы (рис. 7.3).
Доступны следующие типы диапазонов:
- Диапазон ячеек – указываются произвольные ячейки таблицы;
- Диапазон таблицы – предлагается выбрать таблицы из списка;
- Именованный диапазон – предлагается выбрать именованные диапазоны (если они есть)

Рис. 7.3. Окно выбора данных для импорта в список
Список создан, при желании можно изменить его параметры, например, название, или создать представления. Обращаю ваше внимание, что в этом случае синхронизация между содержимым файла и списка НЕ происходит.
Экспорт из Excel 2010
Рассмотрим еще один вариант импорта электронной таблицы в список. Для начала нужно создать таблицу (рис. 7.4).

Рис. 7.4. Окно создания таблицы
После чего при клике на любой ячейке таблицы на ленте появляется конструктор для работы с таблицами (рис. 7.5). Кликнем на Экспорт таблицы в список SharePoint.

Рис. 7.5. Кнопка для экспорта таблицы в список
В появившемся окне (рис. 7.6) указываем адрес сайта, на который нужно опубликовать список, имя и описание. Если создать неизменяемое подключение к новому списку, то книга будет связана со списком (как и в первом случае, связь односторонняя), в противном случае – связи между книгой и списком не будет. Кликаем на Далее.

Рис. 7.6. Первый шаг экспорта таблицы в список SharePoint
На втором шаге осуществляется проверка типов данных (рис. 7.7). При этом стоит учесть, что формулы будут удалены и вместо них будет подставлено вычисленное значение соответствующего типа.

Рис. 7.7. Второй шаг экспорта таблицы в список SharePoint
Кликаем на Готово, и список опубликован, о чем оповестит окно со ссылкой на список.
Особенность данного подхода заключается в том, что представление списка – таблица данных (рис. 7.8). В правой части можно обнаружить панель со ссылками на полезные команды. Безусловно, при желании можно изменить представление.

Рис. 7.8. Внешний вид списка с экспортированной электронной таблицей
Экспорт списка/библиотеки в Excel
При необходимости можно экспортировать список/библиотеку в Excel. При этом нужно учитывать, что экспортируется только текущее представление.
Для экспорта списка воспользуемся лентой (рис. 7.9). Кликаем на Экспорт в Excel, и откроем появившийся файл owssvr.iqy, который представляет собой файл подключения.

Рис. 7.9. Кнопка на ленте для экспорта списка в Excel
В Excel появляется извещение системы безопасности (рис. 7.10). Так как мы уверены в надежности источника файла, то кликаем на Включить. Далее будет предложено авторизоваться, вводим туда учетные данные, используемые для входа на портал SharePoint 2010.

Рис. 7.10. Извещение системы безопасности Microsoft Excel
В книгу загрузятся данные активного представления списка в виде таблицы. Интересно, что в этом случае нельзя добавлять данные в список путем добавления их в файл, можно лишь получать содержимое списка. Обновлять данные можно вручную с помощью кнопки Обновить. Также можно настроить автоматическое обновление, кликнув на Свойства, в появившемся окне можно изменить интересующие параметры. Свойства обновления указываются непосредственно в свойствах подключения, куда можно попав, кликнув по соответствующей кнопке (рис. 7.11).

Рис. 7.11. Свойства подключения к списку
Данные вид экспорта удобно использовать для подготовки печатных отчетов.
Важная составляющая интеграции Excel 2010 и SharePoint 2010 – службы Excel, которые рассматривались в главе 5.
В этой части руководства рассматривалась интеграция Excel 2010 и SharePoint 2010.
В следующей части руководства рассматривается интеграция Access 2010 и SharePoint 2010