Использование Excel вместе с Таблицами: рекомендации
Далее: Как управлять данными
Содержание
- Как работать с файлами Excel на Диске
- Как использовать Excel вместе с Таблицами
- Как редактировать файлы Excel в Таблицах
- Как импортировать данные Excel в Таблицы
- Как преобразовать файл Excel в формат Таблиц
- Как поделиться копией файла Таблиц в формате Excel
Как работать с файлами Excel на Диске
Работать с файлами Microsoft Excel можно разными способами. Вы можете:
- Импортировать данные Excel в Таблицы. Подробнее…
- Преобразовывать файлы Excel в формат Таблиц. Подробнее…
- Редактировать файлы Excel на Диске, не изменяя их формат. Подробнее…
- Преобразовывать файлы Таблиц в Excel или другие форматы. Подробнее…
Как использовать Excel вместе с Таблицами
Если ваша команда работает и с Microsoft Excel, и с Таблицами, ознакомьтесь с рекомендациями о том, в каких случаях лучше выбрать тот или иной продукт.
Преобразуйте таблицы Excel в формат Таблиц, если:
- Вам необходимо работать над ними вместе с командой.
- Набор данных составляет менее пяти миллионов ячеек.
Продолжайте работать с таблицей в Excel, если:
- Набор данных превышает пять миллионов ячеек.
- Вы используете дополнение Hyperion в Excel.
- Вы работаете с редкими типами таблиц, например трехмерными диаграммами-пирамидами или вторичными круговыми диаграммами.
Как редактировать файлы Excel в Таблицах
Откройте файл Excel на Диске и отредактируйте его в Таблицах. Все внесенные изменения будут автоматически сохраняться в исходном формате Excel.
Только для браузера Chrome
- Убедитесь, что расширение «Редактирование файлов Office» не установлено:
- Откройте браузер Chrome и в правом верхнем углу нажмите «Ещё»

Дополнительные инструменты
Расширения.
- Если вы видите в списке расширение «Редактирование файлов Office», нажмите Удалить.
- На Диске дважды нажмите на файл Excel.
Он откроется в окне предварительного просмотра.
- Вверху страницы нажмите Открыть в Google Таблицах.
Теперь вы можете просматривать историю версий, редактировать файл, открывать к нему доступ и работать над ним вместе с другими пользователями в режиме реального времени. Все изменения сохраняются в исходном файле Microsoft Office.
Теперь вы можете просматривать историю версий, редактировать файл, открывать к нему доступ и работать над ним вместе с другими пользователями в режиме реального времени. Все изменения сохраняются в исходном файле Microsoft Office.
Как импортировать данные Excel в Таблицы
Вы можете импортировать данные из файла Excel в новый или существующий файл Таблиц. При этом файл Excel не изменится, даже если вы отредактируете соответствующий документ в Таблицах.
- Создайте в Таблицах новый файл или откройте существующий.
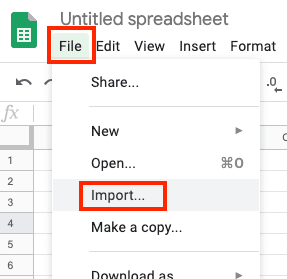
- Нажмите Файл
Импортировать.
- Найдите файл Excel и нажмите Выбрать.
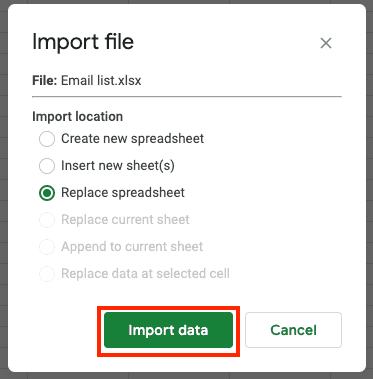
- Выберите вариант импорта:
- Создать таблицу
- Вставить лист(ы)
- Заменить таблицу
- Нажмите Импортировать данные.
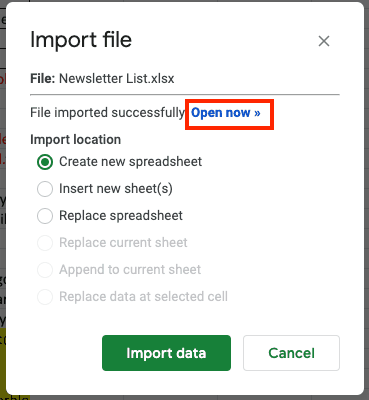
- Если появится запрос, нажмите Открыть
Как преобразовать файл Excel в формат Таблиц
Вы можете преобразовать файл Excel в формат Таблиц и продолжить работать над ним в этом сервисе, не импортируя данные. При этом файл Excel изменен не будет.
- На Диске дважды нажмите на файл Excel.
Он откроется в окне предварительного просмотра.
- Вверху страницы нажмите Открыть в Google Таблицах.
- Нажмите Файл
Сохранить как таблицу Google.
Чтобы в будущем все загружаемые файлы Office автоматически преобразовывались в формат Google Таблиц, выполните указанные ниже действия.
- Откройте Диск и в верхней части экрана выберите

Настройки.
- В разделе «Загруженные файлы» установите флажок Преобразовывать загруженные файлы в формат Google.
Примечание. Ранее загруженные файлы не будут преобразованы.
На Диске вы увидите файл Excel и появившийся файл Таблиц. Файл Excel можно сохранить или удалить. Если вы сохраните его, измените его название (например, на [Архив] Мой документ.xls), чтобы избежать путаницы.
Совет. Чтобы вам было проще различать файлы Таблиц и Excel, на Диске используются следующие значки:
Таблицы
Excel
Как поделиться копией файла Таблиц в формате Excel
Вы можете поработать над файлом в Таблицах, а затем отправить его копию по электронной почте в формате Excel или PDF.
- Откройте файл в Таблицах.
- Нажмите Файл
Отправить по электронной почте.
В разделе Прикрепить как выберите Microsoft Excel.
- Введите адрес электронной почты, тему и сообщение.
- При необходимости установите флажок Отправить мне копию.
- Нажмите Отправить.
Файл Таблиц также можно скачать в формате Excel, PDF, CSV, ODS и других.
- В Таблицах нажмите Файл
Скачать.
- Выберите формат файла.
Google, Google Workspace, а также другие связанные знаки и логотипы являются товарными знаками компании Google LLC. Все другие названия компаний и продуктов являются товарными знаками соответствующих компаний.
Далее: Как управлять данными
Эта информация оказалась полезной?
Как можно улучшить эту статью?
И Google Таблицы, и Microsoft Excel — это мощное программное обеспечение для работы с электронными таблицами. В то время как в Excel вы можете работать в автономном режиме, Google Таблицы позволяют создавать и управлять электронными таблицами в Интернете. Google Таблицы также автоматически сохраняют каждое изменение. Преимущество использования Google Таблиц заключается в том, что вы можете управлять электронными таблицами из любого места на любом устройстве, просто войдя в свою учетную запись Google.

Вы можете загрузить Google Таблицы в xlsx и других форматах и создать резервную копию на своем ПК. Но каждый раз, когда вы вносите изменения в Google Таблицы, вам необходимо загрузить их и заменить предыдущий файл резервной копии. А теперь представьте, что если вы занимаете более высокую должность в организации, вам нужно управлять значительным объемом данных. В таком состоянии вам будет сложно вручную синхронизировать все файлы резервных копий с Google Таблицами. Есть ли способ, при помощи которого все загруженные файлы будут обновляться автоматически? Да, есть. В этой статье мы увидим метод подключения или синхронизации Google Таблиц с MS Excel, чтобы каждое изменение, сделанное в Google Таблицах, автоматически отражалось в соответствующем файле MS Excel.
Прочтите: Как использовать темную тему в Google Документах, Таблицах и Презентациях.
1]Откройте файл в Google Таблицах, который вы хотите синхронизировать с MS Excel. Я подготовил образцы данных температур разных штатов Индии.
2]Теперь перейдите в «Файл»> «Опубликовать в Интернете» в Google Таблицах.
3]В раскрывающемся меню «Весь документ» у вас есть возможность опубликовать либо весь документ, либо только конкретный лист документа.
Щелкните часть «Опубликованное содержимое и настройки», чтобы развернуть ее и посмотреть, включена ли часть «Автоматически повторно публиковать при внесении изменений». Если нет, включите его. Теперь нажмите кнопку «Опубликовать» и выберите ОК во всплывающем окне.
Прочтите: Как запустить Word, Excel, PowerPoint в безопасном режиме.
4]После публикации документа вы получите ссылку. Вы должны вставить эту ссылку в документ MS Excel, который вы хотите связать с Google Таблицами. Если вы вставите эту ссылку в свой веб-браузер, вы увидите, что она доступна в виде веб-страницы.
Теперь запустите MS Excel и создайте в нем новый пустой документ. Перейдите в «Данные> Новый запрос> Из других источников> Из Интернета».
5]Вы увидите всплывающее окно, в котором вам нужно вставить скопированную ссылку и нажать OK. Если у вас есть два варианта, Базовый и Расширенный, выберите Базовый.
6]Все данные Google Sheet будут доступны в Excel в виде таблицы. Теперь в окне «Навигатор» сначала установите флажок «Выбрать несколько элементов», а затем выберите «Таблица 0». Предварительный просмотр выбранного элемента доступен на правой панели.
На приведенном ниже снимке экрана вы можете видеть, что столбец 1 пуст, а в столбце 2 указаны серийные номера, а наши фактические данные перечислены в столбцах 3 и 4. Поскольку столбцы 1 и 2 нам не нужны, мы должны их удалить. Для этого нажмите кнопку «Редактировать» в нижней части окна навигатора. У некоторых из вас может быть «Преобразовать данные» вместо «Редактировать» в зависимости от вашей версии MS Excel. Откроется «Редактор запросов».
Прочтите: Советы по Excel, чтобы сэкономить время и работать быстрее.
7]Мы хотим сделать нашу первую строку заголовком. Для этого нажмите в верхнем левом углу и выберите «Использовать первую строку в качестве заголовков».
8]Чтобы удалить ненужные столбцы, щелкните верхний левый угол и выберите «Выбрать столбцы». После этого снимите флажки напротив ненужных столбцов и нажмите ОК.
9]Теперь нажмите «Закрыть и загрузить», чтобы загрузить данные Google Sheet в Excel.
Вы подключили свой лист Google к Excel. Каждый раз, когда вы вносите какие-либо изменения в Google Sheet, вам нужно подождать 5 минут, чтобы эти изменения были опубликованы в Интернете. После этого вам может потребоваться обновить файл Excel, чтобы эти изменения отразились в файле Excel. Для этого перейдите в «Данные> Обновить все».
Читайте: клавиши со стрелками не работают в Excel.
Если вы хотите, чтобы Excel обновлялся сам по себе всякий раз, когда вы вносите изменения в таблицу Google, вам нужно сделать еще несколько шагов.
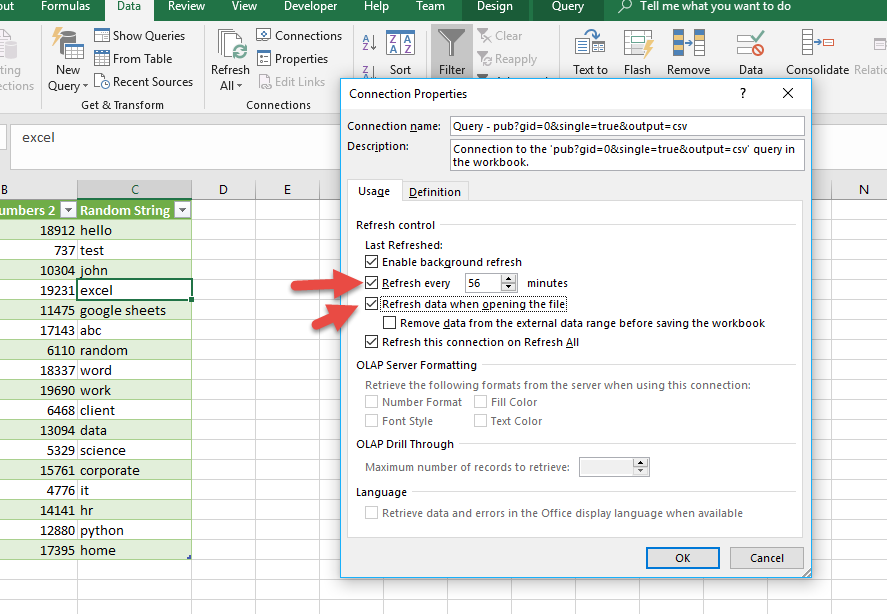
1]Выберите таблицу и перейдите в «Данные> Подключения». Откроется окно, в котором вы должны выбрать «Свойства».
2]Теперь установите флажок «Обновлять каждые» и введите время, по истечении которого Excel будет обновляться автоматически. Я ввел 5 минут. Если вы включите параметр «Обновлять данные при открытии файла», Excel будет проверять наличие обновлений каждый раз, когда вы его открываете. Когда вы закончите, нажмите OK и закройте предыдущее окно.
Вот и все. Вот как вы можете подключить Google Таблицы к MS Excel.
Читайте дальше: Дополнительные советы и рекомендации по работе с Excel.
 .
.
|
Синхронизация между xlsx и google sheets, как сделать? |
||||||||
Ответить |
||||||||
Ответить |
||||||||
Ответить |
||||||||
Ответить |
||||||||
Ответить |
||||||||
Ответить |
||||||||
Ответить |
||||||||
Ответить |
||||||||
Ответить |
||||||||
Ответить |
||||||||
Ответить |
||||||||
Ответить |
||||||||
Ответить |
||||||||
Ответить |
||||||||
Ответить |
||||||||
Ответить |
||||||||
Ответить |
||||||||
Ответить |
||||||||
Ответить |
||||||||
Ответить |
Google Sheets is a strong competitor with Microsoft Excel. Here, get the most useful, comprehensive instructions for how to open Excel documents in Sheets, and discover what you’ll need to know to migrate your data from Excel to Sheets.
Included on this page, you’ll find details on how to convert Excel documents to Google Sheets format, how to prepare your business to move from Excel to Google Sheets, and potential issues with opening Excel documents in Google Sheets.
If you have an Excel spreadsheet, but want to open it in Google Sheets, there are a few options.
How to Convert Excel Documents to Google Sheets Format
Converting an existing Excel spreadsheet into Google Sheets is a quick process. Follow the steps below.
-
Open Google Sheets. Click File, then click Import.
-
If the document is saved on your Google Drive, select it from the My drive, Shared with me, or Recent tab. If it’s on your hard drive, click Upload and follow the on-screen prompts to upload or drag and drop the document. Excel documents have an x; Sheets documents have two crossed lines.
-
On the Import file window, choose the option that works best, then click Import data. Here are the options:
- Create a new spreadsheet.
- Insert a new sheet into the current spreadsheet.
- Replace the current sheet with the contents of the imported sheet.
- Replace the current sheet with the imported sheet.
- Append the imported data to the current sheet.
- Replace the existing data in the currently selected cell.
-
Click Open now >> and you’re done.
Open the Document, but Keep It in Excel Format
-
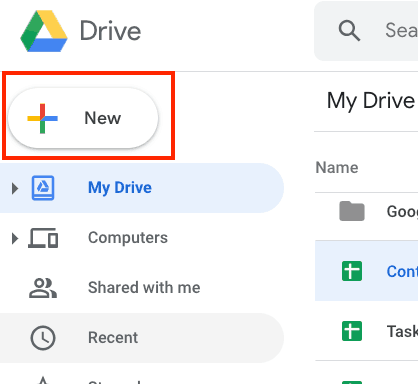
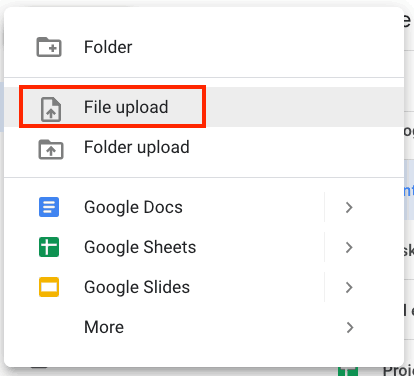
Open Google Drive in your browser. On the sidebar, click New.
-
Click File upload and navigate to the Excel document on your hard drive.
-
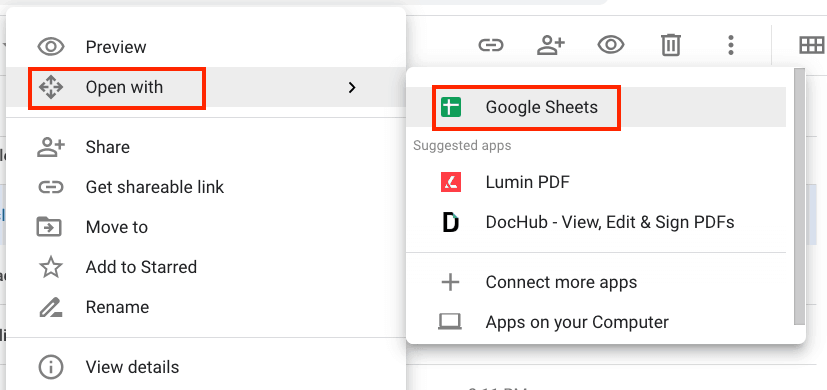
Right-click the new document. Click Open with, then click Google Sheets.
This action will allow you to work with the data, but the document will remain in Excel format, as indicated by the filename extension “.xlsx.”
-
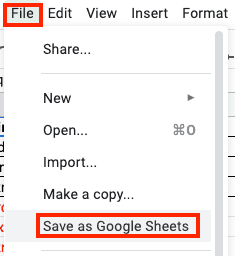
If you change your mind and want to open the document in the Sheets format, click File, then click Save as Google Sheets. Doing this will make a copy of the document, and both the Excel and Google Sheets versions will be saved in your Google Drive.
Open the Document as View-Only
Open Google Drive in your browser. On the sidebar, click New.
Click File upload and navigate to the Excel document on your hard drive.
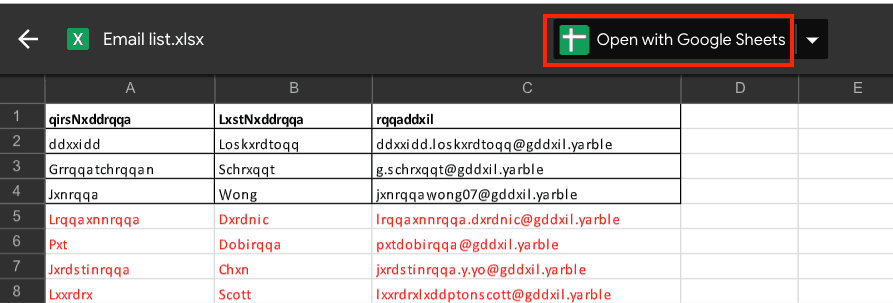
Once you’ve uploaded the file, double-click it to open it in Google Sheets. If you change your mind and want to edit the document, click the Open with Google Sheets button at the top.
Google Sheets Formulas Compared to Excel
While the process of importing Excel documents into Google Sheets is quick and easy, there are a few issues to be aware of due to the differences between the two programs.
- If the original spreadsheet has macros, you’ll have to recreate them in Google Sheets. Excel and Sheets use different scripting languages, so macros you create in one application won’t work in the other. Make a note of any macros and recreate them in the Sheets document.
- Excel uses some formulas that don’t have any equivalents in Sheets. Or, in cases in which the apps do share formula functions, the formulas themselves may still have different formats. Make a note of any formulas and verify that they work correctly in the Sheets document.
- Some text and cell formats may not transfer. Check the formatting of the Sheets version against that of the Excel version in order to verify.
- Password-protected files won’t transfer. Remove any password protection before attempting to open an Excel file in Sheets.
- Any charts created in Excel won’t transfer. You’ll have to recreate them in Sheets.
- Any links to any other Excel spreadsheets won’t work in Sheets after conversion.
- Pivot tables from Excel may not work in Sheets. Make a note of any pivot tables and verify that they work correctly in the Sheets document.
- The Excel-only features Power Pivot and Power Query won’t work in Sheets.
Why Change from Excel to Sheets?
Google has been adding features and functions to Sheets since the app’s launch, so the once-large gap between Sheets and Excel’s capabilities has narrowed greatly. Here are some reasons that users move away from Excel:
- Sheets is free and therefore easy to try.
- Sheets automatically saves documents.
- Sheets automatically saves previous versions, and it’s easy to revert to them.
- Because Sheets is cloud-based, the app makes it easy to share documents and collaborate.
- Sheets offers numerous add-ons that increase the app’s functionality.
- When you’re creating formulas, Sheets offers tips.
- Because Sheets is cloud-based, it also means that its documents’ formulas constantly pull data from websites.
Can You Convert Excel to Google Sheets Automatically?
There isn’t a program available to automate the process. If your goal is to move all your documents from Excel to Google Sheets (whether you’re doing a complete or staged migration), you’ll have to do or buy some custom programming.
Is There an Excel to Google Sheets Converter?
There isn’t a program available to automate the process. If this is your goal, you’ll have to perform or purchase some custom programming.
General Information about Spreadsheets
Spreadsheets are powerful tools that you can adapt to many uses — a wide variety of people, from financial professionals to creative artists, use spreadsheets. You can use spreadsheets for simple tasks, from to-do lists and personal budget tracking to more complex undertakings, like project planning and management, data analysis, chart creation, accounting (which uses complex formulas), billing, and invoice creation. Excel and Sheets are the two best-known spreadsheet programs. While they are similar in many ways, they each have their own strengths.
Features Common to Both Applications
Excel and Google Sheets share some of the most useful spreadsheet features. Here are the key ones:
- They both possess functions for simple operations like sums and complex operations like hex-to-decimal conversion.
- They both have macros to quickly repeat a series of actions.
- They both offer charts and graphs (e.g., line, pie, bar, area, scatter, histogram).
- They both offer the ability to collaborate and view changes made by others.
- They both give you the ability to comment and reply to comments.
- They both have pivot tables to assist in data analysis.
- They both have data sorting and filtering.
Benefits and Features of Google Sheets
Sheets is known for its ease of use and its built-in collaboration and sharing abilities (because it’s cloud-based). Here are some other things that Sheets does well:
- Provides a good introduction to new users
- Makes it easy to share a link in an email or a chat window
- Makes it easy to embed a document in websites and Google Suite apps (Slides and Docs)
- Does not require additional software because it’s browser-based
- Can open and convert Excel files and save to Google Drive
- Can prevent others from sharing
- Has three access levels for sharing (view, comment, edit)
- Makes it easy to collaborate with others
- Makes it easy to review and revert to previous versions
- Allows users to edit documents on any device
- Allows users to automatically import of data into Sheets
- Makes it easy to create charts, graphs, and summaries of statistics
- Allows real-time chat during collaboration
Benefits and Features of Excel
Even though Sheets has been catching up to Excel, there are still a few ways in which Excel is still superior. Here are some of those ways:
- The ability to see who made changes during collaboration
- The option to email documents as attachments
- The ability to apply per-document password protection
- The ability to easily create maps
How to Prepare Your Business to Move from Excel to Google Sheets
If you’ve decided to make Sheets your primary spreadsheet app, you’ll need to be aware of a few things. First and foremost, you must get a Google account and familiarize yourself with Google Drive. (Of course, if you’ve already checked out Sheets, you can skip this step.) In the next few sections, we’ll walk you through key things to note as you prepare for a move from Excel to Google Sheets.
Functionality You Will Lose When You Move from Excel to Google Sheets
Google Sheets doesn’t do everything that Excel does. While many people will be able to perform all the tasks they need to, there are a few limitations in Sheets. These include the following:
- Fewer options for charts and graphs
- No password protection for individual documents
- No ability to open pre-Windows 95 Excel spreadsheets
Functionality You Will Gain When You Move from Excel to Google Sheets
There are some ways in which Sheets is superior to Excel. Here are some examples:
- Sheets has better real-time collaboration tools.
- Sheets auto-saves to the cloud, so you’ll never lose work.
- Sheets can open the .xls (Office 95 and later), .xlsx, .xlsm, .xlt, .xltx, .xltm, .ods, .csv, .tsv, .txt, and .tab spreadsheet formats, which is a few more than Excel can.
- Chart, graph, and summary statistics appear instantly.
How to Import Excel to Google Calendar
If you have calendar data in Excel, you can move it into your Google Calendar by following the steps below:
-
In Excel, save the file as .csv.
-
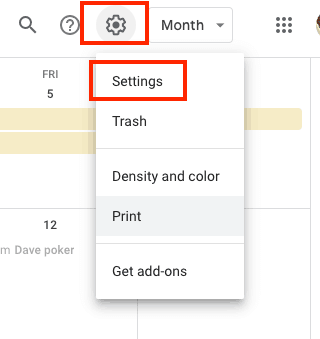
Open Google Calendar. In the upper-right-hand corner, click the Settings icon, then click Settings.
-
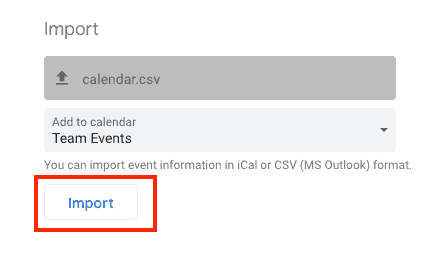
On the sidebar, click Import & export. From the dropdown menu, select the calendar you want to use, then click Select file from your computer, navigate to where the file is saved, and select it.
-
Click Import.
-
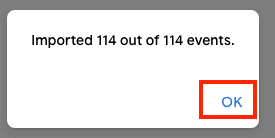
On the confirmation message, click OK, and you’re done.
Note: The calendar import process will not accept all .csv files. If you get an error message and can export the data from the source calendar in .ics format, try that instead.
Comparison of Functions: Google Sheets vs. Excel
When Google first launched Sheets, the app was way behind Excel in terms of the number of functions it offered. Over time though, Google Sheets caught up. It’s difficult to say which app is superior, because each one possesses some functionality that the other doesn’t. Moreover, the two apps have some features in common, but each uses different terminology for such shared elements. Here are the lists of functions for Excel and Sheets.
Moving from Google Sheets to Excel
Even if you’ve switched everything to Google Sheets, you may still need to save a document in Excel format (for example, if someone you work with refuses to use Sheets) or convert a document into Excel format. Follow the steps below.
- Click File, click Download as, and then click Microsoft Excel (.xlsx).
- Choose where to save the document and click Save.
For more detailed information, check out this article.
Frequently Asked Questions: Excel to Google Sheets
Can you convert Excel to Google Sheets?
Yes. Follow the steps above.
Can you export Excel to Google Sheets?
No, but you can open Google Sheets and import an Excel document. Follow the steps above.
Can you import Excel to Google Sheets?
Yes. Follow the steps above.
Can you open an .xlxs document in Google Docs?
You can open the document via Google Docs, but you’ll be switched to Sheets.
How do you upload an Excel spreadsheet to Google Drive?
While in Google Drive, click New, click File upload, and then navigate to the document. To see how to open or convert the Excel spreadsheet in Google Sheets, follow the steps above.
How do you link Excel to Google Sheets?
You can’t link them, but you can open an Excel spreadsheet in Google Sheets. Follow the steps above.
How do you save Excel to Google Sheets?
You can’t save spreadsheets from Excel in the Sheets format. But, you can convert them. Follow the steps above.
How do you convert Excel to Google Sheets in Drive?
Once you upload the Excel document to your Google Drive, right click it, click Open with, click Google Sheets, click File, and then click Save as Google Sheets.
How do you convert Excel to Google Sheets on an iPad?
- In the Sheets app on your iPad, tap the Menu icon in the upper-left-hand corner (three lines) and choose where the Excel document is stored. Then, tap the document to open it.
- Tap the More icon in the upper-right-hand-corner (three dots).
- Tap the Question mark next to “Office Compatibility Mode.”
- Tap Save as Google Sheets.
How do you copy an Excel spreadsheet with a formula to Google Sheets?
When you try to convert a spreadsheet with a formula from Excel to Sheets, it may work. However, the two applications do not share all formulas. After the conversion, verify that all formulas work as expected.
Use Spreadsheets to Drive Results with Real-Time Work Management in Smartsheet
Empower your people to go above and beyond with a flexible platform designed to match the needs of your team — and adapt as those needs change.
The Smartsheet platform makes it easy to plan, capture, manage, and report on work from anywhere, helping your team be more effective and get more done. Report on key metrics and get real-time visibility into work as it happens with roll-up reports, dashboards, and automated workflows built to keep your team connected and informed.
When teams have clarity into the work getting done, there’s no telling how much more they can accomplish in the same amount of time. Try Smartsheet for free, today.
Доброго времени суток!
Имеется аккаунт в гугле, с определёнными документами, в которых нужно работать.
При очень большом количестве данных вкладка с таблицами начинает лагать и тормозить до такой степени, что работать становится просто не выносимо.
Однако в офисе на самом компьютере при таких же объемах данных такой проблемы нет.
Вопрос: существует ли способы синхранизировать файл таблицы офиса от микрософта и гугла?
Желательно так, чтобы я даже не думал об этом, а всё происходило автоматически.
Если такого способа нет, то буду рад любым другим.
(Про CTRL-C CTRL-V можете не говорить).
Заранее спасибо.
-
Вопрос заданболее трёх лет назад
-
3227 просмотров
На данный момент реализованного решения нет, но можно попробовать совместными усилиями, так сказать, для грядущих поколений.
Можете как-то показать свои неполучившиеся попытки? Значения ячеек заданного диапазона Excel уже умеете в длинную строку сворачивать и в тело письма Outlook ее помещать? Если да, то уже полдела сделано! На стороне Google я потом помогу.
На данный момент реализованного решения нет, но можно попробовать совместными усилиями, так сказать, для грядущих поколений.
Можете как-то показать свои неполучившиеся попытки? Значения ячеек заданного диапазона Excel уже умеете в длинную строку сворачивать и в тело письма Outlook ее помещать? Если да, то уже полдела сделано! На стороне Google я потом помогу. Gustav
На данный момент реализованного решения нет, но можно попробовать совместными усилиями, так сказать, для грядущих поколений.
Код отправки excel в теле письма нашёл!))) Теперь осталось вытянуть в таблицу. )))
Sub Mail_Selection_Range_Outlook_Body()
‘For Tips see: http://www.rondebruin.nl/win/winmail/Outlook/tips.htm
‘Don’t forget to copy the function RangetoHTML in the module.
‘Working in Excel 2000-2016
Dim rng As Range
Dim OutApp As Object
Dim OutMail As Object
Set rng = Nothing
On Error Resume Next
‘Only the visible cells in the selection
Set rng = Selection.SpecialCells(xlCellTypeVisible)
‘Тут указываем лист и диапазон
Set rng = Sheets(«название листа»).Range(«E41:S190»).SpecialCells(xlCellTypeVisible)
On Error GoTo 0
If rng Is Nothing Then
MsgBox «The selection is not a range or the sheet is protected» & _
vbNewLine & «please correct and try again.», vbOKOnly
Exit Sub
End If
With Application
.EnableEvents = False
.ScreenUpdating = False
End With
Set OutApp = CreateObject(«Outlook.Application»)
Set OutMail = OutApp.CreateItem(0)
With Application
.EnableEvents = True
.ScreenUpdating = True
End With
Set OutMail = Nothing
Set OutApp = Nothing
End Sub
Function RangetoHTML(rng As Range)
‘ Changed by Ron de Bruin 28-Oct-2006
‘ Working in Office 2000-2016
Dim fso As Object
Dim ts As Object
Dim TempFile As String
Dim TempWB As Workbook
TempFile = Environ$(«temp») & «» & Format(Now, «dd-mm-yy h-mm-ss») & «.htm»
‘Publish the sheet to a htm file
With TempWB.PublishObjects.Add( _
SourceType:=xlSourceRange, _
Filename:=TempFile, _
Sheet:=TempWB.Sheets(1).Name, _
Source:=TempWB.Sheets(1).UsedRange.Address, _
HtmlType:=xlHtmlStatic)
.Publish (True)
End With
‘Close TempWB
TempWB.Close savechanges:=False
‘Delete the htm file we used in this function
Kill TempFile
Set ts = Nothing
Set fso = Nothing
Set TempWB = Nothing
End Function
Источник
Перенос данных из Excel в Google Таблицы и наоборот
Импорт из Excel
В меню Файл выберите пункт Импорт:
Затем перейдите на вкладку Загрузка, нажмите на единственную кнопку Выберите файл на компьютере или перетащите иконку с файлом в это окно:
После того как вы выберете или перетащите файл, появится следующее окно импорта:
В первом случае (Создать таблицу) появится новый документ, во втором (Вставить лист(ы)) — новые листы в текущем документе, а в третьем все данные в текущем документе будут заменены на данные из импортированного файла Excel.
После того как вы выберете подходящий вариант, нажмите кнопку Импортировать.
Экспорт в Excel
Чтобы сохранить таблицу на локальный диск в формате Excel, проделайте следующий путь:
Файл → Скачать как → Microsoft Excel (XLSX)
Книга сохранится на ваш локальный диск.
Обратите внимание, что при экспорте в Excel не сохранятся изображения, которые вы загрузили с помощью функции IMAGE, а результаты работы функций, которых нет в Excel, сохранятся — но как значения. Это касается, например, функций SPLIT, IMPORTRANGE и других функций импорта (IMPORTXML, IMPORTDATA, IMPORTHTML), UNIQUE и COUNTUNIQUE, QUERY, REGEXEXTRACT, GOOGLEFINANCE.
Функции SPARKLINE превратятся в обычные спарклайны Excel.
Отсутствующие в Excel функции при экспорте превращаются в ЕСЛИОШИБКА (IFERROR), где в качестве первого аргумента будет запись вида __xludf.DUMMYFUNCTION (функция), которая и выдаст ошибку в Excel, а в качестве второго аргумента — то значение, которое возвращала эта функция в момент экспорта.
Регулярно публикуем новые кейсы и советы. Заглядывайте в гости:
Источник
Как перенести Excel в Google Таблицу: пошаговая инструкция
Если требуется перенести таблицу Excel в Google Таблицы, то это можно сделать двумя способами, описанными ниже.
Перенос Excel в Google Таблицу (Способ №1)
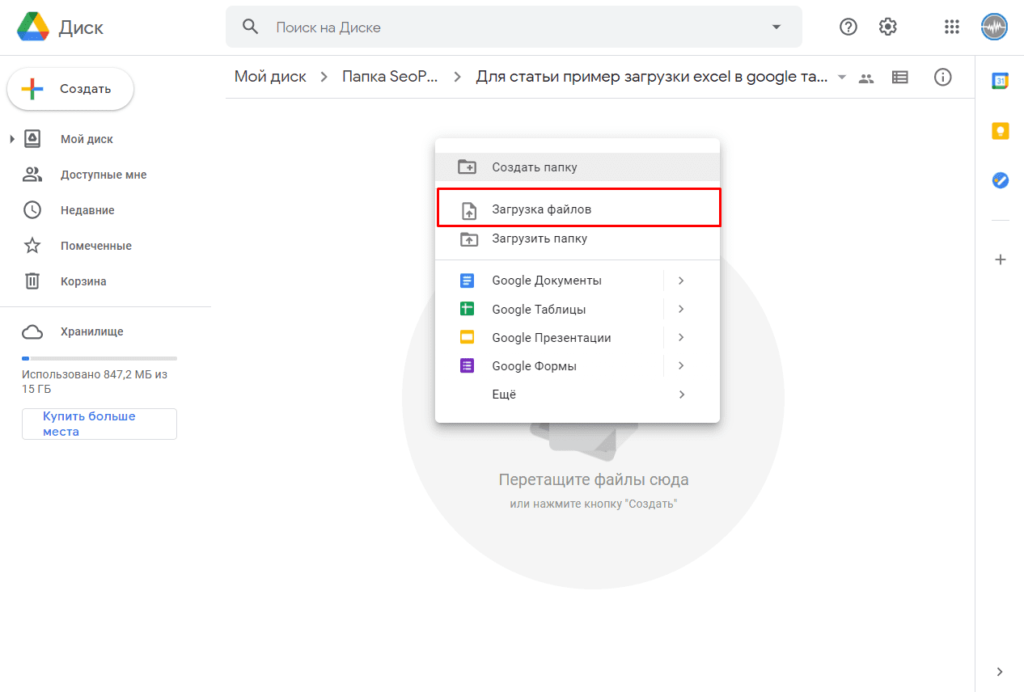
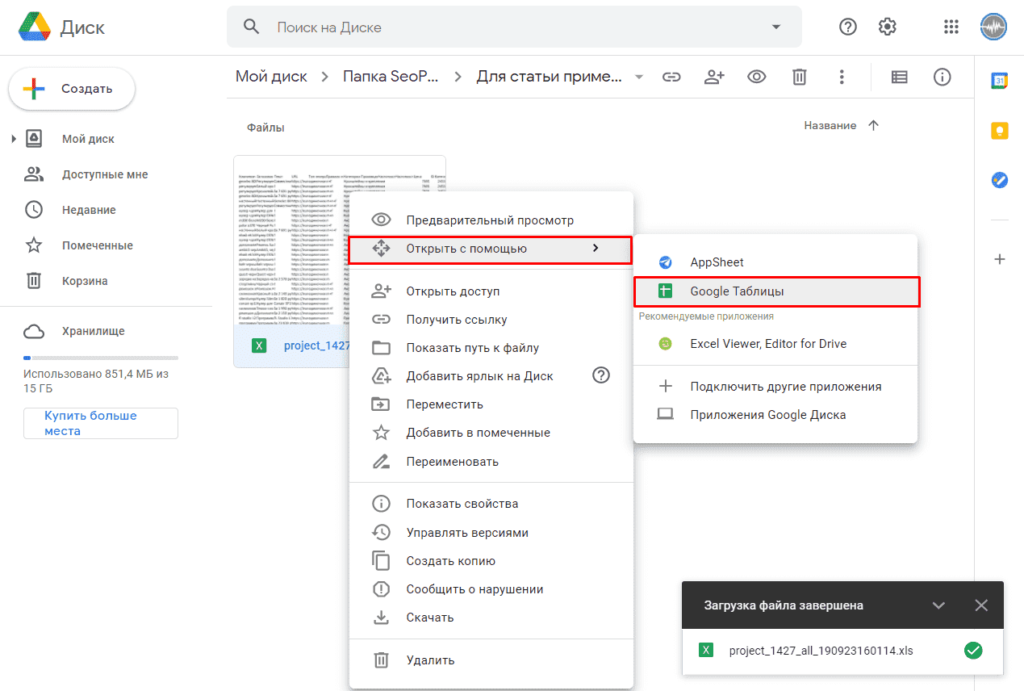
Для переноса таблицы с несколькими заполненными листами, формулами, значениями и другими данными достаточно перейти в Google Диск после чего кликнуть правой клавишей мыши в любом месте экрана после чего в выпавшем списке выбрать «Загрузка файлов».
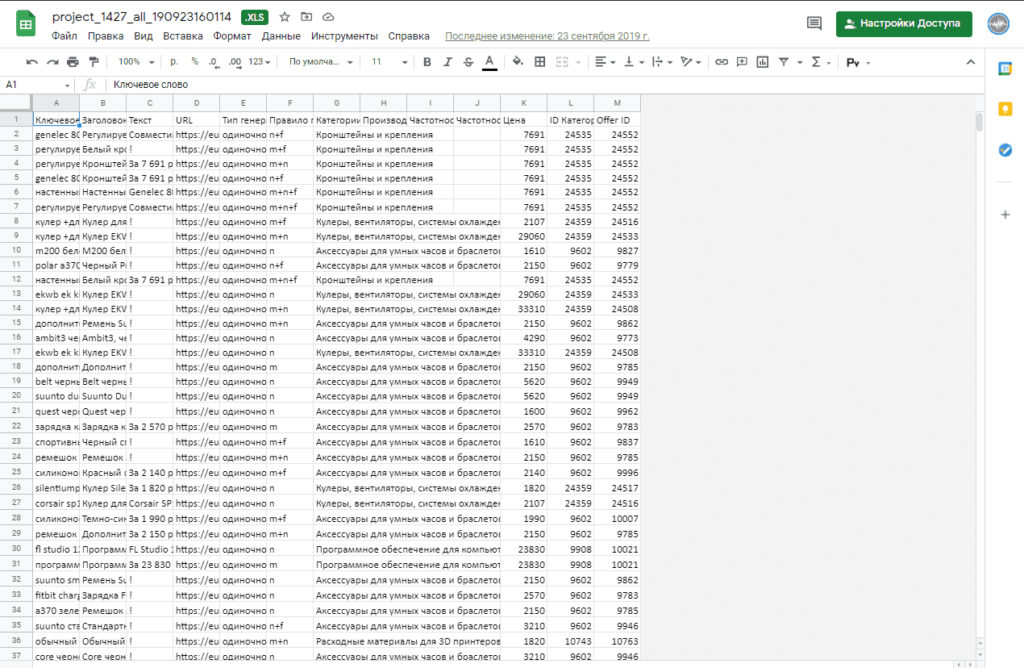
После загрузки можно открыть файл при помощи Google Таблиц.
Все готово, файл полностью перенесен.
Второй способ
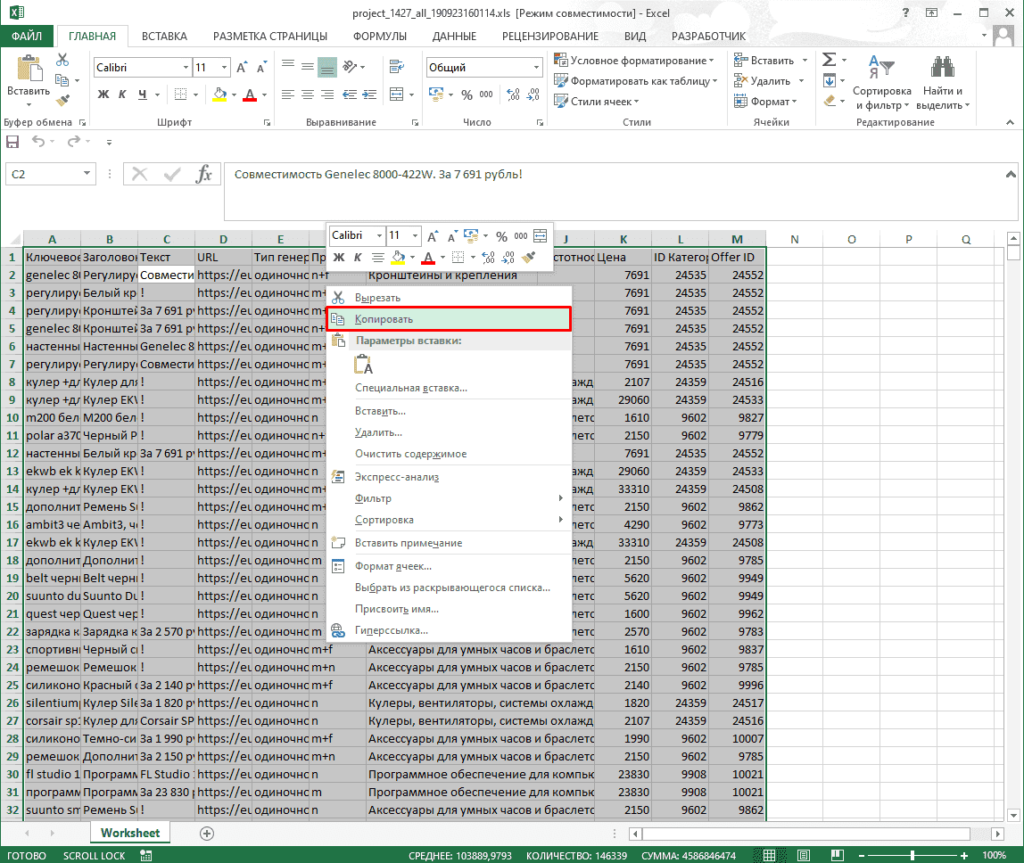
Для этого открываем нужный файл Excel и копируем таблицу.
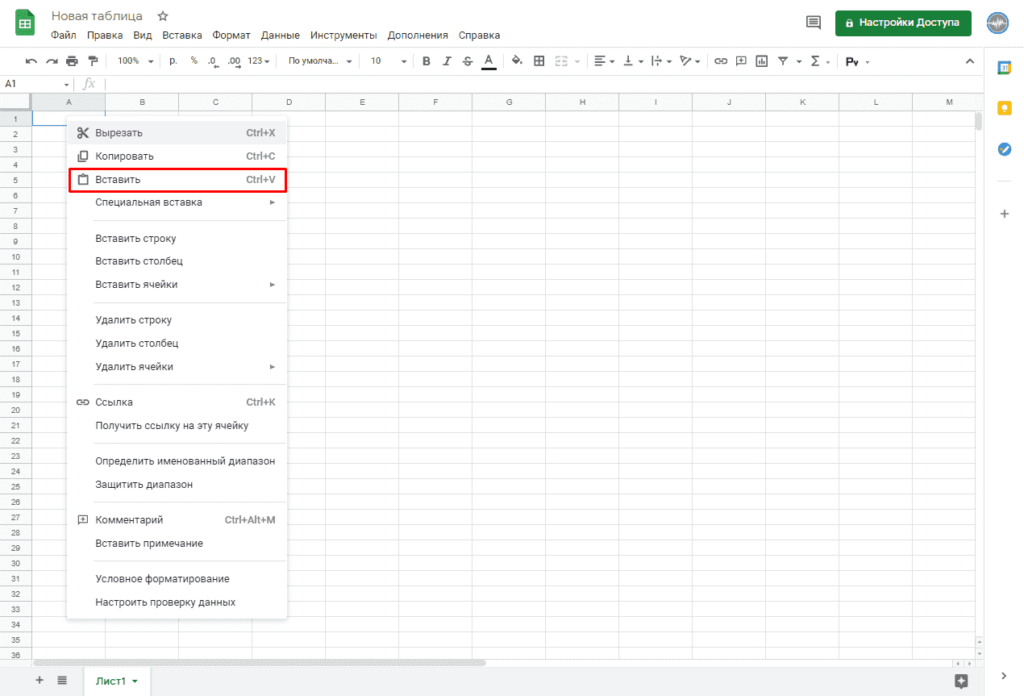
После открываем Google Таблицу и кликаем правой клавишей мыши и в списке выбираем «Вставить».
Все готово таблица перенесена.
Важно! В этом случае каждый лист придется переносить отдельно.
Важно! При использовании второго способа формулы не будут перенесены, а лишь в виде значений.
Источник
4 способа конвертировать Excel в Google Таблицы
Если вы работали с данными в Excel и поняли, что хотите использовать функции или сценарии Google Таблиц, преобразовать файлы из Excel в Google Таблицы довольно просто.
Однако есть несколько способов сделать это в зависимости от формата исходных данных. Процесс зависит от того, сохранена ли электронная таблица Excel в формате CSV, стандартном формате Excel или уже содержит какие-либо сценарии.
В этой статье мы рассмотрим четыре способа преобразования файлов Excel в электронную таблицу Google Sheets.
1. Самый простой: конвертируйте Excel в Google Таблицы с помощью копирования и вставки.
Если вам нужно только преобразовать данные из Excel в Google Таблицы и у вас нет каких-либо сложных функций или скриптов в фоновом режиме, достаточно простого копирования и вставки данных.
Это заполнит лист всеми данными, которые вы скопировали из электронной таблицы Excel. Это так просто.
2. Из файла Excel: просто откройте файл Excel напрямую.
В Google Таблицах просто выполните следующие действия, чтобы открыть файл Excel напрямую.
Вы заметите, что при использовании этого подхода для преобразования Excel в Google Sheets происходит несколько вещей.
3. Импорт CSV: импорт непосредственно из файла CSV.
Вы можете импортировать прямо из файла Excel, сохраненного в формате CSV. Однако вам нужно знать, как файл разделен; разделены ли они табуляцией или запятыми, или каким-либо другим символом.
Использование функции импорта
Выполните ту же процедуру, описанную выше, но когда вы выберете файл CSV, вы увидите окно, в котором можно выбрать форматирование файла и способ преобразования данных электронной таблицы в электронную таблицу Google Sheet.
Вы также можете настроить, хотите ли вы открывать данные в новой электронной таблице, заменять текущий лист или добавлять к текущему листу. Также настройте, хотите ли вы, чтобы текст из файла CSV преобразовывался в соответствующий тип данных (числа, даты и формулы).
После настройки параметров преобразования выберите «Импортировать данные», чтобы перенести данные файла CSV в электронную таблицу Google Таблиц.
Использование функции IMPORTDATA
Другой подход к вводу данных из файла Excel, сохраненного в формате CSV, — использование функции IMPORTDATA в Google Таблицах.
У этого подхода есть одна загвоздка. Файл должен храниться на веб-сервере в Интернете и доступен по прямой ссылке. Например, Бюро переписи предоставляет множество файлов данных в формате CSV, таких как общие данные о населении по штатам, по следующей ссылке:
Вы можете импортировать данные прямо из такого CSV-файла в электронную таблицу Google Sheets с помощью функции IMPORTDATA.
Это скопирует все исходные данные в новую статическую электронную таблицу в Google Таблицах.
4. Открыть с помощью: открыть файл после загрузки.
Есть еще один способ конвертировать Excel в Google Таблицы. Это работает независимо от того, сохранен ли файл в формате CSV или XLSX.
Щелкните файл правой кнопкой мыши и выберите Открыть с помощью, затем выберите Google Таблицы.
Это преобразует электронную таблицу и откроет ее в новую электронную таблицу в Google Таблицах.
Преобразование Excel в Google Таблицы
Как видите, есть несколько способов перенести данные электронной таблицы Excel в Google Таблицы. Выбранный вами подход зависит от формат исходного файла, и какая процедура кажется вам наиболее удобной.
Источник
Как синхронизировать несколько таблиц или листов в Google Sheets
Все еще переносите данные вручную? Автоматизируйте процесс — сэкономьте свое время!
Какая польза от синхронизации таблиц
Табличная структура как нельзя лучше подходит для хранения и обработки данных. В ячейках удобно работать практически с чем-угодно, будь то финансовые показатели, контакты клиентов или статистика по посетителям сайтов. Неудивительно, что сервисы онлайн-таблиц вроде Google Sheets так популярны в бизнесе и многих других областях, завязанных на обработке информации.
Тем не менее при работе с таблицами приходится выполнять огромное количество однотипных действий. На поиск, копирование и вставку данных может уходить масса времени. Особенно, когда работа ведется с большим количеством таблиц.
Синхронизация позволит автоматизировать значительную часть рутины. Вы можете связать несколько таблиц или листов и настроить их так, чтобы робот передавал между ними необходимые данные вместо вас. Машина будет находить, копировать и вставлять числа или текст самостоятельно.
Допустим, у вас есть онлайн-магазин и все заказы добавляются в одну сводную таблицу. Для руководителя это удобно, поскольку можно наблюдать общую картину целиком. Но менеджерам по продажам проще работать только с теми категориями товаров, за которыми они закреплены. Поэтому разумно создать отдельную таблицу для каждого менеджера и копировать туда только необходимые ему данные. Вот тут-то вас может выручить автоматизация: робот справится с такой работой быстрее и дешевле, чем любой человек.
Как синхронизировать таблицы с помощью ApiX-Drive
Чтобы синхронизировать таблицы, не нужно уметь программировать. Достаточно воспользоваться онлайн-коннектором ApiX-Drive. Это система, которая позволяет легко и быстро настраивать обмен данными между разными сервисами. В том числе ApiX-Drive поддерживает Google Sheets.
Коннектор способен автоматически передавать данные из выбранной в любую другую таблицу или множество таблиц. Или даже из выбранного листа в другие листы текущей таблицы. Работает это так: каждый раз, когда добавляется новая строка, робот копирует ее в указанные листы или таблицы.
Причем вы можете выбирать, какие именно данные передавать. Например, строку целиком, только ячейки из определенных столбцов или ячейки, которые содержат заданные ключевые слова.
Вдобавок ApiX-Drive умеет не только передавать данные, но и автоматически обрабатывать их на лету. Так, система может выполнять математические операции. Например, увеличивать цифры на заданное число или конвертировать валюты. Также коннектор способен форматировать передаваемые данные: менять регистр, удалять лишние символы и так далее. Так что информация попадает не просто в нужное место, но и в нужном виде.
Таким образом, ApiX-Drive — это простая, но в то же время функциональная система, которую можно настроить под самые разные нужды.
Настройка синхронизации таблиц Google Sheets
Процесс синхронизации между двумя таблицами/листами проходит в несколько этапов. Сначала надо зарегистрироваться на сайте ApiX-Drive. Далее — подключить к нему сначала таблицу/лист-источник и выбрать подходящие настройки. Затем нужно сделать то же самое с таблицей/листом-приемником. После этого коннектор создаст между источником и приемником связь и вам останется только запустить процесс передачи данных.
При необходимости точно так же можно подключить к приемнику другие таблицы или листы, чтобы данные передавались в несколько приемников сразу.
Создание новой связи в ApiX-Drive
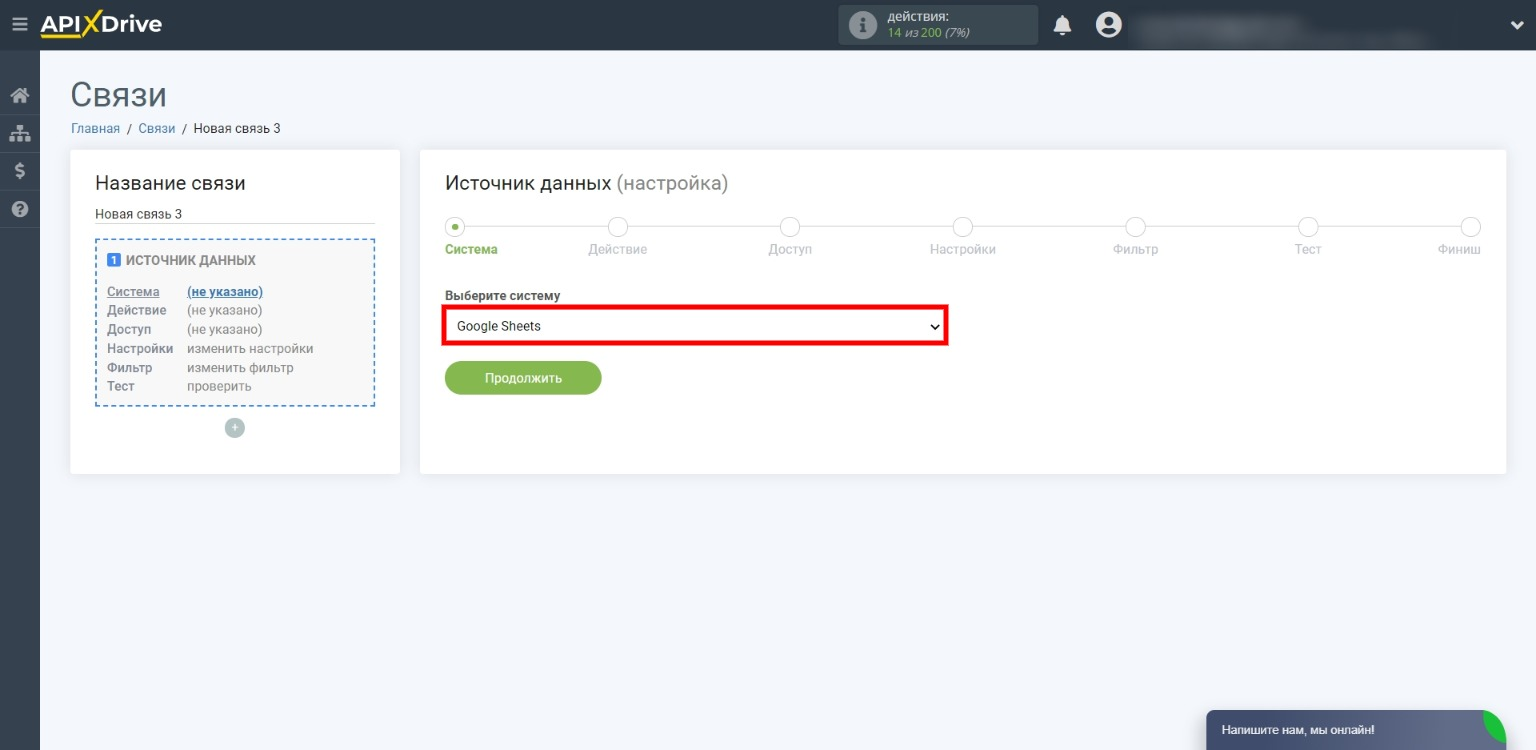
Зарегистрируйтесь на сайте коннектора и войдите в личный кабинет. Затем нажмите «Создать связь».
Настройка источника данных
Выберите в качестве источника Google Sheets и пройдите все шаги настройки, которые отображаются на шкале сверху. В процессе нужно будет выбрать конкретную таблицу и лист, откуда коннектор будет копировать данные. Если вдруг у вас возникнут трудности, можете взглянуть на подробную инструкцию в справке ApiX-Drive.
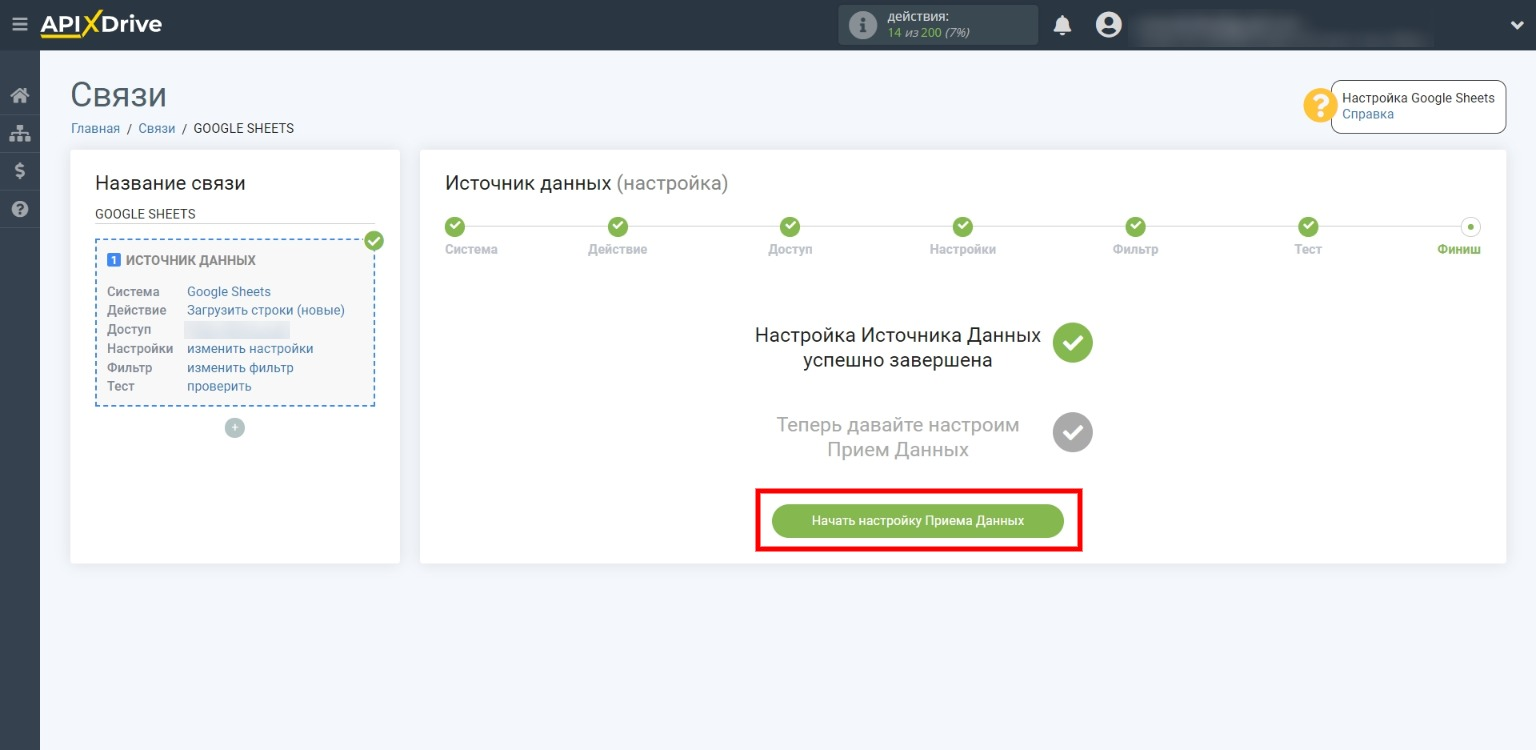
Когда увидите надпись «Настройка Источника Данных успешно завершена», кликните «Начать настройку Приема Данных».
Настройка приемника данных
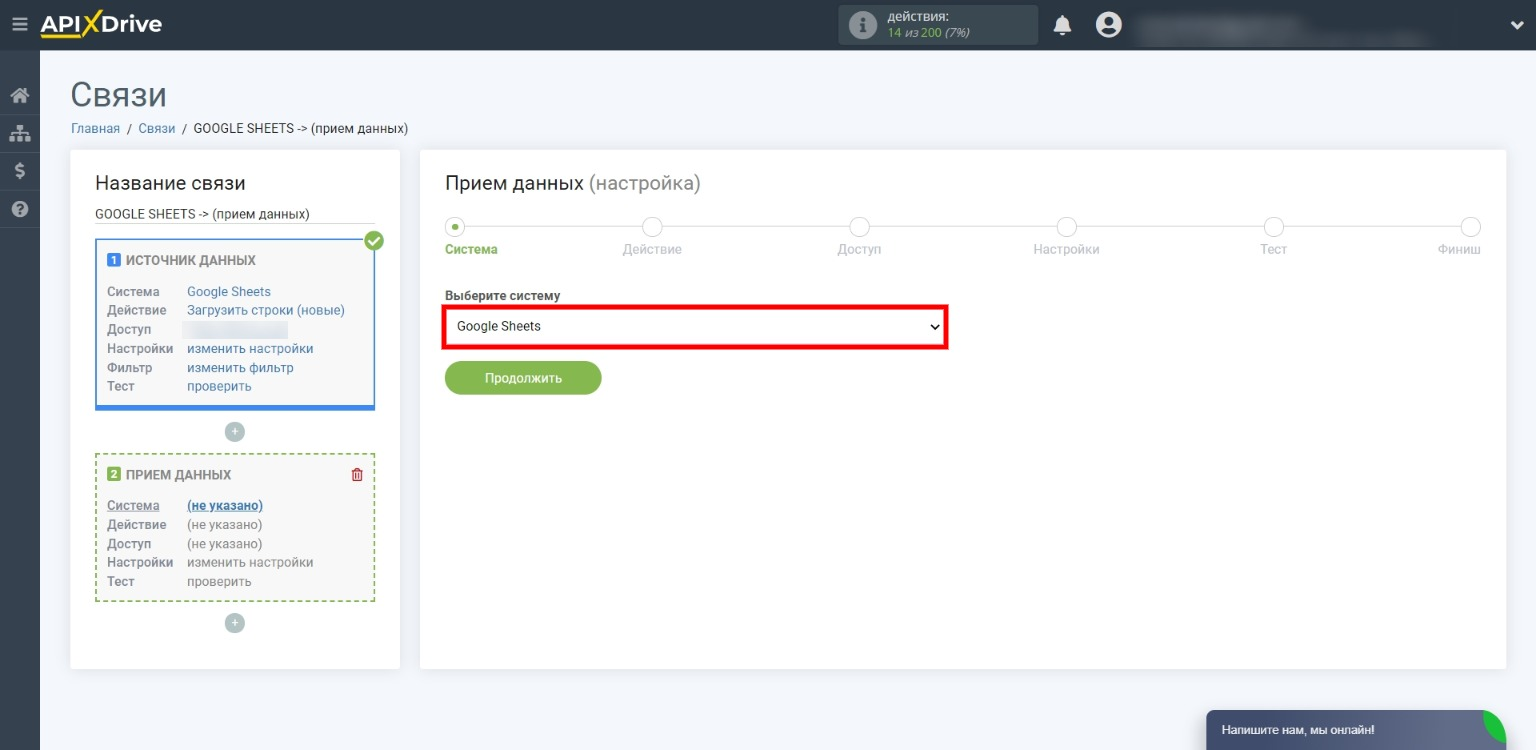
Выберите в качестве приемника Google Sheets и завершите оставшиеся этапы настройки, которые перечислены сверху. От вас потребуется выбрать конкретную таблицу и лист, куда ApiX-Drive будет передавать данные. Если столкнетесь с трудностями, поможет подробная инструкция в справке.
Запуск настроенной связи
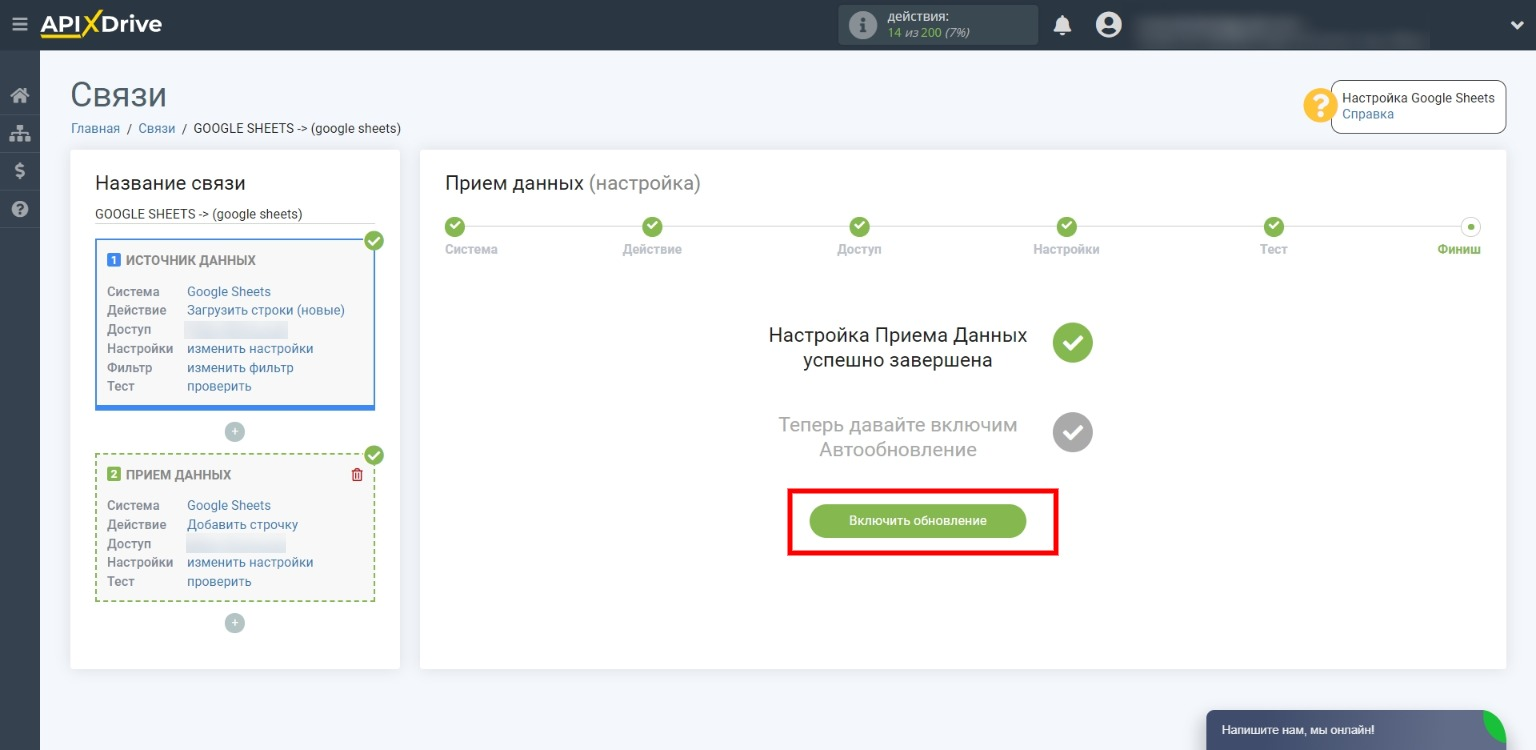
Когда на экране появится надпись «Настройка Приема Данных успешно завершена», нажмите «Включить обновление», чтобы запустить связь.
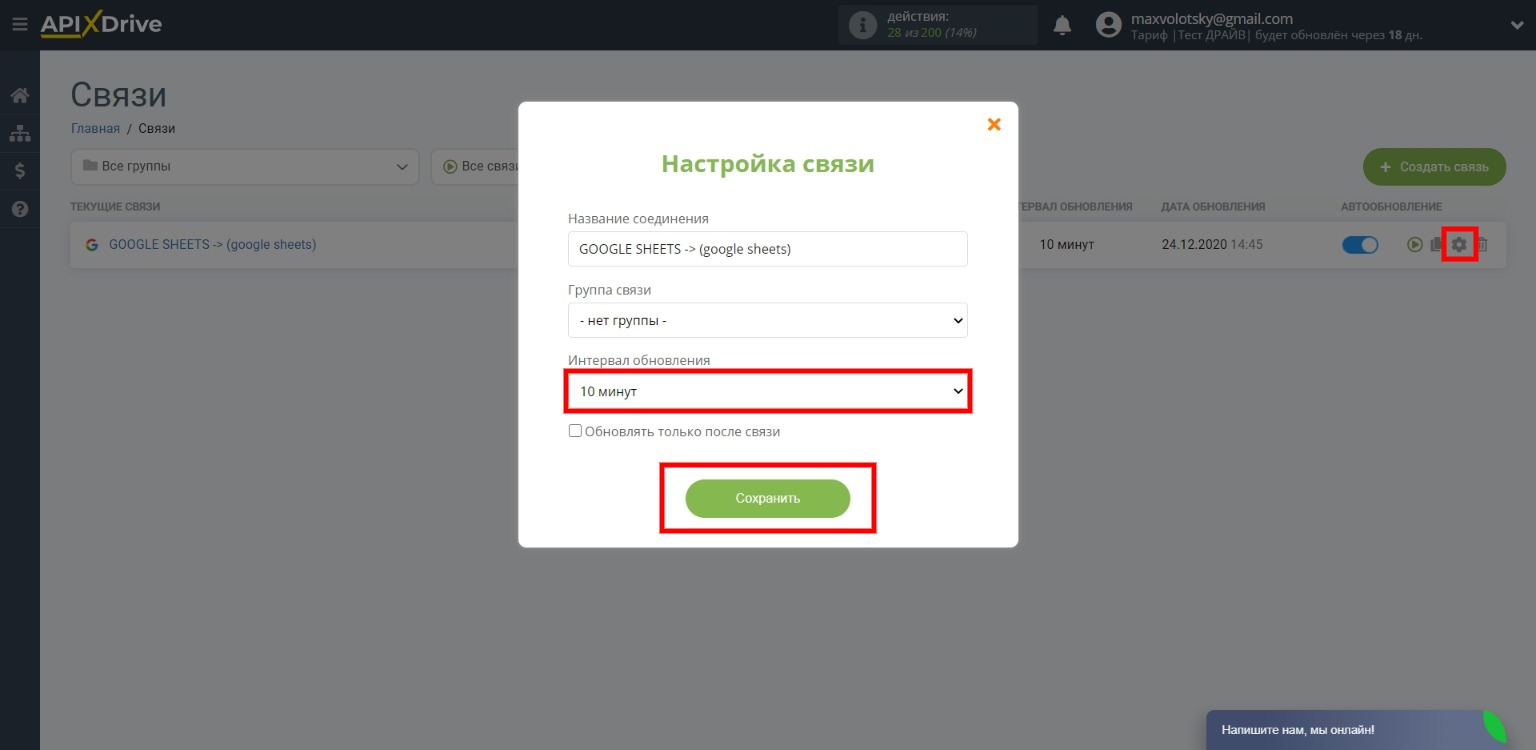
Теперь кликните по шестеренке, выберите подходящий интервал, с которым будут передаваться данные, и нажмите «Сохранить».
Вот и все. ApiX-Drive будет копировать данные из выбранных таблицы и листа в другой лист этой же или отдельной таблицы — смотря какие настройки вы указали.
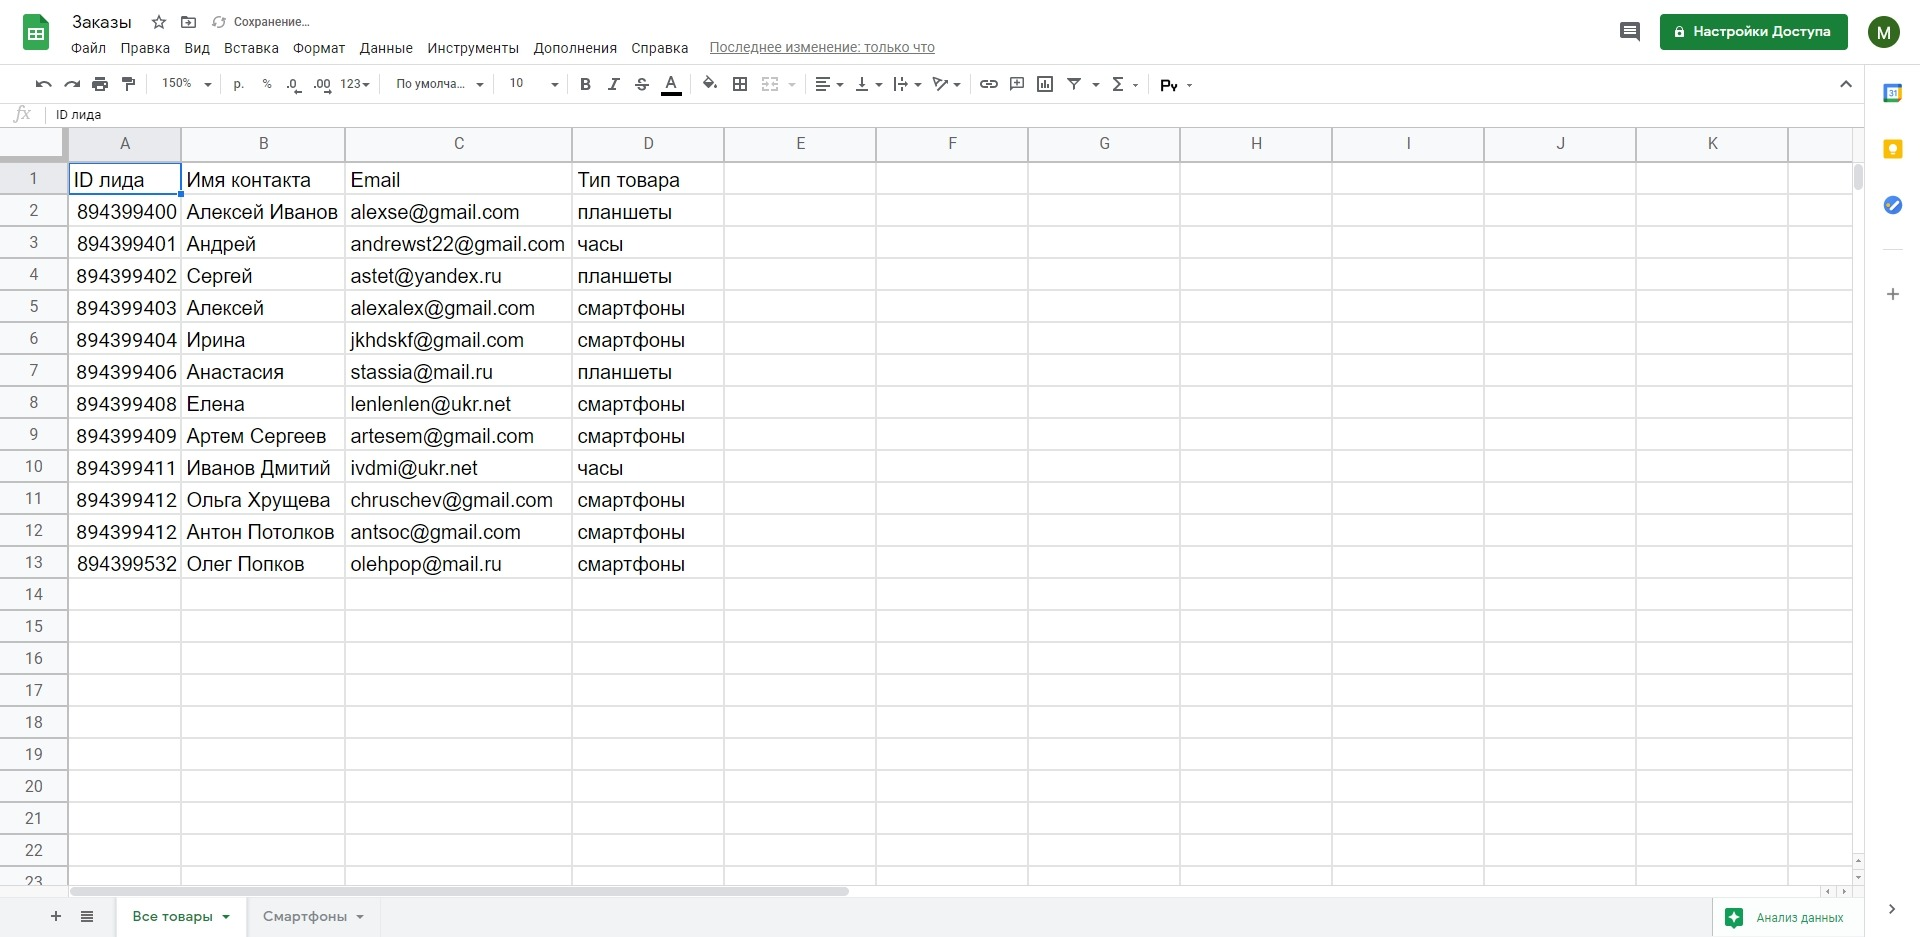
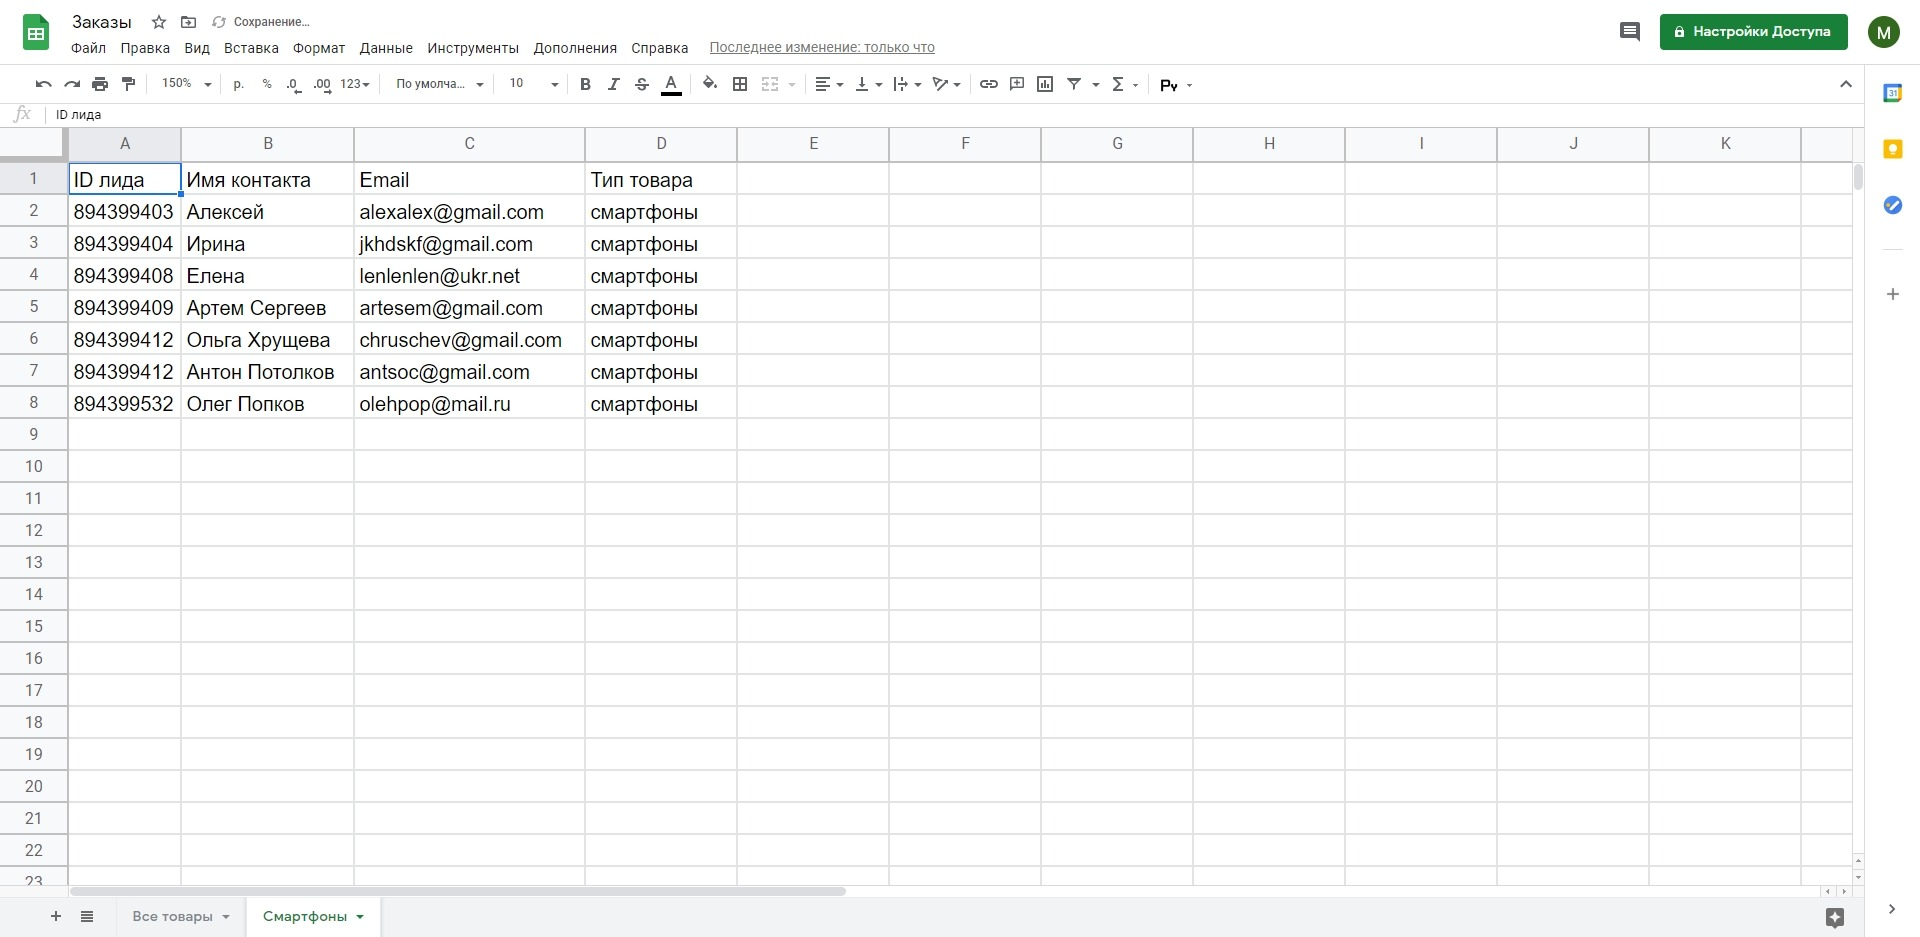
Для примера мы синхронизировали два листа одной таблицы. Данные передаются из листа «Все товары» в лист «Смартфоны». Причем в настройках мы включили фильтрацию: передаются только заказы по смартфонам.
Кстати, настраивать фильтры можно не только при создании связей, но и в уже готовых интеграциях. Для этого нужно кликнуть на связь в личном кабинете и нажать «настроить фильтр» в блоке «Источник данных». В следующем окне вы сможете добавить новые условия фильтрации или отредактировать уже добавленные.
Добавление других листов/таблиц в качестве приемников
Если нужно, чтобы ApiX-Drive передавал данные сразу в несколько листов одной или множества таблиц, можете добавить их в качестве новых приемников. Для этого достаточно открыть настроенную связь, нажать на плюс на левой панели и настроить новые приемники аналогично первому.
Еще не настроили синхронизацию? Регистрируйтесь на сайте ApiX-Drive и добавьте новую связь для своей таблицы. Это просто. Наш коннектор готов поработать на благо вашего бизнеса.
Источник
Adblock
detector
Today, even after 30+ years since its launch, Excel is one of the most popular Spreadsheet tools, especially in the business world. Thousands of companies leverage this Microsoft product to maintain their Data Records and create Data Visualization. However, in the last decade, Google Spreadsheet’s popularity is also on the rise. This Cloud-based tool offers huge scalability and flexibility to users which were absent in the traditional Excel software.
Google Spreadsheets and Excel both have their benefits and restrictions. However, companies are looking to combine both of these tools to obtain maximum benefits for their Data Management tasks. Businesses can Sync Excel to Google Sheets to enhance their Sales Records and create vivid Charts for various teams.
This article will introduce you to Excel and Google Sheets along with their key features. It will also provide a step-by-step explanation for you to sync Excel to Google Sheets. Read along to understand the steps and benefits of connecting these 2 tools!
Prerequisites
To Sync Excel to Google Sheets, you must have:
- A Gmail account.
- Data present in Google Sheets.
- An Excel account.
What is Excel?
Excel is one of the most popular traditional spreadsheet tools used by businesses worldwide. Microsoft launched Excel in the year 1985 intending to assist businesses in compiling their data related to finances, yearly credit & debit, taxes, etc.
It facilitates complex statistical & mathematical computations, graphs & tables, and custom coding. Moreover, Excel allows you to integrate with popular external software easily and import data from various sources directly. Companies rely heavily on Excel and have vast data volumes accumulated over the years. Furthermore, Excel finds applications for tasks involving stock analysis, budgeting, organizing client lists, and many more.
Key Features of Excel
The following features make Excel a popular choice for businesses:
- Easy Arithmetic Solutions: Excel, with its rich collection of formulae, can execute arithmetic operations at a massive scale. Moreover, you can easily re-do a complex calculation in case a value is changed. This feature is useful for companies in managing yearly sales and other such long-term data.
- Formatting Options: Excel offers various formatting techniques such as italics, highlights, custom coloring, etc. This way businesses can distinguish their valuable data from the rest of the information. For example, you can use row highlighting to mark specific data in the Accounting Sheets.
- Availability of Online Access: Excel, being a tool of the Office 365 Productivity Suite, allows business teams to access their files over the cloud network seamlessly. Moreover, with a working internet connection, you can access and modify your Excel sheets remotely using your PC, mobile, tablet, etc.
- Charts for Analysis: Excel enables you to design comprehensive data charts in a hassle-free manner. Once your data passes through the filtering process, you can create a Pie Chart or Clustered Columns with just a few clicks. Furthermore, you can even customize the colors & boundaries of your charts to make them more appealing and elegant.
To learn about Excel in more detail, visit here.
What is Google Sheets?
Google Sheets is an online tool that offers you the services of a spreadsheet over the Cloud. Google Sheets due to its Cloud support provides high scalability and flexibility as compared to traditional tools. Moreover, it offers numerous functionalities that allow you to perform complex data management tasks in no time.
This Google product provides you with services to create, format, manage, and collaborate data & you can even access, edit, and even collaborate on Excel files directly from Google Sheets using the Office editing tool. Furthermore, this tool is easily compatible with most popular browsers including Google Chrome, Mozilla Firefox, Internet Explorer, Apple Safari, etc.
Key Features of Google Sheets
Google Sheets provide you with the following unique features:
- Easy Access: Since Google Sheets operate using Cloud, you can easily access the data stirred in its sheets from anywhere around the world. Moreover, all the popular operating systems come with an integrated Google Sheets connection. This way you do not have to indulge in any complex installation process.
- Free: Google Sheets is free for all Gmail users and its access is directly associated with your Gmail ID. Therefore, you don’t have to shell out any extra cost to store and modify your data in Google Sheets.
- Small Learning Curve: Google Sheets shares a basic design with Excel Sheets. So if you are familiar with the features & functions of Excel Sheets, working with Google Sheets will be a cakewalk.
- Integrations: Google Sheets offers you easy integrations with external software via plug-ins, add-ons, and even custom codes. This way you can extend the functionality of Sheets to further increase their Data Analysis capabilities.
To learn more about Google Sheets, visit here.
Using manual scripts and custom code to move data into the warehouse is cumbersome. Frequent breakages, pipeline errors, and lack of data flow monitoring make scaling such a system a nightmare. Hevo’s reliable data pipeline platform enables you to set up zero-code and zero-maintenance data pipelines that just work.
Reliability at Scale – With Hevo, you get a world-class fault-tolerant architecture that scales with zero data loss and low latency.
Monitoring and Observability – Monitor pipeline health with intuitive dashboards that reveal every stat of pipeline and data flow. Bring real-time visibility into your ELT with Alerts and Activity Logs
Stay in Total Control – When automation isn’t enough, Hevo offers flexibility – data ingestion modes, ingestion, and load frequency, JSON parsing, destination workbench, custom schema management, and much more – for you to have total control.
24×7 Customer Support – With Hevo you get more than just a platform, you get a partner for your pipelines. Discover peace with round-the-clock “Live Chat” within the platform. What’s more, you get 24×7 support even during the 14-day full-featured free trial.
Transparent Pricing – Say goodbye to complex and hidden pricing models. Hevo’s Transparent Pricing brings complete visibility to your ELT spend. Choose a plan based on your business needs. Stay in control with spend alerts and configurable credit limits for unforeseen spikes in the data flow.
Get started for Free with Hevo!
To Sync Excel to Google Sheets, you can export your data from Google Sheets in the form of a table and store it in Excel using the following steps:
- Step 1: Export Data from Google Sheets
- Step 2: Transfer Data to Excel
- Step 3: Automate the Process to Sync Excel to Google Sheets
Step 1: Export Data from Google Sheets
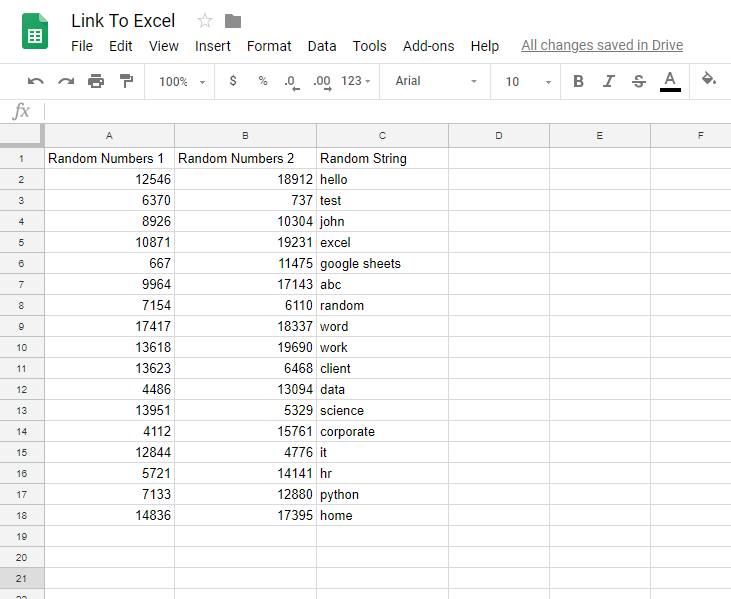
To sync Excel to Google Sheets, login to your Google Sheets and decide on the data that you wish to export. For instance, in this example, you will work on 3 data columns and sync Excel to Google Sheets. The data columns are shown in the below image.
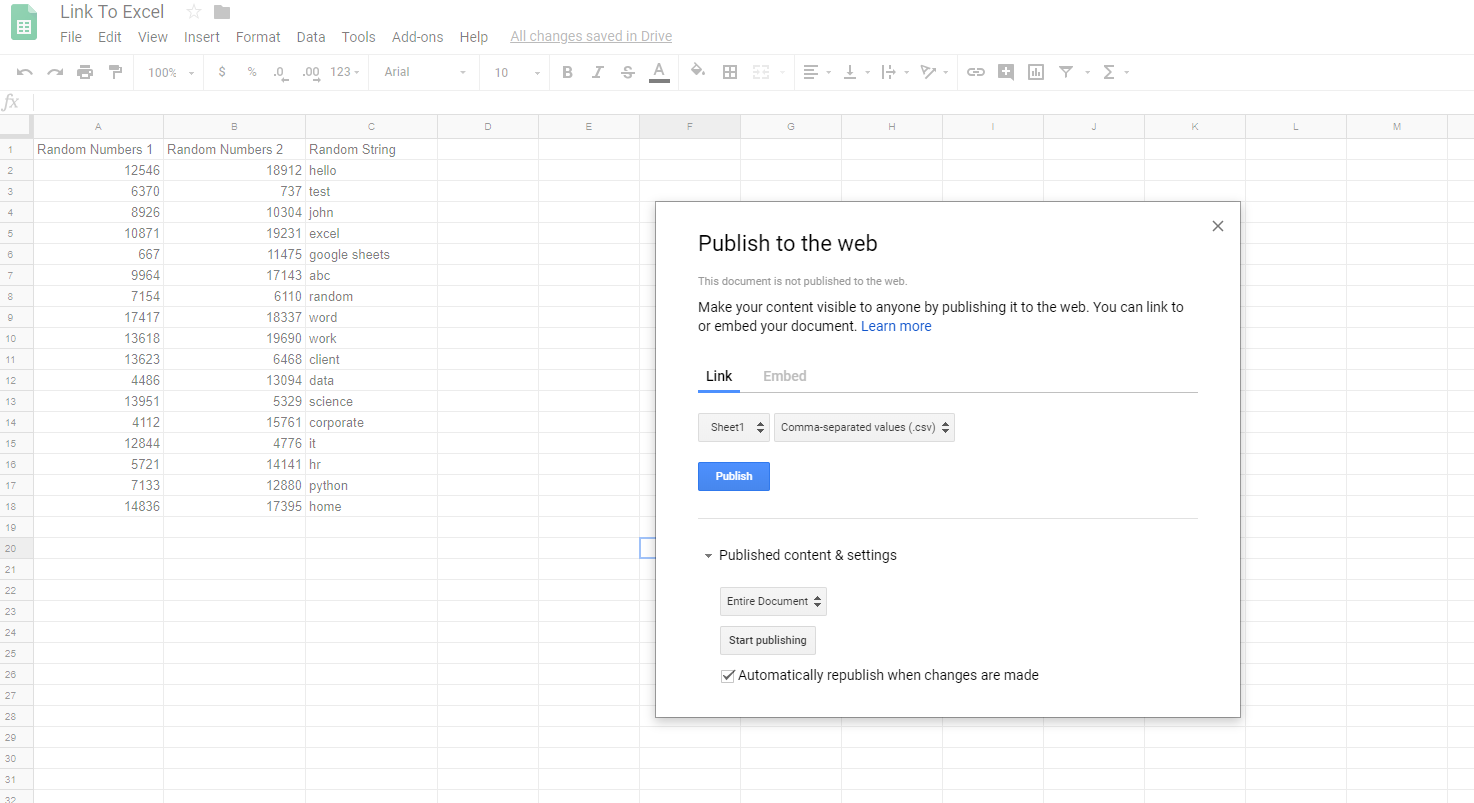
Now, go to the top left section of your screen and click on File. Now, select Publish to the web and click on Link. Now select the Sheet containing the transferable data and choose the Comma-separated values (.csv) as the export format.
Next, open the Published content & settings and tick the Automatically republish when changes are made checkbox. Afterward, click the Publish button as shown in the below image.
You will now get a link to the CSV file. Copy the link as it is required in the next step to sync Excel to Google Sheets. (if done correctly the very end of the link should be =csv)
Note that, the link updates automatically every 5 minutes. So you can make real-time changes to your data.
Step 2: Transfer Data to Excel
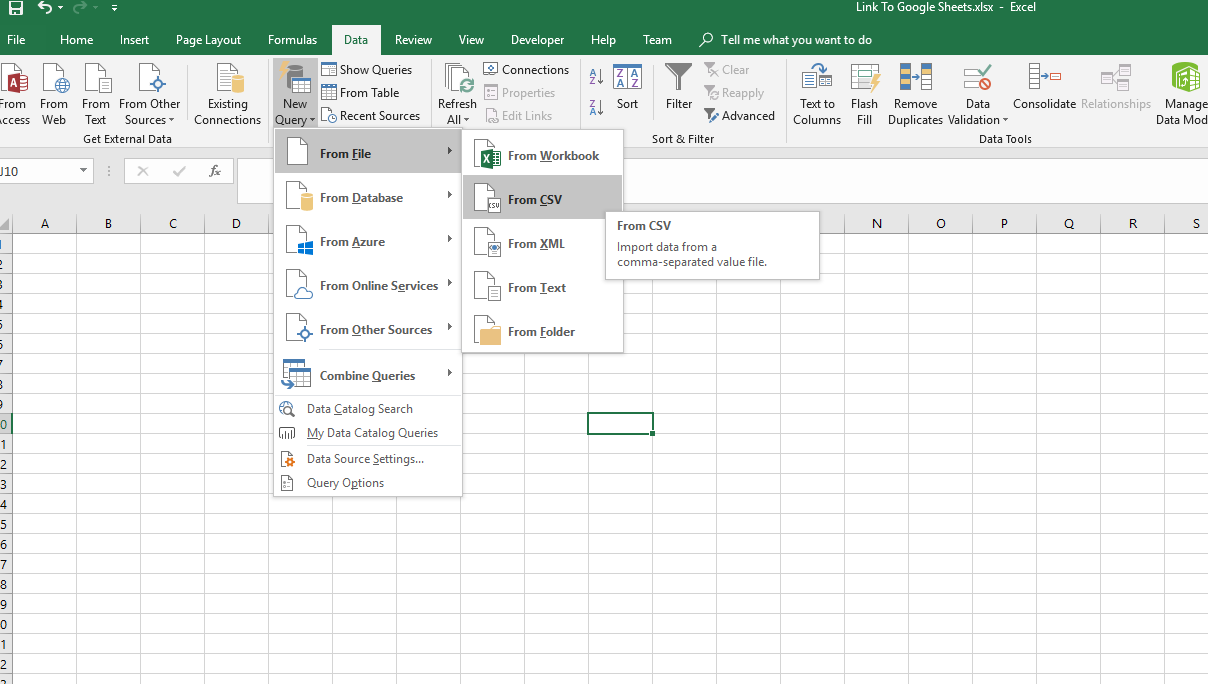
Now, since you have created the CSV file in Step 1, navigate to the Data tab in Excel and click on New Query. Next, select From File and then click on From CSV as shown in the below image.
Now, paste your copied link to the File name and click on Open. After a few seconds, the software will ask you about accessing the web content. Don’t change the default settings and select Connect.
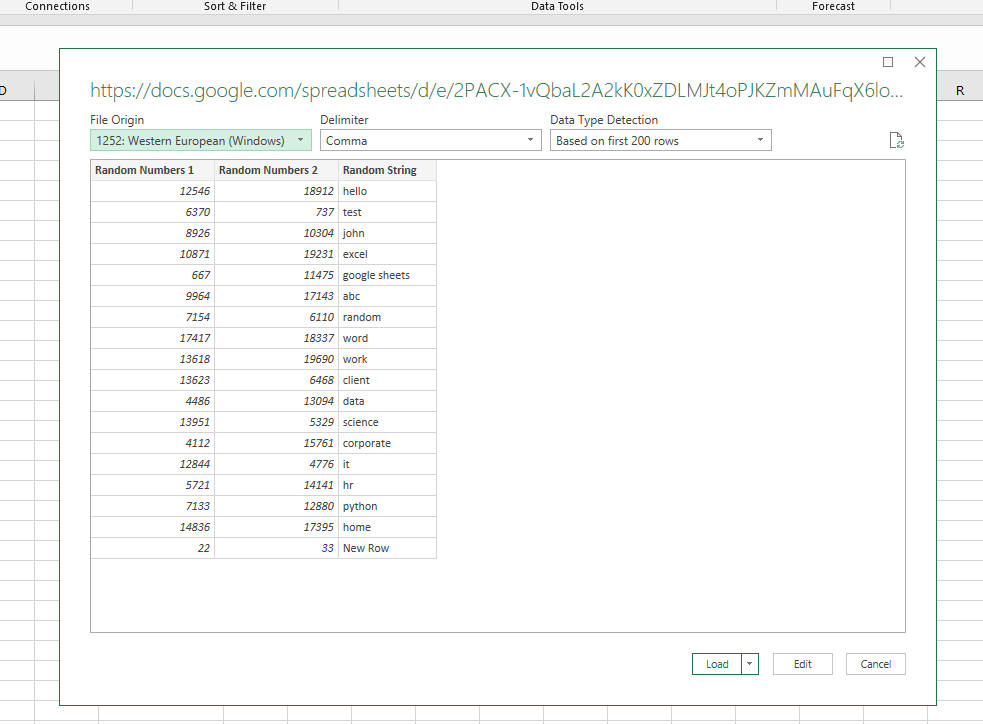
This will result in a pop-up of a data snippet. Now, you can sync Excel to Google Sheets by using the following options:
- Click on Load (To create a new spreadsheet and transfer all your data as a table).
- Click on Load To (To decide the location of your new data table after transfer).
- Click on Edit (To open the Power Query Editor).
The Power Query Editor is shown in the below image.
To keep things simple in the task to Sync Excel to Google Sheets, click on Load.
This will load your Google Sheets data into Excel.
Step 3: Automate the Process to Sync Excel to Google Sheets
Now, automate the process to Sync Excel to Google Sheets by clicking on the required table and the Data tab. Next, visit the drop-down menu and select Refresh All, and open Connection Properties. Check the boxes related to Refreshing the files as shown in the below image.
That’s it! Your process to link Google Sheet to Excel is complete. Now you can try to Sync Excel to Google Sheets on your own.
Benefits of linking Google Sheets to Excel
You can follow the steps given in the previous section and Sync Excel to Google Sheets. This will provide you with the following benefits:
- Google Sheets provide flexibility but it works slower than Excel if you are dealing with Big Data. Therefore, you can Sync Excel to Google Sheets and transfer your data into Excel for faster processing.
- Excel offers a rich variety of Data Visualization options as compared to the limited services of Google Sheets. Moreover, the formulas present in Google Sheets are not enough to manage complex accounting and bookkeeping. Excel, on the other hand, can make complex calculations easily in no time. Therefore, you can sync Excel to Goole Sheets and enjoy the Visualizations and Mathematical superiority of Excel for your data.
- Google Sheets documents your data over the Cloud and this creates a risk to your data. Since hackers get to your business email, your Cloud data can very well be stolen. So, it is better to manipulate your data using Google Sheets and then store it in Excel for safekeeping. Therefore you can Sync Excel to Google Sheets and ensure sure data’s safety.
Conclusion
This article introduced you to Excel and Google Sheets along with their key features. It also provided a step-by-step approach to Sync Excel to Google Sheets. This way you can easily transfer your data from Google Sheets to Excel and even automate the entire process. Furthermore, the article listed the benefits of setting up this integration. After reading this article, you can go and Sync Excel to Google Sheets on your own and experience its various benefits.
Visit our Website to Explore Hevo
Google Sheets and Excel are great tools for performing Data Visualization for your business. However, at times, you need to transfer this data to a Data Warehouse for analysis. Building an in-house solution for this process could be an expensive and time-consuming task.
Hevo Data, on the other hand, offers a No-code Data Pipeline that can automate your data transfer process, hence allowing you to focus on other aspects of your business like Analytics, Customer Management, etc. This platform allows you to transfer data from 100+ sources like Google Sheets & Excel, and load it to Cloud-based Data Warehouses like Snowflake, Google BigQuery, Amazon Redshift, etc. It will provide you with a hassle-free experience and make your work life much easier.
Want to take Hevo for a spin? Sign Up for a 14-day free trial and experience the feature-rich Hevo suite first hand.
Try to Sync Excel to Google Sheets yourself and share your experience in the comments section!


