
| title | keywords | f1_keywords | ms.prod | api_name | ms.assetid | ms.date | ms.localizationpriority |
|---|---|---|---|---|---|---|---|
|
Names object (Excel) |
vbaxl10.chm487072 |
vbaxl10.chm487072 |
excel |
Excel.Names |
ffecf89d-7bae-c470-8e37-608857a9de2a |
03/30/2019 |
medium |
Names object (Excel)
A collection of all the Name objects in the application or workbook.
Remarks
Each Name object represents a defined name for a range of cells. Names can be either built-in names—such as Database, Print_Area, and Auto_Open—or custom names.
The RefersTo argument must be specified in A1-style notation, including dollar signs ($) where appropriate. For example, if cell A10 is selected on Sheet1 and you define a name by using the RefersTo argument «=sheet1!A1:B1», the new name actually refers to cells A10:B10 (because you specified a relative reference). To specify an absolute reference, use «=sheet1!$A$1:$B$1».
Example
Use the Names property of the Workbook object to return the Names collection. The following example creates a list of all the names in the active workbook, plus the addresses that they refer to.
Set nms = ActiveWorkbook.Names
Set wks = Worksheets(1)
For r = 1 To nms.Count
    wks.Cells(r, 2).Value = nms(r).Name
    wks.Cells(r, 3).Value = nms(r).RefersToRange.Address
Next
Use the Add method to create a name and add it to the collection. The following example creates a new name that refers to cells A1:C20 on the worksheet named Sheet1.
Names.Add Name:="test", RefersTo:="=sheet1!$a$1:$c$20"
Use Names (index), where index is the name index number or defined name, to return a single Name object. The following example deletes the name mySortRange from the active workbook.
ActiveWorkbook.Names("mySortRange").Delete
This example uses a named range as the formula for data validation. This example requires the validation data to be on Sheet 2 in the range A2:A100. This validation data is used to validate data entered on Sheet1 in the range D2:D10.
Sub Add_Data_Validation_From_Other_Worksheet()
'The current Excel workbook and worksheet, a range to define the data to be validated, and the target range
'to place the data in.
Dim wbBook As Workbook
Dim wsTarget As Worksheet
Dim wsSource As Worksheet
Dim rnTarget As Range
Dim rnSource As Range

'Initialize the Excel objects and delete any artifacts from the last time the macro was run.
Set wbBook = ThisWorkbook
With wbBook
    Set wsSource = .Worksheets("Sheet2")
    Set wsTarget = .Worksheets("Sheet1")
    On Error Resume Next
    .Names("Source").Delete
    On Error GoTo 0
End With

'On the source worksheet, create a range in column A of up to 98 cells long, and name it "Source".
With wsSource
    .Range(.Range("A2"), .Range("A100").End(xlUp)).Name = "Source"
End With

'On the target worksheet, create a range 8 cells long in column D.
Set rnTarget = wsTarget.Range("D2:D10")

'Clear out any artifacts from previous macro runs, then set up the target range with the validation data.
With rnTarget
    .ClearContents
    With .Validation
        .Delete
        .Add Type:=xlValidateList, _
             AlertStyle:=xlValidAlertStop, _
             Formula1:="=Source"

'Set up the Error dialog with the appropriate title and message
        .ErrorTitle = "Value Error"
        .ErrorMessage = "You can only choose from the list."
    End With
End With

End Sub
Methods
- Add
- Item
Properties
- Application
- Count
- Creator
- Parent
See also
- Excel Object Model Reference
[!includeSupport and feedback]

What is VBA Name?
VBA NAME is a statement which can be used to move files from across drives and while moving the files we can rename the moving file as well.
- What if you want to copy the file but paste with different name???
- What is you want to copy the file but to delete the file in the original source folder??
- With manual work we do all this without much trouble, but if your VBA project requires all of these to be done in the middle of the code execution how will you do??
In this article, we will show you how to do all of these using “Name Statement” in VBA. Read on…
What Does Name Statement Do in VBA?
When you hear the word “Name” what comes to your mind?? The first thing I got was “Worksheet Name” and “Workbook Name”.
Renaming can be done within the same directory or folder, not across drives. Let’s look at the syntax of the NAME statement.
Name OldName as NewName
- Old Name: This is nothing but the current name of the file in the mentioned folder path.
- New Name: While moving the file what should be the new name to be allocated to it?
One thing we need to remember is, NAME statement is used to move and rename the files not to create any file, folder or directory.
In order to move or rename the file, we need to first close the targeted file and execute the task or else we will get an error message.
How to Use VBA Name in Excel?
We will learn how to use a VBA Name Function with few examples in excel.
You can download this VBA Name Excel Template here – VBA Name Excel Template
Example #1 – VBA Name
Take a look at the simple example of changing the name of the File in the same folder. For example, I have a file in the below folder.

With this file, I want to rename the file “Sales April 2019.xlsx” to “April 2019.xlsx”. This can be done by using the NAME statement. Follow the below steps to apply the code.
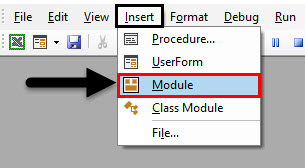
Step 1: Add the new module.
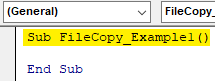
Step 2: Start the subprocedure.
Code:
Sub FileCopy_Example1()

End Sub
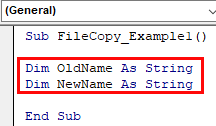
Step 3: Declare two variables as a string.
Code:
Sub FileCopy_Example1()

Dim OldName As String
Dim NewName As String

End Sub
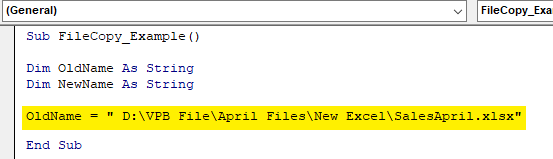
Step 4: For Old, Name Variable assign the folder path and file name with extension.
Code:
Sub FileCopy_Example1()

Dim OldName As String
Dim NewName As String

OldName = " D:VPB FileApril FilesNew ExcelSalesApril.xlsx"

End Sub
Step 5: For the New Name variable we will mention the same path but will change the name of the file only.
Code:
Sub FileCopy_Example1()

Dim OldName As String
Dim NewName As String

OldName = " D:VPB FileApril FilesNew ExcelSalesApril.xlsx"
NewName = " D:VPB FileApril FilesNew ExcelApril.xlsx"

End Sub
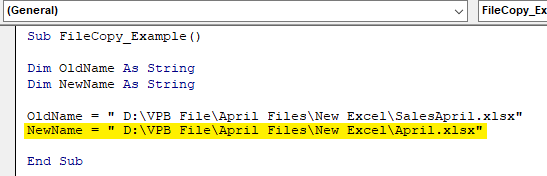
Step 6: Now I will use the NAME Statement.
Code:
Sub FileCopy_Example()

Dim OldName As String
Dim NewName As String

OldName = " D:VPB FileApril FilesNew ExcelSalesApril.xlsx"
NewName = " D:VPB FileApril FilesNew ExcelApril.xlsx"

Name OldName As NewName

End Sub

Step 7: Old Name & New Name are the variables which hold path references. Now execute the code to see the magic.

In the same folder itself, it has changed the file name from “Sales April 2019.xlsx” to “April 2019.xlsx”.
This is the way of changing the file name in the same folder how about changing from one folder to a different folder.
Example #2 – Change from One Folder to Another
In order to move from one folder to another, we need to change the New Name path. For an example look at the below code.
Sub FileCopy_Example1()

Dim OldName As String
Dim NewName As String

OldName = "D:VPB FileApril FilesNew ExcelApril 1.xlsx"
NewName = "D:VPB FileApril FilesFinal locationApril.xlsx"

Name OldName As NewName

End Sub
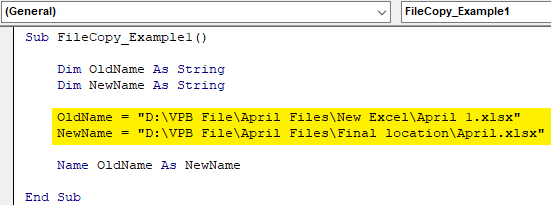
If you observe the difference from our previous code to this code, we have changed the New Name to a different folder in the same drive.
Now I will execute this code and see the impact in both the folders.
New Folder:

In the new folder, we got the new sheet named as “April 2019.xlsx”. Now, look at the Old Folder.
Old Folder:

It says “This folder is empty”.
This is unlike our File Copy method. Name statement has removed the original file from the old folder and moved to a new folder with a new name as we specified.
Like this, we can move files from one folder to another with different names by using the “NAME” statement.
Recommended Articles
This is a guide to VBA Name. Here we discuss how to use Excel VBA Name Function along with practical examples and downloadable excel template. You can also go through our other suggested articles –
- VBA Copy Paste
- VBA RGB
- VBA Subscript out of Range
- FileCopy in VBA
Names in Excel VBA – Explained with Examples!
Names in Excel VBA makes our job more easier. We can save lot of time using Names. It is easy to maintain the formulas, Cells,Ranges and Tables. You can define the names once in the workbook and use it across the workbook. The following examples will show some of the Names daily operations.
- Adding Names in Excel VBA
- Deleting Names in Excel VBA
- Hide UnHide Names in Excel VBA
Adding Names in Excel VBA:
Sometimes you may need to Add name to a particular range in excel worksheet. We can manage range names in excel vba with using names collection.
- Solution
- Code
- Output
- Example File
Adding Names in Excel VBA – Solution(s):
We can use Names.Add method or Name property of a range for adding names in excel VBA.
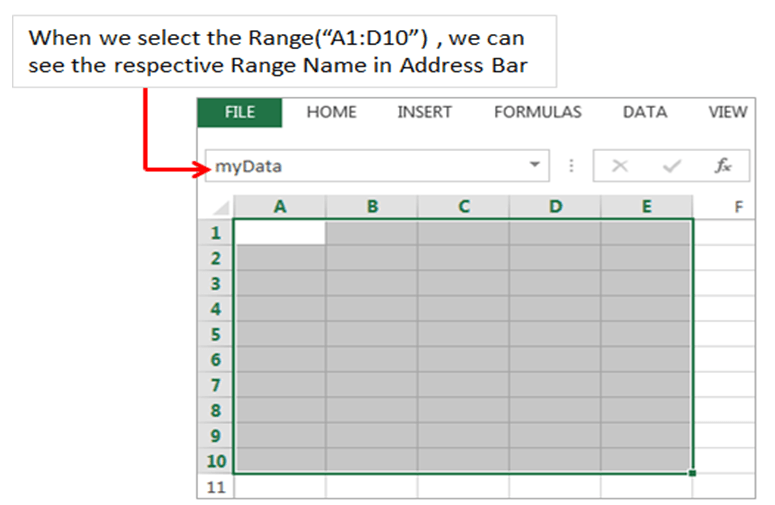
We can create range name in the following way. It contains several properties.We must define Name and the Refers To property.please find the following example.The following code creates a name “MyData” and referring to sheet1 of a range(“$A$1:$E$10”)
Code:
'Naming a range
Sub sbNameRange()

    'Adding a Name
    Names.Add Name:="myData", RefersTo:="=Sheet1!$A$1:$E$10"

    'OR

    'You can use Name property of a Range
    Sheet1.Range("$A$1:$E$10").Name = "myData"

End Sub
Output:

Instructions:
- Open an excel workbook
- Press Alt+F11 to open VBA Editor
- Double click on ThisWorkbook from Project Explorer
- Copy the above code and Paste in the code window
- Press F5
- GoTo Sheet1 and Select Range A1 to D10
- You should see the following example
Example File
Download the example file and Explore it.
Analysistabs – Adding Name to Range in excel Workboobk
Deleting Names in Excel VBA:
Sometimes you may need to Delete range name in existing excel workbook for cleaning broken references in excel workbook.
- Solution
- Code
- Output
- Example File
Deleting Names in Excel VBA – Solution(s):
You can use Delete method for deleting existing names in excel workbook.We can delete range name in the following way.please find the following example.The following code Deletes a name “MyData”.
Code:
'Deleting Names
Sub sbDeleteName()

    'myData=Sheet1.range("A1:E10")
    Names("myData").Delete

End Sub
Output:

Instructions:
- Open an excel workbook
- Press Alt+F11 to open VBA Editor
- Double click on ThisWorkbook from Project Explorer
- Copy the above code and Paste in the code window
- Press F5
- GoTo Sheet1 and Select Range A1 to D10
- You should see the following example
Example File
Download the example file and Explore it.
Analysistabs – Deleting Name to Range in excel Workboobk
Hide UnHide Names in Excel VBA:
Sometimes you may need to Hide UnHide names in Excel VBA.
- Solution
- Code
- Output
- Example File
Hide UnHide names in Excel VBA – Solution(s):
You Can Hide UnHide Names in Excel VBA using Visible Property in the following way. when we set visible proprty to false, We dont see defined range name . when we set visible proprty to true, We can see defined range name .
Code:
'Hiding a Name
Sub sbHideName()

	Names("myData").Visible = False

End Sub


'UnHide aName
Sub sbUnHideName()

	Names("myData").Visible = True

End Sub
Output:

Instructions:
- Open an excel workbook
- Press Alt+F11 to open VBA Editor
- Double click on ThisWorkbook from Project Explorer
- Copy the above code and Paste in the code window
- Press F5
- GoTo Sheet1 and Select Range A1 to D10
- You should see the following example
Example File
Download the example file and Explore it.
Analysistabs – Hide UnHide Names in excel Workboobk
A Powerful & Multi-purpose Templates for project management. Now seamlessly manage your projects, tasks, meetings, presentations, teams, customers, stakeholders and time. This page describes all the amazing new features and options that come with our premium templates.
Save Up to 85% LIMITED TIME OFFER

All-in-One Pack
120+ Project Management Templates
Essential Pack
50+ Project Management Templates
Excel Pack
50+ Excel PM Templates
PowerPoint Pack
50+ Excel PM Templates
MS Word Pack
25+ Word PM Templates
Ultimate Project Management Template
Ultimate Resource Management Template
Project Portfolio Management Templates
Related Posts
-
- Adding Names in Excel VBA:
- Adding Names in Excel VBA – Solution(s):
- Deleting Names in Excel VBA:
- Deleting Names in Excel VBA – Solution(s):
- Hide UnHide Names in Excel VBA:
- Hide UnHide names in Excel VBA – Solution(s):
VBA Reference
Effortlessly
Manage Your Projects
120+ Project Management Templates
Seamlessly manage your projects with our powerful & multi-purpose templates for project management.
120+ PM Templates Includes:
5 Comments
-
Eric W
April 30, 2015 at 11:17 AM — ReplyI am having a problem copying Ranges from one point to another in Excel using VBA.
I have tried several methods and get the same result any way I’ve tried
When the copy action is triggered, the destination has the copy from the header row in the destination
Example: Range(“U14:AO14”).Copy Destination:=Range(“A40”)
I am receiving the data from U2:AO2.
I have named the range by selection using the spreadsheet name window. The array that shows in the window shows the correct value. The destination is correct.Do you have a clue what is happening, or what I am doing wrong?
Thank You -
Amar
September 9, 2015 at 5:23 PM — ReplyCan this defined name be used for coding or in vba editor
-
PNRao
September 11, 2015 at 11:51 PM — ReplyHi Amar,
Yes! we can use the defined names in VBA. Example:Sheet1.Range("$A$1:$E$10").Name = "myData" Range("myData").Interior.ColorIndex = 3here, myData is a user defined name and the above code will change the background color of the defined range.
Thanks-PNRao! -
Silke Flink
September 12, 2015 at 12:35 AM — ReplyThank you for this post. I was wondering if it is possible to address a dynamic name range in VBA. I have a named range (though I use a lookup-function in the name manager) that is visible in the name manager and can be used in formulas in the Excel sheet.
I tried this
dim Taxes_from_Sales as Range
Set Taxes_from_Sales = Range(“Taxes_from_Sales”)whereas “Taxes_from_Sales” is a excel Lookup defined name range. VBA doesn’t recognize it cause of the formula.
Any idea how to approach this without writing Lookup in VBA?
Thanks for help
silke
-
PNRao
September 13, 2015 at 1:48 AM — ReplyHi,
It works for dynamic range. In your case, Lookup functions always returns a value, and we need a range to use in VBA.I have tried the below example and its working fine:
Sub DynamicNamedRange()
'Adding a dynamic Name
Names.Add Name:="test", RefersTo:="=OFFSET(Sheet1!$A$1,0,0,COUNTA(Sheet1!A:A),1)"

'Entering sample data
For i = 1 To 10
Cells(i, 1) = i
Next

'Formatting dynamic range
Range("test").Interior.ColorIndex = 3
End Sub
Thanks-PNRao!
Effectively Manage Your
Projects and Resources
ANALYSISTABS.COM provides free and premium project management tools, templates and dashboards for effectively managing the projects and analyzing the data.
We’re a crew of professionals expertise in Excel VBA, Business Analysis, Project Management. We’re Sharing our map to Project success with innovative tools, templates, tutorials and tips.
Project Management
Excel VBA
Download Free Excel 2007, 2010, 2013 Add-in for Creating Innovative Dashboards, Tools for Data Mining, Analysis, Visualization. Learn VBA for MS Excel, Word, PowerPoint, Access, Outlook to develop applications for retail, insurance, banking, finance, telecom, healthcare domains.
Page load link

3 Realtime VBA Projects
with Source Code!
Go to Top
Описание
Задает или возвращает определяемое пользователем имя объекта доступа к данным (DAO). Для объекта, не добавленного в семейство, это свойство доступно для чтения/записи.
Значение
Задаваемое или возвращаемое значение является выражением типа String, указывающим имя объекта. Имя объекта должно начинаться с буквы. Максимальный размер (в символах) значения свойства Name определяется типом объекта, как показано в разделе «Дополнительные сведения». Имя может содержать цифры и символы подчеркивания ( _ ), но не должно содержать знаки препинания.
Замечания
Объект TableDef, QueryDef, Field, Index, User и Group не может иметь имя, совпадающее с именем другого объекта в том же семействе.
Значением свойства Name объекта Recordset, открытого с помощью инструкции SQL, становятся первые 256 символов инструкции SQL.
Допускается использование свойства Name в инструкциях Dim в программах Visual Basic для приложений (VBA) для создания новых экземпляров объекта.
Для многих объектов доступа к данным (DAO) свойство Name отражает имя, зарегистрированное в объекте Database. Это же относится к объектам TableDef, Field или QueryDef. Прямой связи между именем объекта и именем используемой для ссылок на объект базы данных объектной переменной не существует.
Использование для чтения/записи свойства Name при доступе к объекту определяется типом объекта, к которому относится свойство, а также тем, был ли объект добавлен в семейство. В рабочей области ODBCDirect свойство Name добавленного объекта всегда доступно только для чтения. В следующей таблице показано, в каких случаях свойство Name в рабочей области Microsoft Jet доступно для чтения записи или только для чтения для объекта, добавленного в семейство (если иное не указано). Для случая, когда свойство допускает чтение/запись, приведена максимальная длина значения (в символах).
Объект				Применение	Длина
Container				Только чтение
Connection			Только чтение
Database				Только чтение
Document				Только чтение
Field
  Не добавлен			Чтение/запись	64
  Добавлен в Index			Только чтение
  Добавлен в QueryDef		Только чтение
  Добавлен в Recordset		Только чтение
  Добавлен в TableDef
  (таблица в базе данных)		Чтение/запись	64
  Добавлен в TableDef
  (присоединенная таблица )		Только чтение
  Добавлен в Relation		Только чтение
Group
  Не добавлен			Чтение/запись	20
  Добавлено			Только чтение
Index
  Не добавлен			Чтение/запись	64
  Добавлено			Только чтение
Parameter				Только чтение
Property
  Не добавлен			Чтение/запись	64
  Добавлено			Только чтение
  Встроенный			Только чтение
QueryDef
  Не добавлен			Чтение/запись	64
  Временный			Только чтение
  Добавлено			Чтение/запись	64
Recordset				Только чтение
Relation
  Не добавлен			Чтение/запись	64
  Добавлено			Только чтение
TableDef				Чтение/запись	64
User
  Не добавлен			Чтение/запись	20
  Добавлено			Только чтение
Workspace
  Не добавлен			Чтение/запись	20
  Добавлено			Только чтение
Пример
Следующая программа использует свойство Name для указания имени нового объекта, для вывода перечня объектов в семействе и для удаления объекта из семейства.
Sub NameX()

	Dim dbsNorthwind As Database
	Dim qdfNew As QueryDef
	Dim qdfLoop As QueryDef

	Set dbsNorthwind = OpenDatabase("Борей.mdb")

	With dbsNorthwind
		' Создает новый постоянный объект QueryDef
		' и добавляет его в семейство QueryDefs.
		Set qdfNew = .CreateQueryDef()
		qdfNew.Name = "NewQueryDef"
		qdfNew.SQL = "SELECT * FROM Сотрудники"
		.QueryDefs.Append qdfNew
		' Отображает семейство имена объектов QueryDef
		' в семействе QueryDefs.
		Debug.Print "Имена запросов в " & .Name
		For Each qdfLoop In .QueryDefs
			Debug.Print "    " & qdfLoop.Name
		Next qdfLoop
		' Удаляет новый объект QueryDef, созданный
		' только для демонстрации.
		.QueryDefs.Delete qdfNew.Name
		.Close
	End With
End Sub
Содержание
- 1 Adding Comments for a name
- 2 A name can also store the data stored in an array.
- 3 Checking for the Existence of a Name
- 4 Check Name existance
- 5 Define a name by hard code the cell address
- 6 Determining which Names Overlap a Range
- 7 Enables access to named ranges in arbitrary workbooks
- 8 Fill named range with values
- 9 find out which names are overlapping the selected cells, regardless of whether they entirely contain the selected cells
- 10 Generate named range from Range object
- 11 Generate Range object from named range
- 12 Go to a name
- 13 Hide a name by setting its Visible property to False
- 14 Hide the name after it has been created:
- 15 Insert hidden name
- 16 Is Name In Workbook
- 17 Names Overlapping Selection
- 18 Range objects cannot be used with an worksheet object as superobject
- 19 Retrieving Values Stored as a Workbook Name Using the Evaluate Method
- 20 Searching for a Name
- 21 Searching for the Name of a Range
- 22 Selection Entirely In Names
- 23 Select named range
- 24 specify that the Names collection belongs to a worksheet:
- 25 Store formulas into names. The formula must start with an equals sign (=).
- 26 storing a formula in a name is the same as for a range
- 27 Storing Values in Names
- 28 use names to store numbers between sessions
- 29 use the Evaluate method equivalent to evaluate the name in VBA:
- 30 Using named ranges of cells
- 31 Using the Names Object to List All Named Ranges
<source lang="vb">
Sub addcomment()
ActiveWorkbook.Worksheets("Sheet7").Names("LocalOffice").rument = "text"
End Sub
</source>
A name can also store the data stored in an array.
<source lang="vb">
Sub NamedArray()
   Dim myArray(10, 5)
   Dim i As Integer, j As Integer
   For i = 1 To 10
       For j = 1 To 5
           myArray(i, j) = i + j
       Next j
   Next i
   Names.add name:="FirstArray", RefersTo:=myArray
End Sub
</source>
Checking for the Existence of a Name
<source lang="vb">
Function NameExists(FindName As String) As Boolean
   Dim Rng As Range
   Dim myName As String
   On Error Resume Next
   myName = ActiveWorkbook.Names(FindName).Name
   If Err.Number = 0 Then
       NameExists = True
   Else
       NameExists = False
   End If
End Function
</source>
Check Name existance
<source lang="vb">
Sub Main()
 If NameExists("SalesData") Then
   MsgBox "Name Exists"
 Else
   MsgBox "Name does not exist"
 End If
End Sub
Function NameExists(myName As String) As Boolean
 Dim X As String
 On Error Resume Next
 X = Names(myName).RefersTo
 If Err.Number <> 0 Then
   NameExists = False
   Err.Clear
 Else
   NameExists = True
 End If
End Function
</source>
Define a name by hard code the cell address
<source lang="vb">
Sub DefineName1a()
ActiveWorkbook.names.Add Name:="NameArea", RefersToR1C1:="=sheet1!R1C1:R3C1"
End Sub
</source>
Determining which Names Overlap a Range
   <source lang="vb">

    Sub SelectionEntirelyInNames()
        Dim sMessage As String
        Dim nmName As name
        Dim rngNameRange As range
        Dim rng As range
        On Error Resume Next
        For Each nmName In Names
            Set rngNameRange = Nothing
            Set rngNameRange = nmName.RefersToRange
            If Not rngNameRange Is Nothing Then
                If rngNameRange.Parent.name = ActiveSheet.name Then
                   Set rng = Intersect(Selection, rngNameRange)
                   If Not rng Is Nothing Then
                       If Selection.Address = rng.Address Then
                           sMessage = sMessage & nmName.name & vbCr
                       End If
                   End If
                End If
            End If
        Next nmName
        If sMessage = "" Then
            MsgBox "The selection is not entirely in any name"
        Else
            MsgBox sMessage
        End If
    End Sub
</source>
Enables access to named ranges in arbitrary workbooks
<source lang="vb">
Sub ChangeValueInNamedCell2()
 Dim rng As Range
 Set rng = Evaluate(ActiveWorkbook.names("CellXy").Name)
 rng.Value = "This is a named cell."
 Debug.Print rng.Value
End Sub
</source>
Fill named range with values
<source lang="vb">
Sub FillNameArea1()
 Application.Goto Reference:=ActiveWorkbook.Names("NameArea").Name
 Selection.value = "Test1"
End Sub
Sub FillNameArea2()
Evaluate(ActiveWorkbook.Names("NameArea").value).value = "Test2"
End Sub
</source>
find out which names are overlapping the selected cells, regardless of whether they entirely contain the selected cells
   <source lang="vb">

    Sub NamesOverlappingSelection()
        Dim sMessage As String
        Dim nmName As name
        Dim rngNameRange As range
        Dim rng As range
        On Error Resume Next
        For Each nmName In Names
            Set rngNameRange = Nothing
            Set rngNameRange = range(nmName.name)
            If Not rngNameRange Is Nothing Then
                If rngNameRange.Parent.name = ActiveSheet.name Then
                   Set rng = Intersect(Selection, rngNameRange)
                   If Not rng Is Nothing Then
                           sMessage = sMessage & nmName.name & vbCr
                   End If
                End If
            End If
        Next nmName
        If sMessage = "" Then
            MsgBox "The selection is not entirely in any name"
        Else
            MsgBox sMessage
        End If
    End Sub
</source>
Generate named range from Range object
<source lang="vb">
Sub BuildNameFromRange()
 Dim rng As Range
 Set rng = ActiveWorkbook.Sheets("sheet1").[A1].CurrentRegion
 ActiveWorkbook.Names.Add Name:="NameArea", RefersTo:="=" + rng.Address(External:=True)
 Debug.Print Range("NameArea").Address(External:=True)
End Sub
</source>
Generate Range object from named range
<source lang="vb">
Sub BuildRangeFromName()
 Dim rng As Range
 Set rng = Evaluate(ActiveWorkbook.names("NameArea").Value)
 Debug.Print rng.Address(External:=True)
End Sub
</source>
Go to a name
<source lang="vb">
Sub GotoName2()
Application.Goto Reference:= ActiveWorkbook.names("NameArea").Name, Scroll:=True
End Sub
</source>
Hide a name by setting its Visible property to False
<source lang="vb">
Sub nameRef()
Names.add name:="StoreNumber", RefersTo:=v, Visible:=False
End Sub
</source>
Hide the name after it has been created:
<source lang="vb">
Sub vis()
Names("StoreNumber").Visible = False
End Sub
</source>
Insert hidden name
<source lang="vb">
Public Sub InsertHiddenName()
Names.Add Name:="PassWord", RefersTo:="Bazonkas", Visible:=False
End Sub
</source>
Is Name In Workbook
<source lang="vb">
Option Explicit
Public Function IsNameInWorkbook(ByVal Name As String) As Boolean
  Dim X As String
  Dim aRange As Range

  Application.Volatile
  On Error Resume Next
  Set aRange = Application.Caller
  Err.Clear

  If aRange Is Nothing Then
     X = ActiveWorkbook.Names(Name).Name
  Else
     X = aRange.Parent.Parent.Names(Name).Name
  End If

  If Err.Number = 0 Then IsNameInWorkbook = True
End Function
Public Sub TestName()
 If IsNameInWorkbook(InputBox("What Name")) Then
   MsgBox "Name exists"
 Else
   MsgBox "Name does not exist"
 End If
End Sub
</source>
Names Overlapping Selection
<source lang="vb">
Public Sub NamesOverlappingSelection()
 Dim Message As String
 Dim aName As Name
 Dim NameRange As Range
 Dim aRange As Range

 On Error Resume Next
 For Each aName In Names
   Set NameRange = Nothing
   Set NameRange = Range(aName.Name)
   If Not NameRange Is Nothing Then
     If NameRange.Parent.Name = ActiveSheet.Name Then
       Set aRange = Intersect(Selection, NameRange)
       If Not aRange Is Nothing Then
         Message = Message & aName.Name & vbCr
       End If
     End If
   End If
 Next aName
 If Message = "" Then
   Debug.Print "No Names are overlapping the selection"
 Else
   Debug.Print Message
 End If
End Sub
</source>
Range objects cannot be used with an worksheet object as superobject
<source lang="vb">
Sub ChangeValueInNamedCell1()
 Range("CellXy").Value = "CellXy"
 Debug.Print Range("CellXy").Value
End Sub
</source>
Retrieving Values Stored as a Workbook Name Using the Evaluate Method
<source lang="vb">
Sub TestWorkbookNameValue()
   Dim vValue As Variant
   vValue = Application.Names("SalesTaxRate").RefersTo
   Debug.Print "Value retrieved using RefersTo: " & vValue
End Sub
</source>
Searching for a Name
   <source lang="vb">

    Function IsNameInWorkbook(sName As String) As Boolean
        Dim s As String
        Dim rng As range
        Application.Volatile
        On Error Resume Next
        Set rng = Application.Caller
        Err.clear
        If rng Is Nothing Then
            s = ActiveWorkbook.Names(sName).name
        Else
            s = rng.Parent.Parent.Names(sName).name
        End If
        If Err.Number = 0 Then IsNameInWorkbook = True
    End Function
    Sub TestName()
          If IsNameInWorkbook(InputBox("What Name")) Then
          MsgBox "Name exists"
          Else
          MsgBox "Name does not exist"
          End If
    End Sub
</source>
Searching for the Name of a Range
   <source lang="vb">

    Sub TestNameOfRange()
        Dim nmName As name
        On Error Resume Next
        Set nmName = Selection.name
        If nmName Is Nothing Then
            MsgBox " Selection has no name"
        Else
            MsgBox nmName.name
        End If
    End Sub
</source>
Selection Entirely In Names
<source lang="vb">
Public Sub SelectionEntirelyInNames()
 Dim Message As String
 Dim aName As Name
 Dim NameRange As Range
 Dim aRange As Range
 On Error Resume Next

 For Each aName In Names
   Set NameRange = Nothing
   Set NameRange = aName.RefersToRange
   If Not NameRange Is Nothing Then
     If NameRange.Parent.Name = ActiveSheet.Name Then
       Set aRange = Intersect(Selection, NameRange)
       If Not aRange Is Nothing Then
         If Selection.Address = aRange.Address Then
           Message = Message & aName.Name & vbCr
         End If
       End If
     End If
   End If
 Next aName
 If Message = "" Then
   MsgBox "The selection is not entirely in any name"
 Else
   MsgBox Message
 End If
End Sub
</source>
Select named range
<source lang="vb">
Sub GotoName1()
 Application.Goto Reference:= _
   ActiveWorkbook.names("NameArea").Name
End Sub
</source>
specify that the Names collection belongs to a worksheet:
<source lang="vb">
Sub nameAdd()
Worksheets("Sheet1").Names.add name:="F", RefersToR1C1:="=Sheet1!R1C1:R6C6"
End Sub
</source>
Store formulas into names. The formula must start with an equals sign (=).
<source lang="vb">
Sub addName()
Names.add name:="ItemsInA", RefersTo:="=COUNTA($A:$A)"
End Sub
</source>
storing a formula in a name is the same as for a range
<source lang="vb">
Sub addName()
Names.add name:="Product", RefersTo:="=OFFSET(Sheet2!$A$2,0,0,COUNTA(Sheet2!$A:$A))"
End Sub
</source>
Storing Values in Names
<source lang="vb">
Sub var()
    Dim v As Variant
    v = 3.14159
    Names.add name:="StoreNumber", RefersTo:=v
    v = "Sales"
    Names.add name:="StoreString", RefersTo:=v
End Sub
</source>
use names to store numbers between sessions
<source lang="vb">
Sub store()
   NumofSales = 5123
   Names.add name:="TotalSales", RefersTo:=NumofSales
    "Or use this:
   Names.add name:="TotalSales", RefersTo:=5123
End Sub
</source>
use the Evaluate method equivalent to evaluate the name in VBA:
<source lang="vb">
Sub itemA()
    Names.add name:="ItemsInA", RefersTo:="=COUNTA($A:$A)"
    MsgBox [ItemsInA]
End Sub
</source>
Using named ranges of cells
<source lang="vb">
Option Explicit
Sub DefineName1()
 Range("A3:B5").Name = "TestArea"
 Debug.Print Range("TestArea").Address(External:=True)
End Sub
</source>
Using the Names Object to List All Named Ranges
<source lang="vb">
Sub TestListNames()
ListWorkbookNames ThisWorkbook, ThisWorkbook.Worksheets(2).range("a2")
End Sub
Sub ListWorkbookNames(wb As Workbook, rgListStart As range)
   Dim nm As name
   For Each nm In wb.Names
       rgListStart.value = nm.name
       rgListStart.Offset(0, 1).value = """ & nm.RefersTo
       Set rgListStart = rgListStart.Offset(1, 0)
   Next
End Sub
</source>
VBA Name function is categorized as File and Directory function. This built-in VBA Name function moves the specified file to the new directory or folder in Excel VBA. This function works like rename of an existing file, folder, or directory. If specified file is not available, it returns an error. If we try to rename already opened file, throws an error.
This function can be used in either procedure or function in a VBA editor window in Excel. We can use this VBA Name Function in any number of times in any number of procedures or functions. In the following section we learn what is the syntax and parameters of the Name function, where we can use this Name Function and real-time examples in Excel VBA.
Table of Contents:
- Overview
- Syntax of VBA Name Function
- Parameters or Arguments
- Where we can apply or use VBA Name Function?
- Example 1: Move a File
- Example 2: Move a File(Returns an Error)
- Example 3: Move and ReName a File
- Instructions to Run VBA Macro Code
- Other Useful Resources
The syntax of the Name Function in VBA is
Name OldPath As NewPath
The RmDir Function doesn’t return any value. It renames an existing folder or file.
Parameters or Arguments:
The Name function/statement has two arguments in Excel VBA.
where
OldPath: It is a mandatory string parameter. The OldPath argument represents the folder or file path to rename.
NewPath: It is a mandatory string parameter. The NewPath argument represents the folder or file path.
Where we can apply or use VBA Name Function?
We can use this Name Function in VBA MS Office 365, MS Excel 2016, MS Excel 2013, 2011, Excel 2010, Excel 2007, Excel 2003, Excel 2016 for Mac, Excel 2011 for Mac, Excel Online, Excel for iPhone, Excel for iPad, Excel for Android tablets and Excel for Android Mobiles.
Example 1: Move a File
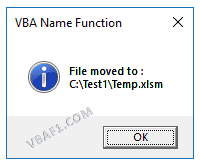
Here is a simple example of the VBA Name function. This below example moves a file from source location to destination location. Once moved file to destination, file is not available at source location.
'Move a File
Sub VBA_Name_Function_Ex1()

    'Variable declaration
    Dim sFileName1 As String, sFileName2 As String

    sFileName1 = "C:TestTemp.xlsm"
    sFileName2 = "C:Test1Temp.xlsm"

    Name sFileName1 As sFileName2

    MsgBox "File moved to : " & vbCrLf & sFileName2, vbInformation, "VBA Name Function"

End Sub
Output: Here is the screen shot of the first example output.
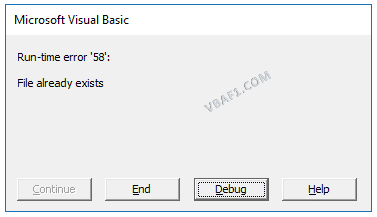
Example 2: Move a File(Returns an Error)
Here is a simple example of the VBA Name function. This below example returns an error. Because specified file is not available at source location.
'Move a File(Returns an Error)
Sub VBA_Name_Function_Ex2()

    'Variable declaration
    Dim sFileName1 As String, sFileName2 As String

    'Note: lets assume specified file 'sFileName1' is not avaialble
    sFileName1 = "C:TestTemp.xlsm"
    sFileName2 = "C:Test1Temp.xlsm"

    Name sFileName1 As sFileName2

    MsgBox "File moved to : " & vbCrLf & sFileName2, vbInformation, "VBA Name Function"

End Sub
Output: Here is the screen shot of the second example output.
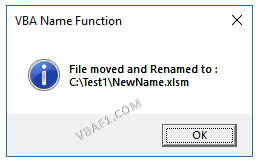
Example 3: Move and ReName a File
Here is a simple example of the VBA Name function. This below example moves and renames a file from source location to destination location. Once moved and renamed file at destination, file is not available at source location.
'Move and ReName a File
Sub VBA_Name_Function_Ex3()

    'Variable declaration
    Dim sFileName1 As String, sFileName2 As String

    sFileName1 = "C:TestOldName.xlsm"
    sFileName2 = "C:Test1NewName.xlsm"

    Name sFileName1 As sFileName2

    MsgBox "File moved and Renamed to : " & vbCrLf & sFileName2, vbInformation, "VBA Name Function"

End Sub
Output: Here is the screen shot of the third example output.
Instructions to Run VBA Macro Code or Procedure:
You can refer the following link for the step by step instructions.
Instructions to run VBA Macro Code
Other Useful Resources:
Click on the following links of the useful resources. These helps to learn and gain more knowledge.
VBA Tutorial VBA Functions List VBA Arrays in Excel Blog
VBA Editor Keyboard Shortcut Keys List VBA Interview Questions & Answers
Обращение к рабочим листам Excel из кода VBA. Переименование листов, скрытие и отображение с помощью кода VBA Excel. Свойства Worksheets.Name и Worksheets.Visible.
Обращение к рабочим листам
Рабочий лист (Worksheet) принадлежит коллекции всех рабочих листов (Worksheets) книги Excel. Обратиться к листу можно как к элементу коллекции и, напрямую, по его уникальному имени.
Откройте редактор VBA и обратите внимание на вашу книгу в проводнике, где уникальные имена листов указаны без скобок, а в скобках — имена листов, отображаемые на ярлычках в открытой книге Excel. Уникальные имена листов отсортированы по алфавиту и их расположение по порядку не будет соответствовать их индексам (номерам), если листы перемещались по отношению друг к другу. Индексы листов смотрите по порядку расположения ярлычков в открытой книге. Переместили листы — изменились их индексы.
Обращение к рабочему листу в коде VBA Excel:
|
‘По уникальному имени УникИмяЛиста ‘По индексу Worksheets(N) ‘По имени листа на ярлычке Worksheets(«Имя листа») |
- УникИмяЛиста — уникальное имя листа, отображаемое в проводнике редактора VBA без скобок, с помощью кода VBA изменить его невозможно.
- N — индекс листа от 1 до количества всех листов в книге, соответствует порядковому номеру ярлычка этого листа в открытой книге Excel.
- Имя листа — имя листа, отображаемое в проводнике редактора VBA в скобках, с помощью кода VBA изменить его можно.
Количество листов в рабочей книге Excel определяется так:
|
‘В активной книге Worksheets.Count ‘В любой открытой книге, ‘например, в «Книга1.xlsm» Workbooks(«Книга1.xlsm»).Worksheets.Count |
Переименование листов
В VBA Excel есть некоторые особенности в наименовании листов, так как у рабочего листа есть два свойства, связанных с именем: (Name) и Name. Откройте окно «Properties» в редакторе VBA, нажав клавишу «F4», и выделите любой лист в проводнике. Вы увидите, что в окне «Properties» свойству (Name) в скобках соответствует в проводнике уникальное имя листа без скобок, а свойству Name без скобок соответствует изменяемое имя листа в скобках. Оба имени в окне «Properties» можно редактировать.
С помощью кода VBA Excel можно редактировать только имя листа Name, отображаемое на ярлычке листа и в проводнике без скобок. Для этого используется свойство рабочего листа Worksheets.Name со следующим синтаксисом:
expression.Name
где expression — переменная, представляющая собой объект Worksheet. Смена имени осуществляется путем присвоения нового значения свойству Worksheets.Name.
Допустим, у нас есть лист с уникальным именем (Name) — Лист1, индексом — 1 и именем Name — МойЛист, которое необходимо заменить на имя — Реестр.
|
Лист1.Name = «Реестр» Worksheets(1).Name = «Реестр» Worksheets(«МойЛист»).Name = «Реестр» |
Скрытие и отображение листов
Для скрытия и отображения рабочих листов в VBA Excel используется свойство Worksheet.Visible со следующим синтаксисом:
expression.Visible
где expression — переменная, представляющая собой объект Worksheet. Свойству Worksheet.Visible могут присваиваться следующие значения:
- False — лист становится невидимым, но он будет присутствовать в списке скрытых листов, и пользователь сможет его отобразить с помощью инструментов рабочей книги Excel.
- xlVeryHidden — лист становится супер невидимым и его не будет в списке скрытых листов, пользователь не сможет его отобразить. Актуально для Excel 2003-2016.
- True — лист становится видимым.
Аналоги присваиваемых значений:
- False = xlHidden = xlSheetHidden = 1
- xlVeryHidden = xlSheetVeryHidden = 2
- True = xlSheetVisible = -1 (константа xlVisible вызывает ошибку)
Примеры:
|
Лист1.Visible = xlSheetHidden Лист2.Visible = —1 Worksheets(Worksheets.Count).Visible = xlVeryHidden Worksheets(«МойЛист»).Visible = True |
Как создать, скопировать, переместить или удалить рабочий лист с помощью кода VBA Excel, смотрите в этой статье.