
Improve Article
Save Article
Like Article
Improve Article
Save Article
Like Article
Apache POI is an open-source java library to create and manipulate various file formats based on Microsoft Office. Using POI, one should be able to perform create, modify and display/read operations on the following file formats. For Example, java doesn’t provide built-in support for working with excel files, so we need to look for open-source APIs for the job.
Apache POI provides Java API for manipulating various file formats based on the Office Open XML (OOXML) standard and OLE2 standard from Microsoft. Apache POI releases are available under the Apache License (V2.0).
Implementation:
Before we move ahead it is suggested geeks you must be well versed with how to read files in the Apache POI library. it does include fundamental interfaces such as Workbook, Sheet, Row, and Cell. For a given Excel file say here it be ‘Geeks.xlsx’, it is needed to create sheets in it then do follow these below generic steps as listed below:
Step 1: Create a Java Maven project
Step 2: Add dependency in the pom.xml file. It is as shown below in the media file.
Example
XML
<dependency>
<groupId>org.apache.poi</groupId>
<artifactId>poi</artifactId>
<version>3.12</version>
</dependency>
<dependency>
<groupId>org.apache.poi</groupId>
<artifactId>poi-ooxml</artifactId>
<version>3.12</version>
</dependency>
Step 3: Create a class in the ‘javaResource’ Folder.
Java
import java.io.*;
import org.apache.poi.hssf.usermodel.HSSFWorkbook;
import org.apache.poi.ss.usermodel.Sheet;
import org.apache.poi.ss.usermodel.Workbook;
public class GFG {
public static void main(String[] args)
throws FileNotFoundException, IOException
{
Workbook wb = new HSSFWorkbook();
OutputStream fileOut
= new FileOutputStream("Geeks.xlsx");
Sheet sheet1 = wb.createSheet("Array");
Sheet sheet2 = wb.createSheet("String");
Sheet sheet3 = wb.createSheet("LinkedList");
Sheet sheet4 = wb.createSheet("Tree");
Sheet sheet5 = wb.createSheet("Dynamic Programing");
Sheet sheet6 = wb.createSheet("Puzzles");
System.out.println(
"Sheets Has been Created successfully");
int numberOfSheets = wb.getNumberOfSheets();
System.out.println("Total Number of Sheets: "
+ numberOfSheets);
wb.write(fileOut);
}
}
Output: On console
Sheets Has been Created successfully
Total Number of Sheets: 6
Output: Changes inside the Excel file are depicted in below visual aid provided.
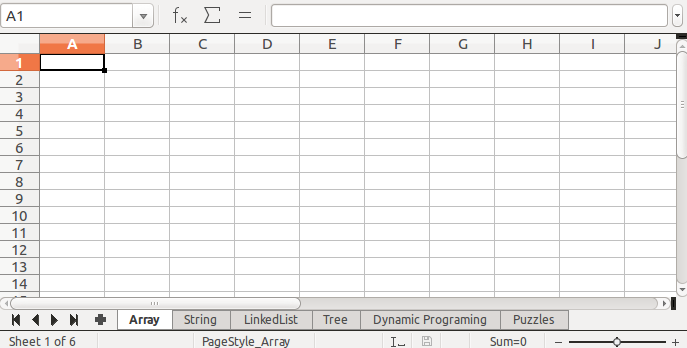
Output explanation:
Here 6 sheets will be created in the Excel file passed in the above program that is ‘geeks.xlsx‘ as shown in the below media provided.
Like Article
Save Article
I’ve created the API «generator-excel» to create an Excel file, below the dependecy:
<dependency>
  <groupId>com.github.bld-commons.excel</groupId>
  <artifactId>generator-excel</artifactId>
  <version>3.1.0</version>
</dependency>
This library can to configure the styles, the functions, the charts, the pivot table and etc. through a series of annotations.
You can write rows by getting data from a datasource trough a query with or without parameters.
Below an example to develop
- I created 2 classes that represents the row of the table.
- I created 2 class that represents the sheets.
- Class test, in the test function there are antoher sheets
- Application yaml
package bld.generator.report.junit.entity;

    import java.util.Date;

    import org.apache.poi.ss.usermodel.HorizontalAlignment;

    import bld.generator.report.excel.RowSheet;
    import bld.generator.report.excel.annotation.ExcelCellLayout;
    import bld.generator.report.excel.annotation.ExcelColumn;
    import bld.generator.report.excel.annotation.ExcelDate;
    import bld.generator.report.excel.annotation.ExcelImage;
    import bld.generator.report.excel.annotation.ExcelRowHeight;

    @ExcelRowHeight(height = 3)
    public class UtenteRow implements RowSheet {

        @ExcelColumn(columnName = "Id", indexColumn = 0)
        @ExcelCellLayout(horizontalAlignment = HorizontalAlignment.RIGHT)
        private Integer idUtente;
        @ExcelColumn(columnName = "Nome", indexColumn = 2)
        @ExcelCellLayout
        private String nome;
        @ExcelColumn(columnName = "Cognome", indexColumn = 1)
        @ExcelCellLayout
        private String cognome;
        @ExcelColumn(columnName = "Data di nascita", indexColumn = 3)
        @ExcelCellLayout(horizontalAlignment = HorizontalAlignment.CENTER)
        @ExcelDate
        private Date dataNascita;
        @ExcelColumn(columnName = "Immagine", indexColumn = 4)
        @ExcelCellLayout
        @ExcelImage(resizeHeight = 0.7, resizeWidth = 0.6)
        private byte[] image;

        @ExcelColumn(columnName = "Path", indexColumn = 5)
        @ExcelCellLayout
        @ExcelImage(resizeHeight = 0.7, resizeWidth = 0.6)
        private String path;


        public UtenteRow() {
        }


        public UtenteRow(Integer idUtente, String nome, String cognome, Date dataNascita) {
            super();
            this.idUtente = idUtente;
            this.nome = nome;
            this.cognome = cognome;
            this.dataNascita = dataNascita;
        }


        public Integer getIdUtente() {
            return idUtente;
        }


        public void setIdUtente(Integer idUtente) {
            this.idUtente = idUtente;
        }


        public String getNome() {
            return nome;
        }


        public void setNome(String nome) {
            this.nome = nome;
        }


        public String getCognome() {
            return cognome;
        }


        public void setCognome(String cognome) {
            this.cognome = cognome;
        }


        public Date getDataNascita() {
            return dataNascita;
        }


        public void setDataNascita(Date dataNascita) {
            this.dataNascita = dataNascita;
        }


        public byte[] getImage() {
            return image;
        }


        public String getPath() {
            return path;
        }


        public void setImage(byte[] image) {
            this.image = image;
        }


        public void setPath(String path) {
            this.path = path;
        }

    }
package bld.generator.report.junit.entity;

import org.apache.poi.ss.usermodel.DataConsolidateFunction;
import org.apache.poi.ss.usermodel.HorizontalAlignment;

import bld.generator.report.excel.RowSheet;
import bld.generator.report.excel.annotation.ExcelCellLayout;
import bld.generator.report.excel.annotation.ExcelColumn;
import bld.generator.report.excel.annotation.ExcelFont;
import bld.generator.report.excel.annotation.ExcelSubtotal;
import bld.generator.report.excel.annotation.ExcelSubtotals;

@ExcelSubtotals(labelTotalGroup = "Total",endLabel = "total")
public class SalaryRow implements RowSheet {

    @ExcelColumn(columnName = "Name", indexColumn = 0)
    @ExcelCellLayout
    private String name;
    @ExcelColumn(columnName = "Amount", indexColumn = 1)
    @ExcelCellLayout(horizontalAlignment = HorizontalAlignment.RIGHT)
    @ExcelSubtotal(dataConsolidateFunction = DataConsolidateFunction.SUM,excelCellLayout = @ExcelCellLayout(horizontalAlignment = HorizontalAlignment.RIGHT,font=@ExcelFont(bold = true)))
    private Double amount;

    public SalaryRow() {
        super();
    }
    public SalaryRow(String name, Double amount) {
        super();
        this.name = name;
        this.amount = amount;
    }
    public String getName() {
        return name;
    }
    public void setName(String name) {
        this.name = name;
    }
    public Double getAmount() {
        return amount;
    }
    public void setAmount(Double amount) {
        this.amount = amount;
    }

}
package bld.generator.report.junit.entity;

import javax.validation.constraints.Size;

import bld.generator.report.excel.QuerySheetData;
import bld.generator.report.excel.annotation.ExcelHeaderLayout;
import bld.generator.report.excel.annotation.ExcelMarginSheet;
import bld.generator.report.excel.annotation.ExcelQuery;
import bld.generator.report.excel.annotation.ExcelSheetLayout;

@ExcelSheetLayout
@ExcelHeaderLayout
@ExcelMarginSheet(bottom = 1.5, left = 1.5, right = 1.5, top = 1.5)
@ExcelQuery(select = "SELECT id_utente, nome, cognome, data_nascita,image,path "
        + "FROM utente "
        + "WHERE cognome=:cognome "
        + "order by cognome,nome")
public class UtenteSheet extends QuerySheetData<UtenteRow> {


    public UtenteSheet(@Size(max = 31) String sheetName) {
        super(sheetName);
    }


}
package bld.generator.report.junit.entity;

import javax.validation.constraints.Size;

import bld.generator.report.excel.SheetData;
import bld.generator.report.excel.annotation.ExcelHeaderLayout;
import bld.generator.report.excel.annotation.ExcelMarginSheet;
import bld.generator.report.excel.annotation.ExcelSheetLayout;
@ExcelSheetLayout
@ExcelHeaderLayout
@ExcelMarginSheet(bottom = 1.5,left = 1.5,right = 1.5,top = 1.5)
public class SalarySheet extends SheetData<SalaryRow> {

    public SalarySheet(@Size(max = 31) String sheetName) {
        super(sheetName);
    }

}
package bld.generator.report.junit;

import java.util.ArrayList;
import java.util.Calendar;
import java.util.GregorianCalendar;
import java.util.List;

import org.junit.Before;
import org.junit.Test;
import org.junit.runner.RunWith;
import org.springframework.beans.factory.annotation.Autowired;
import org.springframework.boot.context.properties.ConfigurationProperties;
import org.springframework.boot.test.context.SpringBootTest;
import org.springframework.context.annotation.ComponentScan;
import org.springframework.test.context.junit4.SpringRunner;
import org.springframework.transaction.annotation.EnableTransactionManagement;

import bld.generator.report.excel.BaseSheet;
import bld.generator.report.excel.GenerateExcel;
import bld.generator.report.excel.data.ReportExcel;
import bld.generator.report.junit.entity.AutoreLibriSheet;
import bld.generator.report.junit.entity.CasaEditrice;
import bld.generator.report.junit.entity.GenereSheet;
import bld.generator.report.junit.entity.SalaryRow;
import bld.generator.report.junit.entity.SalarySheet;
import bld.generator.report.junit.entity.TotaleAutoreLibriRow;
import bld.generator.report.junit.entity.TotaleAutoreLibriSheet;
import bld.generator.report.junit.entity.UtenteSheet;
import bld.generator.report.utils.ExcelUtils;

/**
 * The Class ReportTest.
 */
@RunWith(SpringRunner.class)
@SpringBootTest
@ConfigurationProperties
@ComponentScan(basePackages = {"bld.generator","bld.read"})
@EnableTransactionManagement
public class ReportTestJpa {

    /** The Constant PATH_FILE. */
    private static final String PATH_FILE = "/mnt/report/";

    /** The generate excel. */
    @Autowired
    private GenerateExcel generateExcel;

    /**
     * Sets the up.
     *
     * @throws Exception the exception
     */
    @Before
    public void setUp() throws Exception {
    }

    /**
     * Test.
     *
     * @throws Exception the exception
     */
    @Test
    public void test() throws Exception {
        List<BaseSheet> listBaseSheet = new ArrayList<>();

        UtenteSheet utenteSheet=new UtenteSheet("Utente");
        utenteSheet.getMapParameters().put("cognome", "Rossi");
        listBaseSheet.add(utenteSheet);

        CasaEditrice casaEditrice = new CasaEditrice("Casa Editrice","Mondadori", new GregorianCalendar(1955, Calendar.MAY, 10), "Roma", "/home/francesco/Documents/git-project/dev-excel/linux.jpg","Drammatico");
        listBaseSheet.add(casaEditrice);


        AutoreLibriSheet autoreLibriSheet = new AutoreLibriSheet("Libri d'autore","Test label");
        TotaleAutoreLibriSheet totaleAutoreLibriSheet=new TotaleAutoreLibriSheet();
        totaleAutoreLibriSheet.getListRowSheet().add(new TotaleAutoreLibriRow("Totale"));
        autoreLibriSheet.setSheetFunctionsTotal(totaleAutoreLibriSheet);
        listBaseSheet.add(autoreLibriSheet);
        GenereSheet genereSheet=new GenereSheet("Genere");
        listBaseSheet.add(genereSheet);
        SalarySheet salarySheet=new SalarySheet("salary");
        salarySheet.getListRowSheet().add(new SalaryRow("a",2.0));
        salarySheet.getListRowSheet().add(new SalaryRow("a",2.0));
        salarySheet.getListRowSheet().add(new SalaryRow("a",2.0));
        salarySheet.getListRowSheet().add(new SalaryRow("a",2.0));
        salarySheet.getListRowSheet().add(new SalaryRow("c",1.0));
        salarySheet.getListRowSheet().add(new SalaryRow("c",1.0));
        salarySheet.getListRowSheet().add(new SalaryRow("c",1.0));
        salarySheet.getListRowSheet().add(new SalaryRow("c",1.0));
        listBaseSheet.add(salarySheet);
        ReportExcel excel = new ReportExcel("Mondadori JPA", listBaseSheet);

        byte[] byteReport = this.generateExcel.createFileXlsx(excel);

        ExcelUtils.writeToFile(PATH_FILE,excel.getTitle(), ".xlsx", byteReport);

    }


}
logging:
  level:
    root: WARN
    org:
      springframework:
        web: DEBUG
      hibernate: ERROR


spring:
  datasource:
    url: jdbc:postgresql://localhost:5432/excel_db
    username: ${EXCEL_USER_DB}
    password: ${EXCEL_PASSWORD_DB}
  jpa:
    show-sql: true
    properties:
      hibernate:
        default_schema: public
        jdbc:
          lob:
            non_contextual_creation: true
        format_sql: true
        ddl-auto: auto
    database-platform: org.hibernate.dialect.PostgreSQLDialect
    generate-ddl: true
below the link of the project on github:
- https://github.com/bld-commons/dev-excel
Афоризм
Я Вас пристрою в лучший из миров.
Наталья Резник
Поддержка проекта
Если Вам сайт понравился и помог, то будем признательны за Ваш «посильный» вклад в его поддержку и развитие
• Yandex.Деньги
410013796724260
• Webmoney
R335386147728
Z369087728698
Свойства и методы взаимодействия Java приложений с файлами Excel представлены на странице
библиотеки Apache POI. Здесь рассматриваются примеры использования
Apache POI для создания файлов Excel 2007 или более поздней версии. Если необходимо создать
Excel 1997-2003, то следует использовать классы, наименования которых начинаются с символа ‘H’.
Использование библиотеки Apache POI для чтения файлов Excel с примером рассмотрен
здесь.
Создание книги Excel
// Создание книги Excel
XSSFWorkbook book = new XSSFWorkbook();
FileOutputStream fileOut = new FileOutputStream("workbook.xlsx");

// создания страниц
// создание строк
// создание и форматирование ячеек
// запись информации в ячейки

// Закрытие
book.write(fileOut);
fileOut.close();
Создание страницы
XSSFSheet sheet2 = book.createSheet("Sheet 1");
XSSFSheet sheet3 = book.createSheet("Страница 2");
Наименование страницы не должно превышать 31 символ. Следующие символы недопустимы в
наименовании страницы :
0x0 — нулевое значение;
‘:’ — двоеточие;
» — обратный слэш;
‘/’ — прямой слэш;
‘*’ — «звездочка»;
‘?’ — вопросительный знак;
‘[‘ — открывающаяся квадратная скобка;
‘]’ — закрывающаяся квадратная скобка.
Можно использовать утилиту WorkbookUtil для получения наименования страницы книги. Метод
createSafeSheetName данной утилиты заменит «неправильные» символы на пробелы (‘ ‘).
import org.apache.poi.ss.util.WorkbookUtil;

String caption  = "[O'Brien's sales*?]";
String safeName = WorkbookUtil.createSafeSheetName(caption);

// safeName = " O'Brien's sales   ";
XSSFSheet sheet3 = book.createSheet(safeName);
Определение размера колонки
При определении размера колонки необходимо учитывать максимальное количество символов в колонке,
коэффициент размера символа для заданного шрифта (для «Sans Sherif» равен 1.14388) и коэффициент
EXCEL_COLUMN_WIDTH_FACTOR, равный 256. Метод autoSizeColumn(idx_column) позволяет автоматически
установить размер колонки по максимальному значению.
// Определение размера колонки
int width = (int) (6 * 1.14388) * 256; // 1757;
sheet.setColumnWidth(0, width);

// Автоматическая настройка размера колонки
sheet.autoSizeColumn(1);
Метод setColumnWidth(column, width) в качестве параметров принимает номер колонки (отсчет от 0) и
размер колонки. Методу autoSizeColumn(column) необходимо передать только номер колонки.
Создание строки
При создании строки в метод createRow в качестве параметра необходимо передать номер строки
(отсчет от 0). Для определения размера строки можно использовать методы setHeight (short) и
setHeightInPoints (float). При использовании метода setHeight также, как и с определением размера колонки,
необходимо учитывать коэффициенты. Поэтому метод setHeightInPoints оказывается более предпочтительным.
XSSFRow row = sheet.createRow((short)0);
row.setHeightInPoints(80.0f);
Создание ячейки, определение типа значения
В следующем примере создаются ячейки, устанавливается их тип и записываются значения.
XSSFCell cell = row.createCell(0);
cell.setCellType(CellType.NUMERIC);
cell.setCellValue(1.2);

cell = row.createCell(1);
cell.setCellType(CellType.STRING);
cell.setCellValue("Строковое представление");

cell = row.createCell(2);
cell.setCellType(CellType.FORMULA);
cell.setCellValue("SUM(B3:B5)");
Класс CellType включает свойства [_NONE, BLANK, BOOLEAN, ERROR, FORMULA, NUMERIC, STRING],
которые можно использовать для определения типа значения ячейки.
Определение формата даты ячейки
В следующем примере создаются две ячейки с записью текущей даты. Вторая ячейка форматируется.
CreationHelper createHelper = book.getCreationHelper();

XSSFCellStyle cellStyle = book.createCellStyle();
cellStyle.setDataFormat(createHelper
                       .createDataFormat()
                       .getFormat("m/d/yy h:mm"));
XSSFCell cell = row.createCell(0);
cell.setCellValue(new Date());

cell = row.createCell(1);
cell.setCellStyle(cellStyle);
cell.setCellValue(new Date());
Слияние ячеек
Для слияния ячеек используется метод addMergedRegion.
// Создание строки
XSSFRow row = sheet.createRow((short) 1);

// Создание ячейки
XSSFCell cell = row.createCell((short) 1);
cell.setCellValue("This is a test of merging");

// Слияние 2-х ячеек в одной строке
sheet.addMergedRegion(
        new CellRangeAddress(1, // первая строка
                             1, // последняя строка
                             1, // первая колонка
                             2) // последняя колонка
);
Определение шрифта
// Создание шрифта
XSSFFont font = book.createFont();

font.setFontHeightInPoints((short)24);
font.setFontName("Courier New");
font.setItalic(true);
font.setStrikeout(true);
// цвет шрифта
font.setColor(new XSSFColor(new java.awt.Color(16,64,255)));

// Создание стиля с определением в нем шрифта
XSSFCellStyle style = book.createCellStyle();
style.setFont(font);

// Создание ячейки с определением ее стиля
XSSFRow row = sheet.createRow(0);
XSSFCell cell = row.createCell(1);
cell.setCellValue("Тестовый шрифт");
cell.setCellStyle(style);
Помните, что максимальное количество создаваемых шрифтов ограничено значением 32767. Необходимо
использовать объекты шрифтов/стилей.
// Неправильно
for (int i = 0; i < 100; i++) {
    XSSFRow row = sheet.createRow(i);
    for (int j = 0; j < 100; j++) {
        XSSFCell cell = row.createCell((short) j);

        XSSFCellStyle style = workbook.createCellStyle();
        XSSFFont font = workbook.createFont();
        font.setBold(true);
        style.setFont(font);
        cell.setCellStyle(style);
    }
}

// Правильно
XSSFFont font = workbook.createFont();
font.setBold(true);

XSSFCellStyle style = workbook.createCellStyle();
style.setFont(font);

for (int i = 0; i < 100; i++) {
    XSSFRow row = sheet.createRow(i);
    for (int j = 0; j < 100; j++) {
        XSSFCell cell = row.createCell((short) 0);
        cell.setCellStyle(style);
    }
}
Определение цвета фона ячейки
Color COLOR_light_gray  = new java.awt.Color(232, 232, 232);

XSSFCellStyle style = book.createCellStyle();

style.setFillPattern(FillPatternType.SOLID_FOREGROUND);

style.setFillForegroundColor(new XSSFColor(COLOR_light_gray));
ПРИМЕЧАНИЕ : для выделения цвета значения настраивайте шрифт (см. выше).
Выравнивание значения
В следующем примере создаются ячейки с различным выравниванием значений по горизонтали и
вертикали.
createCell(wb, row, (short) 0, CellStyle.ALIGN_CENTER,
                               CellStyle.VERTICAL_BOTTOM);
createCell(wb, row, (short) 1, CellStyle.ALIGN_CENTER_SELECTION,
                               CellStyle.VERTICAL_BOTTOM);
createCell(wb, row, (short) 2, CellStyle.ALIGN_FILL,
                               CellStyle.VERTICAL_CENTER);
createCell(wb, row, (short) 3, CellStyle.ALIGN_GENERAL,
                               CellStyle.VERTICAL_CENTER);
createCell(wb, row, (short) 4, CellStyle.ALIGN_JUSTIFY,
                               CellStyle.VERTICAL_JUSTIFY);
createCell(wb, row, (short) 5, CellStyle.ALIGN_LEFT,
                               CellStyle.VERTICAL_TOP);
createCell(wb, row, (short) 6, CellStyle.ALIGN_RIGHT,
                               CellStyle.VERTICAL_TOP);

/**
 * Creates a cell and aligns it a certain way.
 *
 * @param book   книга Excel
 * @param row    строка
 * @param column колонка
 * @param halign горизонтальное выравнивание
 * @param valign вертикальное выравнивание
 */
private void createCell(Workbook book,
                        Row row, short column,
                        short halign, short valign)
{
    XSSFCell cell = row.createCell(column);
    cell.setCellValue("Значение");
    // Определение стиля
    XSSFCellStyle cellStyle = book.createCellStyle();
    // Настройка выравнивания стиля
    cellStyle.setAlignment(halign);
    cellStyle.setVerticalAlignment(valign);
    // Стиль ячейки
    cell.setCellStyle(cellStyle);
}
Границы ячейки, Border
// Создание строки
XSSFRow row = sheet.createRow(1);
// Создание ячейки
XSSFCell cell = row.createCell(1);
cell.setCellValue("Значение");

// Создание стиля
XSSFCellStyle style = book.createCellStyle();

// Определение граничных значений стиля
style.setBorderTop   (CellStyle.BORDER_MEDIUM_DASHED);
style.setBorderRight (CellStyle.BORDER_THIN         );
style.setBorderBottom(CellStyle.BORDER_THIN         );
style.setBorderLeft  (CellStyle.BORDER_THIN         );
// Определение цвета граничных значений стиля
style.setTopBorderColor   (IndexedColors.BLACK.getIndex());
style.setRightBorderColor (IndexedColors.BLUE.getIndex ());
style.setBottomBorderColor(IndexedColors.BLACK.getIndex());
style.setLeftBorderColor  (IndexedColors.GREEN.getIndex());

// Определение стиля ячейки
cell.setCellStyle(style);
Многострочные ячейки
Для фиксированного разделения/переноса текста в ячейке необходимо в стиле определить
свойство WrapText=true, и в тексте установить разделители ‘n’.
String text = "Фиксированное n разделение n текста";

XSSFCellStyle style = book.createCellStyle();
style.setWrapText(true);

XSSFRow row = sheet.createRow(2);
XSSFCell cell = row.createCell(2);
cell.setCellValue(text);
cell.setCellStyle(style);
Использование формулы
Создадим две ячейки. В первую ячейку cell1 запишем сумму значений колонки, а во второй ячейке
cell2 разместим формулу «СУММА()». Для вычисления значения первой ячейки дополнительно используются
методы getColsSummary и getCellValue.
int row = 5;
int summa = getColsSummary (1, 2, row);
XSSFCell cell1 = row.createCell(2);
if (summa > 0)
    cell1.setCellValue(summa);

XSSFCell cell2 = row.createCell(2);
String formula = String.format("SUM(B3:B%d)", row);
cell2.setCellFormula(formula);
//-------------------------------------------------------
private int getCellValue (final int cl, final int rw)
{
    XSSFRow  row  = sheet.getRow(rw);
    XSSFCell cell = row.getCell(cl);

    return (int)cell.getNumericCellValue();
}
//-------------------------------------------------------
private int getColsSummary (int col, int row1, int row2)
{
    int summary = 0;
    for (int i = row1; i < row2; i++)
        summary += getCellValue (col, i);
    return summary;
}
In this Java Apache POI tutorial we learn step by step to implement a Java program to export data from Java objects to an Excel file using the Apache POI library.
Table of contents
- Add Apache POI dependencies to Java project
- Create New Entity Class
- Implement Excel File Exporter Class
- How to use ExcelFileExporter class to export Excel file
Add Apache POI dependencies to Java project
First step, we add the Apache POI dependencies to the Java project.
If you use Gradle build project, add the following dependencies to the build.gradle file.
implementation group: 'org.apache.poi', name: 'poi', version: '5.2.2'
implementation group: 'org.apache.poi', name: 'poi-ooxml', version: '5.2.2'
If you use Maven build project, add the following dependencies to the pom.xml file.
<dependency>
    <groupId>org.apache.poi</groupId>
    <artifactId>poi</artifactId>
    <version>5.2.2</version>
</dependency>
<dependency>
    <groupId>org.apache.poi</groupId>
    <artifactId>poi-ooxml</artifactId>
    <version>5.2.2</version>
</dependency>
Create New Entity Class
For example, we want to implement a Java application to export a list of contacts data to an Excel file. At this step we implement a new Java class named Contact to represent the contact information which needs to be exported.
Contact.java
public class Contact {
    private String firstName;
    private String lastName;
    private String email;

    public Contact(String firstName, String lastName, String email) {
        this.firstName = firstName;
        this.lastName = lastName;
        this.email = email;
    }

    public String getFirstName() {
        return firstName;
    }

    public void setFirstName(String firstName) {
        this.firstName = firstName;
    }

    public String getLastName() {
        return lastName;
    }

    public void setLastName(String lastName) {
        this.lastName = lastName;
    }

    public String getEmail() {
        return email;
    }

    public void setEmail(String email) {
        this.email = email;
    }
}
Implement Excel File Exporter Class
At this step we implement a new Java class named ExcelFileExporter with the following steps to export an Excel file from given data.
- Create a new Workbook object which represent an Excel workbook.
- Create a new Sheet object which represent an Excel worksheet.
- Create a new header Row from given header texts. At this step we use CellStyle class to define header foreground color and border.
- Create new data rows from given list of Contact objects. At this step we use CellStyle class to define cell border for data rows.
- Using Sheet.autoSizeColumn(int column) method to adjusts column width to fit the contents for three first columns.
- Using the Workbook.write(OutputStream stream) method to write Excel file with given name.
ExcelFileExporter.java
import org.apache.poi.ss.usermodel.BorderStyle;
import org.apache.poi.ss.usermodel.Cell;
import org.apache.poi.ss.usermodel.CellStyle;
import org.apache.poi.ss.usermodel.FillPatternType;
import org.apache.poi.ss.usermodel.IndexedColors;
import org.apache.poi.ss.usermodel.Row;
import org.apache.poi.ss.usermodel.Sheet;
import org.apache.poi.ss.usermodel.Workbook;
import org.apache.poi.xssf.usermodel.XSSFWorkbook;

import java.io.FileNotFoundException;
import java.io.FileOutputStream;
import java.io.IOException;
import java.io.OutputStream;
import java.util.List;

/**
 * Excel File Exporter
 */
public class ExcelFileExporter {

    public void exportExcelFile(List<Contact> contacts, String[] headers, String fileName) {
        // create a new Workbook
        Workbook workbook = new XSSFWorkbook();

        // Create a new Sheet named "Contacts"
        Sheet sheet = workbook.createSheet("Contacts");

        // Create header row
        createHeaderRow(workbook, sheet, headers);

        // Create rows
        for(int i = 0; i < contacts.size(); i++) {
            // row index equals i + 1 because the first row of Excel file is the header row.
            int rowIndex = i + 1;
            createNewRow(workbook, sheet, rowIndex, contacts.get(i));
        }

        // Adjusts 3 columns to set the width to fit the contents.
        sheet.autoSizeColumn(0);
        sheet.autoSizeColumn(1);
        sheet.autoSizeColumn(2);

        // Write to file
        try (OutputStream outputStream = new FileOutputStream(fileName)) {
            workbook.write(outputStream);
        } catch (FileNotFoundException e) {
            e.printStackTrace();
        } catch (IOException e) {
            e.printStackTrace();
        }
    }

    /**
     * Create header row
     * @param workbook the Workbook object
     * @param sheet the Sheet object
     * @param headers the headers text
     */
    private void createHeaderRow(Workbook workbook, Sheet sheet, String[] headers) {
        Row headerRow = sheet.createRow(0);
        CellStyle headerCellStyle = workbook.createCellStyle();
        headerCellStyle.setFillForegroundColor(IndexedColors.LIGHT_YELLOW.index);
        headerCellStyle.setFillPattern(FillPatternType.SOLID_FOREGROUND);
        headerCellStyle.setBorderTop(BorderStyle.THIN);
        headerCellStyle.setTopBorderColor(IndexedColors.BLACK.index);
        headerCellStyle.setBorderRight(BorderStyle.THIN);
        headerCellStyle.setRightBorderColor(IndexedColors.BLACK.index);
        headerCellStyle.setBorderBottom(BorderStyle.THIN);
        headerCellStyle.setBottomBorderColor(IndexedColors.BLACK.index);
        headerCellStyle.setBorderLeft(BorderStyle.THIN);
        headerCellStyle.setLeftBorderColor(IndexedColors.BLACK.index);

        for(int i = 0; i < headers.length; i++) {
            Cell cell = headerRow.createCell(i);
            cell.setCellValue(headers[i]);
            cell.setCellStyle(headerCellStyle);
        }
    }

    /**
     * Create a new row
     * @param workbook the Workbook object
     * @param sheet the Sheet object
     * @param rowIndex the index of row to create
     * @param contact the Contact object which represent information to write to row.
     */
    private void createNewRow(Workbook workbook, Sheet sheet, int rowIndex, Contact contact) {
        Row row = sheet.createRow(rowIndex);
        CellStyle cellStyle = workbook.createCellStyle();
        cellStyle.setBorderTop(BorderStyle.THIN);
        cellStyle.setTopBorderColor(IndexedColors.BLACK.index);
        cellStyle.setBorderRight(BorderStyle.THIN);
        cellStyle.setRightBorderColor(IndexedColors.BLACK.index);
        cellStyle.setBorderBottom(BorderStyle.THIN);
        cellStyle.setBottomBorderColor(IndexedColors.BLACK.index);
        cellStyle.setBorderLeft(BorderStyle.THIN);
        cellStyle.setLeftBorderColor(IndexedColors.BLACK.index);

        Cell cell = row.createCell(0);
        cell.setCellValue(contact.getFirstName());
        cell.setCellStyle(cellStyle);

        cell = row.createCell(1);
        cell.setCellValue(contact.getLastName());
        cell.setCellStyle(cellStyle);

        cell = row.createCell(2);
        cell.setCellValue(contact.getEmail());
        cell.setCellStyle(cellStyle);
    }

}
How to use ExcelFileExporter class to export Excel file
At this final step we implement a Main class and use the ExcelFileExporter above to export Excel file named contacts.xlsx as the following Java code.
Main.java
import java.util.ArrayList;
import java.util.List;
public class Main {
public static void main(String... args) {
// List of contacts to export to Excel file.
List<Contact> contacts = new ArrayList<>();
contacts.add(new Contact("Rayhan", "Harmon", "rayhan@simplesolution.dev"));
contacts.add(new Contact("Paddy", "Sheridan", "paddy@simplesolution.dev"));
contacts.add(new Contact("Clara", "Callaghan", "clara@simplesolution.dev"));
contacts.add(new Contact("Josephine", "Amos", "josephine@simplesolution.dev"));
contacts.add(new Contact("Sheikh", "Tucker", "sheikh@simplesolution.dev"));
// Header text
String[] headers = new String[] {"First Name", "Last Name", "Email"};
// File name
String fileName = "contacts.xlsx";
// Export Excel file
ExcelFileExporter excelFileExporter = new ExcelFileExporter();
excelFileExporter.exportExcelFile(contacts, headers, fileName);
}
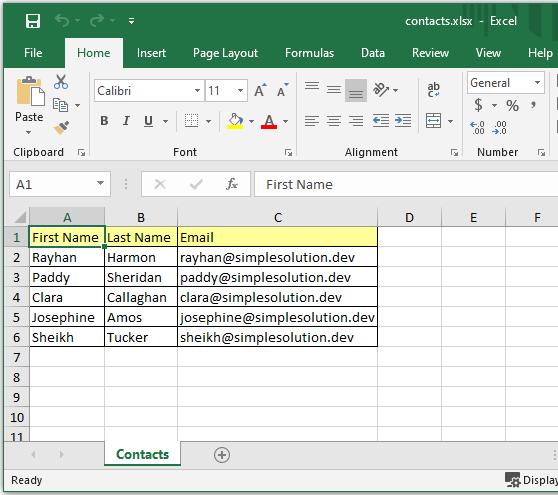
}Execute the the above Java application we have the output contacts.xlsx file as below.
Happy Coding 😊
Related Articles
Java Apache POI Tutorial
Spring Boot Download Excel File Export from MySQL Database
Spring Boot Web Application Download Excel File
Java Read Excel File using Apache POI
Java Read Excel Workbook from File using Apache POI
Java Read Excel Workbook from InputStream using Apache POI
Java Read Password Protected Excel File using Apache POI
Java How to Iterate over Sheets Rows and Cells of Excel file using Apache POI
Java Add Rows to Existing Excel File using Apache POI
Java Add Sheet to Existing Excel File using Apache POI
Java Remove Sheet from Existing Excel File using Apache POI
Java Create Formula Excel Cells using Apache POI
GrapeCity Documents for Excel, Java Edition (GcExcel Java) is a high-speed, feature-rich Excel document API based on VSTO. GcExcel Java includes all the features supported in our Documents for Excel .NET version, allowing developers to fulfill complex business use cases and work with Excel spreadsheets in Java applications.
In another article, we discussed GcExcel Java and its features. In this tutorial, you’ll learn how to generate an Excel Java spreadsheet. We’ll show you how to add features to the spreadsheet-like tables, styles, conditional formatting, and charts.
In this tutorial, we’ll use Eclipse as the Java IDE to work with GcExcel Java. The steps of adding the package and working with GcExcel Java are the same on all three operating systems — Windows, MAC, and Linux.
Step 1. Installation
Prerequisites
- Install Java 6 SDK or higher versions for Windows/Linux/Mac
- Install Java IDE of your choice
Installing GcExcel Package on Eclipse IDE
Download the GcExcel java package (gcexcel-*.0.0.jar) from Maven Central repository or download it locally on your machine from the GrapeCity website.
For Eclipse IDE (or IntelliJ)
- Open the Eclipse IDE
- Create a new Java project
- In the Project name field, enter the name of your project and click Next
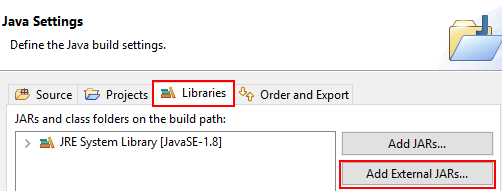
- In Java settings, under Libraries tab, click Add External JARs.
- Select the gcexcel-*.0.0.jar to add it to your project
- Click Finish
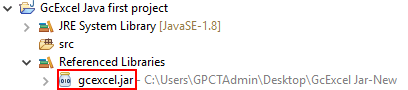
- The jar file will be added under the Referenced Libraries in your project
-
The following dependencies are also required, apart from gcexcel.jar:
- javax.json-1.0.4.jar
- javax.json-api-1.1.4.jar
- fontbox-2.0.19.jar
- pdfbox-2.0.19.jar
- commons-logging-1.1.2.jar
- barcode4j.jar
To know more about the above dependencies, refer GcExcel Dependencies.
For Gradle project:
Open the build.gradle and append the below script in the dependencies block compile («com.grapecity.documents:gcexcel:*.0.0.jar»)
For Maven project:
Open the pom.xml and add below xml element in the dependencies node.
<dependency>
   <groupId>com.grapecity.documents</groupId>
   <artifactId>gcexcel</artifactId>
   <version>*.0.0-snapshot</version>
</dependency>
The jar file will be added as a library in the project and your project can now reference all classes of GcExcel in the jar file.
Step 2. Set Up Your Project
Add Namespace
In Main.java, import the following namespaces:
import java.util.*;
import com.grapecity.documents.excel.*;
import com.grapecity.documents.excel.drawing.*;
Create a New Workbook
In the main function, add the following code to create a new GcExcel workbook:
Workbook workbook = new Workbook();
Initialize Data
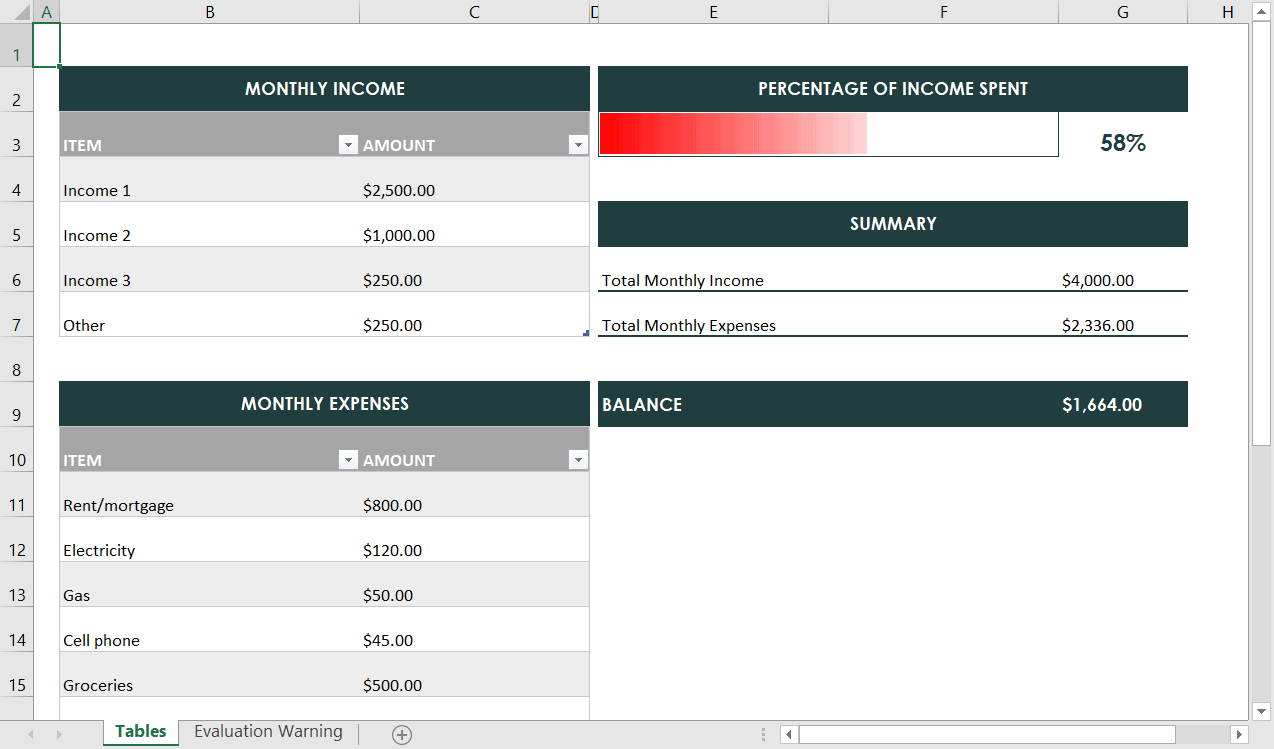
Prepare data for the worksheet and arrange it in a 2-D array. Then set this value to a given range of the worksheet using the setValue method of the worksheet. Also, add labels and calculations for each range of data.
worksheet.getRange("B3:C7").setValue(new Object[][]{
    {"ITEM", "AMOUNT"},
    {"Income 1", 2500},
    {"Income 2", 1000},
    {"Income 3", 250},
    {"Other", 250},
});
worksheet.getRange("B10:C23").setValue(new Object[][]{
    {"ITEM", "AMOUNT"},
    {"Rent/mortgage", 800},
    {"Electric", 120},
    {"Gas", 50},
    {"Cell phone", 45},
    {"Groceries", 500},
    {"Car payment", 273},
    {"Auto expenses", 120},
    {"Student loans", 50},
    {"Credit cards", 100},
    {"Auto Insurance", 78},
    {"Personal care", 50},
    {"Entertainment", 100},
    {"Miscellaneous", 50},
});

worksheet.getRange("B2:C2").merge();
worksheet.getRange("B2").setValue("MONTHLY INCOME");
worksheet.getRange("B9:C9").merge();
worksheet.getRange("B9").setValue("MONTHLY EXPENSES");
worksheet.getRange("E2:G2").merge();
worksheet.getRange("E2").setValue("PERCENTAGE OF INCOME SPENT");
worksheet.getRange("E5:G5").merge();
worksheet.getRange("E5").setValue("SUMMARY");
worksheet.getRange("E3:F3").merge();
worksheet.getRange("E9").setValue("BALANCE");
worksheet.getRange("E6").setValue("Total Monthly Income");
worksheet.getRange("E7").setValue("Total Monthly Expenses");
NOTE: You can get the data from any external data source, like an SQL Server or any back-end database, CRM system, barcode scanner, lab equipment, or whatever you use.
If you want to use data from a data source, you can connect to any data source, add a DataSet, and then use code like the one above to make a 2-D array of type object. You can set the size of the range to fit the data and fill it in with the values from the dataset.
Step 3. Set Row Height and Column Widths
To set the uniform height of rows and widths of columns, set a default row height and column width for the whole worksheet using IWorksheet.setStandardHeight and IWorksheet.setStandardWidth for all the row and column ranges.
worksheet.setStandardHeight(26.25);
worksheet.setStandardWidth(8.43);

worksheet.getRange("2:24").setRowHeight(27);
worksheet.getRange("A:A").setColumnWidth(2.855);
worksheet.getRange("B:B").setColumnWidth(33.285);
worksheet.getRange("C:C").setColumnWidth(25.57);
worksheet.getRange("D:D").setColumnWidth(1);
worksheet.getRange("E:F").setColumnWidth(25.57);
worksheet.getRange("G:G").setColumnWidth(14.285);
Step 4: Create Table
Add two tables: «Income» and «Expenses,» and apply a built-in table style to each.
ITable incomeTable = worksheet.getTables().add(worksheet.getRange("B3:C7"), true);
incomeTable.setName("tblIncome");
incomeTable.setTableStyle(workbook.getTableStyles().get("TableStyleMedium4"));

ITable expensesTable = worksheet.getTables().add(worksheet.getRange("B10:C23"), true);
expensesTable.setName("tblExpenses");
expensesTable.setTableStyle(workbook.getTableStyles().get("TableStyleMedium4"));
Step 5. Set Formulas for the Tables
Create two custom names to summarize the income and expenses for the month, then add formulas that calculate the total monthly income, total monthly expenses, percentage of income spent, and balance.
worksheet.getNames().add("TotalMonthlyIncome", "=SUM(tblIncome[AMOUNT])");
worksheet.getNames().add("TotalMonthlyExpenses", "=SUM(tblExpenses[AMOUNT])");

worksheet.getRange("E3").setFormula("=TotalMonthlyExpenses");
worksheet.getRange("G3").setFormula("=TotalMonthlyExpenses/TotalMonthlyIncome");
worksheet.getRange("G6").setFormula("=TotalMonthlyIncome");
worksheet.getRange("G7").setFormula("=TotalMonthlyExpenses");
worksheet.getRange("G9").setFormula("=TotalMonthlyIncome-TotalMonthlyExpenses");
Step 6. Set Styles
Modify the «Currency,» «Heading 1,» and «Percent» built-in styles, and apply them to ranges of cells. Modify individual style elements for other ranges.
IStyle currencyStyle = workbook.getStyles().get("Currency");
currencyStyle.setIncludeAlignment(true);
currencyStyle.setVerticalAlignment(VerticalAlignment.Bottom);
currencyStyle.setNumberFormat("$#,##0.00");

IStyle heading1Style = workbook.getStyles().get("Heading 1");
heading1Style.setIncludeAlignment(true);
heading1Style.setHorizontalAlignment(HorizontalAlignment.Center);
heading1Style.setVerticalAlignment(VerticalAlignment.Center);
heading1Style.getFont().setName("Century Gothic");
heading1Style.getFont().setBold(true);
heading1Style.getFont().setSize(11);
heading1Style.getFont().setColor(Color.GetWhite());
heading1Style.setIncludeBorder(false);
heading1Style.setIncludePatterns(true);
heading1Style.getInterior().setColor(Color.FromArgb(32, 61, 64));

IStyle percentStyle = workbook.getStyles().get("Percent");
percentStyle.setIncludeAlignment(true);
percentStyle.setHorizontalAlignment(HorizontalAlignment.Center);
percentStyle.setIncludeFont(true);
percentStyle.getFont().setColor(Color.FromArgb(32, 61, 64));
percentStyle.getFont().setName("Century Gothic");
percentStyle.getFont().setBold(true);
percentStyle.getFont().setSize(14);

worksheet.getSheetView().setDisplayGridlines(false);
worksheet.getRange("C4:C7, C11:C23, G6:G7, G9").setStyle(currencyStyle);
worksheet.getRange("B2, B9, E2, E5").setStyle(heading1Style);
worksheet.getRange("G3").setStyle(percentStyle);

worksheet.getRange("E6:G6").getBorders().get(BordersIndex.EdgeBottom).setLineStyle(BorderLineStyle.Medium);
worksheet.getRange("E6:G6").getBorders().get(BordersIndex.EdgeBottom).setColor(Color.FromArgb(32, 61, 64));
worksheet.getRange("E7:G7").getBorders().get(BordersIndex.EdgeBottom).setLineStyle(BorderLineStyle.Medium);
worksheet.getRange("E7:G7").getBorders().get(BordersIndex.EdgeBottom).setColor(Color.FromArgb(32, 61, 64));

worksheet.getRange("E9:G9").getInterior().setColor(Color.FromArgb(32, 61, 64));
worksheet.getRange("E9:F9").setHorizontalAlignment(HorizontalAlignment.Left);
worksheet.getRange("E9:G9").setVerticalAlignment(VerticalAlignment.Center);
worksheet.getRange("E9:G9").getFont().setName("Century Gothic");
worksheet.getRange("E9:G9").getFont().setBold(true);
worksheet.getRange("E9:G9").getFont().setSize(11);
worksheet.getRange("E9:G9").getFont().setColor(Color.GetWhite());
worksheet.getRange("E3:F3").getBorders().setColor(Color.FromArgb(32, 61, 64));
Step 7. Add Conditional Formatting
You can apply conditional formatting on a range depending on the condition to be applied. This example will show the percentage of income spent through a data bar.
IDataBar dataBar = worksheet.getRange("E3").getFormatConditions().addDatabar();
dataBar.getMinPoint().setType(ConditionValueTypes.Number);
dataBar.getMinPoint().setValue(1);
dataBar.getMaxPoint().setType(ConditionValueTypes.Number);
dataBar.getMaxPoint().setValue("=TotalMonthlyIncome");
dataBar.setBarFillType(DataBarFillType.Gradient);
dataBar.getBarColor().setColor(Color.GetRed());
dataBar.setShowValue(false);
With all of the individual style elements and conditional formatting applied, your spreadsheet now looks like this:
Step 8. Add Charts
Create a column chart to illustrate the gap between income and expenses. To polish the layout, change the series overlap and gap width, then customize the formatting of some of the chart elements: chart area, axis line, tick labels, and data points.
IShape shape = worksheet.getShapes().addChart(ChartType.ColumnClustered, 339, 247, 316.5, 346);
shape.getChart().getChartArea().getFormat().getLine().setTransparency(1);
shape.getChart().getColumnGroups().get(0).setOverlap(0);
shape.getChart().getColumnGroups().get(0).setGapWidth(37);

IAxis category_axis = shape.getChart().getAxes().item(AxisType.Category);
category_axis.getFormat().getLine().getColor().setRGB(Color.GetBlack());
category_axis.getTickLabels().getFont().setSize(11);
category_axis.getTickLabels().getFont().getColor().setRGB(Color.GetBlack());

IAxis series_axis = shape.getChart().getAxes().item(AxisType.Value);
series_axis.getFormat().getLine().setWeight(1);
series_axis.getFormat().getLine().getColor().setRGB(Color.GetBlack());
series_axis.getTickLabels().setNumberFormat("$###0");
series_axis.getTickLabels().getFont().setSize(11);
series_axis.getTickLabels().getFont().getColor().setRGB(Color.GetBlack());

ISeries chartSeries = shape.getChart().getSeriesCollection().newSeries();
chartSeries.setFormula("=SERIES("Simple Budget",{"Income","Expenses"},'Sheet1'!$G$6:$G$7,1)");
chartSeries.getPoints().get(0).getFormat().getFill().getColor().setRGB(Color.FromArgb(176, 21, 19));
chartSeries.getPoints().get(1).getFormat().getFill().getColor().setRGB(Color.FromArgb(234, 99, 18));
chartSeries.getDataLabels().getFont().setSize(11);
chartSeries.getDataLabels().getFont().getColor().setRGB(Color.GetBlack());
chartSeries.getDataLabels().setShowValue(true);
chartSeries.getDataLabels().setPosition(DataLabelPosition.OutsideEnd);
Step 9. Save it to XLSX
And finally: the payoff. Export it all to an Excel file so you can see what you’ve built. Be sure that this line of code comes AFTER all of your other code, so it processes before it’s saved.
workbook.save("./SimpleBudget.xlsx");
That’s how you can create a simple spreadsheet in Java with Documents for Excel. Download SimpleBudget.xlsx.
View and download the full demo in Java and Kotlin here.
If you have a question about this tutorial, leave it for us in the comment thread below!