
How do I create an excel file using VBScript? I searched the net but it just mentions opening an existing file.
This is the extraction from the Internet shown below
Set objExcel = CreateObject("Excel.Application")
Set objWorkbook = objExcel.Workbooks.Open("C:ScriptsNew_users.xls")
I want to know how do you create a new excel file or .xls using vbscript?
Thanks and regards
Maddy
![]()
ckpepper02
3,2675 gold badges29 silver badges43 bronze badges
asked Jul 14, 2009 at 5:36
2
Here is a sample code
strFileName = "c:test.xls"

Set objExcel = CreateObject("Excel.Application")
objExcel.Visible = True

Set objWorkbook = objExcel.Workbooks.Add()
objWorkbook.SaveAs(strFileName)

objExcel.Quit
answered Jul 14, 2009 at 5:52
![]()
ShobanShoban
22.9k8 gold badges63 silver badges107 bronze badges
1
set objExcel = CreateObject("Excel.Application")
objExcel.Application.DisplayAlerts = False
set objWorkbook=objExcel.workbooks.add()
objExcel.cells(1,1).value = "Test value"
objExcel.cells(1,2).value = "Test data"
objWorkbook.Saveas "c:testXLS.xls"
objWorkbook.Close
objExcel.workbooks.close
objExcel.quit
set objExcel = nothing `
![]()
CJ7
22.3k65 gold badges186 silver badges318 bronze badges
answered Mar 23, 2015 at 11:48
![]()
MD5MD5
1,31615 silver badges14 bronze badges
'Create Excel

Set objExcel = Wscript.CreateObject("Excel.Application")

objExcel.visible = True

Set objWb = objExcel.Workbooks.Add

objWb.Saveas("D:Example.xlsx")

objExcel.Quit
answered May 17, 2016 at 7:26
![]()
Set objExcel = CreateObject("Excel.Application")
objExcel.Visible = true
Set objWorkbook = objExcel.Workbooks.Add()
Set objWorksheet = objWorkbook.Worksheets(1)

intRow = 2
dim ch
objWorksheet.Cells(1,1) = "Name"
objWorksheet.Cells(1,2) = "Subject1"
objWorksheet.Cells(1,3) = "Subject2"
objWorksheet.Cells(1,4) = "Total"
for intRow = 2 to  10000
name= InputBox("Enter your name")
sb1 = cint(InputBox("Enter your Marks in Subject 1"))
sb2 = cint(InputBox("Enter your Marks in Subject 2"))
total= sb1+sb2+sb3+sb4
objExcel.Cells(intRow, 1).Value = name
objExcel.Cells(intRow, 2).Value = sb1
objExcel.Cells(intRow, 3).Value = sb2
objExcel.Cells(intRow, 4).Value = total
ch = InputBox("Do you want continue..? if no then type no or y to continue")
    If ch = "no" Then Exit For
Next

objExcel.Cells.EntireColumn.AutoFit

MsgBox "Done"
enter code here
answered Jan 14, 2015 at 5:21
![]()
PiushPiush
212 bronze badges
This code creates the file temp.xls in the desktop but it uses the SpecialFolders property, which is very useful sometimes!
set WshShell = WScript.CreateObject("WScript.Shell")
strDesktop = WshShell.SpecialFolders("Desktop")

set objExcel = CreateObject("Excel.Application")
Set objWorkbook = objExcel.Workbooks.Add()
objWorkbook.SaveAs(strDesktop & "temp.xls")
answered Sep 15, 2015 at 13:37
![]()
Use VBScript to create, open, and edit excel files. ( Excel needs to be installed on your computer ).
This file contains bidirectional Unicode text that may be interpreted or compiled differently than what appears below. To review, open the file in an editor that reveals hidden Unicode characters.
Learn more about bidirectional Unicode characters
| ‘Microsoft Excel Automation Basics | |
| ‘:: Create and edit an Excel File. | |
| ‘——————————— | |
| ‘create the excel object | |
| Set objExcel = CreateObject(«Excel.Application») | |
| ‘view the excel program and file, set to false to hide the whole process | |
| objExcel.Visible = True | |
| ‘add a new workbook | |
| Set objWorkbook = objExcel.Workbooks.Add | |
| ‘set a cell value at row 3 column 5 | |
| objExcel.Cells(3,5).Value = «new value» | |
| ‘change a cell value | |
| objExcel.Cells(3,5).Value = «something different» | |
| ‘delete a cell value | |
| objExcel.Cells(3,5).Value = «» | |
| ‘get a cell value and set it to a variable | |
| r3c5 = objExcel.Cells(3,5).Value | |
| ‘save the new excel file (make sure to change the location) ‘xls for 2003 or earlier | |
| objWorkbook.SaveAs «C:UsersUserNameDesktopvbsTest.xlsx» | |
| ‘close the workbook | |
| objWorkbook.Close | |
| ‘exit the excel program | |
| objExcel.Quit | |
| ‘release objects | |
| Set objExcel = Nothing | |
| Set objWorkbook = Nothing |
This file contains bidirectional Unicode text that may be interpreted or compiled differently than what appears below. To review, open the file in an editor that reveals hidden Unicode characters.
Learn more about bidirectional Unicode characters
| ‘Microsoft Excel Automation Basics | |
| ‘:: Open and edit an Excel File. | |
| ‘——————————— | |
| ‘create the excel object | |
| Set objExcel = CreateObject(«Excel.Application») | |
| ‘view the excel program and file, set to false to hide the whole process | |
| objExcel.Visible = True | |
| ‘open an excel file (make sure to change the location) .xls for 2003 or earlier | |
| Set objWorkbook = objExcel.Workbooks.Open(«C:UsersUserNameDesktopvbsTest.xlsx») | |
| ‘set a cell value at row 3 column 5 | |
| objExcel.Cells(3,5).Value = «new value» | |
| ‘change a cell value | |
| objExcel.Cells(3,5).Value = «something different» | |
| ‘delete a cell value | |
| objExcel.Cells(3,5).Value = «» | |
| ‘get a cell value and set it to a variable | |
| r3c5 = objExcel.Cells(3,5).Value | |
| ‘save the existing excel file. use SaveAs to save it as something else | |
| objWorkbook.Save | |
| ‘close the workbook | |
| objWorkbook.Close | |
| ‘exit the excel program | |
| objExcel.Quit | |
| ‘release objects | |
| Set objExcel = Nothing | |
| Set objWorkbook = Nothing |
(Excel Object Model in VBScript)
Excel Application operations using Excel Application Object
Excel Application Object:
It is used to perform operations on Excel Application.
Create Excel Application Object:
Set Variable = CreateObject(“Excel.Application”)
———————-
Excel Application
Excel Workbook / File
Excel Worksheet / Sheet
Excel File Operations using VBScript Examples:
1) Create an Excel file
Dim objExcel
Set objExcel = CreateObject(“Excel.Application”)
objExcel.Visible = True ‘To view the operation (Creating Excel file) during Execution.
objExcel.Workbooks.Add ‘Create New Workbook / file
objExcel.ActiveWorkbook.SaveAs “C:UsersgcreddyDesktopQTP.xls” ‘Save the Excel workbook /file
objExcel.Quit ‘To close the Excel Application
Set objExcel = Nothing ‘To release the memory
—————————————————
2) Check the existence of QTP file, if not exist then create the file.Dim objFso, objExcel, FilePath
FilePath = “C:UsersgcreddyDesktopQTP.xls”
Set objFso = CreateObject(“Scripting.FileSystemObject”)
Set objExcel = CreateObject(“Excel.Application”)
If Not objFso.FileExists(FilePath) Then
objExcel.Workbooks.Add ‘Create New Workbook / file
objExcel.ActiveWorkbook.SaveAs FilePath
objExcel.Quit
End If
Set objExcel = Nothing ‘To release the memory
—————————————————-
3) Check the existence of QTP file, if exists then open the file and enter some data, If not exist then create the file and enter some data (Using Excel Application Object only)
Dim objFso, objExcel, FilePath
FilePath = “C:UsersgcreddyDesktopQTP.xlsx”
Set objFso = CreateObject(“Scripting.FileSystemObject”)
Set objExcel = CreateObject(“Excel.Application”)
If Not objFso.FileExists(FilePath) Then
objExcel.Workbooks.Add
objExcel.Worksheets(1).Cells(1, 1) = “Hello UFT”
objExcel.ActiveWorkbook.SaveAs FilePath
Else
objExcel.Workbooks.Open (FilePath)
objExcel.Worksheets(1).Cells(1, 1) = “Hello UFT”
objExcel.ActiveWorkbook.Save
End If
objExcel.Quit
Set objExcel = Nothing

Excel Objects
1) Excel Application Object
It is used to perform operations on Excel Application.
Set Variable = CreateObject(“Excel.Application”)
——————————–
2) Excel Workbook object
It is used to work with specified Excel file / Workbook
Set Variable = ExcelApplicationObject.Workbooks.Add / Open(“Filepath”)
——————————–
3) Excel Worksheet object
It is used to work with specified work sheet
Set Varaible = ExcelWorkbookObject.Worksheets(Sheet Id / “Sheet name”)
——————————————————-
Excel Application is always only one.
We may have one or more Workbooks.
We may have multiple sheets in every workbook.
———————————————
> Using (“Excel.Application”) class value we create Excel Application Object.
> We create Excel Workbook object using Excel Application Object.
> We create Excel Worksheet object using Excel workbook object.
————————————–
Difference between File system object model and Excel object model in case of Sub objects.
In File system object model creating Text stream object is mandatory to perform File internal operations like Read, Write, Compare, Search etc…
In Excel Object model creating sub and sub-sub objects optional, if you want to work with multiple files and multiple sheets then we can use sub and sub-sub objects.
———————————————————-
4) Check the existence of QTP file, if exists then open the file and enter some data, If not exist then create the file and enter some data (Using Main and sub objects)
Dim objFso, objExcel, objWorkbook, objWorksheet, FilePath
FilePath = “C:UsersgcreddyDesktopQTP.xlsx”
Set objFso = CreateObject(“Scripting.FileSystemObject”)
Set objExcel = CreateObject(“Excel.Application”)
If Not objFso.FileExists(FilePath) Then
Set objWorkbook = objExcel.Workbooks.Add
Set objWorksheet = objWorkbook.Worksheets(1)
objWorksheet.Cells(1, 1) = “Hello UFT”
objWorkbook.SaveAs FilePath
Else
Set objWorkbook = objExcel.Workbooks.Open (FilePath)
Set objWorksheet = objworkbook.Worksheets(1)
objWorksheet.Cells(1, 1) = “Hello UFT”
objWorkbook.Save
End If
objExcel.Quit
Set objExcel = Nothing
————————————————
5) Read data form Excel file and perform Data driven Testing for Login Functionality.
Dim objExcel, objWorkbook, objWorksheet, i, RowsCount
Set objExcel = CreateObject(“Excel.Application”)
Set objWorkbook = objExcel.Workbooks.Open(“C:UsersgcreddyDesktopQTP.xlsx”)
Set objWorksheet = objWorkbook.Worksheets(1)
RowsCount = objWorksheet.UsedRange.Rows.Count
For i = 2 To RowsCount Step 1
SystemUtil.Run “C:Program FilesHPUnified Functional Testingsamplesflightappflight4a.exe”
Dialog(“Login”).Activate
Dialog(“Login”).WinEdit(“Agent Name:”).Set objWorksheet.Cells(i, “A”) ‘i is Row, A is Column Name
Dialog(“Login”).WinEdit(“Password:”).Set objWorksheet.Cells(i, 2) ‘ 2 is Column id
wait 2
Dialog(“Login”).WinButton(“OK”).Click
Window(“Flight Reservation”).Close
Next
objExcel.Quit
Set objWorksheet = Nothing
Set objWorkbook = Nothing
Set objExcel = Nothing
————————————————
6) Read data form Excel file and perform Data driven Testing for Login Functionality. And write Test Result to the Same file 3rd column.
Dim objExcel, objWorkbook, objWorksheet, i, RowsCount
Set objExcel = CreateObject(“Excel.Application”)
Set objWorkbook = objExcel.Workbooks.Open(“C:UsersgcreddyDesktopQTP.xlsx”)
Set objWorksheet = objWorkbook.Worksheets(1)
RowsCount = objWorksheet.UsedRange.Rows.Count
For i = 2 To RowsCount Step 1
SystemUtil.Run “C:Program FilesHPUnified Functional Testingsamplesflightappflight4a.exe”
Dialog(“Login”).Activate
Dialog(“Login”).WinEdit(“Agent Name:”).Set objWorksheet.Cells(i, “A”) ‘i is Row, A is Column Name
Dialog(“Login”).WinEdit(“Password:”).Set objWorksheet.Cells(i, 2) ‘ 2 is Column id
wait 2
Dialog(“Login”).WinButton(“OK”).Click
If Window(“Flight Reservation”).Exist (12) Then
Window(“Flight Reservation”).Close
objWorksheet.Cells(i, 3) = “Login Successful – Passed”
Else
SystemUtil.CloseDescendentProcesses
objWorksheet.Cells(i, 3) = “Login Unsuccessful – Failed”
End If
Next
objWorkbook.Save
objExcel.Quit
Set objWorksheet = Nothing
Set objWorkbook = Nothing
Set objExcel = Nothing
————————————————
7) Read data form Excel file and perform Data driven Testing for Login Functionality. And write Test Result and Error messages to the same file.Dim objExcel, objWorkbook, objWorksheet, i, RowsCount
Set objExcel = CreateObject(“Excel.Application”)
Set objWorkbook = objExcel.Workbooks.Open(“C:UsersgcreddyDesktopQTP.xlsx”)
Set objWorksheet = objWorkbook.Worksheets(1)
RowsCount = objWorksheet.UsedRange.Rows.Count
For i = 2 To RowsCount Step 1
SystemUtil.Run “C:Program FilesHPUnified Functional Testingsamplesflightappflight4a.exe”
Dialog(“Login”).Activate
Dialog(“Login”).WinEdit(“Agent Name:”).Set objWorksheet.Cells(i, “A”) ‘i is Row, A is Column Name
Dialog(“Login”).WinEdit(“Password:”).Set objWorksheet.Cells(i, 2) ‘ 2 is Column id
wait 2
Dialog(“Login”).WinButton(“OK”).Click
If Window(“Flight Reservation”).Exist (12) Then
Window(“Flight Reservation”).Close
objWorksheet.Cells(i, 3) = “Login Successful – Passed”
Else
objWorksheet.Cells(i, 4) = Dialog(“Login”).Dialog(“Flight Reservations”).Static(“Agent name must be at”).GetROProperty(“text”)
SystemUtil.CloseDescendentProcesses
objWorksheet.Cells(i, 3) = “Login Unsuccessful – Failed”
End If
Next
objWorkbook.Save
objExcel.Quit
Set objWorksheet = Nothing
Set objWorkbook = Nothing
Set objExcel = Nothing
——————————————–
 Read Button Names from Login Dialog and export to Excel file 2nd sheet.Dim objExcel, objWorkbook, objWorksheet, oButton, Buttons, i
Set objExcel = CreateObject(“Excel.Application”)
Set objWorkbook= objExcel.Workbooks.Open (“C:UsersgcreddyDesktopQTP.xlsx”)
Set objworksheet = objWorkbook.Worksheets(2)
Set oButton = Description.Create
oButton(“Class Name”).Value = “WinButton”
Set Buttons = Dialog(“Login”).ChildObjects(oButton)
Msgbox Buttons.Count
objWorksheet.cells(1, 1) = “Button Names”
For i = 0 To Buttons.Count – 1 Step 1
objWorksheet.cells(i+2, 1) = Buttons(i).GetRoProperty(“text”)
Next
objWorkbook.Save
objExcel.Quit
Set objWorksheet = Nothing
Set objWorkbook = Nothing
Set objexcel = Nothing
—————————————————
9) Read Link names from Google Home page and export to Excel file 3rd sheet.Dim objExcel, objWorkbook, objWorksheet, oLink, Links, i
Set objExcel = CreateObject(“Excel.Application”)
Set objWorkbook= objExcel.Workbooks.Open (“C:UsersgcreddyDesktopQTP.xlsx”)
Set objworksheet = objWorkbook.Worksheets(3)
Set oLink = Description.Create
oLink(“micclass”).Value = “Link”
Set Links = Browser(“Google”).Page(“Google”).ChildObjects(oLink)
Msgbox Links.Count
objWorksheet.cells(1, 1) = “Link Names”
For i = 0 To Links.Count – 1 Step 1
objWorksheet.cells(i+2, 1) = Links(i).GetRoProperty(“text”)
Next
objWorkbook.Save
objExcel.Quit
Set objWorksheet = Nothing
Set objWorkbook = Nothing
Set objexcel = Nothing
—————————————————
10) Read Customer names from 1 to 10 Records and export to Excel
Dim objExcel, objWorkbook, objWorksheet, Customer_Name, i
Set objExcel = CreateObject(“Excel.Application”)
Set objWorkbook= objExcel.Workbooks.Open (“C:UsersgcreddyDesktopQTP.xlsx”)
Set objworksheet = objWorkbook.Worksheets(2)
objWorksheet.cells(1, 1) = “Customer Names”
For i = 1 To 10 Step 1
Window(“Flight Reservation”).Activate
Window(“Flight Reservation”).WinButton(“Button”).Click
Window(“Flight Reservation”).Dialog(“Open Order”).WinCheckBox(“Order No.”).Set “ON”
Window(“Flight Reservation”).Dialog(“Open Order”).WinEdit(“Edit”).Set i
Window(“Flight Reservation”).Dialog(“Open Order”).WinButton(“OK”).Click
Customer_Name = Window(“Flight Reservation”).WinEdit(“Name:”).GetROProperty(“text”)
objWorksheet.Cells(i+1, 1) = Customer_Name
Next
objWorkbook.Save
objExcel.Quit
Set objWorksheet = Nothing
Set objWorkbook = Nothing
Set objexcel = Nothing
————————————————–
11) Create an Excel File and Rename 1st sheet as “Module”, 2nd sheet as “TestCase”, and 3rd sheet as “TestStep”.
Dim objExcel
Set objExcel = CreateObject(“Excel.Application”)
objExcel.Workbooks.Add
objExcel.Worksheets(1).Name = “Module”
objExcel.Worksheets(2).Name = “TestCase”
objExcel.Worksheets(3).Name = “TestStep”
objExcel.ActiveWorkbook.SaveAs “C:UsersgcreddyDesktopQTP2.xlsx”
objExcel.Quit
Set objExcel = Nothing
12) Create an Excel file and Add one more sheet.Dim objExcel
Set objExcel = CreateObject(“Excel.Application”)
objExcel.Workbooks.Add ‘Create New workbook
objexcel.Worksheets.Add ‘Create New worksheet
objExcel.ActiveWorkbook.SaveAs “C:UsersgcreddyDesktopQTP3.xlsx”
objExcel.Quit
Set objExcel = Nothing
———————————————
Assignment:
Create an Excel file and Move 1st sheet to 3rd position.
Creation Time:
Sheet1 Sheet2 sheet3
Move 1st sheet to 3rd position
Sheet2 Sheet3 Sheet1
————————————————–
Comparison examples:
i) One to one comparison (Textual and binary)
ii) Many to many comparison
————————————————-
Follow me on social media:
The below script is an example of how to create, populate and format an Excel document from a VBS script.
The script is commented, but please feel free to comment if you have any questions.
This code was last tested June 2022 using the latest Office 365 version of Excel
What is covered in this post?
In this example code we will
- Creating a new workbook
- Select a sheet
- Changing the name of the sheet
- Adding some data in specific locations and via a loop
- Change the font to bold and the font size
- Freezing panes
- Change the column widths to a specific size and the auto size to fit the contents
- Change the text and background colors
- Saving the document
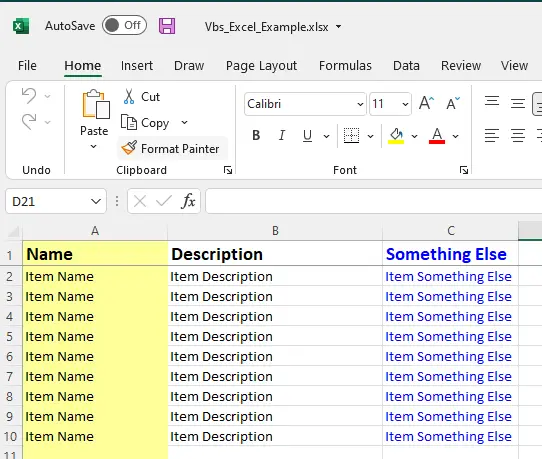
The Result
The result of the following example code will generate an example spreadsheet that looks like this
The Code
Change the variable “strExcelPath” as required to a location you have permission to save to.
'Bind to the Excel object
Set objExcel = CreateObject("Excel.Application")

'Create a new workbook.
objExcel.Workbooks.Add

'Select the first sheet
Sheet = 1

'Bind to worksheet.
Set objSheet = objExcel.ActiveWorkbook.Worksheets(Sheet)

'Name the worksheet
objSheet.Name = "VBS_Excel_Example"

'Set the save location
strExcelPath = "d:Vbs_Excel_Example.xlsx"

'--------------------------------------------------------
'Populate the worksheet with data
'--------------------------------------------------------
'   objSheet.Cells(row, column).Value = "Whatever"

'Add some titles to row 1
objSheet.Cells(1, 1).Value = "Name" 'Row 1 Column 1 (A)
objSheet.Cells(1, 2).Value = "Description" 'Row 1 Column 2 (B)
objSheet.Cells(1, 3).Value = "Something Else" 'Row 1 Column 3 (C)

'Add some data using a loop
For row = 2 to 10
	objSheet.Cells(row, 1).Value = "Item Name"
	objSheet.Cells(row, 2).Value = "Item Description"
	objSheet.Cells(row, 3).Value = "Item Something Else"
Next

'--------------------------------------------------------
' Format the spreadsheet
'--------------------------------------------------------
'Put the first row in bold
objSheet.Range("A1:C1").Font.Bold = True

'Change the font size of the first row to 14
objSheet.Range("A1:C1").Font.Size = 14

'Freeze the panes
objSheet.Range("A2").Select
objExcel.ActiveWindow.FreezePanes = True

'Change column A and B to use a fixed width
objExcel.Columns(1).ColumnWidth = 20
objExcel.Columns(2).ColumnWidth = 30

'Change column C to autofit
objExcel.Columns(3).AutoFit()

'Change the background colour of column A to a light yellow
objExcel.Columns(1).Interior.ColorIndex = 36

'Change the font colour of column C to blue
objExcel.Columns(3).Font.ColorIndex = 5

'--------------------------------------------------------
' Save the spreadsheet and close the workbook
'--------------------------------------------------------
objExcel.ActiveWorkbook.SaveAs strExcelPath
objExcel.ActiveWorkbook.Close

'Quit Excel
objExcel.Application.Quit

'Clean Up
Set objSheet = Nothing
Set objExcel = Nothing
Make sure that your vbs file is placed inside the folder in which you want to create excel file. After running the vbs file, you can delete it from that folder. Use this code inside the vbs file:
call fn_createExcel()

Function fn_CreateExcel()
    Dim objFso, objExcel, objWorkbook
    Set objFso = CreateObject("Scripting.FileSystemobject")
    strTemp = objFso.GetAbsolutePathName("")
    tempArr=Split(strTemp,"")
    strFileName= strTemp&""&tempArr(ubound(tempArr))&"_Summary.xlsx"
    Set objExcel = CreateObject("Excel.Application")
    objExcel.Visible = True
    Set objWorkbook = objExcel.Workbooks.Add()
    objWorkbook.SaveAs strFileName

    objExcel.Quit
    Set objExcel = Nothing
    Set objFso = Nothing
End Function
EDIT 2:
Create a xlsm file having the vba code as below(also see the image attached). Place this xlsm file inside the folder where you want the excel files to be created, open and run the procedure. After excel file is created, you can remove this xlsm file from that folder.
Function fn_CreateExcel()
    Dim objExcel, objWorkbook, strFileName, strTemp
    strTemp = Application.ActiveWorkbook.Path
    tempArr = Split(strTemp, "")
    strFileName = strTemp & "" & tempArr(UBound(tempArr)) & "_Summary.xlsx"
    Set objExcel = CreateObject("Excel.Application")
    objExcel.Visible = True
    Set objWorkbook = objExcel.Workbooks.Add()
    objWorkbook.SaveAs strFileName

    objExcel.Quit
    Set objExcel = Nothing
End Function
You can modify the code/logic further as per your requirement. I have tried this code and is working.