
The reason the solution you found on the internet is no working is because of the line that starts var colCount. The variable mytable only has two elements being <thead> and <tbody>. The var colCount line is looking for all the elements within mytable that are <tr>. The best thing you can do is give an id to your <thead> and <tbody> and then grab all the values based on that. Say you had <thead id='headers'> :
function write_headers_to_excel()
{
  str="";

  var myTableHead = document.getElementById('headers');
  var rowCount = myTableHead.rows.length;
  var colCount = myTableHead.getElementsByTagName("tr")[0].getElementsByTagName("th").length;

var ExcelApp = new ActiveXObject("Excel.Application");
var ExcelSheet = new ActiveXObject("Excel.Sheet");
ExcelSheet.Application.Visible = true;

for(var i=0; i<rowCount; i++)
{
    for(var j=0; j<colCount; j++)
    {
        str= myTableHead.getElementsByTagName("tr")[i].getElementsByTagName("th")[j].innerHTML;
        ExcelSheet.ActiveSheet.Cells(i+1,j+1).Value = str;
    }
}

}
and then do the same thing for the <tbody> tag.
EDIT: I would also highly recommend using jQuery. It would shorten this up to:
function write_to_excel()
{
 var ExcelApp = new ActiveXObject("Excel.Application");
 var ExcelSheet = new ActiveXObject("Excel.Sheet");
 ExcelSheet.Application.Visible = true;

  $('th, td').each(function(i){
    ExcelSheet.ActiveSheet.Cells(i+1,i+1).Value = this.innerHTML;
  });
}
Now, of course, this is going to give you some formatting issues but you can work out how you want it formatted in Excel.
EDIT: To answer your question about how to do this for n number of tables, the jQuery will do this already. To do it in raw Javascript, grab all the tables and then alter the function to be able to pass in the table as a parameter. For instance:
var tables = document.getElementsByTagName('table');
for(var i = 0; i < tables.length; i++)
{
  write_headers_to_excel(tables[i]);
  write_bodies_to_excel(tables[i]);
}
Then change the function write_headers_to_excel() to function write_headers_to_excel(table). Then change var myTableHead = document.getElementById('headers'); to var myTableHead = table.getElementsByTagName('thead')[0];. Same with your write_bodies_to_excel() or however you want to set that up.
![]()

ExcellentExport.js
-
❤️ Sponsor ExcellentExport.js project❤️
-
JavaScript export to Excel or CSV.
-
A quick JavaScript library to create export to Excel/CSV from HTML tables in the browser. No server required.
-
As part of the new version 3.0.0+, there is support for XLSX. The drawback is that the library is 200+ KB.
-
Check My Blog Page for Testing :
JavaScript export to ExcelExcellentExport.js update: JavaScript export to Excel and CSV
Revision history:
3.9.3
- Fix TypeScript exported types
3.9.0
- Cell types and formats!!! Now you can define the cell type and format. For example, you can define a cell as a date or a number. You can also define the format of the cell. For example, you can define a cell as a date with the format «dd/mm/yyyy» or a number with the format «#,##0.00».
3.8.1
- Activate XLSX compression by default. The example of index.bigtable.html went from 18Mb to 3Mb.
- Update npm dependencies to fix vulnerabilities
- Update to latest version of TypeScript
- Reduced size of the library from 912 KB to 277 KB!!!
3.8.0
- Allow RTL options on the whole file or sheet.
- Update npm dependencies to fix vulnerabilities
3.7.3
- Fix (#591) remove columns parameter. Now it is not affected by repeated column numbers nor its order.
3.7.2
- Update npm dependencies to fix vulnerabilities
3.7.1
- Update npm dependencies to fix vulnerabilities
- Start using Dependabot and get rid of Dependabot-preview
3.7.0
- Added option
openAsDownload: boolean. Use this option to download as a file without using an anchor tag. So download can be triggered from a button. - Update npm dependencies to fix vulnerabilities
3.6.0
- Added sponsor link to the project ❤️ Sponsor ExcellentExport.js project❤️
- Transform the project from JavaScript to TypeScript
- Configure Jest as test runner
- Update npm dependencies to fix vulnerabilities
3.5.0
- Add fixValue and fixArray functions to configuration: these configuration functions can be used to manipulate the values of the cells.
- Update npm dependencies to fix vulnerabilities
3.4.3
- Update npm dependencies to fix vulnerabilities
3.4.2
- Remove ES6 function syntax to support IE11
- Update npm dependencies to fix vulnerabilities
3.4.0
- Configure TravisCI on GitHub
- Update npm dependencies to fix vulnerabilities
3.3.0
- Remove columns by index
- Filter rows by value
- Updated build to Webpack 4.x.x
3.2.1
- Update npm dependencies to fix vulnerabilities
3.2.0
- Update npm dependencies to fix vulnerabilities
3.1.0
- Fix old API for base64 and escaping problem.
3.0.0
- XLSX support. This bumps the build size to 640 KB.
- New API : ExcellentExport.convert(…)
- Autogenerate download filename.
- Data input from arrays or HTML Tables.
- Multiple sheets for XLS or XLSX formats.
2.1.0
- Add Webpack build.
- Create UMD JavaScript module. Library can be loaded as a module (import, RequireJS, AMD, etc…) or standalone as window.ExcelentExport.
2.0.3
- Fix export as a module.
- Changed minifier to UglifyJS.
2.0.2
- Fix CSV Chinese characters and other special characters display error in Windows Excel.
- Fix URL.createObjectURL(…) on Firefox.
2.0.0
- Now it can export to big files +2MB.
- Minimum IE 11.
- Links open with URL.createObjectURL(…).
- NPM package available.
- Using Semantic versioning (2.0.0 instead of 2.0).
- Module can be loaded standalone or with RequireJS.
- Change license to MIT.
1.5
- Possibility to select a CSV delimiter.
- Bower package available.
- Compose package available.
1.4
- Add LICENSE.txt with GPL v3
- UTF-8 characters fixed.
1.3
- Added minified version
1.1
- Added CSV data export
1.0
- Added Excel data export
Compatibility
- Firefox
- Chrome
- Internet Explorer 11+
Install
npm
npm install excellentexport --save
yarn
bower
bower install excellentexport
Load
Include script in your HTML:
<script type="text/javascript" src="dist/excellentexport.js"></script>
Include script in your HTML using CDN:
<script type="text/javascript" src="https://cdn.jsdelivr.net/npm/excellentexport@3.4.3/dist/excellentexport.min.js"></script>
Require.js
<script src="http://requirejs.org/docs/release/2.3.6/minified/require.js"></script>
<script>
    require(['dist/excellentexport'], function(ee) {
        window.ExcellentExport = ee;
    });
</script>
ES6 import
import ExcellentExport from 'excellentexport';
Usage
<table id="datatable">
    <tr>
        <td>100</td> <td>200</td> <td>300</td>
    </tr>
    <tr>
        <td>400</td> <td>500</td> <td>600</td>
    </tr>
</table>

<a download="somedata.xls" href="#" onclick="return ExcellentExport.excel(this, 'datatable', 'Sheet Name Here');">Export to Excel</a>
<a download="somedata.csv" href="#" onclick="return ExcellentExport.csv(this, 'datatable');">Export to CSV</a>
<!-- new API, xlsx -->
<a download="somedata.xlsx" href="#" onclick="return ExcellentExport.convert({ anchor: this, filename: 'data_123.array', format: 'xlsx'},[{name: 'Sheet Name Here 1', from: {table: 'datatable'}}]);">Export to CSV</a>
API
 ExcellentExport.convert(options, sheets);

 Options:
 {
    anchor: String or HTML Element,
    format: 'xlsx' or 'xls' or 'csv',
    filename: String,
    rtl: Use Right-to-left characters, boolean (optional)
 }

 Sheets must be an array of sheet configuration objects. Sheet description:
 [
    {
        name: 'Sheet 1', // Sheet name
        from: {
            table: String/Element, // Table ID or table element
            array: [...] // Array with the data. Array where each element is a row. Every row is an array of the cells.
        },
        removeColumns: [...], // Array of column indexes (from 0)
        filterRowFn: function(row) {return true}, // Function to decide which rows are returned
        fixValue: function(value, row, column) {return fixedValue} // Function to fix values, receiving value, row num, column num
        fixArray: function(array) {return array} // Function to manipulate the whole data array
        rtl: Use Right-to-left characters, boolean (optional)
        formats: [...] // Array of formats for each column. See formats below.
        ...
    },
    {
        ...
    }, ...
]
fixValue example
This is an example for the fixValue function to handle HTML tags inside a table cell.
It transforms BR to line breaks and then strips all the HTML tags.
            fixValue: (value, row, col) => {
                let v = value.replace(/<br>/gi, "n");
                let strippedString = v.replace(/(<([^>]+)>)/gi, "");
                return strippedString;
            }
Formats
You can specify an array with the formats for a specific cell range (i.e. A1:A100, A1:D100, A1:H1, etc).
Each element in the format array consists on:
{
    "range": "A1:A100", // Range of cells to apply the format, mandatory
    "format": {
        "type": "<cell_type>", // Type of format, mandatory
        "pattern": "<pattern>" // Pattern, optional
    }
}
Example:
          formats: [
            {
              range: "C2:C20",
              format: {
                type: "n",
                pattern: "0.00",
              },
            },
            {
              range: "C2:C20",
              format: ExcellentExport.formats.NUMBER,
            }
          ],
format can be used from one of the predefined types if you use TypeScript
cell_type can be one of the followint:
's': String
'n': Number
'd': Date
'b': Boolean
pattern is a string with the format pattern used in Excel. For example:
'0' // Integer
'0.00' // 2 decimals
'dd/mm/yyyy' // Date
'dd/mm/yyyy hh:mm:ss' // Date and time
'0.00%' // Percentage
'0.00e+00' // Scientific notation
'@' // Text
Notes
- IE8 or lower do not support data: url schema.
- IE9 does not support data: url schema on links.
- IE10 and above and Edge are supported via the Microsoft-specific
msOpenOrSaveBlobmethod.
Test
python 2.x:
    python -m SimpleHTTPServer 8000

python 3.x:
    python -m http.server 8000
Build
Install dependencies:
Build development version dist/excellentexport.js
Build publish version of dist/excellentexport.js
Publish
Если нужно быстро и единоразово выгрузить данные из таблицы MySQL в Exel файл, то помогут следующие способы:
1
Экспорт через PHPMyAdmin
В PHPMyAdmin при экспорте можно выбрать формат «CSV for MS Excel»:

При открытии полученного файла в Excel будет сбита кодировка:
Чтобы это исправить, нужно открыть csv файл в редакторе типа Notepad++ и изменить кодировку на ANSI:
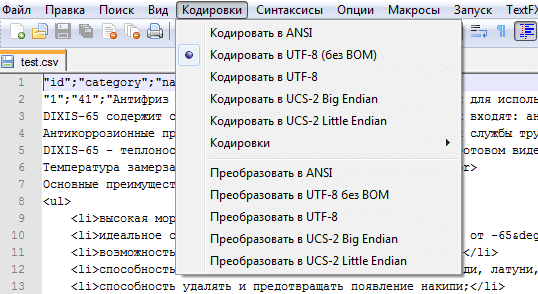
Результат:

2
Экспорт через HTML таблицу
Смысл метода состоит в том чтобы PHP-скриптом сформировать HTML таблицу:
<?php
$dbh = new PDO('mysql:dbname=db_name;host=localhost', 'логин', 'пароль');
$sth = $dbh->prepare("SELECT * FROM `test`");
$sth->execute();
$items = $sth->fetchAll(PDO::FETCH_ASSOC);
?>

<table>
	<tr>
		<td>ID</td>
		<td>Категория</td>
		<td>Название</td>
		<td>Описание</td>
	</tr>
	<?php foreach($items as $row): ?>
	<tr>
		<td><?php echo $row['id']; ?></td>
		<td><?php echo $row['category']; ?></td>
		<td><?php echo $row['name']; ?></td>
		<td><?php echo $row['text']; ?></td>
	</tr>
	<?php endforeach; ?>
</table>
PHP
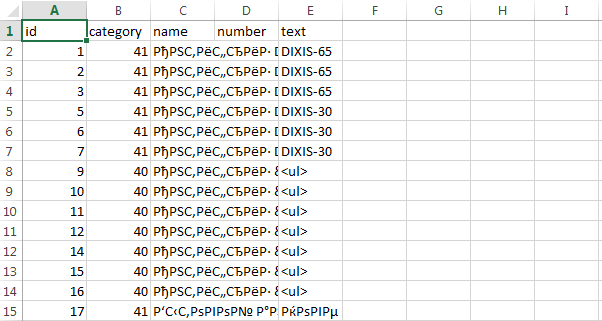
Результат работы скрипта:
Полученную таблицу копируем и вставляем в чистый лист Microsoft Exel:

3
Экспорт через PHPExcel
Третий метод – сформировать xls-файл в библиотеке PHPExcel (PHPExcel.zip).
//spl_autoload_unregister('autoload');
require_once __DIR__ . '/PHPExcel/Classes/PHPExcel.php';
require_once __DIR__ . '/PHPExcel/Classes/PHPExcel/Writer/Excel2007.php';

$xls = new PHPExcel();
$xls->setActiveSheetIndex(0);
$sheet = $xls->getActiveSheet();

// Шапка
$sheet->getStyle("A1:D1")->getFont()->setBold(true);
$sheet->setCellValue("A1", 'ID');
$sheet->setCellValue("B1", 'Категория');
$sheet->setCellValue("C1", 'Название');
$sheet->setCellValue("D1", 'Описание');

// Выборка из БД
$dbh = new PDO('mysql:dbname=db_name;host=localhost', 'логин', 'пароль');
$sth = $dbh->prepare("SELECT * FROM `test`");
$items = $sth->fetch(PDO::FETCH_ASSOC);

$index = 2;
foreach ($items as $row) {
	$sheet->setCellValue("A" . $index, $row['id']);
	$sheet->setCellValue("B" . $index, $row['category']);
	$sheet->setCellValue("C" . $index, $row['name']);
	$sheet->setCellValue("D" . $index, $row['name']);
	$index++;
}

// Отдача файла в браузер
header("Expires: Mon, 1 Apr 1974 05:00:00 GMT");
header("Last-Modified: " . gmdate("D,d M YH:i:s") . " GMT");
header("Cache-Control: no-cache, must-revalidate");
header("Pragma: no-cache");
header("Content-type: application/vnd.ms-excel" );
header("Content-Disposition: attachment; filename=prods.xlsx");

$objWriter = new PHPExcel_Writer_Excel2007($xls);
$objWriter->save('php://output');

exit();
PHP
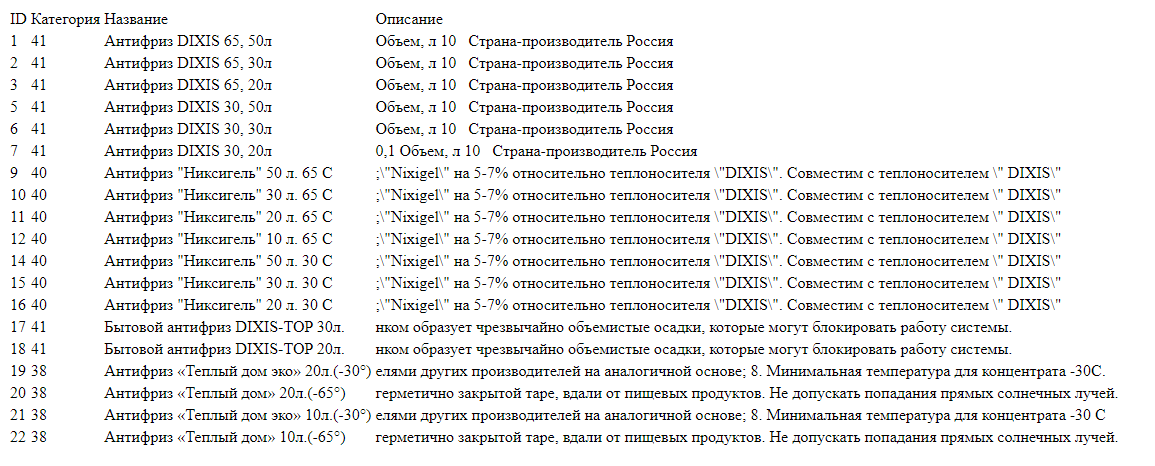
Результат:
У многих при работе с PHP в связке с MySQL возникает такая потребность, как экспорт данных из базы в формат xls, для того чтобы люди, которым нужны эти данные, обрабатывали их в программе Excel или просто пользователям было удобно смотреть эти данные. Недавно у меня возникла такая потребность и сегодня я расскажу, как это дело можно реализовать.
Сразу скажу, что этот способ достаточно простой, но данные выгружаются нормально.
Для начала приведу пример конечного xls файла, в программе Excel выгрузка будет выглядеть примерно так:
Другими словами, никаких картинок, стилей выгружено не будет, только заголовки столбцов и сами данные.
До того как я пришел именно к такому варианту выгрузки я пробовал выгружать в формат csv, но получалось немного коряво, потом пробовал отрисовывать таблицу и сохранять ее с расширением xls, также получалось какая-то ерунда, способ, который я сейчас опишу, меня полностью устроил, и сейчас с Вами я им поделюсь.
Для начала приведу весь код, который я максимально прокомментировал, можете выделить его и сохранить с расширением php и пробовать, только не забудьте прописать настройки подключения к базе данных.

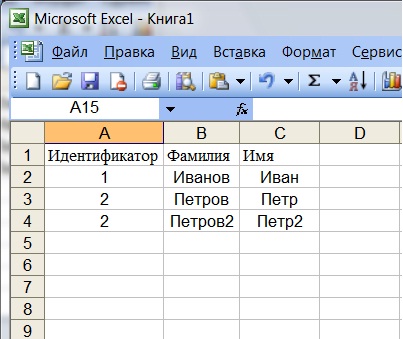
А еще чтобы Вы понимали, какие данные я выгружаю, приведу пример простой таблицы в БД (у меня ее название test):
Тестовая таблица:
| id | firstname | name |
| 1 | Иванов | Иван |
| 2 | Петров | Петр |
| 2 | Петров2 | Петр2 |
Код:
   <?php
        mysql_connect ("localhost", "root","");//подключение к серверу
        mysql_select_db("test") or die (mysql_error());//выбор базы данных
        mysql_query('SET character_set_database = utf8');
        mysql_query ("SET NAMES 'utf8'");
        error_reporting(E_ALL);
        ini_set("display_errors", 1);

   if( !defined( "ExcelExport" ) ) {
    define( "ExcelExport", 1 );
      class ExportToExcel {
        var $xlsData = "";
        var $fileName = "";
        var $countRow = 0;
        var $countCol = 0;
        var $totalCol = 3;//общее число  колонок в Excel
                //конструктор класса
        function __construct (){
                $this->xlsData = pack( "ssssss", 0x809, 0x08, 0x00,0x10, 0x0, 0x0 );
        }
                // Если число
        function RecNumber( $row, $col, $value ){
                $this->xlsData .= pack( "sssss", 0x0203, 14, $row, $col, 0x00 );
                $this->xlsData .= pack( "d", $value );
                return;
        }
                //Если текст
        function RecText( $row, $col, $value ){
                $len = strlen( $value );
                $this->xlsData .= pack( "s*", 0x0204, 8 + $len, $row, $col, 0x00, $len);
                $this->xlsData .= $value;
                return;
        }
                // Вставляем число
        function InsertNumber( $value ){
                if ( $this->countCol == $this->totalCol ) {
                        $this->countCol = 0;
                        $this->countRow++;
                }
                $this->RecNumber( $this->countRow, $this->countCol, $value );
                $this->countCol++;
                return;
        }
                // Вставляем текст
        function InsertText( $value ){
                if ( $this->countCol == $this->totalCol ) {
                        $this->countCol = 0;
                        $this->countRow++;
        }
                $this->RecText( $this->countRow, $this->countCol, $value );
                $this->countCol++;
                return;
        }
                // Переход на новую строку
        function GoNewLine(){
                $this->countCol = 0;
                $this->countRow++;
                return;
                }
                //Конец данных
        function EndData(){
                $this->xlsData .= pack( "ss", 0x0A, 0x00 );
                return;
        }
                // Сохраняем файл
        function SaveFile( $fileName ){
                $this->fileName = $fileName;
                $this->SendFile();
        }
                // Отправляем файл
        function SendFile(){
                $this->EndData();
                header ( "Last-Modified: " . gmdate("D,d M YH:i:s") . " GMT" );
                header ( "Cache-Control: no-store, no-cache, must-revalidate" );
                header ( "Pragma: no-cache" );
                header ( "Content-type: application/x-msexcel" );
                header ( "Content-Disposition: attachment; fileName=$this->fileName.xls" );
                print $this->xlsData;
         }
        }
   }
        if(isset($_GET['id'])) {
                //фильтруем данные
   $id = mysql_real_escape_string(stripslashes(trim(htmlspecialchars($_GET['id'],ENT_QUOTES))));
                $filename = 'Файл_с_id_'.$id; // задаем имя файла
                $excel = new ExportToExcel(); // создаем экземпляр класса
                $sql="SELECT * FROM  test.test where id = $id";//запрос к базе
                $rez=mysql_query($sql);
                $excel->InsertText('Идентификатор');
                $excel->InsertText('Фамилия');
                $excel->InsertText('Имя');
                $excel->GoNewLine();
        While($row=mysql_fetch_assoc($rez)){
                $excel->InsertNumber($row['id']);
                $excel->InsertText($row['firstname']);
                $excel->InsertText($row['name']);
                $excel->GoNewLine();
        }
        $excel->SaveFile($filename);
   }
   ?>
Вся идея здесь заключается в функции pack(), которая упаковывает данные в бинарную строку, а мы в свою очередь последовательно заполняем эту строку данными, которые мы выгрузили из базы данных MySql с помощью обычной функции mysql_query().
Для того чтобы проверить работоспособность данного кода, с учетом того, что Вы настроили подключение к базе данных и создали аналогичную таблицу, можете послать такой запрос:
http://ваш_сайт/название _файла. php?id=2
И у Вас должно выгрузиться две строки с id равным 2.
И теперь каждый, которому Вы разрешите выгружать данные может легко экспортировать их на свой локальный компьютер через web интерфейс. Данный способ удобен как для корпоративных пользователей, если Вы разрабатываете приложение для своей организации, так и для пользователей Вашего web сайта в Интернете. Надеюсь, данный способ Вам помог. Удачи!
Заметка! Если Вас интересует язык SQL, рекомендую пройти мой онлайн-курс по основам SQL, который ориентирован на изучение SQL как стандарта, таким образом, Вы сможете работать в любой системе управления базами данных. Курс включает много практики: онлайн-тестирование, задания и многое другое.

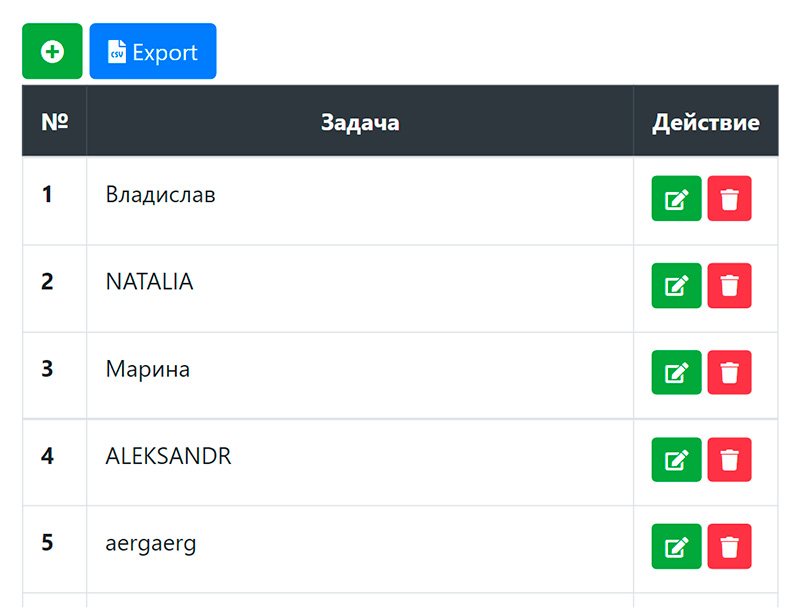
Привет. Очень часто возникает необходимость экспортировать какие-то данные с сайта в Excel таблицу, например внутри личного кабинета компании формировать какой-то отчет и выгрузить его в формате CSV. PHP отлично с этим справляется и даже существуют специальные библиотеки, которые в значительной степени упрощают работу с экспортом данных в Excel. Но в данном примере мы их рассматривать не будем, а научимся это делать на чистом PHP. Ранее я публиковал материалы по созданию CRUD приложения на PHP, где мы помещали в базу данных некую информацию и выводили е на страницу. Я покажу, как можно сделать запись этих данных в CSV файл. И то же самое мы реализуем из другого приложения, где мы делали веб-приложение и хранили все записи в JSON файле. Как это выглядит можно посмотреть на демо странице:

Демо
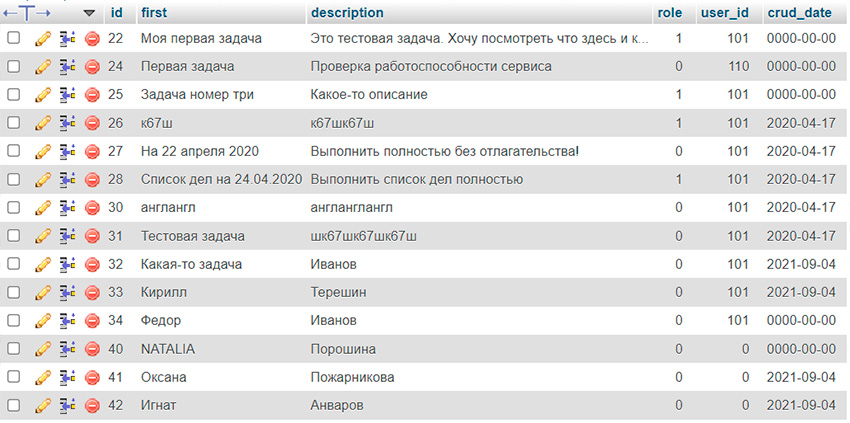
Экспорт в CSV из БД MySQL
Для начала подготовим кнопку, по нажатию которой на компьютер будет происходить загрузка CSV файла с экспортированными данными. Соответственно она должна быть обернута в тег form. Я использую Bootstrap и FontAwesome, поэтому добавлю еще иконку.
1 2 3 4 5 |
<form action="" method="post"> <button class="btn btn-primary mb-1" name="export_excel"> <i class="fa fa-file-csv"></i> Export</button> </form> |

PHP CSV
1 2 3 4 5 6 7 8 9 10 11 12 13 14 |
if (isset($_POST['export_exel'])) { header("Content-Type: text/csv; charset=utf-8"); header("Content-Disposition: attachment; filename=download.csv"); $output = fopen("php://output", "w"); fputcsv($output, array('ID', 'Имя', 'Фамилия', 'Ставка')); $sql = "SELECT * FROM `crud` ORDER BY `id` DESC"; $result = mysqli_query($mysqli, $sql); while ($row = mysqli_fetch_assoc($result)) { fputcsv($output, $row); } fclose($output); exit; } |
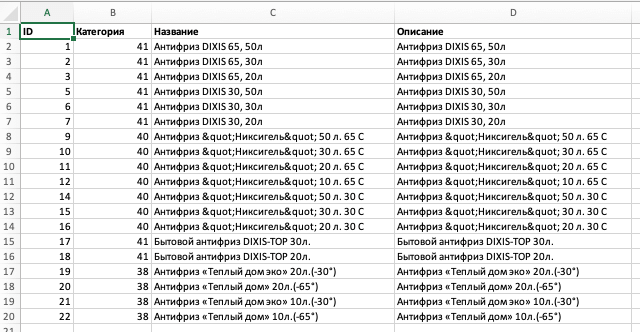
Нажимаем кнопку экспорта и получаем CSV файл с данными:
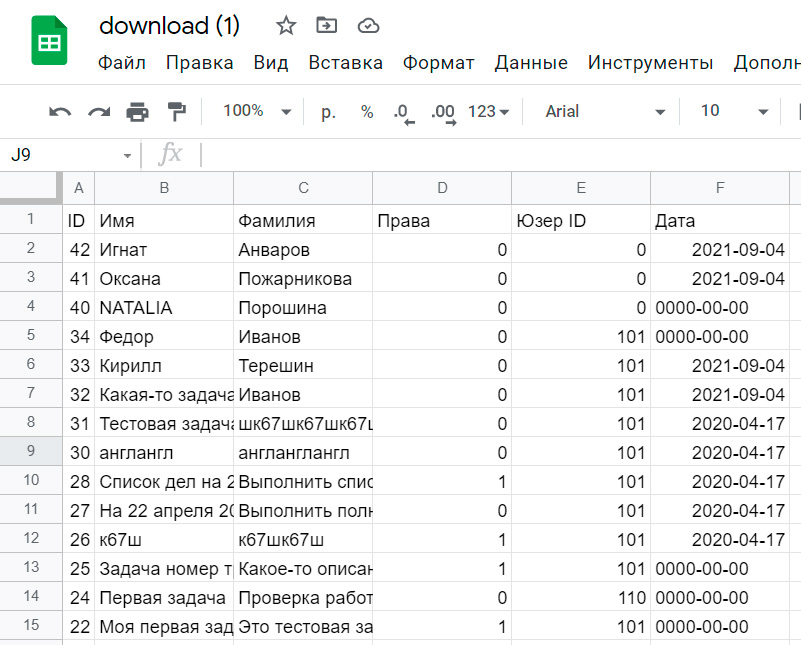
Эта таблица полностью повторяет все, что находится в базе данных MySQL, только в обратном порядке.
Если нужно экспортировать не все, а лишь некоторые ячейки таблицы, к примеру вы хотите из этой базы взять только Имя
Фамилию, то всего лишь нужно заменить пару строк кода:
5 |
fputcsv($output, array('Имя', 'Фамилия')); |
10 |
fputcsv($output, [$row['first'], $row['description']]); |
Конечно в этой БД полный бардак, но думаю, что принцип вам понятен. Для того, чтобы каждый раз вы экспортировали уникальный файл, то можно добавить в его имя временную метку:
И изменить 3 строчку на:
3 |
header("Content-Disposition: attachment; filename=download".$t .".csv"); |
Экспорт в CSV из JSON файла.
Как реализована запись в JSON — смотрите в предыдущем посте. Здесь будет чисто экспорт.
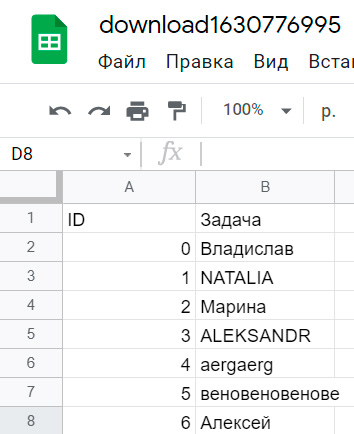
1 2 3 4 5 6 7 8 9 10 11 12 13 |
if (isset($_POST['export_exсel'])) { $t = time(); header("Content-Type: text/csv; charset=utf-8"); header("Content-Disposition: attachment; filename=download".$t .".csv"); $output = fopen("php://output", "w"); fputcsv($output, ['ID', 'Задача']); foreach($jsonArray as $id => $arr) { fputcsv($output, [$id, $arr]); } fclose($output); exit; } |
И запись в CSV из PHP
Искренне надеюсь, что у меня получилось донести до вас информацию на тему экспорта из PHP CSV файл, а это значит, что мы можем открывать его в Excel. Если что — пишите комментарии.