
Your handwritten signature gives your document a personal touch. You can scan your signature and store it as a picture to insert in the document.
You can also insert a signature line to indicate where a signature should be written.
Create and insert a handwritten signature
You need a scanner to do this.
-
Write your signature on a piece of paper.
-
Scan the page and save it on your computer in a common file format: .bmp, .jpg, or .png.
For information on how to use your scanner, use the manufacturer’s manual or Web site.
-
Open the image file in Word.
-
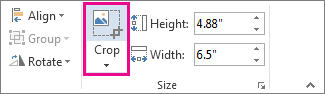
Select the image and on the Picture Format tab, click Crop and use the handles to crop the image.

-
Right-click the image, and choose Save as Picture to save as a separate file.
-
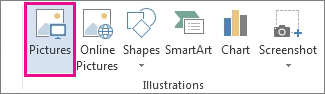
To add the signature to a document, click Insert > Picture s.
Include typewritten text with your reusable signature
If you want information like your job title, phone number, or email address to be part of your signature, save it along with the picture as AutoText.
-
Type the text you want under the inserted picture.
-
Select the picture and the typed text.
-
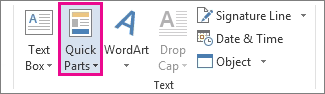
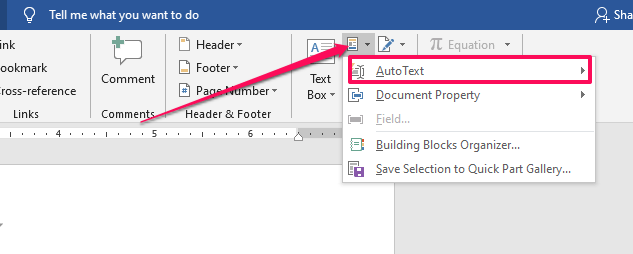
Click Insert > Quick Parts.
-
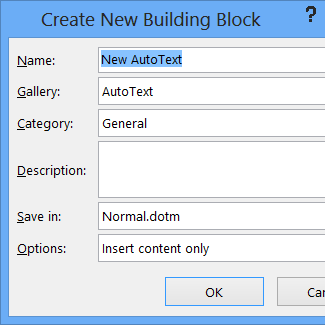
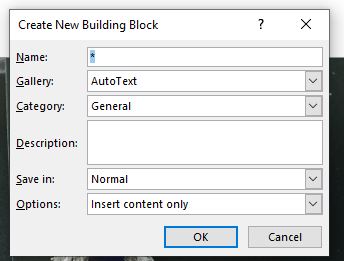
Click Save Selection to Quick Part Gallery. The Create New Building Block box opens.
-
In the Name box, type a name for your signature block.
-
In the Gallery box, select AutoText.
-
Click OK.
-
When you want to use this signature, place the insertion point where you want to insert the signature block.
-
Click Insert > Quick Parts > AutoText, and then click the name of your signature block.
Insert a signature line
Use the Signature Line command to insert a signature line with an X by it to show where to sign a document.
-
Click where you want the line.
-
Click Insert > Signature Line.
-
Click Microsoft Office Signature Line.
-
In the Signature Setup box, you can type a name in the Suggested signerbox. You can also add a title in the Suggested signer’s title box.
-
Click OK. The signature line appears in your document.


Your handwritten signature gives your document a personal touch. You can scan your signature, store it as a picture, and then insert your signature in Word documents.
Scan and insert a picture of your handwritten signature
You need a scanner to do this.
-
Write your signature on a piece of paper.
-
Scan the page and save it on your computer in a common file format: .BMP, .GIF, .JPG, or .PNG.
Tip: For information on how to use your scanner, use the manufacturer’s manual or Web site.
-
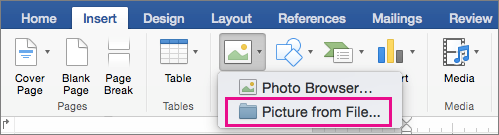
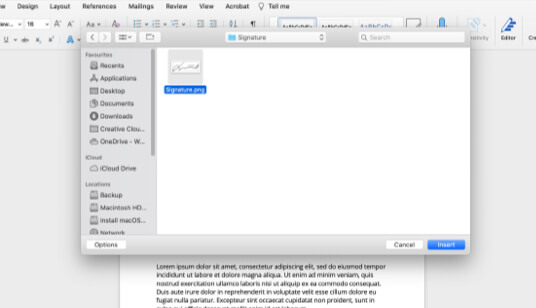
On the Insert tab, click Pictures > Picture from File.
-
Browse to the picture you want to insert, select it, and then click Insert.
-
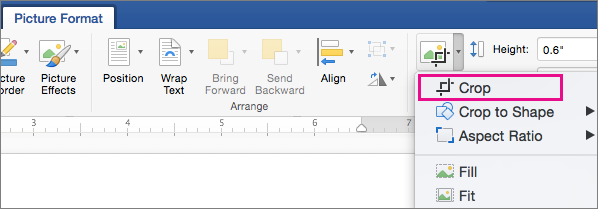
Click the picture to show the Picture Format tab.
-
On the Picture Format tab, click Crop, and then crop the signature.
-
Right-click the picture, and then click Save as Picture to save it as a separate file you can use in other documents.
Include text with your reusable signature
If you want information, such as your job title, phone number, or email address to be part of your signature, save it along with the picture as AutoText.
-
Type the text you want under the inserted picture.
-
Select the picture and the typed text.
-
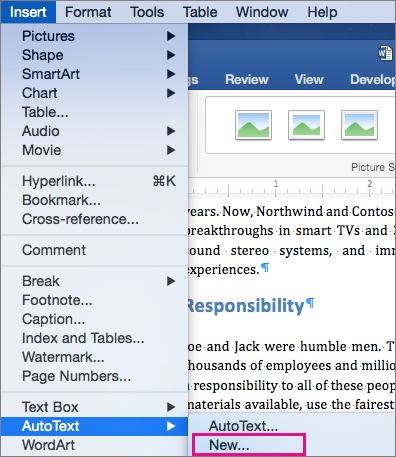
On the Insert menu, click AutoText > New.
-
The Create New AutoText box opens.
Next to Name, type a name for your signature block and click OK.
-
When you want to use this signature, place the insertion point where you want to insert the signature block.
-
On the Insert menu, click AutoText > AutoText, and then click the name of your signature block.


Одним из важных шагов к созданию по-настоящему безбумажного офиса является электронная подпись в приложении Word. Распечатывание документа, затем его подписание, а потом еще и сканирование – дело трудоемкое и совсем не обязательное. Существует два способа создания подписи в Word, о которых мы сейчас расскажем.

Два способа подписания документа Word
Для вставки своей подписи в документ Word можно воспользоваться одной из двух возможностей:
- отсканировать подпись,
- создать подпись прямо в приложении Word. Например, при помощи пера Wacom.
Перо Wacom представляется наиболее удобным решением, особенно если потребность в подписании документов в электронном виде возникает часто. К тому же, перо можно использовать и для других целей, таких как создание электронных пометок в Word или рисование. Ниже мы объясним обе возможности подписания документа Word.
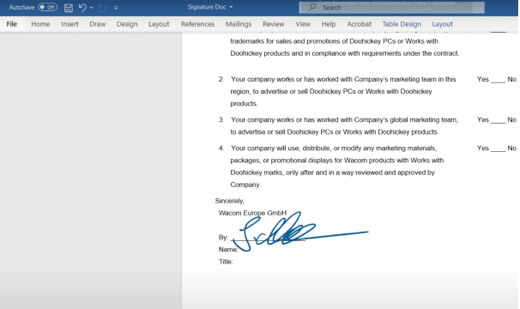
Подписание в Word с помощью пера Wacom
Для подписания документа Word можно воспользоваться графическим планшетом или интерактивным дисплеем Wacom. В этом случае подписание происходит естественным образом, как на листе бумаги, только в цифровом формате.
Чтобы подписать документ Word при помощи пера Wacom, выполните следующие действия:
- Откройте документ в приложении Word.
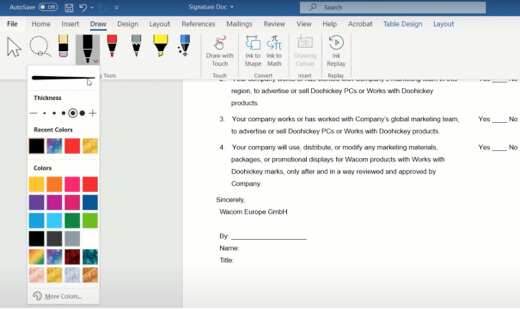
- Чтобы вставить подпись, нажмите опцию «Draw (Рисовать)» на панели инструментов.
- Выберите подходящее перо.
- Выберите относительно тонкую линию для подписи.
- Выберите подходящий цвет; особенно хорошо смотрятся черный и темно-синий.
- Теперь, когда соответствующие настройки пера Wacom выполнены, поместите перо в поле для подписи и поставьте подпись точно так же, как и на обычном листе бумаги.
- Сохраните подписанный документ.
Для создания подписи можно, конечно, воспользоваться вместо пера Wacom мышью или указательным пальцем на сенсорной панели. Однако зачастую это выглядит довольно-таки неразборчиво и непрофессионально.
Рекомендуем на этом этапе сохранить документ в формате pdf, чтобы позже его нельзя было изменить.
Преимущество по сравнению с отсканированной подписью совершенно очевидно: подпись с помощью пера выглядит гораздо более достоверной.
Как вставить подпись в приложении Word при помощи скана

Второй вариант состоит в том, чтобы сфотографировать или отсканировать сделанную на бумаге оригинальную подпись и сохранить ее на компьютере в виде файла изображения. Убедитесь, что размер конечного изображения приемлем. При использовании этого варианта нужно выполнить следующие шаги:
- Если возможно, поставьте свою подпись на чистом листе бумаги.
- Отсканируйте этот лист и сохраните как документ в формате GIF, JPG или PNG.
- Откройте файл изображения и нажмите на панели инструментов опцию «Crop (Обрезать)».
- Выберите (обрежьте) область с изображением так, чтобы она была как можно меньшего размера. Но при этом подпись должна быть видна полностью.
- Нажмите «Save (Сохранить)».
- Откройте документ Word, в который нужно вставить подпись.
- Поместите курсор в соответствующую область и нажмите «Insert (Вставить)» > «Images (Изображения)».
- Выберите изображение, которое ранее было сохранено как подпись.
- Перетаскиванием изображения мышью можно изменить размер и положение подписи.
Преимущество этого метода заключается в том, что отсканировать и подготовить подпись придется всего один раз. Таким образом можно постоянно иметь под рукой свою электронную подпись в Word и оперативно использовать ее по мере необходимости. Недостаток этого метода состоит в том, что результат зачастую выглядит не совсем профессионально. Это происходит из-за того, что вместе с подписью фотографируется также бумага, на которой она сделана. Таким образом, подпись, вставленная в виде изображения, почти наверняка будет выделяться на фоне документа. Часто подписи получаются извилистыми, наклонными, карабкающимися вверх или ползущими вниз, выходящими за линии. Такая индивидуальность в этом варианте теряется. Поэтому для обрезания отсканированной подписи потребуется определенный навык.
Как вырезать электронную подпись в приложении Word

Чтобы отделить подпись от фона, необходимо сделать следующее:
- Сохраните отсканированную подпись в виде файла PNG.
- Откройте подпись в приложении Word.
- Щелкните правой кнопкой мыши по изображению и выберите опцию «Format graphic (Форматировать графику)».
- В опции «Format graphic (Форматировать графику)» появятся четыре иконки. Нажмите крайнюю справа, на которой изображены горы и солнце.
- Теперь внизу появляется опция «Recolour (Перекрасить)».
- Чтобы сделать фон невидимым, выберите «black and white (черно-белое) — 50%».

Пользователь, имеющий некоторый опыт работы с графическими программами, может с их помощью создать прозрачный фон после обрезки подписи. В этом случае можно воспользоваться следующими настройками, чтобы эстетично разместить подпись над текстом или на строке:
- Отметьте мышью изображение подписи.
- Нажмите поле «Image options (Параметры изображения)» в строке меню.
- Выберите «text wrap (обтекание текстом)» > «in front of text (перед текстом)».
- Теперь можно расположить подпись на строке или над текстом с помощью перетаскивания мышью.

Правовой статус электронной подписи
В отношении документа, снабженного подписью в электронной форме, особую важность приобретает аспект безопасности и подлинности. Подделка подписи на электронных документах представляется чрезвычайно легкой. В принципе, любой человек, у которого имеется Ваша собственноручная подпись, взятая из любого документа, может сфотографировать ее и вставить в документ Word в электронном формате. По этой причине в сфере электронных подписей существует множество уровней безопасности. Наиболее безопасной является цифровая подпись с сертификатом. Для некоторых документов наличие сертификата в принципе необходимо для того, чтобы подпись считалась действительной. Для прочих документов, таких как заявление о приеме на работу или отмена подписки, достаточно цифровой подписи в Word, созданной путем вставки изображения, или подписания сразу же пером Wacom. Программное обеспечение для цифровых чернил Wacom основано на технологии Wacom Ink Layer Language (WILL). С помощью этой технологии Ваша подпись с биометрической точностью отображается в самых разных устройствах и приложениях.

Распространяйте документ только в формате pdf
Ни в коем случае не распространяйте свою электронную подпись в формате Word. В том случае, когда содержащий Вашу подпись документ Word не снабжен защитой от записи, его чрезвычайно легко изменить и злоупотребить им в недобросовестных целях. Поэтому для сохранения документа пользуйтесь исключительно форматом pdf. Распространение документа также производите только в формате pdf.

Помимо цифровой подписи: множество возможностей для пера Wacom
Конечно же, пером Wacom можно не только подписывать документы, но и выполнять множество полезных функций. Например, с его помощью можно делать примечания на полях, выделять фрагменты текста, создавать ассоциативные карты в цифровом формате и даже рисовать портреты и пейзажи. В этой связи Вам могут быть интересны наши учебные курсы «Как нарисовать собаку» или «Как нарисовать женское лицо». Итак, пользоваться пером Wacom можно точно так же, как обычным карандашом или перьевой авторучкой, но с тем преимуществом, что результат доступен в цифровом формате.
Подписание документов Word. Начало работы с Wacom One.
Wacom One создает ощущение работы пером по бумаге благодаря 13,3-дюймовому экрану с естественным трением поверхности и минимальным отражающим эффектом. Перо в Вашей руке ощущается легким и естественным, а в выбранной Вами программе превращается в карандаш, кисть или мел. Его даже можно использовать как ластик. Идеально подходит для подписания документов. В комплект поставки входит программное обеспечение для решения творческих задач, а также возможность подключения к Mac или PC и некоторым устройствам на базе Android.

Wacom One 13
Подписывайте документы и занимайтесь творчеством прямо на экране с высоким разрешением при помощи особо точного пера.
Купить Wacom One 13
Это может Вам понравиться
Узнайте больше
Посмотреть все семейства продуктов Wacom

Графические планшеты
Делайте наброски, рисуйте и редактируйте изображения с помощью высокочувствительного блокнота и точного пера и наблюдайте за своими работами на экране.
Купить сейчас

Интерактивные дисплеи
Рисуйте, занимайтесь дизайном и творите прямо на экране с высоким разрешением при помощи точного пера.
Купить сейчас

Графические компьютеры
Творите безо всяких ограничений благодаря повышенной производительности устройства, точному перу и потрясающему дисплею.
Купить сейчас

Планшеты Smartpad
Пишите пером по бумаге и конвертируйте свои рукописные заметки в цифровой формат.
Купить сейчас

Стилус
Ведите записи и быстро фиксируйте идеи на своем мобильном устройстве при помощи стилуса Wacom.
Купить сейчас
Информация о Wacom
Wacom ставит своей глобальной целью сближение людей и технологий с помощью естественного интерфейса. Эта концепция сделала компанию ведущим мировым производителем интерактивных графических планшетов и интерактивных дисплеев, а также цифровых стилусов и решений для сохранения и обработки цифровых подписей. Высокие технологии, которые легли в основу интуитивных устройств ввода Wacom, используются для создания превосходных работ цифрового искусства, фильмов, спецэффектов, разработок в области моды и дизайна по всему миру, а также позволяют индивидуальным и корпоративным пользователям выразить свою индивидуальность с помощью одной из лучших технологий интерфейсов. Компания Wacom, основанная в 1983 году, является международной компанией с головным офисом в Японии (Токийская фондовая биржа 6727) и имеет дочерние и аффилированные компании по всему миру, которые занимаются маркетингом и продажами более чем в 150 странах.
Узнать больше о Wacom
Do you want to add a signature to a contract, a lease agreement, or any other document in MS Word but aren’t sure how to do it?
In this article, I have all the answers for you.
Like most of its other features, MS Word makes adding a signature to any document pretty simple. You don’t even need to manually add a signature line to your documents.
In just a few clicks, Word will add a professional predesigned signature section to your document that is acceptable worldwide.
Let me show you how.
3 Ways To Add A Signature To A Word Doc
We’re living in the digital age where most contracts, agreements, and signed documents change hands over the internet.
This is why businesses use multiple types of signatures in their legal documents depending on the nature of the transaction.
With MS Word you can sign your documents using three different methods.
- Electronic Signatures
- Digital Signatures
- Add A Signature Lines
These are authentic and secure signature types that are not only accepted as your legal signatures but are also good for the environment since they minimize the need for using printed documents.
Let me describe each method in more detail and how you can use it for signing documents in Microsoft Word.
Method#1: Adding An Electronic Signature To MS Word
Adding an electronic signature to your Word document gives it a personal touch and makes it authentic at the same time.
It is also the most common method for singing documents in MS Word and doesn’t take much time once you set it up on your computer.
But what exactly is an electronic signature?
What Is An Electronic Signature?
An electronic signature is an image file of your handwritten signatures that you can add to any document you want.
It is different from digital signatures that I’ll cover later in this article.
To create an electronic signature, you’ll need to physically sign a document and use a scanner to convert it into an image file that can be used in different documents.
Once you have a scanned version of your signatures, you can use it as many times as you want.
Using electronic signatures is a popular practice because of its ease of use and flexibility.
Here’s how you can add an electronic signature to your documents in MS Word.
How To Add An Electronic Signature To A Word Doc
You can add an electronic signature to any Word document by following the steps below.
Step#1: Take a clean piece of white paper and handwrite your signatures with a black pointer or pen. Before signing the paper sheet, I recommend practicing your signature on a separate piece of paper a few times to avoid any mistakes. Using black ink is preferable because of better visibility after scanning.
Step#2: Scan your signature using a scanner machine or mobile phone with a good camera and a scanner app. Scan the document at 600dpi and then save the image in the .PNG format. You’ll need to crop the scanned image to only focus on your signatures.
Step#3 (optional): Open the scanned signature in Adobe Photoshop and copy it using the Magic Wand feature. Now create a new file in Photoshop with a transparent background and paste the signatures to it. This is an optional step but it’s useful because it’ll allow you to use your signatures on documents with colored backgrounds as well.
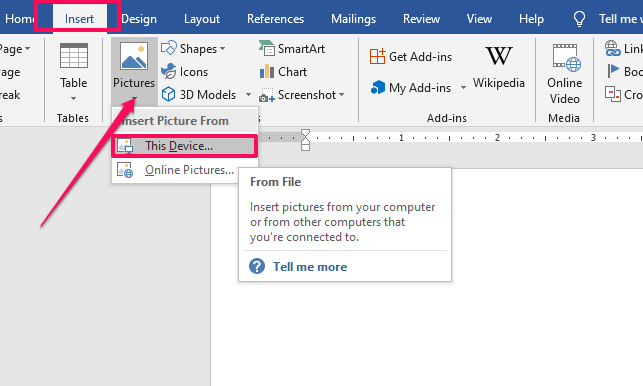
Step#4: Open MS Word and insert the scanned signature int oy our document by click on Insert–>Pictures–>This Device
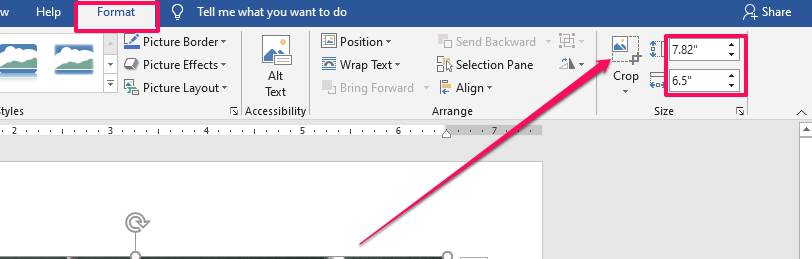
Step#5: If you haven’t already cropped the image, you can do it in Word as well by clicking on it and using the Crop feature. You can also modify the size and dimensions of the image from this section.
Step#6: You can now simply drag the image with your mouse to the signature section of the document.
Step#7: If you want to add additional information below your signature like your name, designation, etc. type the text you want to show under the signature image. Then select both the image and the text content, and click on Insert–>Quick Parts (in the Text section)–>Auto Text–>Save Selection to Auto Text Gallery.
Step#8: In the Auto text pop up, add your name to the Name field, select Auto Text in the Gallery Field, and click Ok.
Step#9: Now whenever you want to add your electronic signatures to a Word document, take your pointer to the right place and click on Insert→ Quick Parts→ Auto Text and choose the name with which you saved your signatures.
That’s it, you can now add your electronic signatures to any Word document you want.
Method#2: Adding A Digital Signature To Word Doc
Another popular way to securely sign your documents in MS Word is to use a digital signature. It’s an encrypted signature method that allows the secure transfer of documents that can only be accessed by authorized persons.
They are based on a unique ID which means there’s no chance of any impersonation or identity theft.
What Is A Digital Signature?
Digital signatures are highly secure encrypted digital IDs that require a valid digital certificate from both the sender and the receiver of the signed document.
Every digital signature has a private key that can only be validated with a public key that comes with a valid digital certificate. When you have a valid digital certificate, you can use it as an authentication method for digital information (including Word documents)
What Is The Difference Between A Digital And An Electronic Signature?
An electronic signature, as I’ve already mentioned, is simply a scanned image of your real-world signatures. Most people mistakenly refer to it as a digital signature.
A digital signature is a technical term used for encrypted signatures backed by a valid digital certificate issued by a reliable third-party certification authority. They’re used to secure Word documents, provide authentication, and protect them from any unauthorized changes.
How To Create A Digital Certificate For Free
You can only get a valid digital certificate from a trusted third-party certification authority (CA). Many independent certificate authorities offer limited time (usually one year) digital certificates for a fee. But you can also get digital certificates from trusted third-party entities for free.
To get a free digital certificate to sign your documents in MS Word, follow these steps (for Windows 10).
- Go to C:Program Files (x86)Microsoft Officeroot (or C:Program FilesMicrosoft OfficerootOffice16 if you’re running the 64-bit version of Office)
- Run the application file SelfCert.exe to open the Create Digital Certificate box.
- Give your certificate a descriptive name and click OK.
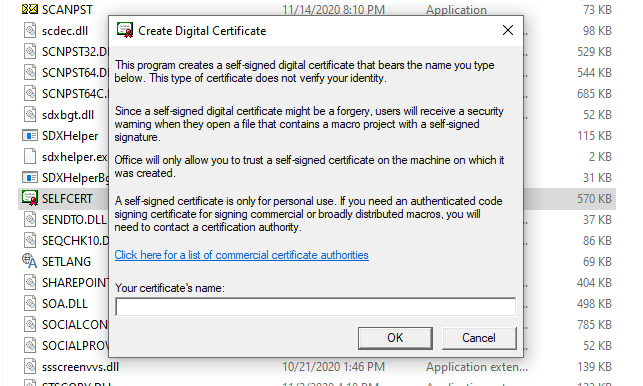
That’s it, you have a valid digital certificate that you can use to digitally sign documents in MS Word. However, this is not verified by a trusted third-party and therefore some organizations might not accept it as a valid certificate.
You can view your certificate in Chrome→ Settings→ Privacy and Security→ Security→ Manage Certificates→ Personal
Let’s now see how you can add a digital signature to Word documents.
How To Add A Digital Signature To A Word Doc
Follow these steps to add a secure digital signature to your documents.
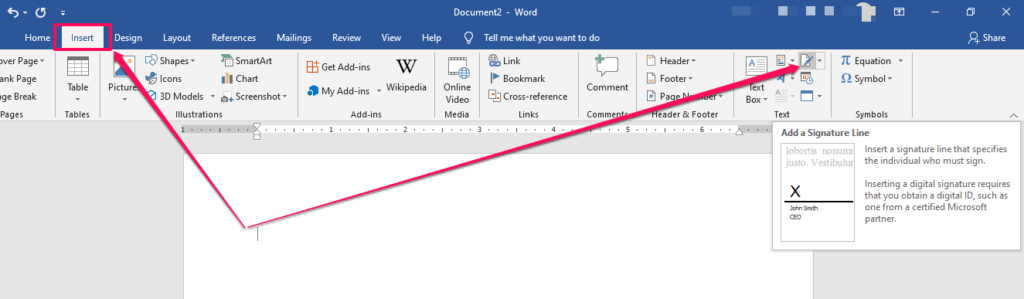
Step#1: Open MS Word and place your cursor where you want to add the digital signature.
Step#2: Click on Insert→ Text→ Signature Line to open the Signature Setup box.
Step#3: Enter the relevant details of the signer in this box (name, designation, email). You can add an instruction note for the signer (or use the default note) along with a comments section, and the signing date.
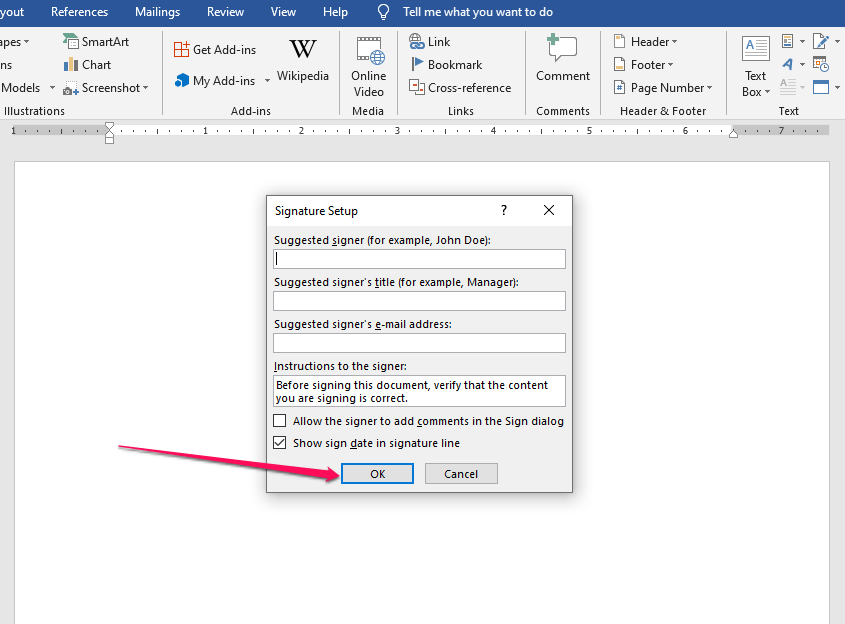
Step#4: Click OK to add a digital signature box to your document.
Step#5: To sign this document, double-click the signature box or right-click and select Sign.
Step#6: You can digitally sign a Word document either by typing your name or by uploading an image of your handwritten signatures. Both options are backed by your digital certificate.
Step#7: You’ll need to save the document before signing it.
Step#8: This will add a digital signature to your document using the certificate you created earlier. The signatures will remain valid as long as no other changes are made to the document.
How to Draw Your Signature
If you have a touch-enabled device, you can draw your signature using your finger, a pen, or a regular mouse.
Here’s how it works.
Step#1: Switch to Print Layout in Word from the View section.
Step#2: Click on Draw and choose your pen type.
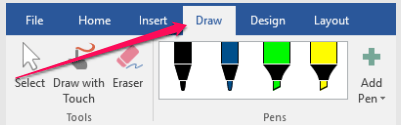
Step#3:Use your pen, finger, or mouse to draw your signature in the appropriate section of the document.
Method#3: Adding A Signature Line To A Word Doc
Sometimes you need to get your documents signed the old fashioned way. You can simply present a document to the signer and ask them to sign wherever they want.
Or you can be a bit more professional and add a signature line to your document so that the signer knows where to sign even if you’re not personally there to guide them.
Unlike the previous two methods, you don’t need a digital certificate or a scanned copy of your signatures for this method to work.
How To Add A Signature Line To A Word Doc
To add a signature line to your Word documents, follow these steps.
Step#1: Take your cursor to the section of the document where you want to add a signature line
Step#2: Click on Insert→ Add A Signature Line to open the Signature Settings box.
Step#3: If you want the signer’s name and designation below the signature line, fill this information in the Signature Settings box. Otherwise, leave it black to display a plain signature line.

You can now print the document and send it to the relevant person for their signatures.
Why It’s Important to Save Your Word Doc as a PDF
No matter what signature method you’re using, make sure you save your Word documents as PDF files once they’re ready to be sent to the signer.
This is important because PDF is a secure document format that does not allow users to make any changes to it. When you send a legal document or a contract that needs to be signed as a PDF file, you can rest assured that no one can edit its content.
Saving a Word document as PDF is really easy in Microsoft Word.
Simply click on File→ Save As and choose .PDF from the file type dropdown.

Keep the original Word document separately so that you can make changes to it in case there’s a need. If that happens, you’ll need to save the Word document in PDF format again before sending it to the relevant person.
How to Change Your Signature in Word
The process for changing your signature in MS Word depends on the type of signature you’re using.
Electronic Signature: If you’re using a scanned image of your handwritten signature for electronically signing documents in MS Word, you’ll need to upload an image file with your new signatures using the same process I described earlier in the Electronic Signature section of this article.
Digital Signature: If you’re using a digital signature, you’ll need to create a new digital certificate using the same process I described in the Digital Signature section. Once you have the new certificate, you’ll need to create a new signature in Word from Insert→ Text→ Add A Signature section.
Signature Line: If there’s a change in the signer’s name or designation, you can change it from the Add a Signature section. Otherwise, leave the signature line untouched.
Are You Ready To Add Your Signature To Word Documents?
As you can see, adding a signature to MS Word documents is quite simple. However, it gives authenticity to your documents, makes them more secure, and adds a professional touch as well. Let me know if you have any questions about the different signature methods I’ve described in this article.
Adding your signature or signing a document digitally is possible in different ways using Microsoft Word or other Office programs.
Before we start, let’s clarify some terminology because ‘signing a document’ can mean several things in the computer world:
- Adding a signature to a document. Inserting a copy of a human written signature into an electronic document. That’s what we’re covering in this article.
- Digitally signing or locking a document. A way of verifying that a document came from a specific source or author and has not been tampered with after sending. It’s possible to do that in Microsoft Word but most people don’t bother. And most people receiving a locked document would not understand either! It’s commonly used to verify VBA code and other digital media but not whole Office documents.
- Digital signing systems. There are various proprietary systems for ‘signing’ a document, the most common is Docusign. If a company wants you to ‘sign’ a document this way, they’ll send you a link and instructions.
- Email signature — the footer at the end of emails. That could include a picture of your ink signature.
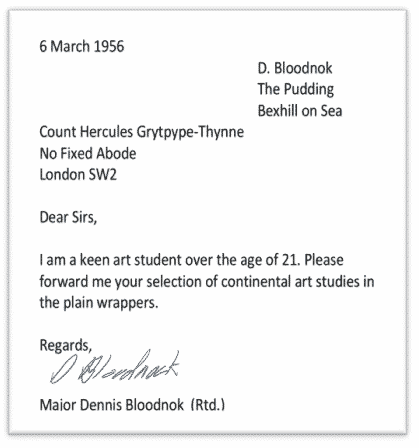
In this article we’ll explain your options for adding your human ‘ink’ signature to a letter like this:
- Word, Excel, PowerPoint and Outlook
- Add your signature directly
- Digital Ink
- Make a picture of your signature
- Write with a digital pen
- Take a photo
- More than one signature
- Cropping your signature image
Word, Excel, PowerPoint and Outlook
We’re going to focus on Microsoft Word since that’s where most signing happens. The same tools apply to Excel worksheets, Outlook emails and PowerPoint slides.
Add your signature directly
Let’s start with ways to write your signature directly into a Word document. This is possible in modern Word and Office with ‘digital ink’ features.
Digital Ink
If you have an iPad, tablet or smartphone with a ‘pen’ then it’s possible to write your signature onto a Word document.
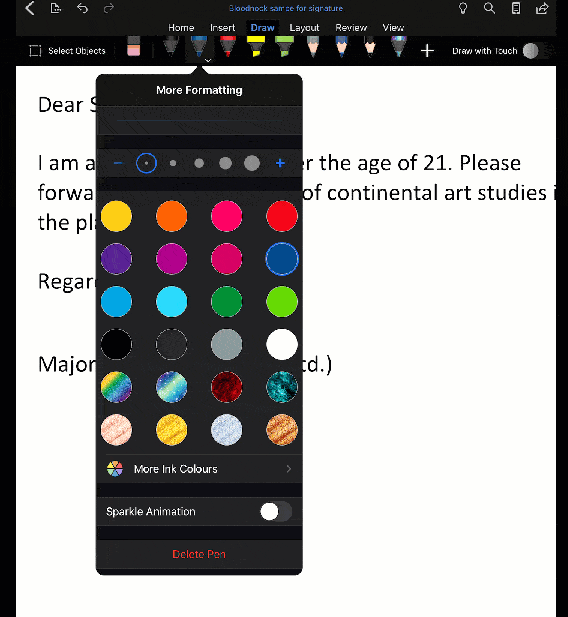
Open the document in the Word app, go to the Draw tab and choose a pen thickness and color. Then write your usual signature into the document.
If you have a touch screen, you can try ‘writing’ on the screen with your fingertip. It’s a little clumsy but might be enough.
Make a picture of your signature
You need a picture of your signature to paste into documents. There are a few ways to do that, depending on the devices and tools available.
Let’s look at the options in order of image clarity.
Write with a digital pen
Similar to writing into a document above. If you have a device with a digital pen (e.g. Apple Pencil or other drawing tool) write your signature, then take a picture of the screen.
Open the Word app or some other app which accepts drawing of some sort.
Write your signature on the screen, erase and try again until you’re happy with it. Remember this is a ‘keeper’ that you can use on any future documents.
Once you’re happy, take an image of the screen with your signature. See Taking screenshots – Windows, Mac and more which covers iPhone, iPad and Android screen image shortcuts too.
If necessary, transfer the screen image to another computer. Modern Camera Roll tools in OneDrive and Dropbox should do that for you automatically.
Or save the document or image from the app it was made in.
You’ll end up with an image showing the entire screen. It’ll need a little cropping, more on that below.
Take a photo
Write your signature on a piece of paper, preferably clean white paper for a good image. Then take a photo with your smartphone or camera.
Try to get a clean image on a plain white background with even lighting.
We suggest writing in blue ink, so your image is obvious and stands out a little from the black text in the letter or document. A digital signature in black doesn’t stand out as much as a real ink signature with a black pen.
Take the photo and transfer it to your computer for cropping.
More than one signature
While you’re preparing images of your signature, do you have multiple signatures to make images of?
Some people have a casual signature for informal occasions, personal letters, billet-doux etc. Another version for formal letters, contracts etc.
By all means, get signature images of both or all!
Cropping your signature image
However you made your signature image, it’ll need some cropping before it’s ready for use. This is a part of the process most ‘digital signing’ tips leave out.
Do it right and you’ll have a useable signature that’ll last you for years.
The main point here is to crop TIGHTLY. Leave very little white space around the sides of your signature. That will make it a lot easier to position later.
Insert the image into a Word document, other Office program or an image editor. Here’s our iPad screen shot from the Word app.

Use a cropping tool to trim all the excess around the signature. In Office, Picture Format | Crop.

See how closely we’re cropping around the signature?

Here’s our final signature image, with a border so you can see how tight the cropping is. Your signature image should be clean with no border.

How to become a doctor with Microsoft Word
Signatures for all occasions in Outlook
Outlook Signatures to be synced – at last!
Microsoft Word is one of the most commonly used and the main word processing software in the world.
Therefore, everyone wants to sign a word document online with minimal effort rather than taking a print to sign a document and then scan it.
Signing a word document online free not only saves time but also provides security, convenience and is cost-effective.
Microsoft word makes it easy to add online signatures in a word document.
There are 3 different ways in which you can sign a word document:
- Insert a signature image to a word document
- Using the Word Document Signature Blocks
Requires having a Microsoft Office Digital ID certificate. - Online e-signing with ZegalSign
Works with any Word Document or PDF File.
We are going to discuss each method in detail below.
Intro to Electronic Signing
Electronic signing or e-signature is a modern era alternative to traditional wet-signing of documents such as handwritten signatures or a stamped seals. An electronic signature is often misunderstood as a digital signature. Both are different, however, there are some similarities between the two.
An electronic signature is merely any form of digital/virtual mark included in a document. It can be drawn, inserted as an image, or technically even typed text. A “signature” is valid as long as you “intended” to sign it – regardless of “how” it’s actually applied. Whereas, a digital signature ID (or Digital Signing) is Microsoft’s proprietary name for digitally signing a document. Digital Signing is not just an image, it uses “special standards of encryption” and “hashing algorithms” to attach authenticity (only the owner of a specific certificate can sign a document with that ID) and integrity (it can’t be altered after the signing). It requires both the sender as well as the recipient to purchase the digital certificate.
Both e-signature and digital signature are legally binding and enforceable. However, digital signatures are more secure than e-signatures. In the case of e-signatures, it also depends upon the software where the document is signed. Some software provides more security than others by automatically generating the certificate of time and date whenever a document is signed.
How To Sign Word Documents Online
How To Insert a Signature in a Word Document
To insert an electronic signature to a word document:
Step 1: you need to have a handwritten signature on a blank piece of paper and then scan it.
Step 2: Save the scanned signature on your PC/laptop in any of the formats: .jpg, .png, .bmg, .gif.
Step 3: Place the cursor where you want to add/insert your electronic signatures in a word document.
Step 4: In the Word document, go to Menu tab > Insert > Pictures. Navigate to the location of the scanned signature on your computer to upload it in the word document.
In just these simple steps, you can add an electronic signature to a document.
Apart from inserting/adding an electronic signature to Word documents by uploading a scanned picture from the computer, you can also insert/create a signature line in Word for the signer to sign.
How to sign using the Microsoft Word Signing Feature
Given below are the steps to follow:
Adding a Microsoft Word Signature Block
Step 1: In the Microsoft Word document, go to Menu Tab > Insert > text field > add a Microsoft Office Signature Line.
Step 2: A Signature set up box pops up, fill in the details of the intended signer (such as Signer Name, title, email address) who will sign the document.
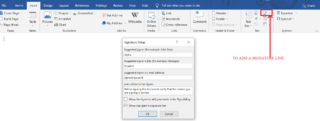
Step 3: Click ok, the signature line will be added to your document. Drag and drop it at the place in the document where you want the intended signer to sign. X denotes the place where the intended signer is to sign.

Note: You can add more than one signature line in one document if the intended signers are more than one. Follow these steps as many times you want to add a signature line.
Step 4: Send the document to the intended signer to sign.
After you have sent the document to an intended signer, in which way the receiver can add/create his signatures to the document. Below is the process for an intended signer/receiver to draw or create his signatures in a word document
Signing a Microsoft Word Signature Block
For a receiver to add signatures in a word document, he must have a digital certificate from Microsoft. Below are the steps for a receiver to draw signatures in a word document:
Step 1: Open the word document where you intend to draw/insert the signature.
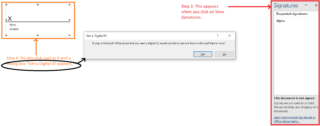
Step 2: The intended signer will see the yellow line which mentions view signatures.
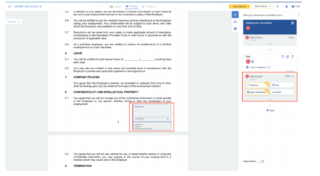
Step 3, 4: Follow the steps given in the image:
Step 5: For a receiver to sign a word document online or draw signatures in the word online, he needs a digital ID from Microsoft.
In order to digitally sign with Microsoft Word, you will need a Microsoft Digital ID. If you do not have a digital ID, you may consider the 3rd option, i.e. online e-signing
Online Signing using ZegalSign
If you don’t have a digital ID, you can sign a document online using ZegalSign. It allows you to electronically sign a document when you receive any document to sign. Follow the below steps to sign a document online for free:
Upload a Document (Word / PDF)
Step 1: Go to zegal.com and on the top right corner > Start now free to create a free account on Zegal.
Step 2: Go to Upload & Sign and upload any Word Document or PDF document.

Step 3: Once the document is uploaded, then start signing.
Place Signature Blocks
Place signature blocks on the document where you would like your recipient to sign
Click Send
Click on start signing, it gets activated, and then sign the document by drawing, typing, or uploading a signature image to sign the document.
Conclusion
This modern era usage of e-signature has changed the way documents are signed and individuals/companies operate their businesses. The debate is whether the tools/options provided in Microsoft Word are sufficient to meet the requirements. Simply adding an image of a signature can be done using Microsoft Word for free. However, the challenge here is that to digitally sign a document in Microsoft Word, one needs to purchase a Digital Certificate. This is where the 3rd option like online signing using Zegal or other platforms can be explored which also allows adding e-signatures by simply uploading the document online.
Related Articles
- 6 Great E-Signature Apps
- Different types of electronic signatures
Important Documents: Draft now
- Shareholders Agreement
- Promissory Note
- Non-Disclosure Agreement
- Employment Contract
- SaaS Agreement
Follow us on
Facebook, LinkedIn & Twitter
Tags: