
Using Excel as a barcode formulator and to translate numbers and letters into barcodes can aid in your business’s inventory management and barcode management processes. Learn how to create barcodes in Excel with this step-by-step guide.
Included on this page, you’ll learn how to create a barcode in Excel step-by-step, how to generate random barcodes, types of barcodes and barcode fonts, and which versions of Excel support barcode creation.
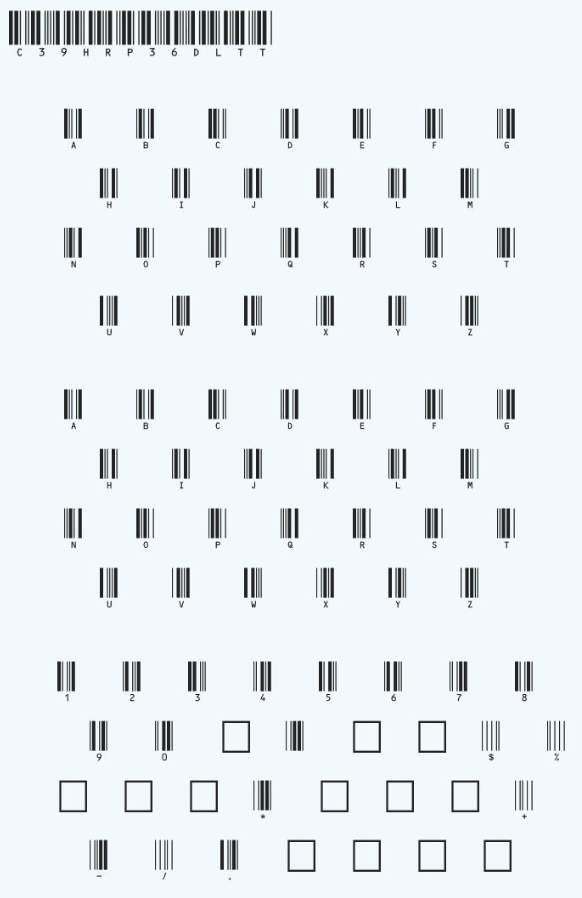
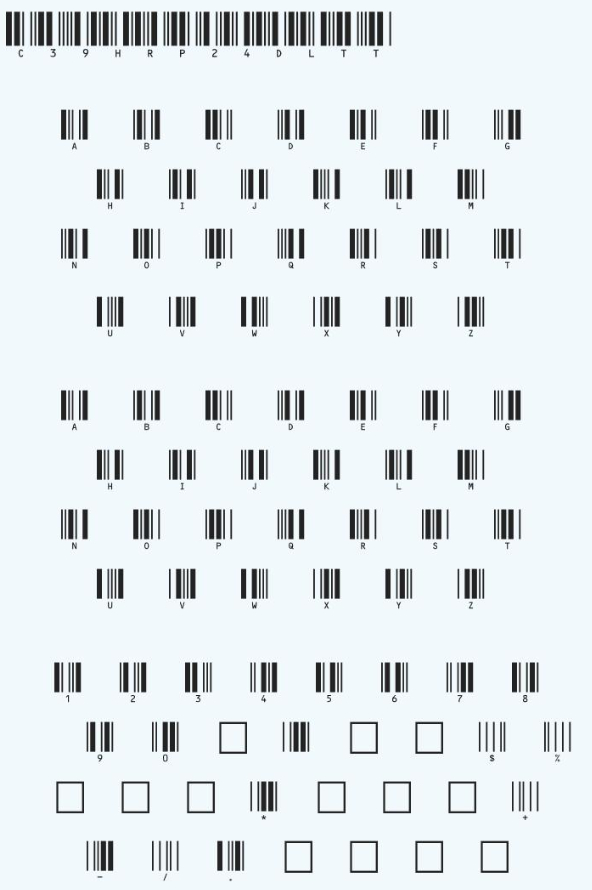
First, you’ll need to download a barcode font. The most common font — and the one we’ll use in this tutorial — is code 39 (more on that in this section of the article). You can download a version of the font from a number of places, including Dafont, Free Barcode Font, ID Automation, or Square Gear. Once you download the font, follow Microsoft’s instructions on how to install a font for Office to get it working with your version of Excel.
Below are a couple of notes about installing fonts:
- You may need to quit and restart Excel for the font to appear in your font list.
- Not all fonts work perfectly for all OSs and versions of Excel. If one doesn’t operate well, delete it and try another.
- Code39 has worked best during the research for this article
Creating a Barcode in Excel
Once you install the font, it’s easy to create barcodes in Excel. Simply follow the steps below.
Step One: Create two columns in a blank spreadsheet.
Title the columns Text and Barcode.
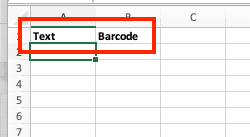
Place the alphanumeric data in the Text column (this is the basis for the barcodes). The barcodes will appear in the Barcode column.
Note: If you want to add a description of each item the barcode applies to, add additional columns to make a table-like layout.
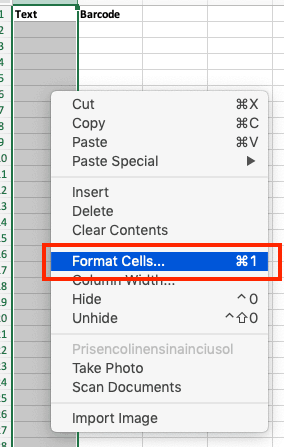
Step Two: Format the cells in the Text column.
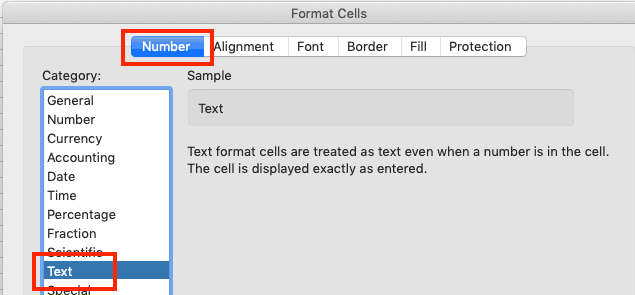
Select the Text column, then right-click on it. Click Format Cells, click Number, click Text. This will prevent larger numbers from displaying in scientific notation as well as preserving leading zeros.

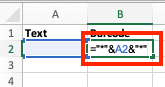
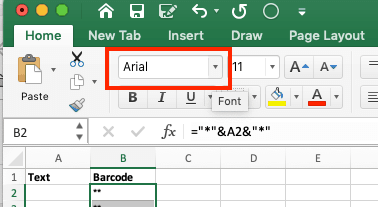
Step Three: Enter the following formula: =»*»&A2&»*» in the first blank row of the Barcode column.
In this step, we’re assuming that the cell in the Text column is A2; if not, adjust the formula accordingly. If you there’s no text in the first column, the second column will display two asterisks.
Step Four: Fill the Barcode column down.
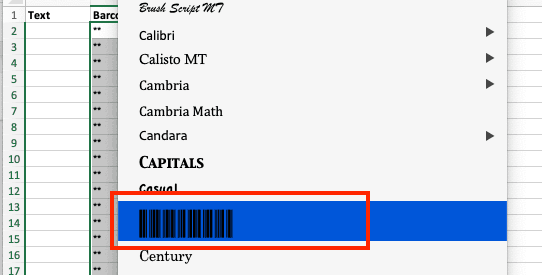
Step Five: Change the font in the Barcode column.
From the font menu, select the downloaded and installed barcode font. It’s a good idea to use the same font for the header row as you do for the rest of the spreadsheet, but that’s up to you.
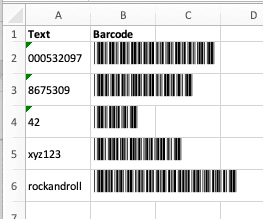
Step Six: Enter alphanumeric data into the Text column.
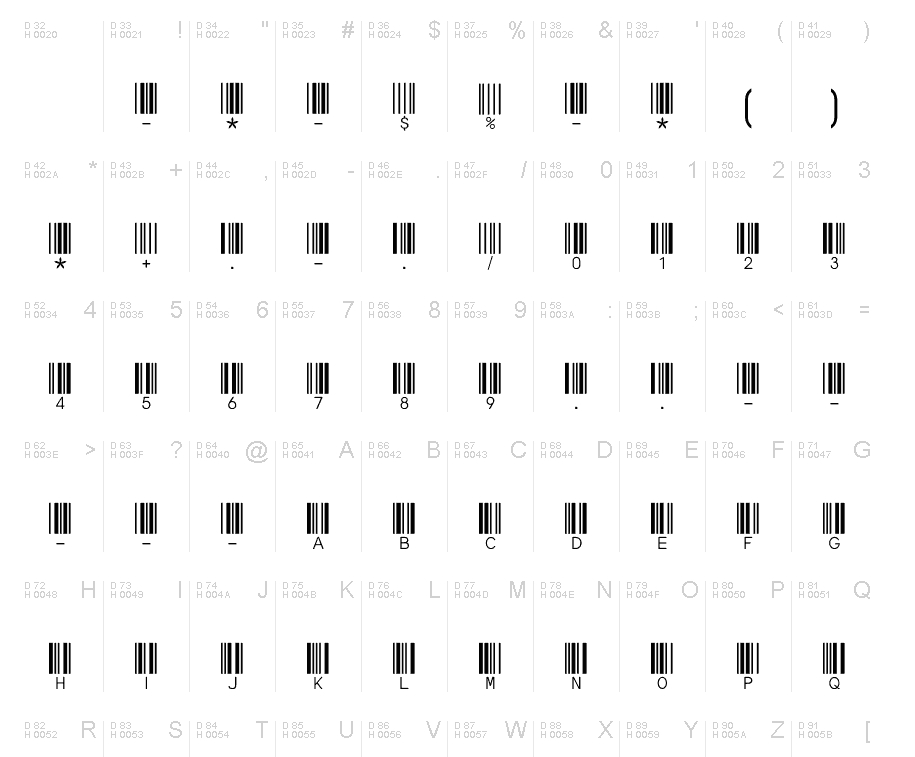
The Code 39 font can encode 1-9, A-Z (the font considers uppercase and lowercase the same), the en dash (-), dollar sign ($), percent sign (%) period (.), slash (/), plus (+), and a space. The font also encodes the asterisk (*), which is used as an indicator for the beginning and end of the sequence (this is also why the formula in Step Three adds an asterisk before and after the text entered). The Barcode row will automatically populate with barcodes.
Benefits of Creating Barcodes in Excel
While creating barcodes in Excel will work well for many, doing so may not be scalable. However, the process is an easy and inexpensive way to do the following:
- Print product numbers or UPC codes.
- Produce a product catalog or product list.
- Track stocked items.
All of these capabilities are extremely useful in inventory management.
How to Generate Random Barcodes in Excel
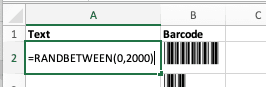
You can use the RANDBETWEEN Excel function for barcodes that require random numbers. Follow the steps below to automatically create random numbers for barcodes.
Note: If you changed the column to text format (see Step Two in the Creating a Barcode in Excel section), change it back to General.
- Enter the RANDBETWEEN Excel function. In the first cell of the Text column, enter =RANDBETWEEN(X,Y), where X is the lowest value and Y the highest. For example, =RANDBETWEEN(100,500) will generate random numbers between 100 and 500.

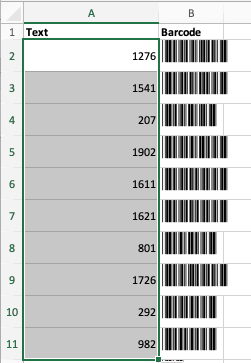
- Fill down the row to generate random barcode numbers. Each cell will have a random number in the specified range.

What Versions of Excel Can Make Barcodes?
The 2010, 2013, and 2016 versions of Microsoft Excels can make barcodes. Some older versions may also be able to make barcodes with a supported add-in. This includes those released in 2003 and 2007.
Types of Barcodes and Barcode Fonts
In addition to Code 39, there are a number of other barcodes available, including the following:
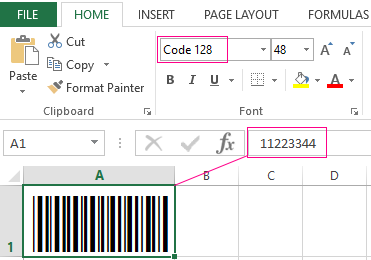
- Code 128: This code is generally used for shipping and supply chain labels. It can encode the same set of characters as Code 39 (though uppercase and lowercase letters can appear differently). There is no length restriction.
- UPC/EAN: This is the barcode most people are familiar with because it’s used for product barcodes. UPC stands for Universal Product Code; EAN for European Article Numbering. The barcode is also known as UPC-A and is restricted to 12 characters.
- I2of5: This is a two row barcode that’s used on rolls of 35mm film, and to label some cartons. It’s also known as industrial 2 of 5 or interleaved 2 of 5, and encodes numeric characters.
- UPC-E: This is a variation of a UPC barcode where certain characters (e.g., leading zeros) are omitted, in order to keep the code to six digits.
- QR: This 2D barcode can be used to open a website or app when scanned with a mobile phone camera. These barcodes are usually used for a printed ticket, to provide a discount, or for mobile payment. The barcode can encode alphanumeric, binary, and kanji. QR stands for Quick Response.
- Postnet: Formerly used by the U.S. Postal Service, this barcode encodes numeric characters.
- Intelligent Mail: Currently used by the U.S. Postal Service, this barcode encodes up to 65 characters. Not only do the width of the bars and spaces carry information, but so do the height and vertical location. Intelligent Mail encodes numeric characters.
What’s the Deal with Code 39?
Also called the 3 of 9 Barcode, Code 3 of 9, and Barcode39, this option is popular for the following reasons:
- It’s well-established.
- It encodes both numbers and letters.
- It’s readily available for free.
Each character display appears as five bars and four spaces; three of the nine bars in the barcode will always be wider.
Creating Barcodes in Word and Other Apps
You can also create barcodes in Word, PowerPoint, Wordpad, TextEdit, and pretty much any app that allows you to change the font. Once you download the font and install it on your computer, enter the text in your program of choice and change the font to the barcode font.
How to Use Excel Barcode Fonts
Once you’ve created barcodes, you need to deploy them. You can print or use a barcode in a catalog and then use a scanner to retrieve the data encoded in the barcode. Scanners can be custom built or off-the-shelf, and you can also use a smartphone that has a designated scanning app.
How Excel Barcodes Work with Android, iPhone, and Macs
You can create barcodes in Excel on a Mac, just like you would on a PC. Apple’s iOS doesn’t support custom fonts, so you can’t view, edit, or create barcodes on an iPhone. An app called AllFonts claims it can get past this restriction, but we have not tested it. Android devices accept custom fonts, so you can download a barcode font to your phone and use it in the Excel app to view, edit, and create barcodes using the same steps above.
How to Create a Barcode in Excel 2007
Download and install a barcode font. Create two rows (Text and Barcode) in a blank Excel spreadsheet. Use the barcode font in the Barcode row and enter the following formula: =»*»&A2&»*» in the first blank row of that column. Then, fill the formula in the remaining cells in the Barcode row. The numbers/letters you place in the Text row will appear as barcodes in the Barcode row. See step-by-step instructions for Excel 2007 here.
How to Create a Barcode in Excel 2010
Download and install a barcode font. Create two rows (Text and Barcode) in a blank Excel spreadsheet. Use the barcode font in the Barcode row and enter the following formula: =»*»&A2&»*» in the first blank row of that column. Then, fill the formula in the remaining cells in the Barcode row. The numbers/letters you place in the Text row will appear as barcodes in the Barcode row. See step-by-step instructions for Excel 2010 here.
How to Create a Barcode in Excel 2013
Download and install a barcode font. Create two rows (Text and Barcode) in a blank Excel spreadsheet. Use the barcode font in the Barcode row and enter the following formula: =»*»&A2&»*» in the first blank row of that column. Then, fill the formula in the remaining cells in the Barcode row. The numbers/letters you place in the Text row will appear as barcodes in the Barcode row. See step-by-step instructions for Excel 2013 here.
How to Create a Barcode in Excel 2016
Download and install a barcode font. Create two rows (Text and Barcode) in a blank Excel spreadsheet. Use the barcode font in the Barcode row and enter the following formula: =»*»&A2&»*» in the first blank row of that column. Then, fill the formula in the remaining cells in the Barcode row. The numbers/letters you place in the Text row will appear as barcodes in the Barcode row. See step-by-step instructions for Excel 2016 here.
Free Excel Barcode Generators
There are a number of websites that will turn alphanumeric text into barcodes. If you don’t want to use Excel, or you only need a barcode once in a while, the following sites are good options:
- Barcode.tec
- Bartender Software
- Cognex
- POSGuys
How to Generate Bulk Barcodes in Excel
If you need a lot of barcodes, you can follow these steps to create them individually, but that might be arduous. Another option is to use a barcode generator add-in. You can also use the online bulk barcode generator offered by POSGuys, and then upload the barcodes to a spreadsheet.
How to Use a Barcode Scanner with Excel
You can use barcode scanners with Excel to scan existing barcodes and enter the data into Excel. For example, when a shipping/receiving department gets new parts, they can scan the barcodes on each part and then enter those codes into a Received Parts spreadsheet.
The second way is to use a scanner to scan the barcodes created in Excel via the steps outlined in this article. You can then enter them into a database or other system.
Using Third-Party Excel Barcode Add-Ins and Software
An add-in is a software package that allows you to extend Excel’s (as well as other Office applications) functionality. You can use Excel barcode add-ins to create individual barcodes, lists, or tables, and to set parameters. Below are some examples of add-ins that can help create barcodes:
- TBar: This is an Excel add-in that can create a single barcode, as well as lists and tables. The add-in allows for direct insertion into cells, and dynamically links to other spreadsheet data. You can also customize the parameters of the barcodes, including height, width, and check digits.
- Barcode Resource Encoder: This standalone software package interfaces with Excel and uses macros to create barcodes.
- ConnectCode: This is a standalone software package to create barcodes.
Discover a Better Way to Manage Your Work with Smartsheet
Empower your people to go above and beyond with a flexible platform designed to match the needs of your team — and adapt as those needs change.
The Smartsheet platform makes it easy to plan, capture, manage, and report on work from anywhere, helping your team be more effective and get more done. Report on key metrics and get real-time visibility into work as it happens with roll-up reports, dashboards, and automated workflows built to keep your team connected and informed.
When teams have clarity into the work getting done, there’s no telling how much more they can accomplish in the same amount of time. Try Smartsheet for free, today.
При ведении учета в торговле, создании личных каталогов используются штрих-коды. Для их последующего считывания существуют сканеры. А создать можно с помощью программных продуктов разработанных специально для Excel.
Как сделать штрих-код в Excel
Сформировать генератор штрих-кодов в Excel можно разными способами: с помощью макроса, инструмента ActiveX и разработанных модулей. Рассмотрим на примере одного из специализированных продуктов. Он является абсолютно бесплатным. Поэтому расценивать статью как рекламную нельзя.
Самый простой способ это установить в Windows шрифты штрих кодов и тогда они буду доступны в Excel на панели «Главная»-«Шрифт».
Пару шрифтов-штрихкодов можно скачать в конце статьи
Так же можно скачать по адресу http://www.idautomation.com/font-encoders/word-excel-addin/ надстройку для ввода штрихкодов в программе Excel или Word.

Перед началом работы убедитесь, что в программе Excel доступен Visual Basic. А в настройках безопасности – сняты ограничения для макросов.
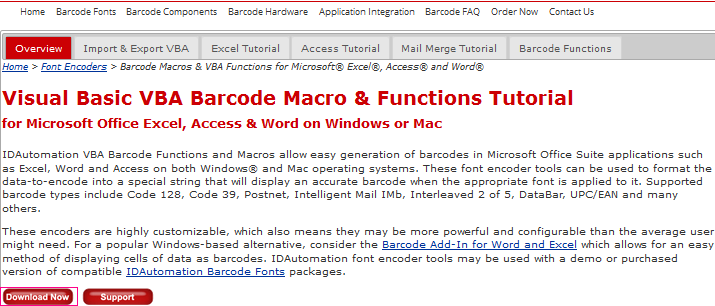
- Откройте сайт http://www.idautomation.com/font-encoders/vba-macro/. В списке бесплатных продуктов найдите «VBA Macros for Excel & Access». (Данный файл также можно скачать в конце статьи).
- Нажмите на ссылку и скачайте продукт на свой компьютер.
- Программа стачивается архивом. Разархивируйте файл с названием «BarcodeFunctions.zip».
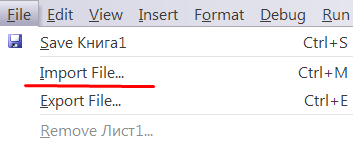
- Одновременным нажатием клавиш Alt + F11 вызовите редактор Visual Basic. В верхнем поле нажмите кнопку File. Нам нужно импортировать загруженный из Интернета код.
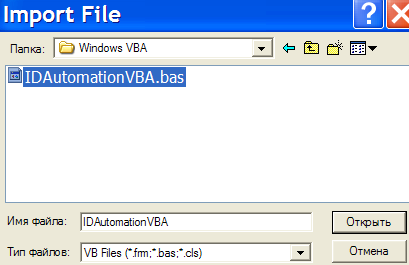
- Находим скачанный файл. В папке Windows VBA выбираем IDAutomation.bas. Импортированный модуль «добавляет» в книгу Excel шрифты и функции, чтобы преобразовывать набор цифр и букв в штрих-код.
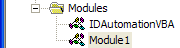
- После импорта он появляется в папке «Модули».
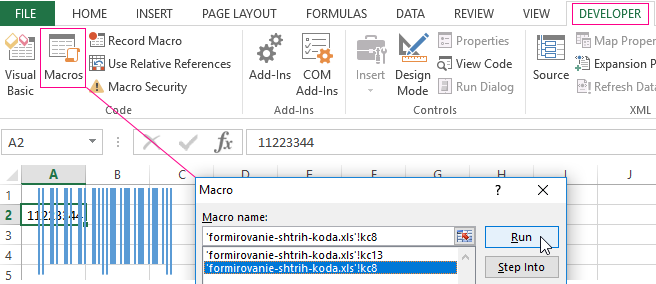
- Далее нужно выйти из редактора Visual Basic. В ячейку A2 ввести пробный код (например, 11223344) и нажать «Разработчик»-«Макрос».
- В появившемся меню выбираем макрос для генерации 8-ми значного штрихкода и нажимаем «выполнить».
Следующий этап – печать штрих-кода из Excel для проверки правильности кодировки. То есть напечатать коды можно только тогда, когда используются специальные шрифты.
Еще один способ формирования штрих-кодов – написать макрос (реализовано тут).
Чтобы добавить штрих-код в Excel 2007, нужно выполнить следующую последовательность:
- Нажать кнопку «Файл» — «Параметры». В основных параметрах – поставить галочку «Показывать вкладку «Разработчик» на ленте.
- Вкладка «Разработчик». Находим кнопку «Вставить» — «Элементы управления ActiveX». Выбираем «Другие элементы управления».
- В открывшемся меню находим StrokeScribe Objekt. Нажимаем ОК. Рисуем мышью прямоугольник в любом месте страницы.
- Появляется штрих-код. Открываем меню правой кнопки мыши. «Свойства». Alphabet – для выбора типа штрих-кода.
Чтобы нарисованный код «заработал» (адаптировался под введенные пользователем цифры), нужно писать макрос.
Как подключить сканер штрих-кода к Excel
Процесс подключения зависит от модели сканера и его возможностей. Иногда ничего делать не нужно. Достаточно подключить сканер к компьютеру, используя включение «разъем клавиатуры», и открыть во время работы книгу Excel (должен быть установлен USB-драйвер сканера).
Сканер не воспринимает штрих-код как графический объект – он преобразует его в набор цифр. Во время работы в активную ячейку вставляется числовое значение, считываемое устройством, и срабатывает перевод строки. Детектор посылает символ Enter, что заставляет курсор перейти в следующую строку.
Ряд моделей сканеров работает как клавиатура. При вводе кода данные сразу попадают в активную ячейку листа.
Скачать макрос генератор штрих кодов в Excel
Скачать шрифты штрих-кодов
Для ряда устройств требуется специальная надстройка: стандартное меню не справится с задачей.

Шрифты для штрих-кода весьма сильно отличаются от обычных, поэтому их не используют для текста. Кроме того, такие шрифты не поддерживают кириллицу в принципе, а значит, искать такие варианты не имеет смысла. При этом выделяют несколько стандартов таких шрифтов:
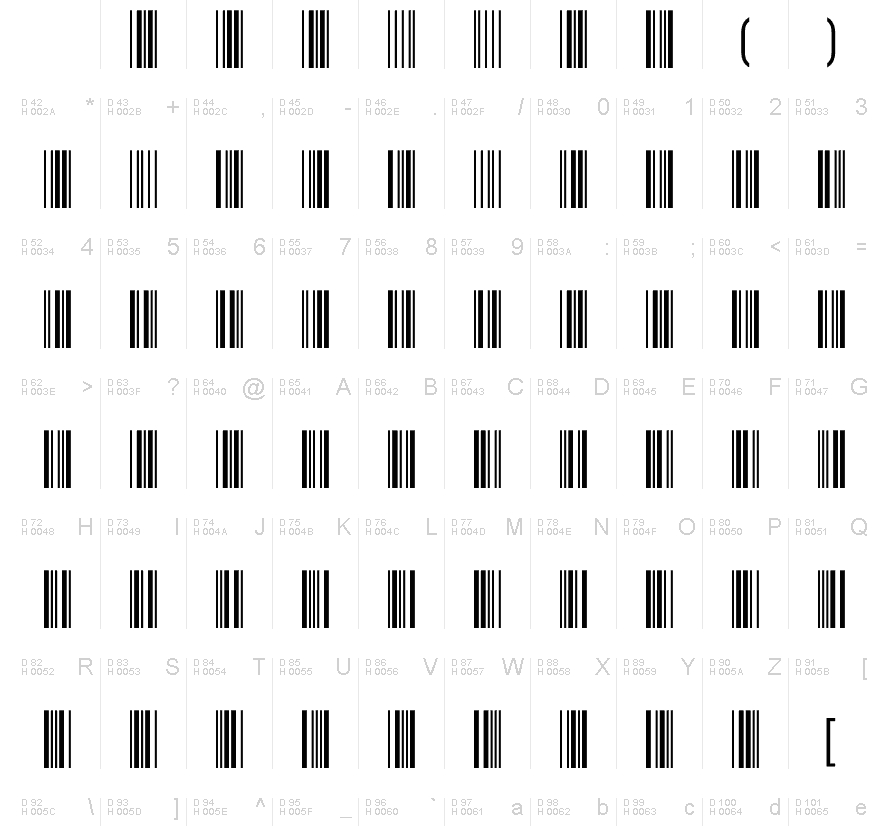
- Code 39 – штрих-код, которым можно закодировать латинские буквы, цифры и некоторые специальные символы.
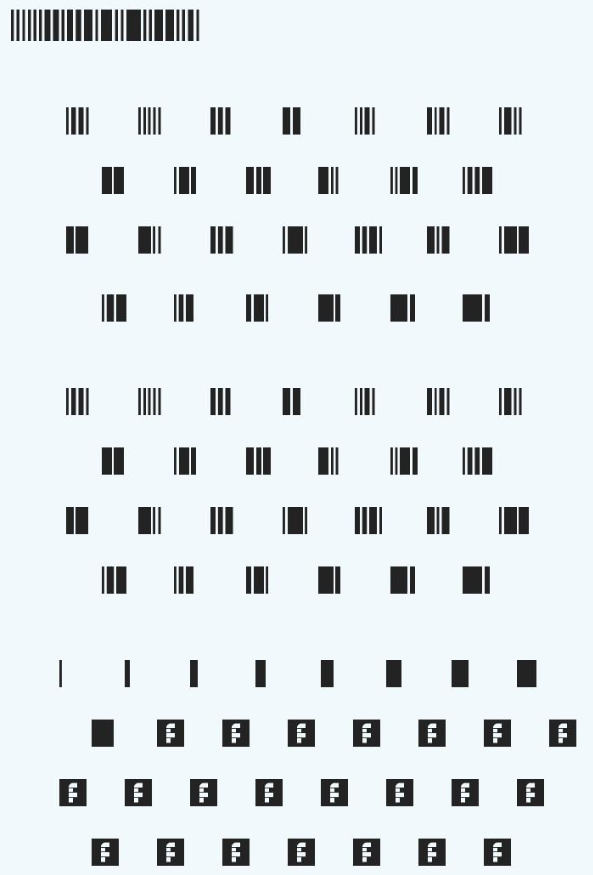
- Code 128 – этот варианте компактнее 39-ого за счёт «двойной упаковки» данных, когда две цифры записываются в один шаблон штрих кода. Буквенные символы кодируются обычным способом.
- EAN – European Article Number (европейский номер товара), самый распространенный формат, предназначенный для кодирования идентификатора товара и производителя. Он имеет в свою очередь несколько типов: EAN-8 (сокращённый) – кодируется 8 цифр, EAN-13 (полный) – кодируется 13 цифр, EAN-128 – кодируется любое количество букв и цифр.
Какой шрифт выбирать вам – решаете только вы и тот, которому нужно создать маркировку. Но если вы оформляете сайт или проект и штрих-код вы размещаете чисто из декоративных целей, то и вариант шрифта может быть самым разным.
О том, как воспользоваться новыми шрифтами в Photoshop и как их правильно установить, можно ознакомиться в нашей Инструкции “Как установить шрифт в Photoshop”.
C39hrp36dltt
Формат: .ttf
Количество: 1
Размер файла: 5 КБ
Скачать
C39hrp24dltt
Формат: .ttf
Количество: 1
Размер файла: 5 КБ
Скачать
C39hrp48dhtt
Формат: .ttf
Количество: 1
Размер файла: 4 КБ

Скачать
Barkode
Формат: .ttf
Количество: 1
Размер файла: 2 КБ
Скачать
Code 128
Формат: .ttf
Количество: 1
Размер файла: 2 КБ

Скачать
Barcode_39
Формат: .ttf
Количество: 1
Размер файла: 2 КБ
Скачать
Barcode_39bar
Формат: .ttf
Количество: 1
Размер файла: 7 КБ
Скачать
EanGnivc
Формат: .ttf
Количество: 1
Размер файла: 3 КБ

Скачать
You can download this font
You can download this font
You can download this font
You can download this font
You can download this font
You can download this font
You can download this font
You can download this font
You can download this font
You can download this font
You can download this font
You can download this font
You can download this font
You can download this font
You can download this font
You can download this font
You can download this font
You can download this font
You can download this font
You can download this font
Содержание
- Баркод шрифты для excel
- Баркод шрифты для excel
- Баркод шрифты для excel
- Tutorial in using the Barcode Fonts in Microsoft Excel 2007 — 2019 or Excel 365
- Tutorial in using the Barcode Fonts in Microsoft Excel 2003
Баркод шрифты для excel
Barcode.ttf Шрифт TrueType для отображение штрихкодов.
Barcode.bas Исходные тексты функций преобразования различные кодировок штрихкодов.
Barcode.doc Пример использования штрихового кодирования в Microsoft Word.
Barcode.mdb Пример использования штрихового кодирования в Microsoft Access.
Barcode.xls Пример использования штрихового кодирования в Microsoft Excel.
Descript.doc Описание принципов формирования штрихкодов.
Readme.txt Описание установки и использования. Этот файл.
2.1. Загрузка пакета на компьютер
3.1. Подготовка документа офисного приложения для использования штрихкодов
— Откройте приложение Micosoft Excel (Word или Access). Создайте новый или откройте существующий документ.
— Выберите в меню Сервис команду Макрос и Редактор Visual Basic.
— В окне редактора Visual Basic в меню File выберите команду Import File.
— Найдите в папках и выберите файл Barcode.bas, включенный в этот комплект. Теперь в список Modules добавиться новый модуль Barcode.bas.
— Закройте редактор Visual Basic и вернитесь в окно Microsoft Excel (Word или Access).
Документ готов для использования штрихового кодирования.
3.2. Вставка штрихкодов в файлы Microsoft Excel
— Выполните инструкцию по подготовке документа для использования штрихкодов, описанную в п.3.1.
— Выберите ячейку, куда Вы хотите вставить штрихкод.
— В меню Вставка выберите команду Функция. Откроется окно Мастер функций
— Мастер функций — шаг 1 из 2. Выберите в левом поле категорию Определенные пользователем и выберите в правом поле одну из функций Codabar, Code_128, Code_39 или Interleaved_2of5 в зависимости от требуемой символики. Нажмите кнопку OK.
— Мастер функций — шаг 2 из 2. В качестве аргумента A задайте формулу, определяющую значение, которое Вы хотели бы закодировать. Нажмите кнопку OK.
— Установить для выбранной ячейки шрифт Barcode размером от 16 до 36 пунктов (оптимальный размер подбирается в зависимости от модели сканера, обычно 26 пунктов).
Теперь содержимое ячейки отображает штрихкод, в котором закодировано значение параметра A функции кодирования.
3.2. Вставка штрихкодов в файлы Microsoft Word
— Выполните инструкцию по подготовке документа для использования штрихкодов, описанную в п.3.1.
— Вставьте текстовые поля формы документа, которые будут содержать штрихкоды.
— Создайте макрос, заполняющий эти поля результатом выполнения функций штрихового кодирования Codabar, Code_128, Code_39 или Interleaved_2of5.
Например,
ActiveDocument.FormFields(«MyBarcode»).Result = _
Code_128(ActiveDocument.FormFields(«MyData»).Result).
— Установите созданный макрос на кнопку или на выход из поля данных формы документа.
— Установите для полей, содержащих штрихкод, шрифт Barcode размером от 16 до 36 пунктов (оптимальный размер подбирается в зависимости от модели сканера, обычно 26 пунктов).
— Не забудьте отключить выделение полей серым фоном, иначе ухудшается распознавание черного на сером.
3.3. Вставка штрихкодов в файлы Microsoft Access
— Выполните инструкцию по подготовке документа для использования штрихкодов, описанную в п.3.1.
— На новой форме или в отчете установите Надпись (Label), определяемую как результат действия одной из функций Codabar, Code_128, Code_39 или Interleaved_2of5.
— Установите для Надписи (Label) шрифт Barcode размером от 16 до 36 пунктов (оптимальный размер подбирается в зависимости от модели сканера, обычно 26 пунктов).
Примечания
— Функции штрихового кодирования могут быть использованы непосредственно в запросах, до отображения на форме.
Функция преобразует цифры и служебные символы в штриховой код Codabar, отображаемый посредством шрифта Barcode.
Параметр A — строка символов из набора
[ 0 1 2 3 4 5 6 7 8 9 — $ : / . + * a b c d t n e ]
Функция автоматически вставляет символы d и е для формирования стартовых и стоповых разрядов.
Функция преобразует символы в штриховой код Code 128, отображаемый посредством шрифта Barcode.
Параметр A — строка символов с кодами ASCII от 0 до 127
Функция автоматически формирует стартовый и стоповый разряды.
Функция преобразует прописные латинские буквы, цифры и служебные символы в штриховой код Code 39, отображаемый посредством шрифта Barcode.
Параметр A — строка символов из набора [ 0 1 2 3 4 5 6 7 8 9 A B C D E F G H I J K L M N O P Q R S T U V W X Y Z — $ : / . + * % SPACE ]
Функция автоматически вставляет символы * для формирования стартовых и стоповых разрядов.
4.4. Interleaved_2of5
Функция преобразует цифры в штриховой код Interleaved 2 of 5, отображаемый посредством шрифта Barcode.
Параметр A — строка символов из набора [ 0 1 2 3 4 5 6 7 8 9 ]
Параметр Check — При значении True функция производит автоматический расчет контрольного знака. По умолчанию False.
Функция автоматически формирует стартовый и стоповый разряды. Нечетное число цифр с учетом контрольного разряда дополняется слева символом «0».
Источник
Баркод шрифты для excel
Продажа, Внедрение и Сопровождение 1С
Нужна помощь специалиста? Звоните:  +7(495) 120-99-28
  info@corvets.ru

Barcode v.1.0
 Code 128
Пакет штрихового кодирования в офисных приложениях
Оглавление
1. Содержимое пакета
2. Загрузка и установка на компьютер
3. Вставка штрихкодов в собственные документы
4. Описание функций Barcode.bas
Barcode.ttf Шрифт TrueType для отображение штрихкодов.
Barcode.bas Исходные тексты функций преобразования различные кодировок штрихкодов.
Barcode.doc Пример использования штрихового кодирования в Microsoft Word.
Barcode.mdb Пример использования штрихового кодирования в Microsoft Access.
Barcode.xls Пример использования штрихового кодирования в Microsoft Excel.
Descript.doc Описание принципов формирования штрихкодов.
Readme.txt Описание установки и использования. Этот файл.
2.1. Загрузка пакета на компьютер
— Выберете эту ссылку для загрузки пакета на компьютер -> Barcode.zip
3.1. Подготовка документа офисного приложения для использования штрихкодов
— Откройте приложение Micosoft Excel (Word или Access). Создайте новый или откройте существующий документ.
— Выберите в меню Сервис команду Макрос и Редактор Visual Basic.
— В окне редактора Visual Basic в меню File выберите команду Import File.
— Найдите в папках и выберите файл Barcode.bas, включенный в этот комплект. Теперь в список Modules добавиться новый модуль Barcode.bas.
— Закройте редактор Visual Basic и вернитесь в окно Microsoft Excel (Word или Access).
Документ готов для использования штрихового кодирования.
3.2. Вставка штрихкодов в файлы Microsoft Excel
— Выполните инструкцию по подготовке документа для использования штрихкодов, описанную в п.3.1.
— Выберите ячейку, куда Вы хотите вставить штрихкод.
— В меню Вставка выберите команду Функция. Откроется окно Мастер функций
— Мастер функций — шаг 1 из 2. Выберите в левом поле категорию Определенные пользователем и выберите в правом поле одну из функций Codabar, Code_128, Code_39 или Interleaved_2of5 в зависимости от требуемой символики. Нажмите кнопку OK.
— Мастер функций — шаг 2 из 2. В качестве аргумента A задайте формулу, определяющую значение, которое Вы хотели бы закодировать. Нажмите кнопку OK.
— Установить для выбранной ячейки шрифт Barcode размером от 16 до 36 пунктов (оптимальный размер подбирается в зависимости от модели сканера, обычно 26 пунктов).
Теперь содержимое ячейки отображает штрихкод, в котором закодировано значение параметра A функции кодирования.
3.2. Вставка штрихкодов в файлы Microsoft Word
— Выполните инструкцию по подготовке документа для использования штрихкодов, описанную в п.3.1.
— Вставьте текстовые поля формы документа, которые будут содержать штрихкоды.
— Создайте макрос, заполняющий эти поля результатом выполнения функций штрихового кодирования Codabar, Code_128, Code_39 или Interleaved_2of5.
Например,
ActiveDocument.FormFields(«MyBarcode»).Result = _
Code_128(ActiveDocument.FormFields(«MyData»).Result).
— Установите созданный макрос на кнопку или на выход из поля данных формы документа.
— Установите для полей, содержащих штрихкод, шрифт Barcode размером от 16 до 36 пунктов (оптимальный размер подбирается в зависимости от модели сканера, обычно 26 пунктов).
— Не забудьте отключить выделение полей серым фоном, иначе ухудшается распознавание черного на сером.
3.3. Вставка штрихкодов в файлы Microsoft Access
— Выполните инструкцию по подготовке документа для использования штрихкодов, описанную в п.3.1.
— На новой форме или в отчете установите Надпись (Label), определяемую как результат действия одной из функций Codabar, Code_128, Code_39 или Interleaved_2of5.
— Установите для Надписи (Label) шрифт Barcode размером от 16 до 36 пунктов (оптимальный размер подбирается в зависимости от модели сканера, обычно 26 пунктов).
Примечания
— Функции штрихового кодирования могут быть использованы непосредственно в запросах, до отображения на форме.
Функция преобразует цифры и служебные символы в штриховой код Codabar, отображаемый посредством шрифта Barcode.
Параметр A — строка символов из набора
[ 0 1 2 3 4 5 6 7 8 9 — $ : / . + * a b c d t n e ]
Функция автоматически вставляет символы d и е для формирования стартовых и стоповых разрядов.
4.2. Code_128
Функция преобразует символы в штриховой код Code 128, отображаемый посредством шрифта Barcode.
Параметр A — строка символов с кодами ASCII от 0 до 127
Функция автоматически формирует стартовый и стоповый разряды.
4.3. Code_39
Функция преобразует прописные латинские буквы, цифры и служебные символы в штриховой код Code 39, отображаемый посредством шрифта Barcode.
Параметр A — строка символов из набора [ 0 1 2 3 4 5 6 7 8 9 A B C D E F G H I J K L M N O P Q R S T U V W X Y Z — $ : / . + * % SPACE ]
Функция автоматически вставляет символы * для формирования стартовых и стоповых разрядов.
4.4. Interleaved_2of5
Функция преобразует цифры в штриховой код Interleaved 2 of 5, отображаемый посредством шрифта Barcode.
Параметр A — строка символов из набора [ 0 1 2 3 4 5 6 7 8 9 ]
Параметр Check — При значении True функция производит автоматический расчет контрольного знака. По умолчанию False.
Источник
Баркод шрифты для excel
Tutorial in using the Barcode Fonts in Microsoft Excel 2007 — 2019 or Excel 365
All the functions available in the Encoder like generating a check digit, formatting the encoded barcode string, and adding start/stop characters are also available as Microsoft Office Macros. It is extremely easy to create and print barcodes in Excel.
Please make sure that ConnectCode is installed on your computer.
Set the Security Settings in Excel 2007 — 2019 or Excel 365
- Launch Microsoft Excel.
- Click on the Developer tab.
- Click on the Macro Security button on the ribbon.

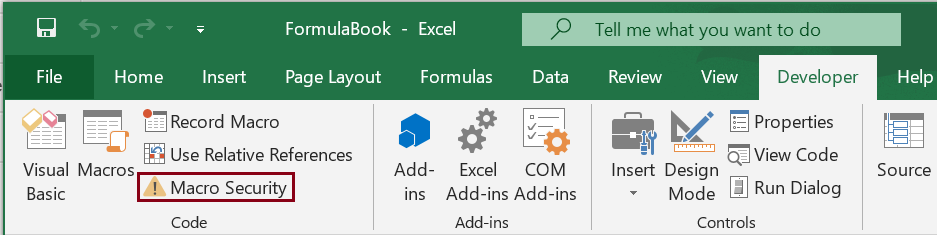
The above steps will only need to be carried out once in Excel.
Import the VBA macros to Excel 2007 — 2019 or Excel 365
- Launch Microsoft Excel.
- Click on the Developer tab.
- Click on the Visual Basic button on the ribbon.
- This will launch the Visual Basic for Applications editor.

Note — If you are using the msix installer for Windows 11, the «Encoder.bas» file is in the «Resource.zip» file.
Creating a barcode in Excel 2007 — 2019 or Excel 365
- Launch Microsoft Excel.
- Create a new Excel Spreadsheet.
- Key in the data «12345678» in cell A1 as shown below. Leave the next column for the barcode.
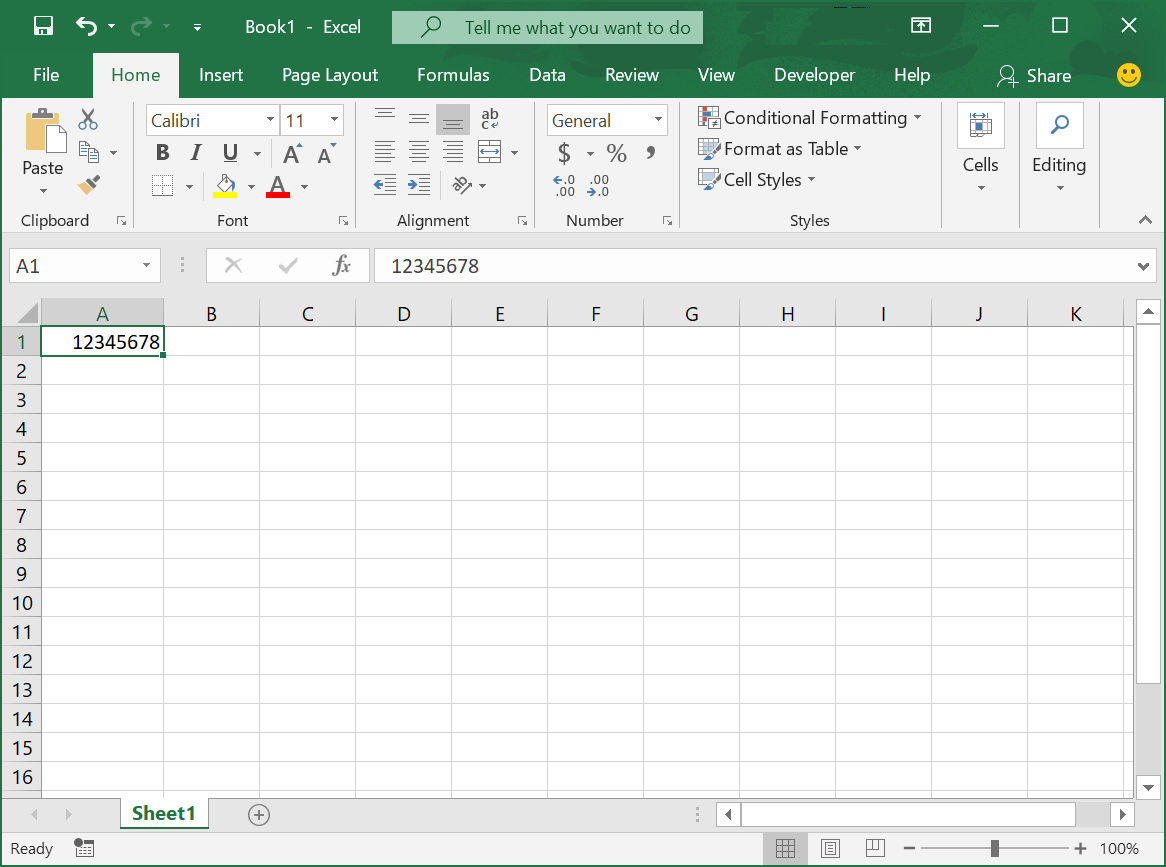

To encode other type of barcodes like Code 128 or UPC/EAN barcode or I2of5, simply use the appropriate functions/macros listed in the section List of Barcode Macros/Functions.
Tutorial in using the Barcode Fonts in Microsoft Excel 2003
Set the Security Settings in Excel 2003
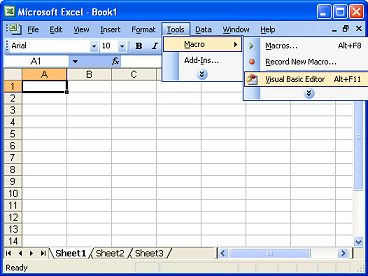
- Launch Microsoft Excel
- Click on the menu Tools->Macro->Security.
- Set the security to Medium
The above steps only need to be carried out once in Excel


Import the VBA macros to Excel 2003
- Launch Microsoft Excel
- Click on the menu Tools->Macro->Visual Basic Editor.
Click on the menu File->Import File. 
Select the Encoder.bas file that is bundled with ConnectCode. This file is located in the Resource sub directory where ConnectCode is installed 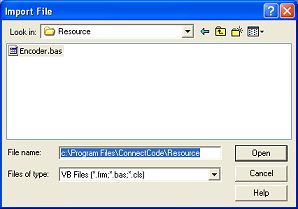
Creating a barcode in Excel 2003
- Launch Microsoft Excel
- Create a new Excel Spreadsheet.
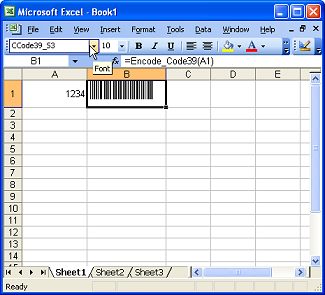
- Key in the data «1234» in the cell A1 as shown below. Leave the next column for the barcode.
- Enter the macro function in cell B1. For example, to encode a Code 39 barcode, set this cell to «=Encode_Code39(A1)».
- Hit the Enter key to see the encoded barcode string «*1234A*»
- Change the font in the cell containing the encoded barcode string (cell B1) to CCode39_S3. You can also choose a different font size to adjust the height.
- You can enter more data in the first column. After which you can encode them as barcode by copying and pasting the encoding function in the second column.

To encode other type of barcodes like Code 128 or UPC/EAN barcode or I2of5, simply use the appropriate functions/macros listed in the section List of Barcode Macros/Functions
Источник