
-
Go to File > Options > Display.
-
Under Always show these formatting marks on the screen, select the check box for each formatting mark that you always want to display regardless if the Show/Hide
 button is turned on or off. Clear any check boxes for ones you don’t want always displayed.
 button is turned on or off. Clear any check boxes for ones you don’t want always displayed.
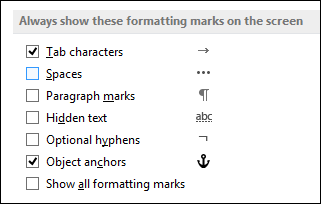
-
Go to File > Help > Options > Display.
-
Under Always show these formatting marks on the screen, select the check box for each formatting mark that you always want to display regardless if the Show/Hide
button is turned on or off. Clear any check boxes for ones you don’t want always displayed.
-
Go to Word > Preferences > View.
-
Under Show Non-Printing Characters, select the check box for each formatting mark that you always want to display regardless if the Show/Hide
button is turned on or off. Clear any check boxes for ones you don’t want always displayed.

The Show/Hide button turns hidden characters like spaces, paragraph markers, or tab marks on and off. Go to File > Options > Display. button is turned on or off.
Contents
- 1 How do I turn on Show hide in Word for Mac?
- 2 How do you show hidden formatting in Word?
- 3 Which of the following turns on the show hide feature?
- 4 How do I hide hidden characters in Word?
- 5 How do you show fields in Word?
- 6 Where is the show Hide button in Word quizlet?
- 7 Is there a Reveal Codes in Microsoft Word?
- 8 What is the shortcut key to the hide and show option?
- 9 How do you turn on Show hide and delete all of the blank lines in the document?
- 10 What does Ctrl F9 do?
- 11 What is hide button?
- 12 How do you show field results in Word?
- 13 How do you toggle fields in Word?
- 14 How do I show merge fields in Word?
- 15 Where is the show hide paragraph’s button located under what tab on the menu?
- 16 How do I hide formatting changes?
- 17 What button do you click to show formatting marks in a document?
- 18 How do you hide codes in Word?
- 19 How do I reveal codes in Word 2010?
- 20 What does Ctrl Shift Alt 6 do?
How do I turn on Show hide in Word for Mac?
There’s a keyboard shortcut for toggling invisible characters (like paragraph marks, and spaces, and tabs) in Microsoft Word on a Mac and as far as I know it’s worked in every version, since the very beginning. Command-8 does it. Command-8 to show them, Command-8 again to hide them.
How do you show hidden formatting in Word?
Show or Hide Formatting Symbols
- Click Home tab.
- Click Show/Hide ¶ button. The hidden formatting symbols are now shown. These symbols represent spaces, new paragraphs, page breaks, and other bits of text and page formatting.
- Click Show/Hide ¶ button again.
Which of the following turns on the show hide feature?
If you are loathe to remove your hands from the keyboard in order to use the mouse, you might want to memorize a quick little shortcut: Ctrl+* (that’s the asterisk), which can also be written as Shift+Ctrl+8. This shortcut key toggles the Show/Hide tool on and off.
How do I hide hidden characters in Word?
First a definition: those characters are the invisible, non-printing characters that make your document readable. You can toggle them on and off by clicking Home Paragraph Show/Hide. You can see what the button looks like turned on and off in the next image.
How do you show fields in Word?
Display the field results
- Click the File > Options. ( In Word 2007, click Microsoft Office Button. , and then click Word Options.)
- Click Advanced.
- Under Show document content, in the Field shading list, do one of the following: To make fields stand out from the rest of the document content, select Always.
Where is the show Hide button in Word quizlet?
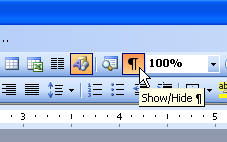
In the Paragraph group on the Home Tab, click the Show/Hide button.
Is there a Reveal Codes in Microsoft Word?
Reveal Formatting
The feature commonly touted as Word’s equivalent to Reveal Codes in earlier versions was the “What’s This?” button on the Help menu. Click on that (or press Shift+F1), then click in a paragraph, and you’d get information about formatting applied both by the style and directly.
What is the shortcut key to the hide and show option?
Maps keyboard shortcuts
| Press this key | To do this |
|---|---|
| Ctrl + F | Search |
| Ctrl + M | Minimize the active tab |
| Ctrl + P | |
| Ctrl + T | Show or hide traffic |
How do you turn on Show hide and delete all of the blank lines in the document?
To start removing empty lines, open your document with Microsoft Word. Click “Home” in the menu and then select “Replace” on the right of the screen. Then click “Replace All” at the bottom of the window. After you click, all the blank lines will be removed from your document.
What does Ctrl F9 do?
Ctrl+F9: Insert new Empty Field {} braces. Ctrl+Shift+F9: Unlink a field. Alt+F9: Toggle the display of a field’s code.
What is hide button?
Not all communications on Facebook are welcome.You can also use the hide button to remove individual posts and stories from your Facebook Timeline or Facebook Page if someone adds an item that you don’t want to display, or you want to clear certain stories, photos or updates you’ve previously posted.
How do you show field results in Word?
You can also use the ALT + F9 keyboard shortcut to toggle between field results and field codes. Scroll down to the Show document content section. Select the desired option from the Field shading drop-down list.
How do you toggle fields in Word?
To toggle all the fields in your document, press Alt + F9. So if you open a document and see field codes instead of results, simply press Alt + F9 to toggle them all.
How do I show merge fields in Word?
Checking Merge Fields in Word
Right-click on the Merge Field in question. From the Word pop-up menu, select Toggle Field Codes. Or, to show all the Merge Fields as code in your Word document, click Alt+F9.
the Home tab
On the Home tab, in the Paragraph group: 1. Click the Show/Hide button to show paragraph mark and other hidden formatting symbols.
How do I hide formatting changes?
Hiding Formatting Changes in Track Changes
- Make sure the Review tab of the ribbon is displayed.
- Click the down-arrow under the Track Changes tool (in the Tracking group) and then click Change Tracking Options. Word displays the Track Changes Options dialog box. (See Figure 1.)
- Clear the Track Formatting check box.
What button do you click to show formatting marks in a document?
Show the marks of formatting in word document
- Click on Office button.
- Click on Word options.
- Click on the display tab. After clicking on the “Word Options” button, click Display tab. Under the “Always show these formatting marks on the screen” section, select the marks that you wish to display.
How do you hide codes in Word?
In Word, go to the “Tools” menu, and select “Options”. Here, on the “View” tab, uncheck the box named “Field Codes“. Click “OK”. The document should now appear normal.
How do I reveal codes in Word 2010?
But, when you select some text in Word and press Shift + F1, the Reveal Formatting pane displays. Word shows you, in list format, how the selected text is formatted with respect to the Font, Paragraph, and Section.
What does Ctrl Shift Alt 6 do?
Navigation
| To do this | In the Desktop app, press | In the Web app, press |
|---|---|---|
| Open Files | Ctrl+6 | Ctrl+Shift+6 |
| Go to previous list item | Left Alt+Up arrow key | Left Alt+Up arrow key |
| Go to next list item | Left Alt+Down arrow key | Left Alt+Down arrow key |
| Move selected team up | Ctrl+Shift+Up arrow key | No shortcut |
I cannot tell you how helpful using this feature can be. If you get used to
working in Word with this feature turned ON, you’ll keep yourself out of so much
trouble!
You receive a document.
And you begin to delete some text, and all of a sudden, everything’s messed
up!
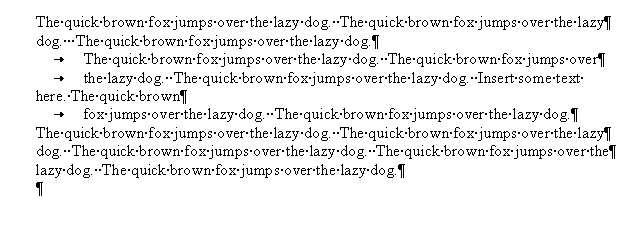
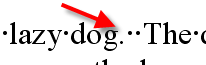
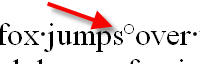
If you had your Show/Hide button on, you’d see that the person
didn’t use an indent to indent the 2nd paragraph, and that there’s returns at
the end of every line, so the text doesn’t wrap properly.
|
Character |
What it indicates |
|
|
Tab |
|
|
Paragraph return |
|
|
Spaces |
|
|
Line break |
|
|
End of cell marker (in a table |
|
|
Non-breaking space |
|
|
Optional hyphen |
|
|
The box indicates that there is |


For instance, I was just asked a question at
All Experts:
I want to create a table that uses all the available space on a page
except for the space required for the header and footer. However I can’t stop
word from adding another page. I still get a gap between the bottom of the table
and the footer — and an extra page that I can’t get rid of. Grateful for any
help,
The reason they cannot figure out where the extra page is coming from is
because they cannot see the paragraph return. The reason they cannot see the
paragraph return is because they don’t work with their show/hide button on.
To turn on the show/hide button, first use the
Recommended Settings
to be sure you can see the button.
Then just click it on the Standard toolbar to turn it on.
In this particular case, the user needs to select that paragraph return at the
end of the document and change its font size to 1pt. Word insists on placing a
paragraph return after a table-something to anchor
the table, I suppose, so the only way to get rid of it is to make it tiny. To
select it, click in front of it and hit Shift + Right Arrow. Then type a 1 in
the font size box on the Formatting toolbar.
Show or Hide White Space in Microsoft Word Documents
by Avantix Learning Team | Updated February 9, 2022
Applies to: Microsoft® Word® 2010, 2013, 2016, 2019 or 365 (Windows)
You can show or hide white space at the top and bottom of pages in Microsoft Word documents. If you hide white space, you won’t be able to see headers, footers or top and bottom margins in Print Layout View. The gray space that typically appears at the top and bottom of pages as you scroll through your document will also disappear. If you want to show or hide spaces between words, you’ll need to click Show/Hide ¶ on the Home tab in the Ribbon.
Print Layout View is the default view in Word. You can click the View tab in the Ribbon and select Print Layout in the Views group to go to this view if necessary.
In Word documents, margins are set for the top and bottom of pages by default and can be changed on the Layout tab in the Ribbon. Headers and footers appear in the top and bottom margin areas (with the exception of floating objects) so if white space is hidden, headers and footers may seem to be missing.
Recommended article: How to Hide Comments in Word (or Display Them)
Do you want to learn more about Microsoft Word? Check out our virtual classroom or live classroom Word courses >
Showing or hiding white space using a shortcut
To show or hide white space in Word using a shortcut:
- Position the cursor at the top of the document (you can press Ctrl + Home to move the cursor to the top of the document).
- Move the pointer into the gray area just above the first page (below the Ruler) until the pointer turns into an up and down arrow. A message appears to Double-click to show white space or Double-click to hide white space.
- Double-click. If you are hiding white space, you can also position the pointer in the gray area between pages and then double-click.
If you show or hide white space, this setting will continue in any new documents you create. When white space is hidden, the setting affects not just the white space between pages but anything that is part of the header or footer (including watermarks and other graphics anchored to the header or footer). When you save and close a document, the setting is retained in the document.
If you hide white space, page breaks are still visible in the document. If you print the document, the headers and footers will print even if white space is hidden.
Showing or hiding white space using the Options dialog box
To show or hide white space using the Word Options dialog box:
- Open a Word document where you want to show or hide white space.
- Click the File tab in the Ribbon.
- Select Options. A dialog box appears.
- In the categories on the left, select Display.
- In the pane on the right, check or uncheck Show whitespace between pages in Print Layout view.
- Click OK.
The Options dialog box, with the Display category selected, appears as follows:

Because this feature isn’t obvious, it can cause problems for users if areas in their document seem to be missing (such as headers or footers).
Subscribe to get more articles like this one
Did you find this article helpful? If you would like to receive new articles, join our email list.
More resources
14+ Word Selection Shortcuts to Quickly Select Text
How to Remove Hard Returns in Word Documents
How to Superscipt or Subscript in Word (with Shortcuts)
How to Insert the Not Equal Sign in Word (5 Ways to Type or Insert ≠)
How to Insert or Type the Degree Symbol in Word (5 Ways to Insert °)
Related courses
Microsoft Word: Intermediate / Advanced
Microsoft Excel: Intermediate / Advanced
Microsoft PowerPoint: Intermediate / Advanced
Microsoft Word: Long Documents Master Class
Microsoft Word: Styles, Templates and Tables of Contents
Microsoft Word: Designing Dynamic Word Documents Using Fields
VIEW MORE COURSES >
To request this page in an alternate format, contact us.
Our instructor-led courses are delivered in virtual classroom format or at our downtown Toronto location at 18 King Street East, Suite 1400, Toronto, Ontario, Canada (some in-person classroom courses may also be delivered at an alternate downtown Toronto location). Contact us at info@avantixlearning.ca if you’d like to arrange custom instructor-led virtual classroom or onsite training on a date that’s convenient for you.
Copyright 2023 Avantix® Learning
Microsoft, the Microsoft logo, Microsoft Office and related Microsoft applications and logos are registered trademarks of Microsoft Corporation in Canada, US and other countries. All other trademarks are the property of the registered owners.
Avantix Learning |18 King Street East, Suite 1400, Toronto, Ontario, Canada M5C 1C4 | Contact us at info@avantixlearning.ca
 Please Note:
This article is written for users of the following Microsoft Word versions: 97, 2000, 2002, and 2003. If you are using a later version (Word 2007 or later), this tip may not work for you. For a version of this tip written specifically for later versions of Word, click here: Shortcut for Show/Hide.
![]()
Written by Allen Wyatt (last updated April 21, 2018)
This tip applies to Word 97, 2000, 2002, and 2003
Word has a number of non-printing characters that it commonly uses in a document. These characters include spaces, tabs, paragraph marks, and a few other such characters. When you are editing and formatting documents, it is often useful to view these characters, as they can affect the appearance of your document.
The normal way to display the non-printing characters is to click on the Show/Hide tool (it looks like it has a backwards P on it). If you are loathe to remove your hands from the keyboard in order to use the mouse, you might want to memorize a quick little shortcut: Ctrl+* (that’s the asterisk), which can also be written as Shift+Ctrl+8. This shortcut key toggles the Show/Hide tool on and off.
WordTips is your source for cost-effective Microsoft Word training.
(Microsoft Word is the most popular word processing software in the world.)
This tip (3456) applies to Microsoft Word 97, 2000, 2002, and 2003. You can find a version of this tip for the ribbon interface of Word (Word 2007 and later) here: Shortcut for Show/Hide.
Author Bio
With more than 50 non-fiction books and numerous magazine articles to his credit, Allen Wyatt is an internationally recognized author. He is president of Sharon Parq Associates, a computer and publishing services company. Learn more about Allen…
MORE FROM ALLEN
Dynamic Worksheet Tab Names
Need a worksheet’s name to change based on the contents of a cell? You’ll need to rely on a macro to do the changing, but …
Discover More
When Replace Doesn’t Work
Find and Replace is a great tool, but what are you to do if your find or replace doesn’t work as you expect? This tip …
Discover More
Canceling a Command
Tired of waiting for a command to finish running? You can use the same shortcut to cancel a command that you use to …
Discover More
More WordTips (menu)
Format Painter Shortcut
Need a way to copy formatting using the keyboard? Word has a great one, and it doesn’t involve the Format Painter or the …
Discover More
Finding Default Shortcut Keys
There are scores of shortcut keys defined in Word. If you want to discover what all those shortcut keys are, here are a …
Discover More
Keyboard Control of the Find and Replace Dialog Box
Hate to take your hands off the keyboard? This tip explains how you can use the keyboard to work with the Find and …
Discover More