
Insert Page X of Y
If you have a header or footer already, click or tap where you want to put the page number first.
-
Go to Insert > Page Number.
-
Do one of the following:
-
Select Current Position if you have a header or footer.
-
Select a location if you have no header or footer yet.
-
-
Scroll until you see Page X of Y and select a format.
-
Select Close Header and Footer, or double-click anywhere outside the header or footer area.
-
Double-click in the footer or header where you want page numbering.
-
Go to Header & Footer > Footer, and then scroll to find and select Semaphore.
-
Select Close Header and Footer or double-click anywhere outside of the header or footer areas to exit.
See also
Start page numbering later in your document
-
Go to Insert > Page Numbers
-
Select Include Page Count for an X of Y format.
-
Choose a location.
To remove page numbers, repeat these steps but choose Remove Page Numbers.

Microsoft Word offers an easy way to add different styles of page numbers to your document. If you’ve got a simple document, it works well enough. But if you’ve worked with Word for a while and use it to create more complex documents, you know page numbering can get a little flaky. So let’s take a closer look.
To add page numbers to your Word document, switch over to the “Insert” tab on the Ribbon and then click the “Page Number” button in the “Header & Footer” section.

A drop-down menu shows several different options for where you’d like the page numbers to appear—top of the page, bottom of the page, and so on. The last couple of options let you format your page numbers more precisely (something we’ll look at a bit later in this article) or remove page numbers from your document.
Hover over one of the first four options and a page number gallery appears. Each option in the gallery gives you a general idea of how the page numbers will look on your page.
Once you find an option you like, go ahead and click it to have Word automatically number all the pages of your document in that style. In this example, we’ve selected the “Accent Bar” style in the “Page X” format.
RELATED: How to Insert Page X of Y into a Header or Footer in Word
If you inserted page numbers at the top or bottom of the page, the header or footer area of your document automatically opens up, and you can make any addition you like around your new page numbers. When you’re ready to get back to your document, you can tap the “Close Header & Footer” button on the Ribbon or double-click anywhere in your document outside the header or footer area.
That’s the simple version of adding page numbers, and it works well enough if you’ve got a simple document—one where you want all the pages numbered, and you want them numbered using the same convention.
For some documents, though, you’ll want to get a little fancier. For example, what if you don’t want the page number to appear on the first page of the document (or on the first page of each section)? Or what if you want the page number placement to be different on odd and even pages, the way it is in a book? Or what if you have different sections that you want to be numbered differently—like an introduction or table of contents where you want Roman numerals instead of the Arabic numerals used in the rest of your document?
Well, Word has a way to do all of that.
How to Make Page Numbering Not Appear on the First Page of a Document or Section
When your first page is a title page, you might want to use a different footer or header for it than you use in the rest of your document and you might not want the page number to show up on that page. When you open your header or footer section by double-clicking somewhere in those areas, Word opens a new “Design” tab on the Ribbon in a section named “Header & Footer Tools.”
On that tab, you’ll find a “Different First Page” option.
The critical thing to know here is that this option applies to the section of the document where your insertion point is currently placed. If you only have one section in your document, selecting the “Different First Page” option makes the current header and footer disappear from the first page of your document. You can then type in different information for your header or footer on the first page if you want.
If you have multiple sections in your document, you can change the header and footer for the first page of each section. Say you were writing a book with different chapters and you had each chapter set up in its own section. If you didn’t want the regular header and footer (and page numbers) showing up on the first page of each section, you can just place your insertion point somewhere in that section and then enable the “Different First Page” option.
How to Number Odd & Even Pages Differently
You can also set up page numbering so that the position of the page numbers is different on odd and even pages. You’ll find that most books take this approach so that the page number appears toward the left side on the left (even) pages and toward the right side on the right (odd) pages. This prevents the page numbers from being obscured by the book’s binding and makes them easier to see as you flip through pages.
Word also has an option for that. On that same “Design” tab in the “Header & Footer Tools” section of the Ribbon, just click the “Different Odd & Even Pages” option.
Word automatically formats the page numbers to appear the way they would in a book, and you can then make any manual adjustments you want.
How to Add Different Numbers and Formats to Different Sections
Most documents use Arabic numerals (1, 2, 3, etc.) in the main body of the document and some use Roman numerals (i, ii, iii, etc.) for different sections like the table of contents, introduction, and glossary. You can set up your document this way in Word, too.
The first thing you’ll need to do is create different sections in your document for these different parts of your document. So, for example, if you wanted your table of contents and introduction to be numbered differently than the main body of your document, you’d need to create a different section up front to hold those parts.
To do this, place your insertion point at the very beginning of your document (if you haven’t already created that preliminary content) or place it right before the first page of your main content (if you have already created the preliminary content).
Switch over to the “Layout” tab on the Ribbon and click the “Breaks” button.
In the drop-down menu, click the “Next Page” option. As the description says, this creates a section break and starts the new section on the next page.
Now that you’ve created the separate section, you can change the format of the page numbers there. The first thing you’ll want to do is break the link between your new preliminary section and the next section where the main body of your document starts. To do that, open up the header or footer area (wherever you have your page numbers) in the main section of your document. On the “Design” tab in the “Header & Footer Tools” section of the Ribbon, click the “Link to Previous” option to break the link to the previous section’s header and footer.
Now that you’ve broken the link, you can fix the page numbering the way you want it. This takes a few steps.
Start by opening up the header and footer area of any page in that preliminary section. You’ll see that the page numbering persists from before you created the new section break.
Right-click the page number and choose the “Format Page Numbers” command from the context menu.
In the Page Number Format window, select the type of numbers you want to use for the section from the “Number Format” drop-down menu. Here, we’ve gone with standard lowercase Roman numerals. Click “OK” when you’re done.
And you can see that our page numbering in that section has changed to Roman numerals.
There’s one more step you’ll need to take, though. Scroll down to the first page in your next section (the one with the main body of your document). You’ll see that the page numbering likely doesn’t start off at page one. That’s because it maintained the same numbering it had before you created that additional section.
It’s an easy fix, though. Right-click the page number and choose the “Format Page Numbers” command from the context menu.
In the Page Number Format window, select the “Start At” option and then set the box at the right to “1” to start the section off on page one.
That’s all there is to it. Now you should have two sections with different numbers and formats.
Controlling Page Numbers Using Fields
Word numbers all your pages, but those numbers remain hidden unless you tell Word to display them. By inserting a field code anywhere on the page, you can tell Word to reveal the page number. This option gives you fine control over page numbers. It also lets you put numbers anywhere you need and not just in the headers, footers, and margins. For example, you could put them in a text box if you wanted to.
Place your insertion point where you’d like to insert page numbers and then press Ctrl+F9 to insert a pair field brackets, which look like this: { }. Then, type “PAGE” inside the brackets like this:
You can also use a few switches along with the PAGE command that gives you some control over the style in which your numbers appear. Use one of the codes below to give your numbers the look you need.
{ PAGE * Arabic }
{ PAGE * alphabetic }
{ PAGE * ALPHABETIC }
{ PAGE * roman }
{ PAGE * ROMAN }
To finish, right-click anywhere between the brackets and choose the “Update Field” command from the context menu.
Here’s an example of a page number we’ve inserted into a text box at the bottom right of our page.
Fixing Broken Page Numbers
If your page numbers are broken in a document—maybe they appear non-sequentially or restart seemingly at random—it’s almost always because of problems with sections.
For Word, a document isn’t really a thing when it comes to formatting. Word breaks things down into sections, paragraphs, and characters—and that’s it.
To fix broken page numbering, start by identifying the sections in your document. The easiest way to do this is to switch over to the “View” menu on the Ribbon and then click the “Draft” button to enter draft view.
In draft view, Word shows you exactly where section breaks occur and what kinds of breaks they are.
When you’ve identified the location of your section breaks, switch back over to the Print Layout view (so you can see headers and footers easier). This is where you’ll need to start doing some detective work.
Make sure that that the sections where you want continuous page numbering have their headers and footers linked together and that sections where you don’t want continuous numbering have that link broken. You can also use the methods we’ve covered in this article to make sure the page numbering of sections start at the right number
READ NEXT
- › How to Create a Book in Microsoft Word
- › How to Rearrange Pages in Microsoft Word
- › Learn These Microsoft Word Features to Make College Easier
- › How to Print Double-Sided in Microsoft Word
- › How to Add Page Numbers to Google Docs
- › How to Cross-Reference in Microsoft Word
- › How to Adjust and Change Discord Fonts
- › This New Google TV Streaming Device Costs Just $20
 Please Note:
This article is written for users of the following Microsoft Word versions: 2007, 2010, 2013, 2016, 2019, Word in Microsoft 365, and 2021. If you are using an earlier version (Word 2003 or earlier), this tip may not work for you. For a version of this tip written specifically for earlier versions of Word, click here: Inserting the Total Number of Pages in Your Document.
![]()
Written by Allen Wyatt (last updated January 14, 2023)
This tip applies to Word 2007, 2010, 2013, 2016, 2019, Word in Microsoft 365, and 2021
It is not unusual to put a page number in your headers or footers, and the different ways of accomplishing that task are covered in other issues of WordTips. You can also, however, insert a field that indicates the total number of pages in a document. This can be used in a header or footer or directly within the text of your document. To insert the total number of pages in your document, follow these steps:
- Position the insertion point where you want the total number of pages to appear.
- Make sure the Insert tab of the ribbon is selected.
- In the Text group, click Quick Parts. You’ll see a drop-down menu.
- Choose Field. Word displays the Field dialog box.
- In the Categories drop-down list, choose Document Information. (See Figure 1.)
- In the Field Names list choose NumPages. (If you don’t see NumPages in the list, check either the Numbering category or the (All) category in step 5.)
- Click on OK to close the dialog box and insert your field.
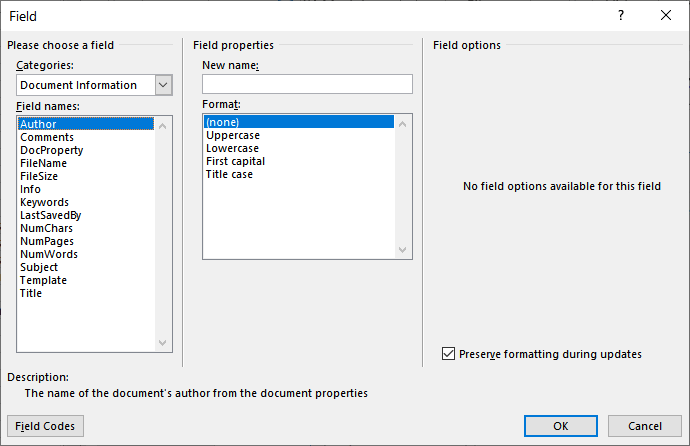
Figure 1. The Field dialog box.
WordTips is your source for cost-effective Microsoft Word training.
(Microsoft Word is the most popular word processing software in the world.)
This tip (980) applies to Microsoft Word 2007, 2010, 2013, 2016, 2019, Word in Microsoft 365, and 2021. You can find a version of this tip for the older menu interface of Word here: Inserting the Total Number of Pages in Your Document.
Author Bio
With more than 50 non-fiction books and numerous magazine articles to his credit, Allen Wyatt is an internationally recognized author. He is president of Sharon Parq Associates, a computer and publishing services company. Learn more about Allen…
MORE FROM ALLEN
Converting Endnotes to Regular Text
If you have a document with lots of endnotes, you may need them converted to regular text so that they can be used …
Discover More
Preventing Changes to Styles in Documents
Have you ever created a template only to have the styles within it changed as they were used within a document? Here are …
Discover More
Creating See-Through Text Boxes
When laying out your document, you may want to use a text box that appears to be positioned over your text, but to be …
Discover More

Learning Made Easy! Quickly teach yourself how to format, publish, and share your content using Word 2013. With Step by Step, you set the pace, building and practicing the skills you need, just when you need them! Check out Microsoft Word 2013 Step by Step today!
More WordTips (ribbon)
Inserting a Page Number Field
The PAGE field is used to indicate the current page number on which the field occurs. If you want to add this field to …
Discover More
Inserting the Current Month
Need to add the name of the current month to your document? Word includes a field that can make the addition easy, and it …
Discover More
Updating Fields in Locked Forms
Updating form fields in Word can be confusing, especially when the fields are locked in a form. This tips explains why …
Discover More
Subscribe
FREE SERVICE: Get tips like this every week in WordTips, a free productivity newsletter. Enter your address and click «Subscribe.»
View most recent newsletter.
Videos
Links and Sharing
For a lengthy document, the total number of pages is important. It tells the reader how many more pages are left before reaching the end of the document.
Also, this information is useful when printing the document. You know when you have reached the end of the document.
MS Word has the ability to print the current page number and the total number of pages. You may have a Word document that:
- Already has the pages numbered
- Has no page numbering
We will show you in simple, step-by-step instructions how you can do this for both cases.
Let us begin.
Method #1: For Document with Page Numbering
This applies to a document where page numbers already appear, but not the total number of pages.
Step #1: Open a Word document
Open the Word document with existing page numbering.
Step #2: Select the page number
Double-click on the page number to select it.

Step #3: Remove page numbers
Once you have double-clicked, the ribbon will change.
You will be in the Design tab under Header and Footer Tools.

In the section Header & Footer, click on the Page Number icon.

A new menu will open.
Click on Remove Page Numbers.

This removes all page numbering from the document.
Step #4: Introduce page number with total number of pages
In the section Header & Footer, click on the Page Number icon again.

A new menu will open, click on Current Position.

Another menu will open.
Scroll down until you reach Page X of Y.

Click on Bold Numbers.
All menus will close.
Word will now show the current page number as well as the total number of pages.

In the top menu bar, click on Close Header and Footer icon to return to your document.

Method #2: For Document without Page Numbering
This method is for when your document has no page numbers yet.
Step #1: Open a Word document
Open the Word document where you want to introduce the total number of pages.
Step #2: Introduce page number with total number of pages
Click on the Insert tab in the top menu bar to change the ribbon.

In the section Header & Footer, click on the Page Number icon.

A new menu will open.
You have four choices for positioning the page numbers:
- Top of Page — Page numbering appears at the top of the pages
- Bottom of Page — Page numbering appears at the bottom of the pages
- Page Margins — Page numbering appears in the margins of the pages
- Current Position — Page numbering appears at the current position of the cursor.
Click on any one of the above choices.
In our example, we selected Top of Page.

Another menu will open.
Scroll down until you reach Page X of Y.

Click on Bold Numbers.
All menus will close.
Word will now show the current page number as well as the total number of pages.

In the top menu bar, click on Close Header and Footer icon to return to your document.

Conclusion
We have shown you two simple methods of introducing the total number of pages in a Word document.
Use the method most suitable for you.
You can easily include the total number of pages along with the current page number (E.g., Page 10 of 20).
When you insert page numbers in a document, you’re actually insert the { PAGE }
field.
Using the { NUMPAGES } field along with the { PAGE } field, you can
include the total number of pages with the page numbering.
To the total number of pages:
1. Place the insertion point where you want to place the count, in the
header or footer.
2. On the Insert tab, in the Text group, click Quick
Parts, and then click Field…:

3. To include the total number of pages, highlight NumPages
in the Field names list:

Attention! The brackets that surround fields are not the brackets on your keyboard. You
can use the Insert -> Field to insert a field, but a more direct way is to press Ctrl+F9.
This displays the special brackets with
a gray highlight for entering a field name.
To add the total number of pages to a header of footer, for example, press Ctrl+F9 and type
NUMPAGES within the brackets:
![]()
All string will be like this:
![]()
To display the result of the field code, press Alt+F9.
See also this tip in French:
Comment inclure le nombre total de pages avec le numéro de page actuel.