How to Show Formulas in Excel: 4 easy methods (2023)
Have you ever worked on a spreadsheet densely packed with formulas?
In such a case, to make sense of how each of the formulas works and how the results are derived, you might want to see the formulas in the cells.
This guide will teach you how to display formulas in Excel. 😀
Download our sample workbook here to follow the guide as we dive into the details of this topic.
How to show formulas in Excel from ribbon
Type any formula into Excel, say = 2+ 2, and hit ‘Enter’.

It’ll take Excel less than a nano-second to run the formula above and display results.
But what if you want the formula ‘= 2 + 2’ to be on the display only? Here’s how you can do it.
1. Select any cell of your worksheet.
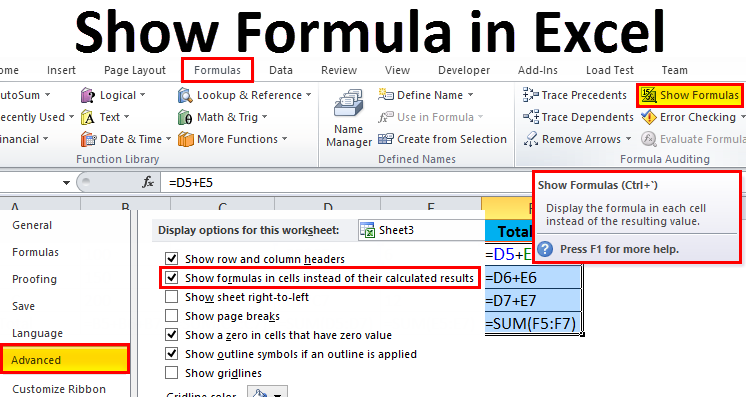
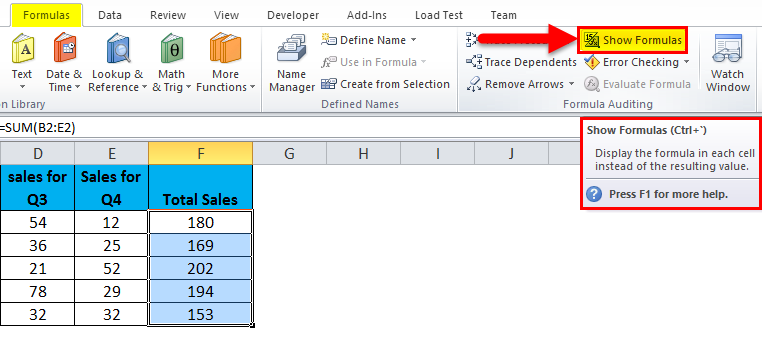
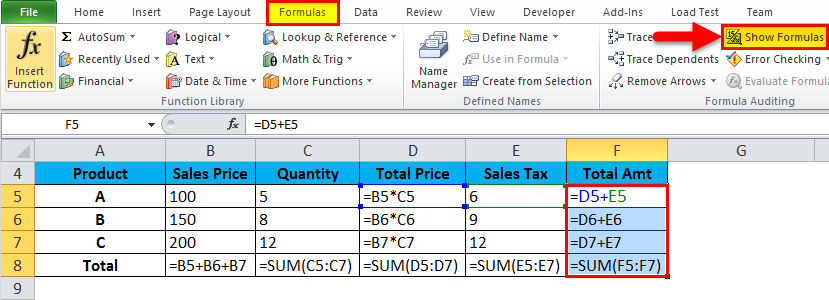
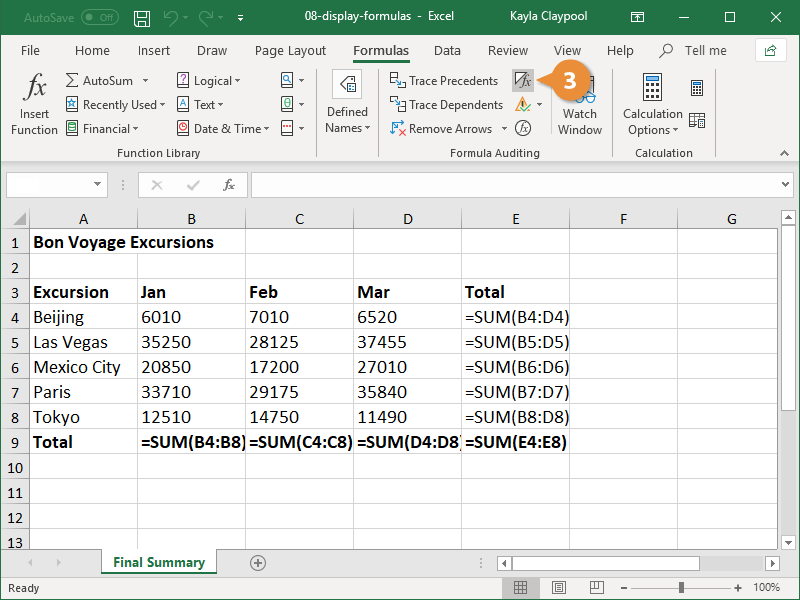
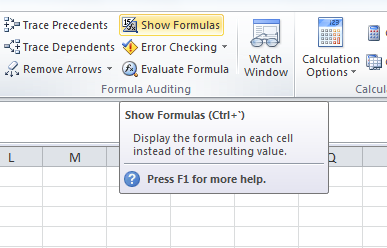
2. Go to the Ribbon > Formulas Tab > Formula Auditing group.

3. Click on the button ‘Show Formulas’.
4. Excel will now display the formulas for all cells in the worksheet and not the result.

Nice! How can we now get back the results?
5. Go back to the Ribbon > Formulas Tab > Formula Auditing group.
6. Again Click on the button ‘Show Formulas’, and there you go.

Excel again displays the result and not the formula.
Show formulas using the shortcut command
You can also display formulas in Excel by using a shortcut key. It is swift and easy.
1. Click any cell of an Excel worksheet.
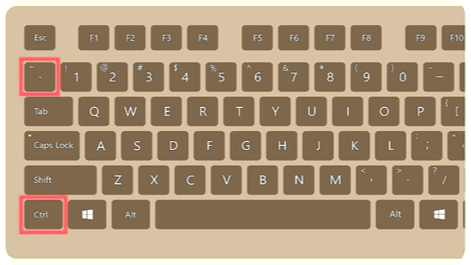
2. Press the Ctrl key + Grave Accent Key ( ` ).
Can’t find the grave accent key on your keyboard? Look to the left of 1 from the number keys.

This puts all cells of that worksheet to display formulas instead of the results.

Note that this shortcut only displays formulas for all cells of the active worksheet. Not the entire workbook.
4. Want to go back already? Press the Ctrl key + Grave Accent Key ( ` ) again.
Excel takes the display back to the results. No more formulas.

That’s for Windows users. Does the method change for Mac users?
Certainly not. Even if you’re a Mac user, the process remains the same. Press the Control key + grave accent key (`) to display formulas.
Whenever you’re done and want to go back to the default display, again press the same keys together.
How to display formulas in specific cells only
We’ve come across two methods to display formulas in Excel already. However, did you notice something?
Both the above methods would display formulas for all the cells of the active worksheet.
But what if you only want to display the formula of a selected cell? There are two ways you can achieve this.
i. Add a space before the formula
Take the following image as an example, where cells A1, A2, and A3 have a formula.

You want to display the formula for cells A1 and A2 only and not for cell A3.
1. Select Cell A1 and A2.
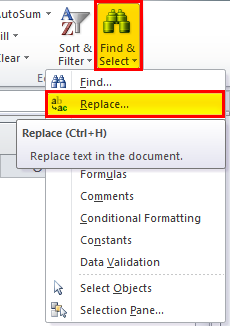
2. Go to Home Tab > Editing group > Find & Select > Replace.

This launches the Find and Replace dialog box as below.

You may use the keyboard shortcut Control + H to launch the Find & Replace feature.
3. Against the Find tab, punch in an equal sign ‘=’.
4. Against the Replace tab, punch in an equal sign but after a space character ‘ =’.

This way the formulas in the selected cells will not start with an equal sign but a space character. And Excel only recognizes a formula when it starts with an equal sign.
5. The results only in the selected cells will be replaced by formulas as follows.

The selected range (Cell A1 and A2) shows formulas. Cell A3 continues to show the results.
ii. Add an apostrophe before the formula
If you do not want a space character visible in the cell, you may use this method instead.
1. Select Cell A1 and A2.
2. Go to Home Tab > Editing group > Find & Select > Replace.
3. In the Find and Replace dialog box, punch in an equal sign (=) against Find.
4. Against the Replace tab, punch in an equal sign but after an apostrophe (‘=).

This way the formulas in the selected cells will not start with an equal sign but an apostrophe. Whenever something starts with an apostrophe in a cell, Excel takes it as a text string.
5. The results only in the selected cells will be replaced by formulas as follows.

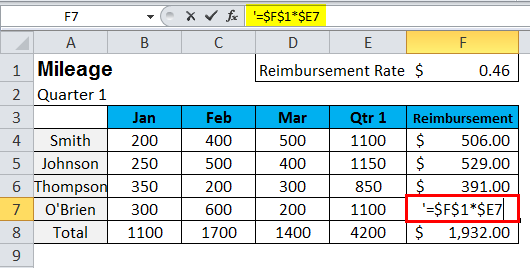
However, unlike the space character, the apostrophe is not visible in the cell. It is only visible in the formula bar or in the edit mode.
Pro Tip!
If you are in a hurry and only want to have a glimpse of the formula in a cell, the above methods might not suit you.
To check the formula to a cell, you may press ‘F2’. This will instantly show the formula running behind a cell.
However, as soon as you click away or press enter, the formula would be replaced by the result.
How to show formulas with the FORMULATEXT function
It’s time we introduce you to a modern-day Excel function. We bet you’ve not heard of it before.
The image below has a cell that contains a formula.

Do you want this formula to appear as it appears in the formula bar but in a different cell?
1. Activate a cell and write the FORMULATEXT function as follows.
= FORMULATEXT (A1)
Write that as the 2nd argument in the MATCH function, replacing what’s currently there.

The FORMULATEXT function of Excel has a single argument – the reference argument.
In the reference argument, you create a reference to the cell whose formula you want to be displayed. We have created the reference to cell A1.
2. Hit enter to see the results as follows.

Note how Excel displays the formula of the referenced cell.
You can display the formula of any cell doing so. 😉
Pro Tip!
What if cell A1 above contained a formula with reference to another workbook?
The FORMULATEXT function would give back a #N/A error if that workbook is not open in the background.
How to select all formulas in the selection
If you’ve only received an Excel file prepared by someone else, how can you quickly identify the cells that have a formula running behind them?
The image below has a list of numbers (some of which are the result of a formula). Whereas, some others are simply punched in numeric values.

To select the formulas for the first six cells of this list (A1 to A6), follow these steps.
1. Select the cells (Cell A1 to A6).
2. Go to the Home Tab > Editing > Find & Select > Go to Special.

Or press down the Control key + G.
3. From the ‘Go To’ dialog box, click special.

4. Check ‘Formulas’ and press okay.

5. Excel selects all the cells that have a formula from Cell A1 to A6.

A5 and A6 do not have any formulas but only numbers. Hence, Excel did not select them.
You can format cells (highlight them) or check the count of these cells from the status bar.

How to print formulas
Whenever you print an Excel sheet, the print contains the calculated results. Not the formulas.
Need the print of your spreadsheet to have the formulas instead of the results?
1. Perform either of the methods above to display the formula in cells.
2. Once your worksheet begins displaying formulas, go to File Tab > Print..

Or just use the print keyboard shortcut. Hit the Control key + P.
3. Here’s what the print preview looks like.

The final printed version would contain formulas and not their calculated results.
That’s it – Now what?
The tutorial above guides you on everything about formulas. Starting from displaying formulas in Excel to printing them.
Once you have a good grip on how formulas work in your spreadsheet, everything will begin to make better sense.
But, do you know how to use some of the most crucial formulas/functions of Excel? Like the VLOOKUP, SUMIF, and the IF functions?
Here’s my 30-minutes free email course that will help you master these and many more functions of Excel in no time.
Kasper Langmann2023-01-19T12:21:09+00:00
Page load link
Excel Show Formula (Table of Contents)
- Show Formula in Excel
- How to Show Formula in Excel Instead of the Values?
Show Formula in Excel
Show Formulas in excel helps the user to see the formulas there in any cell of the worksheet, and it shows all the types and any length of formula. To see the formulas in any cell, go to the Formula menu tab, and under the Formula Auditing section, select Show Formula. We can use this option to show the formula, print it, and hide its value instead of seeing it. First, to print the formula, go to the File menu and, from the Options, section check in the box of Show formula in the cell. And if we see the print preview, it will show the formula instead of the value.
How to Show Formula in Excel Instead of the Values?
There are different ways by which we can show the formulas in Excel. They are listed below, along with the relative examples and screenshots. This will surely help to understand different ways to show formulas in Excel worksheets.
You can download this Show Formula Excel Template here – Show Formula Excel Template
Here is the sample data used for examples:
We will look at a few examples to understand this better.
Example #1 – Double-Clicking a Single Cell to Exhibit the Formula
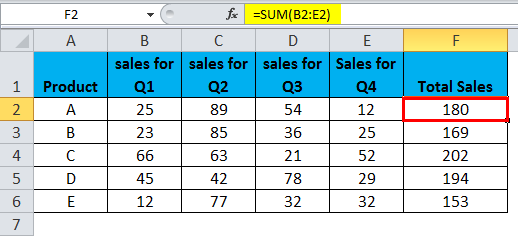
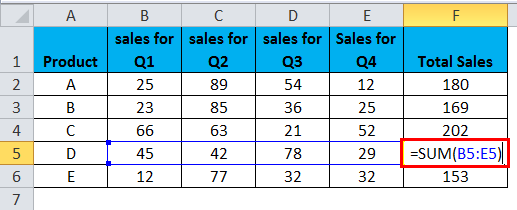
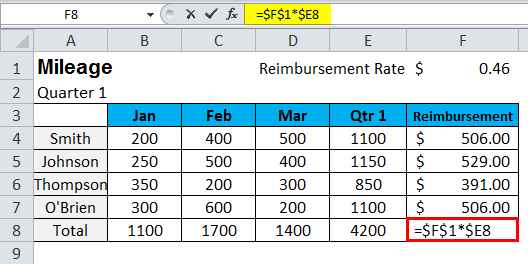
- If you want to see a single cell formula that shows the result, just double click on that cell as below. You can also then edit it:
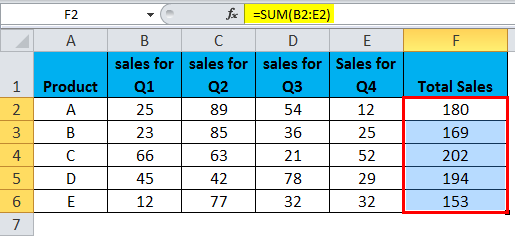
- If you want to see the formula in all the cells of column F, then select the cells as below:
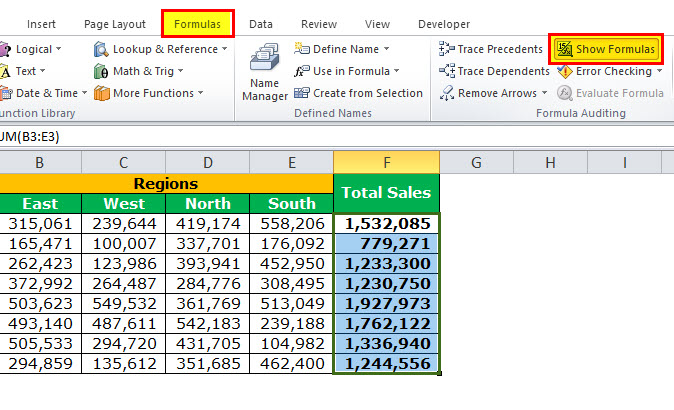
- Now, you have to go to the formula tab and click on the Show Formulas excel option as below:
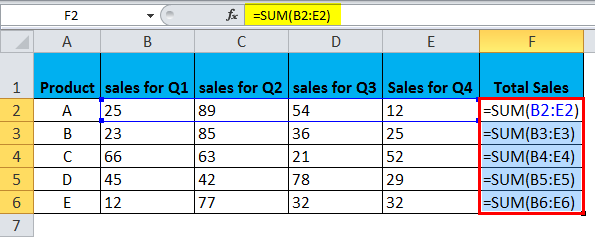
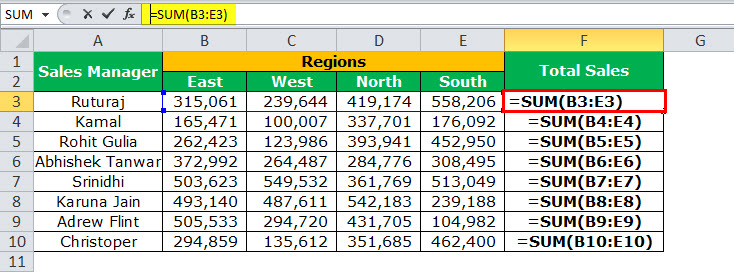
- Once you have clicked the Show Formula tab, then you will see the formulas in the cells of column F as below:
Example #2 – Show Formula in Excel
- Another example from the above data:
- Now select all the cells from column F:
- Now click the Show Formula tab, then you will see the formulas in the cells of column F as below:
- Placing the Cursor before the Formula would show the Formula in that cell.
This shows the formula rather than the result.
Example #3 – By Enabling Show Formula in Workbook Option
- Go to the File option, now go to Options.
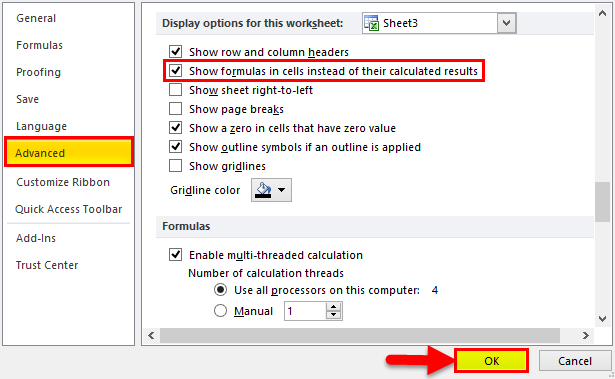
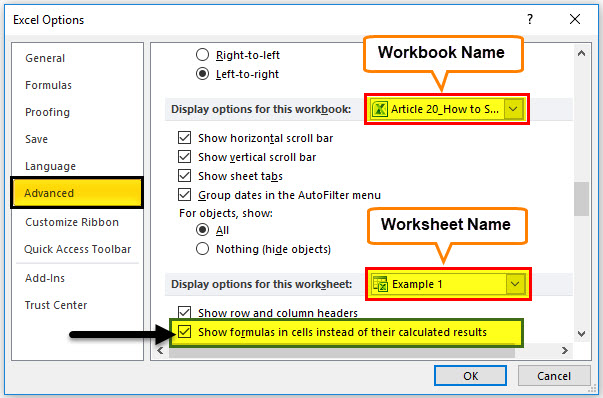
- Now go to Advanced, scroll down a bit, and then under the heading ” Display options for this worksheet “, just check the box Show Formulas in cells instead of their calculated values. Press OK.
This might look like a lengthy process but is very handy in case you want to show the formula for multiple sheets.
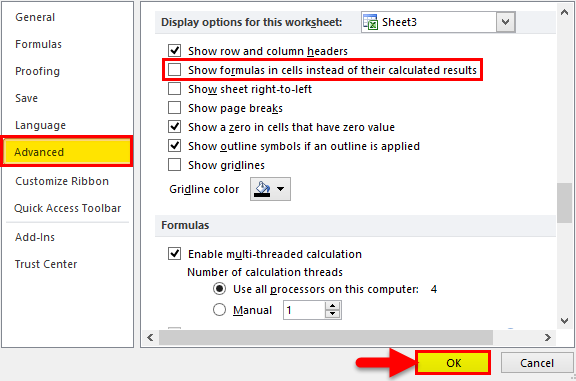
- In case you want to disable this option, just follow the same path, which is File, then Options, then Advanced < heading “Display options for this workbook“.
- Uncheck the box ” Show formulas in cells instead of calculated results.”
Example #4 – Keyboard Shortcut to see the Formula of a Workbook
The keyboard short cut keys are ( CTRL +` ). You can find Ctrl on the left side and the ` right above Tab button on the right side of your keyboard.
Press them, and then you would be able to see every Formula in the spreadsheet, but other cells won’t be changed.
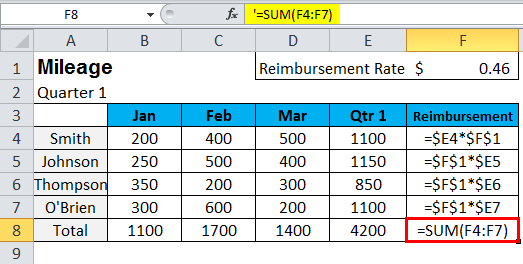
Adding an Apostrophe at the Start of the Cell Containing the Formula.
Just add ‘ in front of the formula so that it can be seen in the cell containing the calculated value.
Example: Using our previous sample data to show how it works.
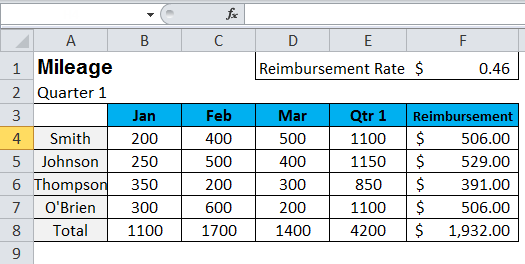
In case you want to switch back to no formula shown in a worksheet, press and hold the Ctrl key and press ~ again. You can also show formulas in multiple sheets. For this, first select the worksheets by pressing and holding the Ctrl key and clicking the worksheets, then press the Ctrl key and ~ on the keyboard.
Show Formulas Selected Cells Only Instead of the Results.
Example: In the below sample data, select all the cells.
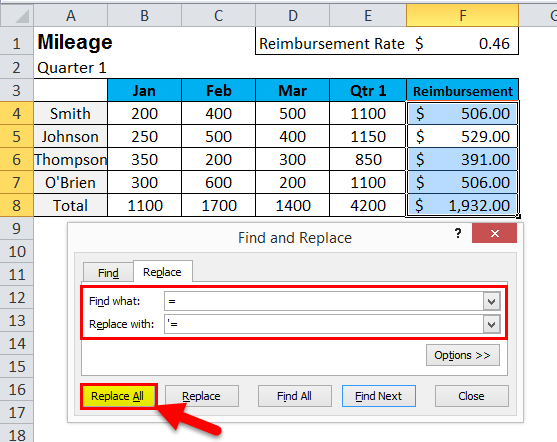
Now, click ” Find and Select “, then select Replace dialog box.
- Within the replace tab, enter “ =” in the ” Find what ” field and “ ‘=” in the ‘Replace with’ field and then click on Replace All.
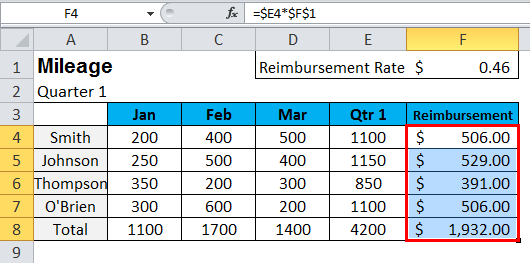
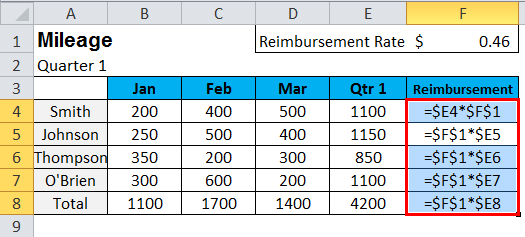
- It will show formulas in all the selected cells while the other cells would not be changed.
Things to Remember About Show Formula in Excel
- Sometimes, we might witness a problem wherein we type formula, and when we press Enter, we get no result. We try again and again, but nothing happens.
The excel formulas show as text and don’t show the result. Like the cell shows :
=sum(A1, B1) but not the result.
One of the reasons could be that unknowingly you set cell formatting to Text instead of General.
This is shown below:
Now make formatting from Text to General.
Another reason could be, you might have pressed, or Show Formulas is enabled.
This can be fixed by pressing CTRL+` again or disable the Show Formulas button.
- Sometimes, the presence of space character or apostrophe before the equal to sign in the formula makes the cell format like text, and the formula shows up instead of the value. To handle this, simply remove these. You can use find and replace to do this.
- It might happen in a hurry that we press the wrong key with Ctrl instead of pressing Ctrl+`. Hence we don’t see the formula in that cell.
- Be careful to study/check the formula by using the above methods but do not lose/delete the formulas in your worksheet/workbook.
Recommended Articles
This has been a guide to Show Formula in Excel. Here we discuss how to use Show Formula in Excel along with practical examples and a downloadable excel template. You can also go through our other suggested articles-
- Basic Excel Formulas
- Write Formula in Excel
- Excel Evaluate Formula
- Excel Text with Formula
In Excel, we have an option to show those formulas to study the relationship of the formula. There is also a keyboard shortcut to show formulas in Excel, which we will explore further. Follow the steps to find that option in Excel.
You can download this Show Formulas Excel Template here – Show Formulas Excel Template
Click on the “Formulas” tab, then “Formula Auditing” and “Show Formulas.”
Once we click on those options, all the formulas in the Excel sheet will be visible instead of the values of the formula.
If you again click on that option, Excel will start to show the values instead of the formula itself.
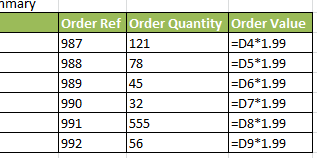
Below is an example of that showing formulas.
Below are the steps of showing formulas:
- First, select the formula cell range.
- Now, go to the “Formulas” tab and click on the “Show Formulas” option.
- Once you click on that option, Excel shows the formula instead of the formula results.
Table of contents
- How to Show Formula in Excel?
- Shortcut to Show Formula in Excel
- How to Enable Show Formula in Workbook Option?
- Print Formulas using Show Formula Option
- Hide Formulas in Excel
- Things to Remember
- Recommended Articles
Shortcut to Show Formula in Excel
The shortcut to show the formula in Excel is “Ctrl + `.” The key (‘) is on the keyboard below the “Esc” button.
How to Enable Show Formula in Workbook Option?
Showing formulas is not a workbook-level option. But, we can offer all the formulas at once by changing our default settings of Excel.
Follow the below steps to enable this option.
- Step 1: Go to the “File” option in Excel.
- Step 2: Now, click on “Options.”
- Step 3: Go to the “Advanced” option.
- Step 4: Scroll down and find “Show formulas in cells instead of their calculated results.”
It seems a long process but is very useful if you want to show multiple sheets’ formulas. However, making one sheet at a time is a very time-consuming process. So, we can rely on these settings options.
Print Formulas using Show Formula Option
We can print these formulas instead of the values using this formula option.
- Step 1: Select the formula cells (if you need particular cells to be displayed, then select those cells only) and click on this formula option. (We can use the shortcut Ctrl + ` ).
It would show up all the selected cell formulas.
- Step 2: Select the printable region data and press the “ALT + P + R + S” shortcut keys. It would set up the print area.
- Step 3: Now, press the “Ctrl + P” keys. It will print all the formulas. Now, you can return and press “Ctrl + `” to remove the visible formulas option and make the values visible.
Hide Formulas in Excel
We cannot only show the formula but also hide those formulas to be visible to other users by protecting the sheet.
- Step 1: Select the formula cells.
Step 2: Right-click and select “Format CellsFormatting cells is an important technique to master because it makes any data presentable, crisp, and in the user’s preferred format. The formatting of the cell depends upon the nature of the data present.read more.”
- Step 3: Select the “Protection” tab and check the “Hidden” box.
- Step 4: Now, click on the “Review” tab and select “Protect Sheet.”
- Step 5: Type the password and protect the sheet.
Things to Remember
- Since “Ctrl + `” is a toggle option, we can show formulas and values after every alternative click.
- We must always study the formula and return to formula values but never lose formulas.
- We often type “Ctrl + `” when using shortcuts. So, do not panic; try typing “Ctrl +`.” It will give back your values.
- If the format of the cell is “TEXT,” then it may show the formula in Excel rather than the values of the formula. Apply “General” formatting to show the values of the formula.
Recommended Articles
This article has been a guide to Show Formula in Excel. Here, we discuss how to show the formula in Excel and its shortcut, along with practical examples. You may learn more about Excel from the following articles: –
- Write Formula in ExcelWrite Formula in excel refers to different formulas written in MS excel to imply a function or calculation to the selected cell or range of cells, rows and columns. There are hundreds of inbuilt formula like AVERAGE, SUM and a proper way of writing it to apply it.read more
- TEXT Formula in ExcelTEXT function in excel is a string function used to change a given input to the text provided in a specified number format. It is used when we large data sets from multiple users and the formats are different.read more
- Excel Print AreaIn Excel, the print area is the portion of the workbook or worksheet that we wish to be printed rather than the entire workbook or worksheet. From the page out tab, we can set up a print area. In addition, a single worksheet can contain numerous print areas.read more
- Create a Formula in ExcelExcel formulas are nothing but simple equations to perform calculations and get desired and accurate outputs. In Excel, you can create your formulas as per your choice and need.read more
- False in ExcelFalse is a logical function in Excel that returns false as an output when used in a blank cell. It can also be used with other conditional functions to return a false, such as the IF function.read more
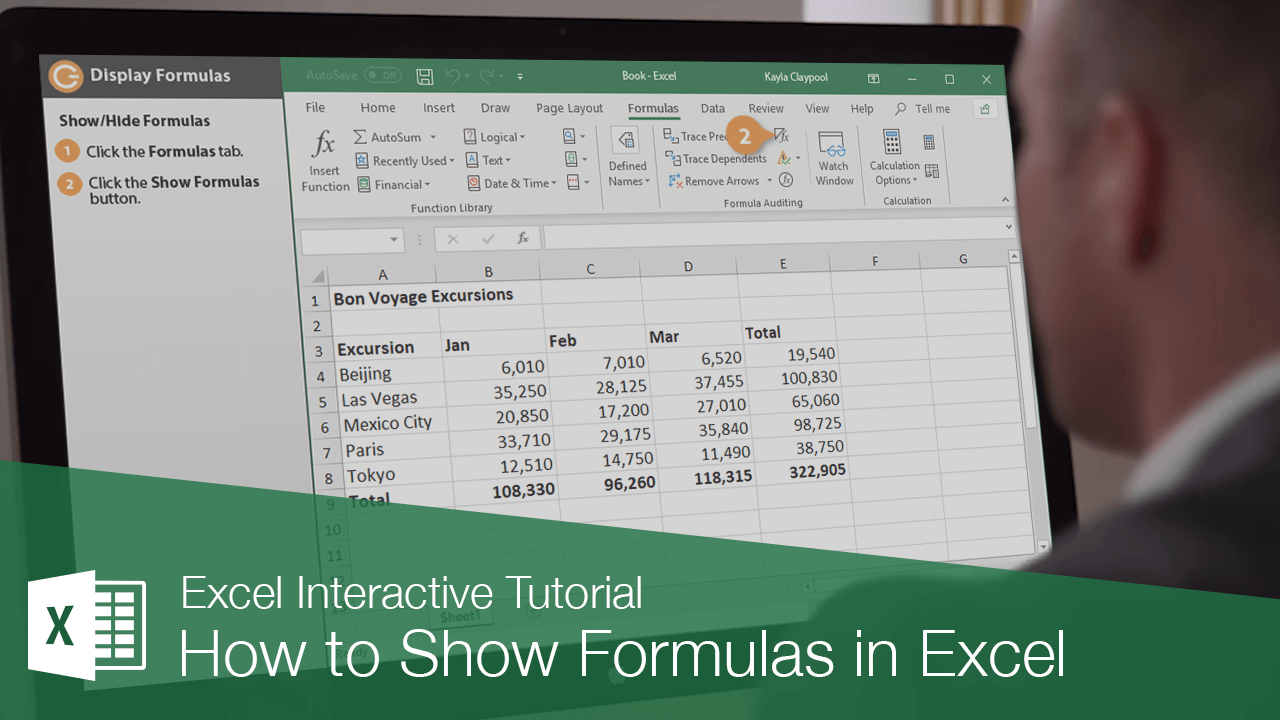
You can better understand what’s going on in your workbooks by showing and highlighting all the formulas in a sheet.
Show/Hide Formulas
By default, Excel displays the results of formulas in the worksheet instead of showing the actual formulas. However, you can choose to have Excel display the formulas so you can see how they’re put together.
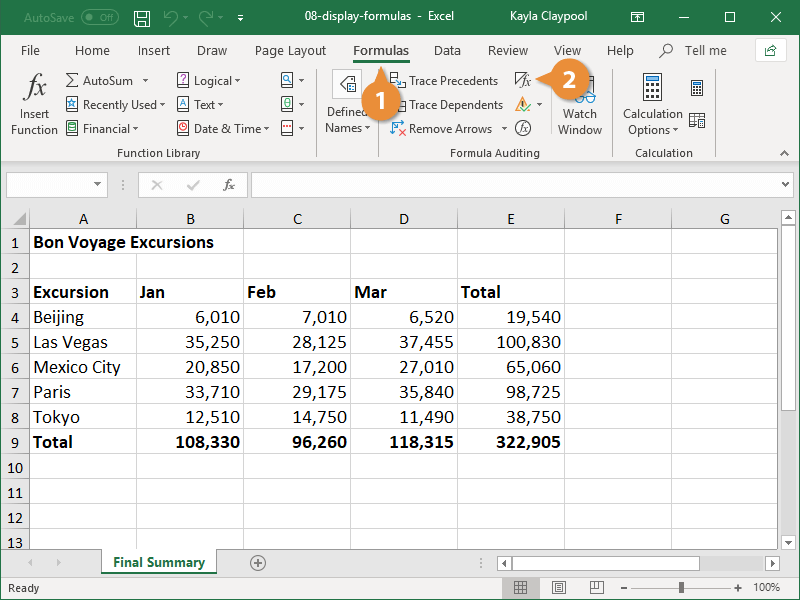
- Click the Formulas tab.
- Click the Show Formulas button.
Formulas are displayed in the worksheet and the columns widen to accommodate the formulas, if necessary.
If you display formulas and then select a cell that contains a formula, colored lines appear around cells that are referenced by the formula.
- Click the Show Formulas button again to hide the formulas.
Formulas are no longer displayed and the columns return to their original sizes.
Highlight Formulas
If you don’t want to see the actual formulas, but want to know which cells contain them, highlight cells with formulas instead.
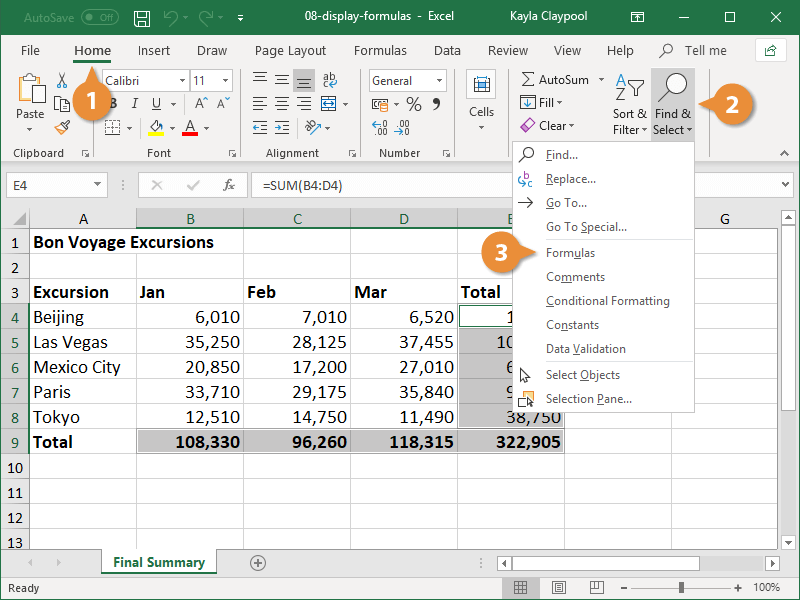
- Click the Home tab.
- Click the Find & Select button.
- Select Formulas.
Any cells that contain a formula are highlighted; however, this doesn’t change the cell formatting. When you click any other cell in the worksheet, the highlighted cells are unselected.
FREE Quick Reference
Click to Download
Free to distribute with our compliments; we hope you will consider our paid training.
It sometimes it is really useful to show your Excel formulas on your worksheets. This gives an insight into the logic of the worksheet. It also is a great way to check your formulas to ensure they look correct. Excel has a built-in option for this already if you want to toggle between a normal view of your worksheet as well as show your formulas. Follow the instructions below.
- Formula Tab
- Formula Auditing
- Show Formulas
You can also quickly toggle between these two views by hitting CTRL+’
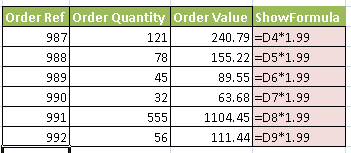
As you can see we have the cell values and the formulas. This method gives you one or the other view.
Let’s get a bit greedy now and look to have both the values AND the formulas on the same worksheet. I have found this beneficial when documenting a spreadsheet solution for a third party or writing a user manual to accompany a spreadsheet.
It takes a bit of VBA, but not much, just a bit, so let’s give it a go. This is done by creating a User Defined Function or a UDF.
What Is A User Defined Function?
I will start with the definition of a User Defined Function in Wikipedia.
“A user-defined function (UDF) is a function provided by the user of a program or environment, in a context where the usual assumption is that functions are built into the program or environment”. Whoa, what does that mean?.
Excel has a lot of built-in functions as you may or may not know at this stage of your Excel and VBA journey. In most cases these suit the job at hand, and even if you need to combine or nest a few functions within each other you get the job done.
If you cannot find a built-in function in Excel to do what you want it to you can BUILD YOUR OWN. Yes, that’s right you can build your own function.*Happy Dance*
Yo just need a little bit Excel VBA code.
So here is the code………
How To Install The Code.
- Hit ALT + F11
- Click on ThisWorkBook in the Project VBA Window
- Insert A Module Into The Project
- Enter the above code into the Module
- Hit ATL+F11
- Save the workbooks
Using The Code
- Enter the formula =showformula(Range) in a worksheet cell that you want to display the formula in
- Your results will be as below
Want To Learn More VBA? NO better place to start than here. With Chandoo’s VBA Classes
What Next?. Want To Learn Even More About Macros?
I have some really useful Excel Macros for you to try. You can check out my full list of Macro Mondays blog posts, and the code is always free for you to copy at the end of the blog post.
If you want more Excel and VBA tips then sign up for my monthly Newsletter where I share 3 Excel Tips on the first Wednesday of the month and receive my free Ebook, 30 Excel Tips.

