Track changes in Word
Note: If a document has been shared with you for review, you may not be able to turn off Track Changes. If you want to edit the document without tracking changes, you’ll need to either save a copy or ask the person who sent it to you to share it again with review mode turned off.
Turn Track Changes on and off
On the Review tab, select Track Changes.
-
When Track Changes is on, the section is highlighted. Deletions are marked with a strikethrough, and additions are marked with an underline. Different authors’ changes are indicated with different colors.
-
When Track Changes is off, the section is not highlighted. Word stops marking changes, but the colored underlines and strikethroughs are still in the document.
Tip: You also can add a Track Changes indicator to the status bar. Right-click the status bar and select Track Changes.
View tracked changes
Note: When a document is in Editing or Reviewing mode, you can select a tracked change to view a collaborator’s full, suggested change in a card that displays. Hover over the Accept or Reject button to see a preview of what that action would do to your final document.
Choose whose changes to track
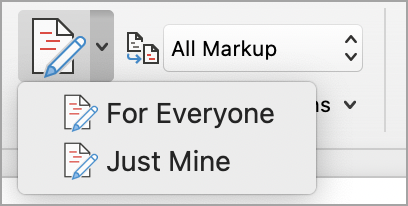
You can choose to track only your own changes or everyone’s changes.
-
To track only your own changes — On the Review tab, select Track Changes > Just Mine.
-
To track everyone’s changes — On the Review tab, select Track Changes > For Everyone.
Tip: to use a password to keep others from turning off Track Changes — On the Review tab, select Track Changes > Lock Tracking.
Choose how you would like to see the changes in the document
You can choose the type of markup you want to see.
-
On the Review tab, select Tracking.
-
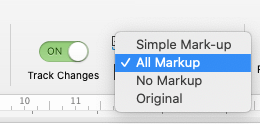
Select All Markup for the drop-down list to display.
-
Select one of the following options.
-
Simple Markup displays tracked changes with a red line in the margin.
-
All Markup displays tracked changes with different colors of text and lines for each reviewer
-
No Markup hides the markup to show the document with changes incorporated
-
Original displays the original document without tracked changes and comments showing. However, any tracked changes or comments in the document that have not been accepted, rejected, or deleted remain in the document.
Choose the way track changes display
You can choose the types of revisions that display and the way they display. If you choose to show revisions as balloons, they display in the margins of the document. If you choose to display them directly within the document in line. In line revisions display all deletions with strikethroughs instead of inside balloons.
-
On the Review tab, select Track > Show Markup.
-
Select Balloons and then select the type of display you want.
-
Show Revisions in Balloons
-
Show All Revisions Inline
-
Show Only Formatting in Balloons
Note: If you want to see tracked changes in balloons, you must be in Print Layout view or Web Layout view.
Display changes by type of edit
-
On the Review tab, select Track Changes > Show Markup.
-
Select the type of edit.
-
Insertions and Deletions
-
Formatting
The check mark next to the item indicates that it’s selected.
Note: Even if you hide a type of markup by clearing it on the Show Markup menu, the markup automatically displays each time the document is opened by you or a reviewer.
Display changes by reviewer(s)
-
In Review > Tracking, select Show Markup.
-
Select Specific People.
-
Select to clear all check boxes except the ones next to the names of the reviewers whose changes you want to show.
Note: To select or clear all check boxes for all reviewers in the list, select All Reviewers.
Navigate tracked changes in Changes menu section
You can navigate from one tracked change to another.
-
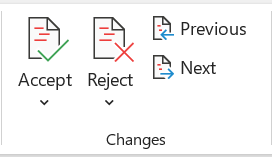
In Review > Changes, select Next to view the next tracked change.
-
In Review > Changes, select Previous to view the previous tracked change.
Accept or Reject tracked changes
There are multiple ways to address tracked changes. The most proficient method is to identify the commentor and respond to the tracked change is through the card display when you click the marked change. The card displays the commentor name and the option to accept or reject the suggestion.

Accept or reject tracked changes in sequence using the main menu
You can resolve teach tracked change from the beginning of the document to the end of the document in sequence.
-
Select Review > Changes > Next.
-
Select Accept or Reject. The next sequential tracked change is highlighted for your review and action.
Note: You can also accept or reject individual tracked changes using the main menus’ drop-down menus. This method is often used as a methodical approach to reviewing tracked changes.
Accept changes using the main menu
-
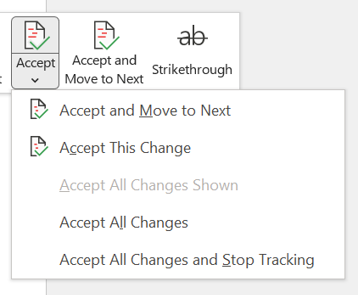
In Review > Changes, select Accept.
-
Select one of the options.
-
Accept and Move to Next
-
Accept This Change
-
Accept All Changes
-
Accept All Changes and Stop Tracking
Reject changes using the main menu
-
In Review > Changes, select > Reject.
-
Select one of the options.
-
Reject and Move to Next
-
Reject This Change
-
Reject All Changes
-
Reject All Changes and Stop Tracking
Accept or reject changes within a document with a right click
Working within a document, you can right-click on a tracked change to accept or reject the change. Using the right-click method displays a banner menu option and a drop-down menu option.
Accept changes in-line with the right-click banner option
-
Right-click a tracked change in the document to review a single suggestion.
-
On the banner, select one of the following.
-
Accept > Accept and Move to Next
-
Accept > Accept This Change
-
Accept > Accept All Changes
-
Accept > Accept All Changes and Stop Tracking
-
Accept and Move to Next
Accept changes in-line with the right-click drop-down menu option
-
Right-click a tracked change in the document to review a single suggestion.
-
In the drop-down menu, select one of the following.
-
Accept Insertion (or Accept Deletion)
-
Reject Insertion (or Reject Deletion)

Accept or reject all tracked changes at once on the main menu
Accept all tracked changes
-
In Review > Changes, select Accept.
-
Select one of the options.
-
Accept All Changes Shown
-
Accept All Changes
-
Accept All Changes and Stop Tracking
Reject all tracked changes
-
In Review > Changes, select Reject.
-
Select one of the options.
-
Reject All Changes Shown
-
Reject All Changes
-
Reject All Changes and Stop Tracking
Note: When Review>Tracking>Show Markup>Specific People>All Reviewers is selected, the Accept All Changes Shown and Reject All Changes Shown options do not display.
Hide tracked changes and comments when printing
Hiding changes doesn’t remove them from the document. You must use the Accept and Reject commands in the Changes group to remove markup from your document.
-
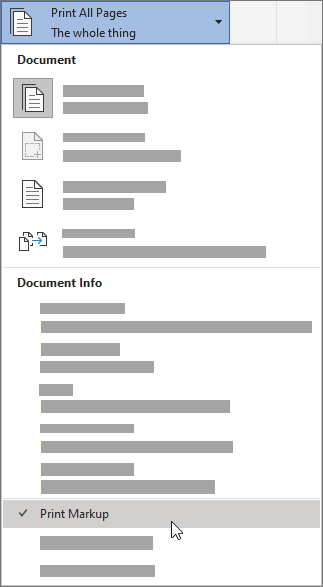
Go to File > Print > Settings > Print All Pages.
-
Under Document Info, select Print Markup to clear the check mark.
View all your changes in a summary list on the Reviewing Pane
-
In Review > Tracking, select Reviewing Pane.
-
Choose if you want to see the Reviewing Pane next to or below your document.
-
Select Reviewing Pane Vertical to see a list of all changes next to your document.
-
Select Reviewing Pane Horizontal to see a list of all changes below your document.
You can use the Reviewing Pane as a handy tool for to check that all tracked changes have been removed from your document so that they show up to others who might view your document. The summary section at the top of the Reviewing Pane displays the exact number of visible tracked changes and comments that remain in your document.
The Reviewing Pane also allows you to review long comments that don’t fit within a comment bubble.
Note: The Reviewing Pane, unlike the document or the comment balloons, is not the best tool for making changes to your document. Instead of deleting text or comments or making other changes in the Reviewing Pane, make all editorial changes in the document. The changes will then be visible in the Reviewing Pane.
Important: Comments are no longer part of the Track Changes function.
Turn on Track Changes
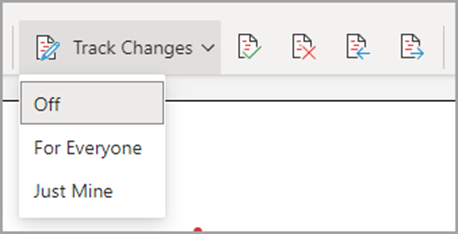
You can set Word for the Web to track changes for all users who are collaborating on the document or to track only your changes.
-
On the Review tab, select Track Changes.
-
In the Track Changes drop-down list, select one of the following:
-
To track only the changes that you make to the document, select Just Mine.
-
To track changes to the document made by all users, select For Everyone.
-
Turn off Track Changes
-
On the Review tab, select Track Changes.
-
In the Track Changes drop-down list, select Off.
Select the Markup view
-
On the Review tab, select Markup view.
-
Select one of the markup options.
-
Markup in margin (Simple Markup) — See suggestions in the margin
-
Markup on page (All Markup) — See suggestions on the page
Review, accept, or reject changes
Accept or reject tracked changes in sequence
You can review each tracked change in sequence and decide whether to accept or reject the change.
-
Click or tap at the beginning of the document.
-
On the Review tab, select Track Changes.
-
Select Accept or Reject. As you accept or reject changes, Word will move to the next change.
Tip: To move through changes in the document without accepting or rejecting them, select Next or Previous.
-
Repeat until you’ve reviewed all of the changes in your document.
Accept or reject a single change
Rather than move through changes in sequence, you can accept or reject a single change. When you accept or reject the change, Word will not move to the next change in the document.
-
Click the change.
-
Select the option to accept or reject it.
When tracked changes are turned on, Word marks any changes made by any authors of the document. This is useful when you’re collaborating with other authors because you can see which authors made a particular change.
Turn Track Changes on
-
On the Review tab, select Track Changes.
-
Select to track only your own changes or everyone’s change.
-
To track only your own changes — On the Review tab, select Track Changes > Just Mine.
-
To track everyone’s changes — On the Review tab, select Track Changes > For Everyone.
Note: To turn Track Changes off, select Track Changes again.
Accept or reject all tracked changes at once on the main menu
Accept all tracked changes
-
Select Reviewing > Accept.
-
Select one of the options.
-
Accept All Changes Shown
-
Accept All Changes
-
Accept All Changes and Stop Tracking
Reject all tracked changes
-
Select Reviewing > Reject.
-
Select one of the options.
-
Reject All Changes Shown
-
Reject All Changes
-
Reject All Changes and Stop Tracking
Word shows changes in the document by displaying a line in the margin. If you switch to All Markup view, you’ll see changes inline and in balloons.

Anytime someone adds a comment, it’ll show up in a balloon.

Review changes inline
To see changes inline instead of in balloons, do the following:
-
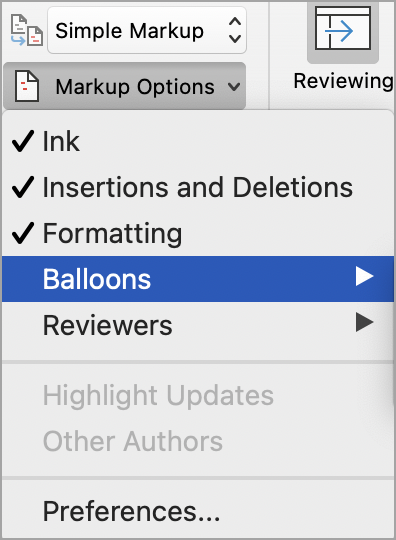
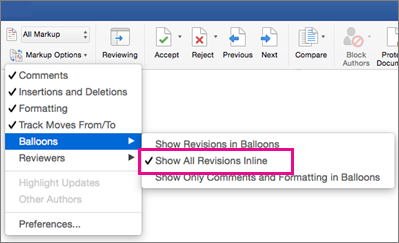
On the Review Tab, select Markup Options
-
Point to Balloons and select Show All Revisions Inline.
Keep Track Changes on
To prevent others from turning off Track Changes, lock Track Changes on with a password.
Important: Be sure to remember the password so you can turn Track Changes off when you’re ready to accept or reject the changes.
Lock Track Changes with a password
-
On the Review tab, select Protect > Protect Document.
-
In the Password box, enter a password.
-
Re-enter your password and select OK.
While tracked changes are locked, you can’t turn off change tracking, and you can’t accept or reject changes.
Unlock Track Changes
-
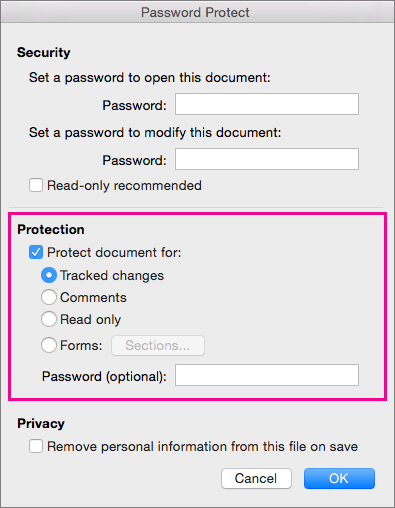
On the Review tab, select Protect > Protect Document.
-
Under Protection, uncheck Protect document for.
-
Enter your password and select OK.
For more info, see
remove the tracked changes and comments.
Turn Track Changes on or off (Word for iPad)
-
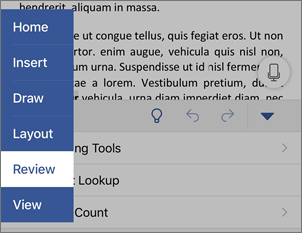
Tap the Review tab.
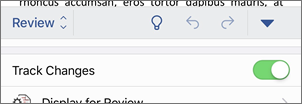
-
Tap the control next to Track Changes to turn Track Changes on or off.
Show or hide markup (Word for iPad)
-
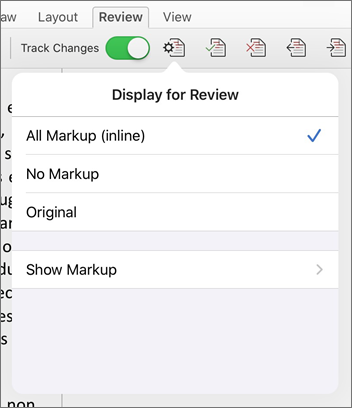
On the Review tab, tap the Display for Review icon.
-
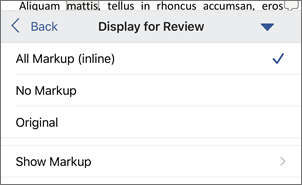
In the Display for Review list, tap the option you want:
-
All Markup (inline) shows the final document with tracked changes visible inline
-
No markup shows the final document without tracked changed
-
Original shows the original document with no tracked changes
-
Show tracked changes by type (Word for iPad)
-
On the Review tab, tap the Display for Review icon.
-
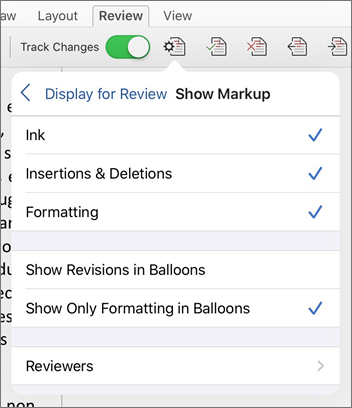
In the Display for Review list, tap Show Markup.
-
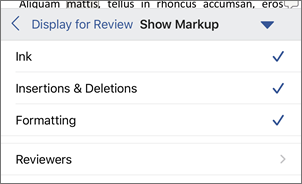
In the Show Markup list, tap the option you want:
-
Ink shows or hides any marks made by digital inking in the document.
-
Insertions & Deletions shows or hides inserted or deleted text.
-
Formatting shows or hides formatting changes.
-
Show Revisions in Balloons shows changes in balloons in the right margin.
-
Show Only Formatting in Balloons shows only formatting changes in balloons and keeps the other changes as inline tracking.
-
Show tracked changes by reviewer (Word for iPad)
If there are multiple reviewers for the document, Word will show all changes by default. However, you can choose to show only changes made by specific viewers.
-
On the Review tab, tap the Display for Review icon.
-
In the Display for Review list, tap Show Markup.
-
In the Show Markup list, tap Reviewers.
-
In the Other Authors list, tap the names of the reviewers whose changes you want to see or tap All Reviewers.
Accept changes (Word for iPad)
-
Tap twice on a change in the document to select it.
-
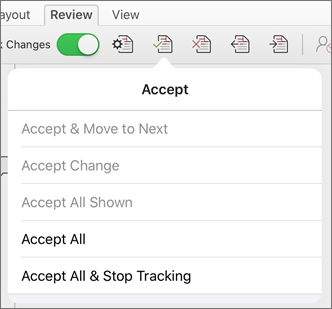
On the Review tab, tap the Accept icon.
-
Do one of the following:
-
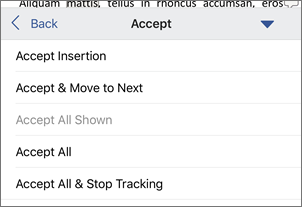
Tap Accept & Move to Next to accept the change and move to the next change in the document.
-
Tap Accept Deletion, Accept Insertion, or Accept Change to accept the selected change, identified contextually by type, and not move to the next change in the document.
-
Tap Accept All Shown to accept all changes that are visible, but not changes that are hidden. For example, if you’re viewing only changes made by a specific reviewer, tapping Accept All Shown accepts only the changes made by that reviewer.
-
Tap Accept All to accept all changes in the document.
-
Tap Accept All & Stop Tracking to accept all changes in the document and turn off Track Changes.
-
-
To move to another change without accepting or rejecting it, tap the Previous or Next icon.
Reject changes (Word for iPad)
-
Tap twice on a change in the document to select it.
-
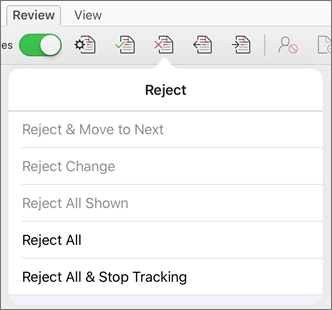
On the Review tab, tap the Reject icon.
-
Do one of the following:
-
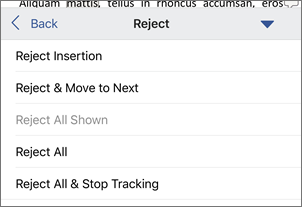
Tap Reject & Move to Next to reject the change and move to the next change in the document.
-
Tap Reject Deletion, Reject Insertion, or Reject Change to reject the selected change, identified contextually by type, and not move to the next change in the document.
-
Tap Reject All Shown to reject all changes that are visible, but not changes that are hidden. For example, if you’re viewing only changes made by a specific reviewer, tapping Reject All Shown rejects only the changes made by that reviewer.
-
Tap Reject All to reject all changes in the document.
-
Tap Rejects All & Stop Tracking to reject all changes in the document and turn off Track Changes.
-
-
To move to another change without accepting or rejecting it, tap the Previous or Next icon.
Delete comments (Word for iPad)
-
Tap twice on a comment in the document to select it.
-
Tap the Review tab.
-
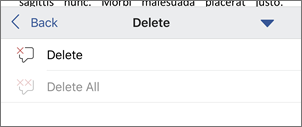
Tap the Delete icon to delete the comment or press and hold the Delete icon until the Delete list appears, and then do one of the following:
-
Tap Delete to delete only the selected comment.
-
Tap Delete All to delete all comments in the document.
-
-
To move to another comment without deleting it, tap the Previous or Next icon.
Turn Track Changes on or off (Word for iPhone)
-
Tap the pen icon at the top to open the ribbon.
-
Tap the Review tab.
-
Tap the control next to Track Changes to turn Track Changes on or off.
Show or hide markup (Word for iPhone)
-
On the Review tab, tap Display for Review.
-
Tap the option you want:
-
All Markup (inline) shows the final document with tracked changes visible inline
-
No markup shows the final document without tracked changed
-
Original shows the original document with no tracked changes
-
Show tracked changes by type (Word for iPhone)
-
On the Review tab, tap Display for Review.
-
Tap Show Markup.
-
In the Show Markup list, tap the option you want:
-
Ink shows or hides any marks made by digital inking in the document.
-
Insertions & Deletions shows or hides inserted or deleted text.
-
Formatting shows or hides formatting changes.
-
Show tracked changes by reviewer (Word for iPhone)
If there are multiple reviewers for the document, Word will show all changes by default. However, you can choose to show only changes made by specific viewers.
-
On the Review tab, tap Display for Review.
-
Tap Show Markup.
-
Tap Reviewers.
-
In the Other Authors list, tap the names of the reviewers whose changes you want to see or tap All Reviewers.
Accept changes (Word for iPhone)
-
Tap twice on a change in the document to select it.
-
On the Review tab, tap Accept.
-
Do one of the following:
-
Tap Accept & Move to Next to accept the change and move to the next change in the document.
-
Tap Accept Deletion, Accept Insertion, or Accept Change to accept the selected change, identified contextually by type, and not move to the next change in the document.
-
Tap Accept All Shown to accept all changes that are visible, but not changes that are hidden. For example, if you’re viewing only changes made by a specific reviewer, tapping Accept All Shown accepts only the changes made by that reviewer.
-
Tap Accept All to accept all changes in the document.
-
Tap Accept All & Stop Tracking to accept all changes in the document and turn off Track Changes.
-
Reject changes (Word for iPhone)
-
Tap twice on a change in the document to select it.
-
On the Review tab, tap Reject.
-
Do one of the following:
-
Tap Reject & Move to Next to reject the change and move to the next change in the document.
-
Tap Reject Deletion, Reject Insertion, or Reject Change to reject the selected change, identified contextually by type, and not move to the next change in the document.
-
Tap Reject All Shown to reject all changes that are visible, but not changes that are hidden. For example, if you’re viewing only changes made by a specific reviewer, tapping Reject All Shown rejects only the changes made by that reviewer.
-
Tap Reject All to reject all changes in the document.
-
Tap Reject All & Stop Tracking to reject all changes in the document and turn off Track Changes.
-
Delete comments (Word for iPhone)
-
Tap twice on a comment in the document to select it.
-
One the Review tab, tap Delete, and then do one of the following:
-
Tap Delete to delete only the selected comment.
-
Tap Delete All to delete all comments in the document.
-
-
To move to another comment without deleting it, tap the Previous or Next icon
Need more help?
Want more options?
Explore subscription benefits, browse training courses, learn how to secure your device, and more.
Communities help you ask and answer questions, give feedback, and hear from experts with rich knowledge.
Find solutions to common problems or get help from a support agent.
Try it!
Turn on Track Changes to show edits made in a document, and use Show Markup to show the types of revisions you’d like to display.
Use Track Changes
-
Select Review > Track Changes to turn it on.
Make edits in your document and Word captures any edits you make.
-
Select Review > Track Changes to turn it off.
Word stops making new edits, and any made stay in the document.
Use Show Markup
-
Select Review > Display for Review.
-
Select the option you want:
-
Simple Markup points out where changes are made with a red line in the margin.
-
All Markup shows all edits with different colors of text and lines.
-
No Markup hides markup to show what the incorporated changes will look like.
-
Original shows the document in its original form.
-
-
In the Show Markup list, select the types of revisions you’d like to see:
-
Comments
-
Insertions and Deletions
-
Formatting
-
Balloons
-
Specific People
-
Want more?
Track changes in Word
Turn off track changes
Discover more Word training at LinkedIn Learning
Need more help?
Want more options?
Explore subscription benefits, browse training courses, learn how to secure your device, and more.
Communities help you ask and answer questions, give feedback, and hear from experts with rich knowledge.
This tutorial shows how to use Track Changes in Microsoft Word. Track Changes helps us edit documents by tracking insertions, deletions, replacements, and format changes. Word calls these edits markups.
This tutorial also includes an overview of Word’s new Modern comment tool.
We will cover twelve topics:
- How to Turn Track Changes On and Off
- How to Show and Hide Track Changes
- How to Delete Text with Track Changes
- How to Insert Text with Track Changes
- How to Replace Text with Track Changes
- How to Change Formatting with Track Changes
- How to Accept or Reject Track Changes
- How to Insert Comments
- How to Reply to Comments
- How to Resolve Comments
- How to Delete Comments
- How to Open and Close the Reviewing Pane
Watch all the steps shown here in real time!
Explore more than 200 writing-related software tutorials on my YouTube channel.
Let’s dive in…
How to Turn Track Changes On and Off
- Select the Review tab in the ribbon.
- Select the Track Changes button in the Tracking group. The button will appear darker than the rest of the ribbon when Track Changes is turned on.
- Select the Track Changes button (see figure 2) again to turn off tracking.
How to Show and Hide Track Changes
You can control how comments and edits appear by using the Display for Review and Show Markup menus in the Tracking group in the ribbon.
- Select the Display for Review drop-down menu to choose how edits and comments are displayed. The options are (A) Simple Markup, (B) All Markup, (C) No Markup, and (D) Original.
(A) Simple Markup displays the edited version of the document without visible in-line edits. However, edits are indicated by a vertical line in the left margin.
For example, if you delete a sentence, that sentence won’t appear on screen. Instead, a vertical line will appear in the left margin showing that a change was made in that location.
If you want to see the edit, select the vertical line to switch to All Markup.
Comments will be visible on the right side of the screen when in Simple Markup.
(B) All Markup displays all edits and comments.
A vertical line, like the one shown in Simple Markup (see figure 4), will appear on the left side of the screen indicating that a change was made in that location.
Select that line to switch to Simple Markup.
(C) No Markup displays the edited version of the document without any visible edits or comments.
(D) Original displays the original version of the document without any edits or comments.
- Select the Show Markup drop-down menu to choose what features Track Changes displays. (Note that this menu is called Markup Options in Word for Mac.)
I recommend showing markups for Insertions and Deletions and Formatting as well as choosing Show Only Formatting in Balloons so that your insertions and deletions will appear in the text and formatting changes will appear next to the text.
Be default, comments will appear in balloons on the right side of the text.
Important note: The remaining sections show Track Changes in the All Markup view.
How to Delete Text with Track Changes
- Select the text you want to delete.
- Select the Delete key on your keyboard. The deleted text will appear with a strikethrough in the All Markup view.
How to Insert Text with Track Changes
- Place your cursor where you want to insert new text.
- Type the new text. The insertion will appear with an underline in the All Markup view.
How to Replace Text with Track Changes
- Select the text you want to replace.
- Type the replacement text. The original text will appear with a strikethrough, and the replacement text will appear with an underline in the All Markup view.
How to Change Formatting with Track Changes
Formatting includes the font style, font size, font color, italics, bold font, underlining, superscripting and subscripting, indentations, alignment, and margins.
- Select the text you want to reformat.
- Change the format. Track Changes will automatically display the change with your other markup if you have selected formatting in the Show Markup section of the Tracking group.
How to Accept or Reject Track Changes
Edits created with Track Changes must be accepted before they become part of your document. You can accept or reject edits individually or all at once.
Accept or Reject Edits Individually
- Click on or select the insertion, deletion, or replacement text.
- Select the Accept or Reject button in the Changes group.
Pro Tip: Use the Previous and Next buttons to navigate through all the edits in the document.
Accept or Reject All Edits
Unless you are very confident in your reviewers’ expertise, I strongly caution against accepting or rejecting all edits without first checking the accuracy of each one.
- Select the Accept or Reject menu arrow in the Changes group.
- Select your preferred option: Accept/Reject All Changes or Accept/Reject All Changes and Stop Tracking.
This section covers the basics of using comments in Word. For a more in-depth look, please see my previous tutorial “How to Use Comments in Microsoft Word (Modern Comments).”
You can use the Comment tool with Track Changes turned on or turned off.
- Place your cursor near the text you want to comment on or select the text.
- Select the Review tab in the ribbon (see figure 1).
- Select the New Comment button in the Comments group.
- Type your comment into the comment text box on the right side of the screen.
If you are part of an organization, you may be able to @ mention other users in your comments.
- Select the Post button or type the keyboard shortcut Ctrl + Enter (PC) or Command + Return (Mac) to post the comment.
- If you need to edit your comment, select the Edit button (PC users see figure 15; Mac users see figure 16).
- Type your reply into the Reply text box in the other person’s comment.
- Select the Post button or type the keyboard shortcut Ctrl + Enter (PC) or Command + Return (Mac) to post the reply.
You can mark a comment as “Resolved” to tell other people (or remind yourself) that an issue has been taken care of. However, you can also reopen a resolved comment, thereby turning it back to a regular comment.
- Select the three-dot menu in the comment.
- Select Resolve thread from the drop-down menu.
The comment will no longer be visible in the contextual view on the right side of the screen.
How to Reopen Resolved Comments
- Select the Review tab (see figure 1).
- Select the Show Comments menu arrow.
- Select List from the drop-down menu.
- Select the Reopen button in the comment.
Here are two ways to delete comments.
Method 1: Select the three-dot menu in the comment and then select Delete thread from the drop-down menu.
Method 2: Place your cursor in the comment or the text connected to the comment and then select the Delete menu arrow in the Review tab.
From there, choose Delete to delete the current comment, or Delete All Comments Shown, Delete All Comments in Document, or Delete All Resolved Comments (PC only).
How to Open and Close the Reviewing Pane
The Reviewing Pane (labeled Revisions) shows all the comments and edits selected in the Show Markup drop-down menu in the Tracking group in the ribbon, along with the total number of those comments and markups in the document.
The Reviewing Pane isn’t necessary for using Track Changes, but it can be helpful when you need to find a specific edit or want to see how many edits or comments are in the document.
- Select the Review tab (see figure 1).
- Select the Reviewing Pane button in the Tracking group.
The Reviewing Pane will appear, normally on the left side of your screen.
- Reselect the Reviewing Pane button to close the Reviewing Pane.
Related Resources
How to Copy and Paste Text with Comments and Track Changes in Word
How to Remove User Names from Existing Track Changes in Microsoft Word
How to Change Your User Name for Track Changes in Microsoft Word
How to Stop Microsoft Word from Calling You “Author” in Track Changes
How to Change the Color of Track Changes in Microsoft Word
Updated January 16, 2023
Track Changes is a tool in Microsoft Word which allows you to show any markups, changes or comments made to a document.
In this post, I’ll teach you how to use Track Changes to edit Word documents, and how to accept or reject those changes as a reviewer.
Why use Track Changes?
It is particularly useful when you are sharing documents with other colleagues, because it allows you to see exactly what changes were made, and by whom. In addition, it gives more power to the owner of the document who can accept or reject any changes made to the document.
Digital communications often shares Word documents containing website content with colleagues across the University, and asks them to use Track Changes to make edits or queries. This allows us to clearly see what edits have been made and greatly speeds up the amount of time we spend editing web pages.
How to use Track Changes
If you do not know how to use Track Changes, Microsoft has a very useful online guide to using Track Changes.
You can also follow these steps if you are using the desktop Microsoft Word app:
Turn on Track Changes
- Open Microsoft Word.
- Choose the Review tab at the top of the document.
- Either click the Track Changes button (PC) or toggle the Track Changes switch (Mac).
- Make sure that you change ‘Simple Markup’ to ‘All Markup’ from the drop down bar next to Track Changes.
Edit
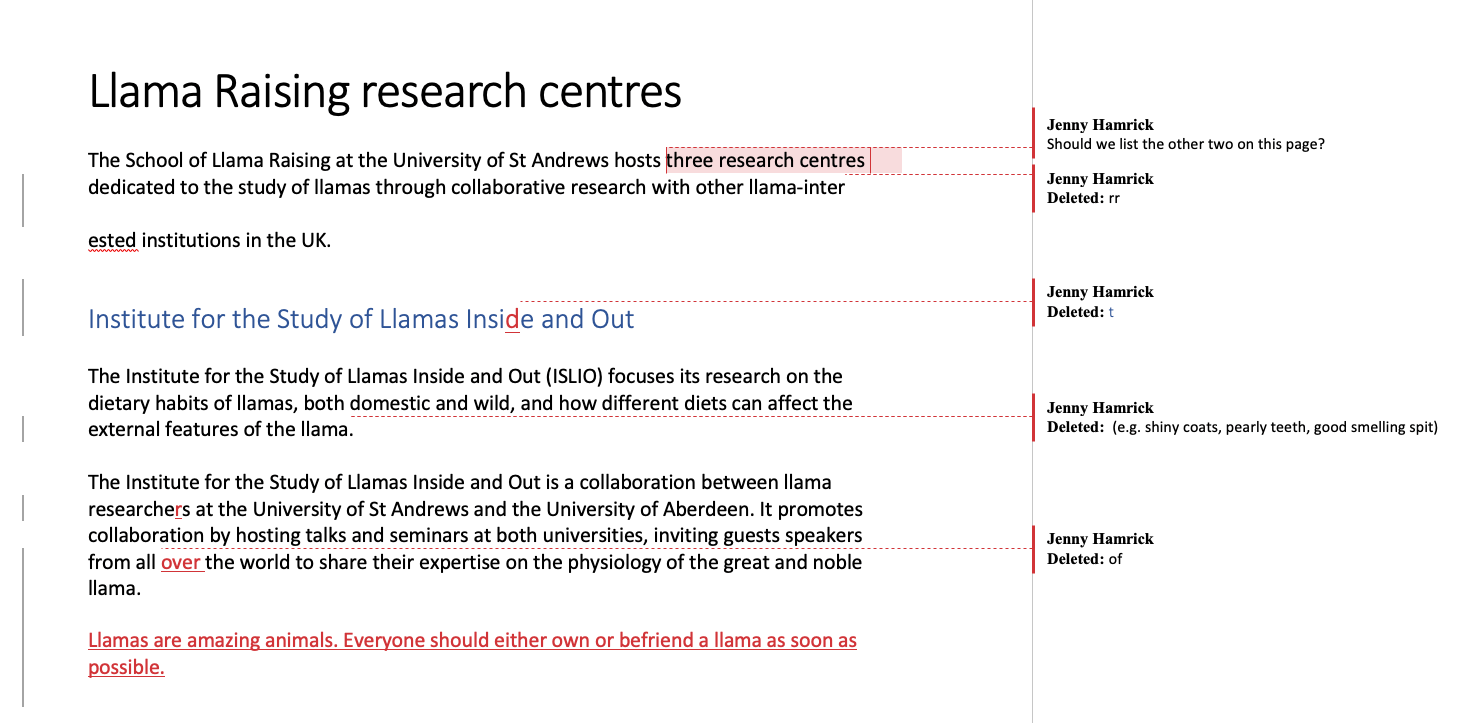
Once Track Changes is turned on, you can start editing the document. Any changes you make to the text will be marked by a grey bar on the left side of the changed text.
When you add text, the added text will be in a different colour to the normal text – making it easy to spot for reviewers.
When you delete text, the deleted text will be noted in a comment in the right margin of the document.
When you reformat text, the type of reformat will be noted in a comment in the right margin of the document.
You can also comment on pieces of text by selecting New Comment from the Review tab. The comment will appear in the right margin of the document.
Review
If you are reviewing a document, you can either accept or reject changes made by another person. To do this, simply click on the changed text (or the note in the margin) and then select either Accept or Reject from the Review tab.
You can also choose to accept or reject all changes at once from the drop down menus beside each option.
Turn off Track Changes
To turn off Track Changes, simply click on the Track Changes button or toggle again.
Home > Microsoft Word > How to Track Changes in Word? A Step-by-Step Guide
(Note: This guide on how to track changes in Word is suitable for all MS Word versions including Office 365)
Imagine this: You are preparing a report for an upcoming event. You share the report’s Word document with your team members since it involves a little bit of collaboration.
However, to your surprise, you notice that they have unnecessarily changed a lot of the document’s content. Now, how will you keep track of the changes that were made in the article and restore the original version?
Don’t worry! We have got you covered. In this guide, I will show you how to track changes in Microsoft Word and different ways to see the changes made to the document.
Table Of Contents
- How to Track Changes in Word?
- How to See the Changes Made in a Document?
- Comments
- Markup
- Show Markup
- Reviewing Pane
- How to Accept/Reject Changes in Word?
- Closing Thoughts
Watch this short video to know about How to Track Changes in Word
How to Track Changes in Word?
In Word, you can easily track the changes made by you or others. As the document owner, you can also accept or reject the changes made by others.
To do this, you need to first turn on the Track Changes feature. It is very simple. Let us see how to do this.
- Open any Word document and click on the Review tab.
- Go to the Tracking section and click on Track Changes. Or, you can use the keyboard shortcut (Ctrl+Shift+E) to start tracking the changes.
Once the Track Changes feature is enabled, every change made by you or others will be tracked by Word.
By default, the changes you make will have a red margin on the left. This margin color will be different for different authors who make changes to the document.
Turn off Tracking Changes
If you don’t want to track the changes anymore, you can easily turn it off.
Go to Review > Tracking and click on Track Changes again. Or, you can use the keyboard shortcut (Ctrl+Shift+E) to disable it.
Once you have switched off track changes, the word does not track any changes that are made. However, the previously made changes will be recorded and visible.
Related:
How to Add Page Numbers in Word? 3 Easy Examples
Footnotes in Word and Endnotes in Word
Working with Page Breaks in Microsoft Word
How to See the Changes Made in a Document?
There are different ways to see the changes made in a document. You can use any one of them based on your preferences. Let us see them one by one.
Comments
As a writer or an editor, you can leave comments to let others know about the change made, or about the change you want them to make.
To add comments to the document, select the text you want to add a comment on and click on Add Comment.
Now, type in the comment inside the comments box.
Some users prefer to add comments to indicate changes made in a document.
You can click on “Show Comments” to toggle on or off the visibility of the comments section. Also, you can delete or navigate between comments by clicking on Delete, Previous or Next buttons respectively.
Markup
There 4 ways to see the changes made to the document by selecting any one option from the Markup dropdown.
- Simple Markup
The simple markup points out the changes with a red margin towards the left side of the document. It does not give much detail about the changes. It just points out the places where the changes are made
- All Markup
To activate this, click on the Simple Markup drop-down and choose All Markup. It gives a detailed description of the changes. It shows all the changes made, including comments, and other details like font style and size. It also indicates newly added text with an underline and deleted text with a strikethrough.
- No Markup
To activate this, click on the Simple Markup dropdown and choose No Markup. Instead of indicating the places that changed or the details of the changes, No Markup simply displays the latest version with all the changes incorporated into the document. That is, it shows how the document would look after the changes are made.
- Original
The last drop-down option, the Original Markup shows the original format of the document before the Track Changes feature was switched on and changes were made. You can use this to restore the original version of the document, in case of an inadvertent error.
Show Markup
In any document, there will definitely be more than one type of change/editing. However, you may be interested only in certain types of changes. (sematext) How can you track only certain kinds of changes in Word?
You can choose to see any one or more types of change made by selecting them in the Show Markup dropdown.
Here, you can toggle on or off to view the comments, formatting, insertions and deletions. Additionally, you can choose the options from the balloons to show the revisions inline or separately.
Moreover, you can also see the changes made by specific people using the show markup drop down and selecting the Specific People option.
Reviewing Pane
If you are an editor, or if the article has just come back from the editor, you might want to see the changes in a detailed format. The Review Pane helps you see the changes in a list view.
It provides details like the inserted text, the format of the text, the comments, and the deleted text (if any).
To see the detailed review window, just click on the Review Pane in the Review tab and choose Reviewing Pane Horizontal/Vertical. This opens up a dialog box and shows you the details of the changes, as shown below.
You can also place the Review Pane in a horizontal or vertical position based on your preference.
How to Accept/Reject Changes in Word?
Word doesn’t stop at keeping track of the changes made by others. It also gives you the liberty to accept or reject the changes made in the document.
To accept or reject the changes, click on the Review tab and click on Accept in the Changes section.
You can accept all the changes at once, or accept the changes one by one by clicking on the drop-down and choosing Accept All Changes.
In the same way, you can also reject any changes made to the document. You can reject all the changes at once, or reject the changes one by one by clicking on the drop-down and choosing Reject All Changes.
Suggested:
How to Convert PDF to Word
How to Create a Fillable Form in Word
Using Tables in Word
Closing Thoughts
In this guide, we saw how to track changes in Word, the easy way. When you share your documents with others, tracking changes provide a fool-proof method to avoid inadvertent errors. We hope you found this helpful.
Please visit our free resources center for more high-quality guides.
To learn Word with Simon Sez IT. Take a look at the Word courses we have available.
Simon Calder
Chris “Simon” Calder was working as a Project Manager in IT for one of Los Angeles’ most prestigious cultural institutions, LACMA.He taught himself to use Microsoft Project from a giant textbook and hated every moment of it. Online learning was in its infancy then, but he spotted an opportunity and made an online MS Project course — the rest, as they say, is history!


