
You can perform calculations and logical comparisons in a table by using formulas. The Formula command is found on the Table Tools, Layout tab, in the Data group.
A formula in Word automatically updates when you open the document that contains the formula. You can also update a formula result manually. For more information, see the section Update formula results.
Note: Formulas in Word or Outlook tables are a type of field code. For more information about field codes, see the See Also section.
In this article
-
Insert a formula in a table cell
-
Update formula results
-
Update the result of specific formulas
-
Update all the formula results in a table
-
Update all the formulas in a document
-
-
Examples: Sum numbers in a table by using positional arguments
-
Available functions
-
Use bookmarknames or cell references in a formula
-
RnCn references
-
A1 references
-
Insert a formula in a table cell
-
Select the table cell where you want your result. If the cell is not empty, delete its contents.
-
On the Table Tools, Layout tab, in the Data group, click Formula.
-
Use the Formula dialog box to create your formula. You can type in the Formula box, select a number format from the Number Format list, and paste in functions and bookmarks using the Paste Function and Paste Bookmark lists.
Update formula results
In Word, the result of a formula is calculated when it is inserted, and when the document containing the formula opens. In Outlook, the result of a formula is only calculated when it is inserted and won’t be available for the recipient of the email to edit.
You can also manually update:
-
The result of one or more specific formulas
-
The results of all formulas in a specific table
-
All the field codes in a document, including formulas
Update the result of specific formulas
-
Select the formulas that you want to update. You can select multiple formulas by holding down the CTRL key while you make selections.
-
Do one of the following:
-
Right-click the formula, then click Update field.
-
Press F9.
-
Update all the formula results in a table
-
Select the table that contains formula results that you want to update, and then press F9.
Update all the formulas in a document
Important: This procedure updates all the field codes in a document, not just formulas.
-
Press CTRL+A.
-
Press F9.
Examples: Sum numbers in a table by using positional arguments
You can use positional arguments (LEFT, RIGHT, ABOVE, BELOW) with these functions:
-
AVERAGE
-
COUNT
-
MAX
-
MIN
-
PRODUCT
-
SUM
As an example, consider the following procedure for adding numbers by using the SUM function and positional arguments.
Important: To avoid an error while summing in a table by using positional arguments, type a zero (0) in any empty cell that will be included in the calculation.
-
Select the table cell where you want your result. If the cell is not empty, delete its contents.
-
On the Table Tools, Layout tab, in the Data group, click Formula.
-
In the Formula dialog box, do one of the following:
|
To add the numbers… |
Type this in the Formula box |
|---|---|
|
Above the cell |
=SUM(ABOVE) |
|
Below the cell |
=SUM(BELOW) |
|
Above and below the cell |
=SUM(ABOVE,BELOW) |
|
Left of the cell |
=SUM(LEFT) |
|
Right of the cell |
=SUM(RIGHT) |
|
Left and right of the cell |
=SUM(LEFT,RIGHT) |
|
Left of and above the cell |
=SUM(LEFT,ABOVE) |
|
Right of and above the cell |
=SUM(RIGHT,ABOVE) |
|
Left of and below the cell |
=SUM(LEFT,BELOW) |
|
Right of and below the cell |
=SUM(RIGHT,BELOW) |
-
Click OK.
Available functions
Note: Formulas that use positional arguments (e.g., LEFT) do not include values in header rows.
The following functions are available for use in Word and Outlook table formulas:
|
Function |
What it does |
Example |
Returns |
|---|---|---|---|
|
ABS() |
Calculates the absolute value of the value inside the parentheses |
=ABS(-22) |
22 |
|
AND() |
Evaluates whether the arguments inside the parentheses are all TRUE. |
=AND(SUM(LEFT)<10,SUM(ABOVE)>=5) |
1, if the sum of the values to the left of the formula (in the same row) is less than 10 and the sum of the values above the formula (in the same column, excluding any header cell) is greater than or equal to 5; 0 otherwise. |
|
AVERAGE() |
Calculates the average of items identified inside the parentheses. |
=AVERAGE(RIGHT) |
The average of all values to the right of the formula cell, in the same row. |
|
COUNT() |
Calculates the count of items identified inside the parentheses. |
=COUNT(LEFT) |
The number of values to the left of the formula cell, in the same row. |
|
DEFINED() |
Evaluates whether the argument inside the parentheses is defined. Returns 1 if the argument has been defined and evaluates without error, 0 if the argument has not been defined or returns an error. |
=DEFINED(gross_income) |
1, if gross_income has been defined and evaluates without error; 0 otherwise. |
|
FALSE |
Takes no arguments. Always returns 0. |
=FALSE |
0 |
|
IF() |
Evaluates the first argument. Returns the second argument if the first argument is true; returns the third argument if the first argument is false. Note: Requires exactly three arguments. |
=IF(SUM(LEFT)>=10,10,0) |
10, if the sum of values to the left of the formula is at least 10; 0 otherwise. |
|
INT() |
Rounds the value inside the parentheses down to the nearest integer. |
=INT(5.67) |
5 |
|
MAX() |
Returns the maximum value of the items identified inside the parentheses. |
=MAX(ABOVE) |
The maximum value found in the cells above the formula (excluding any header rows). |
|
MIN() |
Returns the minimum value of the items identified inside the parentheses. |
=MIN(ABOVE) |
The minimum value found in the cells above the formula (excluding any header rows). |
|
MOD() |
Takes two arguments (must be numbers or evaluate to numbers). Returns the remainder after the second argument is divided by the first. If the remainder is 0 (zero), returns 0.0 |
=MOD(4,2) |
0.0 |
|
NOT() |
Takes one argument. Evaluates whether the argument is true. Returns 0 if the argument is true, 1 if the argument is false. Mostly used inside an IF formula. |
=NOT(1=1) |
0 |
|
OR() |
Takes two arguments. If either is true, returns 1. If both are false, returns 0. Mostly used inside an IF formula. |
=OR(1=1,1=5) |
1 |
|
PRODUCT() |
Calculates the product of items identified inside the parentheses. |
=PRODUCT(LEFT) |
The product of multiplying all the values found in the cells to the left of the formula. |
|
ROUND() |
Takes two arguments (first argument must be a number or evaluate to a number; second argument must be an integer or evaluate to an integer). Rounds the first argument to the number of digits specified by the second argument. If the second argument is greater than zero (0), first argument is rounded down to the specified number of digits. If second argument is zero (0), first argument is rounded down to the nearest integer. If second argument is negative, first argument is rounded down to the left of the decimal. |
=ROUND(123.456, 2) =ROUND(123.456, 0) =ROUND(123.456, -2) |
123.46 123 100 |
|
SIGN() |
Takes one argument that must either be a number or evaluate to a number. Evaluates whether the item identified inside the parentheses if greater than, equal to, or less than zero (0). Returns 1 if greater than zero, 0 if zero, -1 if less than zero. |
=SIGN(-11) |
-1 |
|
SUM() |
Calculates the sum of items identified inside the parentheses. |
=SUM(RIGHT) |
The sum of the values of the cells to the right of the formula. |
|
TRUE() |
Takes one argument. Evaluates whether the argument is true. Returns 1 if the argument is true, 0 if the argument is false. Mostly used inside an IF formula. |
=TRUE(1=0) |
0 |
Use bookmarknames or cell references in a formula
You can refer to a bookmarked cell by using its bookmarkname in a formula. For example, if you have bookmarked a cell that contains or evaluates to a number with the bookmarkname gross_income, the formula =ROUND(gross_income,0) rounds the value of that cell down to the nearest integer.
You can also use column and row references in a formula. There are two reference styles: RnCn and A1.
Note: The cell that contains the formula is not included in a calculation that uses a reference. If the cell is part of the reference, it is ignored.
RnCn references
You can refer to a table row, column, or cell in a formula by using the RnCn reference convention. In this convention, Rn refers to the nth row, and Cn refers to the nth column. For example, R1C2 refers to the cell that is in first row and the second column. The following table contains examples of this reference style.
|
To refer to… |
…use this reference style |
|---|---|
|
An entire column |
Cn |
|
An entire row |
Rn |
|
A specific cell |
RnCn |
|
The row that contains the formula |
R |
|
The column that contains the formula |
C |
|
All the cells between two specified cells |
RnCn:RnCn |
|
A cell in a bookmarked table |
Bookmarkname RnCn |
|
A range of cells in a bookmarked table |
Bookmarkname RnCn:RnCn |
A1 references
You can refer to a cell, a set of cells, or a range of cells by using the A1 reference convention. In this convention, the letter refers to the cell’s column and the number refers to the cell’s row. The first column in a table is column A; the first row is row 1. The following table contains examples of this reference style.
|
To refer to… |
…use this reference |
|---|---|
|
The cell in the first column and the second row |
A2 |
|
The first two cells in the first row |
A1,B1 |
|
All the cells in the first column and the first two cells in the second column |
A1:B2 |
Last updated 2015-8-29
See Also
Field codes in Word and Outlook
In Word, you can insert mathematical symbols into equations or text by using the equation tools. On the Insert tab, in the Symbols group, click the arrow under Equation, and then click Insert New Equation.
Contents
- 1 How do I turn on math equations in Word?
- 2 How do you use MathType in Word?
- 3 What is compatibility mode in Word?
- 4 Can Microsoft Word solve equations?
- 5 How do you enter the symbol in Word?
- 6 How do you type all symbols in Word?
- 7 How do I type math symbols in notepad?
- 8 What happened to MathType?
- 9 How do you use MathType in Word 2016?
- 10 How do you type a combination in MathType?
- 11 How do I turn on compatibility mode?
- 12 How do I choose compatibility settings manually?
- 13 How can I tell if a document is compatible with Word 2007 and 2010?
- 14 Is there a math app for word problems?
- 15 Which command is used to do mathematical calculations in MS Word?
- 16 How do I insert math symbols in Word for iPad?
- 17 Is an element of symbol math?
- 18 How do you make a combination in Word?
- 19 How do you copy and paste math equations in Word?
- 20 How do I get symbols on my keyboard Windows 10?
How do I turn on math equations in Word?
Simply select the “Insert” tab and choose “Equation” under the “Symbols” section. If you still do not see the Equation option, you may have to go to “File” > “Options” > “Customize Ribbon“. Select “All Commands” in the “Choose commands from” menu, then add “Symbols” to the tabs listed on the right side of the screen.
How do you use MathType in Word?
How it works. As easy as it looks. MathType is available on the Microsoft Word and PowerPoint toolbars. Open MathType from any of these toolbars, type in the equation that you need for your document, and then close MathType; your equation will be inserted into your document, with the right font and format settings.
What is compatibility mode in Word?
When you’re using a version of Word that’s newer than the version used to create your document, you typically see Compatibility Mode in the title bar. Compatibility Mode temporarily disables new or enhanced Word features so that the document can still be edited by people using the earlier version of Word.
Can Microsoft Word solve equations?
You can perform calculations and logical comparisons in a table by using formulas. The Formula command is found on the Table Tools, Layout tab, in the Data group. A formula in Word automatically updates when you open the document that contains the formula. You can also update a formula result manually.
How do you enter the symbol in Word?
Type “in” without quotes and then press “Space” to insert the “belongs to” symbol. Alternatively, locate the symbol in the Symbols list and click it once to insert it.
How do you type all symbols in Word?
1: Navigate Insert Tab > Symbol in symbols group. 2: Select More Symbols. 3: Select “normal text” from Font &“Mathematical Operators” from the Subset dropdown. 4: Locate “for all” symbol (∀) and double click it to insert it and click to close dialogue box.
How do I type math symbols in notepad?
Mathematical Symbols Press/hold Alt key while typing the numbers on the keypad (with Num Lock on). Symbol appears when you release the Alt Key.
What happened to MathType?
WIRIS EDITOR was rebranded as MathType in March 2018. You can find former WIRIS EDITOR in MathType for LMS and in Mathtype integrations. Inside Office Tools, you will find WIRIS EDITOR in MathType for Google Workspace and in MathType for Microsoft 365.
How do you use MathType in Word 2016?
You can add the MathType Tab to MS Word 2016:
- Launch Microsoft Word.
- From the File tab choose Options.
- In the resulting window, from the left-side navigation menu choose Add-ins.
- Using the drop-down menu located at the bottom of the window, choose Word Add-ins and click the button labeled, “Go”.
How do you type a combination in MathType?
To use, follow these steps:
- Choose the Open Math Input Panel… command in the Insert Equations group of the MathType tab in Word.
- Write the equation in the MIP writing area.
- Once you’ve confirmed the accuracy of the equation, tap Insert to place the equation into MathType.
How do I turn on compatibility mode?
To turn on Compatibility View:
- Click the Settings Icon on the address bar in your web browser.
- Choose Compatibility View settings.
- In Add this website menu, type pitt.edu if it’s not automatically populated.
- Click the Add button then click the Close button.
- Refresh your webpage. Network Standard.
How do I choose compatibility settings manually?
How to Run an App in Compatibility Mode
- Right-click on an app and select Properties.
- Select the Compatibility tab, then check the box next to “Run this program in compatibility mode for:”
- Select the version of Windows to use for your app’s settings in the dropdown box.
How can I tell if a document is compatible with Word 2007 and 2010?
You can check compatibility between versions of your Microsoft Office files to see if features in a file are supported by older versions of Office by using Compatibility Checker. Click the File tab, and then click Info. Click Check for Issues, and then click Check Compatibility.
Is there a math app for word problems?
Photomath is the best app that solves Math word problems. Hone your math with this app, which is intuitive and has solutions to (almost) all your problems. If you are unable to do your math homework, then simply point your camera at it and Photomath will present the solution.
Which command is used to do mathematical calculations in MS Word?
To perform math calculations:
Select the numbers and operators. From the Tools menu, choose Calculate. Word calculates the result and displays it for a few seconds in the status bar.
How do I insert math symbols in Word for iPad?
Adding equations to Word for iPad
- In the Insert tab, tap Add-ins and choose MathType from the list of installed Add-ins.
- When clicking MathType in the ‘Home’ ribbon, the add-in task pane will open.
- When the MathType editor opens, create the equation and tap Insert to insert it into the document.
Is an element of symbol math?
The symbol ∈ indicates set membership and means “is an element of” so that the statement x∈A means that x is an element of the set A. In other words, x is one of the objects in the collection of (possibly many) objects in the set A.
How do you make a combination in Word?
- Microsoft Word > Ribbon > Insert > Equation > Script > Subscript.
- Then select the lower part and click on Subscript again.
- You will get a tri-layer subscript just like permutation or combination symbol.
- Then, Insert your numbers or variables.
How do you copy and paste math equations in Word?
From the Design menu, open the equation Tools settings:
- Make certain the following option is turned on: “Copy MathML to the clipboard as plain text.”
- Select the equation and copy it. (Tip: To select the whole equation, click the small tab on the left side of the equation container.)
How do I get symbols on my keyboard Windows 10?
To insert symbols or kaomoji on Windows 10, use these steps:
- Open a text file, document, or email.
- Use the Windows key + (period) or Windows key + (semicolon) keyboard shortcut to open the emoji panel.
- Click the Omega button to access the symbols.
- Select the symbols you want to insert.
In some Word documents you need to use formulas, such as summing, subtracting, multiplying, or
dividing certain values:

In this example was used a simple formula to calculate a discount rate:

See
How to turn on or turn off highlighting off fields in a Word document
and
Show blue hyperlink instead of { HYPERLINK link }.
To create a formula like the one above, it is necessary to make two steps:
1. Create a bookmark (variable) for every parameter.
2. Create a formula.
To perform these steps, do the following:
1. Create a field with the volume of a parameter:
1.1. Position the cursor in the document.
It doesn’t important, where: where this variable should be shown in the first time or anywhere in
the text (see both examples below).
1.2. On the Insert tab, in the Text group,
select the Quick Parts drop-down list and the click on Field…:

1.3. In the Field dialog box:
1.3.1. In the Field names list, select the
command Set and click the Field Codes button:

1.3.2. In the Field codes textbox, after
proposed SET type the name of this bookmark (variable) and the value.
For example:

1.3.3. Click OK to insert the current field in
you document:
![]()
Note: Instead of making steps 1.1-1.3, you can press Ctrl+F9 to insert a
field in your document and type:
SET <name> <value>
To create the bookmark (variable) as you type, just update a field: right-click on the field and
choose Update field in the popup menu:

2. Repeat the step 1 for every bookmark (variable)
that you want to define.
In this example, the discount with volume 5.
3. To insert the bookmark (variable) in the text, do
the following:
3.1. Position the cursor where you want to insert the
value of some bookmark (variable).
3.2. On the Insert tab, in the Text group,
select the Quick Parts drop-down list and the click on Field….
3.3. In the Field dialog box, click the
Formula… button:

3.4. In the Formula dialog box, in the
Paste bookmarks drop-down list, if you made all correctly on the previous steps, you will
see all variables that you have created:

Choose one and click OK. For example, price:

Note: Instead of making steps 3.1 – 3.4, if you can press Ctrl+F9 to insert
a field in you document and type:
= <bookmark name>
4. To insert a formula, do the following:
4.1. Position the cursor where you want to insert
the formula.
4.2. On the Insert tab, in the Text group,
select the Quick Parts drop-down list and the click on Field….
4.3. In the Field dialog box, click the
Formula… button.
4.4. In the Formula dialog box type the
formula:
The first variant where each of the variables defined before their values in the text:

The second variant where the variables defined before the text:

See
Functions and formulas in a Word document
for more details.
Note: The field { SET *** } doesn’t shown in the document by default. So,
this field can be easily removed by mistake with any other text or paragraph. To avoid missing
this field, we recommend use a field { Quote *** } to keep the definition and the first
using of the parameter:
![]()
See also this tip in French:
Comment calculer des formules dans un document Word.
MS Word
How to Make Letterhead in Microsoft Word
![]()
Published
1 year ago
on
November 18, 2021

How to make a letterhead in Word correctly and neatly is actually easy, but surely there are still many of you who don’t know how to make it.
In an official letter, of course, there is a letterhead and there is always a line at the bottom right. Well, it turned out to be quite easy to make you know.
Apart from being the introduction to a letter, letterhead is also commonly used as a place to write the identity of the letter, such as the identity of the sender and recipient.
For those of you who want to know how to make it, here we explain in full the steps to make a letterhead in Word for you.
HOW TO MAKE LETTERHEAD IN WORD
You should know how to make a letterhead in Word this time, guys, especially when you want to send letters between agencies.
Although not all agencies use it, it doesn’t hurt you to try and find out how to make this letterhead, here are the steps!
- First, open your Word.
- Place the cursor at the back of the last word of the letterhead
- Then select the menu Borders – Borders and Shading.
- After the border menu appears, all you have to do is select the line you want on the menu with a sign like this.
Don’t rush to click Ok, because there’s one more thing you have to do to make it, guys. In the section below, remove it or set it like this to make the line only exist at the bottom, and then Ok.
Yeah, you have successfully drawn the line, Guys, it’s easy and fast, right, how to make a letterhead in Word?
You don’t need to be confused anymore about how to make it. For beginners, making letterhead or letterhead does sound quite difficult.
In fact, how to make a letterhead in Word is fairly easy as long as you already know the procedure. After all, the letterhead cannot be made casually because it is an official identity.
The letterhead contains the official identity of an institution, agency, or company. Well, you can create an official identity on the letterhead in Microsoft Word.
MS Word
How to Create a Background in Microsoft Word
![]()
Published
1 year ago
on
November 18, 2021

This way of making a background in Word aims to beautify the appearance of the document and make it more attractive Guys.
Usually, this is often found in the use of proposals, certificates, covers, and not infrequently in job applications.
With this function, how do you make it? It’s so easy. Yes, although there are several ways you can do this, you can follow this tutorial in full.
HOW TO MAKE A BACKGROUND IN WORD
This background function is very useful if you want to create a document that upholds the originality of Guys, for example, a thesis.
In addition to having to know how to create a table of contents in Microsoft Word, you may also need to know how to create a background in your thesis document, especially in showing the results of the tests you did.
How to make this background is also needed if you want to make an official letter from the agency. Besides needing to know how to make letterhead lines in Word, you also need to know how to add a background to the letter. Here’s how:
- The first thing you can do is change the color.
- Go to Design – Page Color – and immediately choose a color like this.
That is the easiest way and you can change the color according to your needs or tastes, guys. In addition to this method, you can also replace it with an image that you have.
The method is almost the same, guys, pay attention to the following rare:
- Go to the Design menu.
- Click Page Color.
- Select Fill Effects.
- Next, select the tab Picture – Select Picture – From a File.
- Then find the image you have and press Ok
- Finished! The background will change.
But, you also need to remember that both methods will not appear when you print either color or image.
To make it appear when printing, then you need to go to the File menu – Options – Display – and check the Print background colors and Image.
Well, after you go through these few steps, the background will change and also enter when you print, GRATZ!!! It’s easy to make a background in Word.
MS Word
How to Create a Signature in Word
![]()
Published
1 year ago
on
November 11, 2021

There are several ways to make a signature in Microsoft Word. And the method is really easy, just follow the steps below, guys!
Making a signature is really needed, especially in the digital era like now, right? Of course, you need a signature in your Word file, so from that our Team will provide this tutorial in detail.
Actually, you can also use a third application or additional devices such as pens that support your PC or laptop. But this is the easiest way without using other devices and applications Guys.
HOW TO CREATE A SIGNATURE IN WORD
You need to sign first, Guys on a piece of white paper. Make sure the paper is really white and the pen has colour ink that you can really see clearly.
This function is for later photos or files the resolution will be smaller Guys. Not only that, but the customized color saturation will also reduce the thickness of the pen color, you know.
So make sure you give a signature with a clear enough emphasis. Here’s how to create a signature in Word:
- Prepare a white paper with a signature on it. Photos using a smartphone or you can directly scan the signature through a scanner.

- You can reduce the resolution and crop it so that the photo focuses on the signature. For convenience, click the image file > Edit.
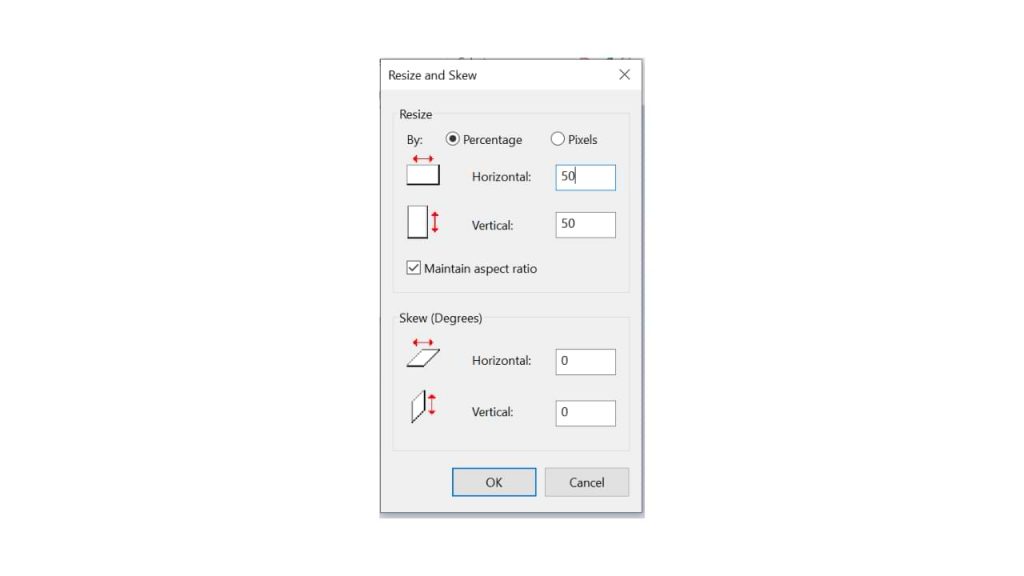
- On the Paint menu, you can resize to reduce the resolution. Choose 50 per cent resolution, fill Horizontal 50 and Vertical 50
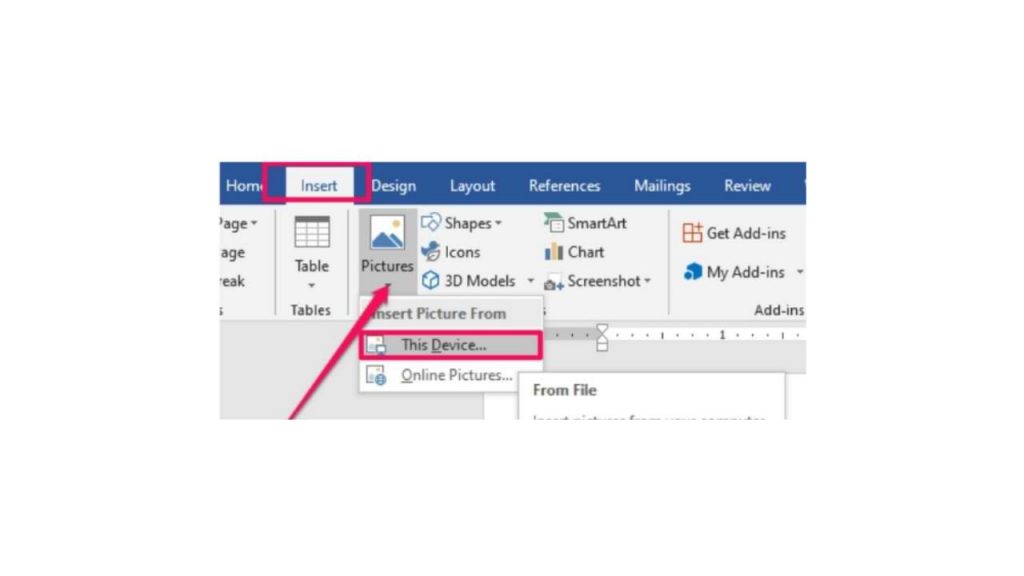
- Hover over the exact position of the word you want to add a signature to. Click Insert > Picture > insert the previous signature image file.
- After you insert the image, reduce the size again using the cursor for more precision.
- Double click on the image.
- On the Format menu, select the Color > Recolor > Black and White 50 per cent submenu.
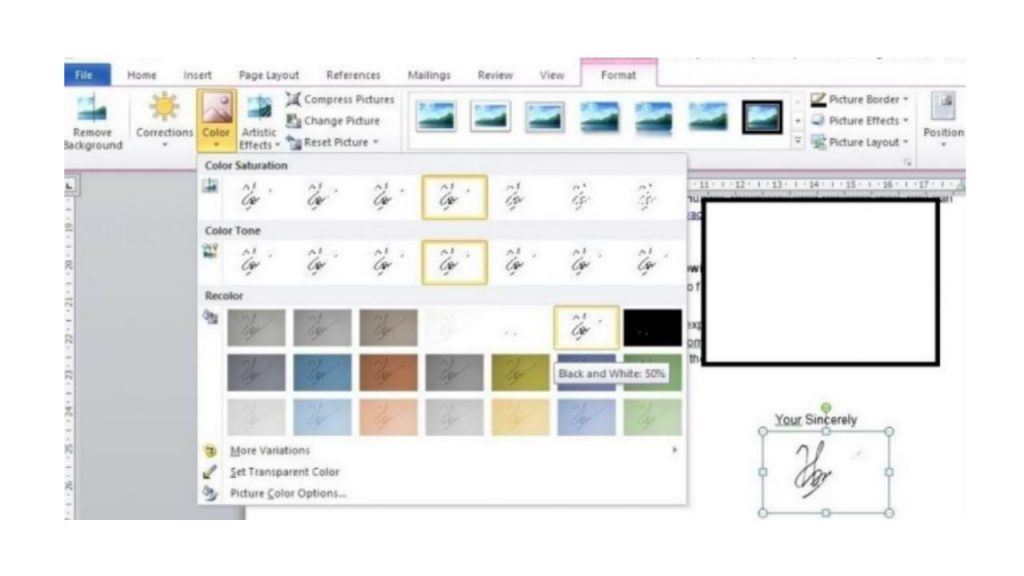
- if your signature is not clear, double click on the image, select menu Correction > Brightness 0 per cent (Normal) Contrast 40 per cent.
You can change the last two steps depending on the contrast and color saturation you want, guys. So you can at the same time adjust the thickness of your signature that has entered the word, so guys.
I also said what Guys, how easy it is to make a signature in Microsoft Word! The most important thing is to make sure your signature is clear enough, and the photos are of high enough quality. Obviously, so that later your signature looks good, it doesn’t break.
It’s true that you can calculate the data in a Word table. But in case that you don’t want to insert a table but still want to process some data in a document, I’ll introduce a simple tip about activating the hidden calculation feature in Word.
Click File, choose Options – Quick Access Toolbar.

Select Commands Not in the Ribbon in the drop-down menu of Choose commands from.
Scroll down the list to find Calculate. Double-click it or hit Add button to put it in the list on the right.

Click OK to confirm it. Then you’ll see the icon of Calculate in the Toolbar.

To use this function, just input the data and formula, select them and click the Calculate button.

Now the result of calculation has been added to your paste board automatically. Put your cursor at the place you want to output the result and press Ctrl+V. Tada!

Copyright Statement: Regarding all of the posts by this website, any copy or use shall get the written permission or authorization from Myofficetricks.