
Microsoft Word has many types of nonprintable symbols such as different types of spaces,
tabulations, line or page breaks, etc. The non-printable symbols are also known as
Whitespace characters in typography, nonprinting characters in the
previous versions of Microsoft products, or formatting marks.
You can show or hide, if you see a lot of strange symbols in the document, some or all of these
symbols by clicking the button Show/Hide ¶ (or pressing Ctrl+* or
Ctrl+Shift+8):

Notes:
- Each of nonprintable characters that you will see after highlighting this button, can be
selected and removed from the document. Also, you can select, delete or replace all
occurrences of a particular kind of special symbols, see
Replacing special characters. - There are some other useful elements that you can use in a document such as bookmarks, fields,
etc. You can show and hide them too, independently from the nonprinting symbols. See
How to show/hide bookmarks in a Word document,
How to turn on or turn off highlighting off fields in a Word document.
You can selectively show only spaces in the document, only Tabulation symbols,
etc. To show or hide specific nonprintable symbols, do the following:
1. On the File tab, click the Options
button:

2. In the Word Options dialog box, open the
Display tab and then check or uncheck options as you like:

- Tab characters or Tabulations: If you check this checkbox, all tabulations
will be shown as an arrow symbol (→):
See
A perfect text alignment using tabs
and
Setting tabs using the Tabs dialog box. - Spaces can differ:
- When you type the text, usually you separate words (sentences or even syllables in
some languages) by pressing the Space key (also known as Spacebar).Usual or common space is shown as a little dot between words:

- To keep words together, can a Nonbreaking space (also called
non-breaking space, no-break space,
non-breakable space (NBSP), hard space, or
fixed space) be used. A Nonbreaking space in the Word document
looks like a degree symbols between words:
See
How to keep two or several words together in a document Word. - Sometimes more specific spacing characters like Em Space, En Space or
¼ Em Space are used.These spaces distinguish by their width:
- Em space means a space the same width as a lowercase m
character. - En space means a space the same width as a lowercase n
character. - ¼ Em space (also known as mid space) accordingly means a
space the same width as a lowercase m character divided by 4 —
one fourth of an Em Space wide.
Em space and En space are shown as common space, as a little dot
between words, but with wider gaps before and after them. ¼ Em Space looks
like a vertical bar between words:
- Em space means a space the same width as a lowercase m
- When you type the text, usually you separate words (sentences or even syllables in
- Paragraph marks or pilcrows (¶) represent a paragraph break.
They are inserted by Word at the end of every paragraph. In other words, it appears every
time when you press Enter:
Notes:
- As you can see in the example above, many of emails are formatted incorrectly. See
How to remove paragraph symbols for every line in Word. - The paragraph mark ¶ contains all the paragraph formatting. To copy all paragraph
formatting, you can select this symbol, copy it, and then paste it into another
paragraph. The last ¶ in the document contains formatting for the last section of the
document, or for entire document if it contains just one section.See
How to copy paragraph or numbering format without changing the text format
and
How to do anything with paragraph format with keyboard.
- As you can see in the example above, many of emails are formatted incorrectly. See
- Hidden text can be used in any Word document because it is a pre-defined format like
Italic or Bold. It isn’t necessary to do something extra to add hidden text.Hidden text is shown with a dotted underline:

See
Check the document for hidden information
and
11 Shortcut Keys to control font format.Notes: In contrast of other nonprinting characters, hidden text can be
printed. See
How to see/show a hidden text in a Word document
and
How to print a hidden text in a Word document. - Optional hyphens are used to break specific lines of text.
They are shown as ¬.
For example, if a lengthy word wraps to the next line and leaves a large amount of white
space, you can insert an optional hyphen in that specific word so that the first part
appears on the first line. If the word later moves to a different position because of
editing, the optional hyphen does not print. If further editing moves the word back into
a hyphenation zone, the hyphen reappears:
See
Using nonbreaking and optional hyphens. - Object anchors are shown in a document just when you select an object.
Any floating object in a document has an anchor that is tied to a particular paragraph
 . It can be moved, replaced or
removed with that paragraph like its part.It is possible to move any anchor to any other paragraph.
- The Show all formatting marks checkbox mirrors the button Show/Hide ¶ that was
described above. When you click to highlight that button on the ribbon or non-highlight it
(or use shortcut keys for that), that checkbox will be checked or unchecked appropriately.


Other formatting marks that you can see in the document by clicking on the Show/Hide 
button:
- Line breaks:
a) As a right-angle arrow pointing to the left
 . This symbol can be added
to the document to start a new line, not a new paragraph, by clicking on
Shift+Enter:
b) As a right-angle arrow between two vertical lines
 . This symbol shows the
break that separate text around object, such as a caption text or an image from the body
text.
- Pagination breaks — a Column break, a Page break and a Section break
are used for the better formatting of the document:

To add the page break, just click Ctrl+Enter.
- Keep marks are shown as a small black bullet ■ on the margin next to the paragraph:

Keep marks represents some of paragraph options:
- Keep with next,
- Keep lines together,
- Page break before.
See
How to keep lines and paragraphs together in a Word document
for more details.You can open the Paragraph dialog box and see keep marks by double-clicking on the
appropriate keep mark. - End-of-cell and End-of-row marks that you can see in tables as universal
monetary symbol or currency sign (¤) looks like a circle with four lines
radiating from the corner:
End-of-cell marks like a paragraph marks contain formatting for the last (or only)
paragraph in the cell and formatting for the cell.End-of-row marks placed at the end of each row of a table. They contain formatting
for the row.


Notes:
- You can show or hide all these special symbols, but they are still non-printable! You can
print just some of them. - To delete any of these special characters, select them and press the Delete key.
- Displaying of these special characters is very helpful for troubleshooting. If your text
doesn’t break as you like, it can be because you have too many (or the wrong) paragraphs set
as Keep with next.If your printer is adding a blank page at the end of your document, it could be because of
several empty paragraphs at the end that are forcing an extra page.If an automatic number insists on being bold even though you have applied bold formatting
only to the part of the numbered paragraph, it can be because of paragraph marks. You need
to select the paragraph mark and un-bold it, since automatic bullets and numbering take
on the formatting of the paragraph mark.
See also this tip in French:
Comment afficher / masquer les symboles non imprimables dans le document Word.
132
132 people found this article helpful
How to Reveal Formatting Marks and Codes in Word
Go behind the scenes of your text to resolve formatting issues
Updated on January 30, 2022
What to Know
- Temporary reveal: In Word, go to the ribbon and select Home. Choose the Show Formatting Symbols icon to toggle marks on and off.
- Permanent reveal: In Word, go to the ribbon and select File > Options > Display. Select Show all formatting marks > OK.
This article explains two ways to reveal the formatting marks and codes in a Microsoft Word document. It also includes information on the Reveal Formatting panel. These instructions apply to Word for Microsoft 365, Word 2019, Word 2016, and Word 2013.
Temporarily Show Formatting Symbols
Microsoft Word uses bullets, numbered lists, page breaks, margins, columns, and more. To see how Word structures a document, view the formatting marks and codes associated with the text.
Quick-view the formatting Word uses in a document by toggling the feature on and off when you need it. Here’s how.
-
To reveal the formatting symbols, go to the ribbon and select Home.
-
In the Paragraph group, select Show/Hide (the icon looks like a paragraph mark).
-
The formatting symbols appear in the document and each symbol is represented by a specific mark:
- Spaces display as dots.
- Tabs are indicated with arrows.
- The end of each paragraph is marked with a paragraph sign.
- Page breaks display as dotted lines.
-
To hide the formatting symbols, select Show/Hide.
Permanently Show Formatting Symbols
If you find that having the formatting symbols visible makes working with Word easier and you want to have them visible all the time, here’s how to change the setting:
-
On the ribbon, select File.
-
Choose Options.
-
In the Word Options dialog box, select Display.
-
In the Always show these formatting marks on the screen section, select Show all formatting marks.
-
Select OK to save your changes.
Display the Reveal Formatting Panel
To find more information about the formatting of a Word document, display the Reveal Formatting panel.
-
Press Shift+F1 on the keyboard to display the Reveal Formatting panel.
-
To view information about a portion of the document, select that text.
-
In the Reveal Formatting panel, select a link to see detailed information about the formatting components and to make changes to the formatting.
-
To close the panel, select X.
Thanks for letting us know!
Get the Latest Tech News Delivered Every Day
Subscribe
Your average keyboard has enough letters, numbers, and punctuation marks for all your day-to-day typing needs. But what if you need symbols or special characters that aren’t on your keyboard?
Well, in Microsoft Word, you have three main options:
- Use the Symbol menu.
- Learn some ASCII codes.
- Use Microsoft Word’s special character shortcuts.
In the rest of this post, we’ll look at how to do each of these in your writing. Watch the video or read the post below to get started:
1. Using the Symbol Menu
To see the Symbol menu in Microsoft Word, go to Insert > Symbols on the ribbon and click the Symbol button (or Insert > Advanced Symbol > Symbols in the menu system in Word for Mac).
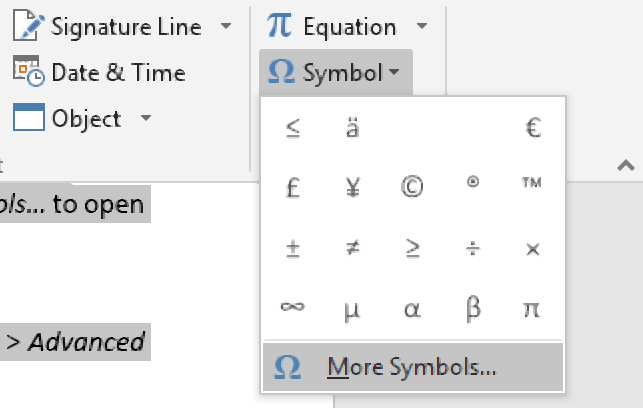
This will open a quick access menu of 20 frequently used symbols to pick from. However, you can also access the full range of special characters in Microsoft Word as follows:
- Go to Insert > Symbols and click Symbol to open the menu.
- Click More Symbols… to open a new window.
- Scroll through until you find the symbol you want to use.
- Click Insert to add the symbol to your document.
The symbol will then appear in your document at your cursor. Microsoft Word will also add it to the quick access menu, saving your time if you need to use the same symbol again.
2. ASCII Codes
ASCII codes each indicate a different symbol, so you can use them to add special characters to a document quickly via the numeric keypad:
- Learn or look up the correct ASCII code for the symbol(s) you need.
- Turn on Num Lock on your keyboard to activate the numeric keypad.
- Hold down the Alt key and type the required code.
The corresponding symbol will then appear at your cursor position.
3. Shortcuts for Special Characters
For some special characters, your simplest option is to let Microsoft Word do the hard work! There are, for example, shortcuts available for the following common symbols:
|
Special Character |
Shortcut |
Autocorrect Option |
|
Trademark symbol (™) |
Ctrl + Alt + T |
Write “TM” in parentheses |
|
Registered trademark symbol (®) |
Ctrl + Alt + R |
“R” in parentheses |
|
Copyright symbol (©) |
Ctrl + Alt + C |
“C” in parentheses |
|
Closed Ellipsis (…) |
Ctrl + Alt + . |
Three periods without spaces |
|
Euro (€) |
Ctrl + Alt + E |
“E” in parentheses |
You’ll notice we’ve included an “autocorrect” version for each symbol above. In these cases, Microsoft Word will automatically correct the specified text to create the symbol.
Find this useful?
Subscribe to our newsletter and get writing tips from our editors straight to your inbox.
For example, to add a trademark symbol to a document, we have two options:
- Hold down Ctrl + Alt + T at the same time.
- Write “(TM)” and let Microsoft Word change this to the symbol.
These shortcuts are very quick and simple, so it is worth memorizing them if you use any of these symbols frequently. Similar shortcuts are also available for accented letters.
Microsoft Word symbols cannot be easily typed in using the keyboard.
However,
the need to include these characters in documents is increasingly common these
days.
Even when writing in English, foreign names of places and people may require some of these special characters.
Scientific writings also include mathematical symbols and Greek letters.
Text may also include characters like the degree symbol and copyright symbol.
There
are character codes you can use to enter a symbol in Word. However, most people
don’t have the time to memorize these character codes.
So, in this guide today, you’ll learn how to insert any symbol in Word either using the mouse pointer or a keyboard shortcut.
NOTE: There are several methods you can use to type symbols in Word. For me, the method I use to type symbols depends on how many and how frequently I need to type them. Keep reading to choose the best method for you
Without
further ado, below are the ways to type symbols in word
1st Method: Using Insert Symbols
This
method involves using the symbols dialog box located in the symbols area at the
right border of the insert tab.
Below are steps to insert symbols in MS Word using Insert Symbols.
NOTE: in the steps below, I’ll illustrate how to insert symbols in MS Word by inserting the greater than or equal to symbol. You can use the same steps to insert any symbol of your choice.

- STEP 1: Click to position the insertion point at where you want to insert the symbol. In this example, we will place the symbol between X and 10 as you can see in the above picture.
- STEP 2: Go to the Insert tab, in the Symbols group and click Symbol, then More Symbols.

NOTE: If the symbol you want to insert is found in the symbols gallery as shown in the picture above, click it to insert it into your document. Any symbol you use will move to the first position in the gallery. Thus, the symbol gallery box gives you access to the 20 most recently used symbols. However, if you can’t find the symbol you are looking for in the symbol gallery, click on More Symbols to display all the symbols.
- STEP 3: Select your desired font from the Font drop down. You can leave it as default (Normal text). You don’t have to explore every font in the list. However, it is worth looking at Wingdings or Symbol if you want a fancy symbol.

- Step 4: Scroll down or up until you find the required symbol, then
click to select it. You can also click the desired symbol in the Recently used
symbols. - Step 5: Click Insert to insert the selected symbol then click
to close the dialog. Alternatively, double-click on the desired symbol to
insert it into your document, then close the dialog.
As soon as you click insert or double-click the symbol, Word will insert it into your document.
2nd
Method: Using the keyboard to insert symbols in Word.
Not all the symbols in Word can be found on the keyboard.
However, all the symbols can be typed using the keyboard.
Typing symbols that are not found on the keyboard can be very tedious. In fact, it is not even necessary in Word because using the first method above is much easier and simple to compare with.
However, it is still useful to know as it becomes handy to obtain certain characters or symbols in software that has no access to Insert Symbol like in Microsoft Word.
Let’s use the following exercise for example:
- Turn on your Num Lock.
- Whilst holding down the [Alt] key, type [065]
on the numeric keypad (on the right). - Then release the [Alt] key. The letter A should
appear. - To type the letter B, repeat steps 2 and 3. But this
time type [Alt 066] on the numeric keypad. - [Alt 067] should give you C, and [Alt 068] should give
you D, and so on.
This
exercise isn’t really necessary because one can easily type in any letter
directly with the keyboard.
However, not all characters and symbols are on the keyboard. Hence let’s try out the following:
- Hold down the [Alt] and type [0176] for a degree sign (°)
- Type [Alt 0189] and [Alt 0190] for fractions (½ and ¾)
- Also try [Alt 0181] for µ
But
how do you remember the number for each symbol?
It’s
almost impossible to remember. It’s not even necessary.
Instead, you should make a note of the symbols or characters you use very often.
In the next section, you’ll learn how to get the shortcut to any symbol into your Word document.
How to find the keyboard shortcut for symbols in word
You
can use the Symbol dialog box to find the character code (or keyboard shortcut)
for any symbol or character.
This way you can insert symbols by typing them on your keyboard instead of using the Symbol dialog box.
Here’s how to learn the keyboard shortcut code for a particular symbol or character in Word:
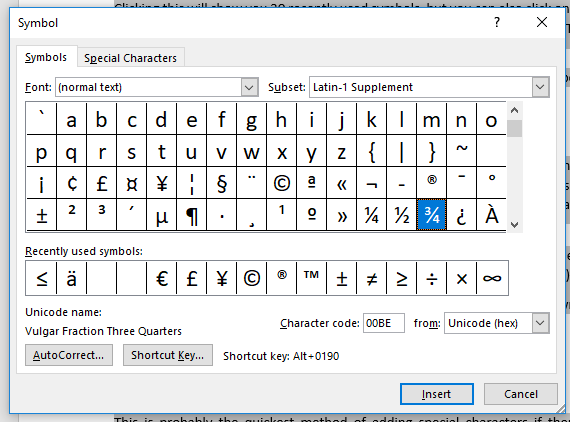
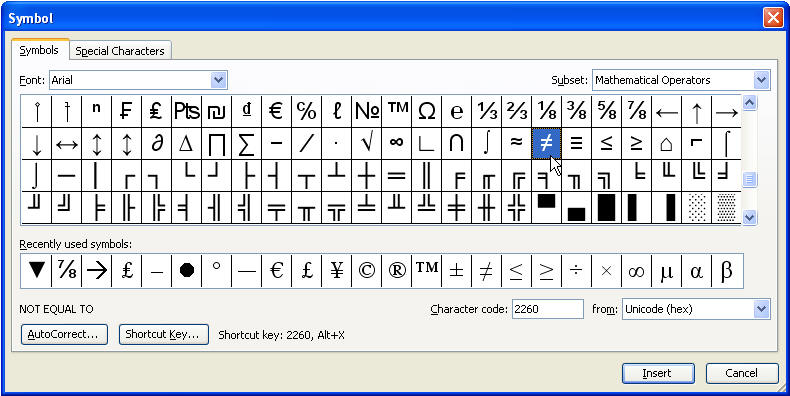
- Open the Symbols dialog box.
To
display the Symbols dialog box, go to the Insert tab, in the
Symbols group and click Symbol, then More Symbols.
- Select the symbol you want to take note of, then look near
the bottom of the dialog for the symbol name as well as its code. - To insert any symbol using its character code, press down the
[Alt] key, type the code, then release the [Alt] key.
If you are lucky, you’ll see another shortcut key aside from the character code which is much easier to type than the code.
See
screenshot below:

Assigning
shortcut keys to symbols
In
Microsoft word, you are not limited to the default hotkeys.
You can assign any keyboard shortcut key to any command or symbol to fit your needs.
As
mentioned, each and every character or symbol in Microsoft Word has a character
code that you can use on the keyboard.
Aside from these character codes, Word still gives you the space to assign a shortcut key to any symbol.
Below
are the steps to do so:
- Open the Symbols dialog box.
To
display the Symbols dialog, navigate to the Insert tab, in the
Symbols group and click Symbol, then More Symbols. The Symbols
dialog box should display.
- Click to select the symbol to which you want to assign a shortcut.
- At the bottom area of the dialog, click Shortcut Key… The Customize Keyboard dialog box appears.

- Under Specify keyboard sequence, in the Press new shortcut key field, type the keyboard shortcut you want to assign for the symbol.
If the shortcut key you assign is already assigned for a command, Word will tell you that hey dude, the shortcut key you are assigning to this symbol is already taken by another command. If you ignore and continue to assign, Word will not stop you. However, this shortcut will not work again for the command it was previously assigned to. It will now work for this symbol.

- Click Assign to assign the shortcut.
NOTE: There is another box labeled Current keys. These are the current hotkeys assigned to the selected symbol. You can take note of these hotkeys without assigning another one for the same symbol.
Typing
any symbol in Word doesn’t have to be difficult as you can see.
If you don’t understand anything explained here, let me know in the comments section below for more clarification.
Thank you very much for reading this article.
It seems a lot of people can’t find how to get certain symbols or
characters into their documents, so I hope to offer every method here.
Insert Symbol
This is one of the easiest methods. If you use the symbol a lot, you may
want to memorize the shortcut key for it, or create a shortcut key or
AutoCorrect entry for it. This is Word’s Symbol dialog.
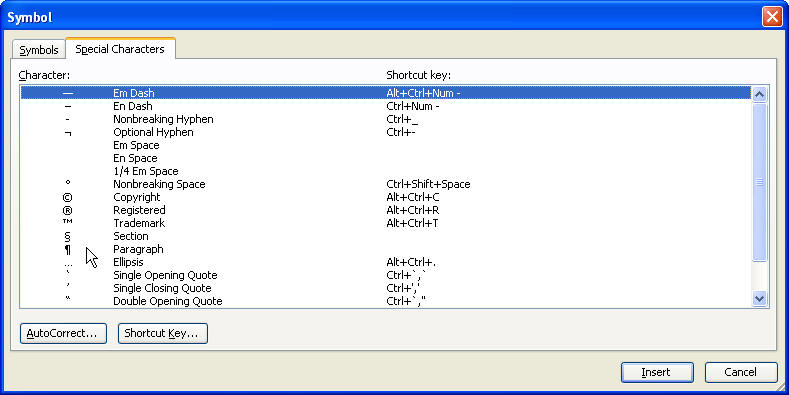
Word’s Symbol dialog also has a Special Characters tab that
you shouldn’t miss if you use Word a lot. One of the most commonly looked for
symbols here is the Paragraph return, also called a Pilcrow.
Special for Excel
Excel lovers can download a special
Excel Insert Character
dialog created by Jon Peltier, Microsoft Excel MVP and owner of
PeltierTech. Thanks very much, John!
Character Map
If you can’t find your symbol or character using the Symbol
dialog, try the Character Map, which comes with Windows. To use it, hit Start Run
and type «charmap» (without the quotes) and hit Enter.
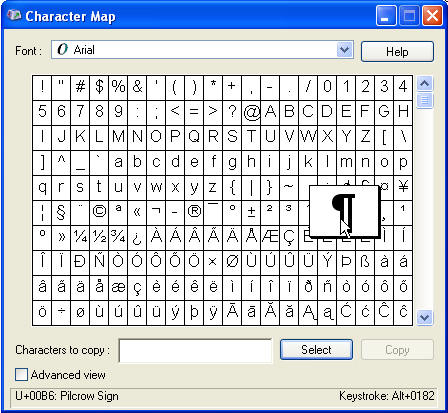
Shortcut Keys
Both the above methods may show keystrokes to use, such as the
one above displays:
Keystroke: Alt+0182
To use this keystroke, hold your Alt key while typing the
numbers on the number keypad. It won’t work using the regular keypad. Once you
type the last number, your symbol or character should appear.
Equation Editor
For even more symbols, usually of a scientific or mathematic
nature, or for creating Arithmetic problems, use the Equation Editor. Don’t
expect to jump right in and become an expert. It takes a bit of time. My
experience has been, too, that every time I try to edit the fonts, I mess it
up even more. Try to live with them the way they are.
To access the Equation Editor, hit Insert Object,
choose Microsoft Equation 3.0. This brings up the toolbar. You can create an
equation, which looks a lot like a graphic in your document. To edit the
equation later, just double-click it. To create another, you can copy the
first one, and paste it, then double-click it to change it.
