
Show Hidden Characters in Word with Show All
- Keyboard, hit Control+Shift+8.
- Mouse, simply click the Show/Hide button on the Home tab.
Contents
- 1 How do you show hidden characters in Word?
- 2 How do I unhide all text in Word?
- 3 How do I show hidden characters in a text file?
- 4 How do I view special characters?
- 5 How do I turn on all nonprinting characters in Word for Mac?
- 6 How do you unhide headers in Word?
- 7 How do you add toggle in Word?
- 8 Where is the hidden text box in Word?
- 9 How do I display Unicode characters?
- 10 What’s a special character?
- 11 What is a Unicode character?
- 12 What is CR LF characters?
- 13 What is feff hex character?
- 14 How do you show hidden characters in Word Mac?
- 15 How do you show hidden characters on Mac?
- 16 How do you show hidden characters in text on a Mac?
- 17 How do I see all styles in Word?
- 18 How do I see all headers in Word?
- 19 How do I show all heading styles in Word?
- 20 What does Alt F10 do in Word?
How do you show hidden characters in Word?
To show non-printing characters in Word documents, click the “Home” tab in the Ribbon. Then click the “Show/Hide Non-Printing Characters” button within the “Paragraph” button group. To hide the display of the non-printing characters in your document, click the “Show/Hide Non-Printing Characters” button again.
How do I unhide all text in Word?
Select all the text in the document by hitting Ctrl+A and then use either of those same methods (Ctrl+Shift+H or Font > Hidden) to unhide all hidden text in the entire document (except in headers or footers, which you’ll have to do separately).
How do I show hidden characters in a text file?
To see invisible characters, you can try whitespace-mode . Spaces and tabs will be displayed with a symbol in a different face. If the coding system is automatically being detected as dos (showing (DOS) on the status bar), carriage returns at the end of a line will be hidden as well.
How do I view special characters?
You can display these special characters, which Word refers to as nonprinting characters, by following these steps:
- Display the Word Options dialog box.
- Click Display at the left side of the dialog box.
- In the Always Show These Formatting Marks On the Screen section, select the characters you want Word to display.
How do I turn on all nonprinting characters in Word for Mac?
Word for Mac OS X
- From the Word menu, select Preferences….
- Select View.
- In the section titled “Nonprinting characters”, check or uncheck the appropriate boxes to view the marks of your choice. Check All to see all formatting marks.
- To save your changes, click OK.
Uncheck the box labeled “Show white space between pages in Print Layout view.” To restore the headers and footers, recheck the box or double-click the top or bottom of a page.
How do you add toggle in Word?
3: Toggling
To toggle all the fields in your document, press Alt + F9. So if you open a document and see field codes instead of results, simply press Alt + F9 to toggle them all. You’ll use this toggling feature when you’re inserting complex fields, and it’s great for debugging.
Where is the hidden text box in Word?
Finding an Invisible Text Box
- Display the Word Options dialog box.
- Click Advanced at the left side of the dialog box.
- Scroll through the options until you can see the Show Document Content section.
- Make sure the Show Picture Placeholders check box is cleared.
How do I display Unicode characters?
Inserting Unicode characters
To insert a Unicode character, type the character code, press ALT, and then press X. For example, to type a dollar symbol ($), type 0024, press ALT, and then press X. For more Unicode character codes, see Unicode character code charts by script.
What’s a special character?
Definition of special character
: a symbol used in writing, typing, etc., that represents something other than a letter or number.
What is a Unicode character?
Browse Encyclopedia. A. U. A character code that defines every character in most of the speaking languages in the world. Although commonly thought to be only a two-byte coding system, Unicode characters can use only one byte, or up to four bytes, to hold a Unicode “code point” (see below).
What is CR LF characters?
CR and LF are special characters (ASCII 13 and 10 respectively, also referred to as rn) that are used to signify the End of Line (EOL). The CRLF sequence is used in operating systems including Windows (but not Linux/UNIX) and Internet protocols including HTTP.
What is feff hex character?
Our friend FEFF means different things, but it’s basically a signal for a program on how to read the text. It can be UTF-8 (more common), UTF-16 , or even UTF-32 . FEFF itself is for UTF-16 — in UTF-8 it is more commonly known as 0xEF,0xBB, or 0xBF .
How do you show hidden characters in Word Mac?
There’s a keyboard shortcut for toggling invisible characters (like paragraph marks, and spaces, and tabs) in Microsoft Word on a Mac and as far as I know it’s worked in every version, since the very beginning. Command-8 does it. Command-8 to show them, Command-8 again to hide them.
How do you show hidden characters on Mac?
The Keyboard Viewer displays an onscreen representation of your Mac’s keyboard, and lets you insert a character into your text by clicking its key on a virtual keyboard. More importantly, you can access hidden characters by holding down your keyboard’s Shift and Option keys, separately or together.
How do you show hidden characters in text on a Mac?
One indirect method is to:
- Select the cells containing the text you wish to examine. Copy.
- Launch TextEdit, and open a new document. Paste.
- Select All (command-A). Copy.
- Open a new Pages (5, should also work with v6) document.
- Paste the copied list into the Pages doc.
- Go View > Show Invisibles (or press command-I)
How do I see all styles in Word?
On the Home tab, click the Styles Dialog Box Launcher, and then click Options. Under Select styles to show, click All styles. All styles are displayed in the Styles task pane. Select text in your document and then click the style in the Styles task pane.
To open the Navigation pane, press Ctrl+F, or click View > Navigation Pane. If you’ve applied heading styles to the headings in the body of your document, those headings appear in the Navigation pane.
How do I show all heading styles in Word?
- Press Ctrl+Alt+Shift+S to display the Styles task pane.
- Click the Options link at the bottom of the Styles task pane. Word displays the Style Pane Options dialog box. (See Figure 3.)
- Using the Select Styles to Show drop-down list, choose All Styles.
What does Alt F10 do in Word?
Alt+Shift+F10: Display a menu or window for an available selection.
If you are working on a Word document with complex formatting, sometimes you need to see the hidden characters and unseen workings. It helps figure out Word’s secrets or what’s going on when the layout doesn’t behave. That’s where ‘Show All’ becomes essential.
Microsoft Word was designed to hide all the formatting and technicalities (WYSIWYG). Early versions of Word had a ‘Show All’ option but it was hidden away because Microsoft believed their software was so good, such a tool was not necessary. At some point commonsense prevailed and now ‘Show All’ is on the Home tab, Paragraph section.

Show all is the easy way to see all the underlying formatting to help you figure out what’s happening. Tabs, Section Breaks, Paragraph Marks even Spaces are all exposed by Show All.
See Understand the Show All markers in Word
As with most things in Word, you can use either a keyboard shortcut or the mouse to see the hidden formatting characters.
- Keyboard, hit Control+Shift+8.
- Mouse, simply click the Show/Hide button on the Home tab.

Formatting Magic with Word
See how experts make their Word documents look better and more professional. Word 365/2021/2019/2016 edition
Font effects, paragraphs, tabs, borders, lists, numbering, tables, text boxes, styles and many special formatting tricks for all occasions.
Show All at work
For example, in the document below, I have a few strange things happening – text in columns with strange gaps in the column, and the text has stopped halfway down the page, even though there is more following on the next page.

We can now see all the paragraph marks, indents, and several different section breaks that are making our text do strange things. The Section Break (Continuous) in the middle of the right-hand column make the two-column setting to become single column then back to two-column. The next page section break at the bottom, is what is pushing text to the next page.
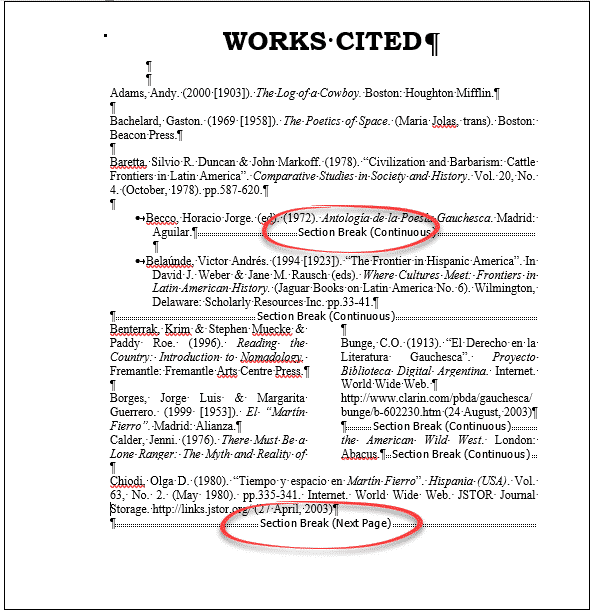
Once we can see all these things, it becomes a lot easier to find the culprits causing problems, and remove them.
Here’s a document with an off-center heading and a paragraph with strange text wrapping..
Show All reveals the problems. The text isn’t centered, someone has used tabs instead, and there are unnecessary tabs after the text. The paragraph is broken with a Line Break

Hiding the Characters Again
Both the keyboard and mouse methods of showing hidden characters act as toggles. So to hide the characters again, just press Control+Shift+8 or click the Show/Hide button again.
If you find you are regularly needing to look at the hidden characters in your document, it is possible to make some or all display permanently. Doing this isn’t usually necessary and make Word very cluttered and difficult to work with, but ‘each to their own’.
Just go to File | Options, and click on the Display tab. Then under “Always show these formatting marks on the screen”, tick the items that you want to show permanently.
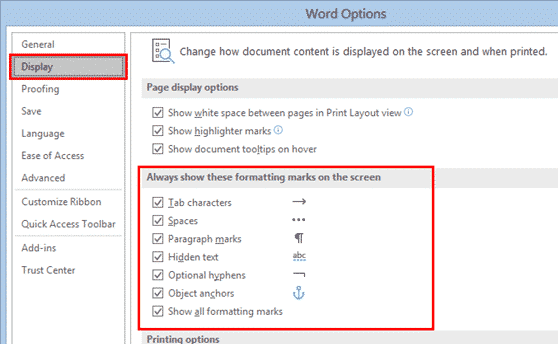
“Show all formatting marks” box acts as a toggle switch for the Show/Hide button on the ribbon. If you tick this box, the Show/Hide button will be toggled on when you look at the document again. Turning this button off on the ribbon will also untick the “Show all formatting marks” in the Word Options dialog.
If you have characters such as paragraph marks, spaces, or tab marks ticked in the Word Options dialog, then switching off Show Hidden Characters will only switch off the items that are not ticked in Word Options. The paragraph marks, etc. will continue to display until you turn them off in Options.
Formatting Magic with Word
Four more vertical formatting tricks in Word
Word tables for formatting magic
All your Clear Formatting options for Microsoft Word
 Please Note:
This article is written for users of the following Microsoft Word versions: 2007, 2010, 2013, 2016, 2019, and Word in Microsoft 365. If you are using an earlier version (Word 2003 or earlier), this tip may not work for you. For a version of this tip written specifically for earlier versions of Word, click here: Displaying Nonprinting Characters.
![]()
Written by Allen Wyatt (last updated April 11, 2020)
This tip applies to Word 2007, 2010, 2013, 2016, 2019, and Word in Microsoft 365
There are several different characters, such as a space and tab, which Word does not normally display on the screen. In addition, there are several special characters that Word uses for housekeeping purposes. For instance, Word uses special characters to indicate the end of a line or the end of a paragraph. You can display these special characters, which Word refers to as nonprinting characters, by following these steps:
- Display the Word Options dialog box. (In Word 2007 click the Office button and then click Word Options. In Word 2010 or a later version, display the File tab of the ribbon and then click Options.)
- Click Display at the left side of the dialog box. (See Figure 1.)
- In the Always Show These Formatting Marks On the Screen section, select the characters you want Word to display.
- Click on OK.
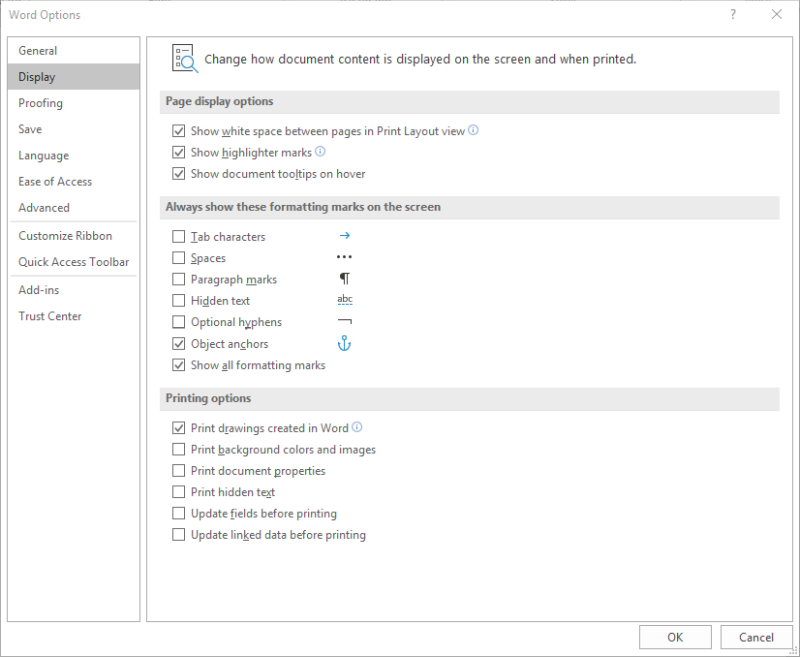
Figure 1. The Display options in the Word Options dialog box.
Why would you want to display these characters? Quite simply, because it is much easier to understand spacing when the characters are displayed. You can quickly tell, for instance, when you have inserted two spaces between words or added an extra carriage return. This allows you to more accurately control the look of your document and what it contains.
There is also a quick way you can turn nonprinting characters on and off using the ribbon. Display the Home tab of the ribbon and look for a tool in the Paragraph group that looks like a backwards P. (Technically this character is called a pilcrow.) This tool is known as the Show/Hide tool. Clicking it toggles the condition of the Show All Formatting Marks checkbox in the dialog box shown earlier. Thus, it can quickly turn on and off the nonprinting character display.
There is one interesting «gottcha» to this, however. In the dialog box, you can select to individually display or hide specific nonprinting characters. If you select the checkboxes for all these individual characters, using the Show/Hide tool still only toggles the Show All Formatting Marks checkbox—the individual settings for specific characters are not affected at all.
WordTips is your source for cost-effective Microsoft Word training.
(Microsoft Word is the most popular word processing software in the world.)
This tip (8879) applies to Microsoft Word 2007, 2010, 2013, 2016, 2019, and Word in Microsoft 365. You can find a version of this tip for the older menu interface of Word here: Displaying Nonprinting Characters.
Author Bio
With more than 50 non-fiction books and numerous magazine articles to his credit, Allen Wyatt is an internationally recognized author. He is president of Sharon Parq Associates, a computer and publishing services company. Learn more about Allen…
MORE FROM ALLEN
Concise Directory of Available Symbols
Need to know what the different codes are that you can use with the Alt key, along with the characters resulting from …
Discover More
Creating a Hanging Indent
One of the more common formatting tasks for paragraphs is to create hanging indents. This tip explains what they are and …
Discover More
Jumping to Text in Worksheet from an Index
In putting together a workbook, you may develop a worksheet that acts as an index, to contain links that lead to other …
Discover More
More WordTips (ribbon)
Moving Text Using the Mouse
Many people use the keyboard to do their primary editing tasks. Word doesn’t limit you to the keyboard, however. You can …
Discover More
Changing the Style Area Font
The style area, displayed at the left side of your document, can be helpful in understanding how styles are used in your …
Discover More
Horizontally Viewing All Your Text
If you are viewing a document and your text runs off the right side of the document window, it can be a real bother to …
Discover More
Microsoft Word has many types of nonprintable symbols such as different types of spaces,
tabulations, line or page breaks, etc. The non-printable symbols are also known as
Whitespace characters in typography, nonprinting characters in the
previous versions of Microsoft products, or formatting marks.
You can show or hide, if you see a lot of strange symbols in the document, some or all of these
symbols by clicking the button Show/Hide ¶ (or pressing Ctrl+* or
Ctrl+Shift+8):

Notes:
- Each of nonprintable characters that you will see after highlighting this button, can be
selected and removed from the document. Also, you can select, delete or replace all
occurrences of a particular kind of special symbols, see
Replacing special characters. - There are some other useful elements that you can use in a document such as bookmarks, fields,
etc. You can show and hide them too, independently from the nonprinting symbols. See
How to show/hide bookmarks in a Word document,
How to turn on or turn off highlighting off fields in a Word document.
You can selectively show only spaces in the document, only Tabulation symbols,
etc. To show or hide specific nonprintable symbols, do the following:
1. On the File tab, click the Options
button:

2. In the Word Options dialog box, open the
Display tab and then check or uncheck options as you like:

- Tab characters or Tabulations: If you check this checkbox, all tabulations
will be shown as an arrow symbol (→):
See
A perfect text alignment using tabs
and
Setting tabs using the Tabs dialog box. - Spaces can differ:
- When you type the text, usually you separate words (sentences or even syllables in
some languages) by pressing the Space key (also known as Spacebar).Usual or common space is shown as a little dot between words:

- To keep words together, can a Nonbreaking space (also called
non-breaking space, no-break space,
non-breakable space (NBSP), hard space, or
fixed space) be used. A Nonbreaking space in the Word document
looks like a degree symbols between words:
See
How to keep two or several words together in a document Word. - Sometimes more specific spacing characters like Em Space, En Space or
¼ Em Space are used.These spaces distinguish by their width:
- Em space means a space the same width as a lowercase m
character. - En space means a space the same width as a lowercase n
character. - ¼ Em space (also known as mid space) accordingly means a
space the same width as a lowercase m character divided by 4 —
one fourth of an Em Space wide.
Em space and En space are shown as common space, as a little dot
between words, but with wider gaps before and after them. ¼ Em Space looks
like a vertical bar between words:
- Em space means a space the same width as a lowercase m
- When you type the text, usually you separate words (sentences or even syllables in
- Paragraph marks or pilcrows (¶) represent a paragraph break.
They are inserted by Word at the end of every paragraph. In other words, it appears every
time when you press Enter:
Notes:
- As you can see in the example above, many of emails are formatted incorrectly. See
How to remove paragraph symbols for every line in Word. - The paragraph mark ¶ contains all the paragraph formatting. To copy all paragraph
formatting, you can select this symbol, copy it, and then paste it into another
paragraph. The last ¶ in the document contains formatting for the last section of the
document, or for entire document if it contains just one section.See
How to copy paragraph or numbering format without changing the text format
and
How to do anything with paragraph format with keyboard.
- As you can see in the example above, many of emails are formatted incorrectly. See
- Hidden text can be used in any Word document because it is a pre-defined format like
Italic or Bold. It isn’t necessary to do something extra to add hidden text.Hidden text is shown with a dotted underline:

See
Check the document for hidden information
and
11 Shortcut Keys to control font format.Notes: In contrast of other nonprinting characters, hidden text can be
printed. See
How to see/show a hidden text in a Word document
and
How to print a hidden text in a Word document. - Optional hyphens are used to break specific lines of text.
They are shown as ¬.
For example, if a lengthy word wraps to the next line and leaves a large amount of white
space, you can insert an optional hyphen in that specific word so that the first part
appears on the first line. If the word later moves to a different position because of
editing, the optional hyphen does not print. If further editing moves the word back into
a hyphenation zone, the hyphen reappears:
See
Using nonbreaking and optional hyphens. - Object anchors are shown in a document just when you select an object.
Any floating object in a document has an anchor that is tied to a particular paragraph
 . It can be moved, replaced or
removed with that paragraph like its part.It is possible to move any anchor to any other paragraph.
- The Show all formatting marks checkbox mirrors the button Show/Hide ¶ that was
described above. When you click to highlight that button on the ribbon or non-highlight it
(or use shortcut keys for that), that checkbox will be checked or unchecked appropriately.


Other formatting marks that you can see in the document by clicking on the Show/Hide 
button:
- Line breaks:
a) As a right-angle arrow pointing to the left
 . This symbol can be added
to the document to start a new line, not a new paragraph, by clicking on
Shift+Enter:
b) As a right-angle arrow between two vertical lines
 . This symbol shows the
break that separate text around object, such as a caption text or an image from the body
text.
- Pagination breaks — a Column break, a Page break and a Section break
are used for the better formatting of the document:

To add the page break, just click Ctrl+Enter.
- Keep marks are shown as a small black bullet ■ on the margin next to the paragraph:

Keep marks represents some of paragraph options:
- Keep with next,
- Keep lines together,
- Page break before.
See
How to keep lines and paragraphs together in a Word document
for more details.You can open the Paragraph dialog box and see keep marks by double-clicking on the
appropriate keep mark. - End-of-cell and End-of-row marks that you can see in tables as universal
monetary symbol or currency sign (¤) looks like a circle with four lines
radiating from the corner:
End-of-cell marks like a paragraph marks contain formatting for the last (or only)
paragraph in the cell and formatting for the cell.End-of-row marks placed at the end of each row of a table. They contain formatting
for the row.


Notes:
- You can show or hide all these special symbols, but they are still non-printable! You can
print just some of them. - To delete any of these special characters, select them and press the Delete key.
- Displaying of these special characters is very helpful for troubleshooting. If your text
doesn’t break as you like, it can be because you have too many (or the wrong) paragraphs set
as Keep with next.If your printer is adding a blank page at the end of your document, it could be because of
several empty paragraphs at the end that are forcing an extra page.If an automatic number insists on being bold even though you have applied bold formatting
only to the part of the numbered paragraph, it can be because of paragraph marks. You need
to select the paragraph mark and un-bold it, since automatic bullets and numbering take
on the formatting of the paragraph mark.
See also this tip in French:
Comment afficher / masquer les symboles non imprimables dans le document Word.
As one would expect, Microsoft Word includes a feature to count the words in a document; it also includes the ability to count the characters. Knowing the character count of a document is important for any business owner. For example, as a freelance writer your client may have specific character counts they want you to obtain; for other business owners, perhaps the contact form for your client is character-count specific. When you need to check the character count in Microsoft Word, you can do so in the same way you check the word count.
-
Open the document in Word that you want to count the characters in.
-
Click the «Review» tab.
-
Click «Word Count» in the Proofing section. The Word Count window opens and displays the numbers of characters in the document with and without spaces.
-
Click «Close» to close the Word Count window.