
If you want to write a book, you’ll need book writing software that’s up to the task. Yes, you can invest in dedicated book writing programs. But you don’t have to: a great writing tool is likely already at your fingertips, if you know how to write a book using Microsoft Word.
There’s a lot of book writing software out there. Many of these programs claim to offer intuitive use, help with organization, and even say they’ll keep you from distraction. The options can be overwhelming.
There’s still one tried and true option if you’re not interested in all that (or can’t afford the fancier programs): Microsoft Word.
I write most of my books in Microsoft Word, not to mention short stories. Here’s the rundown of how to write a book using Microsoft Word, and why that might be your best choice.
The Benefits of Microsoft Word for Book Writing
You most likely already have it. And so does everybody else. Word is the standard, accepted across platforms, and is easy to access for non-writers (your beta readers). It’s been around forever, so most people know how to use it.
There are book formatting templates. A ton of them. They have them for short story format and for manuscript format. Personally, I don’t use those templates, but they’re a nice baseline for beginners, or even old hats that just want to hurry up and write without setting up their document first.
It’s simple and uncluttered. There are a ton of apps and programs out there that will allow you to keep your plot structure notes close at hand, to rearrange your chapters with the click of a button, and to keep detailed character profiles right in the program. That’s all a little too much for me. I prefer handwritten notes and nothing else blocking my screen while I’m typing and Word gives me that.
It is worth noting that if all that sounds appealing to you, you can do those things in Word as well, it just won’t be as fancy as other programs.
Hey writer: the first step to writing a book is coming up with a great idea. The second step is figuring out the structure of your book. If you have an idea but you need help with the structure, check out our new book The Write Structure. In it, we’ll teach you how to apply timeless story structure principles to write a great book. Get The Write Structure »
How to Navigate Your Book in Microsoft Word
When you have a 90,000-word manuscript, navigating becomes daunting. Luckily there are ways to do it in Word that make it easier if you know where to look.
Chapter Headings
Word doesn’t divide your book into chapters for you like some other programs. There will be no easy way to click and drag to rearrange chapters.
What I recommend is using headings. On Word’s Home page, there are already standard headings listed. Definitely mess with them and change their formatting to something simple.
No one needs giant blue words as their chapter headings. (You can set your simpler formatting as your default style as well, so you don’t have to change it every time.)
Make the title or number of each chapter a heading. Then you can easily bounce around to different chapters through the navigation pane (check the Navigation Pane box under the View menu).
Bookmarks
These basically work the same way as headings, but they’re for anywhere in your document. Have a specific scene you need to do more research on? You can bookmark it and jump back to it later.
Bookmark by going to the Insert menu and clicking Bookmark. Name your bookmark and voilà. You can delete them easily from the popup menu as well.
Find and Replace
CTRL+F brings up a simple search option to find words and phrases in your document. CTRL+H brings up the full gambit. From that dialogue box, you can search, replace certain words with others (i.e. Jennifer now becomes Julia all through the manuscript), and go to any page, section, heading, bookmark, etc. that you need to go to.
Microsoft Word is Great for Editing Your Book
Word has a ton of options for editing your story, including comments, tracking changes, and comparing documents. All of these are under the Review menu.
I use the comments feature to make notes to myself where I need to recheck facts or add description later. It’s easy to navigate through the comments with the search feature or the buttons under the Review menu. Don’t forget to remove them all before saving your document as a PDF or sending it off to an editor.
Tracking changes is awesome and a lot of editors (for short stories anyway) will use this feature to collaborate with you during the editing process. You can accept or reject changes or even revert back to the original.
Finally, make sure you have grammar and spellcheck on! Grammar check even allows you to check style issues (like how to use an ellipsis correctly) and passive voice. It’s invaluable.
Pro tip: To keep you on track while you’re writing, turn off some of the more fine-tuning features of grammar check. There’s nothing that will ruin your flow more than a bunch of underlining you feel like you need to take care of immediately. I recommend running the full check when you’re done (or at least done for the day).
Formatting Your Book in Microsoft Word
Make sure you’re familiar with standard manuscript format for novels and formatting short stories. Take a look at those links and follow their instructions. You don’t want to get rejected out of hand because you tried some weird formatting that’s hard to look at.
One of the biggest gripes I see from editors is writers using spaces to indent paragraphs. Don’t do this. It makes it super hard on them when they’re putting a book together. Instead, use the ruler in Word (under the View menu) or the paragraph settings (under the Home menu) to adjust your tabs. A half inch is standard.
Despite what most of us were taught in school, the standard is now one space after periods, not two. This is another sticking point with editors, so don’t do it. If you’re used to two, there’s a grammar check feature in Word you can turn on to highlight every time you use two spaces.
Finally, use the page break option to break for a new chapter, not enter or a million spaces. You can find the page break under the Insert menu.
Pro tip: When in doubt about your formatting, you can turn on the Show/Hide option under the Home menu (looks like a paragraph symbol) to see all your formatting symbols.
Now That You’ve Mastered Microsoft Word, Go Write Your Book
Don’t let choosing writing software stagnant your writing. Don’t overthink it. You don’t need to keep up with the Joneses with the latest writing technology that’s trotted out on tech forums and in writing chats.
The important thing about writing a book is actually writing it. No fancy book writing software is going to help you with that.
So get writing!
Ever used Word to write a book? Do you have any more tips for how to write a book using Word? Let me know in the comments!
PRACTICE
Take fifteen minutes to write. Just write. Don’t worry about page setup, formatting, or which program you’re going to use. Open up Word or get out a pen and paper if you’d like!
When you’re done, share your writing in the comments. Don’t forget to comment on your fellow writers’ work!

Sarah Gribble
Sarah Gribble is the author of dozens of short stories that explore uncomfortable situations, basic fears, and the general awe and fascination of the unknown. She just released Surviving Death, her first novel, and is currently working on her next book.
Follow her on Instagram or join her email list for free scares.
Go to NoStupidQuestions
r/NoStupidQuestions
r/NoStupidQuestions
Ask away!
Members
Online
by
MWVaughn

Do people write WHOLE BOOKS in Microsoft Word?
Weirdly specific, I know. I was writing an essay, and I tried to make it so the bibliography was on a new page. It worked for my copy, but when I turned it in it started towards the bottom of the page before it. It was frustrating for 10 pages, so I can’t image the headache-inducing issues that would come with trying to format 300 pages.
Archived post. New comments cannot be posted and votes cannot be cast.

Microsoft Word comes with pre-built page settings for creating books. Whether you’re creating a memoir or event guide, these settings let you create a beautiful book or booklet, from start to finish.
Create a Book or Booklet
First, go ahead and open Word. It’s recommended that you adjust these setting before writing the content of your book to prevent formatting issues late on.
Once you’re in Word, head over to the “Layout” tab. In the “Page Setup” group, click the small arrow at the bottom-right.

This opens the “Page Setup” window, where you will automatically be on the “Margin” tab. In the “Margins” group, you’re able to set the margins of the page. By default, the “Gutter” margin will be set to 0. This could cause issues further on, as the gutter margin is the amount of space between the content of your book and the fold where the pages of the book will be bound together. That said, go ahead and give the gutter a 1” margin, so the content of your book doesn’t get lost in the fold.
Next, select the arrow next to “Multiple Pages” in the “Pages” group, then select “Book Fold” from the drop-down menu. Once selected, you’ll notice your page orientation automatically changes from “Portrait” to “Landscape.”
Tip: You may notice a “Reverse Book Fold” option. This is for content that reads from right to left, such as Japanese-style books.
Once you’ve adjusted the settings, click “OK.”
The page setup for creating a book or booklet is now complete. There’s a ton of stuff you can do from here depending on what you require for your book. You may want to add a header or footer, create a table of contents, or give your book page numbers for easier navigation. We’ll leave the content and add-ons to you—we’re just here to show you how to create the setup.
It’s also worth noting that, depending on the length of your document, you may need to split it up into multiple booklets due to the sheer size of the document. That’s fine—you can bind them into one book later.
RELATED: How to Reduce the Size of a Microsoft Word Document
Print Your Book or Booklet
Once you’ve finished composing your book, it’s time for printing. Select the “File” tab, then select “Print” found in the left-hand pane.
Next, select the second option in the “Settings” group.
A drop-down menu will appear, presenting a few different printing-style options. If you have a duplex printer, select (1) “Print on Both Sides” (and whether or not to flip the page on the long or short edge). If your printer doesn’t have this functionality, you’ll need to select the (2) “Manually Print on Both Sides” option.
All that’s left to do now is select Print, and you’re good to go!
READ NEXT
- › How to Search for Text in Word
- › How to Use Outline View in Microsoft Word
- › How to Adjust and Change Discord Fonts
- › HoloLens Now Has Windows 11 and Incredible 3D Ink Features
- › This New Google TV Streaming Device Costs Just $20
- › Google Chrome Is Getting Faster
- › The New NVIDIA GeForce RTX 4070 Is Like an RTX 3080 for $599
- › BLUETTI Slashed Hundreds off Its Best Power Stations for Easter Sale
How-To Geek is where you turn when you want experts to explain technology. Since we launched in 2006, our articles have been read billions of times. Want to know more?
Many new writers will reach this common barrier when it comes to publishing their first book. That barrier is formatting.
Once you have written your wonderful book, had it edited and proofread, you may be wondering, right… how do I turn this into an actual book?
Before the final stage of submitting to your chosen self-publishing platform, you will need to format your book. This can be done on various book formatting programs or you could hire a freelancer to do it for you.
But if you want to learn how to do this yourself, and do so inexpensively, then you may want to consider formatting your book in Microsoft Word. Which, I suppose you already have — hence, you reading this post!
Chances are you already have Microsoft Word installed on your PC, making it an easily accessible and free option for your book formatting needs. It is also quite a straight forward solution — especially if you have written a Novel or largely text-based book.
Illustrated books, however, are a little different — but you can learn about that here if you wish.
In addition to the pre-created book and booklet formats, Microsoft Word provides parametrized layouts that can be used to create a beautiful book, whether you’ve written a memoir or sharing your romance novel for the world to read.

You Should Read This Next 👇

Table Of Contents
- Creating Your Book In Word
- Margins
- Gutter
- Other Things To Consider When Formatting Your Book In Microsoft Word
- Free Pre-Edited Downloadable Microsoft Word Formatted Documents
- Hiring A Freelancer To Edit And Format Your Book
Creating Your Book In Word

First, start by opening Word. It’s recommended that you adjust the following settings before writing your content so that you won’t run into issues with formatting later.
Margins
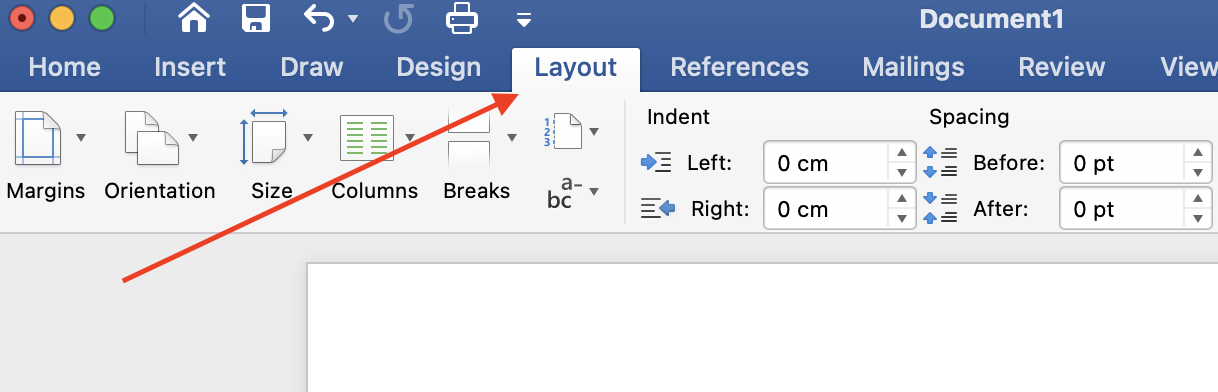
Once you’re in Word, head over to the “Layout” tab and look for the “Margins” icon
From the “Margins” section, you’re able to adjust the parameters for the margins of your book page. These values should reflect your chosen book size and page amount. You may use a book margin calculator or use your book submission platform for reference.
Gutter
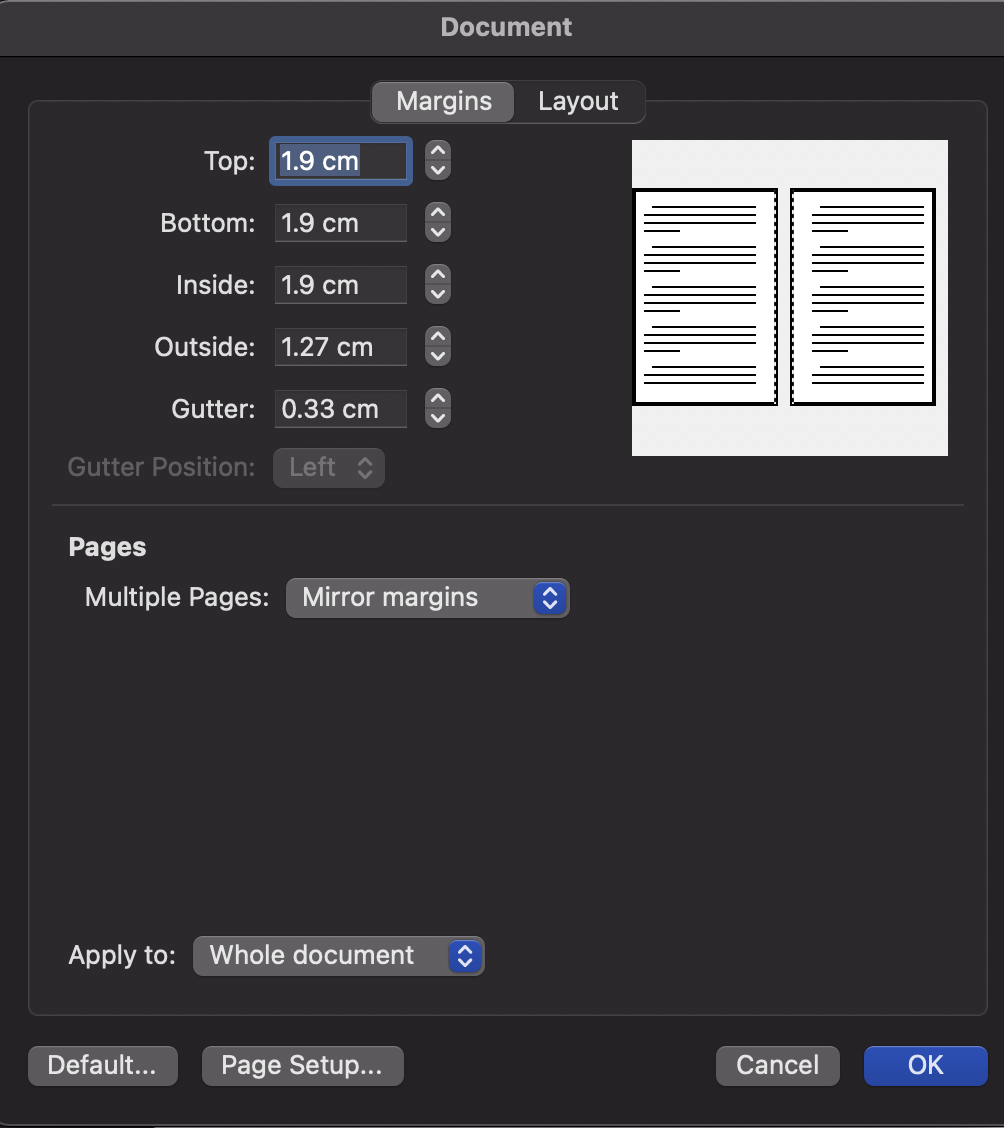
By default, the “Gutter” margin is set to 0. This is likely to cause problems down the line, as the gutter margin is the total space between the content of your book and the fold where the pages of the book will be bound together.

You Should Read This Next 👇
You should either set this to a 1” margin, or whatever you have been advised to set it to based on your chosen book size (the platform you are submitting your book on will provide guidance on this). This will ensure the content of your book doesn’t get cut off by the fold.
Now, select the “Multiple Pages” drop-down, and then select “Mirror Margins”. Then, click “OK.”
This is just a basic set-up guide to show you how to adjust margins and format your book for print or ebook distribution. However, there are a tonne of things you can do through word, such as add page numbers on each page or alternate pages. Add a table of contents for easier navigation etc. So be sure to explore all of your options and play around with the in-built book formatting features in Microsoft Word.
Other Things To Consider When Formatting Your Book In Microsoft Word
- Microsoft Word documents may be difficult to export when they contain complicated formatting (e.g. tables, text sidebars, and insets).
- Do not adjust the margin lengths in your ebook as many platforms convert it to content that is re-flowable and can be viewed with various font sizes.
- Try not to insert empty lines of text to produce blank pages.
- Rather than copying and pasting, add your images straight into your document.
- Insert page breaks when you can at the end of chapters.
Free Pre-Edited Downloadable Microsoft Word Formatted Documents
So, now that you know how to edit your margins yourself, it might be a good time to mention that there are also pre-adjusted documents that you can also download for free.

You Should Read This Next 👇
They are word documents and are already set up for specific book sizes;
| Page size without bleed | Page size with bleed |
|---|---|
| 5″ x 8″ (12.7 x 20.32 cm) | 5.125″ x 8.25″ (13 x 20.92 cm) |
| 5.06″ x 7.91″ (12.85 x19.84 cm) | 5.185″ x 8.16″ (13.15 x 20.44 cm) |
| 5.25″ x 8″ (13.34 x 20.32 cm) | 5.375″ x 8.25″ (13.64 x 20.92 cm) |
| 5.5″ x 8.5″ (13.97 x 21.59 cm) | 5.626″ x 8.75″ (14.27 x 22.19 cm) |
| 6″ x 9″ (15.24 x 22.86 cm) | 6.125″ x 9.25″ (15.54 x 23.46 cm) |
| 6.14″ x 9.21″ (15.6 x 23.39 cm) | 6.265″ x 9.46″ (15.9 x 23.99 cm) |
| 6.69″ x 9.61″ (16.99 x 24.4 cm) | 6.815″ x 9.86″ (17.29 x 25 cm) |
| 7″ x 10″ (17.78 x 25.4 cm) | 7.125″ x 10.25″ (18.08 x 26 cm) |
| 7.44″ x 9.69″ (18.9 x 24.61 cm) | 7.565″ x 9.94″ (19.2 x 25.21 cm) |
| 7.5″ x 9.25″ (19.05 x 23.5 cm) | 7.625″ x 9.5″ (19.35 x 24.1 cm) |
| 8″ x 10″ (20.32 x 25.4 cm) | 8.125″ x 10.25″ (20.52 x 26 cm) |
| 8.5″ x 11″ (21.59 x 27.94 cm) | 8.625″ x 11.25″ (21.89 x 28.54 cm) |
| 8.25″ x 6″ (20.96 x 15.24 cm) | 8.375″ x 6.25″ (21.26 x 15.84 cm) |
| 8.25″ x 8.25″ (20.96 x 20.96 cm) | 8.375″ x 8.5″ (21.26 x 21.56 cm) |
| 8.27″ x 11.69″ (21 x 29.7 cm) | 8.395″ x 11.94″ (21.3 x 30.3 cm) |
| 8.5″ x 8.5″ (21.59 x 21.59 cm) | 8.625″ x 8.75″ (21.89 x 22.19 cm) |
You can download those for free, here.
Likewise, you can use Kindle’s free formatting tool, Kindle Create to compile very professional books with all the trimmings!
Hiring A Freelancer To Edit And Format Your Book
As an author, I am always looking for ways to improve my book before hitting publish. I want to make sure that it is free of any typos or grammatical errors. I also want to ensure that the pacing is good and that the storyline flows smoothly. To do this, I use Grammarly to go through my books with a fine-toothed comb.

You Should Read This Next 👇
I also hire a freelancer on Fiverr as a second set of eyes in the editing process and to format the book according to the publishing platform’s guidelines. This extra step in the editing process has really helped me to improve the quality of my books. I’ve shared some recommended editing services below 👇
Likewise, manuscript formatting and book cover design can be outsourced just as easily; choose a trusted seller and your book is as good as sold (cheesy, I know — and not really, you still need to build a winning marketing plan!)
Use our box below to find a freelancer for any and all of your book publishing needs:
Ah, Microsoft Word. Every aspiring author who even imagines writing and publishing has, in one way or another, experienced MS Word. Microsoft Office introduced Word back in 1983, making it close to 40 years old! During its long tenure, Word has set the bar for word processing, editing, and page layout for millions of authors.
Bookmakers from traditional publishers to self-publishers use Word as their book writing software and primary editing tool. And for its time, Word offered the best way to write. Today, Word is a bit out-moded by some newer tools, but it’s still a standard for authors.
So let’s take a deeper look at what Microsoft Word offers authors.
Microsoft Word, at its core, is a formatting and editing tool. Over the years they have added hundreds of Microsoft Word templates to help you create a resume, business letters, and research papers. Oddly enough, there isn’t a built-in template for a book. Though one could argue that a blank MS Word document is already perfectly suited for the writing process.
Using style-based formatting to create different ‘sets’ of text, Word makes simple formatting easy. Style principles are common now and using them when writing has always made sense to organize chapters and sections within a larger piece. If you applied styles from the moment you started writing your book, searching and organizing during the editing process will be easy.
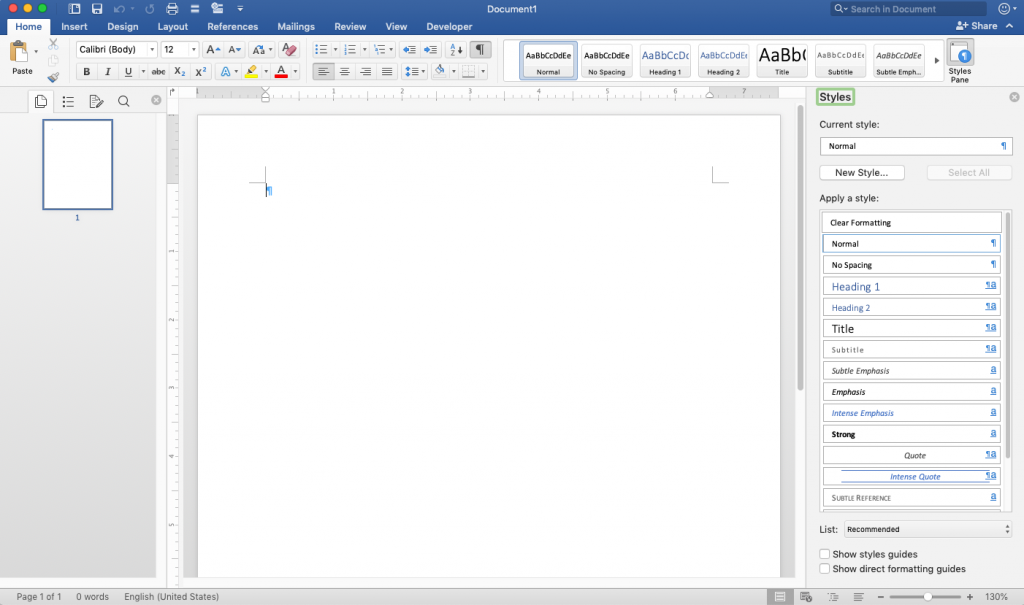
Here’s a blank, open page ready for your creative writing. Or nonfiction. Or whatever. Word is is an impressive writing space and with their rich style options, you can do a fair amount of basic design.
That said, there is an overwhelming amount of options. And unlike some other writing tools, Word doesn’t have a focus mode (that I’m aware of).
Writing, once you’ve got your features set up to your liking, is just fine with Word. I find the speed of characters displaying to be quick enough that it keeps pace with my typing, but not jumbled or distracting. One feature I would love to see is a ‘typewriter’ mode that binds my cursor to the middle of the screen. But no writing tool is ever 100% perfect.
Editing With Word
I generally find Word to be fine, but lackluster as a writing tool. That said, it’s superior as an editor. Yes, if you’re using the desktop version of Word, you must literally share the file. Archaic. But the upside is the delightful ‘Track Changes’ tool under the Review menu.
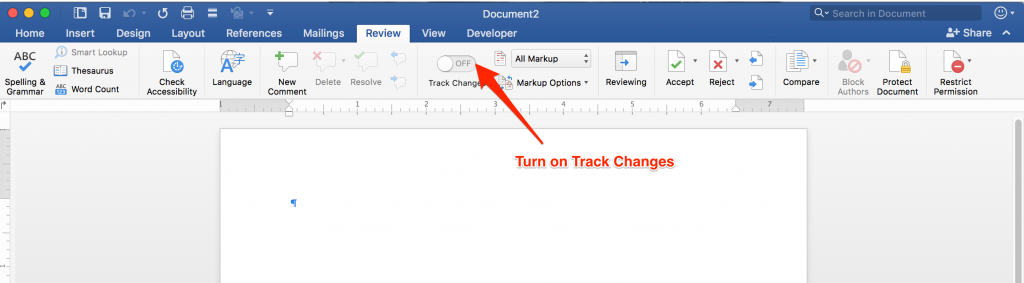
Track Changes create a column on the right side of the document, organizing and listing any edits. This includes deleting or adding text, updating any existing text, new formatting, and providing the opportunity for in-document notation.
The notes (called ‘Comments’) allow you and your editors/proofreaders to make changes and have a conversation within the document, making nothing permanent. The file will be a true living document, and the flow of ideas can run back and forth until you settle on phrasing, organization, and other elements of the design of the manuscript. If you like a change or have acted on a comment, they can be ‘Accepted’ to remove them from the running list of Track Changes and keep the interface nice and clean.
Other writing tools have document sharing and editing options, but Word wins out for clarity and simplicity.
Going Beyond The Basic
You can build in a lot of advanced formatting into your Microsoft Word document. In fact, I wrote an entire post about this very subject. While I don’t recommend using Word to layout your book, you can achieve a very nice final design.
Without digging into the details, the Formatting panels in Word offer a ton of ways to customize your DOCX file and control the style and layout of your pages.
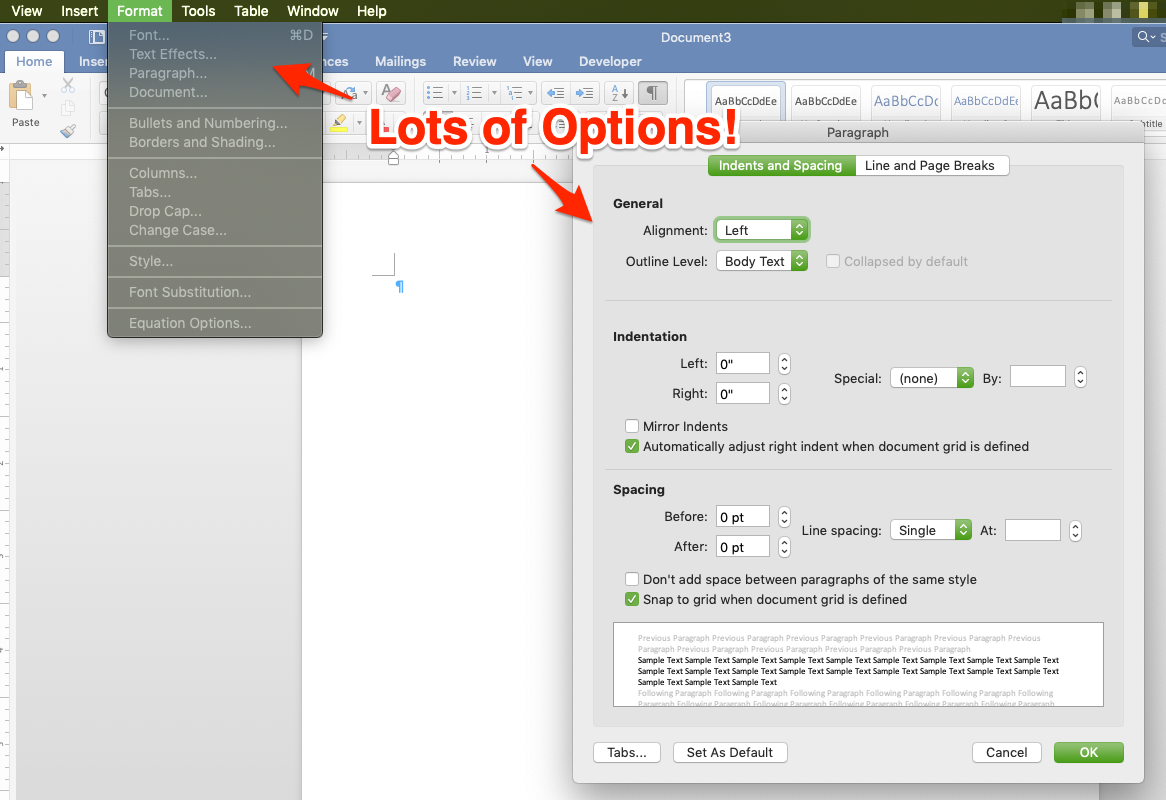
Even just this one Paragraph Format window offers a variety of options for your text. This isn’t even getting into things like drop caps, section and page breaks, and header/footer layout.
The last piece of formatting I want to touch on is page numbering. Again, I’ve written in-depth about this, but it needs to be mentioned that while Word can handle page numbering, it’s a pain in the ass. If there’s one reason to use a dedicated layout tool to create your book file, the challenge of page numbering would be it.
Laying Out Your Book With Word
Finally, the manuscript is done and edited. Now you can start playing with all those options Word offers in their ribbon. If you’re creating a novel with limited graphics, Word is fine for your book’s layout. Anything involving a lot of graphics, charts, or tables and think about a dedicated layout tool like InDesign.
The first step in laying out a file to print and publish a book is setting up the page.
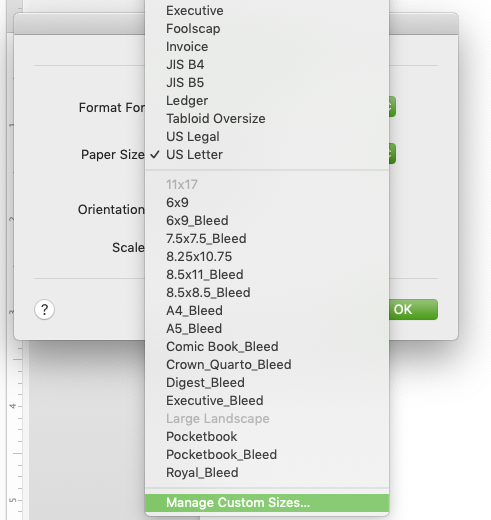
Word handles that nicely with the ‘Layout’ menu to set the page size for the entire document. While they do pre-load common page sizes, they do not include the standard Trade 6 x 9. So you would need to create a custom size, also easy to do in the Layout menu.
Along with the critical layout and design tools, Word can manipulate the content on the page. Breaks (both Page and Section) give you control over the positioning of content, and images can be in line with the text, behind the text, or nested with the text through Word’s ‘Picture’ menu.
Once you’ve got your page all laid out, you must export from DOCX to PDF so the file is ready to be sent to a printer. Some printers may accept a variety of file types, but most require PDF. Regardless, take the time to create a PDF. It’s the only way to ensure printers keep your formatting and will streamline any troubleshooting if a problem arises.
Microsoft Word, At A Price
If you’re PC or laptop came with the basic Office Suite built-in (so Word, Excel, and PowerPoint) you may not know that Microsoft’s products are actually pretty expensive. Particularly when you consider you can do almost all the writing, styling, collaborating, and editing for free with Google Docs.
If your machine did not come with Office installed (or if you’re still running Office 2013) you can purchase the Suite directly from Microsoft. They offer three options to get access to Word:
- Microsoft 365 Family – $99.99/year
- Microsoft 365 Personal – $69.99/year
- Office Home & Student – $149.99 (one-time)
Office 365 Vs. Office Suite
Like many software creators, Microsoft is moving to a subscription model. At first glance, this might seem like a shameless cash grab. You can buy the basic Office Suite for less than just two years of their 365 service! Who would ever do this?
First, we have to acknowledge that most, if not all, paid software is going to shift to subscription models. Because maintaining and updating software takes a lot of time and resources, these software companies need a steady, reliable income to stay in business.
What’s more, while Word 2013 might be fine for writing and editing, it’s outdated. And eventually, it won’t be supported any longer. Once that happens, file standards and new features won’t be available.
So the benefit of the subscription is that you’re always lined up for the newest features and fixes. The downside is that you’re paying for a tool readily available in other (arguably better) forms.
I also want to note that, if you’re considering subscribing to Office 365, there is a free version (for 1 month) to try it out. And you do get access to a TON of tools from Microsoft with this subscription.
Microsoft Word: The Bottom Line
Word is a powerful writing tool. And it has amazing in-line editing options. If you write novels or memoirs, it’s probably all you’ll ever need to create, edit, and design your book files. But it does come at a price—either annually or in purchasing a version that will eventually be outdated.

Paul H
Paul is the Content Marketing Manager at Lulu. When he’s not entrenched in the publishing and print-on-demand world, he likes to hike the scenic North Carolina landscape, read, sample the fanciest micro-brewed beer, and collect fountain pens. Paul is a dog person but considers himself cat tolerant.