
Hide or unhide a worksheet
Note: The screen shots in this article were taken in Excel 2016. If you have a different version your view might be slightly different, but unless otherwise noted, the functionality is the same.
-
Select the worksheets that you want to hide.
How to select worksheets
To select
Do this
A single sheet
Click the sheet tab.

If you don’t see the tab that you want, click the scrolling buttons to the left of the sheet tabs to display the tab, and then click the tab.
Two or more adjacent sheets
Click the tab for the first sheet. Then hold down Shift while you click the tab for the last sheet that you want to select.
Two or more nonadjacent sheets
Click the tab for the first sheet. Then hold down Ctrl while you click the tabs of the other sheets that you want to select.
All sheets in a workbook
Right-click a sheet tab, and then click Select All Sheets on the shortcut menu.
Tip: When multiple worksheets are selected, [Group] appears in the title bar at the top of the worksheet. To cancel a selection of multiple worksheets in a workbook, click any unselected worksheet. If no unselected sheet is visible, right-click the tab of a selected sheet, and then click Ungroup Sheets on the shortcut menu.
-
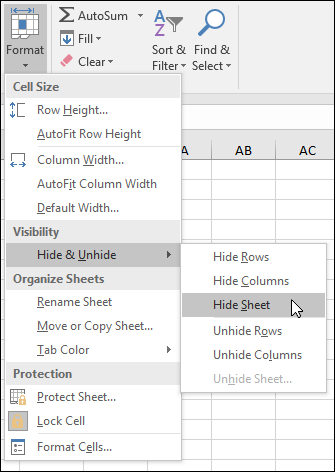
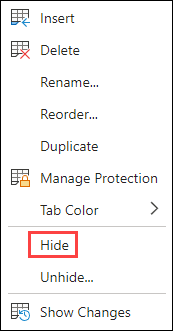
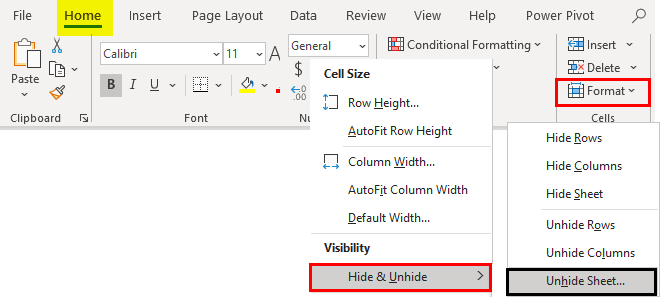
On the Home tab, in the Cells group, click Format > Visibility > Hide & Unhide > Hide Sheet.
-
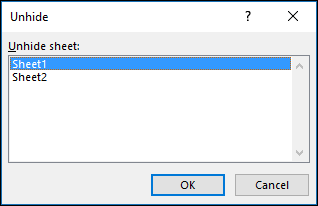
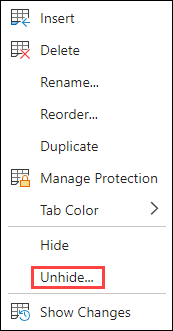
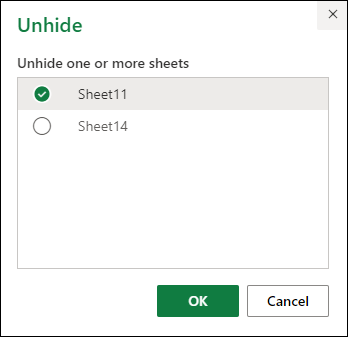
To unhide worksheets, follow the same steps, but select Unhide. You’ll be presented with a dialog box listing which sheets are hidden, so select the ones you want to unhide.
Note: Worksheets hidden by VBA code have the property xlSheetVeryHidden; the Unhide command will not display those hidden sheets. If you are using a workbook that contains VBA code and you encounter problems with hidden worksheets, contact the workbook owner for more information.

Hide or unhide a workbook window
-
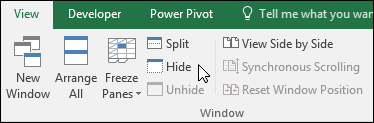
On the View tab, in the Window group, click Hide or Unhide.
On a Mac, this is under the Window menu in the file menu above the ribbon.
Notes:
-
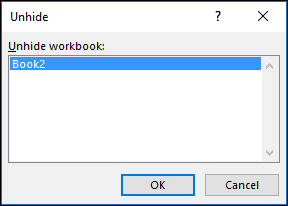
When you Unhide a workbook, select from the list in the Unhide dialog box.
-
If Unhide is unavailable, the workbook does not contain hidden workbook windows.
-
When you exit Excel, you will be asked if you want to save changes to the hidden workbook window. Click Yes if you want the workbook window to be the same as you left it (hidden or unhidden), the next time that you open the workbook.
Hide or display workbook windows on the Windows taskbar
Excel 2013 introduced the Single Document Interface, where each workbook opens in its own window.
-
Click File > Options.
For Excel 2007, click the Microsoft Office Button
, then Excel Options. -
Then click Advanced > Display > clear or select the Show all windows in the Taskbar check box.
 , then Excel Options.
Hide or unhide a worksheet
-
Select the worksheets that you want to hide.
How to select worksheets
To select
Do this
A single sheet
Click the sheet tab.
If you don’t see the tab that you want, click the scrolling buttons to the left of the sheet tabs to display the tab, and then click the tab.
Two or more adjacent sheets
Click the tab for the first sheet. Then hold down Shift while you click the tab for the last sheet that you want to select.
Two or more nonadjacent sheets
Click the tab for the first sheet. Then hold down Command while you click the tabs of the other sheets that you want to select.
All sheets in a workbook
Right-click a sheet tab, and then click Select All Sheets on the shortcut menu.
-
On the Home tab, click Format > under Visibility > Hide & Unhide > Hide Sheet.
-
To unhide worksheets, follow the same steps, but select Unhide. The Unhide dialog box displays a list of hidden sheets, so select the ones you want to unhide and then select OK.
Hide or unhide a workbook window
-
Click the Window menu, click Hide or Unhide.
Notes:
-
When you Unhide a workbook, select from the list of hidden workbooks in the Unhide dialog box.
-
If Unhide is unavailable, the workbook does not contain hidden workbook windows.
-
When you exit Excel, you will be asked if you want to save changes to the hidden workbook window. Click Yes if you want the workbook window to be the same as you left it (hidden or unhidden) the next time that you open the workbook.
Hide a worksheet
-
Right click on the tab you want to hide.
-
Select Hide.
Unhide a worksheet
-
Right click on any visible tab.
-
Select Unhide.
-
Mark the tabs to unhide.
-
Click OK.
The default setting in Excel is to show all the tabs (also called sheets) below the working area.
But if you can’t see any tabs and are wondering where has it disappeared, worry not. There are some possible reasons that may have been the cause of missing tabs in your Excel workbook.
In this article, I will show you a couple of methods you can use to restore the missing tabs in your Excel Workbook.
If you can’t see any of the tab names, it is most likely because of a setting that needs to be changed.
And in case you can see some of the sheet tabs but not all the sheet tabs, one possible reason could be that the sheets have been hidden, and you need to unhide the sheets to make the sheet tabs visible.
Another less likely but possible reason could be that the scrollbar he’s hiding the sheet tabs (when there are more sheets that extends beyond where the scrollbar starts)
Let’s have a look at each of these scenarios.
When All the Sheet Tabs are Missing
Whenever you open an Excel workbook, it must have at least one sheet tab in it (even if it’s a new blank workbook).

If you can’t see any tab, this most likely means that you need to change a setting that will enable the visibility of the tabs.

Below are the steps to restore the visibility of the tabs in Excel:
- Click the File tab

- Click on Options

- In the ‘Options’ dialog box that opens, click on the Advanced option

- Scroll down to the ‘Display Options for this Workbook’ section
- Check the ‘Show sheet tabs’ option

The above change would ensure that all the available sheet tabs in the workbook become visible (unless the user has specifically hidden some of the worksheets)
Note that this setting is workbook specific – which means that in case you enable this setting in one of the workbooks, it would only make the tabs reappear in that specific workbook
When Some of the Sheet Tabs are Missing
Sometimes, you may be able to see some of the tabs in the workbook, while some others may be missing.
In this section, I have some solutions when only some of the tabs are missing and some are visible.
Some of the Sheets are Hidden
The most likely reason that you cannot see some of the tabs in the workbook is that they have been hidden by the user.
When a worksheet is hidden in Excel, it continues to exist as a part of the Excel workbook, but you don’t see that sheet tab name along with other sheet tabs.
And this has a really simple solution – you need to unhide the sheets.
Below are the steps to unhide one or more sheets in Excel:
- Right-click on any of the existing sheet tab name
- Click on the Unhide option. In case there are no hidden sheets in the workbook, this option will be grayed out

- In the Unhide dialog box, click on the sheet name you want to unhide

- Click on OK

The above steps would unhide the selected sheet, and it would reappear as a tab in your workbook.
In case you want to unhide multiple sheets, you can select them in one go in the ‘Unhide’ dialog box. To do this, hold the Control key (or Command key if using Mac) and then click on the Sheet names that you want to unhide. This would select all the sheets on which you click and then you can unhide all these with one click.
But what if you do not see the tab name in the names listed in the Unhide dialog box?
Well, there is a way in Excel to hide a sheet in such a way that its name doesn’t show up in the Unhide dialog box.
Then how do you unhide these ‘very hidden’ sheets?
You can read my tutorial here where I show you how to unhide those sheets that have been ‘very hidden’. It’s easy and it will only take a couple of clicks.
Tabs are Hidden Because of the Scroll Bar
Another reason your tabs may be missing could be because of a large scroll bar that hides the tabs.
And it has a simple fix – resize the scroll bar to make all other tabs visible.
Below I have a screenshot of an Excel workbook where I have 8 sheets but only three sheet tabs are visible. This is because of a large scrollbar that hides those tab names.

To get the sheet tabs to reappear, click on the three dots icon on the left of the scrollbar and drag it to the right. This will minimize the scroll bar and all the sheet tabs that were earlier hidden would now become visible.

In case you have a large workbook with a lot of sheets, even if you minimize the scrollbar, some sheet tabs would still be hidden.
In such a case, you can use the navigation icons (which are at the left of the first sheet tab) to make those sheet tabs visible.
So these are some of the ways you can use to fix the issue when the sheet tabs are missing and not showing in Excel. If you don’t see any sheet tab in the workbook, it’s most likely because of the setting in the Excel Options dialog box that needs to be changed.
And in case you see some sheet tab names but some are missing, then you need to check if some of the sheets have been hidden by the user or if they are hidden because of a large scroll bar.
Other Excel tutorials you may also like:
- Microsoft Excel Won’t Open – How to Fix it! (6 Possible Solutions)
- How to Switch Between Sheets in Excel? (7 Better Ways)
- Count Sheets in Excel (using VBA)
- How to Get the Sheet Name in Excel? Easy Formula
- How to Insert New Worksheet in Excel (Easy Shortcuts)
- How to Delete Sheets in Excel (Shortcuts + VBA)
- Arrow Keys not Working in Excel | Moving Pages Instead of Cells
- How to Change the Color of the Sheet Tab in Excel
How to unhide a hidden spreadsheet with Microsoft Excel?
A hidden Excel worksheet is handy in a shared workbook to not allow all users to change data or settings. For example, if the Excel workbook is locked with a password, then the hidden data is protected from changes. With Microsoft Excel, how to unhide an Excel spreadsheet, i.e., make a hidden worksheet visible?
There are two options, search in the Excel options at the top of the workbook or right click. Excel has been part of the Office 365 suite for some years.
Show hidden Excel worksheets from the right-click menu
Firstly, Excel sheets appear as tabs in Excel. To display a hidden Excel worksheet in the easiest and fastest way, and without writing complex code, just follow these two steps:
Find the Office tutorial in video format on Youtube:
- Right click on the name of the current Excel sheet.
- Click on Display and then choose the hidden worksheet to display.

Unhide an hidden Excel spreadsheets with the Format menu
Secondly, this solution is not as fast as the first one because you must click several times in the top menu of Excel.
- From the Home tab, choose Format menu on the left, then under Visibility select Hide and Unhide, then click on Unhide Sheet.
- Then choose the sheet to be displayed in the list, only the hidden Excel worksheets appear.

Also, if this Excel tip is useful for you and you want to save even more time and efficiency with Excel, here is a selection of the best Excel shortcuts to manage spreadsheets.
In conclusion, this article explains how to display a hidden Excel sheet in a workbook. The counterpart of these options allows of course to hide a visible sheet. To go further, here is an article on another Excel tips on how to separate date and time columns with Excel.
Do the blog posts help you? Share them on social networks!
One of the first “tricks” an Excel user learns is to hide and unhide a sheet.
This is an exceptionally useful feature as it allows us to store data in a sheet, such as lists and tables, but keep the user of the workbook from seeing, manipulating, and more importantly, corrupting the information on the hidden sheet.
As with most things in Excel, there is more than one way to hide a sheet or multiple sheets. One of the easiest methods is to select a sheet (or select multiple sheets using standard Windows CTRL and Shift selection techniques), right-click the sheet tab then select “Hide”.

As an example; suppose you have twelve sheets labeled “January” through “December” and you want to hide all the monthly sheets except “December”.
- Select the “Jan” sheet
- Hold down the Shift key
- Select the “Nov” sheet
- Right-click on any selected sheet tab
- Click “Hide”

Unfortunately, unhiding multiple sheets in a single step is not as easy. If you right-click a sheet tab and select “Unhide”, the proceeding dialog box only allows a single sheet to be selected for the unhide operation.

This means you will have to perform the unhide operation eleven times to restore all the hidden sheets to a visible state.
Never fear, a solution is here (actually, three solutions)
Solution 1 – Create a Custom View
An often-overlooked feature in Excel is the ability to save a custom view.

Custom views can be used to “save” the hidden or visible states of rows and columns. This is convenient when you wish to show details of data for one printout, but a summarized version of the data in a different printout.
- Hide the desired rows and/or columns.
- Click View (tab) -> Workbook Views (group) -> Custom Views -> Add… and give the current configuration a name.

If you change the hidden/visible state of rows and/or columns but then wish to return to the saved configuration, repeat the process (View (tab) -> Workbook Views (group) -> Custom Views), select your saved view then click “Show”.

The screen will immediately return to the desired state.
Custom views also work with the visible/hidden states of worksheets. If we create a custom view prior to hiding ANY of the sheets (View (tab) -> Workbook Views (group) -> Custom Views -> Add…), we can hide as many sheets as we like. When it comes time to redisplay all the sheets, we repeat the process and select our “normal” view and click “Show”.
All the sheets have returned.
There is one negative to this process. Custom views do not work with Data Tables. The moment you add a Data Table to ANY sheet, the Custom Views feature becomes inoperable.

Because more and more people use Data Tables in their workbooks (and why wouldn’t you? They’re AMAZING!!!), we need to explore another way of unhiding all hidden worksheets.
Solution 2 – Using the VBA Immediate Window
Right up front, this does not require the use of macro-enabled workbooks. This technique can be performed in any Excel workbook.
- Open the Visual Basic Editor by pressing Alt-F11 on the keyboard or right click on any sheet tab and select View Code.

Don’t concern yourself with what you see in the ensuing window; all of that is for another day.
- Activate the Immediate Window by clicking View -> Immediate Window (or CTRL-G).

Now we will run a macro. This macro will loop through all the hidden sheets and revert their visibility states to “visible”. We will use a “For…Each” collection loop to perform this operation.
NOTE: If you are interested in learning about this command and many other useful things macros can do for you, visit the links at the end of this tutorial.
- In the Immediate window, type
for each sh in worksheets: sh.visible=true: next sh
(press Enter)
All the sheets have returned to a visible state.

What does that code mean? Let’s break down the code.
for each sh in worksheetsThis establishes a collection (list) of all worksheets and allows us to refer to each sheet individually with the alias “sh”.
sh.visible=trueWith the first sheet in the collection, set the visible property to “true”. This makes the sheet visible to the user.
next shThis selects the next sheet in the collection and returns to the first statement to repeat the process.
This process will repeat for as many sheets as are in the collection.
If this code is something you will use frequently, you can save the code in a Notepad file and then copy/paste it back into the Immediate Window whenever needed.
Solution 3 – Add a Macro to the Quick Access Toolbar (QAT)
This technique is covered in detail in the Excel VBA course (link below if you are interested in becoming a VBA Powerhouse) but will be summarized here.
If this feature is to be used often across many different workbooks, it’s worth taking the time to set this feature up on the QAT.
We will create a simple macro and store it in a special place in Excel called the Personal Macro Workbook.
Creating the Macro
- Click the “Record Macro” button on the Status Bar in the lower-left corner of Excel.
- Give the macro a name (“Unhide_All” is a good name.) Macro names cannot contain spaces.
- Change the “Store macro in:” option from “This Workbook” to “Personal Macro Workbook”.
- Click OK
- Click the “Stop Recording” button on the Status Bar in the lower-left corner of Excel.
- Open the Visual Basic Editor (Alt-F11).
- In the Project Explorer panel (upper-left), click the plus-sign next to the entry labeled “VBAProject (PERSONAL.XLSB)”.
- Click the plus-sign next to the folder labeled “Modules”.
- Double-click the module named “Module1”.
- Highlight and delete EVERYHTING in the code window (right panel).
- Enter the following code:
Sub Unhide_All()
Dim sh As Worksheet
	for each sh in worksheets: sh.visible=true: next sh
End Sub
Setting up the QAT Macro Launch Button
- Click the down arrow at the far right of the QAT and select “More Commands…” towards the bottom of the list.
- In the dropdown titled “Choose commands from:” select “Macros”.
- Select the “Unhide_All” macro on the left and click “Add>>” to move the macro to the list on the right.
- Click the “Modify” button to personalize the button icon as well as provide a tooltip. Whatever you write in the “Display name:” filed will appear on the screen when the user hover’s over the launch button on the QAT.
- Click OK.
Whenever you want to invoke the macro to unhide all the hidden sheets, click the unhide macro button on the QAT.

This feature is available for use in all open workbooks. Because we have updated the Personal Macro Workbook, don’t forget to save the changes to the Personal Macro Workbook when closing Excel.

Additional Resources
Excel VBA For…Each Loop tutorial
Excel VBA – Full Playlist
If you don’t have Office 365 and you’d like a free tool that unhides all sheets for you, then this is it!
You can add this tool to your Quick Access Toolbar or to your Excel ribbon by saving it in your Personal Macro Workbook. In this video I show you the steps to do that.

Many Thanks to Daniel Lamarche from Combo Projects for sharing this tool for free with our community members.
Please visit Daniel’s page at:
Published on: March 7, 2019
Last modified: March 2, 2023


Leila Gharani
I’m a 5x Microsoft MVP with over 15 years of experience implementing and professionals on Management Information Systems of different sizes and nature.
My background is Masters in Economics, Economist, Consultant, Oracle HFM Accounting Systems Expert, SAP BW Project Manager. My passion is teaching, experimenting and sharing. I am also addicted to learning and enjoy taking online courses on a variety of topics.
Unhiding hidden worksheets in Excel was for a long time troublesome, especially if there were many hidden worksheets in your workbook. Fortunately, Microsoft has just released a new feature in Office 365 (now: “Microsoft 365) for unhiding multiple sheets at once. So far, so good. But what, if you want to unhide “very hidden” sheets? Or, what if you work with older Office versions? Here is everything you need to know!
In this first part you learn to unhide “normal” hidden worksheets in Excel. This regards the far majority of hidden worksheets. If you “miss” a worksheet from the list of hidden sheets, it’s possible that it is very hidden. For very hidden sheets, please click here to scroll down.
Unhide worksheets manually
The first step: Check if there are any hidden worksheets. Therefore, right click on any sheet name. If the “Unhide” option is greyed out, there are no hidden worksheets in your workbook.
If the “Unhide” button in clickable, click on it. Now you’ll see a list with all hidden (not very hidden) worksheets. Click on any worksheet name in that list and click on OK.
You want to hide a worksheet? It works basically the same way, just click “Hide” instead of “Unhide”. Please refer to this article for more information.
Update 2021: Unhiding multiple sheets at once with built-in methods (Office 365)
It’s finally here: Unhide multiple worksheets at once in Excel. Microsoft has listened to user suggestions and implemented a fast method to unhide several worksheets:
- Right-click on any sheet name.
- Click on “Unhide…” (again: if this button is greyed-out it means that there are no hidden sheets in your file).
- Hold down the Ctrl key on the keyboard and click on the sheet names one by one you want to show.
Alternatively, hold down the Shift key to select many sheets at once.
Please note: This feature is only available in Office 365 since beginning of 2021. If you work with older versions of Office / Excel, you have to use one of the following methods.
Unhiding multiple worksheets at once with older versions of Excel
Again, this is primarily revelant for older versions of Excel (not Office 365 since beginning of 2021; if you are on the current Excel version please scroll up). There is another way of unhiding all hidden and very hidden worksheets: Using VBA. As usual, do the following steps:
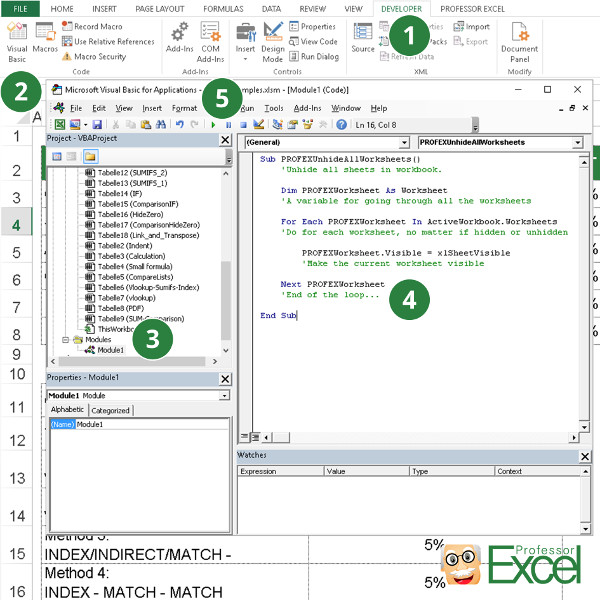
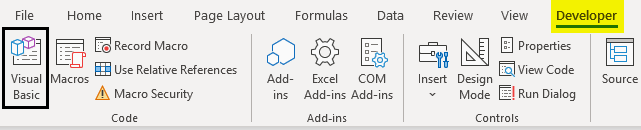
- Go to the developer ribbon in Excel (or just press Alt + F11 on the keyboard and skip the next step number two).
- Click on “Visual Basic”.
- Add a new module. Therefore, right click on any sheet and then click on “Insert” and “Module”.
- Paste the following code.
- Press start on the top.
You can follow the steps on the screenshot on the right-hand-side. If you need assistance with adding the VBA module, please refer to this article.
Sub PROFEXUnhideAllWorksheets()
    'Unhide all sheets in workbook.

    Dim PROFEXWorksheet As Worksheet
    'A variable for going through all the worksheets

    For Each PROFEXWorksheet In ActiveWorkbook.Worksheets
    'Do for each worksheet, no matter if hidden or unhidden

        PROFEXWorksheet.Visible = xlSheetVisible
        'Make the current worksheet visible

    Next PROFEXWorksheet
    'End of the loop...

End Sub
How to unhide hidden worksheets with a keyboard shortcut?
To speed up unhiding sheets with older versions than the current Office 365 version, you can use keyboard shortcuts. Press the following keys after each other:
Alt –> O –> H –> U –> Enter
Repeat these steps – this should speed up the process of unhiding. There is one more disadvantage: This method doesn’t work for all “very hidden” worksheets in Excel.
Very hidden worksheets you have to unhide within the VBA editor (see below in part 2). Select the very hidden worksheet and set the visibility to show. Therefore click on “Visible” in the properties window (usually on the left bottom corner) and set it to “xlSheetVisible”.
Do you want to boost your productivity in Excel?
Get the Professor Excel ribbon!

Add more than 120 great features to Excel!
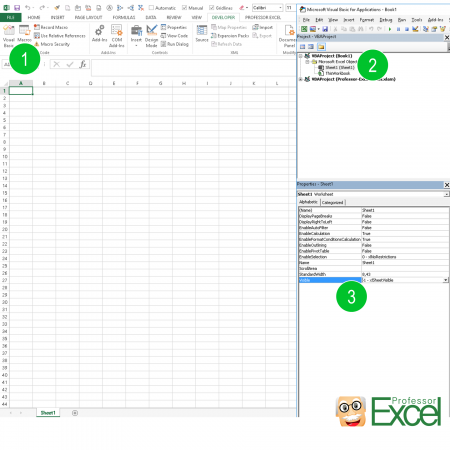
Yes, it sounds strange. Maybe programmer humor… But there is the option to set sheets to “very hidden” in Excel. For unhiding “very hidden” worksheets, you have to open the VBA editor.
- Click on “Visual Basic” on the left hand side of the Developer ribbon.
- You can see a list of all worksheets within the Project Explorer.
- Change the status “Visible” to “xlSheetVisible”.
Part 3: Unhide unhiding hidden and very hidden worksheets comfortably
As unhiding worksheets can be very troublesome, we have included a very simple function into Professor Excel Tools: A worksheet manager.
Just click on “Unhide Sheets” on the “Professor Excel” ribbon. If you don’t have it yet: Download the add-in here.
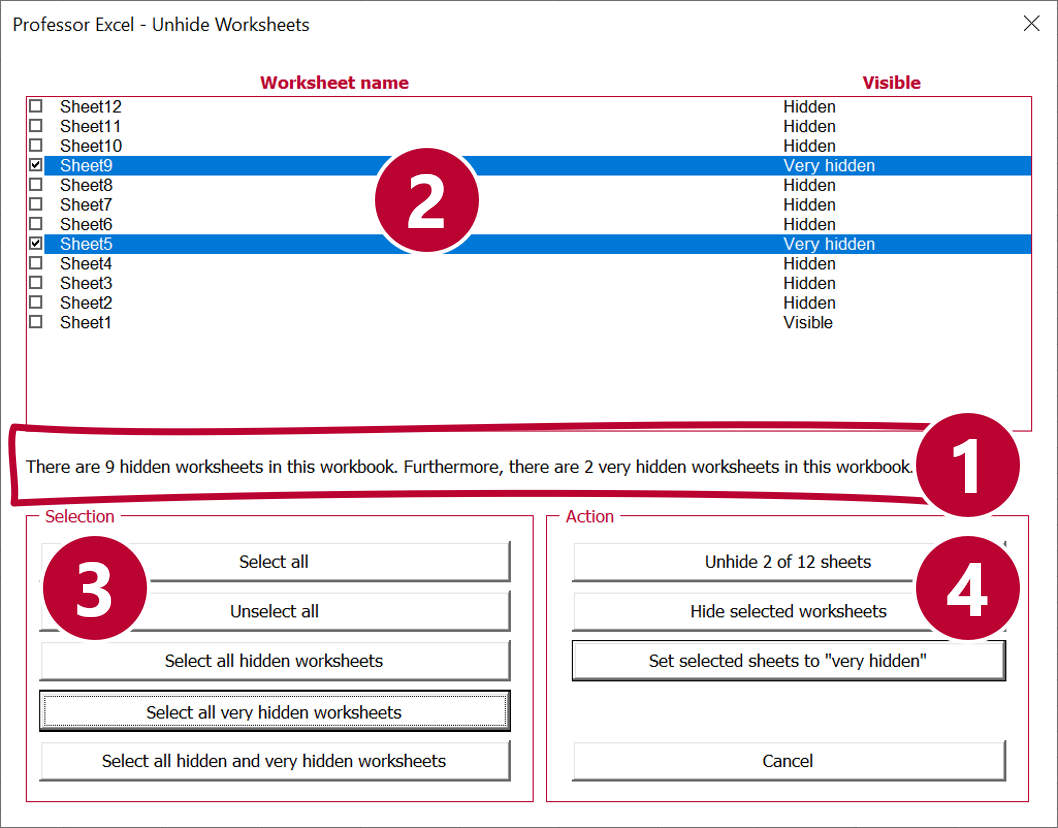
- Check the summary: How many hidden and very hidden worksheets does your file have?
- Conveniently see all worksheets in a list and select them easily. See also the visibility level of “Visible”, “Hidden” or “Very hidden”.
- Either select all sheets from the list or click one of the easy select button (for example, select all hidden but not very hidden worksheets).
- Action: Decide, what to do with these sheets: Unhide them, hide them or set them to very hidden.

This function is included in our Excel Add-In ‘Professor Excel Tools’
(No sign-up, download starts directly)
Unhide All Sheets In Excel (Table of Contents)
- Introduction to Unhide Sheets in Excel
- Examples to Unhide Worksheets in Excel
Introduction to Unhide Sheets in Excel
In this article, we will see an outline on How to unhide sheets in excel?. Hiding multiple worksheets in an Excel workbook is quite easy; however, unhiding them can be tedious. We can unhide multiple sheets one by one in Excel or use a VBA code to unhide all of these in one go. The need to unhide sheets can be seen when we analyze that the sheet is hidden.
Let us see below some of the commonly used methods or ways using which we can unhide one or all of the hidden worksheets in an Excel workbook.
Examples to Unhide Worksheets in Excel
Let’s look at a few examples to unhide all hidden worksheets one by one in Excel.
You can download this How to Unhide All Sheet in Excel Template here – How to Unhide All Sheet in Excel Template
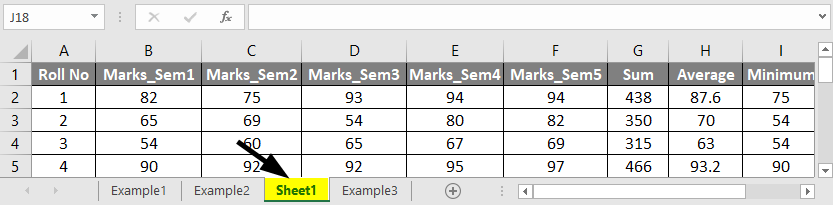
Example #1
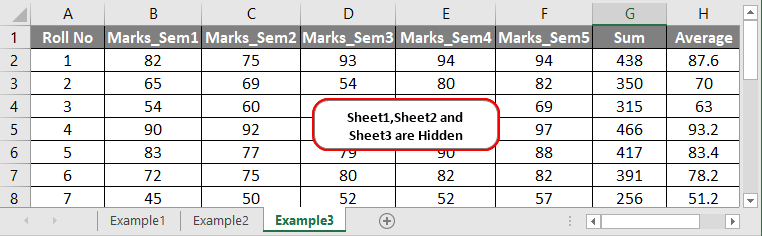
Let us say we have an Excel workbook with three worksheets (named as Sheet1, Sheet2, Sheet3) that are hidden, and we wish to unhide one or all of these hidden worksheets one by one. To do this, we follow the below steps:
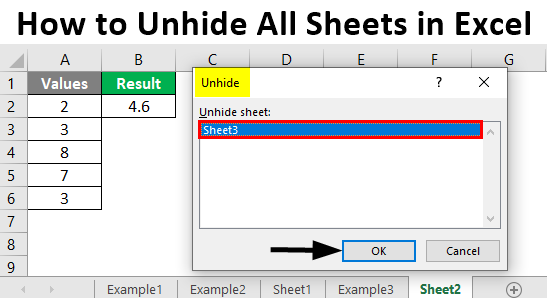
- Click on the ‘Home’ tab, and then select ‘Format’ -> ‘Hide & Unhide’ -> ‘Unhide Sheet’ :
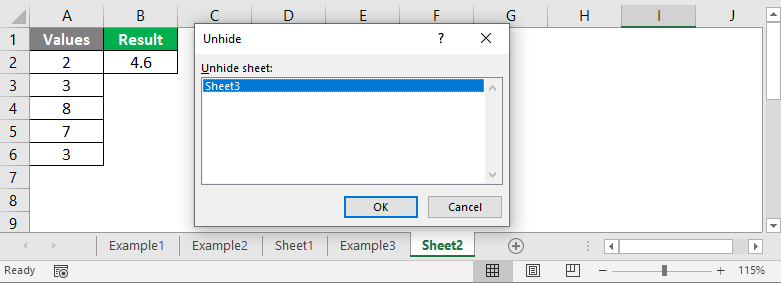
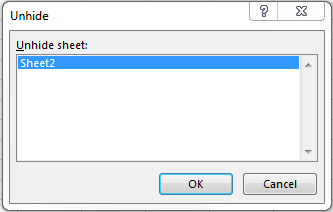
On doing this, an Unhide dialog box will appear with all the hidden worksheets. The following screenshot illustrates this.
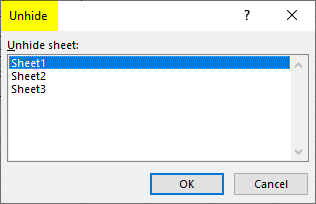
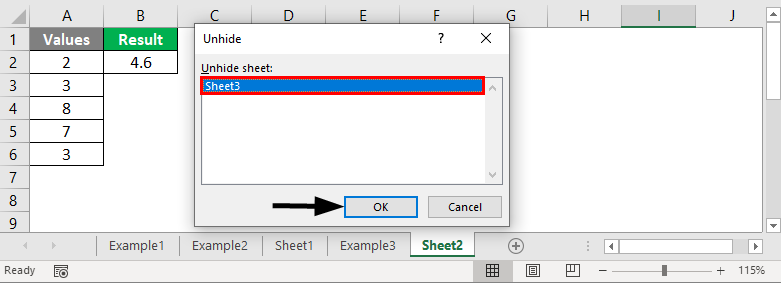
Now select the sheet that is to be unhidden and then click on ‘OK.’ This will display the selected hidden sheet.
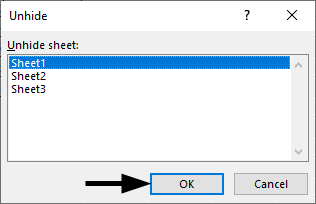
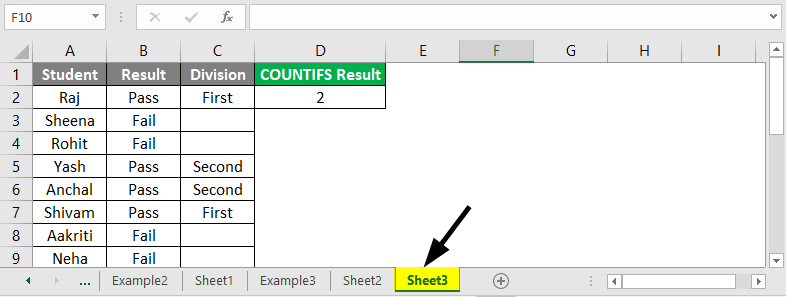
So in the above screenshot, we can see that ‘Sheet1’ is now visible to us that was previously hidden. We can repeat the above steps if we wish to unhide the other two sheets.
Example #2
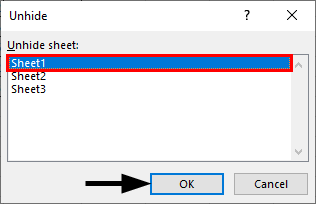
Now, we wish to unhide ‘Sheet2’ and ‘Sheet3’ in the same Excel workbook. We use another method to do this:
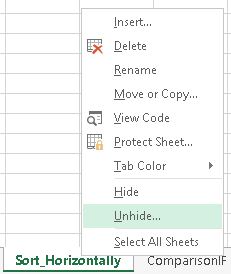
Right-click on any of the worksheet tabs and then select ‘Unhide.’
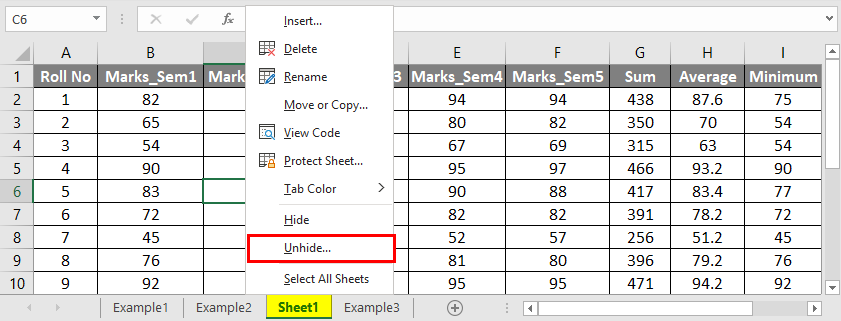
On doing this, an Unhide dialog box will appear with all the hidden worksheets. The following screenshot illustrates this.
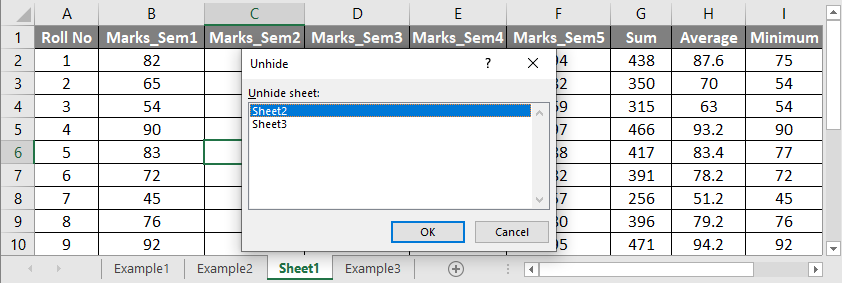
Now select the sheet that is to be unhidden and then click on ‘OK.’ This will display the selected hidden sheet.

So in the above screenshot, we can see that ‘Sheet2’ is now visible to us that was previously hidden.
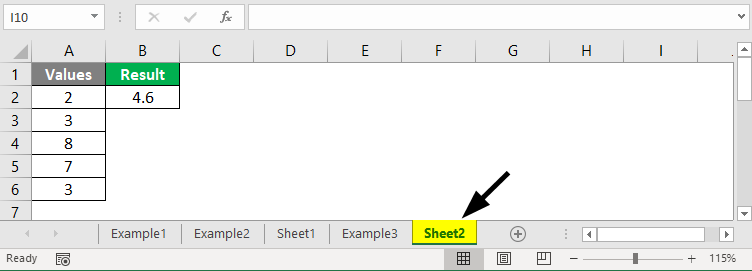
Now we can repeat the above steps to unhide ‘Sheet3’ as well.
Example #3
Apart from the above two ways that we have used to unhide one sheet at a time, there is another method to open the same ‘Unhide’ dialog box and then unhide the required hidden sheet. Let us see how this method works:
- Press Alt+H+O+U+H. On using this Excel shortcut key, the Unhide dialogue box (same as we saw in the above two examples) will appear with all the hidden worksheets. Below is the screenshot:
Now select the sheet that is to be unhidden and then click on ‘OK’. This will display the selected hidden sheet.
So in the above screenshot, we can see that ‘Sheet3’ is now visible to us that was previously hidden.
Example #4
Now, in the workbook that we have seen in the above three examples, we again hide all the three sheets (Sheet1, Sheet2, Sheet3) in them. So this is how the workbook looks like now:
Now we wish to unhide all the hidden worksheets in one go. In the above three examples, we have seen that we could not unhide all the sheets at once. Using the ‘Unhide’ dialog box, we could only unhide one sheet at a time. But this might be quite a time taking if there are many sheets that are required to be unhidden. So one way to unhide all the hidden sheets in one go is by writing a VBA code in Excel. Let us see how this works:
We write the VBA code in the Visual Basic Editor that can be accessed as follows:
Go to the Developer tab, then click on Visual Basic Editor, or press Alt+F11 to open the Visual Basic Editor window.
On doing this, a window opens as follows:
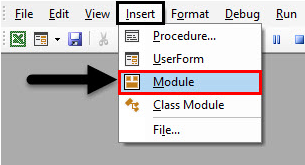
Right-click on the workbook name in the ‘Project-VBAProject’ pane and then click on ‘Insert’-> ‘Module’ as follows :
Now we can write our VBA code or sub-procedure in this module:
Code:
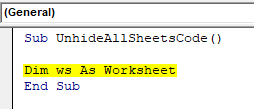
Sub UnhideAllSheetsCode()
End Sub

Define the variable ‘ws’:
Code:
Sub UnhideAllSheetsCode()

Dim ws As Worksheet
End Sub
So the first statement of the code defines the variable ‘ws’.
In the following statements of the VBA code, we use the ‘For Each’ loop with Worksheet.Visible property to unhide all the hidden worksheets in the current or active workbook.
Code:
Sub UnhideAllSheetsCode()
Dim ws As Worksheet
For Each ws In ActiveWorkbook.Worksheets
wsVisible = xlSheetVisible
Next ws
End Sub
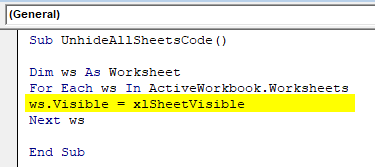
The Worksheet .Visible property is used to return or set an xlSheetVisibility value which is used to check or determine if the object is visible. xlSheetVisibility is a way for the user to make the sheets visible by setting the visible property to true. The syntax for the visible property is expression .visible, where expression is a variable that represents a Worksheet object.
Now when we run this code manually by clicking on ‘Run’ at the top of the window or by pressing F5, we will see that all the hidden sheets get unhidden all in one go. The following screenshot illustrates this:
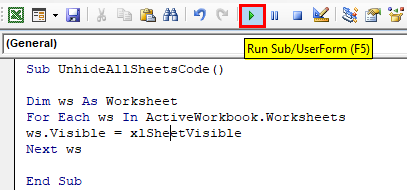
So, we can see in the above screenshot that on running the sub-procedure or the VBA code, all the hidden sheets (Sheet1, Sheet2, Sheet3) in the workbook get visible in one go.
Things to Remember About How to Unhide All Sheets In Excel
- There may be times when we are unable to unhide certain worksheets in an Excel workbook. This may be due to the following reasons:
- The workbook may be protected.
- The worksheets are hidden using a VBA code (i.e. they are ‘VeryHidden’ using the XlSheetVeryHidden property).
- We can also unhide all the worksheets except a particular worksheet in a workbook by writing a VBA code.
- Another method to unhide all sheets in one go that can be used in all the versions of Excel is using the ‘Custom Views’ method.
Recommended Articles
This is a guide to How to Unhide All Sheets in Excel?. Here we discuss How to Unhide All Sheets in Excel along with practical examples and downloadable excel template. You can also go through our other suggested articles –
- Protect Sheet in Excel
- Create a Spreadsheet in Excel
- Insert New Worksheet In Excel
- Worksheets in Excel
Did you know that Excel has two levels of hidden worksheets? Excel has “hidden” worksheets, and, “very hidden” worksheets. This post walks through the differences, and how to hide worksheets at each level.
By default, all new worksheets are visible. A visible worksheet’s tab appears in the bottom of the Excel window, enabling the user to click the tab in order to navigate to the worksheet. Easy enough, let’s move on.
Visible Property
In the real world, an object is either visible or it is not. For example, Harry Potter is typically visible. However, when he throws on that sweet cloak of invisibility, he is not visible. His visible status changes to false. In the real world, the visible status of an object is either true or false, it is either visible or it is not. In Excel however, the visible property of a worksheet object has three possible values: true, false, or….very hidden.
Hidden
When a worksheet has a visible property value of true, it is visible and can be seen and selected by the user. When a worksheet has a visible property of false, it is hidden, and can no longer be seen from within the standard Excel user interface. That is, the sheet’s tab is gone. The sheet itself however, is not gone, and formulas can still retrieve values stored on a hidden sheet. It just disappears from the user interface.
It is pretty easy to hide a sheet. Although, if we are trying to be technical, we should say it this way: it is pretty easy to change a worksheet’s visible property from true to false.
All five worksheets in my workbook are visible in the following screenshot.
![]()
To hide a sheet, simply right-click the sheet’s tab and select hide. You can also hide a sheet using the following ribbon command:
- Home > Format > Hide & Unhide > Hide Worksheet
You can also hide a sheet using the following keyboard shortcut:
- Alt+o, h, h
Sheet2 is hidden in my workbook, as shown in the screenshot below:
![]()
To unhide a sheet, simply right-click any sheet’s tab and select Unhide. This reveals the Unhide dialog box as shown below.
Pick the hidden sheet and click ok. You can also unhide a sheet using the following ribbon command:
- Home > Format > Hide & Unhide > Unhide Worksheet
You can also unhide a sheet using the following keyboard shortcut:
- Alt+o, h, u
Now, here is where it gets fun, creating very hidden sheets.
Very Hidden
The third property value is very hidden. The difference between a hidden sheet and a very hidden sheet is simply this: very hidden sheets do not appear in the Unhide dialog box.
Now, before we get to the mechanics of how to set a sheet’s property to very hidden, let me set up a bit of background that will be useful. First, we need to understand that in Excel, there is a world outside of the typical Excel user interface. What you see when navigating inside the Excel application window is a subset of everything available in Excel. A primary example is macros. Macros are not edited within the standard interface, they are edited within a utility application called the Visual Basic Editor (VBE). The VBE is a powerful and useful utility, and Excel power users spend quite a bit of time in it. It is inside the VBE where we change the visible property of a worksheet to very hidden. Here is how the VBE refers to the Visible property values:
- True = xlSheetVisible
- False = xlSheetHidden
- Very Hidden = xlSheetVeryHidden
You still with me? Great, let’s get into the VBE now.
Visual Basic Editor
There are a couple of different ways to open the VBE. You could use either of the following keyboard shortcut:
- Alt+F11
- Alt+t, m, v
Or, if you are more of a ribbon person, you could use the following ribbon command:
- Developer > Visual Basic [Note: Microsoft does not ship Excel with the Developer ribbon tab visible, so, you’ll need to turn it on. In Excel 2010/2013: customize the ribbon and check the Developer tab. In Excel 2007: go into options and check the “Show developer tab in ribbon” checkbox]
At this point, you should have the VBE open, and it should look a little something like the screenshot below.

In the top left panel is the Project Explorer, where you can use the tree to navigate to any open workbook, and to any sheet. Double-click the sheet you want to update.
[Note: if you don’t see the Project Explorer, simply select View > Project Explorer]
Then, you’ll be able to view and change the status of the Visible property in the Properties window.
[Note: if you don’t see the Properties window, simply select View > Properties Window]
On the Visible property, use the combo box to change the value to xlSheetVeryHidden, or, to either of the other options.
In the screenshot below, I selected xlSheetVeryHidden from the Visible property combo box:
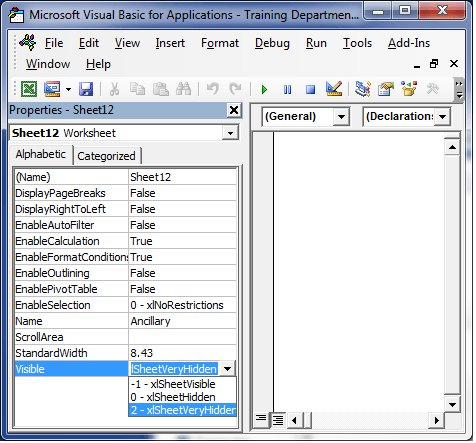
Once you return to Excel, you’ll notice that the sheet’s tab is not visible. You’ll also notice that if the workbook contains very hidden sheets, the user won’t have an option to open the Unhide dialog box. If the workbook contains both hidden and very hidden sheets, then the user can open the Unhide dialog box, however, the very hidden sheets do not appear. In my workbook, Sheet2 is very hidden, and Sheet3 is hidden, and the Unhide dialog box is shown in the screenshot below.
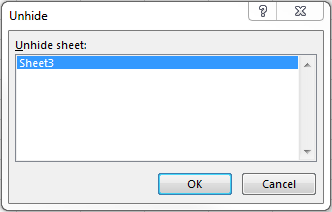
Wow, Sheet2 is very hidden!
If you want to view the sheet again, simply change the property from xlSheetVeryHidden to xlSheetVisible from within the VBE and you’ll be all set.
Now, with great power comes great responsibility, so use this super power with great care!
Learn how to hide sheets in Excel using three different ways: with the mouse right-click, using the ribbon, or using a keyboard shortcut.
Why would you need to hide a worksheet in Excel? Well, maybe you have some source data, and you don’t want it to be visible, or you simply want to keep all your drop-down lists hidden from the public eye. Whatever the reason, you can hide as many sheets as you need using a few quick methods. Just remember, at least one sheet needs to remain visible.
The fastest way to hide sheets in Excel is using your mouse right-click. All you need to do is:
- Select the sheet or group of sheets to hide. If you struggle, use this article to learn how to group worksheets in Excel.
- Right-click the selection and choose Hide from the menu.

Boom! The selected sheets are now hidden and no longer visible in the Excel window.
How to hide worksheet using the ribbon
The second method to hide a worksheet in Excel is using the ribbon. Here are the steps:
- Select any visible sheet or grouped sheets that you want to hide.
- Navigate to the Home tab, locate the Cells group, and click Format.
- In the dialox box, look for the Visibility section, click Hide & Unhide, and select Hide Sheet.

Keyboard shortcut to hide Excel sheets
While Microsoft Excel provides no keyboard shortcut for hiding sheets, you can hide a worksheet using just your keyboard. To do so, press the following keys one by one (in a sequence, not all together): ALT, H, O, U, S
How to hide Excel sheet using only your keyboard
Don’t worry. You don’t have to remember these keys. When you hit ALT, Excel will open the keyboard menu. From there, you can select the corresponding letter:
- H – selects the Home menu
- O – opens the Format panel
- U – selects the Hide & Unhide menu
- S – selects Hide Sheet

How to tell if there are hidden sheets
If your Excel workbook doesn’t have any hidden sheets, the Unhide button is grayed out and cannot be pressed. If one or multiple sheets are hidden, then the Unhide button can be pushed, and you can use one of the above methods to unhide them. You can unhide multiple sheets at once, or one by one.
What to do next?
As you’ve seen, it’s really simple to hide worksheets in Excel. If you need to unhide any hidden worksheets, it’s just as easy.
If you have any Excel questions or how to work faster and more productively, don’t hesitate to reach out. Write a comment, and I will get back to you as soon as possible.
Хитрости »
Как сделать лист очень скрытым
1 Май 2011 90246 просмотров
Иногда возникают ситуации, когда надо скрыть лист со всем его содержимым от посторонних любопытных глаз. Очень часто это делается из контекстного меню листа (для счастливых обладателей 2007 Excel. Подробнее: здесь). Но при использовании данного метода необходимо защитить книгу, иначе отобразить скрытые листы сможет каждый (тем же правым щелчком мыши — Отобразить). А что делать, если книгу не надо защищать? Ведь часто необходимо оставить пользователям возможность работы со структурой книги, например, добавлять листы. Как тогда скрыть лист так, чтобы его нельзя было отобразить? Есть достаточно простой способ через редактор VBA, при этом обладать навыком программирования вообще не нужно. Итак, определились какой лист надо скрыть. Далее:
- заходим в редактор VBA(Alt+F11)
- жмем сочетание клавиш Ctrl+R или идем в меню View —Project Explorer (чтобы отобразить окно объектов проекта VBA)
- жмем F4 или через View —Properties Window (чтобы отобразить окно свойств)
- в левой части окна (в Project Explorer) ищем книгу, лист в которой надо скрыть и раскрываем её папку(на скрине это VBA Project (Книга1))
- раскрываем папку Microsoft Excel Objects и выделяем там лист с нужным именем
- в Окне свойств (Properties Window) находим свойство Visible и назначаем ему значение xlSheetVeryHidden

Чтобы затем отобразить этот лист необходимо свойству Visible задать значение — xlSheetVisible. При этом для отображения листа необходимо будет обязательно зайти в редактор VBA — простым методом отобразить не получится. И книгу защищать не надо. Что нам и было необходимо.
Для большей надежности можно защитить проект VBA, чтобы не было возможности отобразить лист из VBA, не указав пароль. На функционал это не повлияет совершенно.
В том же окне VBA(Alt+F11):
- Tools —VBAProject Properties -вкладка Protection
- для защиты устанавливается галочка «Lock project for viewing«; для разблокировки — снимается
- вписывается/удаляется сам пароль в полях Password и Confirm password.
Скрыть только определенные листы активной книги можно следующим кодом:
Sub Hide_Sheets()
    Dim ws, aSheets
    aSheets = Array("Лист1", "Списки", "Лист2") 'через запятую перечисляем листы для скрытия(обязательно в кавычках)
    For Each ws In aSheets
        ActiveWorkbook.Sheets(ws).Visible = xlSheetVeryHidden
        'отобразить – xlSheetVisible; сделать лист просто скрытым -  xlSheetHidden
    Next wsSh
End Sub
Как использовать: Для начала надо убедиться, что разрешены макросы и при необходимости включить их: почему не работает макрос. Затем копируем код выше, из Excel переходим в редактор VBA(Alt+F11) —Insert —Module. Вставляем туда скопированный код. Теперь код можно вызывать нажатием клавиш Alt+F8 -выделяем Hide_Sheets —Выполнить(Run).
Скрыть все листы в активной книге, кроме листа с именем «Видимый», можно следующим кодом:
Sub Hide_All_Sheets()
    Dim wsSh As Object
    For Each wsSh In ActiveWorkbook.Sheets
        If wsSh.Name <> "Видимый" Then wsSh.Visible = xlSheetVeryHidden
        'отобразить – xlSheetVisible; сделать лист просто скрытым -  xlSheetHidden
    Next wsSh
End Sub
Скрыть абсолютно все листы не получится — Excel не позволит это сделать, т.к. в книге должен быть видимым хотя бы один лист.
Также см.:
Как сделать лист скрытым?
Изменить видимость листов
Почему нет листов?
Статья помогла? Сделай твит, поделись ссылкой с друзьями!