
Excel for Microsoft 365 Excel for Microsoft 365 for Mac Excel for the web Excel 2021 Excel 2021 for Mac Excel for iPad Excel for iPhone Excel for Android tablets Excel for Android phones More…Less
Have you ever collaborated with someone else in a worksheet, looking at a large data set, and suddenly the table shrinks and you’re unable to finish your work? It’s pretty disruptive, isn’t it?
Sheet Views is an innovative way of letting you create customized views in an Excel worksheet without being disrupted by others. For instance, you can set up a filter to display only the records that are important to you, without being affected by others sorting and filtering in the document. You can even set up multiple Sheet Views on the same worksheet. Any cell-level edits you make will automatically be saved with the workbook regardless of which view you’re in.
-
Select the worksheet where you want the Sheet View, then click to View > Sheet View > New.
-
Apply the sort/filter that you want. Excel automatically names your new view Temporary View to indicate the Sheet View isn’t saved yet.
-
To save it, click Temporary View in the Sheet View menu, type the new sheet view name, and then press Enter.
Keep in the mind the following:
-
Once you create a Sheet View, it’s available on all Excel platforms: Excel for Desktop and Mac, Excel for the web, and Excel on a mobile device.
-
If other people are working on the file, you can sort or filter, and Excel asks if you want to apply that sort or filter for just you, or everyone. This is another entry point for Sheet Views.
-
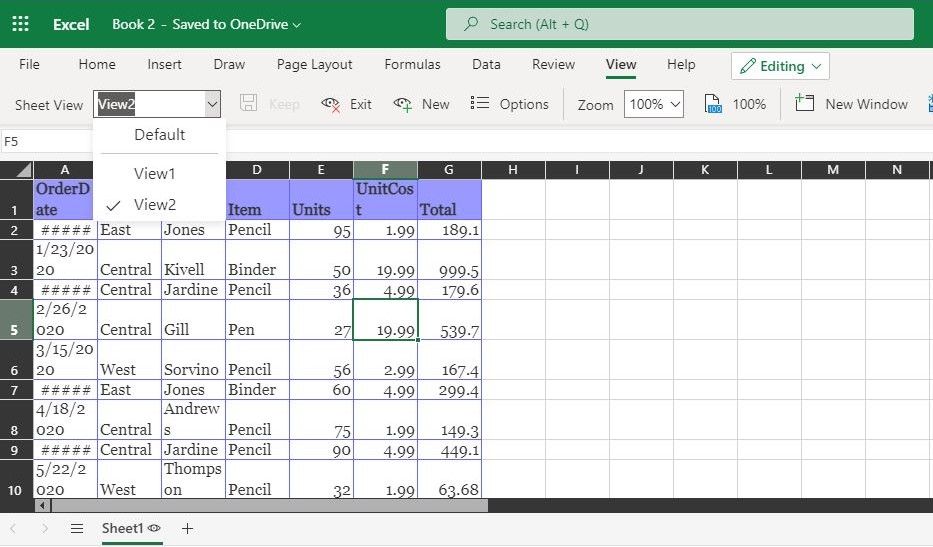
When you’re ready to display a particular view, you can select it from the Sheet View menu.
-
The Sheet View menu only displays views for the active worksheet.
-
When a Sheet View is applied, an eye symbol appears next to the worksheet tab name. Hovering over the eye will display the active Sheet View’s name.
-
When you first create a new Sheet View, Excel will preserve your initial view and display it in the Sheet View switcher as Default. Selecting the default option will reset your view to the main view of the document.
-
To close a Sheet View and return to the default view, select View > Sheet View > Exit.
-
To switch between views, select View > Sheet View, and then select your view from the Sheet View menu.
-
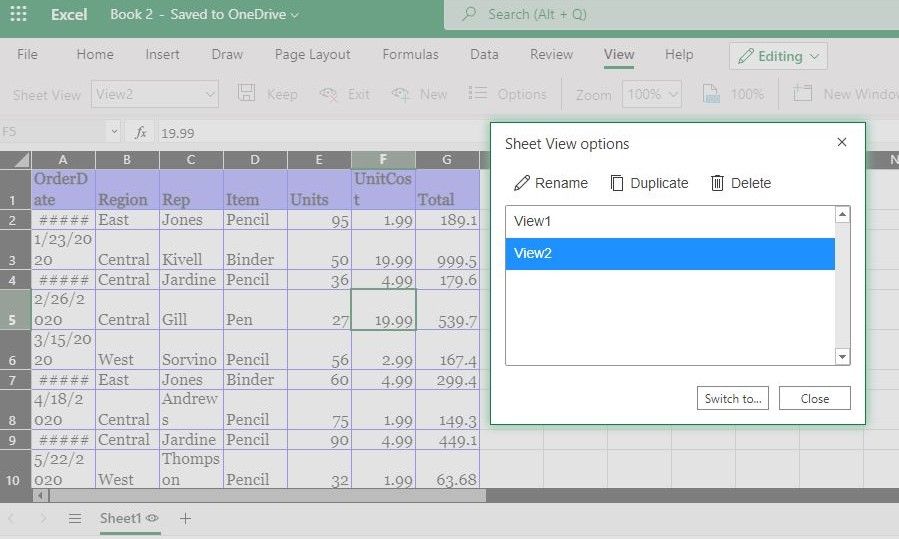
If you decide that you no longer want a particular Sheet View, select View > Options, select the view in question, and then press Delete.
-
Select View > Options.
-
In the Sheet View options dialog box, select Rename or Duplicate existing views.
-
To activate a view, double-click the sheet name in the list.
It’s more useful when everyone in a document uses Sheet View so that when coauthoring, no one is being impacted by each other’s sorts and filters. If you are not in Sheet View, you will be impacted by others who sort and filter. To reduce this impact, we will sometimes opt you into a Sheet View so that you are unaffected by sorts and filters from others.
While using a Sheet View, you can hide, or display columns and rows just as you would normally. This lets you see only the columns and rows you care about without changing the view for others.
Additionally, we will not opt you into a Sheet View when you hide, or display columns and rows in the document. You must enter a Sheet View and perform these actions there just as you would normally. If you hide or display columns or rows in default view, it persists across all Sheet Views on Excel for Desktop and Mac, and Excel for the web. For Excel on a mobile device, then it opts-in to Sheet View instead.
Why do my Sheet View options appear grayed out? You can only use Sheet Views in a document that is stored in a SharePoint or OneDrive location. Sheet Views are supported in Excel for Microsoft 365 and Excel 2021. If you save a local copy of a file that contains sheet Views, the Sheet Views will be unavailable.
Is a Sheet View private, and only for me? No, other people who share the workbook can see views you create if they go to the View tab and look at the Sheet View menu in the Sheet Views group.
Can I make different Sheet Views? You can create up to 256 Sheet Views, but you probably don’t want to get overly complicated.
Need more help?
Want more options?
Explore subscription benefits, browse training courses, learn how to secure your device, and more.
Communities help you ask and answer questions, give feedback, and hear from experts with rich knowledge.
Excel for Microsoft 365 Excel for Microsoft 365 for Mac Excel for the web Excel 2021 Excel 2021 for Mac Excel for iPad Excel for iPhone Excel for Android tablets Excel for Android phones More…Less
Have you ever collaborated with someone else in a worksheet, looking at a large data set, and suddenly the table shrinks and you’re unable to finish your work? It’s pretty disruptive, isn’t it?
Sheet Views is an innovative way of letting you create customized views in an Excel worksheet without being disrupted by others. For instance, you can set up a filter to display only the records that are important to you, without being affected by others sorting and filtering in the document. You can even set up multiple Sheet Views on the same worksheet. Any cell-level edits you make will automatically be saved with the workbook regardless of which view you’re in.
-
Select the worksheet where you want the Sheet View, then click to View > Sheet View > New.
-
Apply the sort/filter that you want. Excel automatically names your new view Temporary View to indicate the Sheet View isn’t saved yet.
-
To save it, click Temporary View in the Sheet View menu, type the new sheet view name, and then press Enter.
Keep in the mind the following:
-
Once you create a Sheet View, it’s available on all Excel platforms: Excel for Desktop and Mac, Excel for the web, and Excel on a mobile device.
-
If other people are working on the file, you can sort or filter, and Excel asks if you want to apply that sort or filter for just you, or everyone. This is another entry point for Sheet Views.
-
When you’re ready to display a particular view, you can select it from the Sheet View menu.
-
The Sheet View menu only displays views for the active worksheet.
-
When a Sheet View is applied, an eye symbol appears next to the worksheet tab name. Hovering over the eye will display the active Sheet View’s name.
-
When you first create a new Sheet View, Excel will preserve your initial view and display it in the Sheet View switcher as Default. Selecting the default option will reset your view to the main view of the document.
-
To close a Sheet View and return to the default view, select View > Sheet View > Exit.
-
To switch between views, select View > Sheet View, and then select your view from the Sheet View menu.
-
If you decide that you no longer want a particular Sheet View, select View > Options, select the view in question, and then press Delete.
-
Select View > Options.
-
In the Sheet View options dialog box, select Rename or Duplicate existing views.
-
To activate a view, double-click the sheet name in the list.
It’s more useful when everyone in a document uses Sheet View so that when coauthoring, no one is being impacted by each other’s sorts and filters. If you are not in Sheet View, you will be impacted by others who sort and filter. To reduce this impact, we will sometimes opt you into a Sheet View so that you are unaffected by sorts and filters from others.
While using a Sheet View, you can hide, or display columns and rows just as you would normally. This lets you see only the columns and rows you care about without changing the view for others.
Additionally, we will not opt you into a Sheet View when you hide, or display columns and rows in the document. You must enter a Sheet View and perform these actions there just as you would normally. If you hide or display columns or rows in default view, it persists across all Sheet Views on Excel for Desktop and Mac, and Excel for the web. For Excel on a mobile device, then it opts-in to Sheet View instead.
Why do my Sheet View options appear grayed out? You can only use Sheet Views in a document that is stored in a SharePoint or OneDrive location. Sheet Views are supported in Excel for Microsoft 365 and Excel 2021. If you save a local copy of a file that contains sheet Views, the Sheet Views will be unavailable.
Is a Sheet View private, and only for me? No, other people who share the workbook can see views you create if they go to the View tab and look at the Sheet View menu in the Sheet Views group.
Can I make different Sheet Views? You can create up to 256 Sheet Views, but you probably don’t want to get overly complicated.
Need more help?
Microsoft 365 has unlocked powerful features for collaboration, making it even easier to share an Excel file or work on a spreadsheet simultaneously using the Excel Co-Authoring functionality. The downside to having multiple users editing a file at the same time is that it may interfere with your viewing of the data. For example, you might try to analyze a column that suddenly disappears because come else has filtered or sorted it.
Now you can create customized views, aka Sheet Views, in Excel so that others can’t interfere with your work. In this article, you’ll learn what Sheet View is and how to create a temporary Sheet View in Excel, remove it, and switch between your custom Sheet Views.
What is Sheet View in Excel?
Sheet Views are an Excel feature that allows you to create different views of the same data in a spreadsheet. It’s extremely useful for collaboration since it allows multiple users to view the same data in different ways at the same time.
If you find that the Excel Sheet View is missing or not working, you might not have the required version of Microsoft 365. If you do, you need to make sure it is saved to OneDrive or SharePoint. Let’s explore how you can enable Sheet View in Excel.
How do I enable Sheet View in Excel?
If you find the Sheet View options disabled, then this is how you can check that your Excel is online.
Open your Excel workbook and click on the file name at the top. A “File Name” drop-down box will appear where you can select the online folder.

How To Use Excel Sheet View For Easy Collaboration — Click filename
Now, you’ll see how easy it is to create a Temporary Sheet View in Excel.
How to create a Temporary Sheet View in Excel?
Sheet Views are temporary because you can easily remove them at any time. This is how you can create a Temporary Sheet View in your Excel.
- 1. Open an Excel workbook and click on any sheet to make sure it’s active.

How To Use Excel Sheet View For Easy Collaboration — Select Sheet
- 2. Head to the “View” tab and click on “New” within the “Sheet View” group.

How To Use Excel Sheet View For Easy Collaboration — Sheet View
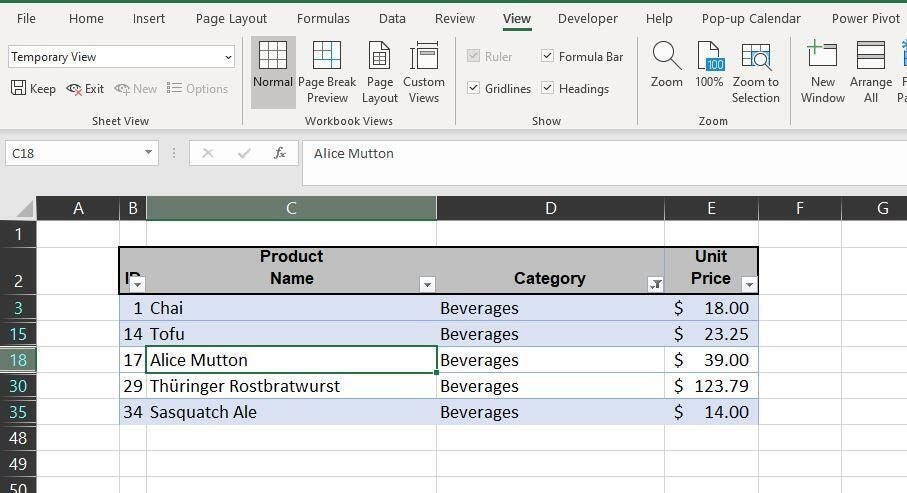
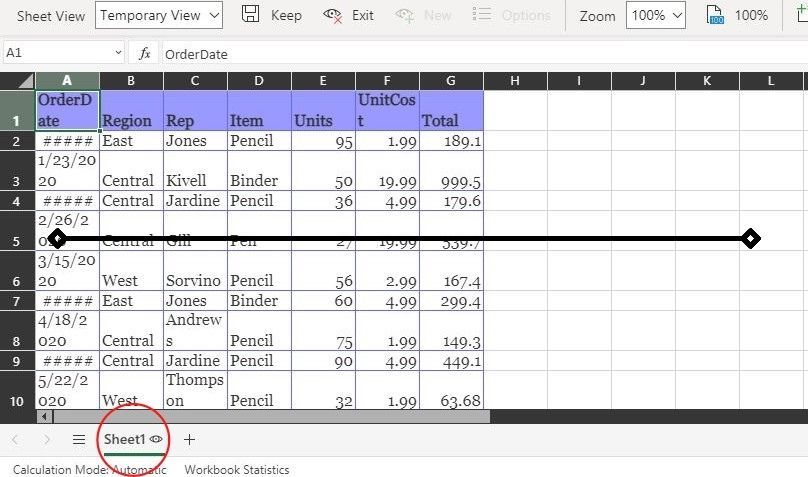
Notice how your column and row headers are now black, and Excel displays “Temporary View” as a drop-down option in the Sheet View group. Next to your sheet tab name at the bottom, an eye icon should also appear.
- 3. To remove the “Temporary View”, click “Exit” within the “Sheet View” group.

How To Use Excel Sheet View For Easy Collaboration — Exit View
You can now easily work on your data without being interrupted. In case another user applies a filter or tries to sort data, Excel will ask you whether you want to work on their view or continue to work on your own. Let’s explore how you can use Sheet View in Excel to have full control over how you can view your data.
How to Use Sheet View in Excel?
Excel first allows you to create a Temporary View, which you can easily exit, as shown before. However, if you would like to save the Temporary View, this is what you need to do.
How to save a Sheet View in Excel?
The great thing about Sheet View is that you can save more than one view per sheet.
- 1. In the “Sheet View” group, click on “Keep”.

How To Use Excel Sheet View For Easy Collaboration — Keep
- 2. You should now see the default name of your view has replaced “Temporary View” in the drop-down menu.

How To Use Excel Sheet View For Easy Collaboration — Default name
However, you can customize the Sheet View name so that it’s easier for you to switch between views. Let’s see how you can rename your custom view.
How to rename a Sheet View in Excel?
Renaming your custom views can be done in two simple steps.
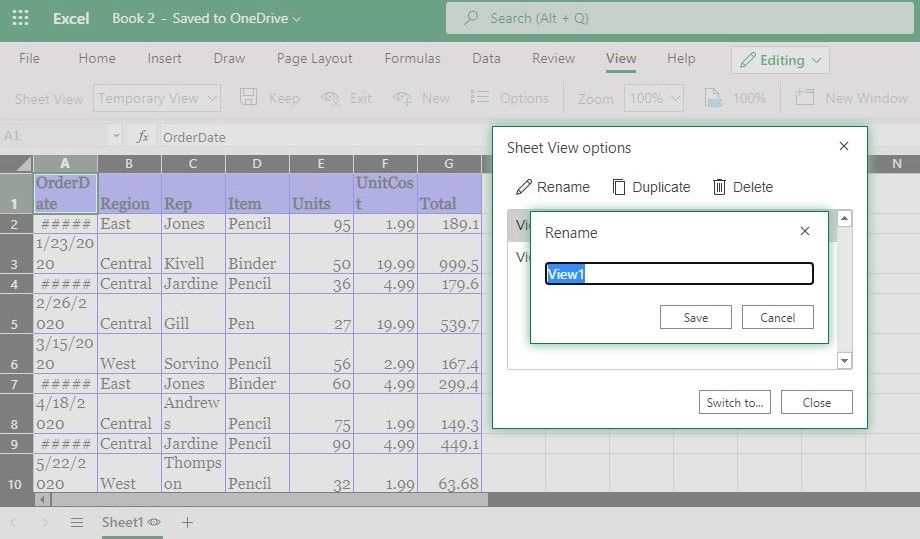
- 1. Click on “Options” next to the “New” button. Then, select the Sheet View to rename, and select “Rename”.

How To Use Excel Sheet View For Easy Collaboration — Options
- 2. Type in the new name and click “Save”.

How To Use Excel Sheet View For Easy Collaboration — Rename
But what if you’ve saved different custom views and want to switch between them? Here’s how to do it.
How to Share an Excel File for Multiple Users?
There are different ways to share an Excel file. Here’s how to share an Excel file with multiple users for easy collaboration
READ MORE

How to switch or leave a Sheet View?
You can switch between your saved custom views from the “Sheet View” drop-down box.
- 1. To switch to a different Sheet View, click on the drop-down list and select the desired Sheet View. Here, I would like to switch to “Sorted A-Z” a view I saved earlier, which filters the last column and sorts the first column as A-Z.

How To Use Excel Sheet View For Easy Collaboration — Switch
- 2. To leave a Sheet View, click “Exit”. You can see how the drop-down box now shows “Default” as the current view.

How To Use Excel Sheet View For Easy Collaboration — Default
If you’re wondering whether you can access other views in the shared Excel, you’ll be happy to learn that it’s possible. However, this also means that there is no private view option. As a result, any other user can also see and accidentally change your custom view.
Want to Boost Your Team’s Productivity and Efficiency?
Transform the way your team collaborates with Confluence, a remote-friendly workspace designed to bring knowledge and collaboration together. Say goodbye to scattered information and disjointed communication, and embrace a platform that empowers your team to accomplish more, together.
Key Features and Benefits:
- Centralized Knowledge: Access your team’s collective wisdom with ease.
- Collaborative Workspace: Foster engagement with flexible project tools.
- Seamless Communication: Connect your entire organization effortlessly.
- Preserve Ideas: Capture insights without losing them in chats or notifications.
- Comprehensive Platform: Manage all content in one organized location.
- Open Teamwork: Empower employees to contribute, share, and grow.
- Superior Integrations: Sync with tools like Slack, Jira, Trello, and more.
Limited-Time Offer: Sign up for Confluence today and claim your forever-free plan, revolutionizing your team’s collaboration experience.
Conclusion
Although Excel Sheet Views might seem like a basic feature, this feature makes collaborative work easier than ever before. You can perform any task on your spreadsheet — basic or complex — and it won’t affect or interfere with your colleagues’ work.
In this article, you have seen how Sheet View makes collaboration in Excel even easier. You should now know to use the Sheet View functionality in Excel in full. You should also know how to create a Temporary View, how to remove it, and how to manage Sheet Views to go back to a specific Sheet View at any time.
Hady is Content Lead at Layer.
Hady has a passion for tech, marketing, and spreadsheets. Besides his Computer Science degree, he has vast experience in developing, launching, and scaling content marketing processes at SaaS startups.
Originally published May 20 2022, Updated Mar 22 2023
Sheet views in excel
Have you ever collaborated with someone else in a worksheet, looking at a large data set, and suddenly the table shrinks and you’re unable to finish your work? It’s pretty disruptive isn’t it?
Sheet views are an innovative way of letting you create customized views in an Excel worksheet without being disrupted by others. For instance, you can set up a filter to display only the records that are important to you, without being affected by others sorting and filtering in the document. You can even set up multiple sheet views on the same worksheet. Any cell-level edits you make will automatically be saved with the workbook regardless of which view you’re in.
Note: Sheet views are currently limited to Excel 2007 or later files stored in OneDrive, OneDrive for Business, and SharePoint. If you save a local copy of a file that contains sheet views, the sheet views will be unavailable until the file is saved to SharePoint and opened from that environment. If you add sheet views to a workbook and save it as Excel 97-2003, the sheet views will be discarded.
How do I add a sheet view?
Select the worksheet where you want the sheet view, and go to View > Sheet View > New. Next, apply the sort/filter that you want. Excel will automatically name your new view: Temporary View. Your view is initially temporary, so if you want to keep it, select that view name from the sheet view switcher drop-down, type your new name, then press Enter.
Notes:
-
If other people are working on the file, you can sort or filter, and we’ll ask if you want to apply that sort or filter for just you, or everyone. This is another entry point for sheet views.
-
When you’re ready to display a particular view, you can select it from the sheet view switcher drop-down.
-
The sheet view switcher only displays views for the active worksheet.
-
When a sheet view is applied, there will be an eye symbol next to the worksheet tab name. Hovering over it will display the active sheet view’s name.
-
When you first create a new sheet view, Excel will preserve your initial view and display it in the sheet view switcher as Default. Selecting the default option will reset your view to where it was when you started.
How do I close or switch between sheet views?
If you want to close a sheet view and return to the default view, go to View > Sheet View > Exit. To switch between views, go to View > Sheet View, and select your view from the sheet view switcher drop-down list.
How do I delete a sheet view?
If you decide that you no longer want a particular sheet view, you can go to View > Sheet Views > Options, select the view in question, then press Delete. You can use Shift/Ctrl+left-click to select multiple views to delete.
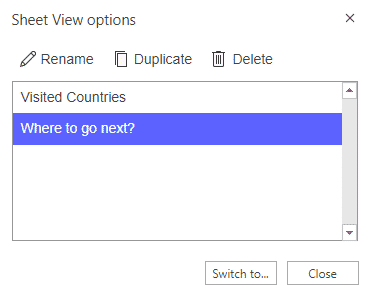
Sheet View Options
There is an Options dialog within the Sheet View group on the View tab. This dialog lists all sheet views that are associated with a given worksheet. You also have the options to Rename, Duplicate, or Delete existing views. To activate a view from the Options dialog, you can double-click it from the views list, or select it, then use the Switch to… button.
Frequently Asked Questions
Why wouldn’t I want a sheet view? Let’s say you’re in a meeting, and need everyone to see what you do. Sheet views could get confusing if you’re not all looking at the same thing.
How do I exit a view? Go to the View tab > Sheet Views > Exit.
What happens when a sheet view is active and I close the file and reopen? Any active sheet view will automatically reset to the default view.
Is a sheet view private, and only for me? No, other people who share the workbook can see views you create if they go to the View tab, and look at the sheet view switcher drop-down in the Sheet Views group.
Can I make different sheet views? You can create up to 256 Sheet Views, but you probably don’t want to get overly complicated.
For desktop, it’s more useful when everyone in a document is using Sheet View so that when coauthoring, no one is being impacted by each others’ sorts and filters.
Add a sheet view
-
Select the worksheet where you want the sheet view, then click to View > Sheet View > New.
-
Apply the sort/filter that you want. Excel automatically names your new view Temporary View to indicate the sheet view isn’t saved yet. To save it, click Temporary View in the sheet view menu, type the new sheet view name, and then press Enter.
Notes:
-
If other people are working on the file, you can sort or filter, and Excel asks if you want to apply that sort or filter for just you, or everyone. This is another entry point for sheet views.
-
When you’re ready to display a particular view, you can select it from the sheet view menu.
-
The sheet view menu only displays views for the active worksheet.
-
When a sheet view is applied, an eye symbol appears next to the worksheet tab name. Hovering over the eye will display the active sheet view’s name.
-
When you first create a new sheet view, Excel will preserve your initial view and display it in the sheet view switcher as Default. Selecting the default option will reset your view to the main view of the document.
Close or switch between sheet views
-
To close a sheet view and return to the default view, click View > Sheet View > Exit.
-
To switch between views, click View > Sheet View and then select your view from the sheet view menu.
Delete a sheet view
If you decide that you no longer want a particular sheet view, click View > Sheet Views > Options, select the view in question, and then press Delete.
Sheet View options
There is an Options dialog within the Sheet View group on the View tab. This dialog lists all sheet views that are associated with a given worksheet. You can also Rename, Duplicate, or Delete existing views. To activate a view from the Options dialog, you can double-click the in the sheet views list, or select it, then use the Switch to… button.
Frequently Asked Questions
Why do my Sheet View options appear grayed out? You can only use Sheet Views in a document that is stored in a SharePoint or OneDrive location.
Is a sheet view private, and only for me? No, other people who share the workbook can see views you create if they go to the View tab, and look at the sheet view menu in the Sheet Views group.
Need more help?
You can always ask an expert in the Excel Tech Community, get support in the Answers community, or suggest a new feature or improvement on Excel User Voice.
See Also
Learn more about Sheet Views

on
September 30, 2020, 1:53 PM PDT
How to use sheet view for more flexible collaboration in Excel
Whether you’re tired of losing your spot when collaborating or you want to customize the way you view your data, sheet views in Microsoft Excel are for you.

Collaboration is the latest Microsoft 365 push, and it’s easier now than ever before to share a document in real time. Now that users can easily collaborate on the same document, you might have run into a new problem.
Have you ever been working in a shared sheet when suddenly—without any input from you—the data you were viewing was gone, replaced by a different display of the same data? It’s a real-time problem, but there’s a quick and easy solution: Use sheet views. In this article, we’ll review the problem a bit and then learn how to use sheet views to solve it. Even if you don’t collaborate, you can use this feature to create custom views for yourself or your users.
SEE: 60 Excel tips every user should master (TechRepublic)
I’m using Microsoft 365 on a Windows 10 64-bit system, but you can work with older versions back to 2007. You can work with your own data or download the demonstration .xlsx file. This feature was available first in the browser, so it is totally appropriate for the browser version, and it should be available now to most users in the desktop version.
About sheet view in Excel
Sheet views allow you to customize the way you view data in a shared sheet, without being interrupted by others sharing the same sheet. For instance, if you’ve applied a filter, you won’t suddenly lose its results when another user sorts or filters the same data in a different way. If necessary, you can create multiple sheets based on the same data.
SEE: How to copy expressions without changing cell references in Excel (TechRepublic)
In a nutshell, sheet views are different views of the same data that allow you and other collaborators to view the same data in different ways at the same time. Now, let’s learn how to protect the way you work by applying a sheet view.
How to add a sheet view in Excel
Before you can apply a view, you need a shared workbook. Click the Share button in the top-right corner and follow the prompts. It couldn’t be easier. I’m not offering specific instructions because there’s more than one option, and Excel walks you through it. After you click Share, Excel will prompt you with possible server locations (I’m using OneDrive) and a file type. For our purposes, choose an Excel file, not a PDF file. If you have trouble, you might need to make a quick call to you Microsoft 365 administrator.
SEE: How to expose expressions that return a defined error value in Microsoft Excel (TechRepublic)
Next, we need a custom view of your data on which we’ll base the sheet view. To illustrate both, we’ll add a simple filter to the sheet in Figure A that displays only beverages:
- Click anywhere inside the data set and then click the Data tab. (This works with a Table object as well.)
- In the Sort & Filter group, click Filter. Doing so will add filtering drop-downs to all fields (Figure A).
- To set a filter, click the Category dropdown, deselect Select All, click Beverages, and then click OK.
Figure A

Now that we have a custom data set, let’s create a custom view for it.
Select the sheet in question and then do the following:
- Click the View tab.
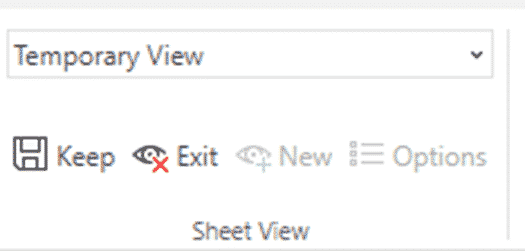
- In the Sheet View group, click New. Notice that the sheet view dropdown displays Temporary View (Figure B).
- Make the necessary changes—sorts, filters, and so on—to create the view of the data that you need to do your work. You’ll know you’re in sheet view by the eye icon in the sheet tab and the different colored headers.
Figure B
This view is temporary. To make it permanent, replace Temporary View in the sheet view dropdown with a name and press Enter or click Keep. For example, I named the filtered view Beverages (Figure C).
Figure C

The remaining mechanics are easy. To apply the Beverages sheet view or any other sheet view, simply choose it from the sheet view drop-down. To leave sheet view, click Exit in the Sheet View group. Using the Options drop-down, you can also rename, duplicate, or delete a sheet.
When you create a new sheet view, Excel remembers where you are and names the initial view Default, which you can choose from Options to return quickly to your earlier working data set before you created the sheet view. Managing sheet views couldn’t be easier.
Good things to know about sheet view in Excel
Creating and managing sheet views is easy, but there’s more to them than meets the eye. To get the most from there, there are a few things you’ll want to know:
- There’s no such thing as a private view. Everyone sharing the workbook can see all sheet views.
- Excel limits you to 256 sheet views; I hate to use the word limit though—that number hardly seems limiting!
- The sheet view drop-down displays only sheet views for the active sheet.
- While sheet views allow individuals to control what they see, changes made to cells are shared with everyone, almost immediately, which makes sense.
- You can use this feature to create custom views for yourself or users, even if no one is collaborating.
- If the New option is dimmed, share the sheet with another account of your own or a co-worker.
- Before setting up custom views, consider saving the data set as a custom view so you can easily move back and forth.
- Even if you’re not collaborating, consider setting views for quick print-outs and specialized reports.
Also See
-
How to become a software engineer: A cheat sheet
(TechRepublic) -
Zoom vs. Microsoft Teams, Google Meet, Cisco WebEx and Skype: Choosing the right video-conferencing apps for you (free PDF)
(TechRepublic) -
Hiring Kit: Application engineer
(TechRepublic Premium) -
Microsoft 365 (formerly Office 365) for business: Everything you need to know
(ZDNet) -
The 10 most important iPhone apps of all time
(Download.com) -
It takes work to keep your data private online. These apps can help
(CNET) -
Must-read coverage: Programming languages and developer career resources
(TechRepublic on Flipboard)
-
Microsoft
-
Software

Now in Microsoft Excel, we can create customized views without being disturbed by others. These views are named Sheet Views. For example, we can create a filter that will only display the data that is important for us, without being affected by other users on the same Worksheet. We can even set up multiple Sheet Views on the same Worksheet. These Views that we create are temporary, so if we need to save them, we just select the View Name from the Sheet View drop-down menu, type a name, and finished. To find out more about Sheet View just keep on reading the post below.

In the image below, I have opened a Microsoft Excel Workbook which contains only one Worksheet. So, how do we add a Sheet View?

In the image below, I have selected the View tab, and then I have located from the left area of the ribbon the area named Sheet View.

Then from the Sheet View area, I select the command New as shown below, where a New Sheet View will be created. Then we can apply the sort/filter that we want or need. Don’t worry about the rest, Excel will automatically name our new View.

When a Sheet View is applied, at the bottom next to the Worksheets Name, will be an eye symbol as shown below. If we hover over it, it will display the active Sheet Views name.

When we create a New Sheet View, Excel will keep our initial View and display it in the Sheet View switcher as Default as shown in the image below.

When we create a Sheet View, from the left corner of the Sheet View area on the ribbon, we can select the command Options as shown below. Once selected, the Sheet View Options dialog box will appear where we can either Rename the Sheet View, Duplicate the Sheet View or even Delete the Sheet View. At the bottom of the dialog box, we can also use the Switch To button to switch to a different Sheet View.

When we select Temporary View from the Sheet View Switcher drop-down menu, our View is temporary, so if we want to keep it, we must select that View Name, type in our New Name and then press the Enter button.
All the Sheet Views that we have created, will be available for us to use just by selecting the Sheet View Switcher and from the drop-down menu we select the Sheet View that we want.
If we want to keep the Sheet View that we created, we can select the Keep button which is in the left corner area of the Sheet View area as shown below. The same way we can Exit the current Sheet View by selecting the Exit button of the Sheet View area.

Just keep in mind the following information:
-
When we are ready to display a certain View, we just select it from the Sheet View switcher drop-down menu.
-
If other people are working the same time on the same file, and we either sort or filter, we will be asked if we want to apply the sort of filter for just us, or everyone.
-
The Sheet View switcher can only display Views for the Active Worksheet.
-
If we select the Default Option our View will be restored from where we started.
Below you can check out the video describing How To Use Sheet View in Microsoft Excel?
Don’t Forget To Subscribe To My YouTube Channel!!!

Excel Sheet View is Microsoft’s fix for a problem when sharing an Excel list or table among many people. We’ll explain how it works and what’s happening behind the scenes.
A shared Excel list can be sorted or filtered in many different ways. It’s quite possible that two people can look at the same worksheet and filter it in conflicting ways at the same time.
Sheet Views are different views of the same worksheet or tab. Collaborating users can select the a sheet view that suits them without affecting others.

Source: Microsoft
The concept is sold as a way for different users to view the same list but it’s also convenient for solo users to save and quickly switch between alternative views of the same list.
Sheet View is only available in Excel Online, the browser-based version of Excel and Excel 365 for Windows and Mac.
The worksheet has to be saved on Microsoft cloud storage – OneDrive, SharePoint or Teams.
Excel Sheet View is an excellent idea which appears to have been well thought out. Like many other collaboration features, Sheet View is also useful for individual, not shared workbooks.
Your free and standby Microsoft Office alternative: Office Online
Viewing only
Sheet Views only isolate the way a list or table appears.
Any changes to cell contents appear to everyone, probably within seconds.
Starting with Sheet View
Sheet View is on the View tab and starts with a Default view.
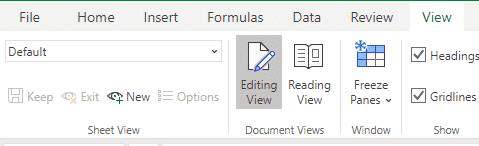
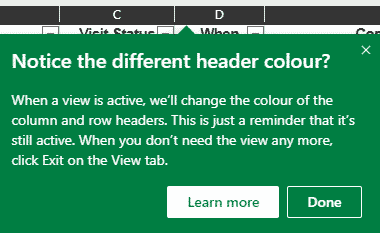
Click on New to make a new Sheet View. The worksheet borders change color to indicate you’re in a View.
Change the sorting and filtering of the worksheet list or table.
When a Sheet View is active, the worksheet tab gets a little ‘eye’ icon. Hover over that icon to see the Sheet View name.

Saving a Sheet View
All new Sheet Views are temporary but can be saved for future use.
Keep – saves the Sheet View but currently there’s no prompt for a name. All you get is ‘View1’ etc.

Name or Rename a Sheet View
To rename a Sheet View, click on Options then Rename,
Sheet View | Options is also where you can Duplicate a current Sheet View or Delete.
On the Filter pull-down
Sheet View options also appear on the Filter & Sort pull-down list for any Table heading.

Select a current Sheet View, a new View or the Options list.
Under the Hood
If you look inside the Excel .XLS file, there’s a new subfolder /xl/namedSheetViews with a namedSheetView1.xml file.
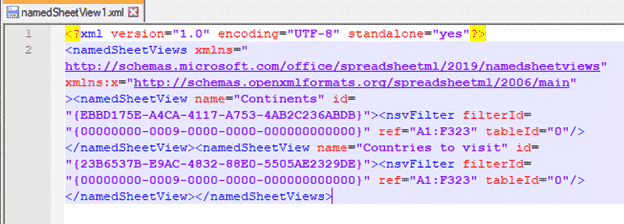
As you can see, there’s a new XML Schema for namedsheetviews . The details of each SheetView are saved in the XML file.
How to share a single Excel worksheet
Link an Excel worksheet into a shared workbook
Now in Microsoft Excel, we can create customized views without being interrupted by others. Here’s how to use Sheet Views.

Do you sometimes share spreadsheets with colleagues and work on them simultaneously? During collaborations, the temporary view feature in Microsoft Excel can help prevent confusion.
Collaborating in Microsoft Office is the easiest and most convenient way to share documents, but it can also be distracting. The constant changes can be misleading when trying to concentrate.
You can solve this problem by creating a temporary view using the Sheet Views feature in Excel. In this way, you can concentrate on the data you wish to examine while collaborating.
The Basics of the Temporary View Feature and Its Availability
The feature is accessible and is hosted by Microsoft Excel 365. You can access it from Windows 10 and even older versions such as the 2007 model; Excel web access also offers access. Here’s an overview of how Sheet Views work in Excel:
- To access Sheet Views from the desktop application for Excel, you must first save the log to OneDrive, Sharepoint, or OneDrive for Business. Otherwise, it will not be accessible.
- You can make changes to any cell regardless of which view you are using.
- The feature is available only for an active spreadsheet.
- Even when not collaborating, the same feature can still be used to create custom views for you and other users.
How Can You Make Temporary Views?
Once you’ve understood the basics and accessibility of the feature, it’s time to learn how to create a temporary sheet view. To use this feature, you require a shared worksheet.
- First, open your shared workbook on Excel and select the sheet in which you want to create a temporary view.
- Look for the tab View on the top bar, and on the left side of this row, you’ll spot a section labeled Sheet View. Click on New.
- Once you’ve clicked, you will instantly notice a difference in your sheet’s formation as the dropdown menu on the Sheet View section will indicate Temporary View.


How to Use Temporary Views During Collaborations
Once you have created a temporary view sheet, the functions and changes involved in the feature will include the following:
- The background of the headers on the rows and columns of your sheet will turn black.
- The drop-down ribbon on the sheet view bar will display Temporary View.
- When you place the cursor over the eye icon next to your sheets, the name of the current sheet will be displayed.

When in temporary view mode, you can work on the sheet with no disruptions from the rest of the users and can make edits and evaluations as you would if you were the only one working on the sheet
What Can You Do with Sheet View?
Here are a number of actions featured in the Sheet View that are convenient for users:
Saving Your Temporary View
Sheet View allows you to save your temporary sheet; not only one sheet but multiple sheets. To save your temporary sheet, you need to:
- Move your cursor to the ribbon and on the Sheet view section, click Keep.
- The view will be saved as View1 for the first sheet, then click Exit to save the initial sheet view.
- You can click New on the eye icon to create another temporary view, which you can again save by clicking Exit. This sheet will be saved as View2, and you can go on for as many as you want to save.
- If you prefer to name your Sheet Views, you can click Options in the sheet view ribbon > Rename > View1 and replace its name.

Leave or Switch a Sheet View
You can use the Sheet View section to change the view format to a different view. You can also use the drop-down menu to change back to default by just clicking the Exit icon.
Other Users Viewing the Sheet View
You can save and use any view you want on the sheet, which anyone can view. They can also create their own views, which you can also access and use. On the Sheet View section of the ribbon, you can select the views you created.
The use of this feature can be both positive and negative depending on the users accessing the views. You are able to utilize the views saved by others, but it’s still risky as other users may alter a view willingly or by accident.
Management of Sheet Views
You can manage your views to your liking. You can delete, duplicate or rename a sheet view by simply moving to the Sheet View section and clicking Options. You can as well organize other users’ sheet views using the same window.
Using a temporary sheet view allows you to save your changes while others use the worksheet at the same time.
What Are the Benefits Presented by the Sheet View Feature in Excel
By using a temporary sheet view, you can create and manage your sheets faster and easier. There are also additional advantages to using it:
- You can make as many as 256 temporary sheets.
- Changes made to a single cell in the sheet view can be viewed by everyone the moment they are made.
- The dropdown menu for the sheet view only displays the sheet views opened on the active sheet.
- This feature also allows you to make custom views for yourself and others when not collaborating.
- You can move back and forth easily through the sheets once you save the custom view data.
This Is the Most Convenient Feature for Collaborations
With Sheet Views, you can customize your views during collaborations on a worksheet without interruptions from other users.
Further, the Sheet View feature allows you to filter out all the data you do not need and display only the important information. Others can do the same without affecting each other’s actions on the sheet.
When you are done with a view, you can choose to delete it under the Options tab. Alternatively, you can click Shift/Ctrl + left click in that order if you want to remove multiple views at once.
Bottom Line: Learn how to view and compare two worksheets in the same workbook with the New Window feature, split screen view, and synchronous scrolling.
Skill Level: Beginner
Video Tutorial
![]()
Make Comparisons Between Sheets Easier
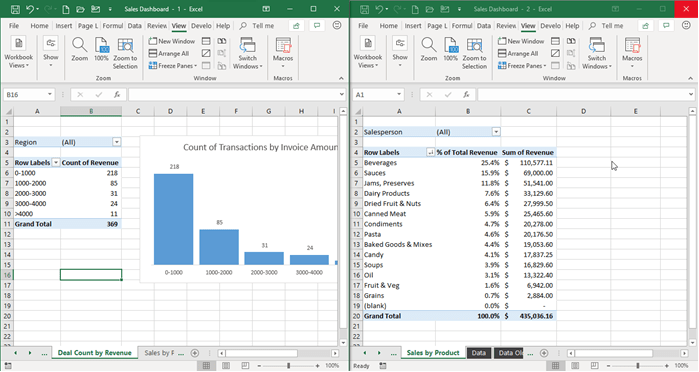
Sometimes we need to flip back and forth between two worksheets in order to compare numbers, copy and paste entries, or create formulas. In these instances, it can be much easier to look at the two (or more) sheets side by side.
To accomplish this, we can use the New Window feature in Excel, as well as some desktop shortcuts to create a split screen view of the the sheets we want to look at simultaneously. It’s a fairly easy habit to pick up and will save you lots of time and frustration in the long run.
Creating a New Window
We can view two or more sheets from the same workbook by using the New Window feature.
To make a new window, go to the View tab on the Ribbon and press the New Window button. This will create a new window of the active workbook (the workbook you were viewing when you pressed New Window).
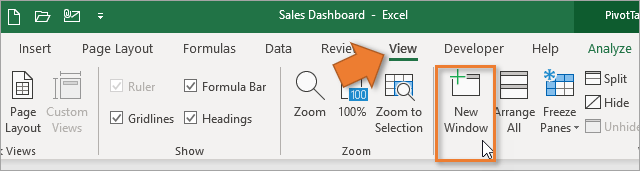
The keyboard shortcut to open a new window is Alt + W + N.
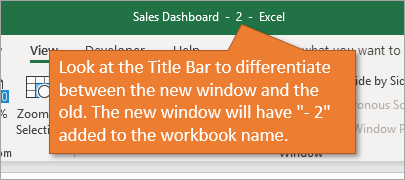
Once you’ve created a new window, you can differentiate between the new and the old by looking at the title bar at the top. The new window will have a dash and the number 2 (then 3, 4, 5 and so on as you continue to open new windows).
Changes are Synced Between Windows
Keep in mind that you are NOT creating a duplicate file, just a new window to look at the same file. Any change you make to the workbook in one window will be reflected in the other. It does NOT matter which window you make changes in. All windows will be updated immediately.
Toggling Between Windows
You can now select a different sheet in the new window to view and edit it. You can then quickly flip between windows by using the Alt + Tab
keyboard shortcut. Hold Alt, then press and release Tab.
This is a very handy shortcut that makes it easy to flip between windows (sheets) when doing common actions like copy & paste.
Create a Split Screen View
To tile the windows side by side, you can simply click on the title bar and then drag the window to the right of the screen. If you have multiple windows open on your computer, you may have to select which window you want to view on the left.
I’ve written a whole post about tips for split screen usage for both Windows and Mac users. I encourage you to check it out and see how you can improve your productivity game with split screens.
Note: This behavior is slightly different in Excel 2010 and earlier. See the section below for details.
Synchronous Scrolling
One cool feature to employ while using a split screen is that you can scroll both sheets at the same time. This is especially helpful if you need to compare line by line, looking for differences in similar sets of data.
To turn on synchronous scrolling, just go to the View tab on the Ribbon and choose the Synchronous Scrolling button.
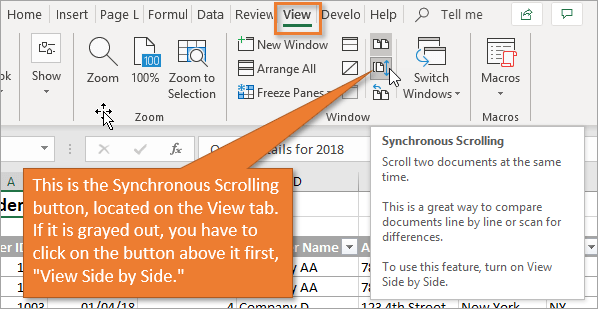
The Synchronous Scrolling Button may be grayed out. If so, you need to turn on View Side by Side. You can do this by clicking the button directly above Synchronous Scrolling. Keyboard shortcut: Alt+W+B
When you click on View Side by Side, it tends to reset any split screen setup you already had, so you may need to drag your window to the right again to see them side by side.
Once your windows are side by side and you’ve clicked the Synchronous Scrolling button, you will see how both sheets scroll simultaneously. This is the case whether you are using the up and down arrows on your keyboard, the scroll bar in either of the windows, or the roller wheel on your mouse.
See the video above for more details on this issue.
And just so you know, you can also use Synchronous Scrolling with two different workbooks as well.
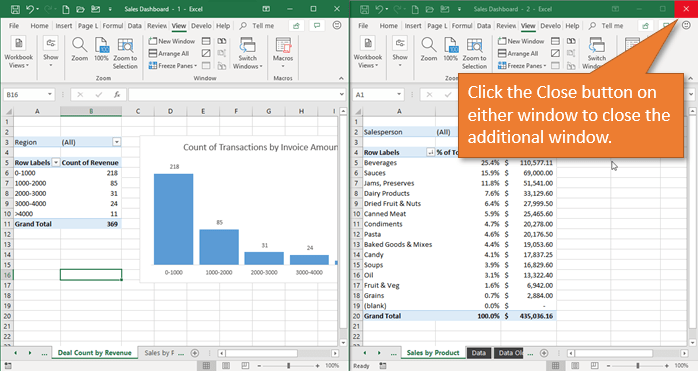
Closing the New Window
Once you are finished, you can simply close either of the windows by pressing the red X in the top right of the application window. This will just close the additional window, and NOT close the file. The “-2” will disappear after the file name and you will be left with only one window open for the file.
You will NOT be prompted to save the file when you close the additional window. You will only be prompted to save when you close the last remaining window for the file.
Close the “-2” Window First!
Even though you can close either window, it’s best to close the “-2” window first. The new window does not retain the settings for gridlines or freeze panes. This is an unfortunate limitation of Excel.
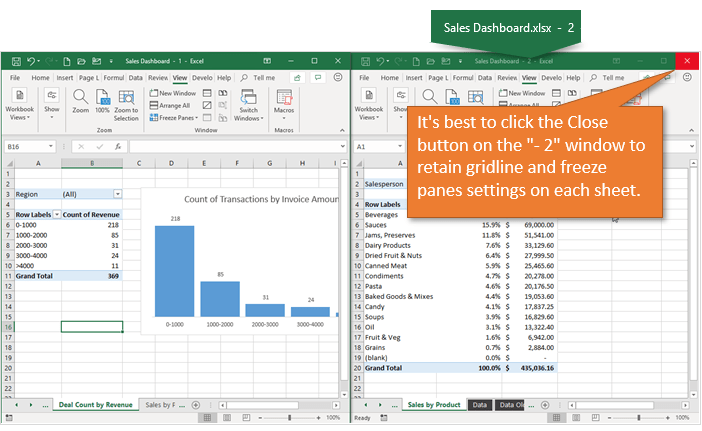
If you close the “-1” window and then make changes to the workbook, you will lose the gridline and freeze pane settings that are applied to each sheet.
I posted a macro in the comment below that apples the gridline settings for each sheet to the new window. I’ll do a dedicated post on this in the future.
And a big thanks to Andre for pointing out the issue with closing window “-2” first.
Excel 2010 and Earlier
If you’re using Excel 2010 or earlier for Windows then the process for viewing multiple windows is slightly different.
These versions of Excel used the Multiple Document Interface (MDI). This means all Excel files/windows are opened in the same application window. Excel is able to display multiple documents.
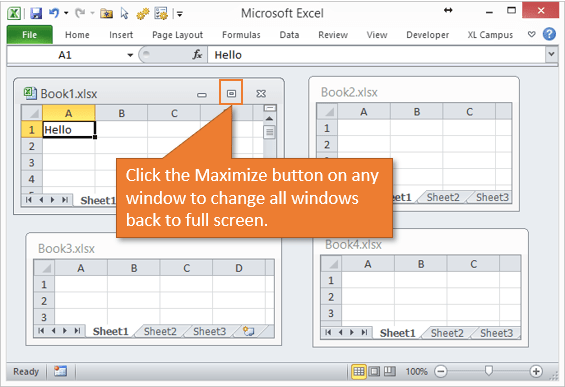
You can view multiple windows within Excel by clicking the Restore button for the current window.

The Arrange All and View Side by Side buttons can still be used as well. That will be the same as the instructions above.
When you want to view a single window again you can click the Maximize button in any window.
Excel 2013 and beyond moved to a Single Document Interface (SDI), which is what I explained in the article above.
Conclusion
I hope this post has been helpful to you for learning how to create a new window and view two (or more) worksheets from the same workbook.
The full keyboard shortcut to setup the new window in split screen is:
Alt+W+N ,Alt+W+B
This view can save us a lot of time when comparing data and tying out numbers between sheets.
Please leave a comment below with any questions or suggestions. Thank you! 🙂