Excel for Microsoft 365 Excel for Microsoft 365 for Mac Excel for the web Excel 2021 Excel 2021 for Mac Excel 2019 Excel 2019 for Mac Excel 2016 Excel 2016 for Mac Excel 2013 Excel 2010 Excel 2007 More…Less
Important: «Shared Workbooks» is an older feature that allows you to collaborate on a workbook with multiple people. This feature has many limitations, and has been replaced by co-authoring. Excel co-authoring is available in Microsoft 365 Apps Excel desktop client and Excel for the Web for Microsoft 365 subscribers.
Buy or try Microsoft 365
Enabling the Shared Workbook feature
-
Be certain that you want to use this method before continuing. Shared Workbooks have limitations, and one in particular is the inability to edit using Excel for the web. Therefore we highly recommend co-authoring, which is the replacement for Shared Workbooks.
-
Create a new workbook or open an existing workbook. Then place it on a network location. For example, put it on a location like \server_namefolder_name. Don’t put the file on OneDrive or SharePoint. If you prefer those locations for the file, co-author the workbook instead.
-
Click Review > Share Workbook.
Note that in newer versions of Excel, the Share Workbook button has been hidden. Here’s how to unhide it.
-
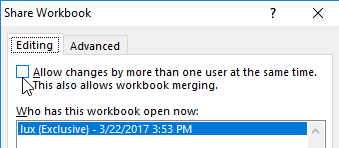
On the Editing tab, select the Allow changes by more than one user … check box.
-
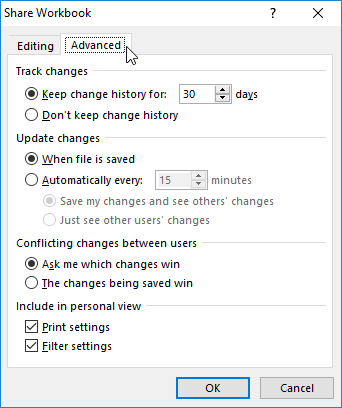
On the Advanced tab, select the options that you want to use for tracking and updating changes, and then click OK.
-
If this is a new workbook, type a name in the File name box. Or, if this is an existing workbook, click OK to save the workbook.
-
If the workbook contains links to other workbooks or documents, verify the links and update any links that are broken.
-
Click File > Save.
-
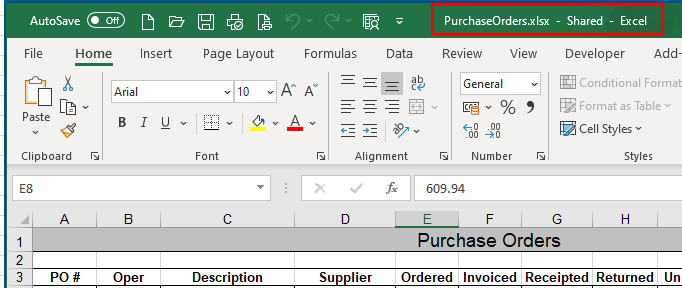
When you’re done, — Shared will appear at the top of the Excel window, next to the filename.
Additional information
Please be aware that Shared Workbooks is an older method of sharing. Therefore, many items and actions are not supported when this method is used. The table below is only a partial list of features not supported.
|
Unsupported items: |
Unsupported actions: |
|---|---|
|
Creating or inserting tables |
Inserting or deleting blocks of cells |
|
Adding or changing conditional formats |
Deleting worksheets |
|
Adding or changing data validation |
Merging cells or splitting merged cells |
|
Creating or changing charts or PivotChart reports |
Sorting or filtering by format |
|
Inserting or changing pictures or other objects |
Using drawing tools |
|
Inserting or changing hyperlinks |
Assigning, changing, or removing passwords |
|
Creating, changing, or viewing scenarios |
Protecting or unprotecting worksheets or the workbook |
|
Inserting automatic subtotals |
Grouping or outlining data |
|
Creating data tables |
Writing, recording, changing, viewing, or assigning macros |
|
Creating or changing PivotTable reports |
Changing or deleting array formulas |
|
Creating or applying slicers |
Adding, renaming, or deleting XML maps |
|
Creating or modifying sparklines |
Mapping cells to XML elements |
|
Adding or changing Microsoft Excel 4 dialog sheets |
Using the XML Source task pane, XML toolbar, or XML commands on the Data menu |
|
Using a data form to add new data |
|
|
Adding threaded comments |
Editing, or deleting threaded comments |
Before you disconnect users, make sure that they have completed their work on the workbook. If you remove active users, any unsaved work of theirs will be lost.
-
Click Review > Share Workbook.
Note that in newer versions of Excel, the Share Workbook button has been hidden. Here’s how to unhide it.
-
On the Editing tab, in the Who has this workbook open now list, review the names of users.
-
Select the name of the user who you want to disconnect, and then click Remove User. Please note that although this action disconnects the user from the workbook, it does not prevent that user from editing the workbook again.
-
To delete any personal view settings of the removed user, click View > Custom Views and delete any other user views.
Before you turn off this feature, you might want to make a copy of the change history. First make sure that all other users have completed their work.
-
Click Review > Track Changes > Highlight Changes.
Note that in newer versions of Excel, the Track Changes button has been hidden. Here’s how to unhide it.
-
In the When list, select All.
-
Clear the Who and Where check boxes.
-
Select the List changes on a new sheet check box, and then click OK.
-
Now you can either print the History worksheet, or you can copy the history and paste it into another workbook.
-
Click Review > Share Workbook.
Note that in newer versions of Excel, the Share Workbook button has been hidden. Here’s how to unhide it.
-
On the Editing tab, make sure that you are the only person listed in the Who has this workbook open now list.
-
Clear the Allow changes by more than one user … check box. If this check box is not available, you must first unprotect the workbook. Do the following:
-
Click OK to close the Share Workbook dialog box.
-
On the Review tab, in the Changes group, click Unprotect Shared Workbook.
-
If you are prompted, enter the password, and then click OK.
-
On the Review tab, in the Changes group, click Share Workbook.
-
On the Editing tab, clear the Allow changes by more than one user … check box.
-
When you are prompted about the effects on other users, click Yes.
-
Enabling the Shared Workbook feature
-
Be certain that you want to use this method before continuing. Shared Workbooks have limitations, and therefore we highly recommend co-authoring, which is the replacement for Shared Workbooks.
-
Create a new workbook or open an existing workbook. Then place it on a network location. Don’t put the file on OneDrive or SharePoint. If you prefer those locations for the file, co-author the workbook instead.
-
Click Review > Share Workbook.
-
On the Editing tab, select the Allow changes by more than one user … check box.
-
On the Advanced tab, select the options that you want to use for tracking and updating changes, and then click OK.
-
If this is a new workbook, type a name in the Save As box. Or, if this is an existing workbook, click OK to save the workbook.
-
If the workbook contains links to other workbooks or documents, verify the links and update any links that are broken.
-
Click File > Save.
-
When you’re done, — Shared will appear at the top of the Excel window, next to the filename.
Additional information
Please be aware that Shared Workbooks is an older method of sharing. Therefore, many items and actions are not supported when this method is used. The table below is only a partial list of features not supported.
|
Unsupported items: |
Unsupported actions: |
|---|---|
|
Creating or inserting tables |
Inserting or deleting blocks of cells |
|
Adding or changing conditional formats |
Deleting worksheets |
|
Adding or changing data validation |
Merging cells or splitting merged cells |
|
Creating or changing charts or PivotChart reports |
Sorting or filtering by format |
|
Inserting or changing pictures or other objects |
Using drawing tools |
|
Inserting or changing hyperlinks |
Assigning, changing, or removing passwords |
|
Creating, changing, or viewing scenarios |
Protecting or unprotecting worksheets or the workbook |
|
Inserting automatic subtotals |
Grouping or outlining data |
|
Creating data tables |
Writing, recording, changing, viewing, or assigning macros |
|
Creating or changing PivotTable reports |
Changing or deleting array formulas |
|
Creating or applying slicers |
Adding, renaming, or deleting XML maps |
|
Creating or modifying sparklines |
Mapping cells to XML elements |
|
Adding or changing Microsoft Excel 4 dialog sheets |
Using the XML Source task pane, XML toolbar, or XML commands on the Data menu |
|
Importing, refreshing, and exporting XML data |
Using a data form to add new data |
Before you disconnect users, make sure that they have completed their work on the workbook. If you remove active users, any unsaved work of theirs will be lost.
-
Click Review > Share Workbook.
-
On the Editing tab, in the Who has this workbook open now list, review the names of users.
-
Select the name of the user who you want to disconnect, and then click Remove User. Please note that although this action disconnects the user from the workbook, it does not prevent that user from editing the workbook again.
-
To delete any personal view settings of the removed user, click View > Custom Views and delete any other user views.
Before you turn off this feature, you might want to make a copy of the change history. First make sure that all other users have completed their work.
-
Click Review > Track Changes > Highlight Changes.
-
In the When list, select All.
-
Clear the Who and Where check boxes.
-
Select the List changes on a new sheet check box, and then click OK.
-
Now you can either print the History worksheet, or you can copy the history and paste it into another workbook.
-
Click Review > Share Workbook.
-
On the Editing tab, make sure that you are the only person listed in the Who has this workbook open now list.
-
Clear the Allow changes by more than one user … check box. If this check box is not available, you must first unprotect the workbook. Do the following:
-
Click OK to close the Share Workbook dialog box.
-
On the Review tab, click Protect Workbook.
-
If you are prompted, enter the password, and then click OK.
-
On the Review tab, Share Workbook.
-
On the Editing tab, clear the Allow changes by more than one user … check box.
-
Need more help?
Sharing in Microsoft Excel enables several users to work with one file. Ten to twenty people on different computers simultaneously enter some kind of data in one document.
Particular formulas work in those places where certain information is located.
The “main user” can track workgroup activities, add / remove members, and edit contradictory changes. How to set up collaboration in Excel?
Features of working with shared file
Not all tasks can be performed in an Excel workbook with shared access.
The following actions are prohibited:
- Creating Excel spreadsheets.
- Creating, changing, and viewing scenarios.
- Deleting worksheets.
- Combining or splitting cells.
- Working with XML data (importing, adding, updating, deleting, etc.)
The way out is to: disable shared access – to perform the prohibited function – to enable shared access again.
Sharing data restricts a number of tasks for users:
| It’s impossible to: | It’s possible to: |
| Insert or delete a group of cells | Add a row or a column |
| Add or change conditional formats | Work with existing formats |
| Enable or modify the «Data Validation» tool | Work with existing verification settings |
| Create or edit charts, summary reports | Work with existing charts and pivot tables |
| Insert or edit drawings and graphics | View existing drawings and graphics |
| Insert or change hyperlinks | Click through existing hyperlinks |
| Assign, edit or delete passwords | Use existing passwords |
| Put or remove the protection of worksheets and workbooks | Use existing protection |
| Group, structure data; insert sublevels | Work with existing groups, structures and sublevels |
| Record, modify, or view macros | Run existing macros that are not associated with unavailable tasks |
| Change or delete array formulas | Use existing formulas |
| Add new information to the form | Search for information in the data form |
How to share an Excel file?
First, determine which workbook you will “open” for editing by several members at the same time. Create a new file and fill it with information. Alternatively, open the existing one.
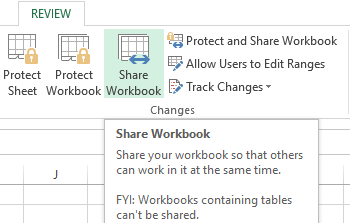
- Go to «REVIEW» tab, then to «Share Workbook» dialog box.
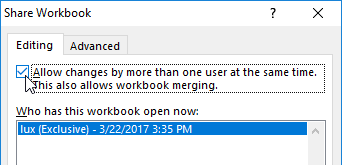
- In window «Share Workbook». Select check box «Allow changes by more than one user at the same time».
- Go to «Advanced» tool to configure the settings for multi-user editing.
- Click OK. If you share a new workbook, you should choose the title for it. If sharing is implies using an existing file — click OK.
- Open the Microsoft Office menu. Choose «Save as» command. Choose the save file format that will be suitable for all users ‘computers.
- Choose a network resource / network folder as a storage location that will be opened by the prospective participants. Click «Save».
It’s important! You cannot use a web server to save a file.
Now check and update the links:
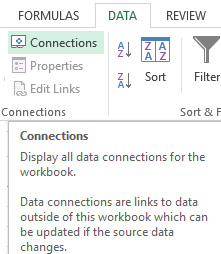
- «DATA» tab, «Connections».
- «Manage Sets». If there is no such button, there are no linked files in the worksheet.
- The OK button indicates the operability of the links.
Opening a shared book
- «FILE» Click on «Open» (CTRL+O).
- Choose a shared workbook.
- When the book is open, click on the Microsoft Office button. Go to «Options» tab (at the bottom of the menu).
- «General» — «Personalize your copy of Microsoft Office» — «User name:». Enter the identification information (name, nickname).
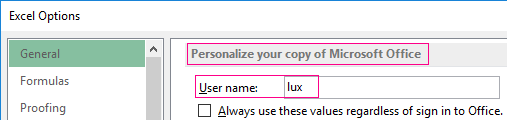
That’s all. You can edit this information, enter new one, as well as save it afterwards.
Occasionally, when you open a shared Excel workbook, «File is locked» notification appears, making saving impossible. When you later open it, it turns out that sharing is disabled. Possible causes of the problem:
- Several users edit the same part of the document. For example, they enter different data in one cell. As a result, blocking occurs.
- When a shared file is used, a change log is kept (who entered, when, what he did). As the book size increases, bugs appear.
- A user has been removed from shared access, but he/she don’t know about this. Then the blocking will be observed only on his/her computer.
- Overloading of the network resource.
If sharing is blocked, you can do the following:
- Clean or delete the change log.
- Clean the file content.
- Disable, and then re-enable shared access.
- Open the xls book in OpenOffice and save it in xls again.
It has been noticed that the notification «File is locked» appears less frequently in the latest versions of Excel.
How to delete a user
- Open «Share Workbook» menu in «REVIEW» tab.
- You can see a list of users in «Edit» section.
- Select the name — click «Remove User».
Before deleting, check whether users have finished working with the file.
How to disable shared access in Excel
All users need to save the information and close the shared file. If you need to save the log, follow the instructions:
- «REVIEW» tab — «Track Changes» — «Highlight Changes».
- Set the parameters of «Changes». When – «All». Clear checkboxes opposite «Who» and «Where». «List changes on a new sheet» check box should be selected. Click OK.
- The change log will open. It can be saved or printed.
To disable Excel file sharing, click «Share Workbook» and uncheck «Allow changes by more than one user at the same time» in «REVIEW» tab.
The single user should remain in the list. It is you.
For sharing an Excel workbook with other users, we need to save it to a local network location where others can access it and make changes. We also can keep track of those changes and can accept or reject those changes as per the requirement.
Let’s take the below example to understand how to share an excel sheet.
You can download this Share Excel Workbook Template here – Share Excel Workbook Template
We have given the below customer details in a workbook saved with “Customer Data.”

Below are the steps of sharing an excel workbook in excel –
- First, go to the REVIEW tab.
- Click on the “Share Workbook” option under “Changes.” You may refer to the below screenshot.

- Then, an Excel “Share Workbook” File dialog box will appear. See the below screenshot.

- Under the Editing tab, tick the checkbox and click on, OK.

- By clicking on this checkbox, we are giving access to other users for editing.
- The screen above shows you who has the workbook open.
- After clicking on “OK,” one dialog box will appear with a message. For example, refer to the below screenshot

- Click on, OK.
- Save this workbook.


Table of contents
- How to Share an Excel Workbook? (Step by Step)
- Highlight the Changes Done on Excel By Other Users
- How to Accept/Reject the Changes Done by Other Users
- Important Points to Remember
- Recommended Articles
Highlight the Changes Done on Excel By Other Users
We can also highlight the changes which other users have made.
Follow the below steps:
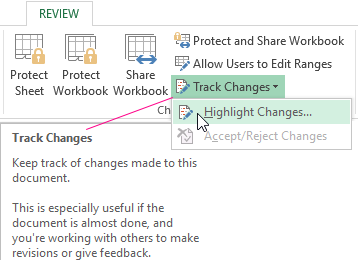
- Step 1: Go to the REVIEW tab.
- Step 2: Click on the Track Changes option in ExcelTracking changes in Excel is a technique of highlighting changes made in a shared worksheet by any user. It highlights the cell that has been modified. This option is present in the «changes» section of the review tab and can be enabled when we share a workbook.read more under the Changes section. You may refer to the below screenshot.

- Step 3: This will show you two options, per the screenshot below.

- Step 4: Click on Highlight changes.
- Step 5: This will open a dialog box here. See the below screenshot.

- Step 6: Click on, OK.
- Step 7: Now, click on the “Protect Shared Workbook” option under the “Changes” section, as shown in the below screenshot.

- Step 8: It will open a dialog box. Tick on the checkbox, as shown in the below screenshot.

- Step 9: Click on, OK.
- Step 10: Now, Excel will show the changes done by the users.
- Step 11: How does it look after changes? For your reference, we will make changes to the file and save those changes.
- Step 12: The sheet automatically highlights the changes wherever we do, as shown in the screenshot below.

How to Accept/Reject the Changes Done by Other Users
We can accept or reject the changes done by other users if those changes are not according to us. For this, follow the below steps:
- Step 1: Go to the REVIEW tab.
- Step 2: Click on the Track Changes in excel”Toread more under the Changes section.
- Step 3: Choose the Accept/Reject Changes option from the list, as shown in the below screenshot.

- Step 4: A dialog box will appear, as shown in the below screenshot.

- Step 5: Click on, OK.
- Step 6: Then, a dialog box will appear. It will show you all the changes one by one, as shown in the below screenshot. It will also highlight the cell in the spreadsheet where the changes are made.

- Step 7: Click on the Accept button to accept the changes or the Reject button to reject the changes.
Important Points to Remember
Excel shared workbook file feature has some limitations. The reason is that not all features are fully supported in excel shared workbooksTo share the workbook, open the desired workbook>click on review tab>choose share workbook option>a dialogue box with «editing» and «advanced» tab will open>mark the required checkbox, save changes> upload the file to network location>send the link to the concerned person.read more. Some of the limitations are:
- Sorting and filtering the data in excel
- Conditional formattingConditional formatting is a technique in Excel that allows us to format cells in a worksheet based on certain conditions. It can be found in the styles section of the Home tab.read more
- Merging Excel cellsMerging a cell in excel refers to combining two or more adjacent cells either vertically, horizontally or both ways. Merging excel cells is specifically required when a heading or title has to be centered over an area of a worksheet.read more
- Hyperlinks in ExcelA hyperlink is an inbuilt function in excel used to create hyperlinks for a particular cell. When the hyperlink is created, it redirects to a specific webpage. The hyperlink formula has two arguments, one is the URL while the other is the name we provide to the URL.read more.
You can use those features but would not be able to add or change them.
- After sharing the workbook, when one or more users are editing on the same workbook simultaneously, some edits can affect the same cells too.
- In these situations, the Excel sheet keeps the changes of the user who saved the workbook first.
- When another user saves the workbook, it will display the Resolve Conflicts dialog box.
- It will display all the information about the conflict changes.
- To resolve conflicts, we can act accordingly by clicking on “Accept Mine,” “Accept Other,” etc.
Recommended Articles
This has been a step by step guide to Share Excel Workbook File. Here we discuss how to Share an Excel Sheet, highlight the changes done in excel, and how to accept/reject the changes done by other users along with practical examples and downloadable templates. You may learn more about excel from the following articles –
- Subscript in Excel
- Using Excel Extensions
- Conditional Formatting in Pivot Table
- How to Share Excel Workbook?To share an Excel workbook, first open it in Excel>go to the Review tab and click on Share Workbook>go to the editing tab and check the box. You can see who has opened it in the same tab.read more
Reader Interactions
How to Share an Excel File Step-by-Step (2023)
Gone are the days when you’d email an Excel file to your team members, and wait for it to be edited by them. And when received back, merge the changes to the original file manually 😫
Even sounds so tiring. With newer versions of Microsoft Excel (starting from Excel 2010 and onwards), you can share an Excel file with your team members and work on it simultaneously.
No, not kidding – you can do that. How? The guide below will teach you to do that 👇
So let’s jump right in.
To share an Excel workbook via OneDrive, you only need to save it to your OneDrive. And then allow access to the same to your colleagues.
Once this is done, you and your team members (with whom the file has been shared) can simultaneously edit it, and you can track the changes in real time 💪
There are two ways how you can share files via OneDrive:
- By logging on to OneDrive, signing in to your account, and uploading the files there.

- By downloading the OneDrive app from here.

After you have downloaded it, sign in with your Microsoft Account details. If you don’t have one already, take out 5 minutes to create one 💭
Once you’ve set up everything, you’re OneDrive Folder will appear under your Files and Folders like this.

Now let’s see how you can save a file to OneDrive to share it.
- Look out for the Share button on the top right corner of your Excel workbook (that is to be shared).

- Click on it.
You’d see the Share dialog box as follows. If you’ve already set up your account, it’d appear here.

- Select the account where you want the workbook uploaded.
You’d then see the dialog box to Send the link as follows:

- Type in the email addresses of the recipients with whom you want to share the file.
To share the file with multiple people at the same time, add the name of one recipient, then add a semicolon before you write in the name of the second recipient ✍
- Click on the Send button.
With this, the file will be shared. And the recipients will now be able to access the shared workbooks from the link sent to them (via email)📨
Here’s another easy way to share an Excel file via OneDrive:
- Launch the OneDrive Folder on your Desktop.
- Drag and drop your Excel file into this folder.

Once you have dropped the file in the OneDrive folder, you’d see this blue icon status at first 🔁
This tells us that the file is still in the process of being uploaded. Once it turns green (like the image below), the file is now uploaded to your OneDrive account ✅

Files uploaded to OneDrive are saved on the cloud. You can access them from any Excel app on another device (like Excel mobile, or another Excel desktop app). OneDrive offers each user a storage space of up to 5 GB.
With this, you are ready to share the file with anyone you like.
- Right-click on the file from your OneDrive folder to launch the context menu.
- Click on Share.

You’ll be navigated to the following window where you can type the addresses of the recipients. And the subject Excel workbook will be shared with them 👀

Excel co-authoring
Excel co-authoring is just like sharing a file via OneDrive. However, this feature of Excel and OneDrive takes sharing a level ahead.
Pro Tip!
Co-authoring is where multiple users can co-author (edit) the shared Excel file simultaneously.
No more mess of creating and saving multiple versions for the same file 😍
To co-author an Excel workbook:
- Look out for the Share button on the top right corner of your Excel workbook.

- Click on it.
- From the Share dialog box, click on the pencil icon on the right ✏
- Set the Access options to ‘Can Edit’.

- Type in the email addresses of the recipients with whom you want to share the file.
Like we have added a recipient here.

- Click on share.
The recipient will receive an email with the link to access the file.
- Again navigate to the top right of your workbook to see more profiles there. This shows who is currently co-authoring your Excel workbook 🚀

Not just that – you can also track changes being made by them to the same spreadsheet in real-time. In short, it works just like Google Sheets does.

Isn’t this just so cool 😎
Unshare an Excel file
After you’ve granted access to your team members to an Excel file, you can always withdraw the access.
To unshare Excel files, follow the steps below:
- Go to the OneDrive folder on your PC. Or log on to OneDrive from your browser.
- Right-click on the Excel shared workbook that is to be unshared.
- From the context menu that launches, select “Manage Access”.

- From the Manage Access dialog box, click on Stop Sharing ❌

Doing so, the file will be unshared. This means no other users (with whom the files were shared) will be able to access the file.
If you want to remove the sharing link only:
- From the Manager Access dialog box, click on the cross button next to the sharing link.

Anyone who has this link can access and edit the subject workbook. However, once you remove this link, other members cannot access the subject Excel file through this link 🎯
- Alternatively, if you only want to remove the file access from certain members, scroll down to see the list of people who have access to the subject file.

- Click on the cross sign to the right of the member’s name to remove his access.
If you don’t want to take away the access but only change the access settings:
- Under the Link Settings, click on the drop-down menu icon next to the access type.
- Change the access type by clicking on it.

If you don’t want to unshare it altogether, just change the access type from ‘Can Edit’ to ‘Can view’ 🙈
The members with whom the file was shared will now only be able to view the file. But won’t be able to make any changes to it. That’s how you can take away the co-authoring rights from any member.
Pro Tip!
If you want to change the access type for any specific member only (and not all members):
- Launch the Manage Access dialog box.
- Go to the list of persons who have access to the file.
- Click on the ellipsis button next to each person’s name.
- Change the access permission for that person.
Kasper Langmann2023-02-24T10:16:22+00:00
Page load link
See all How-To Articles
This tutorial demonstrates how to make a shared spreadsheet for multiple users in Excel and Google Sheets.
Depending on the version of Excel, users can either share a workbook, or allow co-authoring. In Office 365, Microsoft encourages users to use OneDrive and allow co-authoring of workbooks on the web. For this reason in Office 365, the traditional share feature has been hidden by default. Instead there is a share option in the top right-hand corner of the screen which allows the user to save the workbook to OneDrive and send a co-authoring link to another user.
Share Workbooks
In Office 365, you must enable the sharing of workbooks before you can share the workbook.
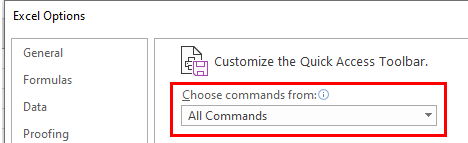
- In the Ribbon, select File > Options > Quick Access Toolbar.
- In the Choose commands from drop-down list select All Commands.
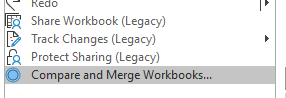
- Scroll down and select Share Workbook (Legacy). Then click Add >> to add it to the Quick Access Toolbar.
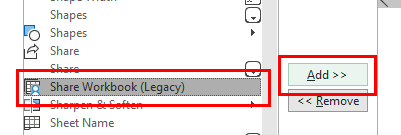
- Scroll through the list and add Track Changes (Legacy), Protect Sharing (Legacy), and Compare and Merge Workbooks.
The icons are added to the Quick Access Toolbar in the title bar.
- To share the current workbook, click on the Share Workbook icon.

- Check Use the old shared workbooks feature instead of the new co-authoring experience.
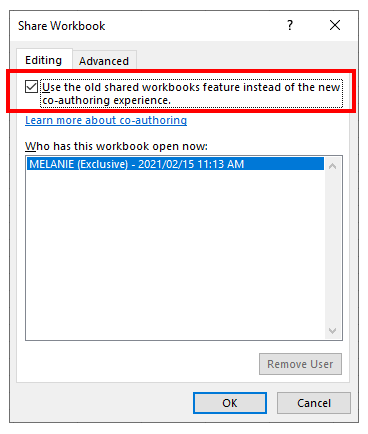
- Click OK to save the workbook.
Track Changes in Excel
Tracking changes in Excel also shares the workbook, if it is not already shared.
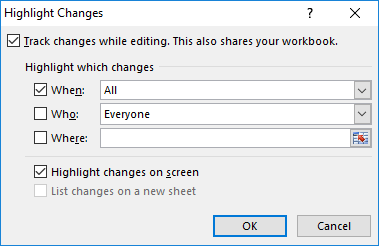
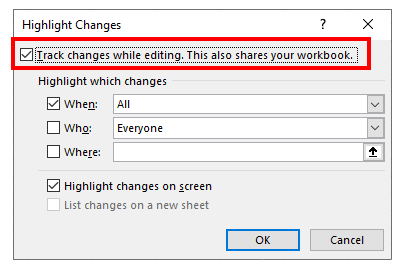
- In the Quick Access Toolbar, select Track Changes > Highlight Changes.

- Check Track changes which editing. This also shares you workbook. and click OK.
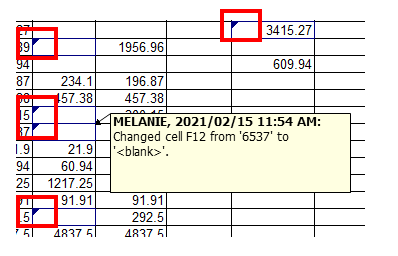
Any changes made to the workbook are then shown by small triangles in the top left-hand corner of the amended cell. If you rest your mouse over a cell that has been changed, the change and author of that change is shown in a comment (note). The color of the triangle is different for each author.
Co-Author in Excel 365
In Excel 365 you can use the new co-authoring feature instead.
- In the top right corner of the Excel screen, just below the title bar, click on Share.

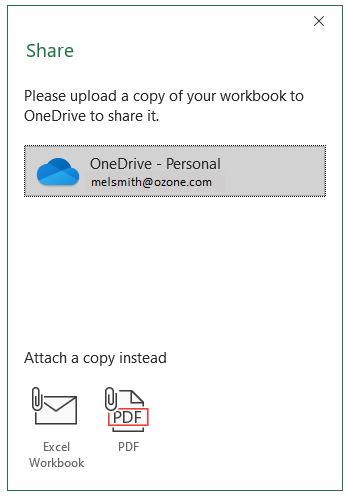
- To co-author this file with other users, first save the file to OneDrive.
Alternatively, you can send the file in an email as an Excel or PDF attachment.
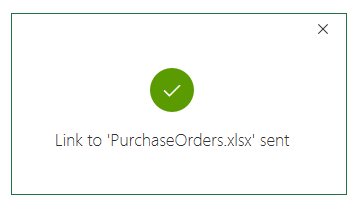
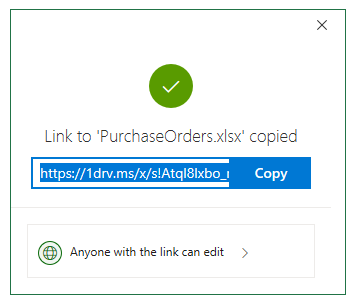
- Once the file is saved to OneDrive, it can be shared with other users.

Type the email addresses of the users to send the file to and click the Send button.
- To amend the link settings, click the Anyone with the link can edit box prior to sending the link.
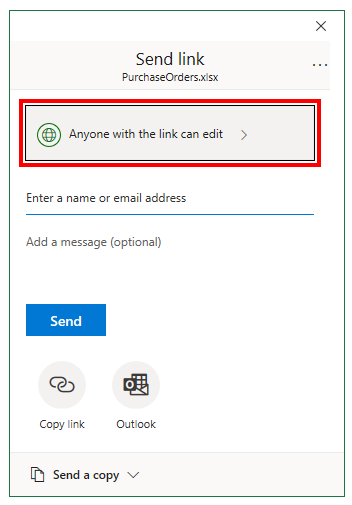
This allows us to set the “Allow Editing” option. If you have a OneDrive paid subscription, you will also be able to set a password and expiry date for the link that you are sending.
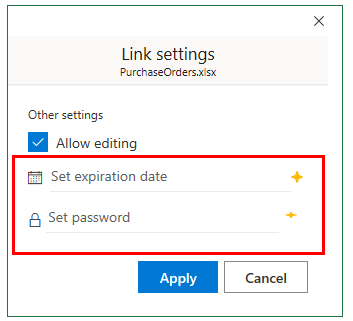
- Set a password and an expiry date for the link.
Copy Link and Outlook Buttons
Instead of Send, you could have clicked the Copy link or Outlook button.

The Copy link button creates a link you can copy and send to a different user.
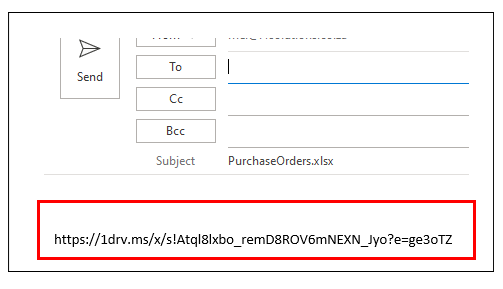
The Outlook button opens a blank email in Outlook with the link already inserted.
Share Spreadsheets in Google Sheets
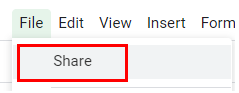
- In the File menu, select Share.
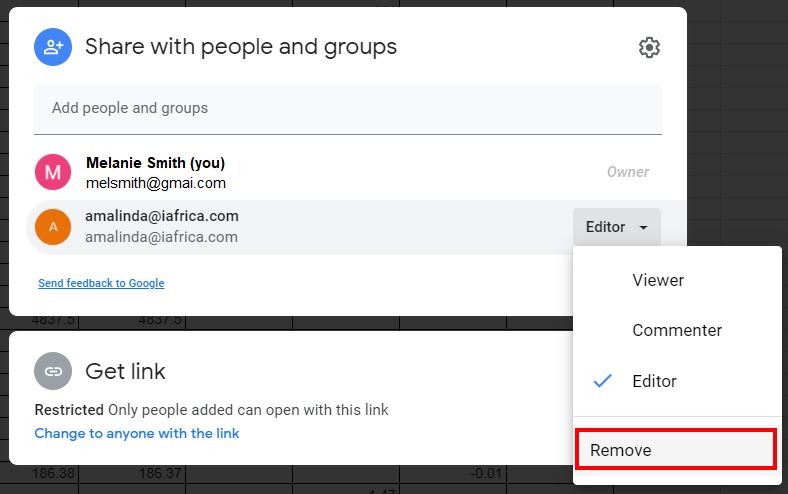
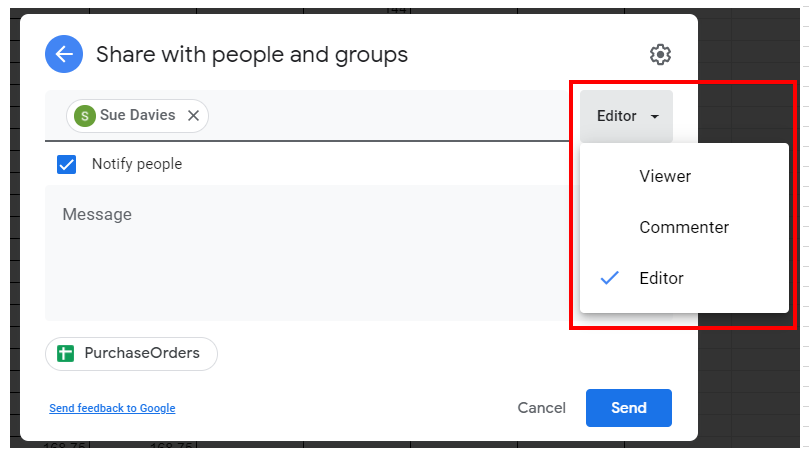
- Type the email of the person you wish to share the file with then select their editing role: Viewer to view only, Commenter to add comments, or Editor to be able to edit the file.
- If the email address is not associated with a Google Account, you get the following message.
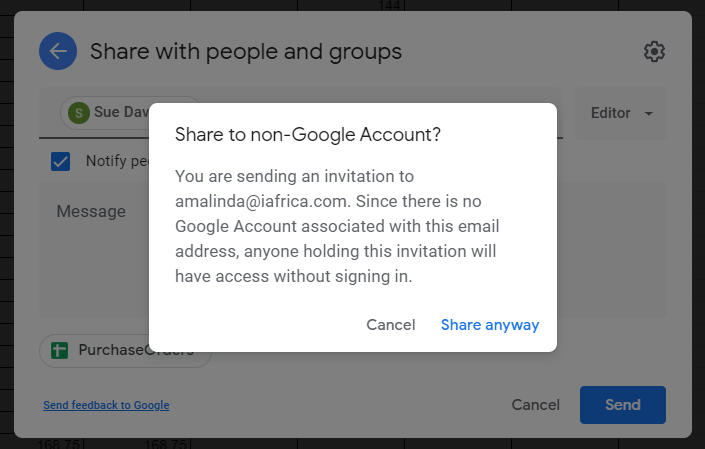
- Click Share anyway.
- Click Send to send the added person an email notification. A “Person added” message appears on the screen.
You can see how many people are sharing the file by resting the mouse on the Share button in the top right hand corner of the screen.

- To remove a person’s access to the file, click on the Share button again then click Remove under the person’s editor role.