
Share and collaborate with Word for the web
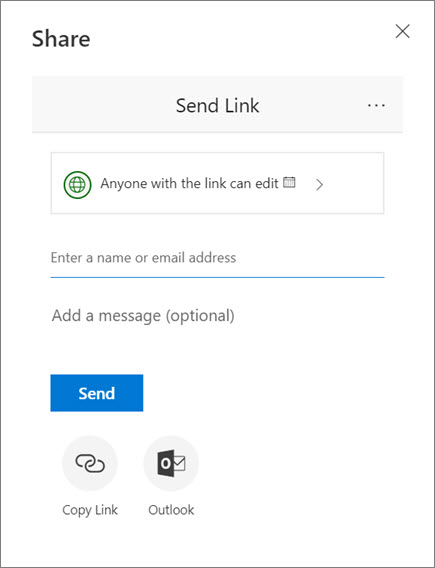
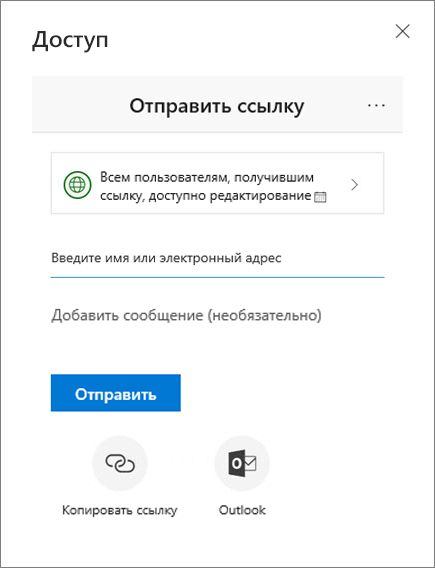
Share your document
-
Select Share.
-
Set the permissions you want.
-
Enter the names or email addresses of who to share with.
-
Add a message (optional).
-
Select Send.
You have additional options:
-
Select Copy Link to create a link to share in an email.
-
Select Outlook to create a new email with a shareable link in Outlook for the web.
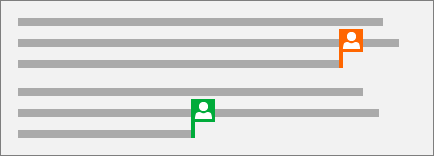
Co-edit a document
After you share your document, you can work on it with others at the same time.
-
To see changes in real time, work together in Word for the web.
-
Next to Share, you’ll see who is also editing the file.
-
Colored flags show you exactly where each person is working in the document.

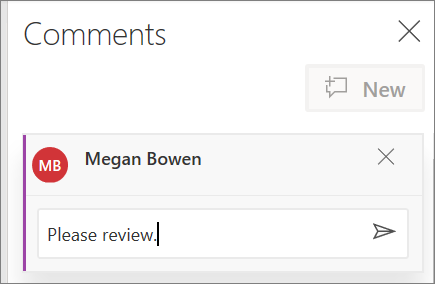
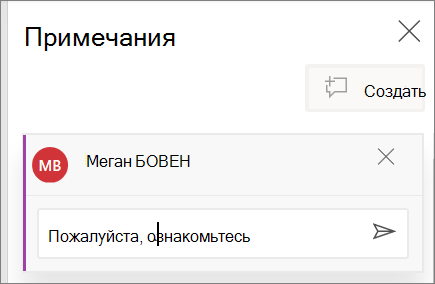
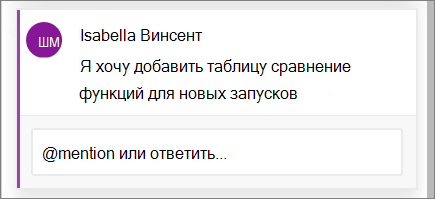
Add a comment
-
Select Review > New Comment.
Or, right-click in your document and select New Comment.
A comment bubble
 appears in the document where there’s a note.
 -
Type a comment and select Post.
 appears in the document where there’s a note.
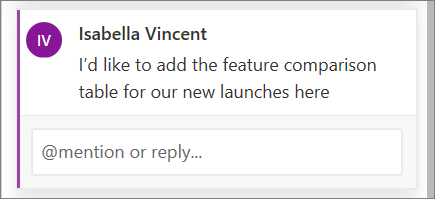
Reply to, @mention in or delete a comment
-
To reply to a comment, select Reply.
-
To @mention someone in a comment, type @ and someone’s name, and choose the name you want.
-
To delete a comment, select Review > Delete.
Review comments
-
Select Show Comments to display all comments in a document.
-
Select Previous or Next to move between comments.
Need more help?
Предоставление общего доступа к документу
-
Нажмите кнопку Поделиться.
-
Задайте нужные разрешения.
-
Введите имена или адреса электронной почты людей, с которыми хотите поделиться файлом.
-
Добавьте сообщение (необязательно).
-
Нажмите кнопку Отправить.
Дополнительные возможности
-
Чтобы создать ссылку для отправки по электронной почте, нажмите кнопку Копировать ссылку.
-
Чтобы создать новое сообщение электронной почты со ссылкой общего доступа в Outlook в Интернете, нажмите кнопку Outlook.
Совместное редактирование документа
Поделившись документом, вы можете работать над ним одновременно с другими пользователями.
-
Чтобы изменения были видны в реальном времени, работайте вместе в Word в Интернете.
-
В разделе Общий доступ вы увидите, кто еще редактирует этот файл.
-
Фрагменты, над которыми работают другие пользователи, обозначается цветными флажками.
Добавление примечаний
-
На вкладке Рецензирование нажмите кнопку Создать примечание.
Также можно щелкнуть в документе правой кнопкой мыши и выбрать команду Создать примечание.
В том месте документа, где добавлено примечание, появляется выноска
. -
Введите примечание и нажмите Опубликовать.
 .
.
Добавление ответов, @упоминаний и удаление примечаний
-
Чтобы ответить на примечание, нажмите кнопку Ответить.
-
Чтобы @упомянуть пользователя в примечании, введите @ и нужное имя.
-
Чтобы удалить примечание, на вкладке Рецензирование нажмите кнопку Удалить.
Просмотр примечаний
-
Чтобы просмотреть все примечания в документе, нажмите кнопку Показать примечания.
-
Для перехода между примечаниями нажимайте кнопки Предыдущее и Следующее.
Нужна дополнительная помощь?
Как поделиться и открыть для просмотра документ в Ворд Онлайн
Используя инструменты Office и OneDrive, есть возможность работать над документами Word, вместе с другими пользователями. Совместное редактирование предполагает, что над ним могут работать одновременно разные пользователи. Но все зависит от того, какой тип прав им предоставлен. Расскажем, как поделиться документом в Ворд Онлайн, и дать общий доступ. Можно ли предоставить права редактора, и как их ограничить для других.

Как поделиться документом в Ворд Онлайн
Изначально сервис Word Online был разработан для создания и редактирования файлов через интернет сразу же был предусмотрен и дополнительный функционал для совместной работы над документами. Если над выложенным вами документом работает другой пользователь, вы увидите это в режиме реального времени.
Если же с вами поделились документом через электронную почту, то письмо будет содержать ссылку. Пройдя по ней, вы сможете открыть данный файл в приложении Word в Интернете. Для работы над ним нажмите в панели управления «Редактировать документ/Изменить в браузере».
Содержание в документе макросов, а именно DOCM, остается возможность совместного использования файлов. Открывать, редактировать, включать запуск макроса Вы можете открывать – весь функционал будет доступен. Если же вы сами создали документ, то им можно поделиться с другими:
- Дать общий доступ для просмотра.
- Ограничить право на редактирование.
- Дать права редактора конкретным пользователям.

Чтобы дать доступ к сохраненному документу в облаке, причем для файла сделать это достаточно один раз. Выполните последовательно следующие шаги:
- Откройте документ, доступ к которому нужно предоставить.
- В меню сверху выберите вкладку «Файл».
- Нажмите на пункт «Сохранить как».
- Два раза нажмите на выбранное расположение документа – службу «OneDrive».
- Впишите имя для файла, тапните «Сохранить».
- Сервис направит вас на вкладку «Сведения», здесь нажмите на кнопку «Общий доступ».
Что нужно для совместного редактирования
Такой тип редакции доступен для тех документов, которые сохранены в OneDrive или SharePoint. Чтобы вы могли вместе работать над ним, вам потребуется выполнить следующие условия:
- Наличие общих хранилищ.
- Доступ к приложению Word Online у каждого из пользователей.
- Документ формата .docx.

Все изменения, внесенные в файл, будут редактироваться, а также сохранять изменения напрямую в системе. Чтобы в приложении был доступ к документу, выполните его сохранение в облако:
- Откройте Word Online, авторизуйтесь, и нажмите вкладку «Файл».
- Выберите пункт «Сохранить как», после чего добавьте его в облачное хранилище.
- Для отправки в этот раздел, в пункте «Добавление места», выберите службу «OneDrive».
- Укажите имя пользователя и пароль, это условие является обязательным!
- Расположение документа отобразится в области «Сохранить как приложения Word».
Обратите внимание! При предоставлении прав доступа другим пользователям к документу Ворд, вам потребуется логин и пароль для входа в систему.

Как сделать доступ с редактированием и без него
Добавленный в хранилище документ вы можете предоставить для других пользователей, чтобы они могли ознакомиться с ним. При этом доступна настройка редакторских прав. Они находятся на вкладке «Сведения», и выполняются для общего просмотра, с редактированием, или без редактирования:
- Откройте пункт «Совместно с пользователями».
- Введите имена, либо адреса электронных ящиков тех, с кем будете делиться файлом.
- Для ограничения редакторских прав выберите пункт «Можно просматривать».
- Для предоставления прав редактора установите отметку «Можно редактировать».
При необходимости, отправляя данный документ, к нему можно оставить комментарий. Он вводится в поле под адресной строкой, ведущей на место хранения файла. После этого тапните по кнопке «Общий доступ».
Часто бывает необходимо организовать совместную работу над документом или предоставить другим людям доступ на чтение. Microsoft Office предоставляет такую возможность.
Делиться файлами можно как со своего компьютера, так и через официальный сайт office.com. Важным условием в обоих случаях является хранение документа на облачном сервисе OneDrive. Если вы создавали новый файл непосредственно через браузер, то он автоматически сохранился куда нужно под вашей учетной записью Microsoft, а вот в случае работы на стационарном устройстве необходимо будет сначала выгрузить файл в онлайн.
Доступ через браузер
Как бы вы ни предоставляли доступ на документы, другие пользователи смогут открыть их онлайн, даже если не являются подписчиками платной версии MS Office. Онлайн-версия доступна для всех, правда имеет некоторые ограничения по функционалу.
Зайдите на сайт office.com и авторизуйтесь под своей учетной записью. Система автоматически предложит вам на выбор документы, с которыми вы работали в последнюю очередь, либо же создать новый файл в одной из популярных программ – Word, Excel, PowerPoint, OneNote и другие. Выбрав одно из приложений, вам также будет доступен список файлов соответствующего типа, что хранятся у вас на сервисе OneDrive. Если нужного файла нет в списке, просто перейдите по ссылке снизу «Открыть файлы из OneDrive».
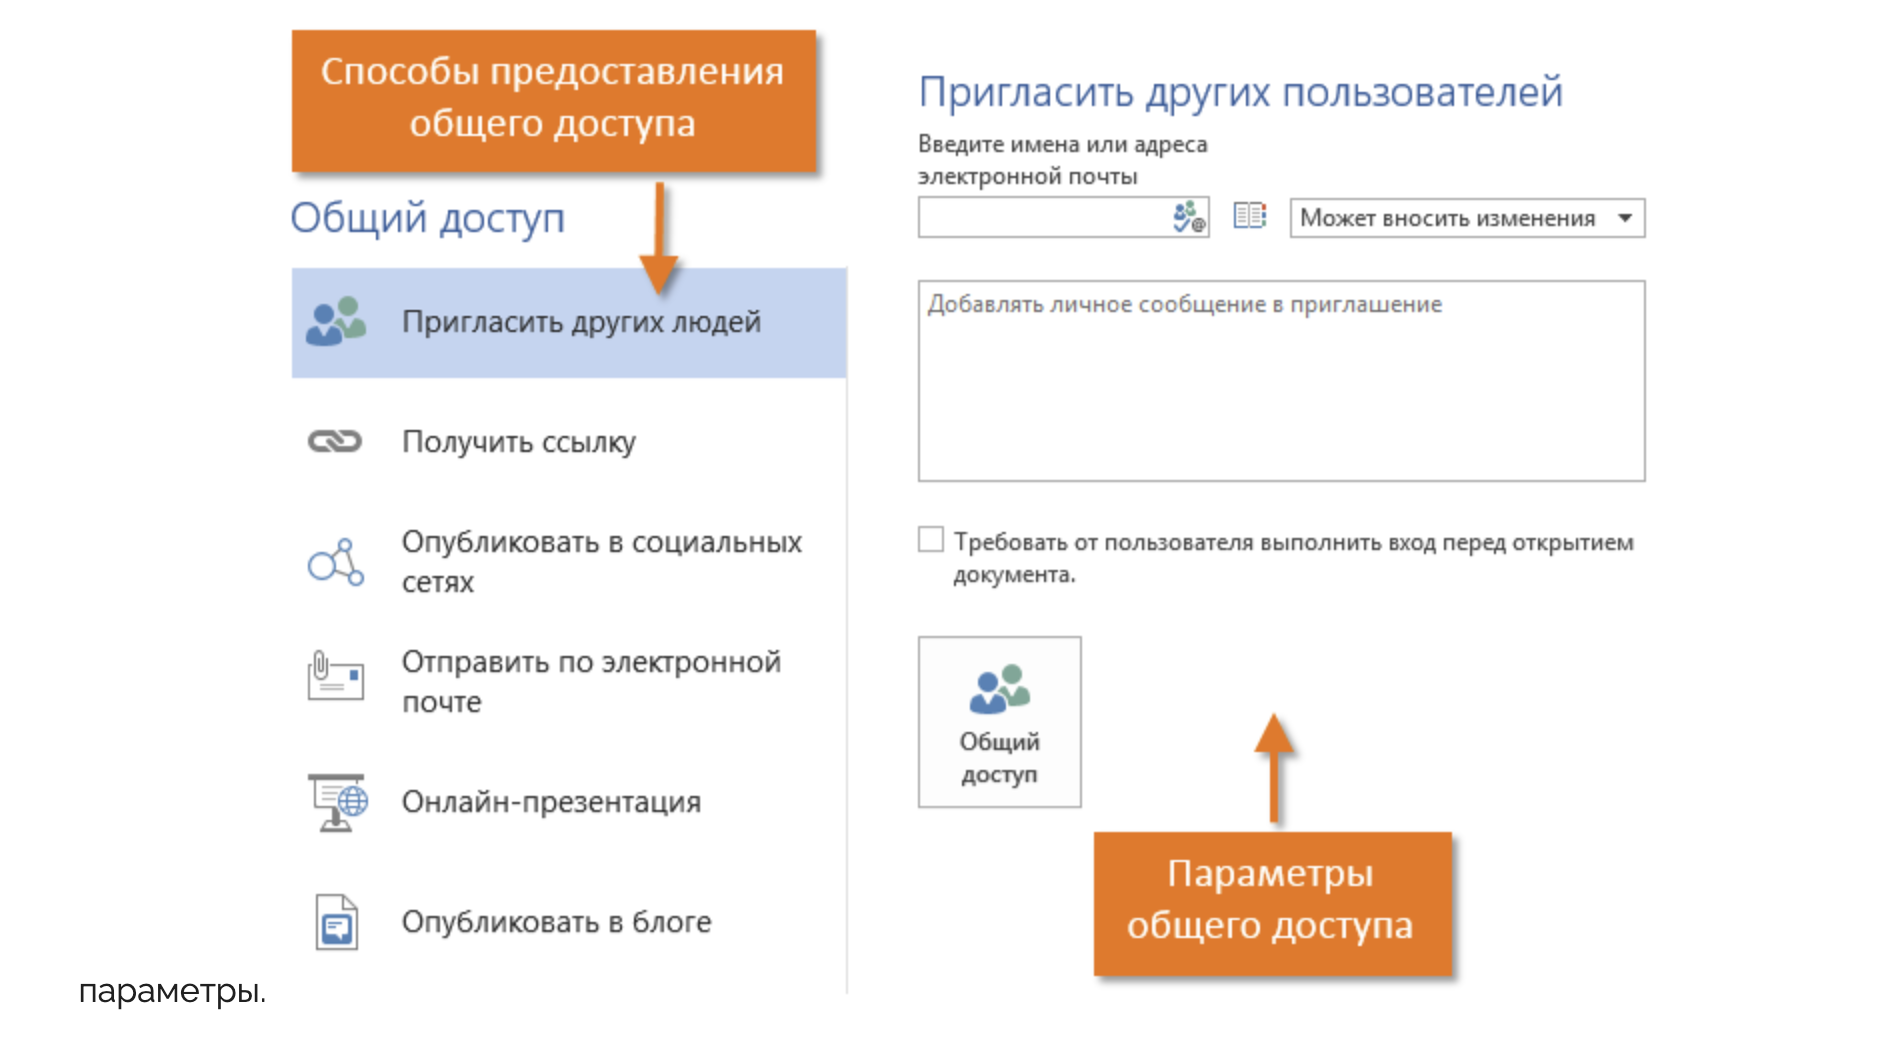
Удивительно, но разработчики онлайн-версии офисного пакета зачем-то по-разному оформили кнопки совместного доступа. Так для документов Word и Excel сама кнопка вроде находится в одном месте, но называется по-разному – «Общий доступ» и «Поделиться» соответственно. А для PowerPoint отдельной кнопки в принципе не предусмотрено – вместо нее предлагается простая ссылка с текстом «Совместно с другими людьми».
![]()
Впрочем, по нажатию этих разных по оформлению ссылок открывается единое окно для общего доступа. Слева в нем сообщается о том, кому уже предоставлен доступ к файлу, а справа можно ввести электронные адреса новых получателей. По нажатию на ссылку «Получатели могут вносить изменения» можно изменить права редактирования на опцию «Получатели могут только просматривать», а также можно указать, что для работы с файлом необходимо войти в учетную запись Microsoft (хотя это необязательно).

Когда адреса получателей введены и указаны соответствующие права, просто нажмите на кнопку «Поделиться». Люди получат уведомления по электронной почте и по ссылке из письма смогут попасть на документ.
Другой способ поделиться файлом – это в том же диалоговом окне в области слева выбрать пункт «Получить ссылку». Благодаря этой возможности нет необходимости указывать каждого получателя отдельно. Ссылку можно отправить в общий чат или разместить в социальной сети или сайте. При создании ссылки также есть возможность указать права для пользователей – на редактирование, либо же только на просмотр документа. Кнопка «Создать ссылку» предоставит вам соответствующий URL-адрес, после чего можно создать еще одну ссылку. Таким образом, можно сформировать одну ссылку для редактирования, другую – для чтения.

Доступ с компьютера
Чтобы поделиться документом, с которым вы работаете на стационарном компьютере, не придется разбираться в различных подходах к оформлению различных программ. Word, Excel, PowerPioint, OneNote – имеют одинаковый интерфейс для этих целей.
Перейдите в меню «Файл» — «Общий доступ». Здесь вас интересует первый пункт «Поделиться», хотя дальше в зависимости от программы могут быть и дополнительные опции, вроде «Отправить по электронной почте», создать «Онлайн-презентацию» и так далее. Для совместной работы нас интересует именно пункт «Поделиться».

Если файл ранее еще не был выгружен в хранилище OneDrive, то вам будет предложено это сделать по кнопке «Сохранить в облаке». Если открылось представление «Сохранить как», то выберите здесь пункт «OneDrive», укажите имя файла и нажмите на кнопку «Сохранить».

После этого в меню «Файл» — «Общий доступ» у вас появится кнопка «Совместно с пользователями». По ее нажатию в приложении появится область для ввода электронных адресов и указания их прав для работы с документом: с возможностью редактирования или без оной. На этой стадии интерфейс у приложений может немного отличаться. В частности, в Word может сначала потребоваться ввести электронный адрес, после чего появится возможность задать права.

Ниже в области для предоставления доступа могут быть ссылки «Отправить как вложение» и «Получить ссылку для совместного доступа». В первом случае человеку на электронную почту будет отправлена копия файла, а во втором – можно будет создать ссылку для онлайн доступа к файлу.

Share Documents in Word: Overview
One way to share documents in Word is to use the co-authoring features of Word as part of an Office 365 subscription. To use co-authoring in Word, you must also save the shared document to an online site like OneDrive, OneDrive for Business, or SharePoint Online. Co-authoring lets you to work on shared Word documents at the same time as other users.
Alternatively, if available, you can also share a Word document to an internally shared network drive, just like any other type of file. Word also provides other sharing options that let you share a document via email using a sharing link or even present your document online. However, these options do not allow for real-time document updates when changes occur.
Share Documents in Word Using Co-authoring
To share a document using co-authoring in Word as part of Office 365 if you haven’t yet saved the document online, open the document to share. Then click the “Share” button in the upper-right corner of the Ribbon to open a “Share” pane. This pane lists the connected online OneDrive and SharePoint sites to which you can share the document. Click the desired choice in the “Share” pane to upload a copy of the document to that site.
After doing that, the “Share” pane then turns into the “Send Link” pane. Alternatively, if you clicked the “Share” button within a document you had already saved online, then the “Send Link” pane appears right away, instead. The “Send Link” pane lets you choose the users to invite to co-author the document via a link you send to their email addresses.
By default, Word wants to send a link that lets anyone with the link edit the document. To configure this link, click the “Anyone with this link can edit >” button in the “Send Link” pane to change it into the “Link settings” pane. Then click the button that shows the users with whom you want to share the link. Choices include “Anyone with the link,” “People in (Your Organization’s Name) with the link,” “People with existing access,” or “Specific people.”
For most choices, you can also check or uncheck the “Allow editing” checkbox at the bottom of the pane to choose whether or not to also allow editing access, if desired. You must allow editing access if you want users to co-author the document with you. Otherwise, they can only read the document, but not edit it.

Share Documents in Word – Instructions: A picture of a user changing sharing settings in the “Link settings” pane in Word.
For many sharing choices, if you uncheck the “Allow editing” checkbox, you can also enable the “Block download” switch by clicking it to block downloading, too, if desired. Additionally, if you select the “Anyone with the link” option, you can click into the “Set expiration date” field at the bottom of this pane to select an expiration date for the sharing link, if desired.
You can also password protect the document file if you choose the “Anyone with the link” option by clicking into the “Set password” field and then typing the desired file password. Note that you will need to provide this password to anyone with this link so they can access the file. After changing your link settings, click the “Apply” button to continue and return to the “Send Link” pane again.
Then enter the users’ names or email addresses, as needed, into the “Enter a name or email address” field, which is above the blue line in this pane. Then select the names from the drop-down that appears to add them to the list. Continue doing this until you have added all the users with whom to share the document.
To enter an optional message within the email, type it into the “Add a message (optional)” field. To then email the invitations, click the “Send” button in the “Send Link” pane. Then click the “x” button in the upper-right corner of the confirmation message box that appears to tell you the email is sent.
Share Documents in Word Using a Link
Alternatively, you can instead get a sharing link to either view or edit the shared document, which you can then send to other users in emails or other kinds of messaging apps. To share documents in Word using a link, edit the sharing link settings, as usual. Then click the “Copy link” button instead of the “Send” button at the bottom of the “Send Link” pane.
The link is then copied and appears within a “Link to (Document Name) copied” pane. You can also click the link’s adjacent “Copy” button to copy the link to your clipboard, if needed. You can then send the link to your desired recipients using whatever application you want. Then click the “x” button in the upper-right corner of the “Link to (Document Name) copied” pane to close it, when finished.
Alternatively, you can also send the link via your desktop Outlook application, if available. To do this, edit the link settings, as usual. Then click the “Outlook” button instead of the “Send” button at the bottom of the “Send Link” pane. Your desktop version of Outlook then opens and creates an email with the link that you can send to the recipients.
You can also choose to share a non-collaborative copy of the document as a Word document or PDF attachment via Outlook by clicking the “Send a Copy” button at the bottom of the “Send Link” pane. Then select either “Word Document” or “PDF” from the pop-up menu that appears. Your desktop version of Outlook then opens and attaches a copy of the shared document to an email, using the file type you selected. You can then send this to the recipients, as usual. Note this is not a shared document, however; they are simply sent a copy of the document.
Stop Sharing Documents in Word or Change Sharing
To stop sharing a document or change its sharing settings, open the “Send Link” pane again by clicking the “Share” button at the right end of the Ribbon. To add more users, repeat the sharing process again. To remove users from sharing the document, click the ellipsis mark button to the right of the “Send Link” label in the pane. Then select the “Manage Access” command from the pop-up menu that appears to change the pane into the “Manage Access” pane. Any users given access or links created for sharing then appear in a list within this pane.
To remove a link, click the ellipsis mark button to the right of the link to see its link options. Then click the “x” button to the right of the link to delete it. Then click the “Delete link” button in the confirmation message box that appears to confirm the link’s deletion. Alternatively, note that you can also click the “Back” arrow button in the upper-left corner of the “Manage Access” pane if you want to return to the “Send Link” pane again without making any changes.
After you finish co-authoring the Word document, if needed, you can then save a local copy of the shared document to your computer by clicking the “File” tab in the Ribbon and selecting the “Save a copy” command from the left side of the Backstage view. After confirming you have saved the copy, you can then safely delete the file from its shared network or online location, if needed.
Share Documents in Word: Instructions
How to Share Documents in Word Using Co-authoring
- To use co-authoring in Word, you must also save the shared document to an online site like OneDrive, OneDrive for Business, or SharePoint Online.
- To share a document using co-authoring in Word as part of Office 365 if you haven’t yet saved the document online, open the document to share.
- Then click the “Share” button in the upper-right corner of the Ribbon to open a “Share” pane, which lists the connected online OneDrive and SharePoint sites to which you can share the document.
- Click the desired choice in the “Share” pane to upload a copy of the document to that site.
- After doing that, the “Share” pane then turns into the “Send Link” pane.
- Alternatively, if you clicked the “Share” button within a document you had already saved online, then the “Send Link” pane appears right away, instead.
- The “Send Link” pane lets you choose the users to invite to co-author the document via a link you send to their email addresses.
- By default, Word wants to send a link that lets anyone with the link edit the document.
- To configure this link, click the “Anyone with this link can edit >” button in the “Send Link” pane to change it into the “Link settings” pane.
- Then click the button that shows the users with whom you want to share the link. Choices include “Anyone with the link,” “People in (Your Organization’s Name) with the link,” “People with existing access,” or “Specific people.”
- For most choices, to choose whether or not to also allow editing access, if desired, you can also check or uncheck the “Allow editing” checkbox at the bottom of the pane.
- You must allow editing access if you want users to co-author the document with you. Otherwise, they can only read the document, but not edit it.
- To block downloading, too, if you uncheck the “Allow editing” checkbox for many sharing choices, enable the “Block download” switch by clicking it.
- To select an expiration date for the sharing link, if desired and if you select the “Anyone with the link” option, click into the “Set expiration date” field at the bottom of this pane and set the desired date.
- To password protect the document file if you choose the “Anyone with the link” option, click into the “Set password” field and then type the desired file password. Note that you will need to provide this password to anyone with this link so they can access the file.
- After changing your link settings, click the “Apply” button to continue and return to the “Send Link” pane again.
- Then enter the users’ names or email addresses, as needed, into the “Enter a name or email address” field, which is above the blue line in this pane.
- Then select the names from the drop-down that appears to add them to the list.
- Repeat steps #17 and #18 until you have added all the users with whom to share the document.
- To enter an optional message within the email, type it into the “Add a message (optional)” field.
- To then email the invitations, click the “Send” button in the “Send Link” pane.
- Then click the “x” button in the upper-right corner of the confirmation message box that appears to tell you the email is sent.
Share Documents in Word Using a Link
- Alternatively, to instead get a sharing link to either view or edit the shared document, which you can then send to other users in emails or other kinds of messaging apps, edit the sharing link settings, as shown in the instructions above.
- Then click the “Copy link” button instead of the “Send” button at the bottom of the “Send Link” pane.
- The link is then copied and appears within a “Link to (Document Name) copied” pane.
- To copy the link to your clipboard, if needed, click the link’s adjacent “Copy” button.
- You can then send the link to your desired recipients using whatever application you want.
- Then click the “x” button in the upper-right corner of the “Link to (Document Name) copied” pane to close it, when finished.
- Alternatively, to send the link via your desktop Outlook application, if available, edit the link settings, as shown in the instructions above.
- Then click the “Outlook” button instead of the “Send” button at the bottom of the “Send Link” pane.
- Your desktop version of Outlook then opens and creates an email with the link that you can send to the recipients.
- To share a non-collaborative copy of the document as a Word document or PDF attachment via Outlook, click the “Send a Copy” button at the bottom of the “Send Link” pane.
- Then select either “Word Document” or “PDF” from the pop-up menu that appears.
- Your desktop version of Outlook then opens and attaches a copy of the shared document to an email, using the file type you selected.
- You can then send this to the recipients, as usual.
- Note that this is not a shared document, however, and they are simply being sent a copy of the document.
Stop Sharing Documents in Word or Change Sharing
- To stop sharing a document or change its sharing settings, open the “Send Link” pane again by clicking the “Share” button at the right end of the Ribbon.
- To add more users, repeat the sharing process again.
- To remove users from sharing the document, click the ellipsis mark button to the right of the “Send Link” label in the pane.
- Then select the “Manage Access” command from the pop-up menu that appears to change the pane into the “Manage Access” pane.
- Any users given access or links created for sharing then appear in a list within this pane.
- To remove a link, click the ellipsis mark button to the right of the link to see its link options.
- Then click the “x” button to the right of the link to delete it.
- Then click the “Delete link” button in the confirmation message box that appears to confirm the link’s deletion.
- Alternatively, to return to the “Send Link” pane again without making any changes, note that you can also click the “Back” arrow button in the upper-left corner of the “Manage Access” pane if you want.
- To save a local copy of the shared document to your computer after you finish co-authoring the Word document, if needed, click the “File” tab in the Ribbon.
- Then select the “Save a copy” command from the left side of the Backstage view.
- After confirming you have saved the copy, you can then safely delete the file from its shared network or online location, if needed.
Share Documents in Word: Video Lesson
The following video lesson, titled “Sharing Documents in Word Using Co-authoring,” shows you how to share documents in Word. This video lesson is from our complete Word tutorial, titled “Mastering Word Made Easy v.2019 and 365.”