
Excel for Microsoft 365 Excel 2021 SharePoint Server Subscription Edition Excel 2019 SharePoint Server 2019 Excel 2016 SharePoint Server 2016 Excel 2013 SharePoint Server 2013 SharePoint in Microsoft 365 Excel 2010 SharePoint Server 2010 Excel 2007 More…Less
You can export data from an Excel table to a SharePoint list. When you export the list, Excel will create a new SharePoint list on the site. You can then work with the data on the site, just like you would for any other SharePoint list.
Note: Exporting a table as a list does not create a data connection to the SharePoint list. If you were to update the table in Excel after exporting it, the updates will not be reflected in the SharePoint list.
To export a table in an Excel spreadsheet to a list on a SharePoint site, you need:
-
A SharePoint site where you are creating the list.
-
Permissions to create lists on the site. If you are not sure, contact your SharePoint site administrator.
To view the list in datasheet view on the SharePoint site you need:
-
Excel or Access. These programs are required for using the datasheet view on the SharePoint site.
Note: Datasheet view is not supported in 64-bit version of Microsoft Office. It is recommended that you install 32-bit version of Office in order to be able to use Datasheet view in a list on a SharePoint site.
Export a table to a SharePoint list
-
Click inside the table.
-
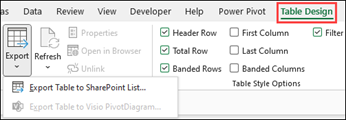
Click Table Design > Export > Export Table to SharePoint List.

-
In the Address box, type the address, or URL of the SharePoint site.
Important: Type everything that’s in your Web address before the “/default.aspx”. For example, if the address is http://contoso/default.aspx, type http://contoso. If the address is http://contoso/teams/accounting/sitepages/home.aspx, type http://contoso/teams/accounting.
-
In the Name box, type a unique name for the list.
-
Optionally, enter a description in the Description box.
-
Click Next.
Note: You may be asked to enter your Microsoft 365 credentials, or organizational domain credentials, or both.
-
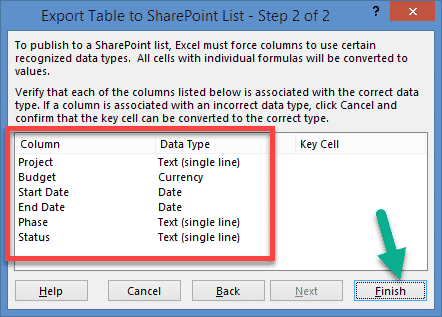
Review the information given in Columns and Data Types and then click Finish.
-
Click OK.

A message indicating that your table is published, along with the Uniform Resource Locator (URL) appears. Click on the URL to go to the list. Add the URL as a favorite in your browser.
Note: Another way to open the list is to go the SharePoint site, click the gear icon on the upper-right corner, and click Site Contents.
Supported data types
Some Excel data types cannot be exported to a list on the SharePoint site. When unsupported data types are exported, these data types are converted to data types that are compatible with SharePoint lists. For example, formulas that you create in Excel are converted to values in a SharePoint list. After the data is converted, you can create formulas for the columns on the SharePoint site.
When you export an Excel table to a SharePoint site, each column in a SharePoint list is assigned one of the following data types:
-
Text (single line)
-
Text (multiple lines)
-
Currency
-
Date/time
-
Number
-
Hyperlink (URL)
If a column has cells with different data types, Excel applies a data type that can be used for all of the cells in the column. For example, if a column contains numbers and text, the data type in the SharePoint list will be text.
Need more help?

In this SharePoint tutorial, we will discuss how to open SharePoint list in excel or how to export SharePoint list to excel. I will also show, how to update excel from SharePoint list automatically.
Also, we will see how to fix the error, Access to the resource is forbidden excel SharePoint that comes while trying to open SharePoint list in excel.
Now, let us see how to Open SharePoint list in excel. Here, we will connect with the SharePoint Online site from excel.
In my SharePoint Online site, I have created a custom list as Employees. And the list looks like below with some data.

Now, let us see how to open this SharePoint Online list in excel.
First of all Open a excel file in your desktop.
Then click on Data -> Get Data -> From Online Services -> From SharePoint Online List like below:

Then it will ask you to provide the SharePoint Online Site URL like below, you can provide also the list URL, but you might get an error.

Once you click on OK, it will ask you to enter the Credentials. Here first select Microsoft account.
It will show the Sign-in button if you have not already signed in with an Office 365 account.
Click on the Sign-in button and then it will ask you to enter the user name and password.

Then you can see it will show you Sign in as different user. Then select the SharePoint site where you list exists.
Then click on the Connect button.

Then it will display all the lists and libraries presented in the SharePoint Online site.
Select the particular list, in this case I selected Employees list. In the right site it will display all the columns that includes all the out of box hidden columns also.
If you want to load all the columns, then click on the Load button.
But if you want to load the select columns then click on the Transform Data button like below:
Here, I want to select a few specific columns from the SharePoint Online list.

Once you will click on the Transform Data button, it will open the Excel Power Query Editor from where we can select the columns that we want to display from the list.
Here click on Home -> Choose Columns -> Choose Columns like below:

Then it will Open a dialog box, from where we can Choose Columns.
Here, you can uncheck every column and select only those columns that we required.
Here I wanted to show the below SharePoint list columns:
- ID
- Title
- FullName
- Designation

Once you click on Choose columns, then click on OK. Then Close & Load button from the ribbon, like below:

Now, you can see your SharePoint List data or items will be there in the excel.

This is how we can open SharePoint list in excel.
Update excel from sharepoint list automatically
Once your SharePoint Online list data in excel, the next question is how to update excel from SharePoint list automatically.
Meaning If you insert an item to SharePoint Online list, then it will automatically update excel spreadsheet from SharePoint list.
From the excel spreadsheet, click on Data -> Queries & Connections like below:

Then click on the Refresh icon like below:

This will open the Query Properties dialog box from where we can enable auto update excel from SharePoint list option.
If the properties window did not open, then click on the Refresh icon and then click on … and then click on Properties like below:

Here in the Query Properties dialog box, check the below checkboxes:
- Enable background refresh: Once you enable background refresh, it will refresh and sync list data to excel in the background.
- Refresh every minutes: Here, you can set the interval when you want the refresh to happen. I have set it for 2 minutes. So in every 2 minutes, the refresh will happen and if any new records are there in the SharePoint list, the list item will be synced with the excel.
- Refresh data when opening the file: If you will enable Refresh data when opening the file, then when you will open the excel, it will do the refresh.
- Refresh this connection on Refresh All: Once you enable this option, if you will click on Refresh All button from the ribbon, then refresh will happen.

Click on OK.
Enter a few items to the SharePoint list, and wait for 2 minutes, it will update excel from SharePoint list automatically.
You can see here I have added 3 items to the SharePoint Online list.

Once the automatic refresh will happen, you can see the SharePoint list items have been automatically updated in the excel.

This is how we can update excel from SharePoint list automatically without using flow.
Access to the resource is forbidden excel SharePoint
In the beginning, when I was trying to Open SharePoint list in excel, I got an error as access to the resource is forbidden excel SharePoint.
The error looks like below:
Unable to connect. We encountered an error while trying to connect. Details: “Access to the resource is forbidden“.

The error comes because I tried to get data by using the below method,
Data -> From Web and then I enter the SharePoint site URL to connect.

To fix excel sharepoint connection access to the resource is forbidden issue, the ideal way is to connect from Data -> Get Data -> From Online Services -> From SharePoint Online List.

In case you want to check out all the SharePoint connections, then you can go to Data -> Get Data -> Data Souce Settings.

This will open the Data source settings page from where you can see all your data connections.
There you can edit permissions or you can also clear permissions and make the connection again.

This is how we can fix error, access to the resource is forbidden excel SharePoint online.
The remote server returned an error 404 not found excel SharePoint
I also got an error that says, Unable to connect. We encountered an error while trying to connect.
Details: “Microsoft.Mashup.Engine1.Library.Resources.HttpResource: Request failed:”. The remote server returned an error 404 not found.

The error was coming when I give the direct SharePoint Online list URL like below:

To fix this issue, enter the SharePoint site URL and then choose your particular list.

This is how we can fix error, The remote server returned an error 404 not found.
You may also like the following tutorials:
- How to create PowerApps collection from Excel
- Create a canvas app from Excel in Power Apps
- Create a Data Table from Excel Data using Power Apps
- Create a Power BI report from Excel using Power BI Desktop
- How to directly save Excel File into SharePoint Online Document Library
- How to export excel table to SharePoint List
- Import excel spreadsheet into SharePoint list 2013
- SharePoint audience targeting – Everything you need to know
In this SharePoint tutorial, we learned:
- How to open a SharePoint list in excel
- Update excel from sharepoint list automatically
- Access to the resource is forbidden excel SharePoint
- The remote server returned an error 404 not found excel SharePoint

I am Bijay a Microsoft MVP (8 times – My MVP Profile) in SharePoint and have more than 15 years of expertise in SharePoint Online Office 365, SharePoint subscription edition, and SharePoint 2019/2016/2013. Currently working in my own venture TSInfo Technologies a SharePoint development, consulting, and training company. I also run the popular SharePoint website EnjoySharePoint.com
A while back, I published a post where I explained how to export SharePoint lists from SharePoint to Excel. Today, I am going to cover the opposite of this – how to import Excel to SharePoint. Say, you have an Excel list/table and want to bring it to SharePoint (because SharePoint custom list kicks ass!). How do you achieve this? Well, let me explain. You have a few options to choose from!
July 2020 Update – READ THIS FIRST!
Below techniques describe the “old way” of importing Excel to SharePoint. If you are in SharePoint on-premises, below tips are the only options you have. However, if you are in SharePoint Online (Office 365), we now have a new and easier way to import Excel data, which would be the easiest and preferred option to use. Please reference this most recent post for instructions.
Option 1: Import using Quick Edit
The first option assumes that you already have a SharePoint list with all the corresponding columns, and just need to copy/paste the content from Excel to SharePoint. Here is what you need to do to achieve this:
- Build out all the columns exactly as they appear in Excel

- Make sure columns in a view are in the same order as in Excel (otherwise when you do copy/paste, you will get a mismatch)

- If you are taking advantage of metadata (drop-downs), make sure to populate all the possible choices into respective columns (otherwise, when you paste, and pasted text does not match the drop-down choice, the row will be rejected)
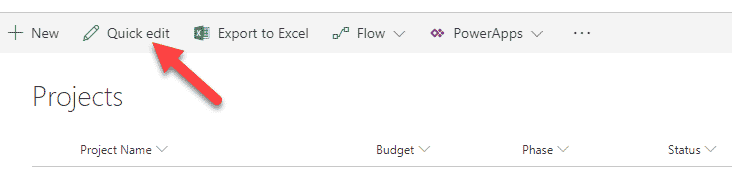
- Open your list in Quick Edit (Datasheet view for those in SharePoint 2010)

- Copy the rows you want to copy from Excel
- Paste into Quick Edit View
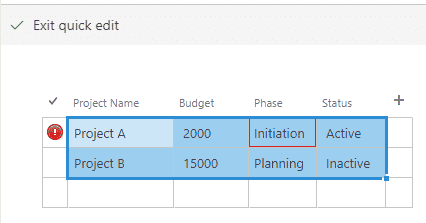
- You will notice the rows being pasted one by one. You might need to give it some time if you have lots of rows. In case you get a mismatch in data being imported, you will get a red warning just like in the image below

- When all data is successfully pasted/mismatches resolved, just click on Exit Quick Edit. You are all set!
Pros
- Allows to take advantage of metadata and different types of columns in the existing list (i.e., Text, Choice, Date, Currency, etc.)
Cons
- It takes time to set up the list and view before you can import/paste
- Might not be a good technique for importing large data sets
- Error handling capabilities are limited (if you have a row that fails, might take time to figure out the issue/field causing the issue and you might need to redo the whole import)
- Import will not work if you set up metadata drop-down using Term Store (managed metadata). Click here to read more about this issue

Option 2: Import Spreadsheet Web part
Another option that is available to import Excel to SharePoint is to use a Web Part called “Import Spreadsheet.” These are the steps to follow:
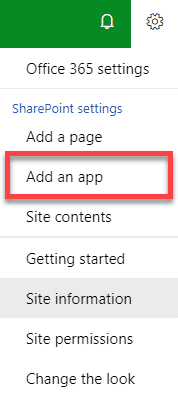
- Gear Icon > Add an App

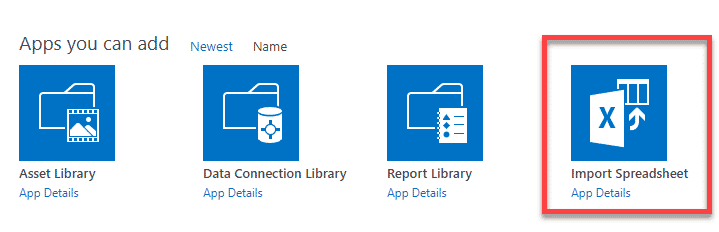
- Scroll down to Import Spreadsheet App. Click on it.

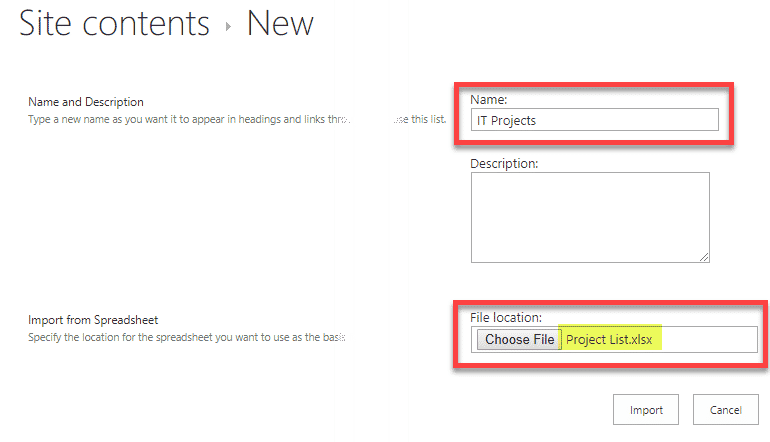
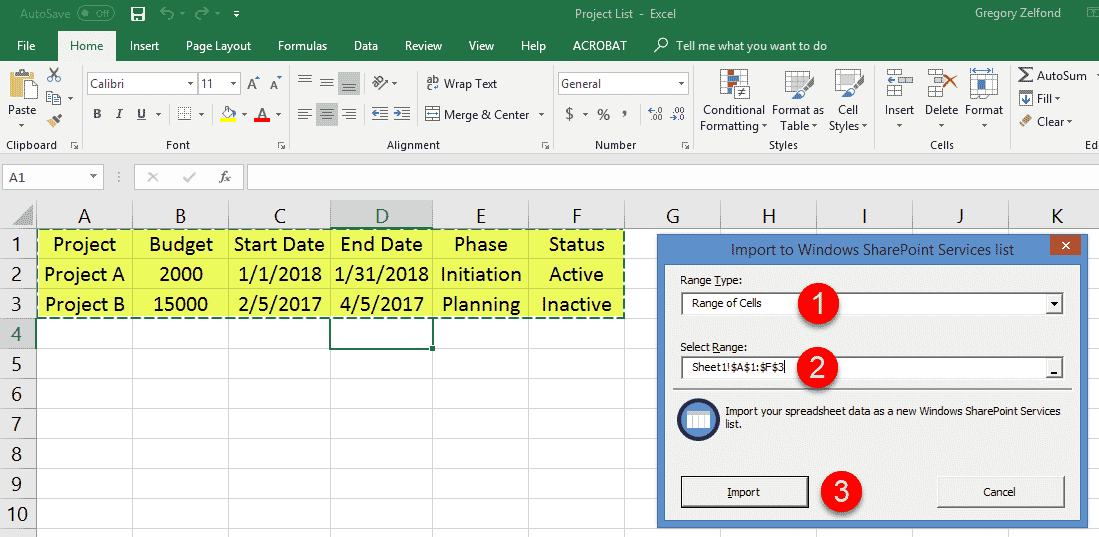
- On the next screen, give your new app/list a name, then choose an Excel file. Click Import

- You will now notice an Excel file open up with a pop-up window where you need to select a range of cells to import. Once you choose the range of cells in the pop-up, click Import.

- The table will now be imported to SharePoint. It will go ahead and create a custom list with proper column headers and values.


Pros
- Relatively easy to use
- Does not require much prep time like Option 1
Cons

Option 3: Import directly from Excel
Another great option is to import data right from within Excel. This is what you have to do:
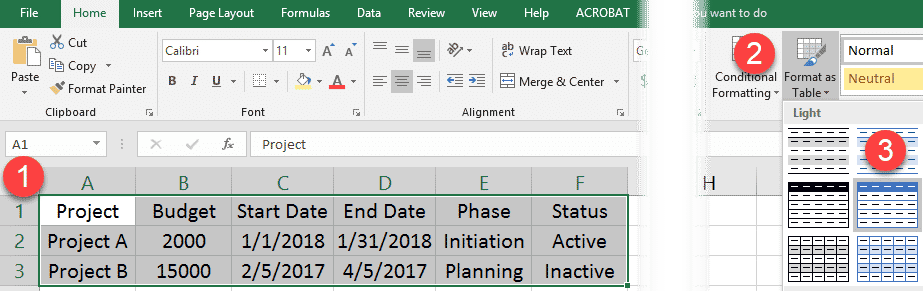
- In Excel spreadsheet, select the data range and Format it as a Table

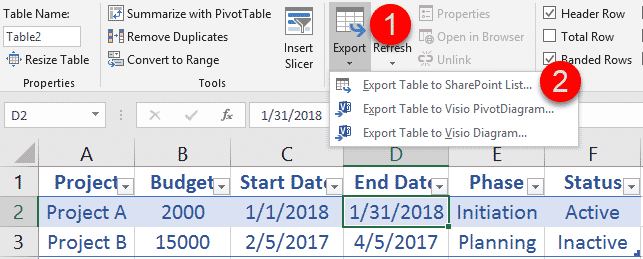
- While still in Excel, highlight the table, then choose Export from the top ribbon, then Export Table to SharePoint list

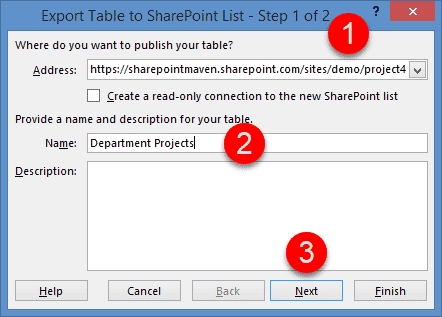
- From the pop-up that appears, specify the URL of the site you are importing to, then give the list a name, then hit Next. You can also (optionally) check the box next to Create a read-only connection to the new SharePoint list. What it does is make your Excel physically linked to SharePoint list. Any changes in the SharePoint list will propagate down to Excel when you refresh the data there.

- On the next screen, you will see all the columns with corresponding recognized column types (Currency, Date, etc.). Just click Finish
- You should be getting a success message/pop-up.

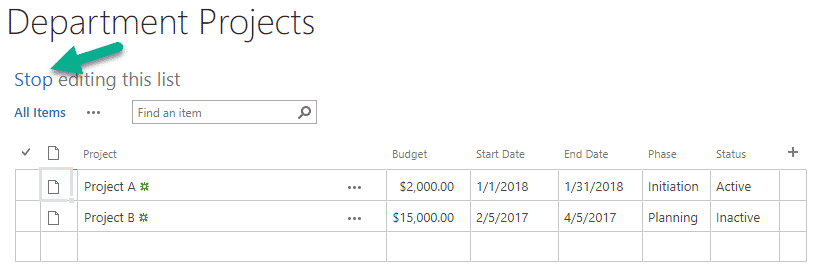
- You should now see your list created in SharePoint. It will default to Datasheet view, just click Stop to view it as a normal list.


Pros
Same as Option 2
Cons
- Same as with Option 2, some drop-down choices are recognized as Text.
- The list created is a classic list and not a modern one (for those who are in SharePoint Online)
- By default, the list opens up in Datasheet view. You always have to click Stop Editing to see a “normal” list

How to Import and Export Data from Excel to SharePoint Lists and Vice Versa
Many users who use SharePoint Online like to use lists because SharePoint lists look just like Excel tables. For better integration, Microsoft allows you to export Excel tables to SharePoint lists and vice versa. Users usually ask: How do I import data from SharePoint to Excel? How do I extract data from SharePoint? How do I create a SharePoint list in Excel? This blog post can help you answer these questions and explains how to export tables from Excel to SharePoint lists and vice versa. Four methods of exporting data from Excel and one method of exporting data from SharePoint lists are covered.
Method 1 – How to Export Data from Excel to SharePoint Lists Manually
The idea of the first method is that you should create an empty list that contains the same columns as in the Excel table. The data format of columns must be the same to preserve data consistency. Then you should manually copy data from each column of the Excel table and paste this data to the appropriate column of the SharePoint list.
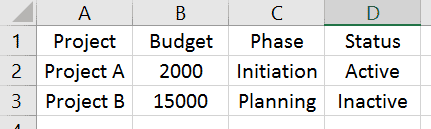
Open an XLS, XLSX, CSV file, or a file of another format that contains a table in Microsoft Excel that is installed on your computer. In my example, I’ve created a simple table for demonstration. You can see this table opened in Excel in the screenshot below.

Open a web browser and log into your Office 365 account (Microsoft 365 account). Open your team site in SharePoint Online, and create a new list. Let’s call our test list List02 and enter a description, for example, Import Excel into SharePoint list. You can also read this blog post about SharePoint Online to learn more about sites, lists, and libraries.

Once you have created a new SharePoint list, create the appropriate columns by clicking +Add column. The columns must have the same names and data format as the columns in the source Excel table.

In the window that opens, enter a name, description, and type, and define other needed parameters for a column. Then hit Save.

The list now contains all the needed columns but remains empty. To start copying data to a SharePoint list, you have to view the list as a table. To do this, click Edit in grid view. You are ready to copy data from Excel to SharePoint list.

Select data in a column of an Excel table, and press Ctrl+C to copy the selected data to clipboard. On the screenshot below you can see the data in the Name column selected.

You can move columns (left and right) after creating them in a SharePoint list. Select the empty cell in the needed column (the Names column in our case), and press Ctrl+V to paste data you have copied to the clipboard. The Name column now contains all the needed data in our example. Similarly copy paste data for the other columns.

Once you have transferred data to all columns of your SharePoint list, you can exit grid view. We have finished copying data from an Excel table to a SharePoint list. On the screenshot below you can see how our list looks after copying all the data.

The advantage of this method is that it’s easy to use when you don’t have that many tables or columns.
The disadvantage is that it’s time-consuming and inconvenient when you have too many columns and tables to copy.
Method 2 – How to Export Data Directly from Excel to a SharePoint List
The idea of this method is that you should export your table to a SharePoint list directly from Excel installed on your computer. Excel must be able to connect to your SharePoint site. You should provide your credentials, and your Office 365 account must have sufficient permissions to create a SharePoint list on a SharePoint site.
Open Microsoft Excel installed on your computer, and open the table you want to export to SharePoint Online. Let’s create a test table for our blog post with some equipment items and create columns with vendors who manufactured these items, users who are owners of the appropriate item, and the price for each item.
Convert a spreadsheet to a table before you start exporting. Click Insert > Table.

In the Create Table window, you can leave default values and hit OK.

Now the view of the table is a little bit different, as headers are marked with another color.
Select any column name in your table, go to the Design tab (Table Tools), and enter a table name, for example, TestTable01. There should be no spaces in the name.
Select the Design tab, click Export, then click Export Table to SharePoint List…

A pop-up window is displayed. There are two steps to complete.
Enter the address of your team site in SharePoint, which is the destination for the Excel table that you want to export. In my case, I’m using the following address: https://nakivo.sharepoint.com/sites/BlogTeamSite
Enter a name for your table, for example: Excel to SharePoint list. This name will be used as the SharePoint list name after export.
Enter a description, for example: Import Excel to SharePoint list.
Hit Next to continue.

Define the correct data types for each column of the exported table, then hit Finish.

Now Microsoft Excel connects to your SharePoint site you have selected as destination to export the Excel table into a SharePoint list. Excel needs to pass authentication in Office 365 to export a table to a SharePoint list. You should enter the username and password for your Office 365 account.

If everything is correct, the export process will be completed successfully, and you should see the message:
The table was successfully published and may be viewed on: <address>

Open the link provided in the window in a web browser.
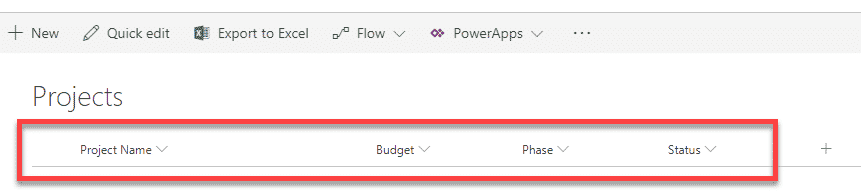
Now you can see the exported Excel table as a list in SharePoint Online.

You can open this list manually in SharePoint Online by opening your team site and going to the Site Contents section in the navigation pane of the web interface.

The advantage of this method is that it’s convenient to export data directly from Excel to a SharePoint list. All you need is Excel and access to SharePoint Online. No third-party apps are required.
Method 3 – How to Export Data from Excel to a SharePoint List with an App
The idea of the third method is that you should use a special SharePoint App to import spreadsheets from Excel to SharePoint lists. You need the Import Spreadsheet app and a web browser that supports ActiveX controls, for example, Internet Explorer.
Open your team site in SharePoint Online, click the Settings icon, and, in the menu that opens, hit Add an app.

In the window that opens, you can see a list of different SharePoint apps. Type “import” in the search field on this page. When the Import Spreadsheet app is found, click it.

On the page that opens, you should enter a name and description of the new SharePoint list that is created after import with the app.
Name: Excel to SharePoint list
Description: Import Excel to SharePoint list
Click Browse, and select the XLSX file (or another Excel file format that is supported by the app) that you want to import to SharePoint as a list.
Hit Import.

ActiveX controls must be enabled in your web browser. If ActiveX controls is not enabled, you will see a warning message in your web browser. Refer to documentation for your web browser to learn how to enable ActiveX controls. ActiveX controls is a piece of software allowing you to interact with content you browse in the web. They can have access to your computer and may lead security issues. ActiveX controls are also known as plug-ins for Internet Explorer.
The advantage of this method is that it doesn’t take much manual intervention.
The disadvantages of the method are that you need to configure ActiveX controls that can be difficult or not supported in your web browser and that you need to use a special web app for SharePoint.
Method 4 – How to Export Data from Excel when Creating a New SharePoint List
There is one more method that allows you to import an Excel table to a SharePoint list when creating a new list in SharePoint Online. You don’t need Excel or other applications to use this method. Just open your web browser and log in to SharePoint Online with your Office 365 account (Microsoft 365) credentials.
Open you team site in SharePoint Online, click the Settings icon, and hit Site contents.

On the Site contents page that opens, click New > List.

A new page opens suggesting that you create a list. On the left side of the page, select From Excel to create a list from Excel. Enter a name for your new list, for example, SharePoint import Excel. Click Upload file, and select an Excel file (XLS, XLSX, or other supported formats) you want to import as a SharePoint list to SharePoint Online. As an alternative, you can select a file that has been already uploaded to a SharePoint site. Hit Next to continue.

A table in the file we have uploaded is recognized. Check the column types and make sure that the data format is correct to preserve consistency. Hit Create when ready to finish.

A SharePoint list has been created successfully and data has been exported from an Excel table to a SharePoint list.

The advantages of this method is that you don’t need to install Excel on your computer to export a table to SharePoint as a list and you don’t need to use a SharePoint app.
How to Export SharePoint List to Excel
You can export a SharePoint list to an Excel table with a few clicks by using a web interface of SharePoint Online.
Open your team site in SharePoint Online, then open the SharePoint list you want to export. Click Export to Excel.

A window notifies you that query.iqy must be opened in Excel. Select Excel as an application to open the downloaded query.iqy file, and hit OK. A Microsoft Excel security notice is displayed when you open a file downloaded from the internet in Microsoft Excel. The purpose of this notification message is to reduce risks of ransomware attacks and infection with other viruses. Click Enable to open the SharePoint list you are exporting to an Excel table.

Now a table opens in Excel and the export of the SharePoint list is finished. Save the table as a file in the needed format, for example, XLS or XLSX.

Refreshing data in Excel
If changes are written to your SharePoint list stored on a team site in SharePoint Online, you can refresh data in the table you have imported to Excel and update your table without the need to perform a new export/import operation. The data in Excel is not refreshed automatically right after changes are saved in a SharePoint list; you should perform one manual operation to do this. You should know how to connect Excel to SharePoint lists in this case.
Let’s add a new Switches line in the SharePoint list.

As you can see, the Excel table we have imported before is not updated automatically with the data we added to our SharePoint list (the Switches line). We need to update it by going to the Data tab and clicking Connections in Excel.

The Workbook Connections window opens. Click Refresh to refresh the data in your Excel table, then you can close this window.

Data has been updated in Excel, and the Switches line is added in the bottom of our Excel table without the need to re-export all data.

Be aware that data is refreshed only in one direction. If you change data in your Excel table and click Refresh, the SharePoint list is not updated.
If you don’t need to update data in the current Excel table, go to Data > Connections, select a query, and click Remove.

Conclusion
Microsoft provides good integration between SharePoint Online and Excel as they both are Microsoft products. There are at least four methods to export data from Excel tables to SharePoint lists. Methods covered in this blog post have advantages and disadvantages you should be aware of when selecting a method that is suitable for you. Select the right method depending on whether you want to do it manually, use Excel, or use another app. Data export from a SharePoint list to Excel is straightforward and affordable for all SharePoint Online users.
When you use SharePoint Online and Office 365 in general, don’t forget to back up your data. NAKIVO Backup & Replication supports Office 365 data backup for Exchange Online, OneDrive for Business, and SharePoint Online. Download the latest version of the product, and back up all needed data in your environment.
SharePoint is a Microsoft online platform that most companies use as an internal website or intranet, i.e., a cloud storage and management system for all business-related data, including your Excel documents. Although you can use OneDrive to share an Excel file, SharePoint unlocks features for more advanced collaboration.
In this post, you’ll understand what a SharePoint list is, how to import data from Excel into a SharePoint list, and how to export from SharePoint to Excel.
If you want to import data into Google Sheets, you can do that easily using Layer. Layer is a free add-on that allows you to share sheets or ranges of your main spreadsheet with different people. On top of that, you get to monitor and approve edits and changes made to the shared files before they’re merged back into your master file, giving you more control over your data.
Install the Layer Google Sheets Add-On today and Get Free Access to all the paid features, so you can start managing, automating, and scaling your processes on top of Google Sheets!
Sharepoint is a web-based collaboration platform developed by Microsoft. It combines various aspects of document management and storage, intranet portals, extranets, and social networking tools into one integrated package. Sharepoint is designed to help businesses manage workflow and collaborate more effectively with colleagues, partners, and customers. By utilizing this platform’s features, organizations can streamline their processes, create virtual workplaces and securely share information.
Sharepoint is available to businesses of all sizes, from small startups to large corporations. It provides users with an easy-to-use interface for accessing documents, tracking tasks, and communicating with others. With Sharepoint, organizations can quickly and easily share files, track projects, assign tasks and hold discussions.
As a result, employees can work more efficiently, complete tasks faster, and improve collaboration between teams. Sharepoint also provides users with a range of other features, such as analytics tools, enterprise search capabilities, document libraries, and mobile access. These additional tools make it easier for businesses to manage their data, stay organized and collaborate from any location.
Sharepoint can be used to store, manage and share documents with colleagues. It also provides a platform for collaboration on projects so that teams can easily work together on tasks in real-time. Sharepoint allows users to create custom webpages, such as intranets and extranets, which can be used for team collaboration or client interaction. Users can also access Sharepoint from their mobile devices, making it easier to stay connected and collaborate on the go.
In addition to the features mentioned above, Sharepoint also offers a range of other tools for managing documents, including document libraries, lists, workflows, and discussions. These features make it easier for users to organize and manage their data, resulting in improved efficiency and collaboration.
A SharePoint list is mainly a data container, similar to an Excel table with rows and columns. These lists can keep all types of detailed information on your clients, employees, products, or services.
SharePoint lists allow you to set up columns according to the data format, i.e., text, number, dates, currency, etc. You can attach photos or hyperlinks to make your list as detailed as possible.
Let’s first start by creating a SharePoint list by importing the data from Excel.
How to Combine Multiple Excel Files Into One
Discover the most popular methods used to manually or automatically combine multiple Excel spreadsheets and data inputs into one master file
READ MORE

To export Excel data to a SharePoint List, you need to make sure of three things:
- You have formatted the data as a table.
- You have named the table.
- You have named the columns.
This is how you can export an Excel table to a SharePoint list.
- 1. Open your Excel workbook and select the whole table. Then, go to Table Design > Export > Export Table to SharePoint List.

Import And Export From SharePoint To Excel — Export Table to SharePoint List
- 2. Enter the URL of your SharePoint site in the “Address” bar.

Import And Export From SharePoint To Excel — SharePoint site URL
- 3. Tick the box “Create a read-only connection to the new SharePoint list”. This allows the new data to show up in your Excel table when you add or refresh your SharePoint list.

Import And Export From SharePoint To Excel — Create read-only connection
- 4. Type in the “Name” for the SharePoint List. Optionally, you can add further information in the “Description” box. Then, click “Next”.

Import And Export From SharePoint To Excel — Name and Description
- 5. Review the data types per column in case you need to make any changes. Once you’re ready to export, click “Finish”.

Import And Export From SharePoint To Excel — Finish to export
- 6. Go to your SharePoint site to check that it has exported the table correctly. It will appear under the “Activity” group, as shown below.
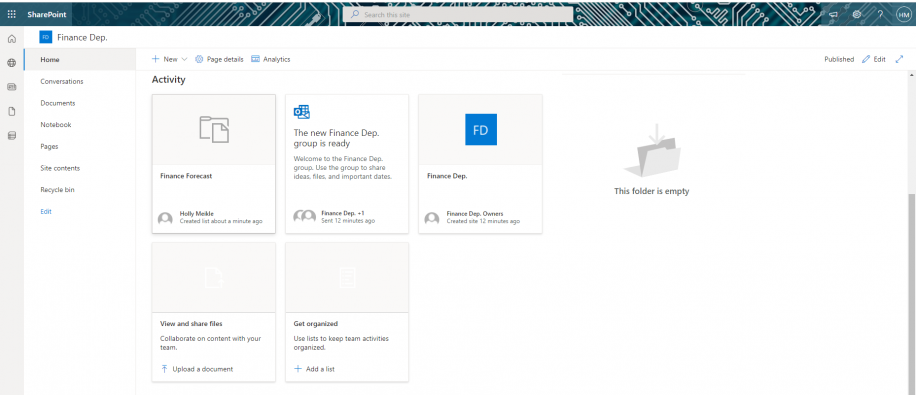
Import And Export From SharePoint To Excel — Check Excel in SharePoint
Now that you know how to export an Excel table to a SharePoint list, let’s see how you can do the reverse process.
To export data from a SharePoint list to Excel, follow these steps.
- 1. Go to the SharePoint site and click on the SharePoint list you just created to open. Go to Export > Export to Excel. This will export your list as a “query.iqy” file.

Import And Export From SharePoint To Excel — Select SharePoint list
- 2. Open the “query.iqy” file and click on “Enable” if you get the “Microsoft Excel Security Notice” alter.

Import And Export From SharePoint To Excel — Enable
Let’s see how you can perform these same actions automatically using Power Query.
How To Use Excel Power Query for Beginners?
With Power Query, you can import data from different sources and prepare the data for analysis. Here’s how to use Power Query in Excel.
READ MORE

PowerQuery is an automation feature in Excel that allows you to perform repetitive tasks automatically. Unlike the read-only connection set in the previous method, this will give you more control over which data in the SharePoint list you would like to import or export.
However, to import or export a SharePoint list in Excel using Power Query, you will need to subscribe to an Enterprise Plan.
- 1. Open your Excel spreadsheet and go to Data > Get Data > From Online Services > From SharePoint Online List.
- 2. Enter the URL to your SharePoint site. Click “OK” to continue.
- 3. Select the SharePoint list to import. Then, a preview of the list should appear on the right.
Please note: All SharePoint lists assign a unique identifier to each column. This ID column is created automatically on SharePoint. Simply edit according to preference to exclude any unwanted column.
- 4. Select the columns to import by pressing down the Ctrl key and right-click on any of the selected headings to “Remove Other Columns”.
- 5. Once you finish, “Save” and “Load”. In the Power Query Editor, go to Home > Close & Load.
Now that you’ve set up your PowerQuery connections between SharePoint and Excel, you can quickly update your SharePoint list from Excel.
To automatically update a SharePoint list from Excel, you can do so manually by simply clicking on the “Refresh” button under the “Table Design” tab. If you want Excel to do this automatically through a workflow, you can do so using PowerQuery, Power BI, or Power Automate. However, note that automating with PowerQuery requires you to have the Enterprise Plan. This is how you can quickly update a SharePoint list from Excel using Power Automate.
- 1. Launch Power Automate and go to “Templates” on the left-side menu.

Import And Export From SharePoint To Excel — Templates
- 2. Type in “When a file is modified in OneDrive, synchronize the changes to SharePoint” to quickly access the template.

Import And Export From SharePoint To Excel — Type in template name
- 3. Make sure you are logged in to all applications to proceed. Click “Continue”.

Import And Export From SharePoint To Excel — Continue
- 4. Select the folder where you have stored the Excel file to trigger the “When a file is modified” action. Then, select the SharePoint folder where you saved the list. Once you finish, click “Save”.

Import And Export From SharePoint To Excel — Fill in flow details
- 5. Test the flow to check that it runs correctly by clicking on the “Test” button to the far right.

Import And Export From SharePoint To Excel — Test flow
Additionally, Power Automate may ask you to make a change in your Excel file to trigger the flow. You can also create an automatic trigger. However, this requires a more complex setup which you can learn in more detail here.
Want to Boost Your Team’s Productivity and Efficiency?
Transform the way your team collaborates with Confluence, a remote-friendly workspace designed to bring knowledge and collaboration together. Say goodbye to scattered information and disjointed communication, and embrace a platform that empowers your team to accomplish more, together.
Key Features and Benefits:
- Centralized Knowledge: Access your team’s collective wisdom with ease.
- Collaborative Workspace: Foster engagement with flexible project tools.
- Seamless Communication: Connect your entire organization effortlessly.
- Preserve Ideas: Capture insights without losing them in chats or notifications.
- Comprehensive Platform: Manage all content in one organized location.
- Open Teamwork: Empower employees to contribute, share, and grow.
- Superior Integrations: Sync with tools like Slack, Jira, Trello, and more.
Limited-Time Offer: Sign up for Confluence today and claim your forever-free plan, revolutionizing your team’s collaboration experience.
Conclusion
SharePoint has proven to be a great platform to store and manage data for any organization. Moreover, it provides powerful features to reach advanced levels of collaboration across various departments within a company.
In this article, you have learned how SharePoint and Excel integrate, so you can export and import data manually and automatically using the PowerQuery tool. You simply have to consider that the features offered for Office 365 are more limited in the Business Plan, than in the Enterprise Plan.
If you’re interested in unlocking the full potential of Office 365 tools and creating your own workflows between apps, read Power Automate & Excel: Examples And Use Cases.