
Экспорт можно выполнить в один из следующих вариантов:
-
Excel книги Данные имеет одностороннее подключение к исходному списку. Периодическое обновление книги извлекать изменения, внесенные в список. -
CSV-файл (разделенные запятыми значения) Его можно открыть в Блокноте или Excel. Данные не подключены к исходному списку. (В macOS единственным доступным вариантом является экспорт в CSV.)
Важно:
-
Максимальное число строк, которые можно экспортировать в CSV-файл, составляет 30 000.
-
Возможно, вы заметили, что в библиотеках документов на короткое время включен параметр «Экспорт в CSV». Параметр был включен непреднамеренное, поэтому нам пришлось его отключить. Мы будем рады использовать эту возможность в библиотеках документов, и мы работаем над ней, но не можем оценить время, которое можно использовать совместно.
-
Экспорт в Excel книги
-
На панели команд списка выберите » Экспортировать >в Excel».

Важно:
Параметры экспорта доступны только в том случае, если элементы списка не выбраны.В зависимости от браузера вы можете сохранить, открыть или открыть файл напрямую.
Примечание: При сохранении файла имя файла по умолчанию для первой копии — query.iqy, и оно помещается в папку загрузки по умолчанию для браузера. Чтобы изменить имя и расположение, используйте команду «Сохранить как» в браузере.
-
При необходимости нажмите кнопку >«Открыть » после начала скачивания файла.
-
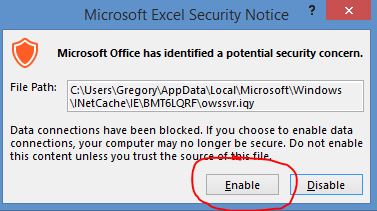
Если появится запрос и вы доверяете SharePoint сайту, на Excel безопасности нажмите кнопку «Включить».
-
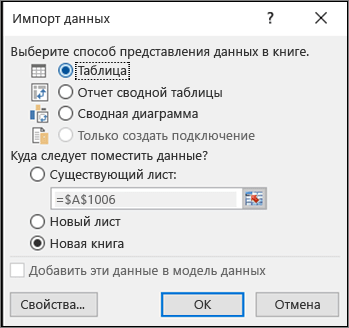
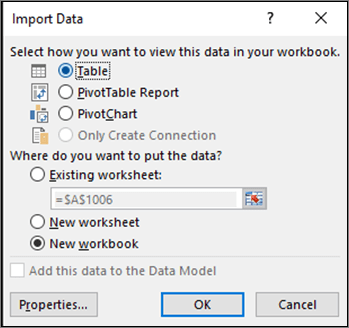
В диалоговомExcel «Импорт данных» выберите «Как вы хотите просмотреть эти данные» и «Где следует поместить параметры данных».
-
По завершении нажмите кнопку «ОК». Список должен отображаться в Excel.

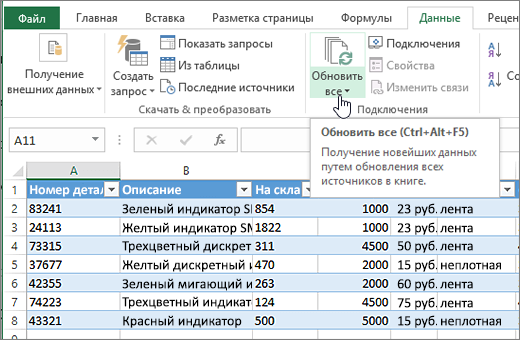
Excel создает Excel с односторонним подключением к данным на основе файла веб-запроса. Чтобы перенести новую копию списка SharePoint в Excel, выберите «Обновить все» на вкладке «Данные «. Изменения, внесенные Excel таблицы, не будут отправляться в SharePoint списка.
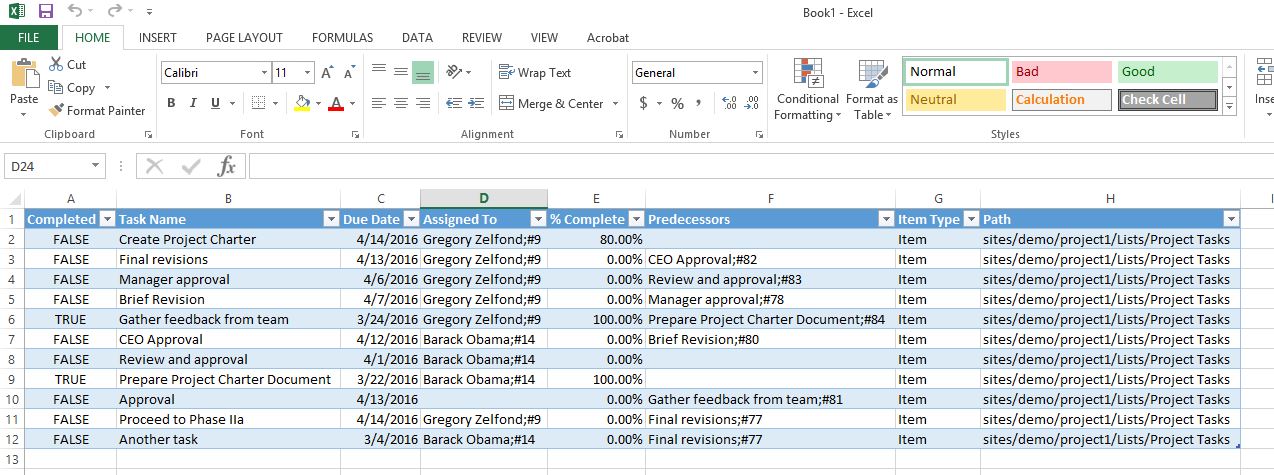
Если SharePoint содержит папки, структура папок не отображается в результирующей Excel таблицы. Однако столбцы «Тип элемента» и «Путь» добавляются в таблицу Excel, что позволяет фильтровать и сортировать данные в зависимости от типа и расположения или вложенной папки списка.
Экспорт в CSV-файл
При экспорте в CSV-файл можно экспортировать не более 30 000 строк данных.
-
Откройте список, данные которого требуется экспортировать.
-
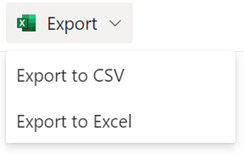
На панели команд над списком выберите » Экспорт >экспорт в CSV-файл » в качестве типа выходных данных.
(В macOS на панели команд над списком просто выберите «Экспорт в CSV-файл».)
Примечание: Параметр «Экспорт » доступен только в том случае, если элементы списка не выбраны.
-
Нажмите кнопку « Открыть», чтобы открыть файл в Excel. Затем можно сохранить файл в виде Excel книги, которая позволяет добавлять форматирование данных в нужном формате.
Кроме того, можно выбрать команду «Сохранить» , чтобы сохранить файл в .csv формате на компьютере.
-
На панели команд списка SharePoint выберите «Экспорт в Excel
«.Важно:
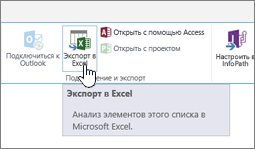
Экспорт в Excel доступен только в том случае, если элементы списка не выбраны.Классический интерфейс SharePoint показывает ленту над списком, а не панель команд. Выберите вкладку «Список » на ленте и нажмите кнопку «Экспорт Excel«.
В зависимости от браузера вы можете сохранить, открыть или открыть файл напрямую.
Примечание: При сохранении файла имя файла по умолчанию для первой копии — query.iqy, и оно помещается в папку загрузки по умолчанию для браузера. Чтобы изменить имя и расположение, используйте команду «Сохранить как» в браузере.
-
При необходимости нажмите кнопку >«Открыть » после начала скачивания файла.
-
Если появится запрос и вы доверяете SharePoint сайту, на Excel безопасности нажмите кнопку «Включить».
-
В диалоговомExcel «Импорт данных» выберите «Как вы хотите просмотреть эти данные» и «Где следует поместить параметры данных».
-
По завершении нажмите кнопку «ОК». Список должен отображаться в Excel.
 «.
«.
Excel создает Excel с односторонним подключением к данным на основе файла веб-запроса. Чтобы перенести новую копию списка SharePoint в Excel, выберите «Обновить все» на вкладке «Данные «. Изменения, внесенные вExcel таблицы, не будут отправляться в SharePoint списка.
Если SharePoint содержит папки, структура папок не отображается в результирующей Excel таблицы. Однако столбцы «Тип элемента» и «Путь» добавляются в таблицу Excel, что позволяет фильтровать и сортировать данные в зависимости от типа и расположения или вложенной папки списка.
You can export to either:
-
Excel workbook The data has a one-way connection to the original list. Periodically refreshing the workbook pulls in changes that have been made in the list. -
CSV (comma-separated values)file It can be opened in Notepad or Excel. The data is not connected to the original list. (On macOS, exporting to CSV is the only available option.)
Important:
-
The maximum number of rows you can export to a CSV file is 30,000.
-
You might have noticed ‘Export to CSV’ option enabled on document libraries for a brief period. The option was enabled unintentionally so we had to disable it. We would love to bring the capability to document libraries, and we are working on it but do not have any time estimate that can be shared.
-
Export to an Excel workbook
-
From the command bar of the list, select Export > Export to Excel.
Important: The Export options are available only when list items are not selected.
Depending on your browser, you can save and open, or open the file directly.
Note: If you save the file, the default file name for the first copy is query.iqy, and it is placed in the default download folder for your browser. To change the name and location, use your browser’s Save as.
-
If needed, select OK > Open after the file download begins.
-
If prompted and you trust the SharePoint site, in the Excel security page, select Enable.
-
In the Excel Import Data dialog box, select the How you want to view this data and Where do you want to put the data options.
-
When done, select OK. The list should appear in Excel.

Excel creates an Excel table with a one-way data connection based on a web query file. To bring a fresh copy of the SharePoint list to Excel, select Refresh All on the Data tab. Changes made to Excel table will not be sent to the SharePoint list.
If your SharePoint list contains folders, the folder structure does not appear in the resulting Excel table. However, the Item Type and Path columns are added to the Excel table so you can filter and sort the data, based on its type and location or subfolder of the list.
Export to a CSV file
When exporting to CSV, you can export a maximum of 30,000 rows of data.
-
Open the list whose data you want to export.
-
From the command bar above the list, select Export > Export to CSV as the type of data output.
(On macOS, from the command bar above the list, simply select Export to CSV.)
Note: The Export option is available only when list items are not selected.
-
Select Open to open the file in Excel. Then you can save the file as an Excel workbook, which allows you to add format the data as you like.
Alternatively, select Save as to save the file in .csv format on your computer.
-
From the command bar of the SharePoint list, select Export to Excel
.Important:
Export to Excel is available only when list items are not selected.The classic SharePoint experience shows a ribbon above the list, not a command bar. Select the List tab on the ribbon, and then select Export to Excel.
Depending on your browser, you can save and open, or open the file directly.
Note: If you save the file, the default file name for the first copy is query.iqy, and it is placed in the default download folder for your browser. To change the name and location, use your browser’s Save as.
-
If needed, select OK > Open after the file download begins.
-
If prompted and you trust the SharePoint site, in the Excel security page, select Enable.
-
In the Excel Import Data dialog box, select the How you want to view this data and Where do you want to put the data options.
-
When done, select OK. The list should appear in Excel.
 .
.
Excel creates an Excel table with a one-way data connection based on a web query file. To bring a fresh copy of the SharePoint list to Excel, select Refresh All on the Data tab. Changes made to the Excel table will not be sent to the SharePoint list.
If your SharePoint list contains folders, the folder structure does not appear in the resulting Excel table. However, the Item Type and Path columns are added to the Excel table so you can filter and sort the data, based on its type and location or subfolder of the list.
In this SharePoint tutorial, We will discuss how to export SharePoint list to excel. Also, We will cover the below topics:
- How to open a SharePoint list in excel
- Access to the resource is forbidden (error) excel SharePoint
- How to open a SharePoint list in excel
- Get data from SharePoint Folder in excel
- How to export SharePoint list to CSV using Microsoft flow
Here, I am going to explain how to export a SharePoint list to excel.
- Open the SharePoint Online list which you want to export to excel.
- Click on Export to Excel in the command bar to download your list in your local system.

- Once you click on Export to excel it will download to your local system. The file will be something like query
- When you try to open the file, you might get a Microsoft Excel Security Notice dialogue box. Just click on the Enable to open the excel.

Here, you can see the SharePoint Online list items is exported to Microsoft Excel.

This is how to export a SharePoint list to excel.
You may also like, How to display excel spreadsheet in SharePoint. and SharePoint custom list example.
How to open a SharePoint list in excel
Now, we will see how to open a SharePoint list in excel. We will see here how to open a SharePoint Online list in excel.
- Open Microsoft Excel to open the SharePoint Online list.
- In Microsoft Excel, click on Data tab >> Get Data.
- Select From Online Services >> From SharePoint Online List.

Then in the next dialog box provide SharePoint Online Site URL and click on OK.
Note: Enter the Site URL, no need to add list URL.

- Once you click on the OK, it will open the Navigator where you can see all the SharePoint Online lists presented in the SharePoint site.
- Select a SharePoint list or you can also select multiple lists to open it.
- Now, Click on Transform Data at the bottom of the page and it will open the SharePoint list in Power Query Editor.
Note: If you have not signed in excel, then it might ask you to provide the credentials.

If you will click on Load, then it will display all the columns from the SharePoint list that includes the default columns also. If you want to display only the selected columns, then click on Transform Data.
From the Power Qwery Editor window, you can select the columns, click on File >> Choose Columns.

In Choose Columns window, you can choose the list columns to display in the excel, then click on OK.

After selected the columns, click on Close & Load to see your list.

Here, you can see your SharePoint Online list in Microsoft Excel with your selected columns.

This is how we can open a SharePoint Online list in excel.
Access to the resource is forbidden (error) excel SharePoint
While trying to open the SharePoint list items in excel, you might get an error “Access to the resource is forbidden“, if you will try to connect to SharePoint Online site from Data -> From Web and then provide the URL.


Once you click on the OK, a dialogue box will appear with an error message “Access to the resource is forbidden”.

To fix the issue, try to connect to the SharePoint site from, Data -> Get Data -> From Online services -> From SharePoint Online List.
Get data from SharePoint Folder in excel
Here, you will see how to get data from SharePoint folder in excel.
Open an excel workbook, go to Data -> Get Data -> From File -> From SharePoint Folder.

Now, it will ask to provide the Site URL and then click on OK. It will redirect to the Navigator preview with all the list of files in the SharePoint site.
If you will click on Load, then it will display all the columns from the SharePoint list that includes the default columns also. If you want to display only the selected columns, then click on Transform Data.

This is how to get data from SharePoint Folder in excel.
How to export SharePoint list to CSV using Microsoft flow
Here, I am going to explain how to export SharePoint list to CSV using Microsoft flow.
- Open SharePoint Online list, click on Automate>> Power Automate >> Create a flow in the commad bar.

In Create a flow window, click on Show more then select “Copy SharePoint list items into a CSV each week”.This template will copy the SharePoint list data and save it as CSV file in OneDrive.

Once you select the template, Microsoft will redirect you the flow site and set the connections across services.

Once the connections are established, you can edit the flow and set the SharePoint Path in Get items.

In Create CSV table, flow creates the CSV table and also creates Output.csv file name.
Now, click on Save .

In Test Flow window, select “I’ll perform the trigger action” option then click on Test.
In the next window click on Run Test.

Here, you can see that your flow ran successfully.

Open OneDrive and you can see your excel file created by flow.

Here, you can see that SharePoint data is exported to the excel file.

This is how to export SharePoint list to CSV using Microsoft flow.
You may like the following SharePoint tutorials:
- Power Automate update SharePoint list increment integer field
- Power Automate update SharePoint list item
- How to delete all items from SharePoint list
- SharePoint list permissions
- How to create Power BI report from SharePoint list
- Create SharePoint list view
- SharePoint list delete title column or SharePoint list title column remove
- How to create a calculated column in SharePoint List or Library
In this SharePoint tutorial, We discussed how to export a SharePoint list to excel. Also, We covered the below topics as:
- How to open a SharePoint list in excel
- Access to the resource is forbidden (error) excel SharePoint
- How to open a SharePoint list in excel (export sharepoint list to excel)
- Get data from SharePoint Folder in excel
- How to export SharePoint list to CSV using Microsoft flow

Bhawana Rathore is a Microsoft MVP (3 times in Office Apps & Services) and a passionate SharePoint Consultant, having around 10 years of IT experience in the industry, as well as in .Net technologies. She likes to share her technical expertise in EnjoySharePoint.com and SPGuides.com
“Can you export this to Excel?” I bet you hear this request all the time. If you are an avid Excel user or just prefer to visualize things in Excel, you are in luck. Being a Microsoft product, SharePoint has native integration with Excel. And any content can easily be exported to Excel.
What can I export from SharePoint to Excel?
Any information contained in any list can be exported to Excel. This includes the following Out of the Box web parts:
- Contacts
- Calendar
- Tasks
- Issues
- Custom List
- Discussion Board
- Document Library
Yes, you can also export document libraries (metadata, not the actual files) to Excel, since they are also lists.
How do I export from SharePoint to Excel?
It is quite easy. Here are detailed instructions:
- Make sure you use Internet Explorer Browser. Export to Excel does not work from Google Chrome
- Go to the list you want to export to Excel (i.e. Calendar)
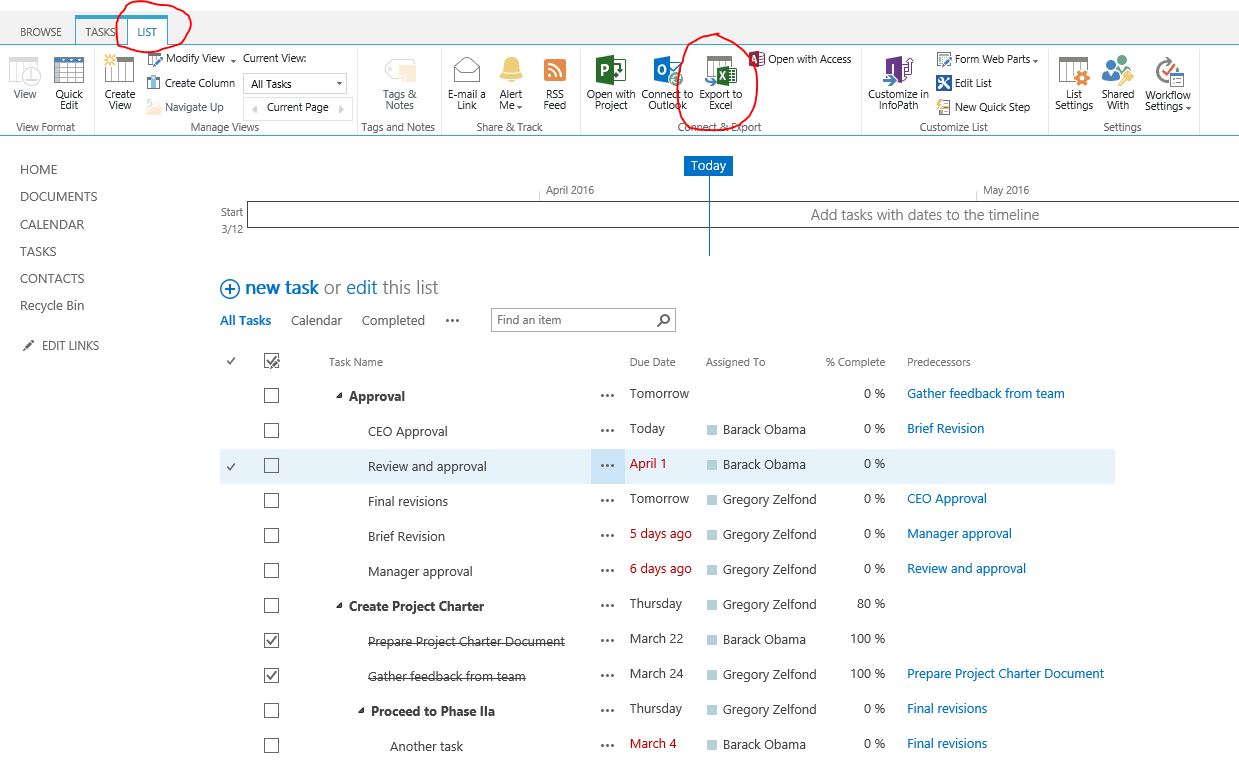
- Navigate to the view you would like to export. The way it works with export to Excel, what you see in SharePoint is what you get in Excel. In other words, if you are exporting a particular view and you only see 5 columns, you will get that view/those columns exported. So if you are looking to export the completed List (database), make sure you have all the columns visible in your view (i.e. All Items View). Also make sure your view is not grouped! (Grouped columns will not get exported to Excel)
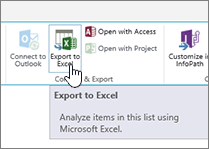
- Click on List tab up top, select Export to Excel in the middle of the ribbon

- You might get a warning message from the browser – just click OK or proceed
- Excel will open up, but you might get another warning – just click Enable

- Your Excel will open up now with data exported!

Refresh the Data in Excel without doing another Export
One important thing to know about export to SharePoint is that the Excel file you exported to still maintains a connection to SharePoint. That means that any changes in the list in SharePoint will propagate down to your Excel file on a computer. Excel will not change automatically. You have to refresh it for changes to trickle down. Here is how to do this:
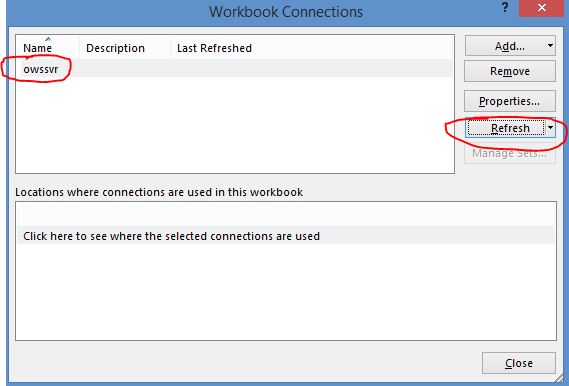
- From Excel, click on Data Tab, then Connections

- On the pop-up screen that appears, click Refresh button, then Close

- Your data in Excel has been updated!

This refresh functionality is really cool if you let’s say build some sort of pivot tables/charts based off SharePoint data and want to update your chart based on changes in SharePoint. This way, you do not need to reinvent the wheel and re-export data, build charts, etc. All you have to do is just click that Refresh button. Very powerful!
Important to note that the connection between SharePoint and Excel is 1-way. In other words, information flows form SharePoint to Excel, not the other way around! So any changes in Excel will not go back to SharePoint. Once you click on Refresh, SharePoint will overwrite whatever you did in Excel.
Break the connection between Excel and SharePoint
Unless you specifically refresh using instructions above, your data in Excel will remain as it was at the time of the export. If, for whatever reason, you would like to remove that connection permanently, please follow the instructions below:
- From Excel, click on Data Tab, then Connections
- On the pop-up screen that appears, click Remove

- On the warning message that appears, click OK

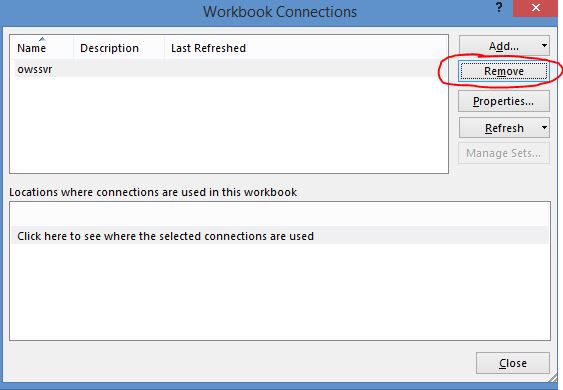

Table of Contents
- Introduction
- Problem
- Solutions
- See Also
Introduction
Microsoft office tools are most famous and widely used all over the world in offices. So it’s no surprise that Office tools can be used in or can use other Microsoft products. So
is SharePoint. Excel application amongst the Office tool is most used by people in offices to store records, to create the charts, reports. So in this article we are going to see how we can get data into excel sheet from the SharePoint list.
Problem
So let’s say your manager comes and ask you that he wants single excel file in which there will be multiple sheets which will be linked to separate single SharePoint list and will
fetch all records from there. And he/she wants it quickly and no need of new application. Now as a developer you will first think what Manager is saying? Without writing new application? Is there any way I can do this quickly? Yes you can do this by some tricks.
Solutions
Yes you can achieve this requirement with the help of SharePoint list and Excel. What you need is just follow below steps. Before starting let’s take two lists: A and B for our
example. So the Problem statement will be like: fetch data of list A into Sheet1 and data of list B into Sheet2. Let’s start with below steps:
1. Go to SharePoint List A and then click on List tab on Ribbon control
2. Then click on ‘Export to Excel’ button on ribbon control

3. Save the file with meaningful name, for example: owssvrA.
4. Repeat the steps for 1 to 3 for List B and save file with another name: owssvrB.
5. Now we have ‘MS Excel Web Query File’ files for both lists.
6. Open new excel application.
7. Go to Sheet1 and click on any cell.
8. Click on Data in ribbon

9. Click on Existing Data Connection
10. Click on ‘Browse for More’ and go to the location where ‘’MS Excel Web Query File’ files are saved.

11. Select List A’s Query File and click Open.
12.
On Import Data pop up select ‘New Worksheet’, (if you know exact column numbers then choose existing worksheet and cell range).

13. Now you have data of List in your Excel sheet.

14. Rename sheet with name: “Sheet1” and you are done for list A.
15. Now repeat same steps for List B and you have two lists data in two separate sheets. You can refresh data as well from the ribbon button.
Isn’t it easy?? And once this is done you have this for forever to use. This is best solution for those who are comfortable with the excel sheet. You
can also create the chart with above approach; only there is slightly change after step 11. Let’s do it also, so steps onwards 12 will be like:
12. On Import Data pop up choose ‘Pivot Chart and Pivot table Report’ and ‘New worksheet’.

13. Then click on the OK button. And it will open new sheet with chart configuration wizard. Just configure how you want your chart and you are done. You
can also refresh your charts/reports so that latest data from list can be taken. You have refresh button under Data tab on ribbon control. So without writing single line of code and minimal effort you
have implemented great solution for your manager. Isn’t it great?
See Also
- SharePoint
2013: How to Export Excel Sheet to SharePoint List