
In this SharePoint tutorial, we will discuss how to configure the excel service application in SharePoint 2013/2016. Also, we will check, what is excel services in SharePoint? Which version of SharePoint support Excel Services? Why & Where we use Excel Services in SharePoint 2013? Advantages with Excel Services in SharePoint 2013/2016.
What is Excel Services in SharePoint 2013?
Excel service is a shared service in SharePoint that provides you a facility to publish Excel workbooks on SharePoint portal for better collaboration. These published workbooks cab be fully secured and managed across the users as per the business needs.
The beauty of excel service is excel workbook will be rendered in the browser seamlessly. So user really no need to have office installed on their machine.
Which version of SharePoint support Excel Services?
Excel services will be available only in the Enterprise version of SharePoint server 2013. Excel Services consists of Excel Calculation Services, the Excel Web Access Web Part, and Excel Web Services for programmatic access.
Why & where we use Excel Services in SharePoint 2013?
In SharePoint 2013 Enterprise portals Excel services play a key & vital role. Excel service is primarily used for Business Intelligence scenarios. As part of BI, Excel workbooks can connect to external content sources to generate reports and can be easily published in SharePoint document libraries.
Since Excel Services can render workbooks in browser it will be much quicker and easily readable. This really gives a free hand to collaborate the reports/documents across the organization.
Advantages with Excel Services in SharePoint 2013/2016
Excel Service will provide below a list of advantages:
- Edit and browse the workbooks in a browser
- Sharing workbooks
- Building business intelligence (BI) dashboards
- Report building in Power view & Power pivot
Let us learn step by step approach to configure excel services in SharePoint 2013.
Log on to the SharePoint Application server as a FARM administrator account
Open Central Admin as administrator. Open Manage Service Applications in the below path
Central Administration -> Application Management ->Manage Service Applications (under Service Applications).

Click on New service application and select “Excel Service Application” as shown in the below screenshot.

Enter the below mandatory fields:
- Service application Name
- Application pool name
- Select the desired managed account
- Once you enter all the required fields click on the “OK” button

Once you click on OK button SharePoint will create a new Excel Service Application.

As soon as the service application is created ensure than “Excel Calculation Services” is running as part of services on the server.
SharePoint 2013 Central Administration -> Application Management -> Manage Services on Server (under Service Applications)


The last step is to check the user permissions on the content database.
- Log on to SQL server with an admin account
- Launch SQL server management studio
- Select the right content DB
- Expand Security
- Select Users option
- Select the right user and ensure the login name
- Ensure the right permissions DBOwner & SPDataAccess


Configure excel services SharePoint 2013 PowerShell
Below PowerShell commands configure excel services in SharePoint 2013/2016.
Syntax:
$webApp = Get-SPWebapplication << URL of the web application >>
$webApp.GrantAccessToProcessIdentity(<<"service account">>)
Example:
$webApp = Get-SPWebapplication "http://sharepoint13:12345"
$webApp.GrantAccessToProcessIdentity("mstechnologySPFARM")Now Excel services configured successfully it is time for us to test it.
As I mentioned above excel services primarily uses in SharePoint BI, so Follow the below steps to ensure the same:
Create a new site collection with Business Intelligence template in the same web application.
Web application: http://sharepoint13:12345/
BI Site collection: http://sharepoint13:12345/sites/bi/
Note: Change URL as per your organization/company policies
Navigate to BI Site collection and open site content
Open “Documents” document library
You must see “Excel Service Sample Workbook.xlsx” file. Double click on that file.
Notice the URL you will see “xlviewer.aspx” which proves that this excel has been rendered using excel services.

You may like the following SharePoint tutorials:
- How to get SharePoint features using PowerShell
- Customize access denied page in SharePoint 2013/2016
- How to create a custom master page in SharePoint using design manager
- Configure user profile service application in SharePoint 2016 step by step tutorial
- Create and use image mapping in SharePoint Online
- How to export user permission in SharePoint using PowerShell
- SharePoint change list URL
- SharePoint bcs step by step
- How to make SharePoint site read only?
In this tutorial, we learned what is excel services in SharePoint? advantages of using excel services in SharePoint 2013/2016? Then we learned how to configure excel services in SharePoint 2013/2016.

I am Krishna.Vandanapu a SharePoint architect working in IT from last 13+ years, I worked in SharePoint 2007, 2010, 2013, 2016 and Office 365. I have extensive hands on experience in customizing SharePoint sites from end to end. Expertise in SharePoint migration tools like Sharegate, Doc Ave and Metalogix. Migrated SharePoint sites from SharePoint 2007 to 2010 and 2010 to 2013 several times seamlessly. Implementing CSOM with Microsoft best practices. Spent quality time in configuring SharePoint application services like User Profile, Search, Managed Meta data services etc. Now exploring SharePoint Framework and SharePoint 2019
From Wikipedia, the free encyclopedia
Excel Services is a server technology included in SharePoint 2010 and SharePoint 2007. This shared service enables users to load, calculate, and display Excel 2010 workbooks on Microsoft Office SharePoint Server 2010.
Using Excel Services, users can reuse and share Excel workbooks on Microsoft Office SharePoint Server 2010 portals and dashboards. For example, they can create content in Excel 2010 and share it by using an Office SharePoint Server 2007 portal and dashboard. The entire workbook or just parts of it (such as just a single sheet, chart or table) can be shared.
End-users can view live, interactive workbooks using only a web browser. They can also interact with workbooks to explore data, and analyze Pivot Table reports and charts by using a browser. Excel Services supports workbooks that are connected to external data sources. Users can embed connection strings to external data sources in the workbook or save them centrally in a data connection library file.
Selected cells in worksheets can be made editable by making them named ranges or «parameters». Items which are set as «viewable», when they save to Excel Services, will appear in the Parameters pane in the browser. Users can change the values of these named ranges in the parameters pane and refresh the workbook. They can also use the portal’s filter Web Part to filter several Web Parts (Excel Web Access and other types of web parts) together.
References[edit]
- Asnash et al. (2007). Beginning Excel Services. Wiley. ISBN 0-470-10489-9
- Prish, S. (2007). Professional Excel Services. Wiley. ISBN 0-470-10486-4
External links[edit]
- Official Excel Services 2007 website
- Official Excel Services 2010 website
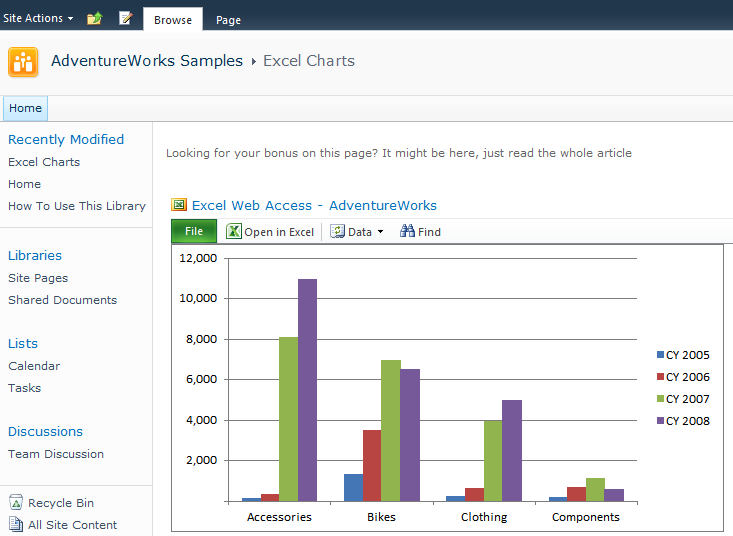
Графики — это то, за что охотней всего платит клиент и начальник дает премию. Почему? Потому что они позволяют быстро понять ситуацию и так же быстро принять решение. Целая армия аналитиков работает сегодня в области Business Intelligence и занимается разработкой и построения отчетов, большинство которых (опираюсь на личный опыт) сделано с помошью Microsoft Excel различных версий. В последнее несколько лет очень актуально отображение отчетов в Web (как на внутренних сайтах так и доступных всем). Поскольку покупка специализированных решений не всегда целесообразно по соображениям стоимости, использование готовых решений по управлению контентом (CMS) позволяет достигнуть результата с наименьшими затратами. В данной статье я расскажу, как показать отчеты СMS системе разработанной компанией Microsoft, Microsoft SharePoint 2010 Server.
В результате прохождения всех шагов мы получим страничку, на который мы увидим графики, которые динамически (для этого нужны дополнительные шаги, которые я опишу) данные из примеров AdventureWorks 2008R2 и научимся такие странички создавать.
Статья состоит из следующих частей
1. Устанавливаем SharePoint Server 2010
2. Настраиваем SharePoint Server 2010
3. Публикуем графики для Excel Services 2010
4. Показываем графики на странице. Заключение
Под катом первая часть
Для работы нам понадобятся:
1) Cервер, на котором установлена 64-битная (это требование для SharePoint 2010) операционная система, Windows Server 2008 SP2 или Windows Server R2. На сервере должно быть минумум 4GB оперативной памяти и жесткий диск не менее 40 GB. Для успешной установки у Вас должны быть привилегии локального администратора.
2) Желательно, чтобы сервер был включен в AD домен и была возможность добавлять доменных пользователей, под которыми будут запущены различные сервисы. Либо у Вас должны быть права доменного администратора либо кто-то с такими правами должен создать пользователей для Вас.
3) Клиентская машина на которой установлен IE 8 или Firefox 3
При установке понадобится следующие программы:
1. SQL Server 2008 R2
2. Примеры AdventureWorks 2008R2
3. SharePoint Server 2010.
4. Microsoft Office 2010.
— При установке я буду описывать только важные шаги, на которые нужно обратить внимание. Все программы требуют привилегий локального администратора, поэтому до начала установки убедитесь, что они у Вас есть
1) Сначала нужно установить SQL Server 2008 R2 как Standalone Server. Когда спросит тип лицезии — выбирайте Enterprise Evaluation (в этом случае мы сможем использовать один экземпляр SQL Server вместо создания нескольких). Если Вы планируете использовать существующий экземпляр SQL Server, то на данном этапе можно выбрать Express установку, для хранения контента в SharePoint ее должо быть достаточно.
Если Вы планируете показывать отчеты, сделанные в MS Reporting Services на SharePoint то на шаге конфигурации Reporting Services нужно выбрать SharePoint Integrated Mode.
При запросу, с привилениями какого пользователя нужно запускать SQL Server, лучше всего установить доменного пользователя, созданного специально для этой цели(sqlservice). Поскольку примеры не поставляются вместе с SQL Server 2008 R2, их необходимо скачать и установить. При возникновении вопросов рекомендую почитать документацию
2) После завершения установки SQL Server (самый простой шаг, если Вы используете 2008 R2) можно переходить к установке SharePoint 2010 Server. На данном шаге желательно подключить сервер к Internet — это похволит мастеру установки скачать необходимые обновления. Запускаем мастер установки, выбираем Install prerequisites и устанавливаем все, что Wizard посчитает нужным. Установка, как правило, проблем не вызывает, в отличие от этапа концигурации, который я опишу в следующей статье на хабре и моем блоге на английском
Это статья серии “Введение в SharePoint 2010”
В предыдущей главе рассматривалась настройка внешнего вида сайтов SharePoint.
В этой главе рассматриваются возможности для построения аналитических решений в SharePoint 2010.
В этой части руководства рассматриваются следующие темы:
- Что такое BI?
- Службы Excel
- Excel Web Access
- REST API для служб Excel
Что такое BI?
Business Intelligence (с англ. бизнес-аналитика) представляет из себя набор приложений и технологий, предназначенных для хранения, сбора, анализа и обработки информации. С помощью средств BI пользователи получают нужную информацию в удобном для восприятия виде – аналитические диаграммы и таблицы, списки состояний и т.д.
При правильном использовании BI позволяет облегчить процесс принятия решений и работы с большими объемами данных. В качестве анализируемых данных могут быть различные показатели эффективности, такие как количество продаж, прибыльность определенных категорий товаров, отслеживание тенденций продукта и т.д. Таким образом, спектр областей применения BI является достаточно обширным.
В SharePoint 2010 есть инструменты для работы с бизнес-аналитикой, о возможностях которых речь пойдет ниже. Удобно, что SharePoint 2010 тесно интегрирован с Microsoft SQL Server, что позволяет объединить преимущества этих продуктов.
Службы Excel
Excel очень известный инструмент для работы с таблицами данных, с которыми можно выполнять расчеты по собственным или стандартным формулам, строить графики или диаграммы.
Службы Excel состоят из следующих компонентов:
- Excel Web Access
- REST API для служб Excel
- Службы вычислений Excel
Рассмотрим возможности служб Excel на примере сайта Центр бизнес аналитики (рис. 5.1), который является стандартным шаблоном, используемым специально для BI решений (замечу, что для работы со службами Excel понадобится Enterprise редакция SharePoint Server).

Рис. 5.1. Центр бизнес аналитики
Вспомним про сайт школьной библиотеки, создание простейшей версии которого мы рассматривали в главе 3. Создадим книгу Excel, которая содержит данные о количествах книг в год, которыми пользуются ученики разных классов. На основе этих данных построена диаграмма, показывающая, ученики каких классов являются самыми активными читателями (рис. 5.2). Важно не забыть дать диаграммам и таблицам названия.

Рис. 5.2. Содержимое книги Excel
Итак, после создания файла, опубликуем его на портале, для чего в библиотеке документов портала кликнуть на Добавить документ (рис. 5.3) и в появившемся окне выбрать файл на компьютере.

Рис.5.3. Библиотека документов центра бизнес-аналитики
Также можно воспользоваться другим способом, иногда более удобным, чтобы сохранить документ сразу в библиотеку документов, минуя стадию сохранения файла на рабочей станции. Для этого нужно в Excel 2010 в меню Файл выбрать Сохранить и отправить, далее кликнуть на Сохранить в SharePoint, после чего в правой части окна появится одноименная панель (рис. 5.4). При нажатии на кнопку Параметры публикации появится окно, предлагающее выбрать элементы для публикации – вся книга, определенные листы или определенные элементы книги. По умолчанию публикуется книга целиком.

Рис. 5.4. Меню сохранения файла на портал SharePoint
Далее остается кликнуть на Сохранить как, набрать адрес портала, авторизоваться, и сохранить документ.
После публикации книги Excel на портале с настроенными службами Excel есть возможность просматривать содержимое прямо в браузере (рис. 5.5), при этом Microsoft Office 2010 может отсутствовать на рабочей станции.

Рис. 5.5. Открытая в браузере книга Excel
Excel Web Access
Представляет из себя стандартную веб-часть, которая может быть добавлена на любую страницу. Смысл ее заключается в том, что она позволяет отобразить содержимое любой книги Excel (или ее части), которая находится на портале.
Создадим новую пустую страницу веб-частей в библиотеке страниц, которую назовем Активность читателей. Для добавления веб-части нужно открыть страницу для редактирования, и в любой зоне можно кликнуть на Добавить веб-часть. После этого в верхней части страницы можно найти каталог веб-частей, доступных для вставки на страницу (рис. 5.6). интересующая нас веб-часть находится в каталоге Бизнес-данные, после выбора кликнуть на Добавить.

Рис. 5.6. Панель выбора веб-частей для вставки на страницу
После добавления веб-части на страницу нужно указать путь к файлу в свойствах веб-части (рис. 5.7). Кроме подключения книги, можно также настроить внешний вид веб-части, макет, определить панель инструментов, доступную пользователям, а также задать аудитории для просмотра веб-части. После настройки кликнуть на ОК.

Рис. 5.7. параметры веб-части Excel Web Access
В результате получится следующее (рис. 5.8). Для того, чтобы другие пользователи увидели изменения, нужно не забыть опубликовать страницу.

Рис. 5.8. Страница с добавленной веб-частью Excel Web Access
REST API для служб Excel
С помощью REST API для служб Excel есть возможность получать данные из книги Excel посредством URL.
URL, с помощью которого можно получить данные, состоит из следующих частей
- URI: страница Excel REST
- Путь до файл Excel на портале
- Путь до ресурса (в книге) для отображения
http://<портал>/_vti_bin/ExcelRest.aspx/<библиотека%20excel>/<книга%20excel>/<ресурс>
Посмотрим, как это работает на примере нашего документа, для чего нужно перейти по ссылке
http://<портал>/_vti_bin/ExcelRest.aspx/Excel%20Library/Активность%20Классов.xlsx/model.
В результате чего мы увидим следующее (рис. 5.9), что представляет собой типы ресурсов, доступных для отображения. Ресурсы можно извлекать в следующих форматах – html, atom, изображение (в формате PNG), рабочая книга.

Рис. 5.9. Элементы, которые можно получить из книги Excel
Например, с помощью ссылки
http://<портал>/_vti_bin/ExcelRest.aspx/<библиотека%20excel>/<книга%20excel>/Model/Ranges(‘<название%20диапазона>’)?$format=HTML
отображается диапазон данных в формате html.
http://<портал>/_vti_bin/ExcelRest.aspx/<библиотека%20excel>/<книга%20excel>/Model/Tables(‘название%20таблицы’)?$format=html
отображается таблица в формате html
http://<портал>/_vti_bin/ExcelRest.aspx/<библиотека%20excel>/<книга%20excel>/Model/PivotTables(‘таблица%20Pivot’)?$format=html
отображается таблица Pivot в формате html
http://<портал>/_vti_bin/ExcelRest.aspx/<библиотека%20excel>/<книга%20excel>/Model/Charts(‘название%20диаграммы’)?$format=image
отображается диаграмма в формате изображения.
Для чего это нужно? Например, на портале загружен документ, в котором содержатся большие объемы данных, а нам нужно, чтобы на одной из страниц (или в документе Word) отображался некий текст и несколько диаграмм из этого документа. Целесообразно использовать REST API, при этом можно говорить о “живых диаграммах”, так как пользователю не нужно заботиться об обновлении диаграммы при изменении данных в документе, т.к. это происходит автоматически.
Рассмотрим конкретный пример, для чего создадим новую страницу, на которую напишем, что на ней изображен график активности классов в чтении книг, после чего нужно вставить ссылку на картинку (рис. 5.10), указав в поле адреса следующее:
http://<портал>/_vti_bin/ExcelRest.aspx/Documents/Читательская%20активность.xlsx/Model/Charts(‘Активность_читателей’)

Рис. 5.10. Кнопка на ленте для вставки ссылки на изображение
После вставки изображения можно сохранить страницу. В итоге страница не нагромождена веб-частями (рис. 5.11), и при изменении данных в опубликованной книге график также претерпит изменения (это произойдет автоматически).

Рис. 5.11. Страница с добавленной диаграммой из книги Excel
Использование REST API не ограничивается описанными сценариями. Подробное описание работы с REST API можно найти здесь.
Службы вычисления отвечают за ячейки, значения которых рассчитывают по формулам.
Продолжение читать здесь.
SharePoint 2013 enterprise edition offers Excel Services service application that enables the browser-based rendering of Excel workbooks. Not just for rendering, but it’s primarily used in business intelligence scenarios for its excel calculation & analysis capabilities, ability to query external data sources, etc. Let’s walk through the steps of configuring Excel Services to SharePoint Server 2013 farm.
Here are the steps in high-level to configure Excel Services
- Start Excel Calculation Services Service Instance
- Create Excel Services Service Application
- Grant Database Access to Excel services service Account
- Suppress Office Web Apps to enable Excel services
- Configure trusted file location.
Prerequisites – We need a managed account for Excel Services service application. Create a new managed account if you don’t have one configured already!. Configuring Managed Accounts in SharePoint 2013
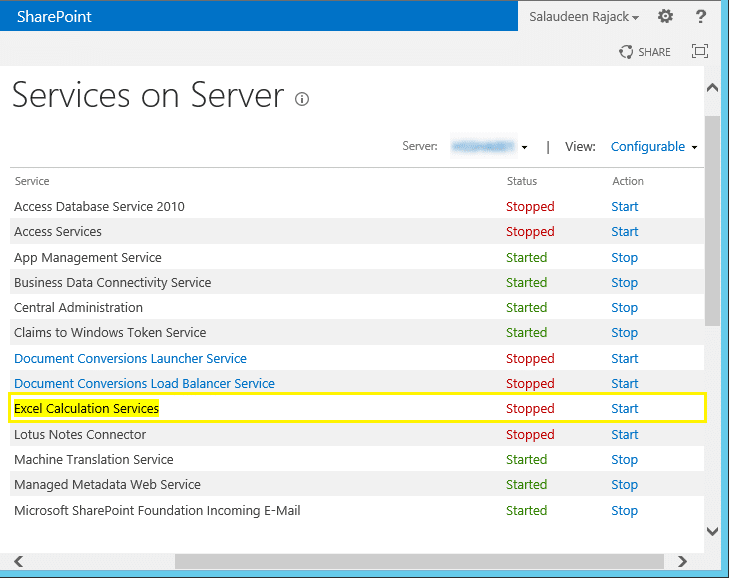
Step 1: Start Excel Calculation Services Service Instance:
Excel Services application relies on Excel calculation service. To start the Excel calculation service, Navigate to
- Central Administration >> System Settings >> Manage Services on server
- Select the server where you want to start the Excel Services. Typically, this will be one of your application server. You can run it on multiple servers for better performance and availability.
- In the services list, Click on “Start” link next to “Excel calculation services”
Once it’s been started, the next step is to create an Excel Services service application.
Step 2: Create Excel Services Service Application
Here is how to create new “Excel services” service application
Step 3: Grant Database access to “Excel Services” Service Application’s service account
The Excel Services application pool account must be granted access to SharePoint content databases. This can be done directly from SQL Server management studio or with PowerShell.
Grant Database Access to Excel Services Application Pool account with PowerShell:
$WebApp = Get-SPWebApplication "https://intranet.crescent.com"

$WebApp.GrantAccesstoProcessIdentity("CrescentSP13_ServiceApps")
Which grants “SPDataAccess” Membership roles on all content databases of the Web Application to the Service Application App Pool account! Please note, You must rerun these cmdlets, If you add new content databases in the future!
Step 4: Suppress Office Web Apps to enable Excel services
If office web apps is enabled for your SharePoint environment, You must suppress it for Excel files in order to enable Excel services. Run these cmdlets to suppress Excel Office Web Application.
New-SPWOPISuppressionSetting -Extension "XLSX" -Action "view"

New-SPWOPISuppressionSetting -Extension "XLS" -Action "view"

#To Check current suppression settings: Get-SPWOPISuppressionSetting
#To Revert : Remove-SPWOPISuppressionSetting -Extension "XLSX" -Action "view"
#Remove-SPWOPISuppressionSetting -Extension "XLS" -Action "view"
From now on, opening any Excel file in SharePoint should launch Excel Services, instead of Excel Web Apps. Watch out for the URL when you launch any Excel file from SharePoint. It should be something like “/_layouts/15/xlviewer.aspx” Instead of “/_layouts/15/WopiFrame.aspx”
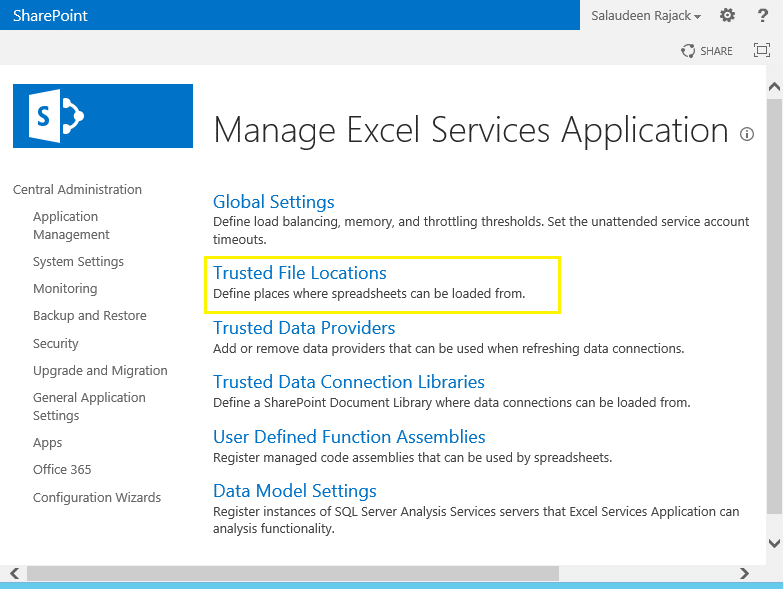
Step 5: Configure Trusted File Locations
The final step to complete configuring Excel services is to add a trusted file location. Here is how:
- Navigate to Central Administration >> Application management >> Click on “Manage Service Applications” link
- On the Manage service applications page, click on the Excel Services service application that we created.
- From the “Manage Excel Services Application” page, click on the “Trusted File Locations” link.

- Click on “Add Trusted File Location”. In the Address column, Enter the URL of your SharePoint Site/Library. Set other options accordingly.
- Click “OK” to save your changes.
Test everything works as expected!
So now, we’ve finished configuring Excel Services for SharePoint 2013. Let’s test it out.
- Go to any of your SharePoint sites with “Enterprise Features” turned ON. Click on “Edit page” from Site Actions gear.
- Click on Insert >> Web part >> Select “Excel Web Access” web part.
- Set the web part properties to fetch any Excel file from the SharePoint document library location.
- Save and Publish the page. You should see the Excel file rendering in the web part.


Technet article: Overview of Excel Services in SharePoint Server 2013