
Sharing in Microsoft Excel enables several users to work with one file. Ten to twenty people on different computers simultaneously enter some kind of data in one document.
Particular formulas work in those places where certain information is located.
The “main user” can track workgroup activities, add / remove members, and edit contradictory changes. How to set up collaboration in Excel?
Features of working with shared file
Not all tasks can be performed in an Excel workbook with shared access.
The following actions are prohibited:
- Creating Excel spreadsheets.
- Creating, changing, and viewing scenarios.
- Deleting worksheets.
- Combining or splitting cells.
- Working with XML data (importing, adding, updating, deleting, etc.)
The way out is to: disable shared access – to perform the prohibited function – to enable shared access again.
Sharing data restricts a number of tasks for users:
| It’s impossible to: | It’s possible to: |
| Insert or delete a group of cells | Add a row or a column |
| Add or change conditional formats | Work with existing formats |
| Enable or modify the «Data Validation» tool | Work with existing verification settings |
| Create or edit charts, summary reports | Work with existing charts and pivot tables |
| Insert or edit drawings and graphics | View existing drawings and graphics |
| Insert or change hyperlinks | Click through existing hyperlinks |
| Assign, edit or delete passwords | Use existing passwords |
| Put or remove the protection of worksheets and workbooks | Use existing protection |
| Group, structure data; insert sublevels | Work with existing groups, structures and sublevels |
| Record, modify, or view macros | Run existing macros that are not associated with unavailable tasks |
| Change or delete array formulas | Use existing formulas |
| Add new information to the form | Search for information in the data form |
How to share an Excel file?
First, determine which workbook you will “open” for editing by several members at the same time. Create a new file and fill it with information. Alternatively, open the existing one.
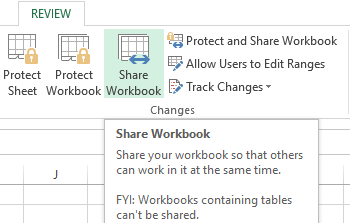
- Go to «REVIEW» tab, then to «Share Workbook» dialog box.
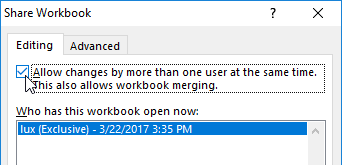
- In window «Share Workbook». Select check box «Allow changes by more than one user at the same time».
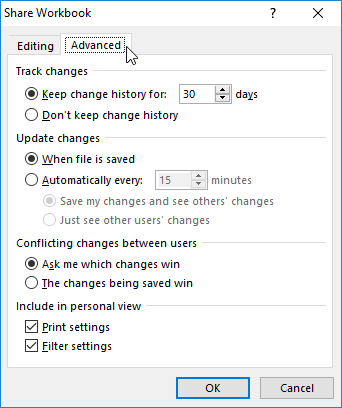
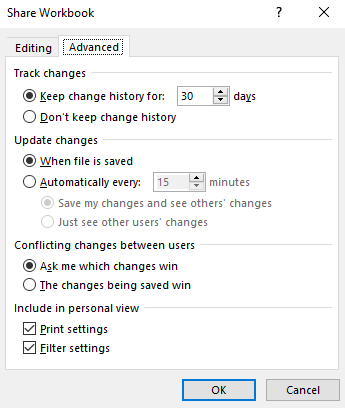
- Go to «Advanced» tool to configure the settings for multi-user editing.
- Click OK. If you share a new workbook, you should choose the title for it. If sharing is implies using an existing file — click OK.
- Open the Microsoft Office menu. Choose «Save as» command. Choose the save file format that will be suitable for all users ‘computers.
- Choose a network resource / network folder as a storage location that will be opened by the prospective participants. Click «Save».
It’s important! You cannot use a web server to save a file.
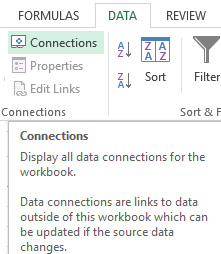
Now check and update the links:
- «DATA» tab, «Connections».
- «Manage Sets». If there is no such button, there are no linked files in the worksheet.
- The OK button indicates the operability of the links.
Opening a shared book
- «FILE» Click on «Open» (CTRL+O).
- Choose a shared workbook.
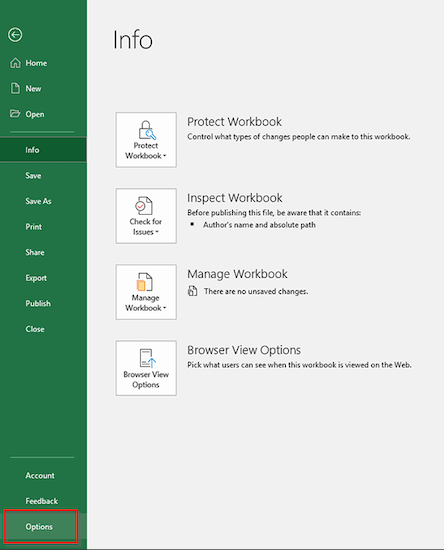
- When the book is open, click on the Microsoft Office button. Go to «Options» tab (at the bottom of the menu).
- «General» — «Personalize your copy of Microsoft Office» — «User name:». Enter the identification information (name, nickname).
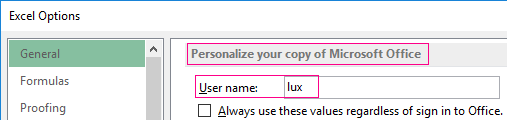
That’s all. You can edit this information, enter new one, as well as save it afterwards.
Occasionally, when you open a shared Excel workbook, «File is locked» notification appears, making saving impossible. When you later open it, it turns out that sharing is disabled. Possible causes of the problem:
- Several users edit the same part of the document. For example, they enter different data in one cell. As a result, blocking occurs.
- When a shared file is used, a change log is kept (who entered, when, what he did). As the book size increases, bugs appear.
- A user has been removed from shared access, but he/she don’t know about this. Then the blocking will be observed only on his/her computer.
- Overloading of the network resource.
If sharing is blocked, you can do the following:
- Clean or delete the change log.
- Clean the file content.
- Disable, and then re-enable shared access.
- Open the xls book in OpenOffice and save it in xls again.
It has been noticed that the notification «File is locked» appears less frequently in the latest versions of Excel.
How to delete a user
- Open «Share Workbook» menu in «REVIEW» tab.
- You can see a list of users in «Edit» section.
- Select the name — click «Remove User».
Before deleting, check whether users have finished working with the file.
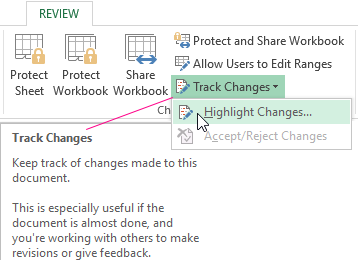
How to disable shared access in Excel
All users need to save the information and close the shared file. If you need to save the log, follow the instructions:
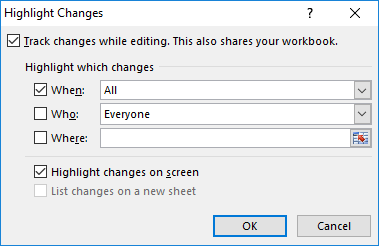
- «REVIEW» tab — «Track Changes» — «Highlight Changes».
- Set the parameters of «Changes». When – «All». Clear checkboxes opposite «Who» and «Where». «List changes on a new sheet» check box should be selected. Click OK.
- The change log will open. It can be saved or printed.
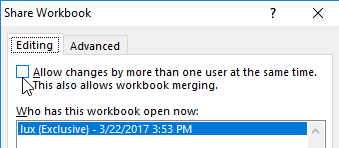
To disable Excel file sharing, click «Share Workbook» and uncheck «Allow changes by more than one user at the same time» in «REVIEW» tab.
The single user should remain in the list. It is you.
Collaboration is important in many work spaces. Since most projects require files to be accessed by a lot of users, collaborative setups have become necessary.
Microsoft Excel is one is just one of the many programs used by companies worldwide. As such, the need for shared workbooks is crucial.

In this post, you’ll learn how you and your team can collaborate using Excel 2016 and other versions of Excel online.
Share Excel Files Offline
If you have a local area connection, all users in the network can have access to any file. Not only that, any changes made to the file can be tracked. You can also set which users would have access to the file.
Start by saving the file in a location that can be accessed by everyone in your group. You can then set your file for collaboration.
Adding Back Shared Workbook Feature
Office 365 users will find the Shared Workbook feature hidden by default. This is because Microsoft encourages users to share workbooks online.
Here’s how you enable the feature. If you’re using an older version of Excel, you can skip to the succeeding section – Sharing a Document.
- Go to File > Options > Quick Access Toolbar.
- Under the Choose Commands From drop-down menu, select All Commands. Scroll through the list until you see Share Workbook (Legacy) and select that item.
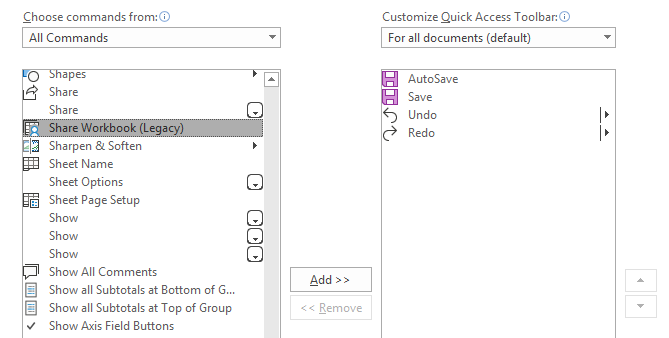
- Click the Add button.
- Do the same for the following commands:
- Track Changes (Legacy)
- Protect Sharing (Legacy)
- Compare and Merge Workbooks
- Click OK when you’re done.
Sharing a Document
- On the Review tab, click the Share Workbook button.
Those who followed the steps in the Adding Back Shared Workbook Feature section will find the Share Workbook button (along with the other commands you added) in the Quick Access Toolbar instead.
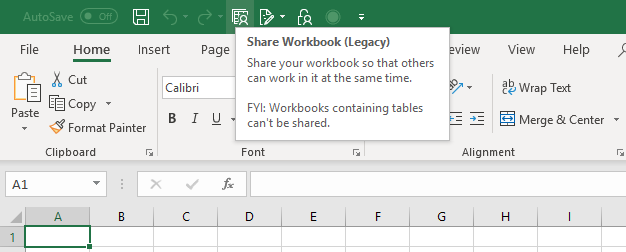
- This will prompt a dialog box to appear. Tick the option that enables the shared workbooks feature.
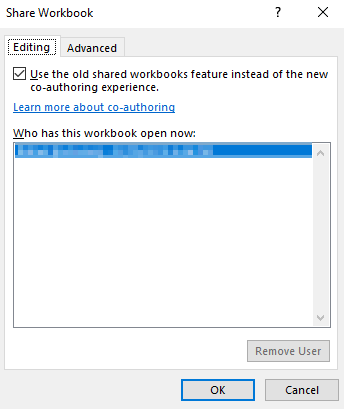
- Head over to the Advanced tab and enable Track Changes and other settings you might want to turn on.
Protect Your File
The steps above give everyone access to your file. But it also gives everyone administrative access by default. Protecting your file means access to the file will be limited and tracked.
- Go to the Review tab and click the Protect and Share Workbook button.
- Tick the Sharing With Track Changes check box.

- You should also create a password otherwise anyone can revert the workbook to its original settings.
- Save your changes and exit.
Share Excel Files Online
While working offline is a great solution, you’re hampered by the necessity for a shared local drive. Working online is clearly the better choice. Here’s how you do it.
Using OneDrive
- Open the file and go to File > Share > Save to Cloud.
- Invite people you’d want to collaborate with by entering their email address. You can also set the permission settings.
- Click Share when you’re finished.
Using Google Drive
Google Drive is probably the easiest way to work on a project simultaneously. Anyone with a Google account can access files and edit as needed.
- Log into your account and go to Google Drive.
- Once you’re in, you can create a new file or upload an existing one.
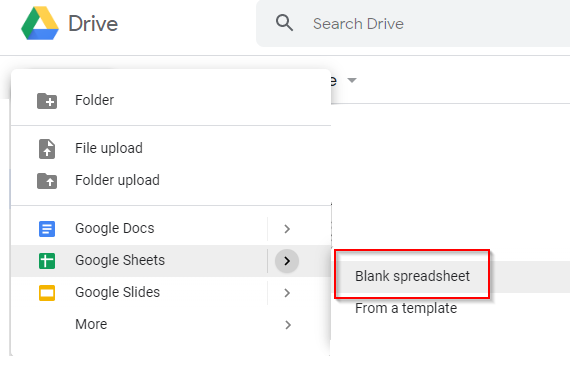
- Once your document has been created or uploaded, click the Share button on the upper-right corner of the worksheet.
This will give you the option to share the spreadsheet by entering an
email address or by sharing a link to your colleagues.
All changes are automatically tracked and saved. You can work on the document together in real-time which is very convenient.
Share using co-authoring or the shared workbook feature
Updated on November 12, 2021
What to Know
- Sign up for OneDrive if you don’t already have an active account.
- Open the workbook and select Share > Sign In. Enter a name and choose a OneDrive folder, then select Save. Select Share again.
- Under Sharing Options, select Invite People and enter the recipients’ email addresses. Check Can Edit to grant editing privileges.
With shared Microsoft Excel workbooks, you can collaborate with others by adding or modifying data, formulas, and formatting on the fly from multiple locations and devices. Here’s how to share an Excel file in Microsoft 365, Excel 2019, Excel 2016, and Excel Online.
Sign Up for OneDrive
If you use Microsoft 365 or Microsoft Office, you may have an active OneDrive account. If not, or if you’re unsure, sign up for OneDrive before continuing. The only exception is if you intend to share an Excel file hosted on a SharePoint Online library or internal network, in which case, you don’t need a OneDrive account.
Before you can share a spreadsheet for co-authoring purposes, you must save it in the XLSX, XLSM, or XLSB format.
How to Share an Excel File in Microsoft 365 or Excel 2019
To share an Excel workbook:
Newer versions of Excel replaced the Shared Workbook feature with a service called co-authoring. It allows for similar collaboration and offers advanced tools that aren’t available in older versions of Excel.
-
Open the Excel workbook you wish to share.
-
Select Share, located in the upper-right corner of the screen and below the Search Sheet bar.
-
In the Share dialog box, select Sign In.
If you’re signed in to your Microsoft account, go to step 6.
-
When prompted for your Microsoft account credentials, follow the on-screen instructions to complete the authentication process.
-
Once signed in, return to the main Excel window and select Share again.
-
In the Name field, enter a title for the shared workbook.
-
Select the Place drop-down menu to choose where to share the file, for example, OneDrive. In most cases, this is the preferred location unless you use a SharePoint library or an internal network location.
-
Select Save.
-
The file uploads to the repository you chose in step 7. Select Share.
-
In the Sharing Options pop-up list, select Invite People.
You don’t have to share the workbook for collaboration purposes. If you’d rather share a read-only version, select Send a Copy.
-
In the Invite People dialog, type the email addresses of the people you want to share the workbook with. Separate each email address with a comma.
You can type names from your contacts in place of email addresses. In this case, you’re prompted to grant Excel access to the corresponding application.
-
Enter a message for the recipients, if desired.
-
The Can Edit option, accompanied by a check box, is disabled by default for precautionary purposes and dictates that the recipients can’t modify the Excel file. To remove this read-only restriction, select the check box so that the check mark appears.
-
Select Share. Your recipients are notified that a workbook has been shared with them.
How to Share a File in Excel Online
Just like Excel for Microsoft 365 and Excel 2019, the web-based version of Excel uses the co-authoring features in place of what used to be known as Shared Workbooks.
-
Go to Excel Online in a web browser and open the workbook you want to share.
-
Select Share, located in the upper-right corner of the browser window to display the Invite People dialog box.
-
In the To field, type the email addresses of the people you want to share the workbook with, each separated by a comma.
-
In the Add a quick note field, enter a relevant message for your recipients.
-
Select Recipients can edit.
-
Two drop-down menus appear. The first contains the following options: Recipients can edit (default) and Recipients can only view. If you choose the latter, your recipients receive the workbook with read-only restrictions.
-
The second drop-down menu dictates whether your recipients require a Microsoft account to access the document. Select the option that meets your needs.
-
Select Share. Your recipients are notified that a workbook has been shared with them.
How to Share a File in Excel 2016
Follow the Microsoft 365 instructions, as the co-authoring feature and the steps are similar. The main difference is the Share button, which appears in the upper-right corner and is represented by a head and torso alongside the word Share.
If you’d like, you can use the Shared Workbook feature. To do so, add the appropriate options to the Quick Access Toolbar by following the steps below.
Unless you have a specific need to enable the original Shared Workbook functionality, such as sharing on a restricted network with particular requirements, use co-authoring instead.
Add a Shared Workbook Button in macOS
To add the Shared Workbook functionality in macOS:
-
Select Excel > Preferences.
-
In the Excel Preferences dialog, select Ribbon & Toolbar, located in the Authoring section.
-
Select Quick Access Toolbar.
-
In the Choose commands from setting, select Review Tab.
-
In the list of options provided, select Share Workbook (Legacy) to highlight it.
-
Select the right bracket (>) found next to the Share Workbook (Legacy) option so that it moves to the list labeled Customize Quick Access Toolbar.
-
Select Save to complete the process. You can now begin the sharing process from the Excel toolbar.
Add a Shared Workbook Button in Windows
Follow these steps to add the Shared Workbook functionality to Excel 2016 for Windows:
-
Select File > Options > Quick Access Toolbar.
-
Select Choose commands from to expand it, then select All Commands.
-
Scroll down and select Share Workbook (Legacy) to highlight it.
-
Select Add.
-
Add each of the following commands, one at a time: Track Changes (Legacy), Protect Sharing (Legacy), Compare and Merge Workbooks.
-
After these items are added, select OK to return to the main Excel window. You can now begin the sharing process from the Excel toolbar.
Thanks for letting us know!
Get the Latest Tech News Delivered Every Day
Subscribe
It is commonplace nowadays for any business to use Excel as their preferred tool to input, manage and share work. While some users continue to share files as email attachments, this can quickly result in too many downloaded versions of the same file. Not only can this be confusing to know which download is the most up-to-date version, but it can also cause issues with collaboration and productivity.
Luckily, the most recent versions of Microsoft Excel (2010, 2013, and 2016) allow you to collaborate with others while working on a single version of your current spreadsheet. This article will explain how to share an Excel file on Mac for multiple users, how to protect a shared Excel workbook, and how to make the Excel file editable for multiple users.
Excel allows you to share/save your workbook to a local network location where other users can access and make changes to it. As the owner of the Excel file, you can keep full track of changes by accepting or rejecting them.
Let’s look at a step-by-step on how to share your Excel files with others:
- 1. Click on the “Share” button to the far right of your Excel toolbar.

- 2. As instructed in the pop-up window, you can either “Move” or “Copy” the file. Unless you wish to maintain a local copy, then select “Move” as shown below.

- 3. Once you select your preferred option, you can change the name or not. Since we chose “Move”, we have kept the original file name.

- 4. Below the “Name” field, you have the “Place” drop-down menu. This will allow you to choose between OneDrive or any other previously created local or shared folder.

- 5. To explore more places to share the file, click on “Other”.

- 6. In the new window, you can also choose to “+Add a Place” in case you would like to share your file to more than one OneDrive folder or shared local folder.

- 7. At this point, you can also choose to connect OneDrive for Business or Sharepoint.

NOTE: OneDrive provides a files experience on all devices via web, mobile, and the desktop (Windows PC or Mac OS). OneDrive for Business is part of Office 365 (including the Sharepoint server) and grants company employees with personal storage managed from a central location. Sharepoint can act as a platform for portals, news, business apps, etc. For more information on the advantages of each, read this Microsoft Support entry.
- 8. Let’s use the standard OneDrive and click on “Choose Location”.

- 9. Complete the sharing process by selecting “Upload”, next to “Move” option.

- 10. Just to be sure, check that the “AutoSave” is “ON” in the top-left corner of your Excel file.

- 11. You can also “Send a Copy” as an email attachment, at the very bottom of the pop-up window.

- 12. Select the file format you would like to attach.

- 13. Click on “Email as Attachment”.

- 14. Alternatively, select the upload icon next to “Email as Attachment” to upload to one of the options shown below.

Although Simultaneous collaboration on an Excel shared workbook, can be useful, you may want to protect your workbook from certain actions to avoid any accidental setbacks. These could include users reverting changes, turning off the change history, or even removing the spreadsheet from shared use.
- 1. Go to the Review tab of your shared Excel workbook and click on “Protect Workbook”.

- 2. You will be prompted to enter a password.

IMPORTANT: Note that this feature protects your workbook from being moved, deleted, hidden, renamed, etc., and the steps followed are similar to what is explained in how to password protect an Excel file. However, changes can be made to individual sheets. In order to protect specific data, you need to go to Review > Protect Sheet. For a full step-by-step illustration of different methods and levels of protection, read our article on how to lock cells in Excel.
Now you know how to protect your Excel from removing track changes or changing history features. This is a good way to keep track of any modifications in case you want to revert or undo any editing made to the shared Excel workbook. Moreover, it’s the only way to resolve any conflicting changes in a shared Excel file.
How to make an Excel file editable by multiple users?
You can either specify the users that can edit or simply make the whole Excel shared workbook editable by not following the “Protect Sheet” process. This way, anyone with access to the shared workbook (on OneDrive, OneDrive for Business, or Sharepoint) will be able to make changes to the file without the owner having to accept or reject their changes.
To allow specific users to edit:
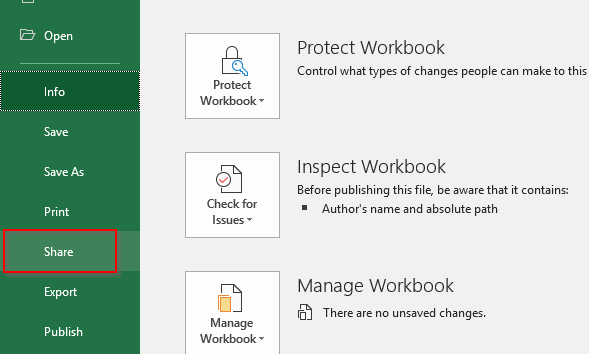
- 1. Go to the “File” tab and select “Share”.

- 2. Or click on the “Share” button to the far right of the Excel window and select “Invite People”.

- 3. Then, simply type in the email address of users you want to allow to edit and make sure you leave the “Can Edit” box ticked. When you are done, click on the “Share” button.

So far, we have shown how you can manage to edit and share options locally. Although this would also require that you are online, you can make these changes directly via OneDrive.

As you can see below, it allows users to “Open” the spreadsheet in the browser or desktop.

This is a great built-in feature since users might work on different Excel versions, In some cases, it may be more advisable for everyone to edit the shared file in the browser.
Once a project or task is finished, you might want to unshare the Excel file to safeguard the work that has been done so far. This is as simple as clicking the “Unshare Workbook” appearing in the “Review” tab. If you cannot view this feature, then you can move the shared file to a local folder.
Want to Boost Your Team’s Productivity and Efficiency?
Transform the way your team collaborates with Confluence, a remote-friendly workspace designed to bring knowledge and collaboration together. Say goodbye to scattered information and disjointed communication, and embrace a platform that empowers your team to accomplish more, together.
Key Features and Benefits:
- Centralized Knowledge: Access your team’s collective wisdom with ease.
- Collaborative Workspace: Foster engagement with flexible project tools.
- Seamless Communication: Connect your entire organization effortlessly.
- Preserve Ideas: Capture insights without losing them in chats or notifications.
- Comprehensive Platform: Manage all content in one organized location.
- Open Teamwork: Empower employees to contribute, share, and grow.
- Superior Integrations: Sync with tools like Slack, Jira, Trello, and more.
Limited-Time Offer: Sign up for Confluence today and claim your forever-free plan, revolutionizing your team’s collaboration experience.
Conclusion
Now you know how to share an Excel file or workbook and how to make it editable by multiple users. Whether you are working on Windows or Mac OS, you need to make sure that you apply the editing features before sharing the Excel file, since shared workbooks do not have all the features that Excel desktop has. Please remember that as you are sharing your Excel workbooks online, you must have access to a local network at all times – if not, you may risk losing important edits and changes to your Excel files.
Prefer to collaborate on Google Sheets? Take a look at our article on how to password protect a Google Sheet to control the changes made to your spreadsheets by other users.
Hady is Content Lead at Layer.
Hady has a passion for tech, marketing, and spreadsheets. Besides his Computer Science degree, he has vast experience in developing, launching, and scaling content marketing processes at SaaS startups.
Originally published Jan 24 2022, Updated Mar 22 2023
Summary:
This post will help you out to know how to share an Excel workbook with multiple users by saving it on the local network or OneDrive.
Apart from that you will also get to know control user access to a shared Excel file and fix conflicting changes.
How Do You Change Access To Shared Excel Spreadsheet?
Here is a complete step to set permissions for a shared Excel file. So, that multiple users can work together on the Excel file simultaneously.
How To Share Your Workbook?
- Choose the Share option.
- Set permissions.
- Allow editing is automatically checked. If you un-tick this option then users can only view the file but they can’t edit it.
- Choose Apply option.

- Assign the email address and name of the users with whom you want to share your Excel file.
- You can add a message if you want to give it to your Excel users.
- Hit the Send button. OR alternatively, you can choose the Copy link to get the file link.
Check out the following video to learn how to share Excel workbook online and offline. This video will let you know how to share Excel workbook with multiple users. Here I have described how you can share your Excel file offline and online.
Co-author a workbook
Here is setting permission for shared Excel file which you must apply to work with your Excel file simultaneously.
- For a better experience, work together in Excel for the web and watch out the real-time changes.
- Within Share option, you will see the user’s name who is currently editing your file.
- Colored cell indicates how many users are currently active in your Excel workbook. Tap to the color to see who is editing that cell.
Allow Specific Users To Edit Ranges In A Protected Spreadsheet
Excel gives you the option to assign user-level privileges on a different section of a password-protected worksheet.
You can assign any specific user for editing a particular range while the Excel spreadsheet is password protected.
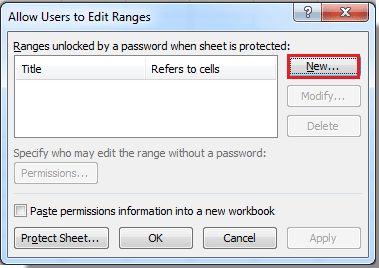
1. Hit the Review tab and then from the Changes group choose the Allow Users to Edit Ranges.

Note: This Allow Users to Edit Ranges command will appear only when the Excel workbook is not password protected.
2. Now you can perform any of the three options:
- In order to modify the already existing editable range, you need to choose the “Ranges unlocked by a password when sheet is protected” box. After then hit the “Modify” option.
- For deleting up the editable ranges choose the Ranges unlocked by a password when sheet is protected box. After that hit the Delete button.

- In case, if you need to add a new editable range then follow these steps:
3. Hit the New option to open the New range dialog box:
4. Within the Title box, you have to type the range name which you need to unlock.

5. Now in the box of Refers to cells you have to put an equal sign (=), and after that type the range reference which you have to unlock.
You can make a tap on the Collapse Dialog button, so make a selection for the range in your Excel spreadsheet. After that, hit the Collapse Dialog button once again to get back in the dialog box.
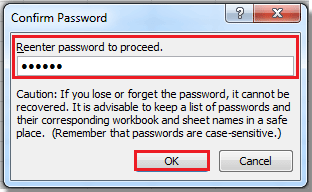
6. Within the Range password box, you have to enter the password which works as a key to access that particular range. Well, this password is completely optional. But if you don’t assign the password then any other user can easily edit your worksheet cells.
7. Hit the Permissions button. This will open the permission for range dialog box:
8. Add those users to whom you want to assign this edit the ranges or remove permission. And then tap to the Ok
9. After making all the changes, within the dialog box of Allow Users to Edit Ranges. Hit the Protect Sheet… option for opening up the dialog box of Protect Sheet:
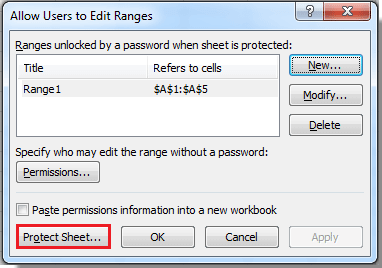
10. From the section of Allow all users of this worksheet, choose the items to assign to your users to make any changes in it.
11. Now in the Password to unprotect sheet box, enter the password for the Excel sheet and tap the OK button. Retype the password for the confirmation.
Can An Excel File Be Edited By Multiple Users?
In past, when you required to share Excel workbook with some other user. You should send it like an email attachment or just save the Excel data to PDF format for printing.
While convenient and fast, a former method created multiple versions of the same document and later on produce through non-editable copy.
A recent version of the Excel 2010/ 2013/ 2016/2019 file is quite easy to share and collaborate on the workbooks.
By sharing up the Excel file you can give other users access to the same document and allow editing simultaneously.
This saves you from the trouble of keeping track of multiple versions.
What Are Limitation Of Shared Excel Workbook?
Before sharing an Excel workbook it’s important to have knowledge about the limitations that the shared workbook doesn’t support.
So have a look over it…!
- Sorting and filtering by format
- Conditional formatting
- Merging cells
- Excel tables and PivotTable reports
- Charts and pictures
- Data validation
- Worksheet protection
- Grouping or outlining data
- Subtotals
- Slicers and sparklines
- Hyperlinks
- Array formulas
- Macros
- A few more things
Actually, you can use the existing excel features but you are not allowed to add or modify them. So, if you like to use any of the above-listed options then apply them before sharing up the Excel files.
How To Fix Conflicting Changes In A Shared Excel File?
- When more than two users simultaneously start editing the same Excel workbook then it may affect the data of that particular cell.
- In that case, Excel will only save the changes of that user who has saved the workbook first.
- Whereas the other user will receive a pop message of “Resolve Conflicts”. This dialog box contains the detail about conflicting changes.
- You can perform the following procedures to fix the conflicting changes:

- To save up your made changes, tap the Accept Mine button.
- Save the changes of some other user hit the Accept Other button.
- To keep the entire changes done by you just click the Accept All Mine button.
- Save entire changes done by others, just click the Accept All Others.
Tip.
For saving up a copy of the shared workbook along with the changes hit the Cancel button within the dialog box of “Resolve Conflicts”.
After that save your excel workbook with a new name. Later on, you can also merge all the changes done by multiple users.
How To Force Recent Changes To Override Previous Changes Automatically?
To get the latest changes automatically by overriding all the previous changes done by any other user, without getting any “Resolve Conflicts “dialog box. In that case, you need to perform the following operation.
- Go to the Review tab and then from the Changes group hit the Share Workbook option.

- On the opened window of share, workbook hit the “Advanced” Choose the option “changes being saved win” which is present under Conflict changes between users. Hit the OK button.
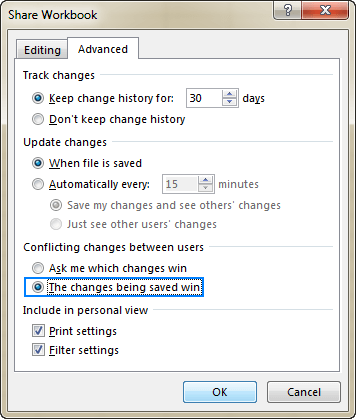
To see the entire changes you have made to the shared workbook. Just use the Track Changes option present within the changes group of the Review tab.
With this, you can easily extract details like what and who have made the changes.
Wrap up:
Applying passwords in the shared workbook is optional. But if you don’t assign any password then the third person can easily unprotect your excel sheet and can make modifications to the protected Excel items.
Ensure that you have selected a password that is quite easy to remember.
If unfortunately, you lose the password, you can’t be able to access to protected element in the spreadsheet.


Priyanka is an entrepreneur & content marketing expert. She writes tech blogs and has expertise in MS Office, Excel, and other tech subjects. Her distinctive art of presenting tech information in the easy-to-understand language is very impressive. When not writing, she loves unplanned travels.