
Share and collaborate with Word for the web
Share your document
-
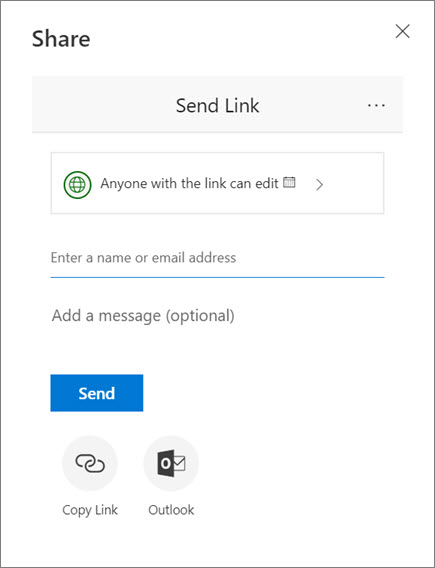
Select Share.
-
Set the permissions you want.
-
Enter the names or email addresses of who to share with.
-
Add a message (optional).
-
Select Send.
You have additional options:
-
Select Copy Link to create a link to share in an email.
-
Select Outlook to create a new email with a shareable link in Outlook for the web.

Co-edit a document
After you share your document, you can work on it with others at the same time.
-
To see changes in real time, work together in Word for the web.
-
Next to Share, you’ll see who is also editing the file.
-
Colored flags show you exactly where each person is working in the document.

Add a comment
-
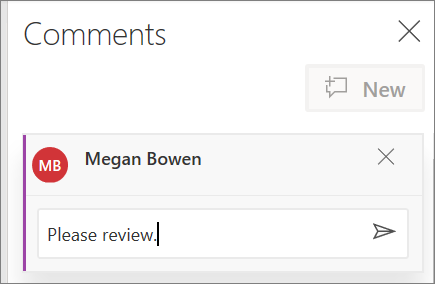
Select Review > New Comment.
Or, right-click in your document and select New Comment.
A comment bubble
 appears in the document where there’s a note.
 -
Type a comment and select Post.
 appears in the document where there’s a note.
Reply to, @mention in or delete a comment
-
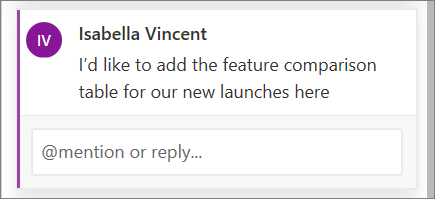
To reply to a comment, select Reply.
-
To @mention someone in a comment, type @ and someone’s name, and choose the name you want.
-
To delete a comment, select Review > Delete.
Review comments
-
Select Show Comments to display all comments in a document.
-
Select Previous or Next to move between comments.
Need more help?
Как поделиться и открыть для просмотра документ в Ворд Онлайн
Используя инструменты Office и OneDrive, есть возможность работать над документами Word, вместе с другими пользователями. Совместное редактирование предполагает, что над ним могут работать одновременно разные пользователи. Но все зависит от того, какой тип прав им предоставлен. Расскажем, как поделиться документом в Ворд Онлайн, и дать общий доступ. Можно ли предоставить права редактора, и как их ограничить для других.

Как поделиться документом в Ворд Онлайн
Изначально сервис Word Online был разработан для создания и редактирования файлов через интернет сразу же был предусмотрен и дополнительный функционал для совместной работы над документами. Если над выложенным вами документом работает другой пользователь, вы увидите это в режиме реального времени.
Если же с вами поделились документом через электронную почту, то письмо будет содержать ссылку. Пройдя по ней, вы сможете открыть данный файл в приложении Word в Интернете. Для работы над ним нажмите в панели управления «Редактировать документ/Изменить в браузере».
Содержание в документе макросов, а именно DOCM, остается возможность совместного использования файлов. Открывать, редактировать, включать запуск макроса Вы можете открывать – весь функционал будет доступен. Если же вы сами создали документ, то им можно поделиться с другими:
- Дать общий доступ для просмотра.
- Ограничить право на редактирование.
- Дать права редактора конкретным пользователям.

Чтобы дать доступ к сохраненному документу в облаке, причем для файла сделать это достаточно один раз. Выполните последовательно следующие шаги:
- Откройте документ, доступ к которому нужно предоставить.
- В меню сверху выберите вкладку «Файл».
- Нажмите на пункт «Сохранить как».
- Два раза нажмите на выбранное расположение документа – службу «OneDrive».
- Впишите имя для файла, тапните «Сохранить».
- Сервис направит вас на вкладку «Сведения», здесь нажмите на кнопку «Общий доступ».
Что нужно для совместного редактирования
Такой тип редакции доступен для тех документов, которые сохранены в OneDrive или SharePoint. Чтобы вы могли вместе работать над ним, вам потребуется выполнить следующие условия:
- Наличие общих хранилищ.
- Доступ к приложению Word Online у каждого из пользователей.
- Документ формата .docx.

Все изменения, внесенные в файл, будут редактироваться, а также сохранять изменения напрямую в системе. Чтобы в приложении был доступ к документу, выполните его сохранение в облако:
- Откройте Word Online, авторизуйтесь, и нажмите вкладку «Файл».
- Выберите пункт «Сохранить как», после чего добавьте его в облачное хранилище.
- Для отправки в этот раздел, в пункте «Добавление места», выберите службу «OneDrive».
- Укажите имя пользователя и пароль, это условие является обязательным!
- Расположение документа отобразится в области «Сохранить как приложения Word».
Обратите внимание! При предоставлении прав доступа другим пользователям к документу Ворд, вам потребуется логин и пароль для входа в систему.

Как сделать доступ с редактированием и без него
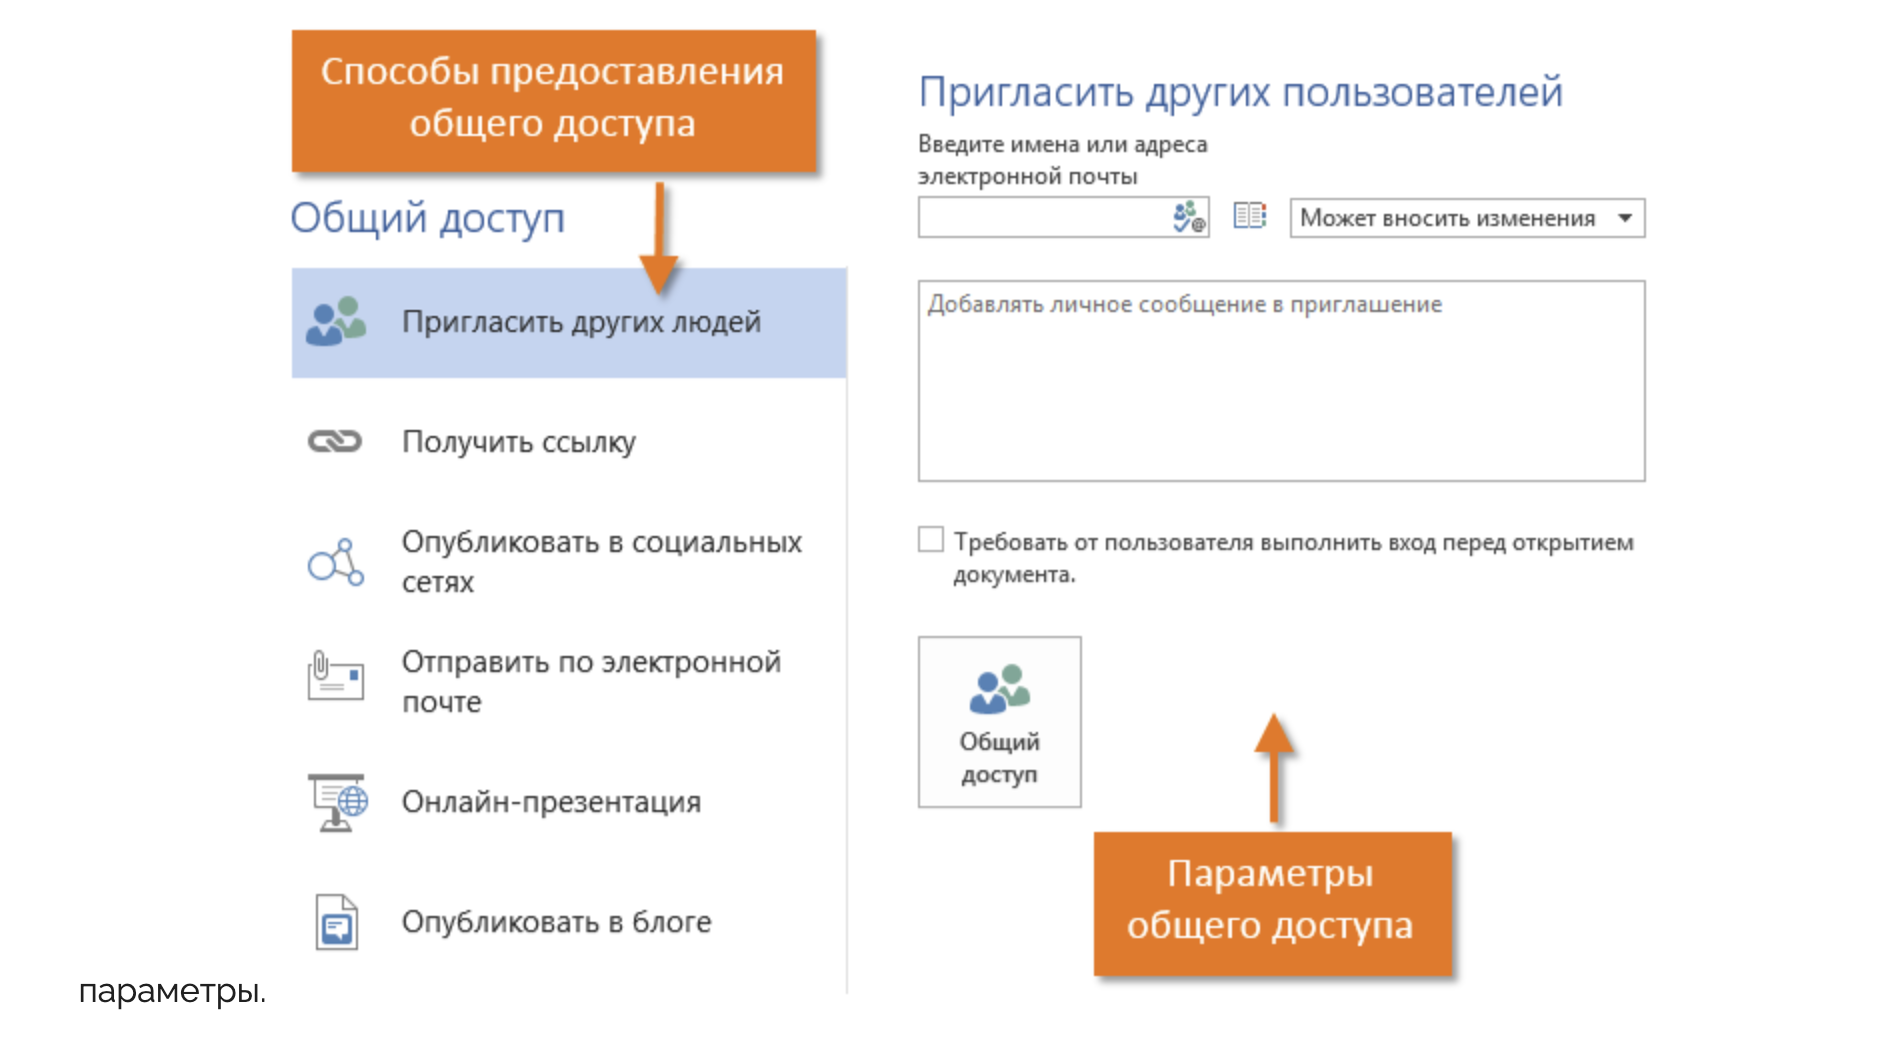
Добавленный в хранилище документ вы можете предоставить для других пользователей, чтобы они могли ознакомиться с ним. При этом доступна настройка редакторских прав. Они находятся на вкладке «Сведения», и выполняются для общего просмотра, с редактированием, или без редактирования:
- Откройте пункт «Совместно с пользователями».
- Введите имена, либо адреса электронных ящиков тех, с кем будете делиться файлом.
- Для ограничения редакторских прав выберите пункт «Можно просматривать».
- Для предоставления прав редактора установите отметку «Можно редактировать».
При необходимости, отправляя данный документ, к нему можно оставить комментарий. Он вводится в поле под адресной строкой, ведущей на место хранения файла. После этого тапните по кнопке «Общий доступ».
Collaborate in Word
- Select Share. on the ribbon. Or, select File > Share. Note: If your file is not already saved to OneDrive, you’ll be prompted to upload your file to OneDrive to share it.
- Select who you want to share with from the drop-down, or enter a name or email address.
- Add a message (optional) and select Send.
Contents
- 1 Is there a way for two people to edit a Word doc?
- 2 How do I share a Word document on a shared drive?
- 3 How do I share a document that everyone can edit?
- 4 How do I share a Word document for team editing?
- 5 How do I create a link to share a document?
- 6 How do you share a Word document on a Mac?
- 7 Why can’t I share a Word document on teams?
- 8 How do I share a document on teams?
- 9 How do you get a URL for a Word document?
- 10 Why can’t I send a Word document?
- 11 How do I share a Word document without OneDrive?
- 12 Can I present a Word document in teams?
- 13 Can you attach a document to a Microsoft teams meeting invite?
- 14 How do I share files?
- 15 How do I create a link to a file?
- 16 How do I make a link to a document?
- 17 How do I send a Word document as an email?
- 18 How do I send a link to a Word document in an email?
- 19 Can a Word file can be attached to an email message?
Is there a way for two people to edit a Word doc?
With Office 2016, Microsoft introduced a new, highly useful collaboration feature in Word: Co-editing (or co-authoring), which allows multiple people to work on a document at the same time.People you share the document with can view or edit the file using either the free Word Online app or Word 2016.
You can click ‘Share’ at anytime and then select how you would like to share your document. Once you’ve selected your sharing method simply type in the names of the people you wish to share with and their editing rights and click ‘Share’.
Share an already saved document
Click File > Share > Share with People (or, in Word 2013, Invite People). Enter the names or email addresses of the people you’re sharing with. If you want to, click Can Edit or Can View. The first option lets your coworkers change the file.
Work on a file together
- In a team conversation or in the Files tab, select More options. next to the file.
- Choose if you want to edit the file in Teams, on your desktop, or online.
- Select Start conversation to add a message about the file.
- Type your message or @mention someone and select Send.
Creating a shareable link makes it simple to share a document in an email, document, or IM.
- Select Share.
- Select Copy Link.
- Paste the link wherever you want. Note: If you need to change any permissions for the link, select Link settings.
Send your document as an email attachment
- In the upper-right corner, click the Share icon and then click Send Attachment.
- Click Document or PDF.
- Word will open your default email application and attach your file to a new message. Just fill in the details, like email addresses and a short message, and click Send.
As far as I know, there isn’t the special option which can select Word/Excel to share during the Teams presentation, only Desktop, Windows, PowerPoint and Whiteboard. To share the word and excel, you need to share your desktop, then open these files in order to let the participants to view.
To share a file that’s already been uploaded to Teams
- To access all files you’ve recently opened and your OneDrive, tap More. > Files.
- Go to the file you want and tap More options. > Share.
- Search and tap a person or group name in the Chat tab, or tap a channel from the Channel tab.
How do you get a URL for a Word document?
For instance, it could be pasted into a Word document as a link to the document. It could also be saved on your Desktop so you can access the document directly from the Desktop. To view the Document URL, scroll down to the Locations section in the Document Details Panel. There you will see the URL.
Why can’t I send a Word document?
Most servers will block a Word document because it can contain a macro virus. If it shows as being sent on your end, chances are it’s being blocked on the receiving end. Try renaming the document so the extension doesn’t end with . doc (like name it to .
Share a document with no sign-in necessary
- With the document open in Word for the web, Excel for the web, PowerPoint for the web, or OneNote for the web click Share.
- Click Get a link, choose Edit (or another option if you don’t want people to edit), and then click Create link.
- Copy the link and send it out.
Can I present a Word document in teams?
1) In a Team meeting, click the Share tray icon to open the presentation menu. 2) Click Browse to find an existing presentation file. 3) If you have a file uploaded already, click Browse Teams and Channels. 4) Select the presentation file you want.
Can you attach a document to a Microsoft teams meeting invite?
Adding Files to Teams Meetings
The net result is that two ways are available to include files in Teams meetings: The meeting organizer can generate links to files and include them in the meeting invitation. They can also update meeting details afterwards to include links to other files.
Share with specific people
- Select the file you want to share.
- Click Share or Share .
- Under “Share with people and groups,” enter the email address you want to share with.
- To change what people can do to your doc, on the right, click the Down arrow.
- Choose to notify people.
- Click Share or Send.
How do I create a link to a file?
Hold down Shift on your keyboard and right-click on the file, folder, or library for which you want a link. Then, select “Copy as path” in the contextual menu. If you’re using Windows 10, you can also select the item (file, folder, library) and click or tap on the “Copy as path” button from File Explorer’s Home tab.
How do I make a link to a document?
Right-click the file that you want to link to, and select Get a link. Choose the type of link you want, and then copy the link. Return to the document library where you want to add the link, and enter that link in the Create link to dialog.
How do I send a Word document as an email?
How to Send a Document via Email in Word 2016
- Save your document one more time.
- Click the File tab.
- Choose the Share command.
- Choose the E-Mail item found under the Share heading.
- Click the Send As Attachment button. At this point, Outlook takes over, and you compose your email message.
How do I send a link to a Word document in an email?
Select the text or picture that you want to display as a hyperlink. Press Ctrl+K. You can also right-click the text or picture and click Link on the shortcut menu. In the Insert Hyperlink box, type or paste your link in the Address box.
Can a Word file can be attached to an email message?
If you have Outlook installed as part of Microsoft Office, and set as your default email app, you can send your document as an email attachment. If you are using Excel, Publisher, or Word, you can also send your file as the body of an email message.
В наше время существует огромное количество способов поделиться файлами. Но многие из них требуют установки специального программного обеспечения, регистрации, введения всяких паролей и капч. У кого есть время на это? Поэтому хотим вам предложить список сервисов, которые позволяют отправлять большие файлы по-быстрому.

Reep.io
В названии Reep.io зашифрован основной принцип работы сервиса. Если вы прочитаете слово с конца, получится Peer, то есть клиент для обмена файлами в одноранговой сети. C помощью этого сервиса вы сможете передать файлы непосредственно на компьютер получателя без загрузки их на промежуточный сервер.
- Передача файлов производится по зашифрованному каналу.
- Нет ограничений по размеру или количеству файлов.
- Файлы можно защитить паролем.
Reep.io →
FileSender
FileSender — это ещё один сервис, который должен обеспечивать прямую связь между компьютерами отправителя и получателя. Если вы выберете файлы на своём компьютере и нажмёте кнопку Start Transfer, будет сгенерирован специальный код. Получатель должен ввести этот код на своём компьютере, после чего начнётся передача файлов.
- Соединение зашифровано.
- Никаких ограничений по размерам или количеству файлов.
- Нет защиты паролем.
FileSender →
UploadFiles
UploadFiles позволяет загружать файлы на свои серверы без всякой регистрации. Услугами этого сервиса можно пользоваться совершенно свободно практически без ограничений.
UploadFiles — один из лучших сервисов в этом списке.
- Неограниченное число загрузок.
- Максимальный размер одного файла — 5 ГБ.
- Соединение зашифровано.
- Файлы хранятся в течение 30 дней.
UploadFiles →
FileSharing24
FileSharing24 идеально подойдёт, если вам необходимо быстро организовать массовую раздачу файлов. После загрузки вы получите URL, которым можно поделиться в социальных сетях или по электронной почте. Любой человек сможет по этой ссылке скачать ваш файл.
- Неограниченное число загрузок.
- Максимальный размер файла — 5 ГБ.
- Соединение зашифровано.
- Защита паролем.
- Файлы доступны в течение 24 часов.
FileSharing24 →
File Dropper
File Dropper не выделяется ничем особенным, но выполняет свою задачу. И это главное. Просто загрузите файл и поделитесь полученной ссылкой. И ваш адресат сможет скачать желаемое.
- Неограниченное число загрузок.
- Максимальный размер файла — 5 ГБ.
- Нет шифрования или защиты паролем.
- Срок хранения файлов на сервере не указан.
File Dropper →
PlusTransfer
PlusTransfer позволяет поделиться файлами размером до 5 ГБ и сразу же отправить уведомление получателю по электронной почте. Для скачивания файла вашему адресату необходимо будет перейти по ссылке из письма.
- Неограниченное количество загрузок.
- Максимальный размер файла — 5 ГБ.
- Нет шифрования или защиты паролем.
- Файлы хранятся на сервере от 1 до 14 дней в зависимости от вашего выбора.
PlusTransfer →
CueTransfer
CueTransfer — это ещё один сервис, который умеет сам рассылать ссылки на скачивание загруженных вами файлов по указанным адресам. А ещё этот сервис демонстрирует потрясающе красивые фоны при каждом обновлении страницы.
- Неограниченное количество загрузок.
- Максимальный размер файла — 2 ГБ.
- Шифрование или защита паролем отсутствует.
- Срок хранения файлов на сервере не указан.
CueTransfer →
MailBigFile
Бесплатный MailBigFile не представляет собой решительно ничего такого, что могло бы выделить его из числа конкурентов. Вы можете загружать файлы размером до 2 ГБ на срок до 10 дней. Однако обладателям платных аккаунтов, которые можно совершенно свободно опробовать в течение 30 дней, предлагаются гораздо более привлекательные условия.
- Файлы хранятся в течение 10 дней.
- Максимальный размер файла — 2 ГБ.
- Неограниченное количество загрузок.
- Доступны три варианта платных аккаунтов, которые увеличивают максимальный размер файлов до 4, 5 и 20 ГБ.
MailBigFile →
А какой сервис для быстрого расшаривания файлов вы считаете самым удобным?
![]()
Download Article
![]()
Download Article
No matter your platform, there’s no shortage of ways to send a Microsoft Word document to anyone on the Internet. Most cloud services (such as Google Drive and Dropbox) feature the ability to send documents directly from their desktop and mobile apps. You can also attach a document to an email or Facebook chat. And if you have mail program set up on your computer, you can even send your document without leaving Microsoft Word.
-
1
Sign in to your Gmail or Yahoo! Mail account. You can attach your Word document to a message in Gmail or Yahoo! Mail on a computer or by using either service’s app for mobile devices.
- Most free mail sites and apps are similar. These instructions may also help you use providers other than Gmail and Yahoo.
-
2
Click or tap “Compose”. In both mobile apps, the “Compose” icon is a pencil.[1]
A new message window will appear.Advertisement
-
3
Click or tap the paperclip icon. The file selection box will appear on most platforms.[2]
- If you’re using the Yahoo! Mail app on a mobile device, tap the + sign, and then tap the second icon (a sheet of paper) in the resulting toolbar.[3]
The file selection window should now appear.
- If you’re using the Yahoo! Mail app on a mobile device, tap the + sign, and then tap the second icon (a sheet of paper) in the resulting toolbar.[3]
-
4
Tap “Attach File” or “Insert from Drive”. You can skip this step if you’re not using the Gmail app on a mobile device.
- Choose “Insert from Drive” if the document is saved to your Google Drive.
- Choose “Attach File” if the document is saved to your phone or tablet.
-
5
Navigate to the document you want to attach. Browse to the location of your Word document and double-click (or tap) to attach it.
- If you’re attaching from Google Drive, tap the file you want to attach, and then tap “Select”.
-
6
Address the email to the recipient. Enter the desired recipient’s email address into the “To:” field, then add your subject and message content.
-
7
Click or tap “Send”. When the recipient opens the email, they’ll find the option to open or download the file to their computer or mobile device.


Advertisement
-
1
Open the Mail app on your device. To use this method, make sure Mail is properly configured to send mail from your email account.[4]
- You’ll be able to attach a document that’s on your device or in your iCloud Drive.
- If you have the Dropbox, Google Drive, or OneDrive apps installed on your device, you’ll have the option to attach a document from one of those accounts.
-
2
Tap the “Compose” icon. The icon looks like a square with a pencil.
-
3
Type an email address into the “To:” field. This should be the address of the person to whom you’ll be sending the document.
-
4
Type your message. Enter a subject into the “Subject” field and type a note to the recipient in the main text area.
-
5
Touch and hold your finger in the body of the message. A black bar will appear containing several options from which to choose.[5]
-
6
Tap “Add Attachment”. The file navigator will open to your iCloud drive by default.
-
7
Tap “Locations” to switch to another location. If the document is not located in your iCloud drive, choose it from any of the folders listed (including Google Drive, Dropbox, or OneDrive, if applicable).
- If you don’t see an icon for the cloud service you use, tap “More,” and then select your service. Flip the switch to the “On” position to enable it, and then use the back button to return to the Locations screen.
-
8
Select the file and tap “Add Attachment.” You’ll be returned to the email message you previously composed. This message now has your document attached.
-
9
Tap “Send.” The file will be delivered to the appropriate email account.


Advertisement
-
1
Launch the Mail app on your Apple device. To use this method, you’ll need to have the Mail app configured to send mail through your email account. If you haven’t already done so, do it now.
-
2
Press ⌘ Cmd+N to compose a new message. You could also click the New Message icon (a square with a pencil) or click File > New Message.[6]
-
3
Click the paperclip icon. This icon appears in the upper right area of the New Message Window.
-
4
Select the document and click “Choose File”. You can hold down the ⌘ Cmd key as you click if you want to select multiple files.
-
5
Address the email to the recipient. Type the recipient’s email address into the “To:” field, a subject in the “Subject:” field, and a note in the large text area.
-
6
Send the email. Click the paper airplane icon at the top left corner of the message to send the email and its attached document.


Advertisement
-
1
Open your Google Drive. If your Word document is located in your Google Drive, it’s easy to share it with others. Accessing your Drive is different depending on your platform:[7]
- Mobile: Launch the Google Drive app on your device.
- Desktop: Log in to http://drive.google.com in your web browser.
-
2
Navigate to the document you want to share. If you don’t see it in the main folder, you may have to look in some of the subfolders.
- If you haven’t yet uploaded the document from your computer, click New > File Upload, and then double-click the Word document.[8]
- If you haven’t yet uploaded the document from your computer, click New > File Upload, and then double-click the Word document.[8]
-
3
Click the ⋮ icon and tap “Add People.” Skip this step if you’re using the web version of Drive.
-
4
Right-click the file and select “Share.” Skip this step if you’re using the mobile app.
- Another way to do this is to single-click the document and then click the Share icon (the outline of a person’s head with a plus sign.)
-
5
Type the email address of the person you want to receive your file. If this person is one of your Google contacts, you can just start typing their name and then select the correct person from the search results.
-
6
Control whether the person can edit the copy in your Google Drive. By default, Drive gives the person permission to edit the document in your Google Drive.
- Leave this alone if you’re sharing the document with someone and you both plan to make edits.
-
7
Change “Can Edit” to “Can View” if you want the person to be able to download their own copy but not edit yours.
-
8
Select “Done” or “Share” to share the document. An email will be sent to the recipient containing information on how to access the document. They’ll be able to view it online or download it to their computer.


Advertisement
-
1
Open Dropbox on your computer or mobile device. If you’re a Dropbox user, you can use the service to share documents with anyone on the web. Using this method will send a message to the recipient that includes a link to the document. The recipient will be able to download the document by accessing that link (and they won’t need a Dropbox account).
- You’ll need to have a Dropbox account to use this method.
- You should also have the application installed on your device. If you’re using a computer, you can use the web version by signing in to http://www.dropbox.com.
-
2
Add the document to your Dropbox. If you haven’t uploaded the Word document to your Dropbox, do so now.
- Mobile app: Tap the “+” icon and then select “Upload files.” Navigate to the document you want to upload, and then tap “Upload File.”
- Desktop app: If the folder where the file’s stored is not already synced with Dropbox, drag the file from its current location to the Dropbox folder.
- Dropbox.com: Navigate to the folder where you’d like to store the file, then click the “Upload” icon to select your document.
-
3
Open the “Share” window. This step is a little different depending on your platform:[9]
- Mobile: Tap the downward-pointing arrow next to your Document and select “Share.”
- Desktop: Right-click (or Ctrl+Click) the document in the Dropbox application, then click “Share…”
- Dropbox.com: Hover the mouse over the document file and select “Share” (when the menu appears).
-
4
Select “Can View” from the permissions options. If you’re using a mobile device, you’ll see this option under “These People”.[10]
-
5
Type the email address of the person to whom you’d like to send the file. Enter this into the “To:” field. To add multiple recipients, separate each email address with a comma (,).
-
6
Select the “Invite” or “Send” button. The button name depends on your application.[11]
- If you’re using the Dropbox.com site, the button will say “Share.” An email will now be sent to the email address(es) you provided.


Advertisement
-
1
Log into Facebook. If you have a Word document on your computer that you want to send to someone else, you can do so using the web version of Facebook.[12]
- For this method to work, both you and the person to whom you’d like to send the document need to have Facebook accounts.
- The Facebook Messenger app does not support attaching documents saved to your phone, other than photos or videos
-
2
Open a chat window with the recipient. You will be attaching the document to a chat message.
- Click the mail icon at the top right area of Facebook and select “New Message.”
- Start typing the person’s name into the “To:” field and then click their name when it appears in the search results.
-
3
Click the paperclip icon at the bottom of the chat window. Now you’ll be able to navigate to the Word document on your computer.
-
4
Select the document and click “Open”. If you’re using a Mac, the button will say “Choose File.”
-
5
Press ↵ Enter or ⏎ Return to send the document. The recipient will be able to download the document by double-clicking the icon that appeared in the chat window.


Advertisement
-
1
Open your document in Word Online. If you’re using the free version of Microsoft Word available online, you can share the document right from the program.
- This method is similar to sharing a document from your OneDrive account. If your document is in OneDrive, navigate to the document to open it in Word Online.
-
2
Click the “Share” button. This button is at the top right corner of the screen.
-
3
Select “Invite People.” Here you can enter the email address of the person you’re sharing with.
-
4
Enter the recipient’s email address in the “To:” field. To add multiple recipients, separate each email address with a comma (,).
-
5
Select editing permissions for the document. By default, the recipient of the document will have the ability to make changes to your document. This is noted by the “Recipients can edit” dropdown on the Invite screen.
- If you want to share ongoing access to this document and want everyone on the Invite list to be able to make edits, leave this option alone.
- To share a read-only version of the document (cannot be edited by anyone else), click “Recipients can edit” and select “Recipients can only view.”
-
6
Type a note into the “Note” field. Think of this field as the body of an email. Type something here that will alert the recipient to what the email and document are about.
-
7
Click “Share.” An email will be sent to the recipient that contains a link to the document. With that link, the recipient can make changes to the document on Word Online (if you gave them permission to do so) or download the file to their computer.


Advertisement
-
1
Open your document in Microsoft Word. If you’re using Word 2016 for Windows or Mac, you’ll be able to use the built-in “Share” feature to send your document from the app.
- If you’re using an older version of Word, just click the File menu (or Office button in 2007) and select “Send” or “Send To” to send a Document.
-
2
Save changes to your document. To avoid sending an outdated version of your document, click “File” and then “Save”.
-
3
Click the “Share” icon. You’ll see this icon in the top right corner of Word. It looks like the silhouette of a person with a + sign.[13]
-
4
Click “Save to Cloud” if prompted. If you haven’t saved the document to the cloud, you’ll be prompted to do so. Word attempts to save your document to the cloud in case you want to share the document for editing instead of sending it as an attachment (more on this soon).
-
5
Click “Send as Attachment.” You may have to click “Share” again to see this option. “Send as Attachment” will allow you to email a copy of the document to a recipient.
- If, instead of sending the file to the recipient, you’d like to be able to share online editing access of the document, choose “Invite People” instead.[14]
Type the person’s email address when prompted, then click “Send” to email them an invitation to edit the document.
- If, instead of sending the file to the recipient, you’d like to be able to share online editing access of the document, choose “Invite People” instead.[14]
-
6
Select an attachment type. You have two options from which to choose:[15]
- Send a copy: Choose this option if the person to whom you’re sending the document needs to edit or add to the document.
- Send a PDF: Choose this option if you don’t want the document to be modified.
-
7
Address the email to the recipient. Once you select an attachment option, a new email message will open in your default email program (e.g., Outlook, Apple Mail). Enter the recipient’s email address into the “To:” field, type a subject line, and a description of the file in the body.
- To send the document to multiple people, separate each email addresses with a comma (,).
-
8
Click “Send.” Your document will arrive at its destination in a few moments.


Advertisement
Ask a Question
200 characters left
Include your email address to get a message when this question is answered.
Submit
Advertisement
-
Most cloud services include the ability to send documents via email or mobile applications. The instructions for the majority of cloud services are similar.
-
If you don’t have Microsoft Word, you can use Microsoft Office Online. The service includes a free, up-to-date version of Word accessible only on the web.
Thanks for submitting a tip for review!
Advertisement
About This Article
Thanks to all authors for creating a page that has been read 93,236 times.