
You can use WordArt with a Transform text effect to curve or bend text around a shape. If you want the text to circle the shape, you can also do this, but it’s a little bit more work. You can also insert WordArt multiple times to wrap text around shapes with straight edges.

-
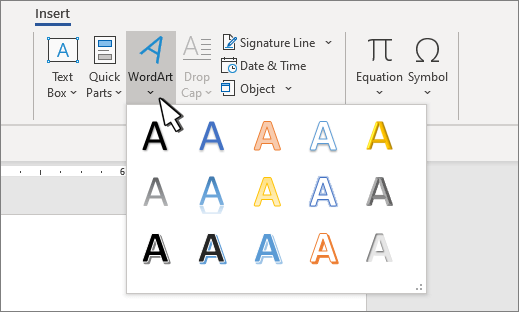
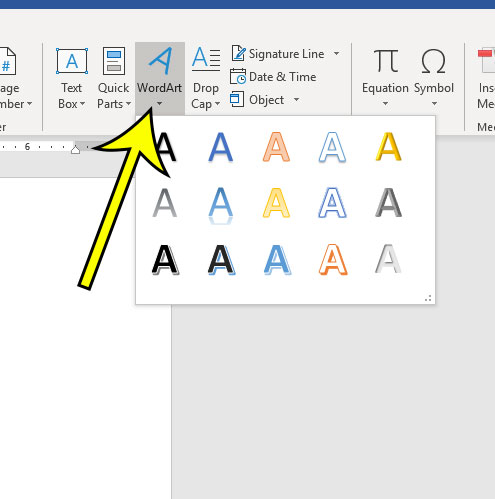
Go to Insert > WordArt, and pick the WordArt style you want.

Note: The WordArt icon is located in the Text group, and it may appear different depending on the version you’re using and the size of your screen. The icon may also look like this
or . -
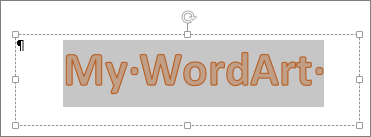
Replace the WordArt placeholder text with your own text.
-
Select your WordArt text.
-
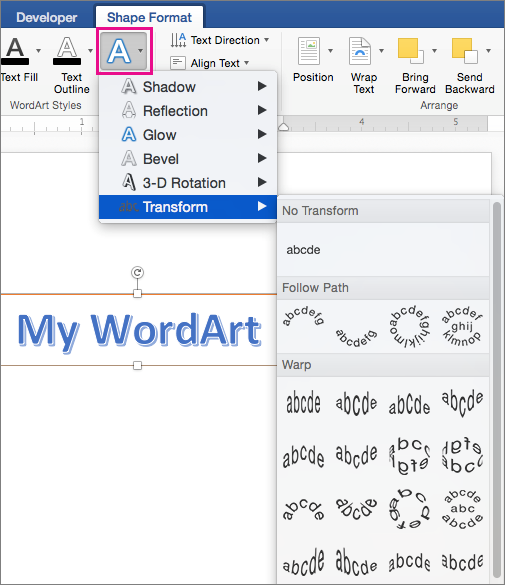
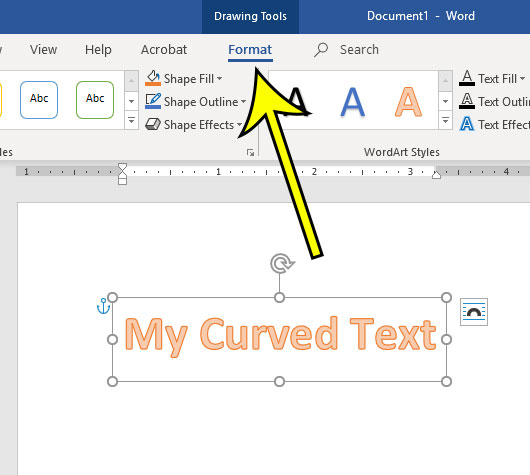
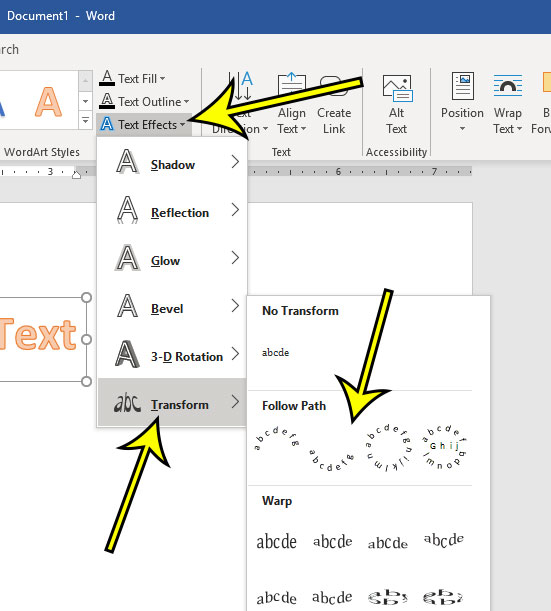
Go to Shape Format or Drawing Tools Format, select Text Effects >Transform and pick the look you want.
 or
or  .
.
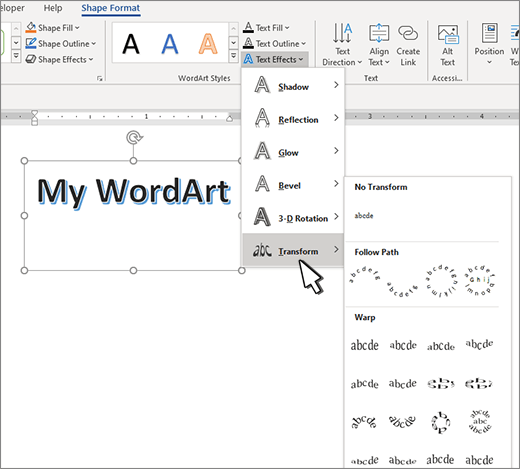
Note: Depending on your screen size, you might only see the icons for WordArt Styles.

Advanced techniques
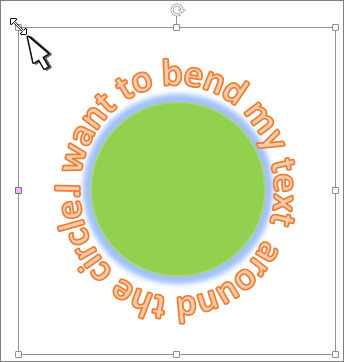
Wrap around a circle To create text that completely circles your shape, choose Circle under Follow Path, and then drag any of the sizing handles until your WordArt is the size and shape you want.
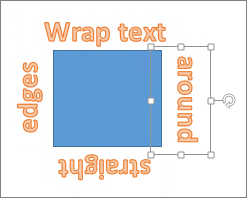
Wrap around straight edges To wrap text around a shape that has straight edges, such as a rectangle, insert WordArt objects for each edge. In this example, WordArt is inserted four times, one for each side of the shape.
Group moves and copy To move or copy multiple WordArt objects as a single shape, see Group or ungroup shapes, pictures, or other objects .
Precise angle control You can control the angle of your WordArt text in relation to your shape with precision by using the Rotate tool.
If you need very precise control or are creating a complex combination of shapes and text, you’ll want to use a third-party drawing or graphics program to create the text around your shape and then copy and paste it into your Office document.
See Also
Add shapes
Insert WordArt
Create curved or circular WordArt
-
Go to Insert > WordArt.
-
Pick the WordArt style you want.
-
Type your text.
-
Select the WordArt.
-
Go to Shape Format > Text Effects > Transform and pick the effect you want.


Advanced techniques
Wrap around a circle To create text that completely circles your shape, choose Circle under Follow Path, and then drag any of the sizing handles until your WordArt is the size and shape you want.
Wrap around straight edges To wrap text around a shape that has straight edges, such as a rectangle, insert WordArt objects for each edge. In this example, WordArt is inserted four times, one for each side of the shape.
Group moves and copy To move or copy multiple WordArt objects as a single shape, see Group or ungroup shapes, pictures, or other objects .
Precise angle control You can control the angle of your WordArt text in relation to your shape with precision by using the Rotate tool.
If you need very precise control or are creating a complex combination of shapes and text, you’ll want to use a third-party drawing or graphics program to create the text around your shape and then copy and paste it into your Office document.
In Word for the web you can see WordArt that’s already in your document, but to add more WordArt you need to open or edit the doc in the desktop version of Word.
You can use the Font features on the Home tab to change the font color and size, and apply bolding, italics, or underlines to your text.
Use the WordArt feature to bend and shape words
Updated on February 6, 2021
What to Know
- Use Transform in Text Effects to curve text as you wish.
- Text Effects is part of Microsoft Word’s Word Art Feature.
This article demonstrates how to bend words into an arch or around a shape or image in Word for Microsoft 365, Word 2019, Word 2016, Word 2013, and Word for Mac 2016 and 2011.
How to Curve Text With WordArt
Microsoft Word uses the WordArt feature to curve text:
-
Open a Word document and select Insert > WordArt.
You can also select the WordArt icon from the toolbar. It looks like a capital letter A. However, the icon’s appearance and location vary depending on the version and platform.
-
In the WordArt menu, choose the WordArt style you want. Placeholder text appears in the document. Type your text over the placeholder text.
-
Select the text to display the Drawing Tools tab.
-
Go to either the WordArt Styles or Text Styles group, then select Text Effects, which is represented by a blue and white letter A.
In Word 2016, Text Effects displays when you hover the mouse cursor over it. In earlier versions, it’s clearly labeled.
-
Select Transform.
-
From the submenu, choose from a variety of effects, including curved and bent text. Select an option to apply it to the text.
How to Undo Curved Text
To remove a curved or bent text effect without deleting your text:
-
Select the curved or bent text you want to modify.
-
Select Text Effects.
-
Select Transform > No Transform. The curved or bent text transformation effect is removed.
Thanks for letting us know!
Get the Latest Tech News Delivered Every Day
Subscribe

If you want to customize text in Word, you might want to try curving the text using WordArt. Here’s how.
A typical Word document has a standard layout, where the text itself is the most essential element, regardless of the formatting. Of course, if you want to create more varied types of documents, you can format the text by changing fonts or by changing the layout with text indents and more.
If you want some of your text to stand out against the rest, however, you may want to add special effects. WordArt is one way to do this, allowing you to curve some of your text in Word. If you want to know how to curve text in Word, here’s what you’ll need to do.
Adding Curves to Text in Word
There are a couple of ways you can add curves to text in Word. The first method is too add a preset curved effect to your text, with various curving effects that follow different paths. These effects curve the text upwards, downwards, or create a circle-like effect.
To add curved text to a Word document, open your document and press the Insert tab on the ribbon bar. From there, press the Wordart option, listed under the Text category.

From the WordArt drop-down menu, select the style of WordArt text you wish to use.

Clicking any of the available effects will insert a text box into your document using that WordArt effect. You’ll need to replace the placeholder text with your own at this point.
Once you’ve replaced the placeholder text, you’ll need to set WordArt to use a curve. To do this, and with the text box active, press the Drawing Tools – Format tab on the ribbon bar.
From there, press the Text Effects button, listed under the WordArt Styles category.

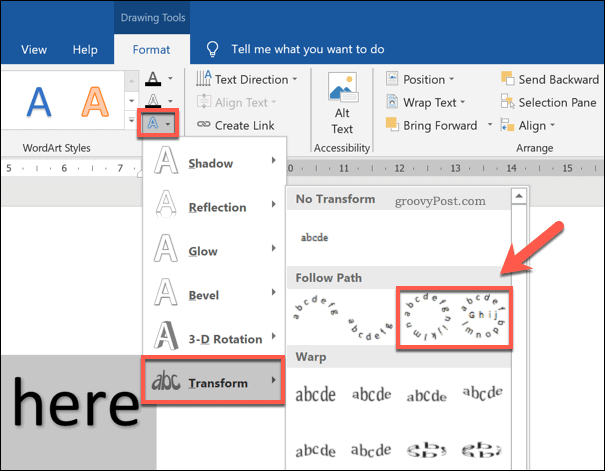
From the WordArt Styles drop-down menu, click Transform to view various curved styles to apply.
In the Follow Path section, you can select an effect that will curve the text upwards, downwards, or to create a full circle. Select one of these effects to apply it to your WordArt text box.
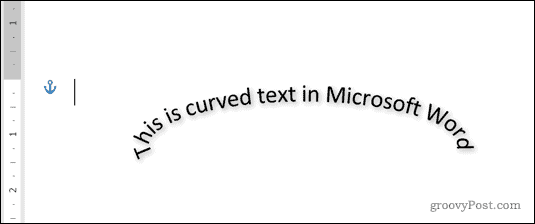
With the WordArt text box style changed, the effect will become visible in the document.
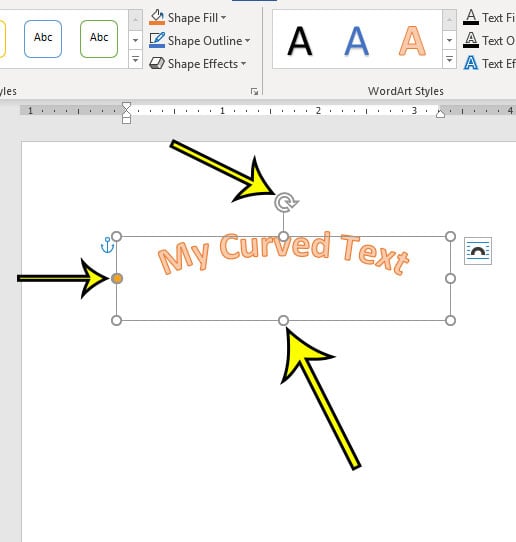
If you want to increase or decrease the curvature of the text, however, you’ll need to first select the text box. With the text box selected, use your mouse or trackpad to move the orange dot icon.
As you move the icon, a trace line showing the future shape of the curve will become visible. The visible shape will depend on the text effect you selected.

Once you’re happy with the curve, release your mouse cursor. This will drop the text into the new position.
Curving Text to a Custom Shape in Word
Using the WordArt text effect, you can curve text using a preset shape and design. If you want, however, you can wrap WordArt text around a custom shape.
If the shape is invisible (or has the same background as your document background), you can wrap the text without the shape of the curve being visible. This allows you to curve text in Word using various custom shapes and designs.
To do this, insert a new WordArt text box by pressing Insert > WordArt.
Replace the placeholder text in the WordArt text box with your own. With the text box inserted and the placeholder text changed, select the text box, then press Drawing Tools – Format > Text Effects.
From the drop-down menu, press Transform, then select Circle from the options provided.

With the circular text effect added to the WordArt text box, you’ll need to wrap the WordArt text around a new shape.
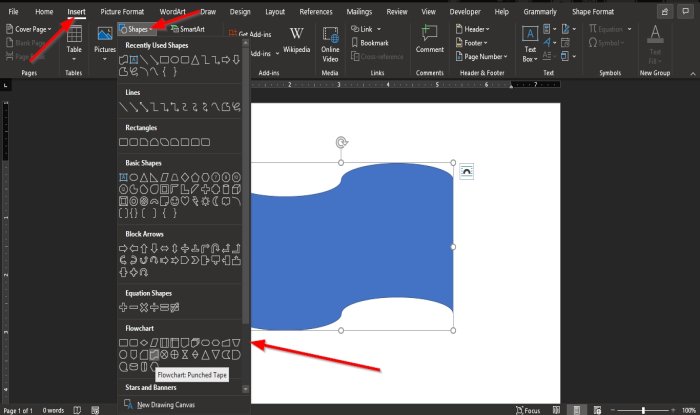
To insert a new shape, press Insert > Shapes and select a shape from the drop-down menu. Shapes with rounded edges are best here, as the path of the WordArt text can be changed to follow the shape.
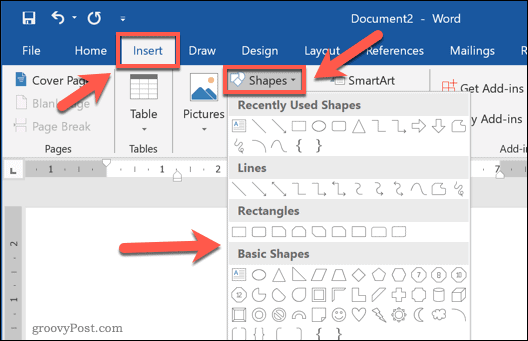
With the shape inserted, select the text box and resize it so that the text surrounds the outside path of the shape. Press the orange dot icon and reshape the WordArt path to surround the outside shape edge.
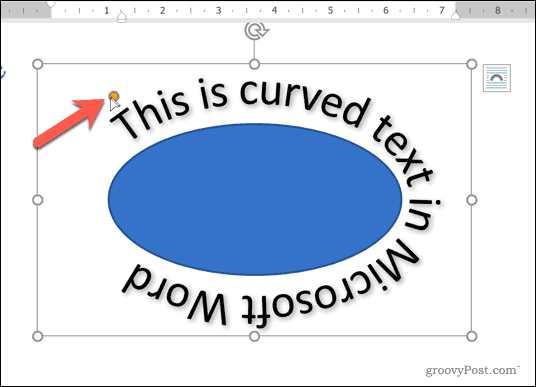
Release your mouse cursor once the WordArt path surrounds the shape as a whole.

If you want to wrap text around shapes with harder edges (for instance, a square or rectangle), you’ll need to create multiple WordArt text boxes.
Once inserted, you’ll then need to position them on each side of the shape manually. You may need to rotate the text boxes to ensure that the text is positioned correctly on each side of the shape.

Removing Curves From Text in Word
If you want to remove a curved text effect from a WordArt text box in Microsoft Word, the process is easy.
To start, select the WordArt text box in your document. From the ribbon bar, press Drawing Tools – Format > Text Effects. From the drop-down menu, select Transform > No Transform.
This will disable any curved text effects and return your WordArt text to normal.

With the text effect removed, the WordArt text will appear horizontally. You may need to take additional steps (for example, removing a shape) to restore your document layout.
Other Word Formatting Options
Curving text in Word using WordArt is just one potential way to add custom formatting to your document. It’s great for emphasis, but it isn’t something you can add to every document, with WordArt better suited to documents like flyers.
There are other types of formatting you can try, however. For instance, you can find and replace formatting in Word to quickly customize your document, or change the default font for consistent text formatting across different files. You may even decide to draw in Microsoft Word, allowing you to add diagrams and basic drawings to your documents.
![]()
Even if you’ve been a Microsoft Word user for a long time, there are certain formatting options or objects that you need, but might not know where to find. For example, you might need to know how to curve text in Word if you’re designing a document that would benefit from having that effect.
A traditional Microsoft Word document, such as one that you might create for school or your job, is rarely more than plain text and maybe a picture or graph. But there are a lot of other elements that can be included in a Word document, including curved words.
You can curve text in Microsoft Word selecting the text, clicking the Insert tab, clicking the WordArt button and choosing an option from the drop down menu. You can then select the Format tab > Text Effects > Transform > then choose a curved path.
Whether you’re designing a flyer or a newsletter, or anything else that needs to be visually appealing, there are many cases where you might find yourself needing to curve a Word in your document. Our guide below will show you how to use the tools in Microsoft Word to achieve your curved text.
How to Arch Microsoft Word Text
The steps in this article were performed in Microsoft Word for Office 365, but will also work in most other versions of Word.
This first part of this section provides a brief overview of how to curve text.
If you would like to see the full tutorial with pictures, simply keep scrolling, or click this link to jump to that section. We also discuss how to curve text without WordArt further down in this article.
- Open the Word document.
- Choose where to add the curved text, then type it.
- Select the text.
- Click the Insert tab.
- Choose the WordArt button, then select a style.
- Click the Drawing Tools – Format tab.
- Select Text Effects, then Transform, then a curved text style.
- Adjust the WordArt text box as needed.
Our guide continues below with additional information on how to curve text in Word, including pictures of these steps.
Would you like to include the number of pages next to your page numbers? Our page 1 of 2 in Word tutorial can show you how to set that up.
Full Tutorial – How to Curve Text in Microsoft Word
As mentioned above, this section provides additional information on curving text in Microsoft Word, including pictures.
Note that this method uses WordArt. However, you can also curve text without WordArt. That method is discussed in the section below this one.
Step 1: Open your document in Word.
Step 2: Click at the point where you want to place the curved text, then type it.
Step 3: Use your mouse to select the text that you wish to curve.
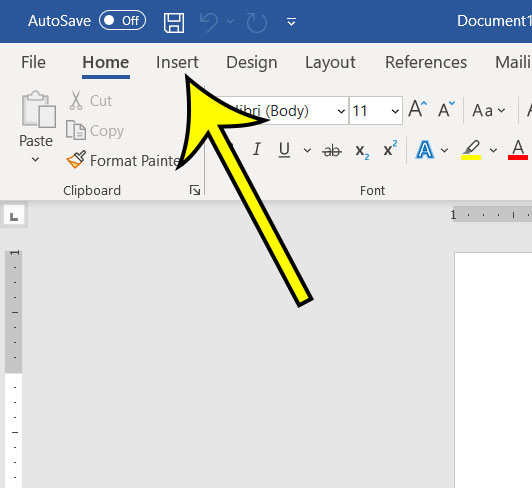
Step 4: Select the Insert tab at the top of the window.
Step 5: Click the Word Art button, then choose the desired style for your curved text.
Step 6: Select the Drawing Tools Format tab at the top of the window.
Step 7: Choose the Text Effects option, select Transform, then click the desired curve type under Follow Path.
Step 8: Adjust the layout options for your curved text by clicking the white anchors to change the size of the text box, clicking and dragging the orange anchor to adjust the curvature, or clicking on the arrow to rotate the text.
The next section provides an alternate method for curving text.
If you’re adding math equations or other similar text to your document, then this how to do fraction on Word guide can show you a useful tool in the application.
How to Curve Text in Microsoft Word Without WordArt
Sometimes you will want to avoid using certain types of objects in Microsoft Word, including WordArt. Therefore you might want to try this method of curving text instead.
Step 1: Click the Insert tab.
Step 2: Click the Text Box button and choose your text box type.

Step 3: Enter the text into the text box.
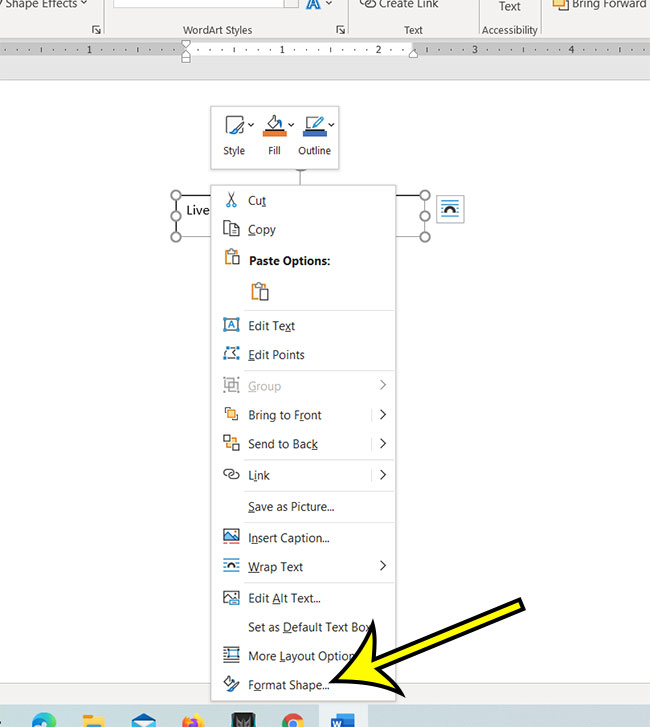
Step 4: Right-click the text box and choose Format Shape.
Note that you need to right-click on the text box border, not inside the text box.
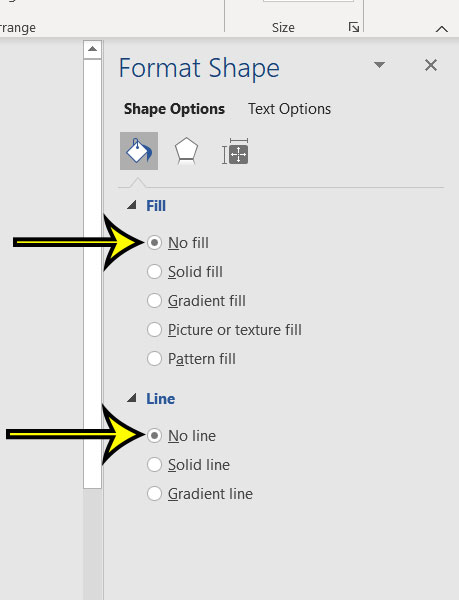
Step 5: Select No Fill and No Line from the column at the right side of the window.
Step 6: Click the Text Effects button, select Transform, then click one of the curved text options under Follow Path.

Depending on the version of Word that you are using you may or may not see a preview of the curved text after you select the shape transformation. Otherwise, you will need to click outside of the text box.
You can edit the text in the text box and adjust its formatting until it looks the way that you want it to look. You can also adjust the size of the text box or rotate it using the controls that surround the text box when it’s selected.
Our tutorial continues below with additional discussion about ways of adding curves to text in Word.
If you see a lot of weird symbols in your document that you can’t remove, then read this how to remove paragraph symbols in Word 2013 article to stop showing all of those different marks.
Frequently Asked Questions About How to Bend Words in Word
Where do I find the different Word Art styles in Microsoft Word?
When you select the Insert tab at the top of the window, you will see a WordArt button in the Text group of the ribbon.
If you click that button it will display the WordArt drop down menu where you can choose from one of the different options that is shown there.
Whichever WordArt icon you select will be applied to the existing text that you used your mouse cursor to select.
How do I add a curved line in Microsoft Word?
If you want to place a curved line in your document instead of choosing to curve or bend text, then you will need to utilize the Shapes tool instead.
You can select the Insert tab at the top of the window, then click the Shapes button in the Illustrations group in the ribbon.
You can then select the Curved line option in the Lines section of the dropdown menu, then draw the line in the document.
Note that the curved line can take some getting used to, as it won’t start curving until you single click your mouse. You can double click your mouse when you are done drawing the curved line, which will create the shape box.
Drawing a line like this in Word takes a little practice, so you might need to try it a couple of times first.
More Information on Curving Text to a Custom Shape in Word
There are a lot of WordArt styles that you can pick from when you are using the Word Art option to create the curved text effect. Plus, you can always go back and choose a different WordArt option or WordArt style after you use the transform option if you don’t like the result.
The placeholder text in a text box can be selected and deleted.
One of the benefits of using a text box to create curved text is that you can move a text box almost anywhere in the Word window, which gives you far more placement options than you have when you use WordArt text.
If you format your curved text and find that you made a mistake, you can undo curved text by pressing the Ctrl + Z keyboard shortcut.
Do you need your curved text to be a specific size? Find out how to show the ruler in Microsoft Word so that you can tell how large part of your document will be when you print it.
Active Time
5 minutes
Additional Time
2 minutes
Total Time
7 minutes
Difficulty
Medium
Materials
- Microsoft Word document
Instructions
- Open the document with the text you want to curve.
- Find the text to curve, or type it.
- Select the text to curve with your mouse.
- Click the Insert tab.
- Choose the Word Art option, then click the text icon that looks the way you want your curved text to look.
- Click the Drawing Tools Format tab at the top of the window.
- Choose the Text Effects option, click Transform, then click a curve type from the options on the menu.
- Adjust the layout options for your curved text.
Notes
After applying the transformation to your text, there will be a text box around it.
— Click the circular arrow to rotate the text box.
— Click one of the white circular anchors to change the size of the text box.
— Click and drag on the orange circular anchor to adjust the curvature of the text.

Kermit Matthews is a freelance writer based in Philadelphia, Pennsylvania with more than a decade of experience writing technology guides. He has a Bachelor’s and Master’s degree in Computer Science and has spent much of his professional career in IT management.
He specializes in writing content about iPhones, Android devices, Microsoft Office, and many other popular applications and devices.
Read his full bio here.
Download PC Repair Tool to quickly find & fix Windows errors automatically
The Shape feature in Microsoft Word allows users to add ready-made shapes to the document, such as Circles, rectangles, and arrows. When the shape is selected, the color and body can be customized to the look you want.
Adding a shape in a Microsoft Word document is easy, but what if you want the text to be inside it. Microsoft Word has a feature that can fit text inside a shape. The text fill shape is like a textbox where you can format the text inside the shape; you can increase and decrease the size of the text, Underline, Bold, italic, and change the font and color of the text. Placing a text into shape is useful when creating flowcharts, network diagrams, and mind maps.
To insert Text into a Shape in Word, follow these steps:
- Open Word document
- Insert Shape
- Right-click and click Add text
- Type or paste the text into the shape
- Click outside the shape
- Save document and exit.
In this tutorial, we will explain how to insert text into a shape; follow the steps below.
Launch Microsoft Word.
Click the Insert tab and click the Shapes button in the Illustration group.
Choose a shape from the list.
Please draw the shape into the document by dragging the mouse and release it when you reach the size you want.
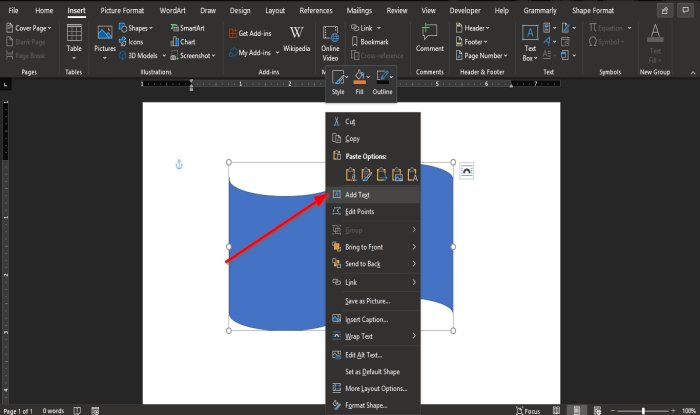
Right-click the shape and click Add text from the context menu.

Enter the text into the shape.
Click outside the shape.
Now, we have a text inside the shape.
You can also format the text inside the shape by changing the font, increasing and decreasing the size, changing the style to underline, italic and bold, and change the color to what you want.
We hope this tutorial helps you understand how to insert text into a shape in Microsoft Word.
Now read: Best Invoice Templates for Word Online to create Business Invoices for free.

Shantel has studied Data Operations, Records Management, and Computer Information Systems. She is quite proficient in using Office software. Her goal is to become a Database Administrator or a System Administrator.