
You can use WordArt with a Transform text effect to curve or bend text around a shape. If you want the text to circle the shape, you can also do this, but it’s a little bit more work. You can also insert WordArt multiple times to wrap text around shapes with straight edges.

-
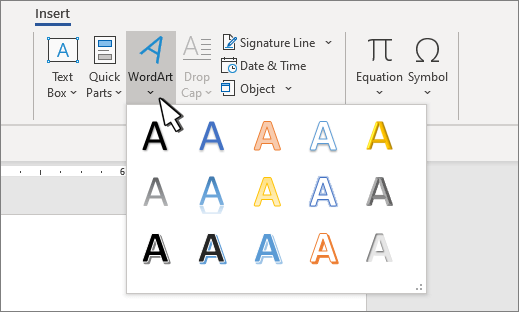
Go to Insert > WordArt, and pick the WordArt style you want.

Note: The WordArt icon is located in the Text group, and it may appear different depending on the version you’re using and the size of your screen. The icon may also look like this
or . -
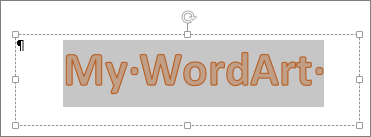
Replace the WordArt placeholder text with your own text.
-
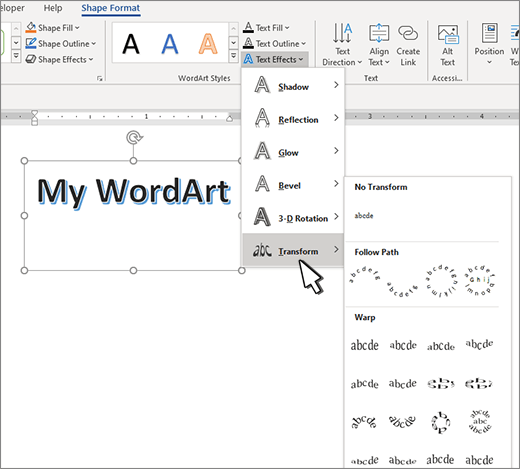
Select your WordArt text.
-
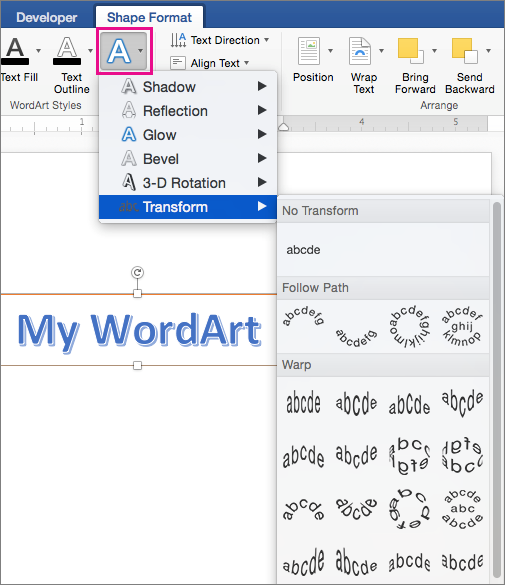
Go to Shape Format or Drawing Tools Format, select Text Effects >Transform and pick the look you want.
 or
or  .
.
Note: Depending on your screen size, you might only see the icons for WordArt Styles.

Advanced techniques
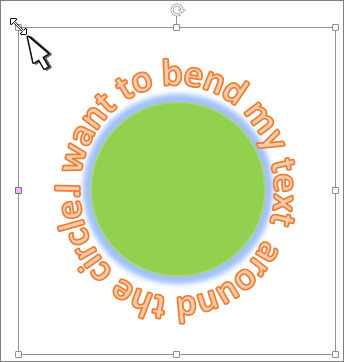
Wrap around a circle To create text that completely circles your shape, choose Circle under Follow Path, and then drag any of the sizing handles until your WordArt is the size and shape you want.
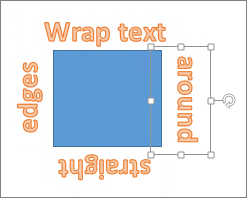
Wrap around straight edges To wrap text around a shape that has straight edges, such as a rectangle, insert WordArt objects for each edge. In this example, WordArt is inserted four times, one for each side of the shape.
Group moves and copy To move or copy multiple WordArt objects as a single shape, see Group or ungroup shapes, pictures, or other objects .
Precise angle control You can control the angle of your WordArt text in relation to your shape with precision by using the Rotate tool.
If you need very precise control or are creating a complex combination of shapes and text, you’ll want to use a third-party drawing or graphics program to create the text around your shape and then copy and paste it into your Office document.
See Also
Add shapes
Insert WordArt
Create curved or circular WordArt
-
Go to Insert > WordArt.
-
Pick the WordArt style you want.
-
Type your text.
-
Select the WordArt.
-
Go to Shape Format > Text Effects > Transform and pick the effect you want.


Advanced techniques
Wrap around a circle To create text that completely circles your shape, choose Circle under Follow Path, and then drag any of the sizing handles until your WordArt is the size and shape you want.
Wrap around straight edges To wrap text around a shape that has straight edges, such as a rectangle, insert WordArt objects for each edge. In this example, WordArt is inserted four times, one for each side of the shape.
Group moves and copy To move or copy multiple WordArt objects as a single shape, see Group or ungroup shapes, pictures, or other objects .
Precise angle control You can control the angle of your WordArt text in relation to your shape with precision by using the Rotate tool.
If you need very precise control or are creating a complex combination of shapes and text, you’ll want to use a third-party drawing or graphics program to create the text around your shape and then copy and paste it into your Office document.
In Word for the web you can see WordArt that’s already in your document, but to add more WordArt you need to open or edit the doc in the desktop version of Word.
You can use the Font features on the Home tab to change the font color and size, and apply bolding, italics, or underlines to your text.
Lesson 14: Working with Shapes
/en/word2010/working-with-hyperlinks/content/
Introduction
You can add a variety of shapes to your document, including arrows, callouts, squares, stars, and flowchart shapes. Want to set your name and address apart from the rest of your resume? Use a line. Need to create a diagram showing a timeline or process? Use flowchart shapes.
In this lesson, you will learn how to insert a shape and format it by changing its fill color, outline color, shape style, and shadow effects. Additionally, you will learn how to apply 3D effects to shapes.
Using shapes
Word’s large shape collection allows you to organize and design the image you want. While you may not need shapes in every document you create, they can add visual appeal. To use shapes effectively, you’ll need to know how to insert a shape and format it by changing its fill color, outline color, and shape style, as well as add 3D effects.
To insert a shape:
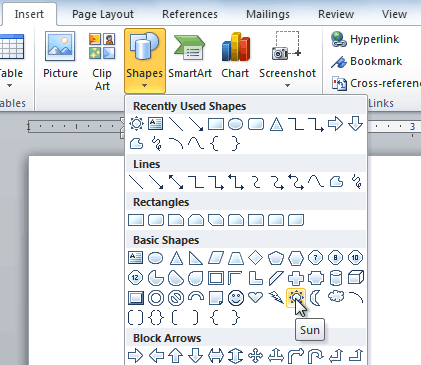
- Select the Insert tab.
- Click the Shapes command.
The Shape command
- Select a shape from the drop-down menu.
- Click and drag the mouse until the shape is the desired size.
Creating a new shape
- Release the mouse button.

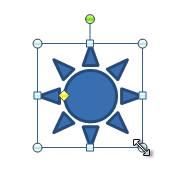
To resize a shape:
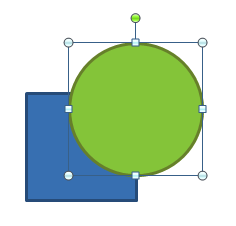
- Click the shape to select it.
- Click and drag one of the sizing handles on the corners and sides of the shape until it is the desired size.
Resizing the shape
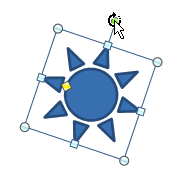
- To rotate the shape, drag the green handle.
Rotating the shape
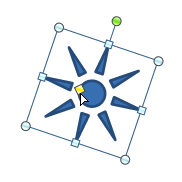
- Some shapes also have one or more yellow handles that can be used to modify the shape. For example, with star shapes you can adjust the length of the points.
Modifying the shape
If you drag the sizing handles on any of the four corners, you will be able to change the height and width at the same time. The sizing handles on the top or bottom of the shape will only allow you to resize vertically, while the handles on the left and right sides will resize the shape horizontally.
To change the order of shapes:
If one shape overlaps another, you may need to change the ordering so the correct shape appears in front. You can bring a shape to the front or send it to the back. If you have multiple images, you can use Bring Forward or Send Backward to fine tune the ordering. You can also move a shape in front of or behind text.
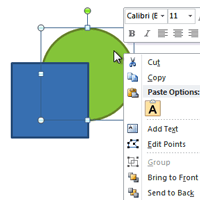
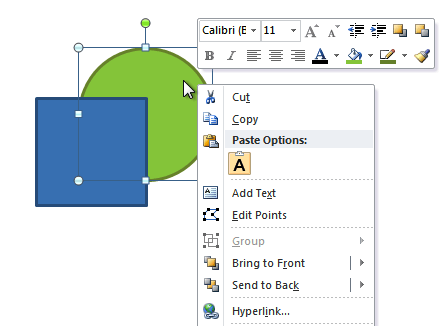
- Right-click the shape you want to move.
Right-clicking the shape
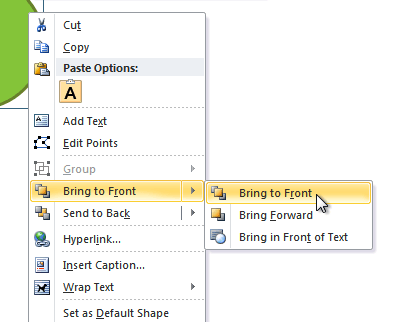
- In the menu that appears, hover over Bring to Front or Send to Back. Several ordering options will appear.
Selecting an ordering option
- Select the desired ordering option. The shapes will reorder themselves.
The reordered shapes
In some cases, the ordering option you select will not affect the ordering of the shapes. If this happens, select the same option again or try a different option.
Changing a shape’s appearance
To change to a different shape:
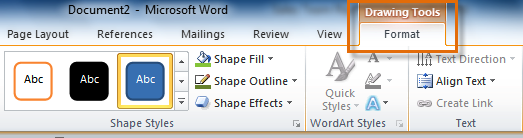
- Select the shape. A new Format tab appears with Drawing Tools.
The Format tab
- Click the Format tab.
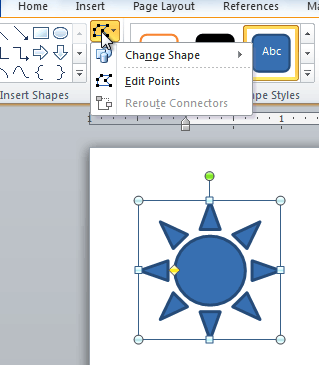
- Click the Edit Shape command.
The Edit Shape command
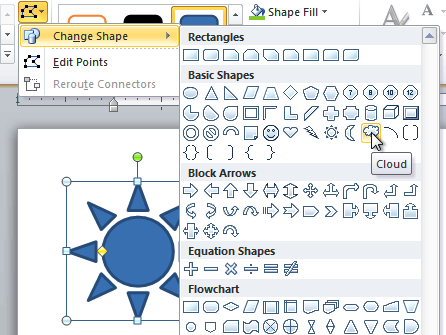
- Click Change Shape to display a drop-down list.
Choosing a new shape
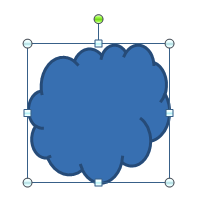
- Select the desired shape from the list.
The new shape
To change the shape style:
- Select the shape. The Format tab appears.
The Format tab
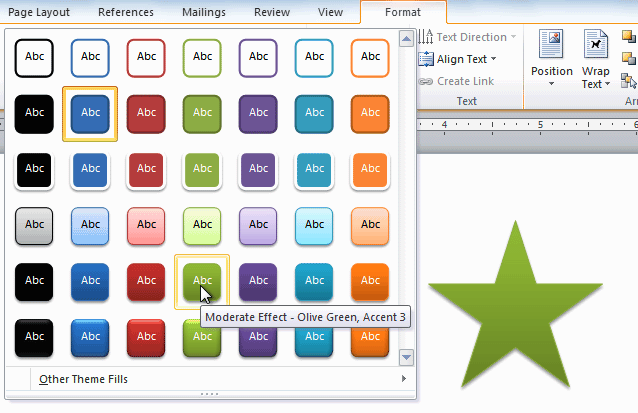
- Click the More drop-down arrow in the Shape Styles group to display more style options.
The More drop-down arrow
- Move your cursor over the styles to see a live preview of the style in your document.
Previewing shape styles
- Select the desired style.
To change the shape fill color:
- Select the shape. The Format tab appears.
- Select the Format tab.
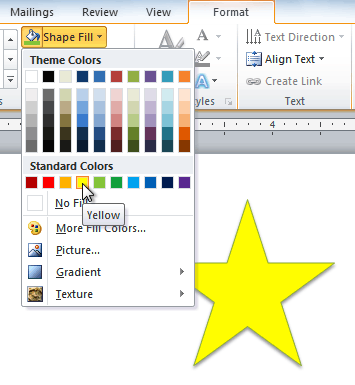
- Click the Shape Fill command to display a drop-down list.
Choosing a fill color
- Select the desired color from the list, choose No Fill, or choose More Fill Colors to choose a custom color.
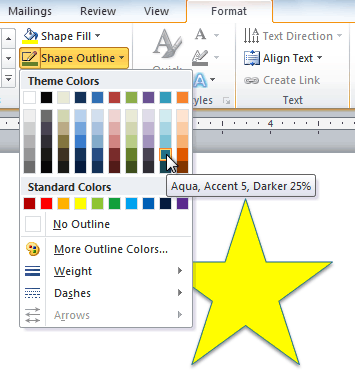
To change the shape outline:
- Select the shape. The Format tab appears.
- Click the Format tab.
- Click the Shape Outline command to display a drop-down menu.
Choosing an outline color
- From the drop-down menu, you can change the outline color, weight (thickness), and whether it is a dashed line.
A thicker outline

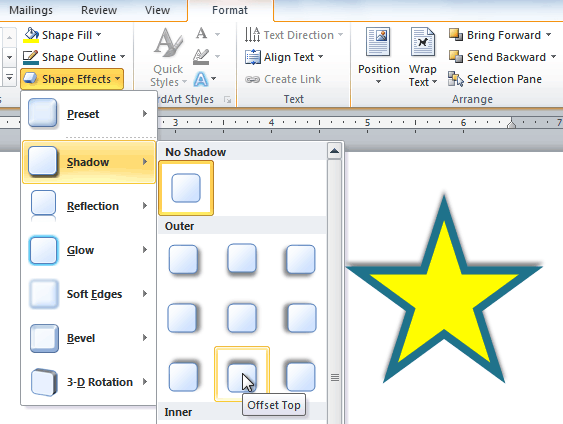
To change shadow effects:
- Select the Format tab.
- Click the Shape Effects command. A drop-down menu will appear.
- Hover your mouse over Shadow. You will see a list of shadow presets.
- Move your mouse over the menu options to see a live preview of the shadow effect in your document.
Choosing a shadow type
- Click the desired shadow effect to add it to your shape.
You can select Shadow Options from the drop-down menu and click the Color button to select a different shadow color for your shape.
3D effects
There are two types of effects you can apply to your shapes to give them a 3D appearance: 3-D Rotation and Bevel. 3-D Rotation gives the appearance that you are viewing the object from a different angle, and it can be applied to any shape. Bevel adds thickness and a rounded edge to shapes, but it doesn’t work with every type of shape.
To use 3-D Rotation:
- Select the shape.
- Click the Format tab.
- Click Shape Effects from the Shape Styles group.
- Hover the mouse over 3-D Rotation. A drop-down menu will appear.
- Select the desired rotation preset from the drop-down menu. You can also click 3-D Rotation Options if you would prefer to type custom values.
Choosing a 3-D rotation preset

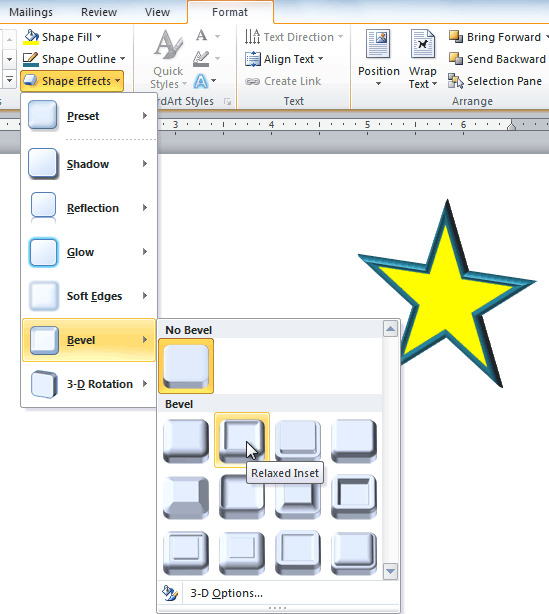
To use bevel:
- Select the shape.
- Click the Format tab.
- Click Shape Effects from the Shape Styles group.
- Hover your mouse over Bevel. A drop-down menu will appear.
Choosing a bevel preset
- Select the desired bevel preset from the drop-down menu. You can also click 3-D Options if you would prefer to type custom values.
If you click 3-D Options, you’ll also be able to change the shape’s material to give it a metal, plastic, or translucent appearance, and you can choose the lighting type to change how the shape is illuminated.
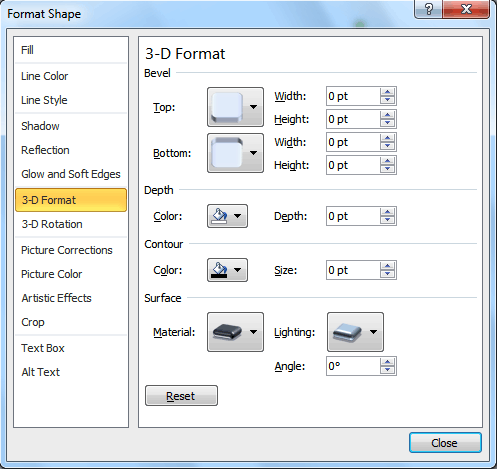 Viewing the 3-D Options
Challenge!
- Create a new Word document.
- Insert a shape.
- Change the shape to a different shape.
- Change the fill color.
- Change the outline color.
- Try various shadow effects.
- Try various 3D effects.
/en/word2010/text-boxes-and-wordart/content/
I can’t find how to create curved text in Word 2010 like you could in previous versions through WordArt. The point is to have the text baseline follow some arc or circle.
In WordArt presets, I can only find stuff that formats each letter with shadows, etc. but not their position relative to each other. Can someone give me pointers?
asked Nov 7, 2010 at 18:49
![]()
Insert a WordArt object, then, in Drawing Tools — Format, look at Text Effects — Transform. Does that give you what you want?
If not, you can still get the old style. Save the file in Word 2003 format, and now when you choose Insert — WordArt, you’ll see the legacy choices.
Reference: Old Style Word Art in Word 2010?
answered Nov 7, 2010 at 19:01
![]()
ricbaxricbax
5,1203 gold badges29 silver badges39 bronze badges
1
Here’s how:
- Make a text box and put in the words you want
- Click on the blue glowing A in the section WordArt Styles
- Hover the mouse over Transform
You will be able to no make curved lines.
![]()
slhck
220k69 gold badges596 silver badges585 bronze badges
answered Mar 20, 2012 at 23:18
![]()
Try using Word Art and typing in an individual letter and rotate it individually. So for instance, if you want to bend the word PEOPLE. Type in the letter P and rotate it, then type in the letter E, rotate it and place next to the letter P. Type in the next letter O, rotate it and place it next to previous 2 letters PE. Continue with this with the other letters. Once completed, you will notice that the word PEOPLE are bend. It may take more of your time, but I find this method more effect and flexible as it gives the user more bending possibilities.
![]()
answered Jan 30, 2012 at 6:10
![]()
MarioMario
191 bronze badge

Microsoft Word makes it easy to add geometric shapes (and a whole lot more) to your document. You can also add text into these shapes, which is handy when you’re creating flowcharts, network diagrams, mind maps, and so on. This being Word, there are plenty of options for doing this, so let’s take a look.
First, you’ll need to insert a shape by going to Insert > Shapes. We’re going to use a nice rounded rectangle, which by default will be filled in with blue.

Right-click anywhere in your shape and click the “Add Text” command.
This places an insertion point in the shape where you can type your text. Once you’ve added whatever you want to write, the “Format” tab has tools you can use to give your text a little pop with things like text styles and shading.
You can also select the text and use the standard Font, Paragraph and Styles tools on the Home tab to format your text, just as if it were a normal part of the document. When you right click your text, you’ll find the usual quick options as well.
RELATED: How to Position Images and Other Objects in Microsoft Word
If you’d like a little more control over the placement and boundaries of your text, you can add a text box inside your shape instead. When you insert a new image or select an existing image, Word automatically switches you to the “Format” tab. You’ll see two ways here to insert a text box, both of which add a text box in the same way.
Select one of the options and move the cursor over your image. A yellow “+” mark will replace your pointer. Hold down the left mouse button and drag the “+” mark to create a text box. When the box looks about right, release the left click (don’t worry if the text box isn’t exactly the right size or location, you can change it afterward), and your text box will be created.
You can use the handles (the little squares) around the text box to resize it or select the whole text box to move it around within your shape. Add your text and format it in whatever way you want.
There are also text boxes with preset formatting that you can add by selecting your shape and then clicking Insert > Text Box. We’ve only scratched the surface of what you can do with text boxes here, so if you want to know more check out our guide to text boxes and all the things you can do with them.
RELATED: How to Create and Format a Text Box in Microsoft Word
READ NEXT
- › How to Circle Text in Microsoft Word
- › How to Link Text Boxes in Microsoft Word
- › How to Remove Borders in Microsoft Word
- › HoloLens Now Has Windows 11 and Incredible 3D Ink Features
- › BLUETTI Slashed Hundreds off Its Best Power Stations for Easter Sale
- › Google Chrome Is Getting Faster
- › How to Adjust and Change Discord Fonts
- › The New NVIDIA GeForce RTX 4070 Is Like an RTX 3080 for $599
How-To Geek is where you turn when you want experts to explain technology. Since we launched in 2006, our articles have been read billions of times. Want to know more?
Доброго времени суток всем читателям и подписчикам блога scriptcoding.ru. В этой статье мы рассмотрим работу с коллекцией Shapes, которая позволяет добавлять различные графические объекты в Word документ.
По сути, используя методы данной коллекции, мы можем делать вставку таких графических объектов в Word как авто-фигуры, выноски, рисунки, диаграммы, полотна и многое другое. Также стоит уточнить, что по ходу статьи, под словом «фигура» будут подразумеваться все графические Word объекты (полотно, WordArt, SmartArtи так далее). Я не привожу примеров программного кода, самим программированием мы займемся, когда будет изучать по отдельности работу с каждым графическим объектом Word, которые создаются с помощью коллекции Shapes.
Содержание
- Коллекция Shapes – графические объекты в Word
- Shapes – свойства, работа с графическими объектами Word
- Shapes — методы, создание графических объектов в Word
Коллекция Shapes – графические объекты в Word
Shapes – свойства, работа с графическими объектами Word
Count— Возвращает количество фигур в коллекции.
Shapes — методы, создание графических объектов в Word

Основной функционал коллекции заключается в ее методах, большинство из которых будут возвращать класс Shape, а тот в свою очередь, будет предоставлять нужные свойства для конкретной фигуры. Например, мы добавили новое полотно в документ, для обработки данного полотна используется свойство CanvasItems, которое хранит ссылку на CanvasShapes. При добавлении новой линии в документ, нам нужно обратиться к свойству Line, которое хранит ссылку на класс LineFormat, который отвечает за обработку линий. И так далее, это логично, так как у каждого графического объекта в Word, например, выноски и WordArt есть различные возможности.
AddCanvas(Left, Top, Width, Height, Anchor) — Добавляет новое полотно в документ.
Anchor – Содержит ссылку на класс Range, который представляет текст, к которому нужно привязать полотно.
AddSmartArt(Layout, Left, Top, Width, Height, Anchor) – Вставка таких графических объектов Word в активный документ, как рисунок SmartArt. Начиная с версии Word 2010.
Layout – Ссылка на класс SmartArtLayout.
AddCallout(Type, Left, Top, Width, Height) – Добавляет текстовую выноску с линиями.
Type – Данный параметр определяет тип линии. Значения константы MsoCalloutType:
- msoCalloutOne — 1 – Горизонтальная линия слева.
- msoCalloutTwo — 2 – Горизонтальна линия с наклоном лева.
- msoCalloutThree — 3 – Линия состоит из двух отрезков слева (один отрезок с наклоном, а другой горизонтальный).
- msoCalloutFour — 4 — Линия состоит из трех отрезков справа (один отрезок с наклоном, другой горизонтальный и третий вертикальный).
AddLine(BeginX, BeginY, EndX, EndY) – Рисует линию с указанными начальными и конечными координатами.
AddConnector(Type, Left, Top, Width, Height) – Рисует соединительную линию.
Type – Тип линии, значение константы MsoConnectorType:
- msoConnectorStraight — 1 — Прямая линия.
- msoConnectorElbow — 2 – Прямое колено.
- msoConnectorCurve — 3 – Изогнутое колено.
- msoConnectorTypeMixed — -2 – Смешанные значения.
AddShape(Type, Left, Top, Width, Height) – Вставка графических объектов в Word, которые представляют указанную автофигуру.
Type – Определяет тип фигуры, значение константы MsoAutoShapeType.
AddPicture(FileName, LinkToFile, SaveWithDocument, Left, Top, Width, Height) — Добавляет изображения. Возвращает класс Shape, представляющий картинку и добавляет ее в коллекцию CanvasShapes. Обязательный только первый параметр.
FileName – Путь к файлу и его имя.
LinkToFile – True – привязать изображение к файлу, из которого он был создан. False – сделать изображение независимым от файла, по умолчанию.
SaveWithDocument – True — сохранить связанный рисунок с документом. Значение по умолчанию False. Если использовать значение False, то может возникнуть ошибка. Работа с графическими Word объектами.

AddLabel(Orientation, Left, Top, Width, Height) — Добавляет текстовую область.
Orientation – Задает ориентацию текста. Значение константы MsoTextOrientation:
- msoTextOrientationHorizontal — 1 — Горизонтальная.
- msoTextOrientationUpward — 2 – Направление вверх.
- msoTextOrientationDownward — 3 – Направление вниз.
- msoTextOrientationVerticalFarEast — 4 – Вертикальное направление для азиатских языков.
- msoTextOrientationVertical — 5 – Направление вниз.
- msoTextOrientationHorizontalRotatedFarEast — 6 — Горизонтальное направление для азиатских языков.
AddTextbox(Orientation, Left, Top, Width, Height) — Добавляет текстовое поле.
AddTextEffect(PresetTextEffect, Text, FontName, FontSize, FontBold, FontItalic, Left, Top) – Создание графического объекта WordArt в Word.
PresetTextEffect – Определяет эффект текста WordArt. Значение константы MsoPresetTextEffect.
Text — Текст в WordArt.
FontName — Название шрифта, используемого в WordArt.
FontSize — Размер шрифта в пунктах.
FontBold – Содержит логическое значение, определяющее, нужно ли сделать шрифт жирным (true) или нет (false).
FontItalic — Содержит логическое значение, определяющее, сделать шрифт курсивом (true) или нет (false).
Item(index) — Возвращает отдельный класс Shape в коллекции Shapes по его индексу.
Range(index) — Возвращает ShapeRange, представляющий графические объекты в Word внутри заданного диапазона. Данный метод позволяет выбрать несколько графических Word объектов для будущей их группировки или обработки.
Index — Указывает, какие графические объекты Word должны быть включены в указанный диапазон. Может быть целое число, указывающее порядковый номер фигуры в коллекции Shapes, строка, которая определяет имя фигуры, или массив, содержащий целые числа или строки. Например:
ActiveDocument.Shapes.Range(Array("Oval 5", "Rectangle 4")).Select
SelectAll() — Выбирает все графические объекты в Word в коллекции Shapes. Этот метод не выбирает классы InlineShape. Вы не можете использовать этот метод, чтобы выбрать более одного полотна.
AddPolyline(SafeArrayOfPoints) — Добавляет открытый или закрытый полигон. Возвращает Shape, который представляет многоугольник и добавляет его в коллекцию CanvasShapes.
SafeArrayOfPoints — Массив с парами координат, которые определяют вершины и контрольные точки кривой.
AddCurve(SafeArrayOfPoints) — Возвращает Shape, который представляет кривую Безье.
BuildFreeform(EditingType, X1, Y1) – Создание свободного графического объекта в Word, вернет класс FreeformBuilder. По сути, данный метод позволяет добавить только первый узел будущей фигуры, а уже далее нужно использовать функционал класса FreeformBuilder.
EditingType – Свойства узла. Значение константы MsoEditingType:
- msoEditingAuto — 0 – Подключение узла.
- msoEditingCorner — 1 — Угловой узел.
- msoEditingSmooth — 2 — Гладкий узел.
- msoEditingSymmetric — 3 — Симметричный узел.
X1 и Y1— Определяют положение узла в пунктах.
AddChart(Style, Type, Left, Top, Width, Height, Anchor, NewLayout) — Добавляет диаграмму в документе.
Style — Стиль диаграммы, целое значение
Type — Тип диаграммы, значение константы XlChartType.
Left – Положение диаграммы в пунктах от левого края.
Top — Положение диаграммы в пунктах от верхнего края.
Width и Height — Ширина и высота в пунктах.
Anchor – Диапазон, который будет связан с графическим объектом в Word.
NewLayout — Если значение true, то график будут вставлен с помощью новых динамические правил форматирования.
AddOLEControl(ClassType, Range) – Добавляет в документ элемент управления ActiveX (ранее известный как элемент управления OLE). Возвращает InlineShape, представляющий новый элемент управления ActiveX. Чтобы изменить свойства элемента управления ActiveX, можно использовать свойство Objectкласса OLEFormat для заданной фигуры.
ClassType — Данный параметр принимает строковое значение, которое содержит имя элемента управления ActiveX. Например:
- CheckBox — «Forms.CheckBox.1».
- ComboBox — «Forms.ComboBox.1».
- CommandButton — «Forms.CommandButton.1».
- Frame — «Forms.Frame.1».
- Image — «Forms.Image.1».
- Label — «Forms.Label.1».
- ListBox — «Forms.ListBox.1».
- MultiPage — «Forms.MultiPage.1».
- OptionButton — «Forms.OptionButton.1».
- ScrollBar — «Forms.ScrollBar.1».
- SpinButton — «Forms.SpinButton.1».
- TabStrip — «Forms.TabStrip.1».
- TextBox — «Forms.TextBox.1».
- ToggleButton — «Forms.ToggleButton.1».
Range — Диапазон, в котором нужно разместить элемент управления ActiveX. Если этот аргумент опущен, то ActiveX размещается автоматически.