
You can use WordArt with a Transform text effect to curve or bend text around a shape. If you want the text to circle the shape, you can also do this, but it’s a little bit more work. You can also insert WordArt multiple times to wrap text around shapes with straight edges.

-
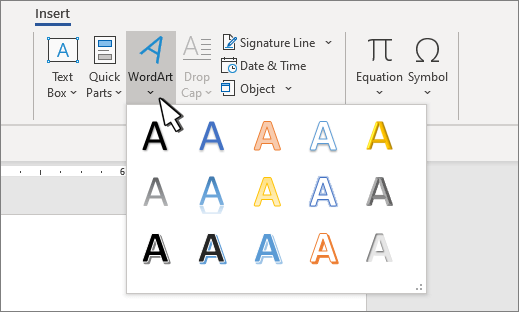
Go to Insert > WordArt, and pick the WordArt style you want.

Note: The WordArt icon is located in the Text group, and it may appear different depending on the version you’re using and the size of your screen. The icon may also look like this
or . -
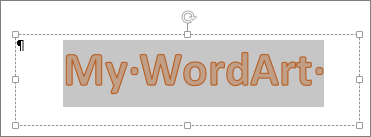
Replace the WordArt placeholder text with your own text.
-
Select your WordArt text.
-
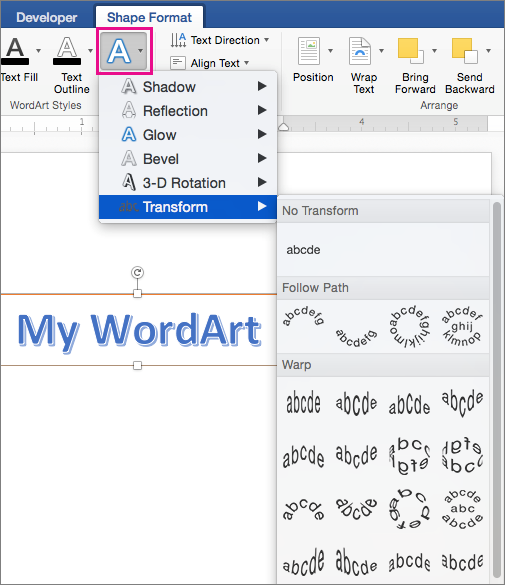
Go to Shape Format or Drawing Tools Format, select Text Effects >Transform and pick the look you want.
 or
or  .
.
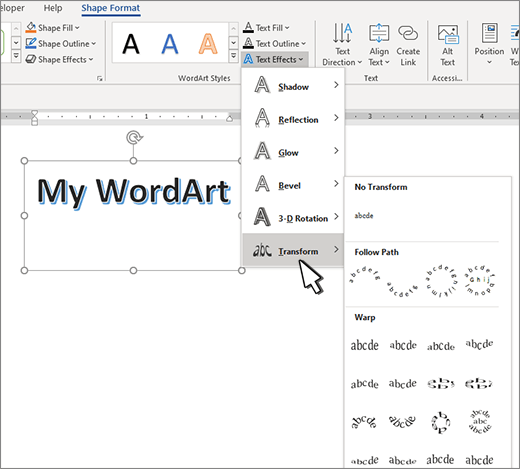
Note: Depending on your screen size, you might only see the icons for WordArt Styles.

Advanced techniques
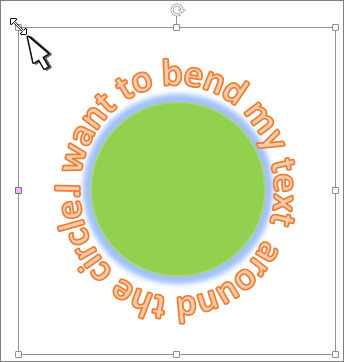
Wrap around a circle To create text that completely circles your shape, choose Circle under Follow Path, and then drag any of the sizing handles until your WordArt is the size and shape you want.
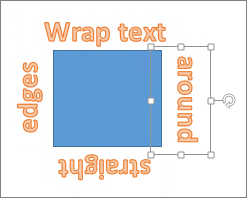
Wrap around straight edges To wrap text around a shape that has straight edges, such as a rectangle, insert WordArt objects for each edge. In this example, WordArt is inserted four times, one for each side of the shape.
Group moves and copy To move or copy multiple WordArt objects as a single shape, see Group or ungroup shapes, pictures, or other objects .
Precise angle control You can control the angle of your WordArt text in relation to your shape with precision by using the Rotate tool.
If you need very precise control or are creating a complex combination of shapes and text, you’ll want to use a third-party drawing or graphics program to create the text around your shape and then copy and paste it into your Office document.
See Also
Add shapes
Insert WordArt
Create curved or circular WordArt
-
Go to Insert > WordArt.
-
Pick the WordArt style you want.
-
Type your text.
-
Select the WordArt.
-
Go to Shape Format > Text Effects > Transform and pick the effect you want.


Advanced techniques
Wrap around a circle To create text that completely circles your shape, choose Circle under Follow Path, and then drag any of the sizing handles until your WordArt is the size and shape you want.
Wrap around straight edges To wrap text around a shape that has straight edges, such as a rectangle, insert WordArt objects for each edge. In this example, WordArt is inserted four times, one for each side of the shape.
Group moves and copy To move or copy multiple WordArt objects as a single shape, see Group or ungroup shapes, pictures, or other objects .
Precise angle control You can control the angle of your WordArt text in relation to your shape with precision by using the Rotate tool.
If you need very precise control or are creating a complex combination of shapes and text, you’ll want to use a third-party drawing or graphics program to create the text around your shape and then copy and paste it into your Office document.
In Word for the web you can see WordArt that’s already in your document, but to add more WordArt you need to open or edit the doc in the desktop version of Word.
You can use the Font features on the Home tab to change the font color and size, and apply bolding, italics, or underlines to your text.

Microsoft Word makes it easy to add geometric shapes (and a whole lot more) to your document. You can also add text into these shapes, which is handy when you’re creating flowcharts, network diagrams, mind maps, and so on. This being Word, there are plenty of options for doing this, so let’s take a look.
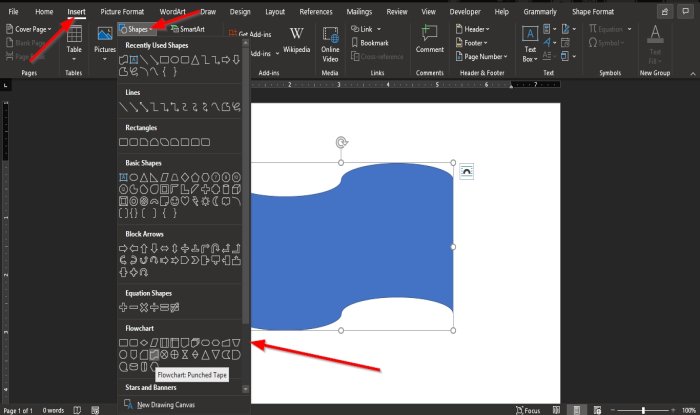
First, you’ll need to insert a shape by going to Insert > Shapes. We’re going to use a nice rounded rectangle, which by default will be filled in with blue.

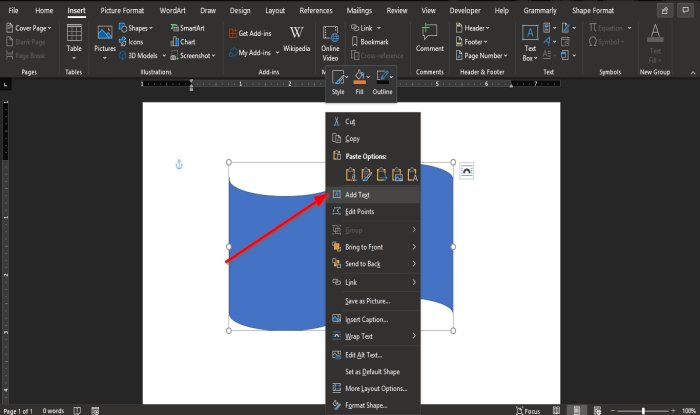
Right-click anywhere in your shape and click the “Add Text” command.
This places an insertion point in the shape where you can type your text. Once you’ve added whatever you want to write, the “Format” tab has tools you can use to give your text a little pop with things like text styles and shading.
You can also select the text and use the standard Font, Paragraph and Styles tools on the Home tab to format your text, just as if it were a normal part of the document. When you right click your text, you’ll find the usual quick options as well.
RELATED: How to Position Images and Other Objects in Microsoft Word
If you’d like a little more control over the placement and boundaries of your text, you can add a text box inside your shape instead. When you insert a new image or select an existing image, Word automatically switches you to the “Format” tab. You’ll see two ways here to insert a text box, both of which add a text box in the same way.
Select one of the options and move the cursor over your image. A yellow “+” mark will replace your pointer. Hold down the left mouse button and drag the “+” mark to create a text box. When the box looks about right, release the left click (don’t worry if the text box isn’t exactly the right size or location, you can change it afterward), and your text box will be created.
You can use the handles (the little squares) around the text box to resize it or select the whole text box to move it around within your shape. Add your text and format it in whatever way you want.
There are also text boxes with preset formatting that you can add by selecting your shape and then clicking Insert > Text Box. We’ve only scratched the surface of what you can do with text boxes here, so if you want to know more check out our guide to text boxes and all the things you can do with them.
RELATED: How to Create and Format a Text Box in Microsoft Word
READ NEXT
- › How to Circle Text in Microsoft Word
- › How to Link Text Boxes in Microsoft Word
- › How to Remove Borders in Microsoft Word
- › HoloLens Now Has Windows 11 and Incredible 3D Ink Features
- › BLUETTI Slashed Hundreds off Its Best Power Stations for Easter Sale
- › Google Chrome Is Getting Faster
- › How to Adjust and Change Discord Fonts
- › The New NVIDIA GeForce RTX 4070 Is Like an RTX 3080 for $599
How-To Geek is where you turn when you want experts to explain technology. Since we launched in 2006, our articles have been read billions of times. Want to know more?
Download PC Repair Tool to quickly find & fix Windows errors automatically
The Shape feature in Microsoft Word allows users to add ready-made shapes to the document, such as Circles, rectangles, and arrows. When the shape is selected, the color and body can be customized to the look you want.
Adding a shape in a Microsoft Word document is easy, but what if you want the text to be inside it. Microsoft Word has a feature that can fit text inside a shape. The text fill shape is like a textbox where you can format the text inside the shape; you can increase and decrease the size of the text, Underline, Bold, italic, and change the font and color of the text. Placing a text into shape is useful when creating flowcharts, network diagrams, and mind maps.
To insert Text into a Shape in Word, follow these steps:
- Open Word document
- Insert Shape
- Right-click and click Add text
- Type or paste the text into the shape
- Click outside the shape
- Save document and exit.
In this tutorial, we will explain how to insert text into a shape; follow the steps below.
Launch Microsoft Word.
Click the Insert tab and click the Shapes button in the Illustration group.
Choose a shape from the list.
Please draw the shape into the document by dragging the mouse and release it when you reach the size you want.
Right-click the shape and click Add text from the context menu.

Enter the text into the shape.
Click outside the shape.
Now, we have a text inside the shape.
You can also format the text inside the shape by changing the font, increasing and decreasing the size, changing the style to underline, italic and bold, and change the color to what you want.
We hope this tutorial helps you understand how to insert text into a shape in Microsoft Word.
Now read: Best Invoice Templates for Word Online to create Business Invoices for free.
Shantel has studied Data Operations, Records Management, and Computer Information Systems. She is quite proficient in using Office software. Her goal is to become a Database Administrator or a System Administrator.
-
1
Open your Word document. Double-click the document in which you want to bend a word or phrase.
-
2
Select a word or phrase. Click and drag your mouse cursor across the word or phrase that you want to bend.
Advertisement
-
3
Click the Insert tab. It’s at the top of the Word window. The Insert toolbar will appear at the top of the window.
-
4
Click WordArt. This option is in the «Text» section of the toolbar. Clicking it prompts a drop-down menu.
-
5
Select a WordArt appearance. Click one of the icons in the WordArt drop-down menu to set it as your selected text’s appearance.
-
6
Click Text Effects. It’s in the «WordArt Styles» section of the Format tab that opens. A drop-down menu will appear.
- If this tab doesn’t automatically open after applying a WordArt appearance to your selected text, click the Format tab before proceeding.
-
7
Select Transform. This option is in the drop-down menu. Selecting it prompts a pop-out menu.
-
8
Click a curved option. You should see four curved options in the «Follow Path» section of the drop-down menu. Click the one you want to use to apply it to your selected text.[1]
- If you want to bend your text around a circular object, click the Rotate option (e.g., the circular text with no word in the middle) in this drop-down menu.
-
9
Adjust your WordArt’s appearance. If you want to change the size and/or curvature of your WordArt word or phrase, do the following:
- Click and drag in or out any of the white dots to shrink or enlarge the word or phrase.
- Click and drag the yellow dot to adjust the curvature of the word or phrase.
-
10
Save your changes. When you’re done adjusting the text, click File and then click Save to save your changes to the document.


Advertisement
Add New Question
-
Question
How do I start a title in MS Word with small letters, gradually increasing the size of the letters to the end of the title?

You have to individually increase the size of the writing by using the «Larger Word» pull-down bar. This is in the Home section of the app.
-
Question
How do I bend heading text in MS Word?
It’s done the same way, just follow the article’s methods.
-
Question
How do I curve a word more/less in MS Word?
Use the yellow dot. The yellow dot is used for adjusting shapes in Word and PowerPoint.
Ask a Question
200 characters left
Include your email address to get a message when this question is answered.
Submit
Advertisement
Video
-
You can also bend words in other Microsoft Office products such as PowerPoint.
Thanks for submitting a tip for review!
Advertisement
-
Applying WordArt to a word or phrase will affect nearby text. For this reason, it’s best to use WordArt on things like titles and headings rather than on a word or phrase in the middle of a paragraph.
Advertisement
About This Article
Thanks to all authors for creating a page that has been read 367,253 times.
Is this article up to date?
Lesson 20: Shapes
/en/word/formatting-pictures/content/
Introduction
You can add a variety of shapes to your document, including arrows, callouts, squares, stars, and flowchart shapes. Want to set your name and address apart from the rest of your resume? Use a line. Need to create a diagram showing a timeline or process? Use flowchart shapes. While you may not need shapes in every document you create, they can add visual appeal and clarity.
Optional: Download our practice document.
Watch the video below to learn more about using shapes in Word.
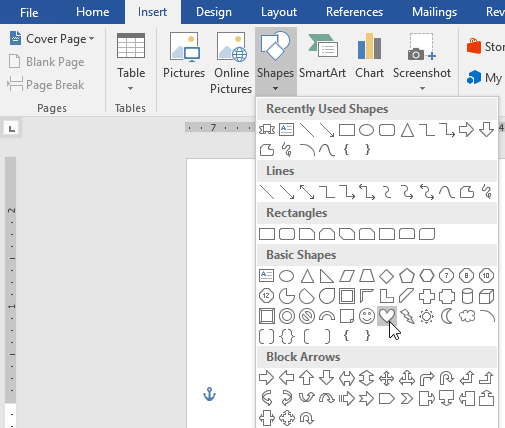
To insert a shape:
- Select the Insert tab, then click the Shapes command. A drop-down menu of shapes will appear.
- Select the desired shape.
- Click and drag in the desired location to add the shape to your document.
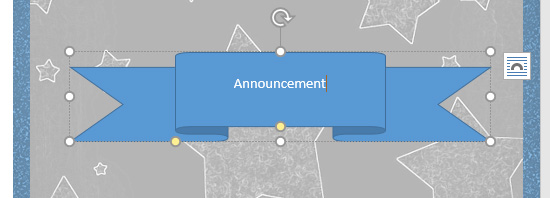
If you want, you can enter text in a shape. When the shape appears in your document, you can begin typing. You can then use the formatting options on the Home tab to change the font, font size, or color of the text.
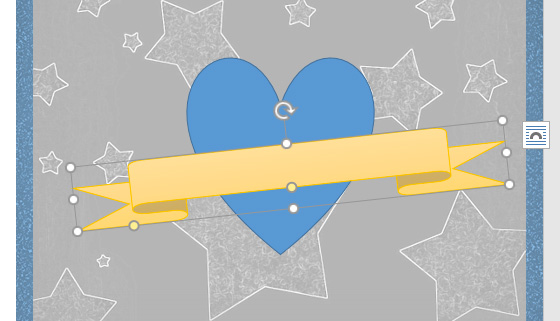
To change the order of shapes:
If one shape overlaps another, you may need to change the ordering so the correct shape appears in front. You can bring a shape to the front or send it to the back. If you have multiple images, you can use Bring to Front or Send to Back to adjust the ordering. You can also move a shape in front of or behind text.
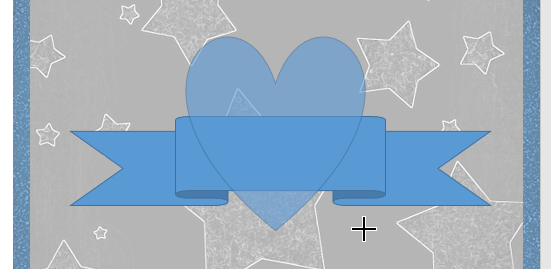
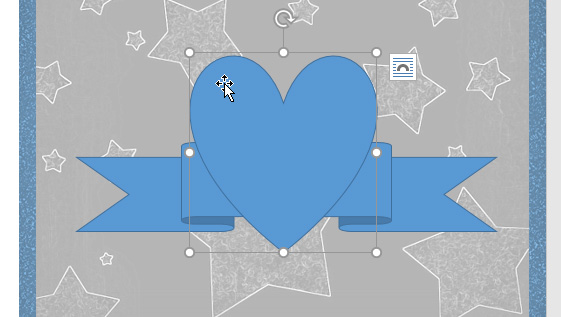
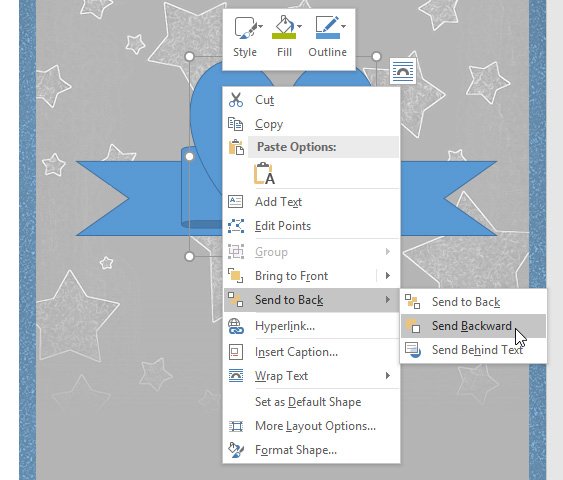
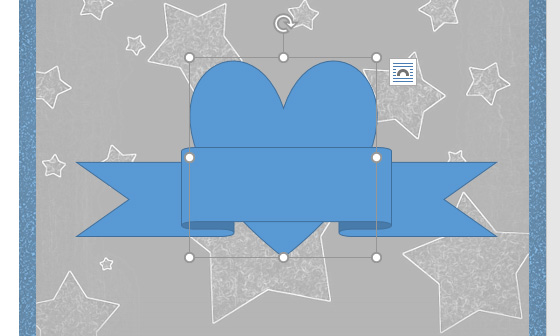
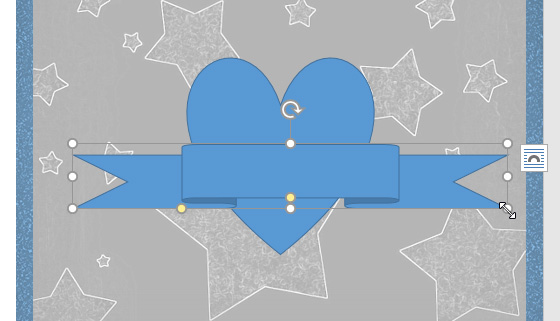
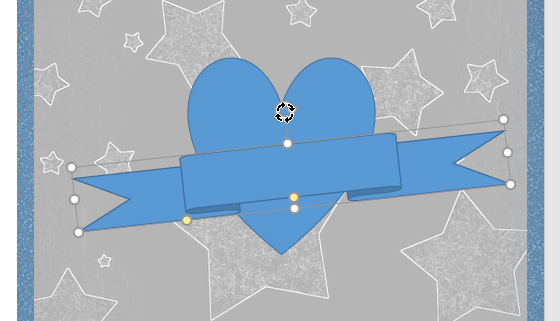
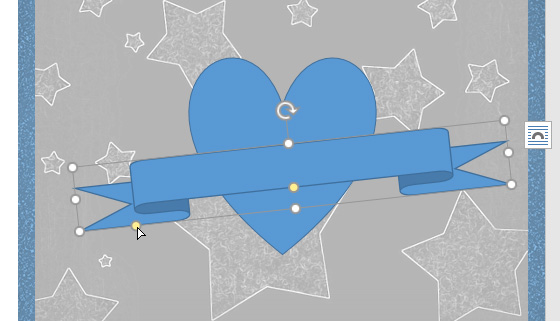
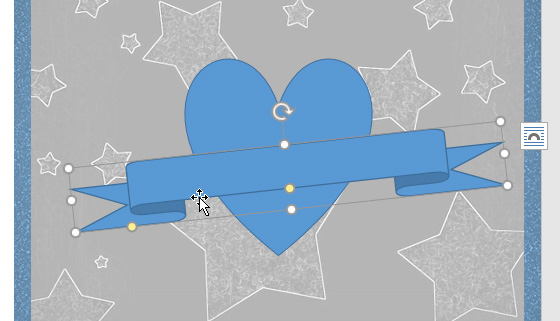
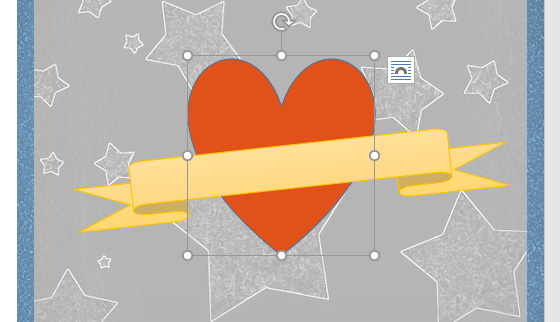
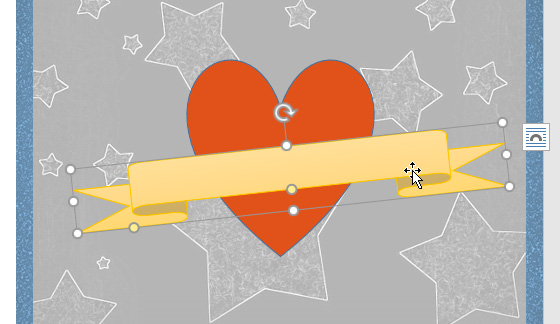
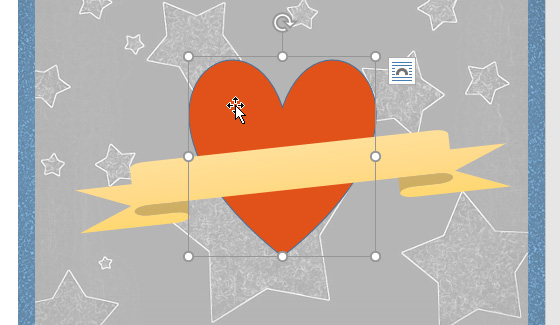
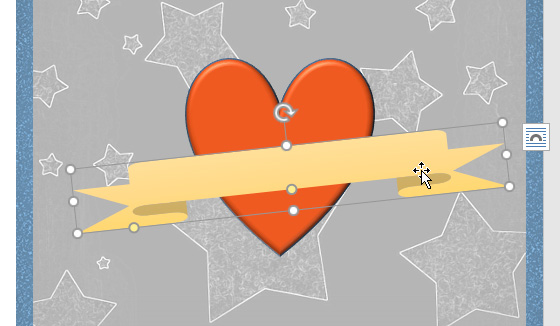
- Right-click the shape you want to move. In our example, we want the heart to appear behind the ribbon, so we’ll right-click the heart.
- In the menu that appears, hover over Bring to Front or Send to Back. Several ordering options will appear. Select the desired ordering option. In this example, we’ll choose Send to Back.
- The order of the shapes will change.
In some cases, the ordering option you select will not affect the ordering of the shapes. If this happens, try selecting the same option again or try a different option.
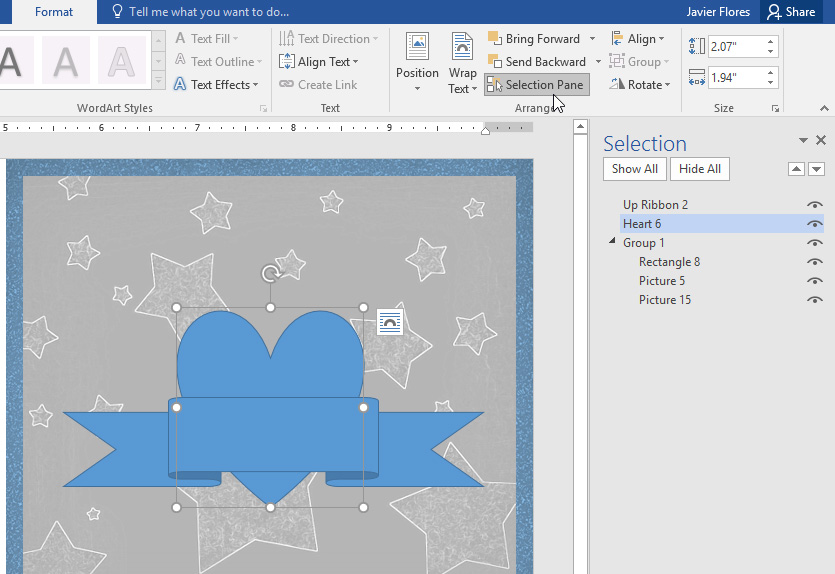
If you have several shapes placed on top of each other, it may be difficult to select an individual shape. The Selection pane allows you to select a shape and drag it to a new location. To access the Selection pane, click Selection Pane on the Format tab.
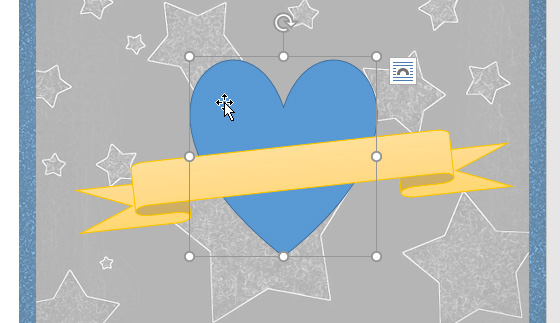
To resize a shape:
- Select the shape you want to resize. Sizing handles will appear on the corners and sides of the shape.
- Click and drag the sizing handles until the shape is the desired size. You can use the corner sizing handles to change the shape’s height and width at the same time.
- To rotate the shape, click and drag the rotation handle.
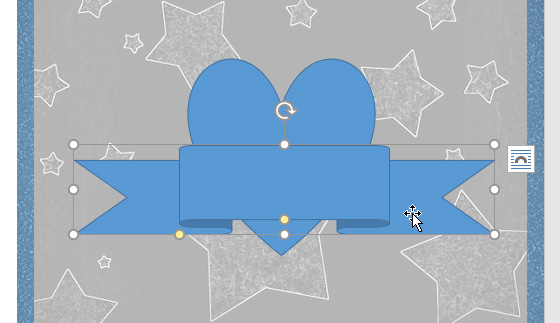
Some shapes also have one or more yellow handles that can be used to modify the shape. For example, with banner shapes you can adjust the position of the folds.
Modifying shapes
Word allows you to modify your shapes in a variety of ways so you can tailor them to your projects. You can change a shape into a different shape, format a shape’s style and color, and add various effects.
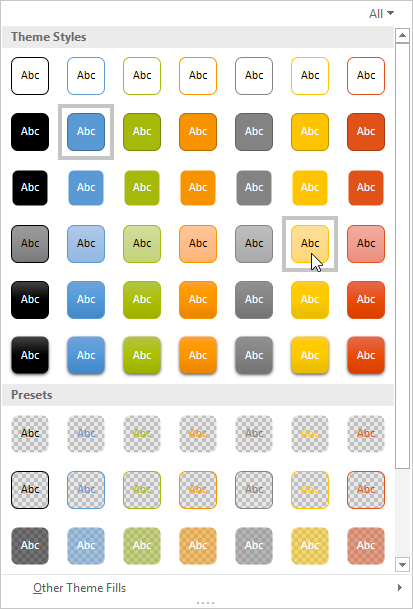
To change the shape style:
Choosing a shape style allows you to apply preset colors and effects to quickly change the appearance of your shape.
- Select the shape you want to change.
- On the Format tab, click the More drop-down arrow in the Shape Styles group.
- A drop-down menu of styles will appear. Select the style you want to use.
- The shape will appear in the selected style.

To change the shape fill color:
- Select the shape you want to change.
- On the Format tab, click the Shape Fill drop-down arrow. Select the color you want to use. To view additional color options, select More Fill Colors.
- The shape will appear in the selected fill color.
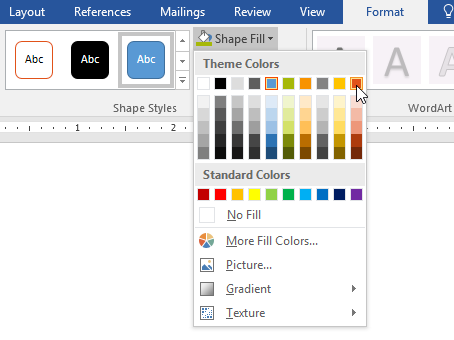
If you want to use a different type of fill, select Gradient or Texture from the drop-down menu. You can also select No Fill to make it transparent.
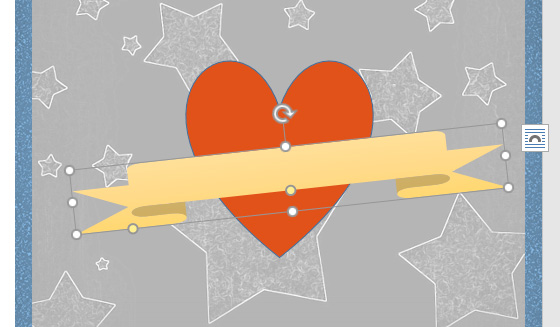
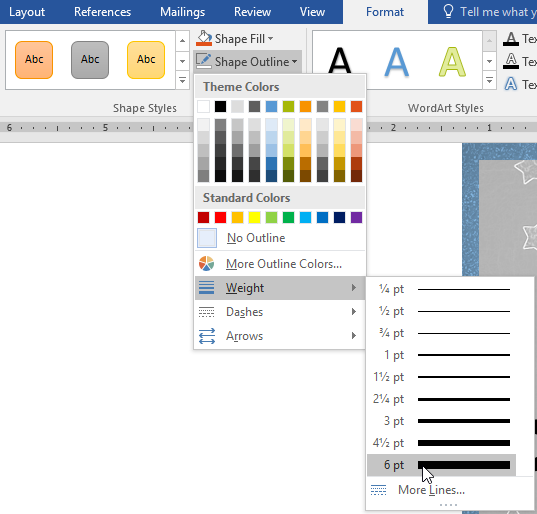
To change the shape outline:
- Select the shape you want to change.
- On the Format tab, click the Shape Outline drop-down arrow. The Shape Outline menu will appear.
- Select the color you want to use. If you want to make the outline transparent, select No Outline.
- The shape will appear in the selected outline color.
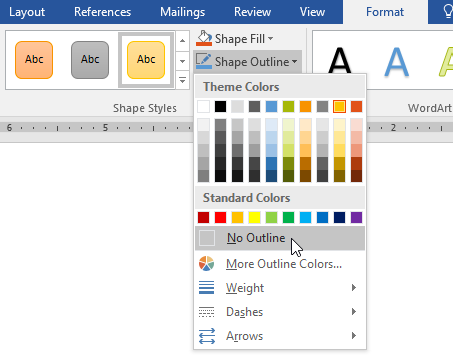
From the drop-down menu, you can change the outline color, weight (thickness), and whether it is a dashed line.
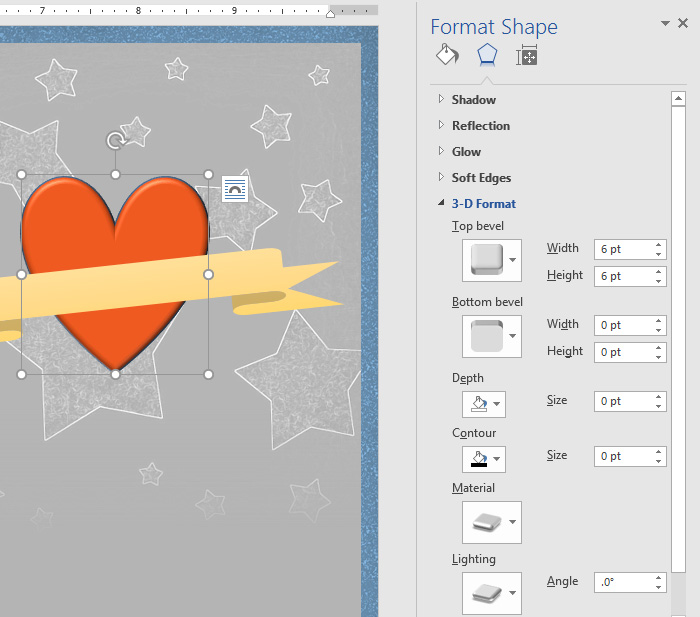
To add shape effects:
- Select the shape you want to change.
- On the Format tab, click the Shape Effects drop-down arrow. In the menu that appears, hover the mouse over the style of effect you want to add, then select the desired preset effect.
- The shape will appear with the selected effect.
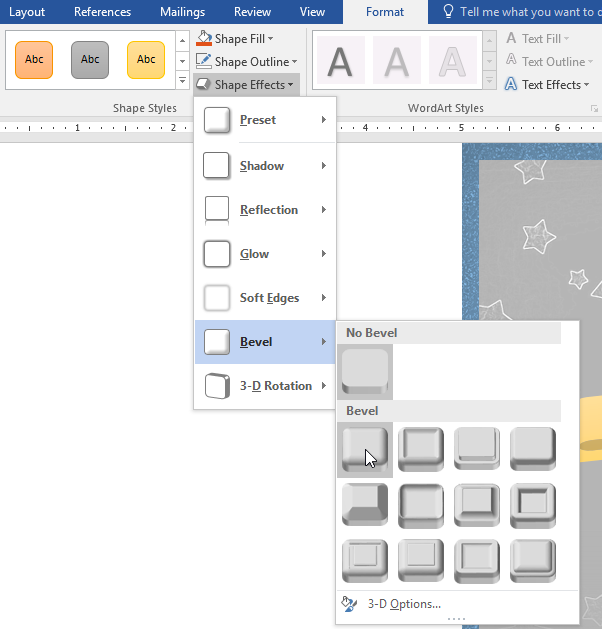

To further adjust your shape effects, select Options at the end of each menu. The Format Shape pane will appear, allowing you to customize the effects.
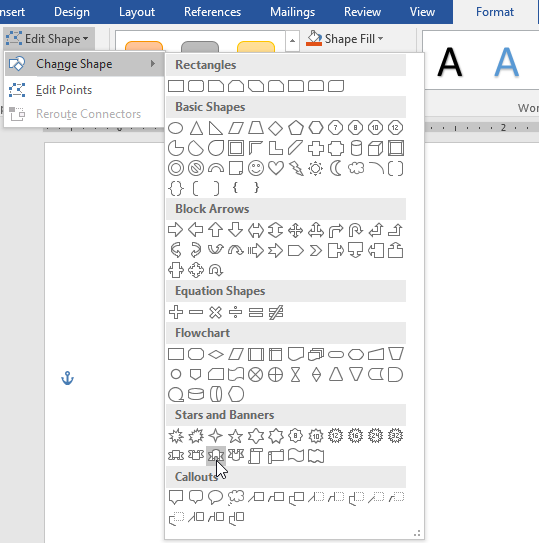
To change to a different shape:
- Select the shape you want to change. The Format tab will appear.
- On the Format tab, click the Edit Shape command. In the menu that appears, hover the mouse over Change Shape, then select the desired shape.
- The new shape will appear.

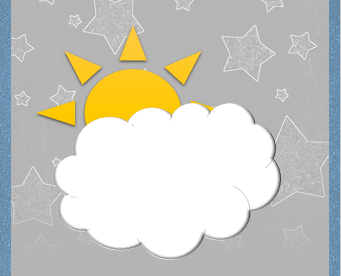
Challenge!
- Open our practice document.
- On the right side of the page, insert a cloud shape from the Basic shapes group. Hint: Shape names appear when you hover over them.
- Change the shape outline to gray.
- Change the shape fill to white.
- Under the Shape Effects drop-down menu, add a Circle Bevel.
- On top of the cloud, insert a Sun shape from the Basic shapes group.
- Change the shape style to your choice of a Gold style. Hint: Style names appear when you hover over them. Make sure the style name has the word Gold in it.
- Send the sun shape backward so it is behind the cloud shape.
- If needed, move the cloud shape so the sun is peeking out from behind it.
- When you’re finished, your image should look something like this:
/en/word/text-boxes/content/