
Word for Microsoft 365 Word for Microsoft 365 for Mac Word 2021 Word 2021 for Mac Word 2019 Word 2019 for Mac Word 2016 Word 2016 for Mac Word 2013 Word 2010 Word for Mac 2011 More…Less
Text boxes and most shapes can include text in them. The text can be positioned horizontally or vertically, and it can appear on one line or wrap to multiple lines.
You can change the direction of the text, and you can also change the margins of text boxes and shapes for optimal spacing, or resize shapes for a better text fit.
Specify text direction in a shape or text box
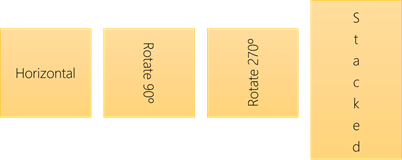
In a shape or text box, you can change the direction in which text is read. That is, you can pivot text 90 or 270 degrees so that it appears sideways.
-
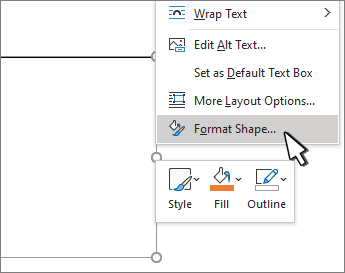
Right-click the edge of the shape or text box.
-
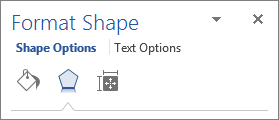
On the shortcut menu, select Format Shape.

-
In the Format Shape pane, click Size/Layout & Properties
. -
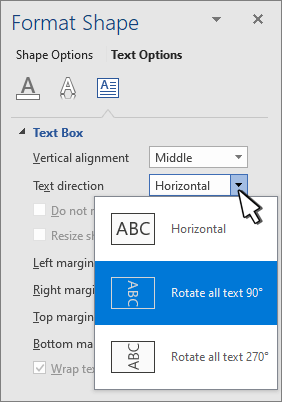
Under Text Box, select the option that you want in the Text direction list.
 .
.
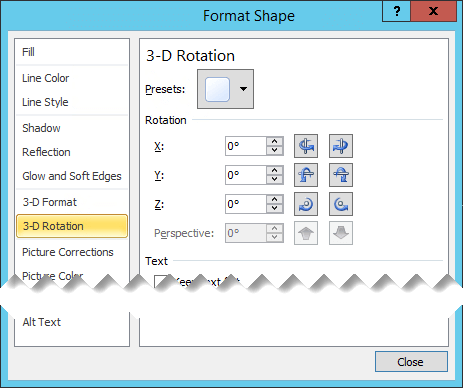
Rotate (mirror) text in a shape or text box
-
Right-click the box or shape and select Format Shape.
-
In the Format Shape pane, select Effects.
-
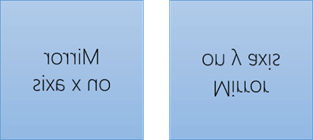
Select 3-D Rotation and in the X Rotation or Y Rotation box, enter 180.
-
(Optional) If your text box is filled with a color, you can remove the color in the Format Shape pane. Select Fill & Line
, select Fill, and then select No fill. -
(Optional) To remove the text box outline, right-click the text box, select Outline in the mini toolbar that appears, and choose No Outline.
 , select Fill, and then select No fill.
-
Select the paragraph, line of text, shape, or text box that you want to modify.
-
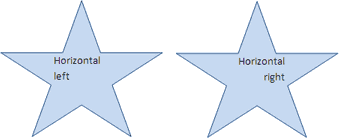
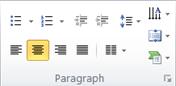
Go to Home and select the horizontal alignment option that you want.
-
Right-click the border of the shape or text box.
-
On the shortcut menu, select Format Shape.
-
In the Format Shape pane, select Size/Layout & Properties
.
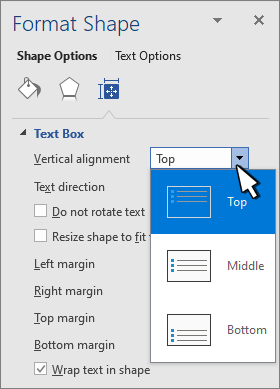
-
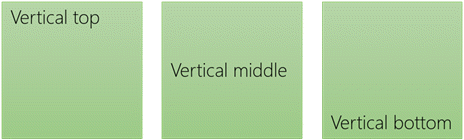
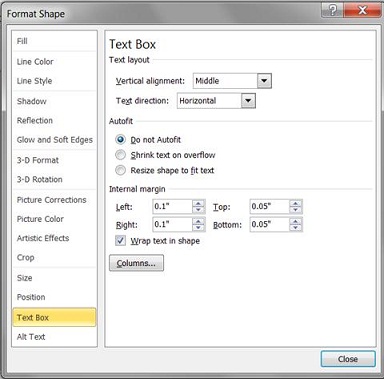
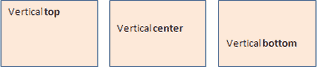
Select the option that you want in the Vertical alignment list.
When text wraps, it automatically continues on a new line as it reaches the right border of the shape or text box.
-
Right-click the border of the shape or text box that contains the text you want to wrap.
-
On the shortcut menu, select Format Shape.
-
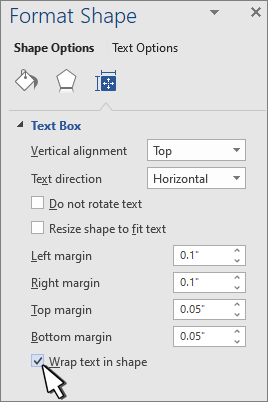
In the Format Shape pane, select Size/Layout & Properties
, and then select Wrap text in shape.
The margin is the distance between the text and the outer border of the enclosing shape or text box.
-
Right-click the border of the shape or text box.
-
On the shortcut menu, select Format Shape.
-
In the Format Shape pane, select Size/Layout & Properties
.
-
Specify a measurement in inches or millimeters (mm) for any of the following margins:
-
Left margin
Distance between the left border of a shape and the leftmost text -
Right margin
Distance between the right border of a shape and the rightmost text -
Top margin
Distance between the top border of a shape and the uppermost text -
Bottom margin
Distance between the bottom border of a shape and the lowest text
-
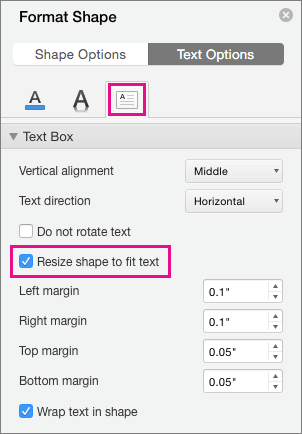
You can automatically increase the size of a shape or text box vertically so that the text fits inside it.
-
Right-click the border of the shape or text box.
-
On the shortcut menu, select Format Shape.
-
In the Format Shape pane, select Layout & Properties
, select Text Box, and then select Resize shape to fit text.

Tip: You can reduce the size of the text to fit it in the shape or text box by selecting Shrink text on overflow.
Specify text direction in a shape or text box
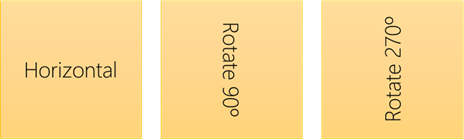
You can change direction of text in a shape or text box. For example, you can rotate text 90 or 270 degrees so that it appears sideways.
-
Right-click the edge of the shape or text box that contains the text.
-
On the shortcut menu, select Format Shape.
-
In the left pane of the dialog box, select Text Box.
-
Under Text layout, select the option that you want in the Text direction list.
-
Select Close.
Rotate (mirror) text in a shape or text box
-
Insert a text box or shape in your document, and then type and format your text.
-
Right-click the box or shape and select Format Shape.
-
In the Format Shape dialog box, select 3-D Rotation on the left.
-
In the X box, enter 180.
-
Select Close.
-
Click or tap in the paragraph, line of text, shape, or text box that you want to modify.
-
On the Home tab, select the horizontal alignment option that you want.
-
Right-click the border of the shape or text box.
-
On the shortcut menu, select Format Shape, and then select Text Box in the left pane.
-
Under Text layout, select the option that you want in the Vertical alignment list.
-
Select Close.
You can automatically increase the size of a shape or text box vertically so that the text fits inside it.
-
Right-click the border of the shape or text box that you want to resize.
-
On the shortcut menu, select Format Shape, and then select Text box in the left pane.
-
Under Autofit, select Resize shape to fit text.
-
Select Close.
Tip: You can reduce the size of the text to fit it in the shape or text box by selecting Shrink text on overflow.
The internal margin is the changeable distance between text and the outer border of a shape or text box.
-
Right-click the border of the shape or text box.
-
On the shortcut menu, select Format Shape, and then select Text Box in the left pane.
-
Under Internal Margin, choose one or more of the following:
-
Left
Specifies the distance between the left border of a shape and the text. -
Right
Specifies the distance between the right border of a shape and the text. -
Top
Specifies the distance between the top border of a shape and the text. -
Bottom
Specifies the distance between the bottom border of a shape and the text.
-
-
Select Close.
Specify text direction in a shape or text box
-
Control + Click the border of the shape or text box that contains the text, and then select Format Shape.
-
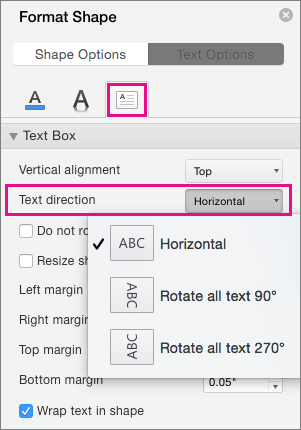
In the Format Shape pane on the right, select Text Options.
-
Select the third icon, Textbox, and then select the option that you want from the Text direction list.
Position text horizontally in a paragraph, text box or shape
-
Click or tap in the paragraph, line of text, shape, or text box that you want to modify.
-
Go to Home, and in the Paragraph group, click the horizontal alignment option that you want.

You can automatically increase the size of a text box or shape vertically so that the text fits inside it.
-
Control + Click the border of the shape or text box that you want to resize, and then select Format Shape.
-
In the Format Shape pane on the right, select Text Options.
-
Select Layout & Properties, and then select the check box next to Resize shape to fit text.
By default, the text wraps automatically as you type in a text box or shape. If you don’t want the text to wrap, do the following:
-
Control + Click the shape that contains the text, and then select Format Shape.
-
In the Format Shape pane on the right, select Text Options.
-
Select Layout & Properties, and then clear the check box next to Wrap text in shape.
Specify text direction in a shape, text box, or table cell
-
Enter the text in the shape or text box or table cell, and then select the text.
-
Ctrl+Click the selected text, and then select Format Shape. On the Text Box tab in the dialog box, choose a direction from the Text Direction box.
Position text horizontally in a shape or text box
-
Select the text in the shape or text box.
-
On the Home tab, under Paragraph, select the horizontal alignment button that you want.
(Align Left, Centered, Align Right, Justified, or Distribute Text)

-
Select the text in the shape or text box.
-
On the Home tab, under Paragraph, select
, and then select the vertical alignment that you want.
 , and then select the vertical alignment that you want.
By default, the text wraps automatically as you type in a text box or shape. If you don’t want the text to wrap, do the following:
-
Select the text in the shape or text box.
-
Go to Format > Shape.
-
On the left side of the dialog box, select Text Box.
-
Under Internal Margin, clear the Wrap text in shape check box.
-
Select the text in the shape or text box.
-
Go to Format > Shape.
On the Format menu, select Shape.
-
On the left side of the dialog box, select Text Box.
-
Under Autofit, select Resize shape to fit text.
Need more help?
Lesson 21: Text Boxes
/en/word2016/shapes/content/
Introduction
Text boxes can be useful for drawing attention to specific text. They can also be helpful when you need to move text around in your document. Word allows you to format text boxes and the text within them with a variety of styles and effects.
Optional: Download our practice document.
Watch the video below to learn more about text boxes in Word.
To insert a text box:
- Select the Insert tab, then click the Text Box command in the Text group.

- A drop-down menu will appear. Select Draw Text Box.
- Click and drag anywhere on the document to create the text box.
- The insertion point will appear inside the text box. You can now type to create text inside the text box.
- If you want, you can select the text and then change the font, color, and size by using the commands on the Format and Home tabs. To learn more about using these formatting commands, see our Formatting Text lesson.
- Click anywhere outside the text box to return to your document.

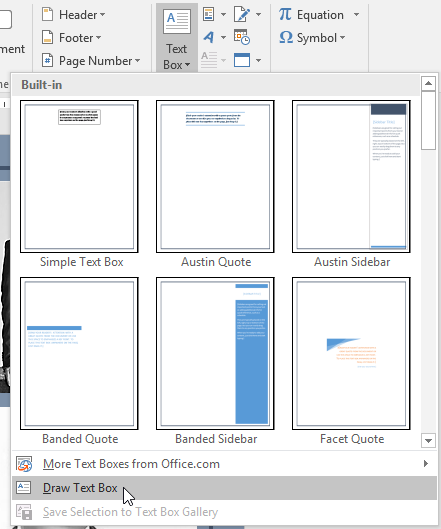
You can also select one of the built-in text boxes that have predefined colors, fonts, positions, and sizes. If you choose this option, the text box will appear automatically, so you will not need to draw it.
To move a text box:
- Click the text box you want to move.
- Hover the mouse over one of the edges of the text box. The mouse will change into a cross with arrows.
- Click and drag the text box to the desired location.

To resize a text box:
- Click the text box you want to resize.
- Click and drag any of the sizing handles on the corners or sides of the text box until it is the desired size.

Modifying text boxes
Word offers several options for changing the way text boxes appear in your document. You can change the shape, style, and color of text boxes or add various effects.
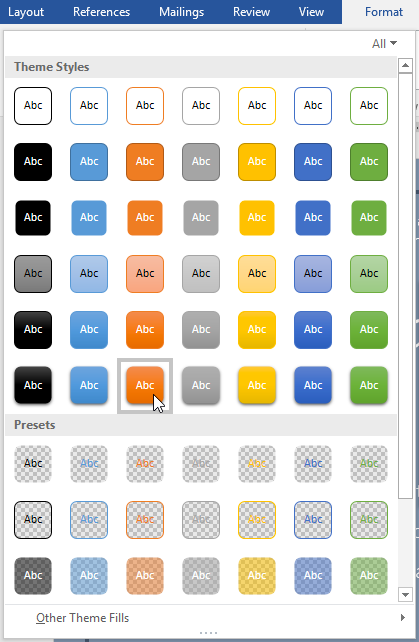
To change the shape style:
Choosing a shape style allows you to apply preset colors and effects to quickly change the appearance of your text box.
- Select the text box you want to change.
- On the Format tab, click the More drop-down arrow in the Shape Styles group.
- A drop-down menu of styles will appear. Select the style you want to use.
- The text box will appear in the selected style.

If you want to have more control over text box formatting, you can use any of the shape formatting options such as Shape Fill and Shape Outline. To learn more, see our Shapes lesson.
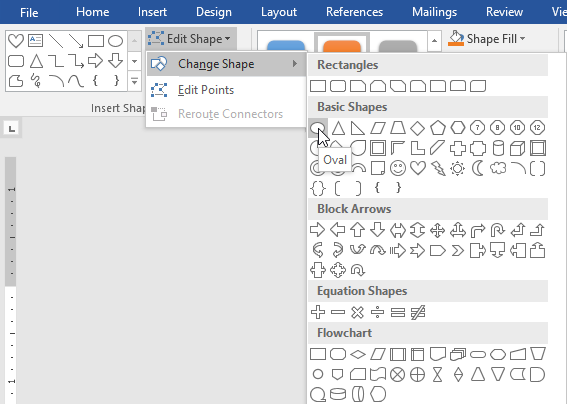
To change the text box shape:
Changing the shape of a text box can be a useful option for creating an interesting look in your document.
- Select the text box you want to change. The Format tab will appear.
- From the Format tab, click the Edit Shape command.
- Hover the mouse over Change Shape, then select the desired shape from the menu that appears.
- The text box will appear formatted as the shape.

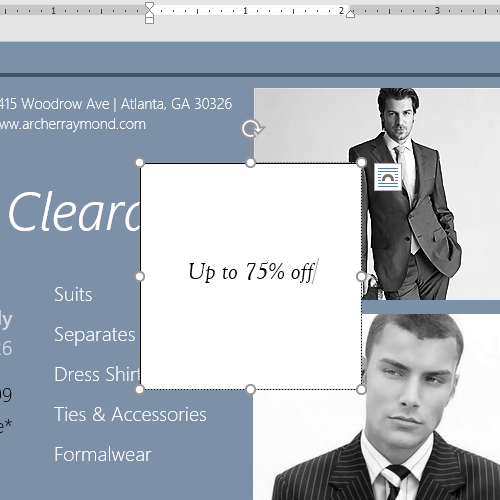
Challenge!
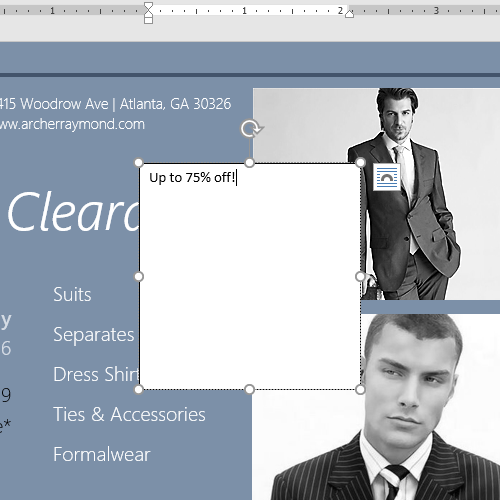
- Open our practice document.
- Insert a Simple Text Box.
- In the text box, type Get an additional 25% off when you mention this ad!
- Change the font to Gadugi, 20 pt, Center Align.
- Change the shape of the text box to Double Wave from the Stars and Banners group.
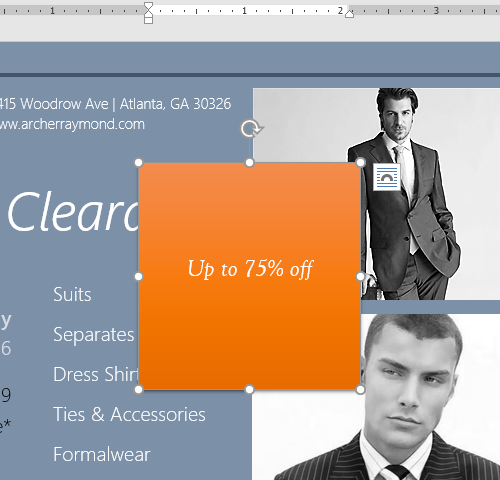
- Change the text box style by selecting any style in the Intense Effect row.
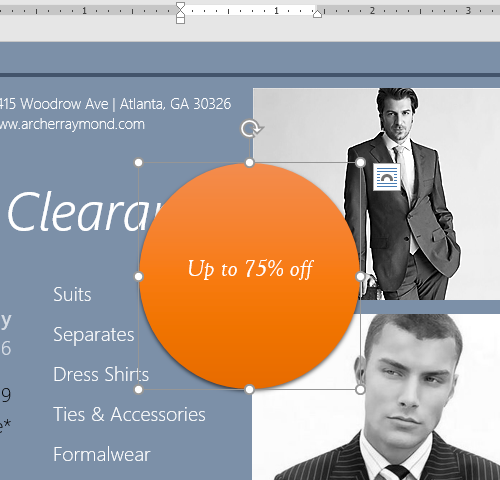
- Drag the text box to the space below Buy 1, Get 1 Free* and Formalwear.
- When you’re finished, your document should look something like this:


/en/word2016/aligning-ordering-and-grouping-objects/content/
Achieve more control and flexibility with your documents
Updated on September 11, 2022
What to Know
- Select Insert > Text Box > choose a text box template. Select and drag box to the position you want.
- To resize text, select and drag circles around the edge. To rotate text, select and drag the circular arrow.
- Place the cursor inside the text box and type the information you want to appear.
This article explains how to use text boxes in Microsoft Word. Instructions apply to Word for Microsoft 365, Word 2019, Word 2016, and Word 2013.
How to Insert a Text Box in Word
Start by opening the document you want to add a text box to. Then follow the steps below.
-
On the ribbon, select Insert.
-
In the Text group, select Text Box, then choose a text box template.
-
The new text box appears in the middle of the text, and the Shape Format tab is automatically selected.
-
Select and drag the box to the position you want. To resize the text box, select and drag the circles around the edge. To rotate the text box, select and drag the circular arrow at the top of the box.
-
Place the cursor inside the text box and type the information you want to appear there.
Why Use Text Boxes?
When you type text in Microsoft Word, you have options for making it look a particular way on the page (such as changing the page margins), but those options are limited. Text boxes expand your formatting repertoire by offering additional control and flexibility for how your text appears. You can place a text box anywhere within a document and format it with different colors and fonts. This feature is especially helpful for creating a blockquote or a sidebar.
Customize a Text Box
After you create a text box, you can customize it in a number of ways.
-
To bring up options, place the cursor inside the text box and right-click. Choose an option and follow the screen prompts to add a border, change the style, or adjust the way the text box interacts with the other text on the page.
Alternatively, use the controls on the Shape Format tab.
-
To go directly to the Layout Options menu, select the text box, then select the Layout Options icon (it looks like a horseshoe and is located to the right of the text box).
-
Change the text, make more adjustments, or move the box to another location at any time. To delete a text box, select its border, then press Delete on the keyboard.
Thanks for letting us know!
Get the Latest Tech News Delivered Every Day
Subscribe

Microsoft Word makes it easy to add geometric shapes (and a whole lot more) to your document. You can also add text into these shapes, which is handy when you’re creating flowcharts, network diagrams, mind maps, and so on. This being Word, there are plenty of options for doing this, so let’s take a look.
First, you’ll need to insert a shape by going to Insert > Shapes. We’re going to use a nice rounded rectangle, which by default will be filled in with blue.

Right-click anywhere in your shape and click the “Add Text” command.
This places an insertion point in the shape where you can type your text. Once you’ve added whatever you want to write, the “Format” tab has tools you can use to give your text a little pop with things like text styles and shading.
You can also select the text and use the standard Font, Paragraph and Styles tools on the Home tab to format your text, just as if it were a normal part of the document. When you right click your text, you’ll find the usual quick options as well.
RELATED: How to Position Images and Other Objects in Microsoft Word
If you’d like a little more control over the placement and boundaries of your text, you can add a text box inside your shape instead. When you insert a new image or select an existing image, Word automatically switches you to the “Format” tab. You’ll see two ways here to insert a text box, both of which add a text box in the same way.
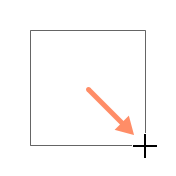
Select one of the options and move the cursor over your image. A yellow “+” mark will replace your pointer. Hold down the left mouse button and drag the “+” mark to create a text box. When the box looks about right, release the left click (don’t worry if the text box isn’t exactly the right size or location, you can change it afterward), and your text box will be created.
You can use the handles (the little squares) around the text box to resize it or select the whole text box to move it around within your shape. Add your text and format it in whatever way you want.
There are also text boxes with preset formatting that you can add by selecting your shape and then clicking Insert > Text Box. We’ve only scratched the surface of what you can do with text boxes here, so if you want to know more check out our guide to text boxes and all the things you can do with them.
RELATED: How to Create and Format a Text Box in Microsoft Word
READ NEXT
- › How to Circle Text in Microsoft Word
- › How to Link Text Boxes in Microsoft Word
- › How to Remove Borders in Microsoft Word
- › The New NVIDIA GeForce RTX 4070 Is Like an RTX 3080 for $599
- › HoloLens Now Has Windows 11 and Incredible 3D Ink Features
- › This New Google TV Streaming Device Costs Just $20
- › Google Chrome Is Getting Faster
- › BLUETTI Slashed Hundreds off Its Best Power Stations for Easter Sale
How-To Geek is where you turn when you want experts to explain technology. Since we launched in 2006, our articles have been read billions of times. Want to know more?
Reading
a lengthy text document can make anyone bored in minutes. However, there are
few simple ways to make your documents more attractive and appealing to the
reader. One such option is to add colorful text boxes in-between paragraphs.
This is a useful way to show important action points on full text based
documents. In this article, let us explore how to create text box in Word
document.
Related: How to quickly add dividers in Word?
We
will discuss the following options based on Word 2016 or later version.
- Create text box from existing text
- Creating empty text box
- Changing text box size and position
- Changing text direction
- Deleting borders
Creating
Text Box from Existing Text
You can convert any of the existing text paragraph and list to a text box in Word. Let’s see how to do that.
- First open your document and select the paragraph you want to convert to a text box.
- Switch to the “Insert” tab from the ribbon menu.
- Open the “Text Box” menu.
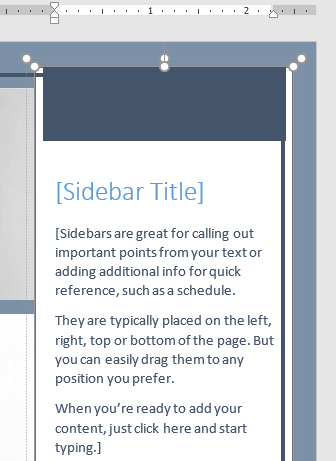
- Word offers a selection of predefined text boxes, for example for creating sidebars with quotes.
- However, for converting the existing text, select the entry “Draw Text Box” in the lower pane.

This will instantly add a bordered text box around
the selected text. Word treats text boxes as a drawing and you can design the
box as per your need using the “Drawing Tools” menu. You can move the text
boxes anywhere in the document, depending on the layout. This can be useful for
the design of flyers and brochure.
Creating
Empty Text Box
Of course, you do not necessarily need existing text to
create a new text box. Alternatively, you can also create empty text boxes and
enter the text into them later.
- Place the cursor where you want to insert a text box.
- Reopen the “Insert” menu and select “Text Box” option.
- Click the “Draw Text Box” menu item. You will see the cursor now changed to cross hair shape.
- Draw out the text box while holding down the left mouse button.
- Then enter the text into the text box.
- You can look at the various options in the context menu of your text box for designing your text box.

Changing
Text Box Size and Position
When
you have created a text box out, you have various options for editing. You can
design it, change the size and place it anywhere in your document.
- You can change the size of the box using the handles on the edges of it. Word will automatically adjust the text content inside the box.
- It is also possible to freely move the box using the mouse. You can hover over the mouse to change the cursor into a star shape, allowing you to drag the box.
- Formatting is also possible as usual, for example, right-click on the selected text to use the Mini toolbar and format the text in bold or change the alignment.
- You can click on the “Layout Options” button on the side of the text box to wrap text box with the content on your document.

Changing
Text Direction
Within
a text box, you can also influence the text direction. Besides the default
horizontal alignment the text can also run vertically.
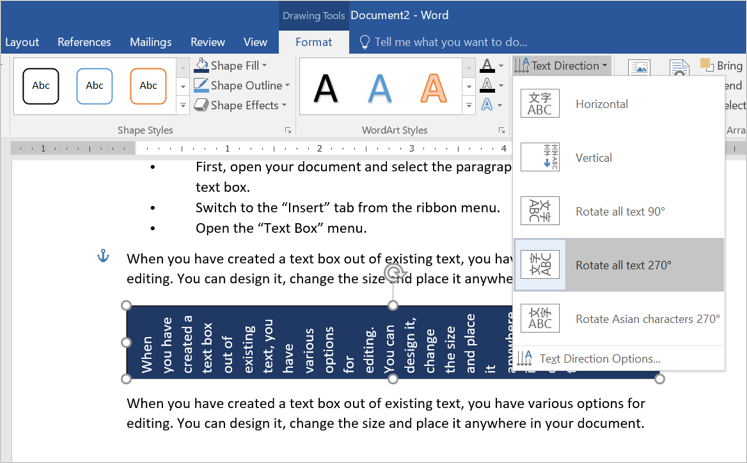
- What about if you want to rotate the text inside text box? This is also
very easy. Open the “Text Direction”. - Double click on the text box to open “Drawing Tools” menu. Click on the
“Text Direction” menu and select the entry, “Rotate all text 270°”. - The text is now set vertically in the text box and you can adjust the
format and position of the box.
- You can move the text box between paragraphs or columns by dragging the
box while keeping the left mouse button pressed.
Related: How to embed Excel table in Word document?
Deleting
Borders and Content
By
default, text boxes are displayed with borders, but you do not have to keep
them. You can easily remove the borders.
- Click on the text box to open the “Drawing Tools” and select “Shape Outline”
button under “Format” menu. - Now, select the entry “No Outline” to remove the borders from the box.
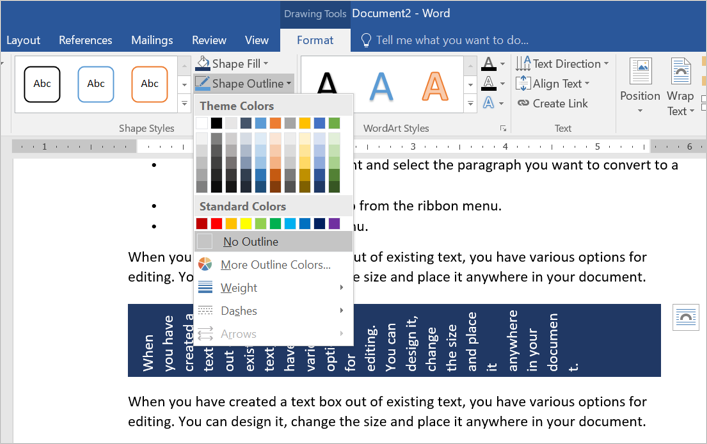
- You can also apply different colors, weight and styles to the border if
you want. - In order to delete a text box content, simply click inside the box and
edit or delete the content. Alternatively, select the text box by clicking on
the border and press delete to completely delete the box. - In this respect, text boxes behave in the same way as other drawing
objects.
Using Text Box Templates
The best and easy way to use text box in Word is to
select one of the predefined text box template. You can select from one of the good-looking
templates from the “Text Box” menu dropdown.

For example, you can use text box in a sidebar
format or choose one of the colorful formats. You can adjust the layout
positions to align the content beside the box.

You can also customize the text box and create a
custom template as a Quick Parts.
- First, select the box you want to use as templates.
- Go to “Insert > Text Box” and choose “Save Selection to Text Box Gallery” option.
- Fill up the details to create a new building block.
- You can view the saved template under “Text Box” menu dropdown from next time onwards.
Other Formatting Options
The “Formatting Tools” menu offers various
additional options for customizing your text box content. You can double click
on any text box to view the menus applicable for drawing object. Below are some
of the activities you can do with the formatting tools:
- Apply shape styles like fill, effects and borders.
- Create WordArt inside text box.
- Change text direction.
- Position and wrap the content around the text box.